
Applies ToWindows 11 Windows 10
If you get an error code while downloading and installing Windows updates, the Update Troubleshooter can help resolve the problem.
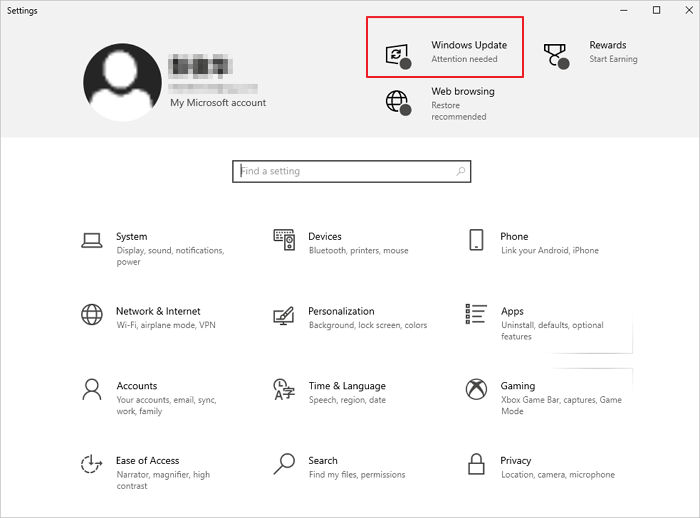
Select Start > Settings > System > Troubleshoot > Other troubleshooters. Next, under Most frequent, select Windows Update > Run.
When the troubleshooter is finished running, it’s a good idea to restart your device.
Next, check for new updates. Select Start > Settings > Windows Update > Check for updates and then install any available updates.
If the problems aren’t all resolved, try running the troubleshooter again to check for additional errors, or see Troubleshoot problems updating Windows and follow the troubleshooting steps.
Check for Windows updates
Need more help?
Want more options?
Explore subscription benefits, browse training courses, learn how to secure your device, and more.
Are you having trouble installing the latest Windows updates? If so, you’re not alone. Many people have been reporting problems with the update process lately. Thankfully, there’s a troubleshooter tool that can help. This blog post will show you how to download Windows Update Troubleshooter on Windows 11/10. We’ll also give you some tips for avoiding common Windows update issues. Keep reading to learn more!
Windows Update Troubleshooter is a program that automatically detects and fixes common problems with Windows Update. Windows Update is a Microsoft service that delivers security patches and updates to Windows users.
However, sometimes Windows Update can run into problems, such as Windows 10 installation has failed, you can’t install Windows 10, Windows 10 keeps crashing or freezing, etc. The Windows Update Troubleshooter can help to fix these problems, restoring the update process to its normal functioning state.
How to Download Windows Update Troubleshooter for Windows 11/10
Windows Update Troubleshooter is a utility that can help you resolve Windows Update issues. It’s a built-in tool. You don’t need to download it from Microsoft. All you need to do is to follow the steps below to run Windows Update Troubleshooter on Windows 11/10.
How to Run Windows Update Troubleshooter on Windows 11
If you are a Windows 11 user, follow the steps below to run Windows Update Troubleshooter to resolve errors while downloading and installing Windows updates.
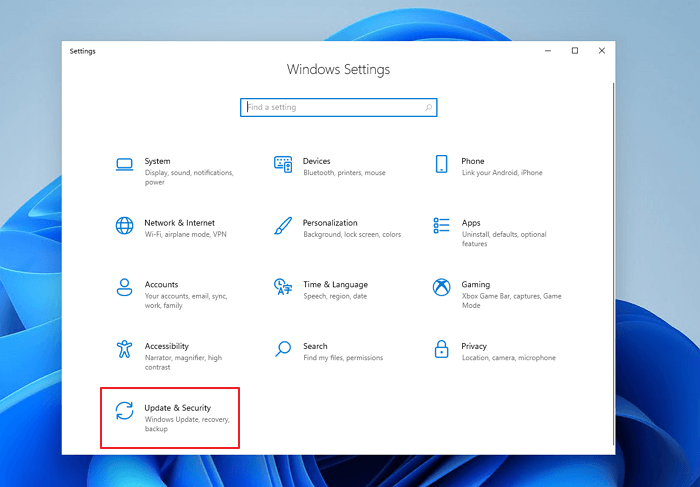
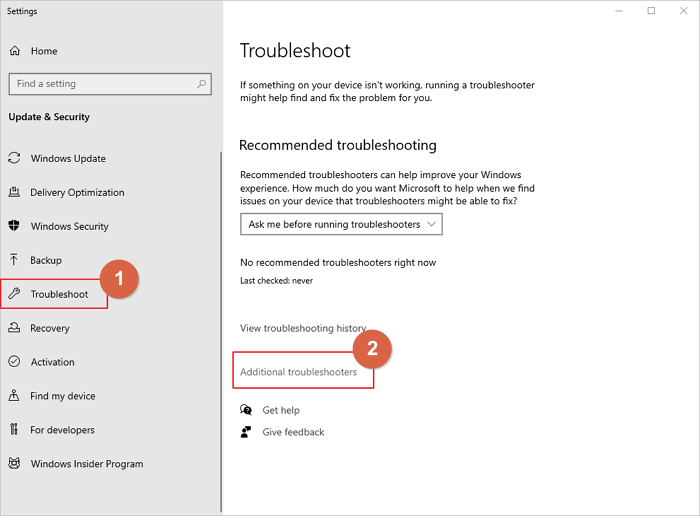
Step 1. Go to «Start > Settings > Update & Security».
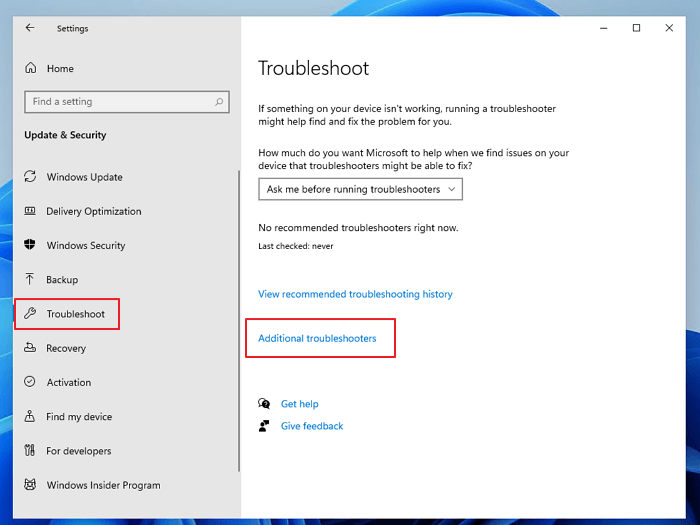
Step 2. Select «Troubleshoot» and choose «Additional troubleshooters».
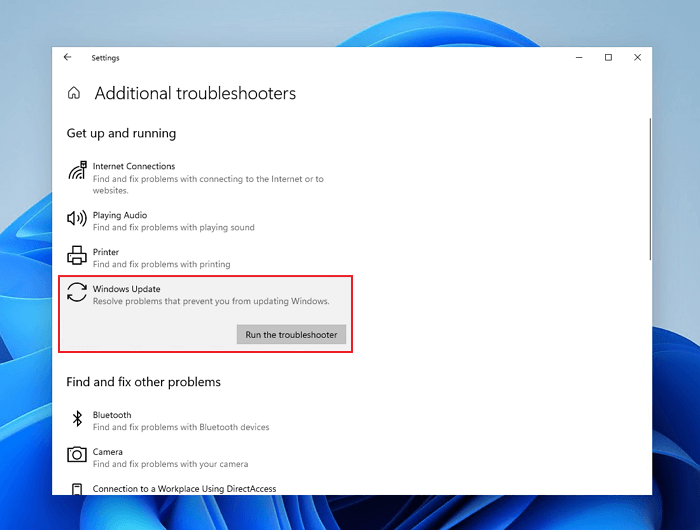
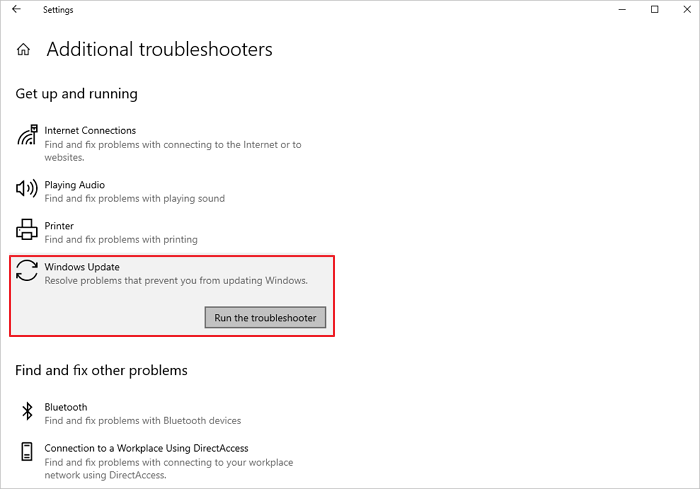
Step 3. Under the Get up and running section, select «Windows Update > Run the troubleshooter».
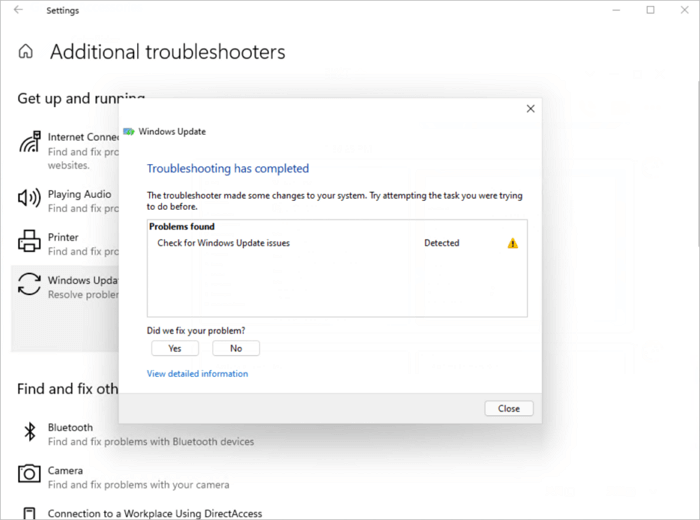
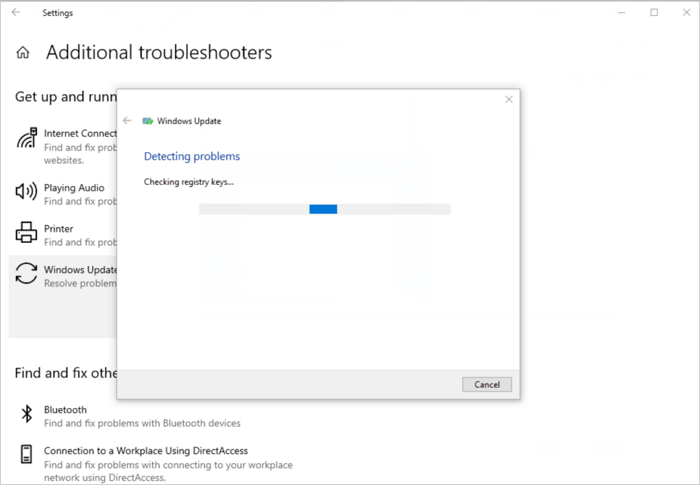
Then, Windows 11 Update Troubleshooter will automatically detect Windows 11 update issues and repair Windows 11 errors. When the troubleshooter is finished running, close the window and restart your PC.
How to Run Windows Update Troubleshooter on Windows 10
There’s a little bit different if you are a Windows 10 user. To run Windows Update Troubleshooter on Windows 10, follow the steps below.
Step 1. Select «Start > Settings > Windows Update».
Step 2. Go to «Troubleshoot > Additional troubleshooters».
Step 3. Then, select «Windows Update > Run the troubleshooter» under Get up and running.
Step 4. Windows Update Troubleshooter will detect the update problems automatically. Wait patiently during the process.
If the problems aren’t resolved, repeat the steps to rerun the troubleshooter. Or, turn to Windows repair service to resolve your issues.
Consult with EaseUS data recovery experts for one-on-one manual recovery service. We could offer the following services after a FREE diagnosis
- Repair corrupted RAID structure, unbootable Windows OS, and corrupted virtual disk file
- Recover/repair lost partition and re-partitioned drive
- Unformat the hard drive and repair the raw drive(Bitlocker encrypted drive)
- Fix disks that become GPT-protected partitions
Conclusion
Windows Update Troubleshooter is a built-in tool for Microsoft that can help users fix common Windows update errors without losing data. The process is simple and does not require any additional software. Users can download the troubleshooter, run it on their computer, and follow the instructions. If you are experiencing data loss problems after the update, we recommend downloading and running EaseUS hard drive recovery software.
Windows Update Troubleshooter Download FAQs
Now that you know what the Windows Update Troubleshooter is and how to run it on your computer, you can fix any Windows update issues without losing data. If you still have problems, keep reading.
1. How to fix Windows won’t update without sending errors?
To fix Windows won’t update errors:
- Restart to apply installed updates
- Run the Windows update again
- Disconnect all peripherals
- Check internet connection
- Run a thorough virus scan…
2. How do I force update Windows 10?
Here are the steps to force Windows 10 update:
Step 1. Type cmd in the search box
Step 2. Then type the following commands
- wuinstall /search
- wuinstall /download
- uninstall /install
Step 3. Wait for the finish of update installation.
3. How do I repair corrupted Windows 10?
6 Ways to Repair Windows 10 for Free
- Repair with Startup Repair
- Repair Windows 10 Using SFC
- Repair Windows 10 with Repair Service
- Repair Windows 10 by Resetting PC
- Repair with System Restore
- Reinstall Windows 10 to Repair
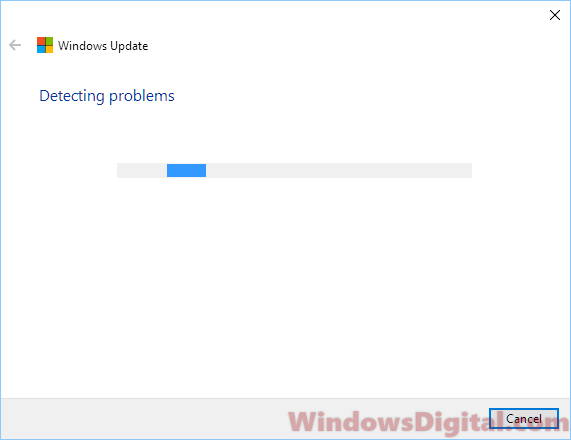
If you have problems with Windows Update in Windows 11 or 10, you might try the Windows Update Troubleshooter to fix the issue. But sometimes, the troubleshooter tool itself doesn’t work, such as getting stuck at certain phase or process (e.g., endless “Detecting problems”). In this guide, we’ll show you some common issues with the Windows Update Troubleshooter and workarounds to fix them.
See also: Troubleshooting has been disabled by Group Policy Windows 11
Some common problems with the Windows Update Troubleshooter
The Windows Update Troubleshooter, although meant to fix problems, can also encounter issues itself, such as getting stuck at the “initializing diagnostic”, “resolving problems”, or “starting BITS service” process. Sometimes, it might also show an error message that tells you that the Windows service registration is missing or corrupted.
When you run the troubleshooter, it will suggest fixes that you can apply to resolve the issues it finds. However, there are cases where some errors may be identified but cannot be fixed by the Windows Update Troubleshooter alone, such as the 0x803c0103 and 0x80244022 Windows Update errors. In these cases, you will need to use repair tools such as DISM and SFC, which we’ll talk about later.
These issues can occur in different versions of Windows, including Windows 11 or Windows 10 Pro or Home edition, and Windows Server 2016 or 2012.
How to fix Windows Update Troubleshooter not working
Here are several ways to fix the Windows Update Troubleshooter if you’re experiencing issues with it in Windows 11 or Windows 10.
Download the Windows Update Troubleshooter
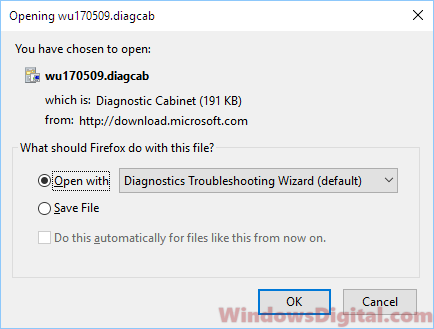
If the built-in Windows Update Troubleshooter isn’t working to resolve your issue or won’t even start, you can try downloading and using the Windows 10/11 Update Troubleshooter from Microsoft’s website.
- Download the Windows Update Troubleshooter for Windows 11/10 from here.
- Open the downloaded wudiag file with “Diagnostics Troubleshooting Wizard.” By default, all .diagcab files will run on “Diagnostics Troubleshooting Wizard.”

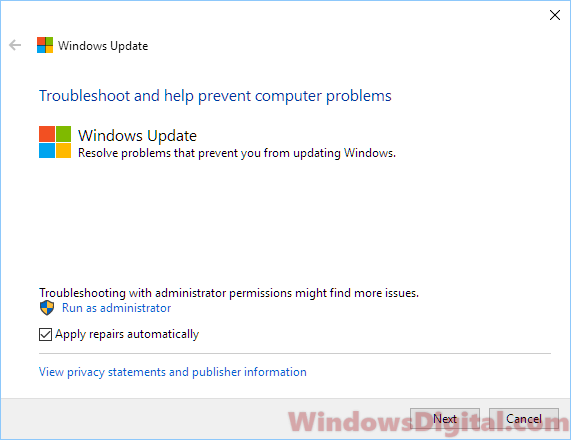
- In the “Windows Update Troubleshooting” window, click on the “Advanced” link.
- Make sure the “Apply repairs automatically” option is checked and enabled.

- Then, click on “Run as administrator” to allow the troubleshooter to run with admin privileges.
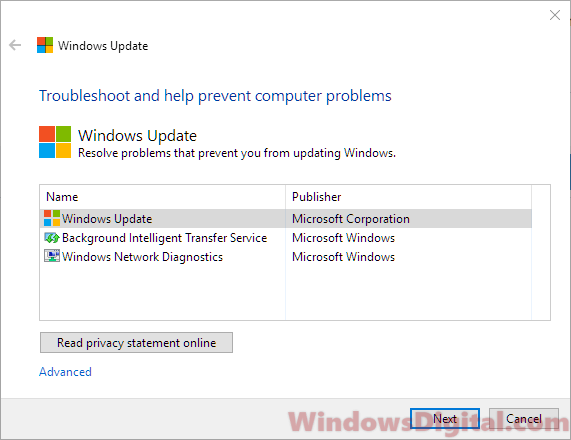
- In the troubleshooter, select “Windows Update.” Then, click “Next.”
- The Windows Update troubleshooter should start detecting problems and will return possible solutions if an error is found.
Download the latest servicing stack update (SSU)
If both the local and downloaded “Windows 10/11 Update Troubleshooter” do not work to fix your Windows Update issue, you can try to force-install the latest Servicing Stack Update (SSU). This is a common fix for when Windows Update couldn’t retrieve any updates or is always stuck at the “check for updates” status.
These issues could be due to corrupted updates in the past or missing system files, which cause Windows Update to lose track of what updates your PC needs. By installing the latest SSU, Windows Update will be able to recognize the version of the latest SSU so that it knows what updates your PC needs.
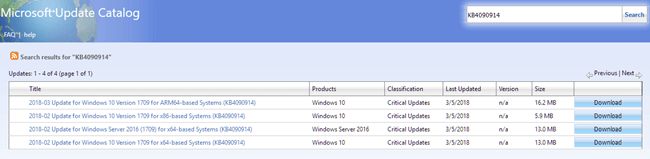
- Go to the Microsoft Update Catalog.
- In the search box, type “Servicing Stack Update” or the name of the update (KB#) and select the version that matches your operating system (e.g., Windows 10 or Windows 11, and 64-bit or 32-bit).

- Click on the “Download” button next to the update to start the download.
- Once the download is complete, double-click on the downloaded file to run it.
- Follow the on-screen instructions to install the latest SSU.
After installing the latest SSU, restart your computer and retry Windows Update again.
Run DISM and SFC to fix Windows Update Troubleshooter errors
“Deployment Imaging and Servicing Management (DISM)” is a built-in Windows repair tool that can automatically update files and correct servicing problems, including Windows Update Troubleshooter problems (such as the “0x803c0103” and “0x80244022” errors) for your Windows 10 or 11 image.
The “System File Checker (SFC)” is another built-in repair tool that can automatically scan for and repair corrupted and missing system files on your Windows PC.
To run these repair tools, go to the Start menu and type CMD. From the search result, right-click “Command Prompt” and select “Run as administrator.” In the command prompt, enter the following commands followed by an Enter key after each line of command:
Dism /Online /Cleanup-Image /RestoreHealth
sfc /scannow
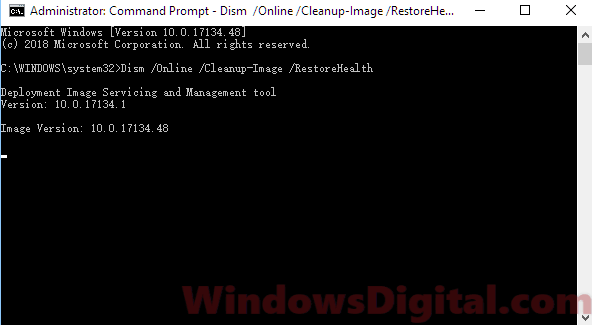
The scans may take some time to complete. Enter the second command only after the first scanning is completed. When the repairs are completed, reboot your computer and try to run Windows Update again.
Besides these repair tools, you may want to run a full virus and malware scan using your antivirus software or Windows Defender. Malware or a virus could also be the cause of why your Windows Update couldn’t run or why the “Windows Update Troubleshooter” isn’t working in Windows 10/11. Run a full system scan to check for possible threats and remove them, then retry Windows Update again.
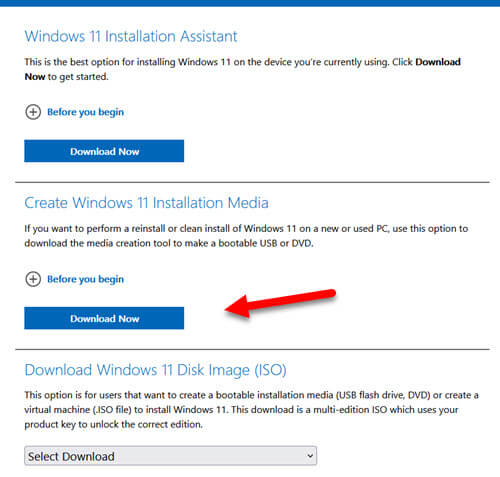
Run update using Windows 10 or 11 Media Creation Tool
If the Windows Update Troubleshooter fails to fix your problem, and you still can’t update your Windows, the last resolution would be to run an update using the Windows Media Creation Tool. This tool allows you to create installation media, such as a USB drive or DVD, to install or upgrade to Windows 10 or 11. The good thing about this tool is that you can also use it to do an in-place upgrade of your current Windows installation, which might potentially help fix the issue.
Note that you will need a working internet connection for this to work. Follow the steps below to proceed:
- Go to the here for Windows 10, or go to the here for Windows 11.
- Click on the “Download tool now” button to download the “Windows 10/11 Media Creation Tool.”

- Once the download is complete, open the tool and select the “Upgrade This PC Now” option.
- Click on the “Next” button to proceed.
- Select the option to “Keep Personal Files and Apps” and click on the “Install” button to begin the installation of the latest updates for Windows 10/11.
- Follow the on-screen instructions to complete the installation process.
- Wait for the installation to complete, and then restart your computer.
After the restart, your Windows OS should now have the latest updates and fixes. This process can, however, take some time (and patience) depending on your internet speed and the amount of updates that need to be installed.
It allows to update the operating system»
It is important to keep all the programs updated, espeacially the operating system. This utility will help you to manage the situation when you cannot update Windows. It will detect and solve the problems that exist regarding the update process. It comes in handy when your PC fails to download and install an update, it helps you scan the problem and suggest possible remedies to the problem that you might be faced with.
Sometimes the errors you get might be as a result of the conflicts from a portion of what you’re trying to download or possibly patches that are not responding, what ever the case may be, be sure that this program will come to the rescue and help you sort out things as they should be.
Enjoy the latest security fixes and performance improvements by making an update. Usually there are several updates per month. This utility will detect the problem that disrupt the update process and will solve it.
Windows Update Troubleshooter is licensed as freeware for PC or laptop with Windows 32 bit and 64 bit operating system. It is in system miscellaneous category and is available to all software users as a free download.
| Share |
| Give a rating |
|
(0 votes, average: 0.00 out of 5) Loading… |
| Author |
|
Microsoft
|
| Last Updated On |
| April 20, 2018 |
| Runs on |
| Windows 10 / Windows 8 / Windows 7 / Windows Vista / XP |
| Total downloads |
| 954 |
| License |
|
Free |
| File size |
| 639 B |
| Filename |
|
WindowsUpdateDiagnostic.diagcab |
Everyone wants to keep his system updated, the way is the have automatic installation of Windows Updates. But there may be certain scenarios when you can’t install all updates fully. The reason behind this could be wast, may be you need to repair your computer in order to fix the issues concerning unsuccessful installation of updates.
Today in this article, we’ll see the some troubleshooting steps which you can follow to fix up the issues with Windows Updates. Many times you face error of similar kind as the one shown in image above, due to this there is installation of Windows Updates is not complete so far. The thing noticeable here is that “Try again” button doesn’t seems working and won’t solve the issue. In such scenarios, you can try this solutions:
Page Contents
Method 1: Windows Updates Troubleshooting Using Troubleshooter
To fix it out initially, you can try the Windows Update Automated Troubleshooter, a specially designed tool to found out and fixes concerning Windows Update. You can download it using following link:
Download Windows Update Automated Troubleshooter
If the troubleshooter was not able to fix your issue, then you can try the following manual fix and we’re pretty sure it will work. Make sure you follow the exact procedure. We recommend you to create a System Restore point before making any changes to system. Here is the fix:
Method 2: Windows Updates Troubleshooting By Resetting Components
Following steps will illustrate you how to reset Windows Update components in Windows:
1. Open the Command Prompt with administrative privileges.
2. Now stop the Background Intelligent Transfer Service (BITS) and Windows Update services using following commands:
net stop bits
net stop wuauserv
3. Moving on, type following command:
Del "%ALLUSERSPROFILE%\Application Data\Microsoft\Network\Downloader\qmgr*.dat"
After applying above stated command, check whether the issue still persists or not. If it is fixed, then skip the step 4 and directly go to the step 5.
4. This is the aggressive step in order to fix the issue. You need to rename following folders using Command Prompt:
%systemroot%\SoftwareDistribution\DataStore
%systemroot%\SoftwareDistribution\Download
%systemroot%\system32\catroot2
To rename the folders, use following commands respectively:
Ren %systemroot%\SoftwareDistributionData\Store *.bak
Ren %systemroot%\SoftwareDistribution\Download *.bak
Ren %systemroot%\system32\catroot2 *.bak
5. Now we, reset the BITS service and the Windows Update service to the default security descriptor. To do this enter following commands (copy the commands and right click paste it Command Prompt) :
sc.exe sdset bits D:(A;;CCLCSWRPWPDTLOCRRC;;;SY)(A;;CCDCLCSWRPWPDTLOCRSDRCWDWO;;;BA)(A;;CCLCSWLOCRRC;;;AU)(A;;CCLCSWRPWPDTLOCRRC;;;PU)
sc.exe sdset wuauserv D:(A;;CCLCSWRPWPDTLOCRRC;;;SY)(A;;CCDCLCSWRPWPDTLOCRSDRCWDWO;;;BA)(A;;CCLCSWLOCRRC;;;AU)(A;;CCLCSWRPWPDTLOCRRC;;;PU)
Now type the following command:
cd /d %windir%\system32
6. Next, re-register the BITS files and the Windows Update files. This requires the following bunch of commands to be executed:
- regsvr32.exe atl.dll
- regsvr32.exe urlmon.dll
- regsvr32.exe mshtml.dll
- regsvr32.exe shdocvw.dll
- regsvr32.exe browseui.dll
- regsvr32.exe jscript.dll
- regsvr32.exe vbscript.dll
- regsvr32.exe scrrun.dll
- regsvr32.exe msxml.dll
- regsvr32.exe msxml3.dll
- regsvr32.exe msxml6.dll
- regsvr32.exe actxprxy.dll
- regsvr32.exe softpub.dll
- regsvr32.exe wintrust.dll
- regsvr32.exe dssenh.dll
- regsvr32.exe rsaenh.dll
- regsvr32.exe gpkcsp.dll
- regsvr32.exe sccbase.dll
- regsvr32.exe slbcsp.dll
- regsvr32.exe cryptdlg.dll
- regsvr32.exe oleaut32.dll
- regsvr32.exe ole32.dll
- regsvr32.exe shell32.dll
- regsvr32.exe initpki.dll
- regsvr32.exe wuapi.dll
- regsvr32.exe wuaueng.dll
- regsvr32.exe wuaueng1.dll
- regsvr32.exe wucltui.dll
- regsvr32.exe wups.dll
- regsvr32.exe wups2.dll
- regsvr32.exe wuweb.dll
- regsvr32.exe qmgr.dll
- regsvr32.exe qmgrprxy.dll
- regsvr32.exe wucltux.dll
- regsvr32.exe muweb.dll
- regsvr32.exe wuwebv.dll
7. After running and registering all components using above commands, run following command:
netsh winsock reset
In case you’re running Windows XP, then additionally execute following command to set proxy settings:
proxycfg.exe -d
8. We’re almost done now! Just restart the BITS & Windows Update services again using following commands:
net start bits
net start wuauserv
In this way your issue should be fixed now. Try reinstalling the updates which were not completely installed previously. It should work fine now. If you’re still facing the issues, then please let us know via comment box!