
При ручной установке MSU обновлений на компьютерах и серверах Windows вы можете столкнуться с ошибкой автономного установщика обновлений Windows: Обновление неприменимо к вашему компьютеру. С такой проблемой проблема чаще всего встречается при ручной установке обновлений на компьютерах в сетях, изолированных от Интернета. Если ваш компьютер обновляется автоматически через Windows Update или сервера обновлений WSUS, такой проблемы быть не может, т.к. агент wuauserv проверяет зависимости перед установкой.
В этой статье мы рассмотрим почему Windows считает, что это обновление неприменимо к компьютеру, и как установить такое обновление.
Итак, ошибка Обновление неприменимо к этому компьютеру (The update is not applicable to your computer – в английской версии Windows) появляется при попытке ручной установки MSU файла обновления с помощью встроенной утилиты
wusa.exe
(Автономный установщик обновлений Windows).
Содержание:
- Почему Windows считает, что обновление неприменимо?
- Ручная установка обновления с помощью CAB файла
- Поиск кодов ошибок применения обновления Windows
Почему Windows считает, что обновление неприменимо?
- Если компьютер давно не перезагружался или не перезагружался после установки последних обновлений, попробуйте принудительно перезагрузить Windows;
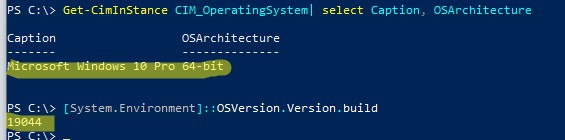
- Данное обновление не соответствует вашей версии ОС, редакции, билду, разрядности (архитектуре процессора: x86, x64; ARM) или языку. Например, вы пытаетесь установить обновление x86 на 64-битную версию Windows x64. Вы можете проверить версию, архитектуры и билд Windows с помощью следующих PowerShell команд:
Get-CimInStance CIM_OperatingSystem| select Caption, OSArchitecture
[System.Environment]::OSVersion.Version.build

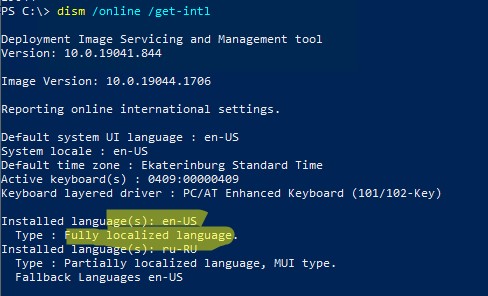
Попытайтесь скачать обновление, подходящее для вашей версии Windows. Касательно языка системы: иногда язык установленной Windows отличается от используемого языка интерфейса, здесь нужно быть внимательным. Проверьте оригинальный язык Windows с помощью команды:
dism /online /get-intl
В этом примере видно, что на компьютере установлена английская версия Windows:Installed language(s): en-US Type : Fully localized language, и дополнительно установлен русский language interface pack/LIP: Partially localized language, MUI type: ru-RU;

- Обновление уже установлено. Список установленных обновлений на компьютере можно получить с помощью команды
wmic qfe list
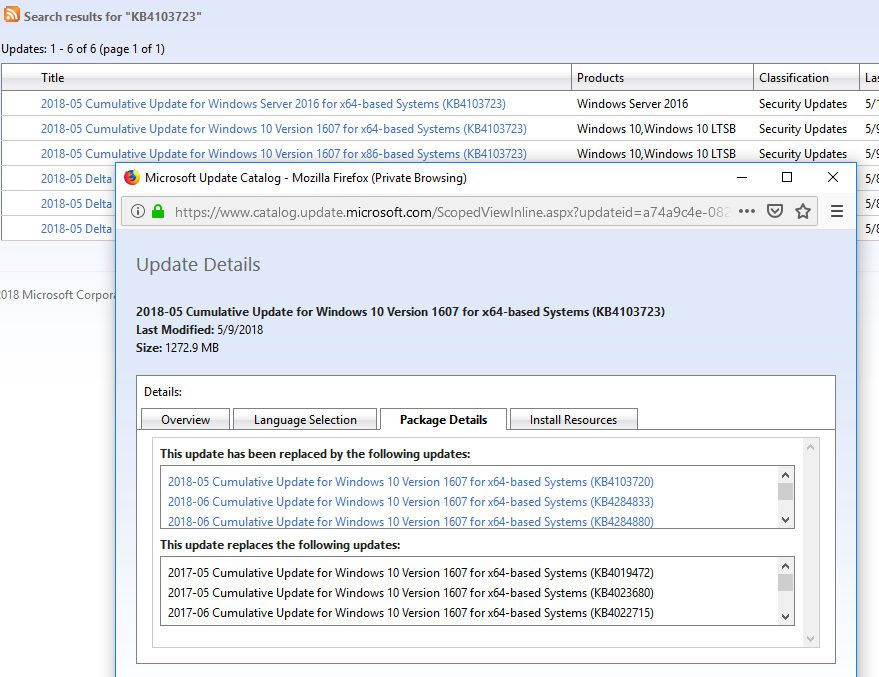
или при помощи PowerShell модуля PSWindowsUpdate; - Данное обновление заменено или установлено более новое обновление, заменяющее данное обновление (информацию о заменяющих обновлениях можно найти на странице KB на сайте Microsoft, обычно эта информация указана в формате Сведения о замене обновлений. Это обновление заменяет ранее выпущенное обновление…);

- Не выполнены предварительные требования для установки данного обновления. Например, большинство обновления для Windows 7 требуют наличия установленного SP1, обновления для Windows 8.1 / Windows Server 2012 R2 требует наличия Update 1 и т.д. Вся эта информация также присутствует на странице с информацией о KB в каталоге обновлений Microsoft (https://www.catalog.update.microsoft.com/Home.aspx ). Внимательно прочтите все требования к вашему патчу, возможно перед его установкой нужно предварительно установить еще какой-то апдейт;
- Проверьте, что вы скачали полноценное MSU обновление для Windows, а не Delta пакет;

- Проверьте, что дата и время на вашем компьютере корректны (включая часовой пояс);
- Некорректно работает служба Windows Update (можно попробовать выполнить скрипт сброса настроек службы обновлений, или запустить Windows Update Troubleshooter (Параметры > Обновления и безопасность > Устранение неполадок > Центр обновления Windows и нажмите Запустить средство устранение неполадок);
- Если вы получили *.msu файл обновления из третьих источников, возможно он был поврежден. Попробуйте заново скачать файл обновления Windows из Microsoft Update Catalog;
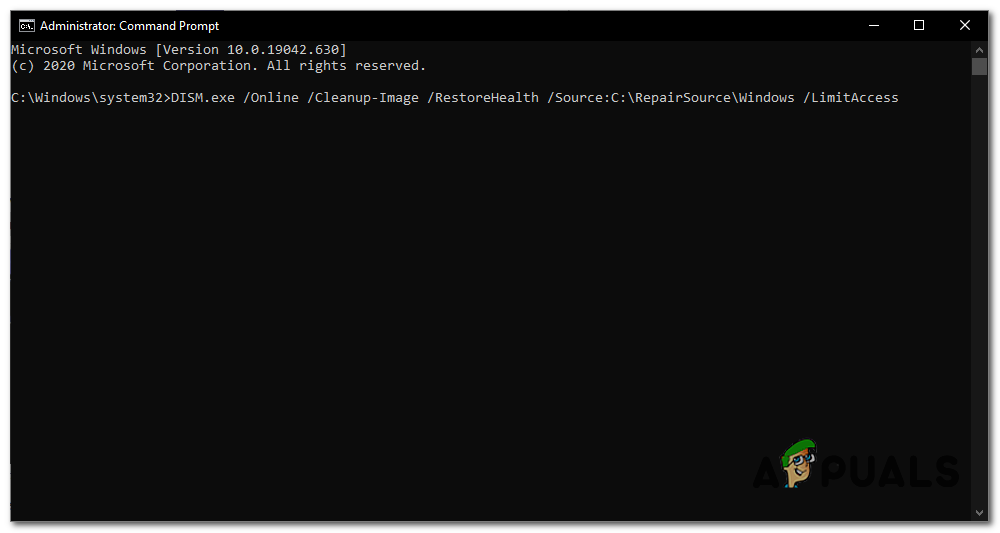
- Проверьте целостность системных файлов Windows с помощью команды
Dism.exe /Online /Cleanup-Image /Restorehealth
или
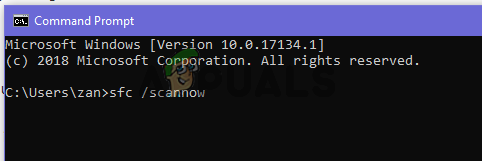
sfc /scannow
.
Также обратите внимание, что обновления безопасности для Windows сейчас выпускаются в виде кумулятивных обновлений. Это значит, что вы можете установить любое более новое месячное кумулятивное обновления для вашего билда Windows (оно уже включает все предыдущие обновления).
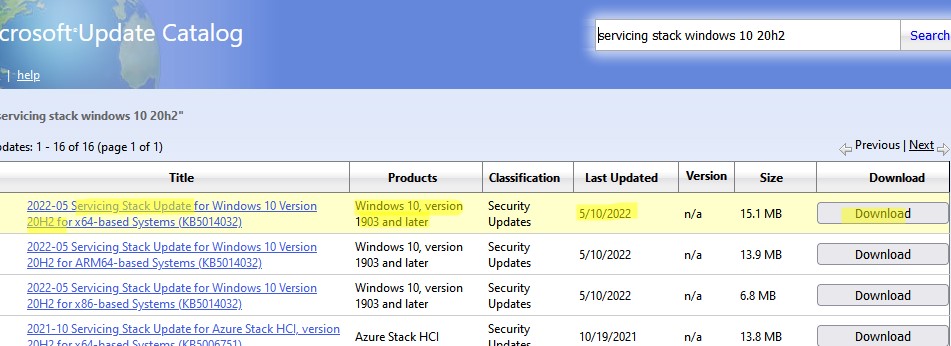
Перед установкой некоторых обновлений нужно сначала установить последнее доступное обновление служебного стека (SSU — Servicing Stack Update). Это обновление можно найти в Windows Update Catalog с помощью следующего поискового запроса:
servicing stack windows 10 20h2
В этом примере, я нашел что последний Servicing Stack Update для Windows 20h2 выпущен в мае 2022. Скачайте и установите SSU перед установкой вашего обновления.
C марта 2021 года Microsoft интегрирует SSU обновления для версий Windows 10 2004 и старше в последнее кумулятивное обновление LCU (Latest Cumulative Update). Администраторам систем Windows 10 до версии 2004 придется следить за зависимостями при развертывании обновлении самостоятельно.
Ручная установка обновления с помощью CAB файла
Вы можете попробовать установить MSU файл обновления не через утилиту WUSA.exe (ее использует автономный установщик обновлений Windows), а распаковав CAB файл и установив его через DISM или командлет Add-WindowsPackage напрямую в образ Windows. Для вашего обновления процедура ручной установки обновления может выглядеть так:
- Распакуйте MSU файл обновления:
expand _f:* “C:\Temp\windows10.0-KB4103723-x64.msu” C:\Temp\KB4103723 - В каталоге C:\Temp\KB4103723 появится CAB с именем вида Windows10.0-KB4103723-x64.cab;
- Установите данный CAB файл обновления с помощью DISM.exe (
DISM.exe /Online /Add-Package /PackagePath:c:\Temp\Windows10.0-KB4103723-x64.cab
) или с помощью PowerShell (
Add-WindowsPackage -Online -PackagePath “c:\Temp\Windows10.0-KB4103723-x64.cab”
)
Поиск кодов ошибок применения обновления Windows
Проверьте конкретный код ошибки установки обновлений в консоли событий Windows Event Viewer. Перейдите в раздел Установка (Event Viewer -> Windows Logs -> Setup) и найдите событие с источником WUSA, скорее всего там будет содержаться примерно такой текст:
Источник: WUSA
Код: 3
Уровень: Ошибка
Не удается установить обновление Windows из-за ошибки: 2149842967 «» (Командная строка: C:\Windows\system32\wusa.exe C:\Downloads\Updates\windows10-kb4103723.msu)
Поищите в Google информацию по коду ошибки (вам может помочь полный список кодов ошибок Windows Update).
Также проверьте ошибки установки обновлений в файле
%systemroot%\Logs\CBS\CBS.log
(ищите ошибки по номеру вашего KB).
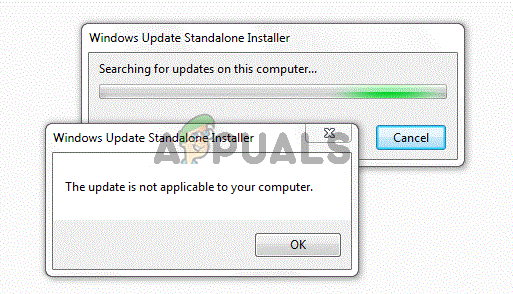
If you are performing a manual installation of updates from Microsoft, you may face the error “The update is not applicable to your computer“. This generally happens when trying to install updates KB2919355 or KB4048955 on your computer.
There are several reasons why this happens. Trying to install incompatible system updates is the main reason behind this error. However, corrupted system files and registry settings can also be the culprit.
Whatever the reasons, we will walk you through all the possible ways to fix this error.
Probable Causes of the Error
Before moving to the fixes section, let’s point out some causes behind this error:
- Missing supportive updates
- Doubly installing the updates
- Interfering third-party applications
- Disabled Windows Update services
- Misconfigured regional settings
Fixes: The Update is Not Applicable to Your Computer Error
Installing the latest cumulative updates can be troublesome if you continue facing the update installation error. You can do a minor tweak in the settings and easily solve the problem.
Here, we have compiled a list of 10 fixes you can apply to troubleshoot the problem. Let’s get straight into it:
Check the Compatibility of the Update
Installing updates can be troublesome if it is not compatible with your operating system. You may be using Windows 10 and trying to install the update made for Windows 8.1. In this case, the update is not the culprit. You made a mistake from your side. So, you must first check if the update is compatible with your system. Follow these steps:
- Open the link for Microsoft Update Catalog.
- In the search box, type the update name you want to install. For example: Type KB2919355 and click Search.
- It will show the Windows version with which the update is compatible. The example we just took, KB2919355, is particularly made for Windows 8.1, so you can not install it in Windows 10.
 17")
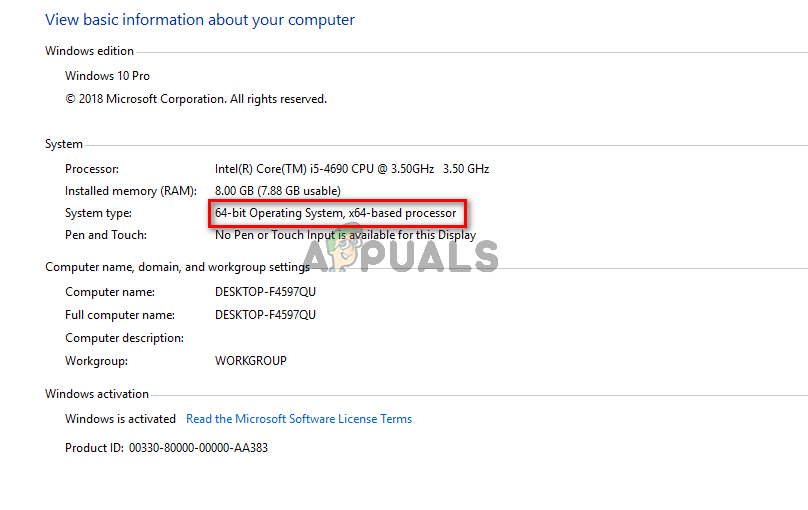
- After verifying it, it’s time to check your processor architecture. Right-click This PC icon from the desktop and select Properties from the right-click context menu.
- In the new window, search for System type. You will see either 64-bit or 32-bit operating systems mentioned.
 18")
- Download and install the update according to the system architecture type. You can not install updates made for 64-bit Windows on a 32-bit computer and vice-versa.
 17")
 18")
Check For the Installed Updates
You can not install the same update twice. Maybe the update you are trying to install already exists in the system, and you are encountering the error from Windows Update Standalone Installer.
Here’s how to check if the update is already installed:
- Hit Windows + R key to open the Run dialog box.
- In the text field of the Run dialog box, type
controland hit Enter to open the Control Panel. - Select the Programs menu and then click Programs & features.
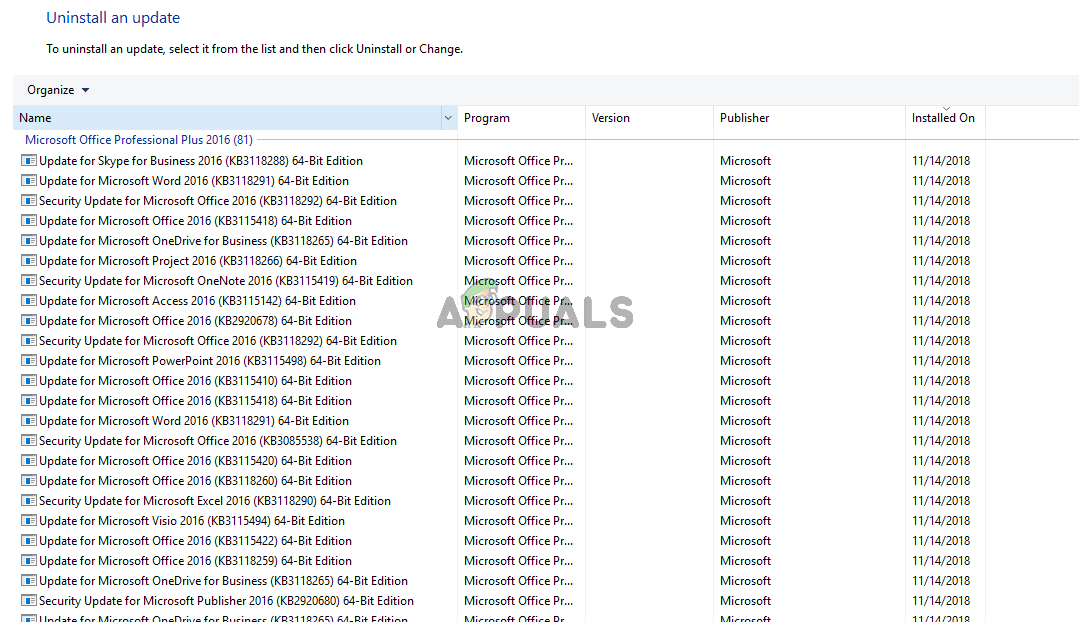
- From the left pane, select View installed updates. It will show a list of recent updates you installed in your system.
 19")
- Look for the update’s name you are wanting to install. If it is already installed, you don’t need to panic. But, if you don’t see the update listed there, try again installing the update or move to further fixes.
 19")
Install the Supporting Updates
There might be cases when installing one update requires another update to be pre-installed in your system. The packages that the post-update requires may be present in the previous one, and it may throw an error message if it does not find the respective package.
You should ensure you have installed the prerequisite update before installing another update. For example, if you want to install updates released after April 2014 on your Windows 8.1, you should first install the KB 291935 update as a prerequisite. You may search for the prerequisite update for the update you are trying to install.
Follow the steps below to see if the pre-update is installed:
- Open Control Panel.
- Navigate to: Programs > Programs & features
- Click View installed updates in the left section.
- Search for the name of the prerequisite update. If you see it, you are good to go. Else, install it first and then only proceed with the update you are willing to install.
Run the Troubleshooting Tool
Windows has an integrated troubleshooter that comprises many specific troubleshooting tools to help you diagnose and fix issues in your system. One of the troubleshooting tools is the Windows update troubleshooter, which fixes problems with the installer.
Here’s how to run the troubleshooter tool:
- Hit Windows + S key on your keyboard and type Troubleshoot settings.
- Click the first search result and open it.
- On the Troubleshoot settings page, click the Other troubleshooters option.
- From the list of troubleshooters, find Windows Update and click the Run button.
 21")
 21")
Run SFC and DISM Tools
Corrupted registry settings or file systems are another reason that might be causing an issue installing the updates. Running the SFC and DISM tools will fix the issues with the corrupted registry and system files and most probably fix the update error.
Follow the steps below to run these commands:
- Right-click the Start button and choose Run from the list of options.
- Type
cmdin the text field and hit Ctrl + Shift + Enter to run Command Prompt as an administrator. - Then type
SFC /Scannowin the command window and hit Enter to run the SFC tool. 22")
- Try installing the update once the SFC tool completes the scan.
- If you still encounter the update error, consider running the DISM tool as well. Copy and paste the command below in the command window and hit Enter.
Dism /Online /Cleanup-Image /RestoreHealth 23")
 22")
 23")
Once the DISM tool does its task, try installing the update again.
Enable the Windows Update Services
Sometimes, the essential Windows services required for installing updates like Windows Update and Windows Module Installer may stop, creating an issue. In such a case, you should restart them and set their startup type to automatic, so they don’t create further problems. Here’s how:
- Hit Windows + R key to open Run application.
- Type
services.mscin the text field and hit Enter to open the Services application. - Search Windows Update service. Double-click the service and set Startup type to Automatic from the dropdown.
 24")
- Under Service status in the same window, click the Start button if it is stopped.
- Click Apply > OK to save the changes.
- Do the same with Windows Modules Installer service.
 24")
 25")
Change the Regional Settings
Most of the users reported that they fixed the issue after changing the regional settings. If the region on your computer is set other than the United States, there may be a problem installing the update.
Follow these steps to change the regional settings:
- Type Control Panel in the Windows search box and open the top result from the list.
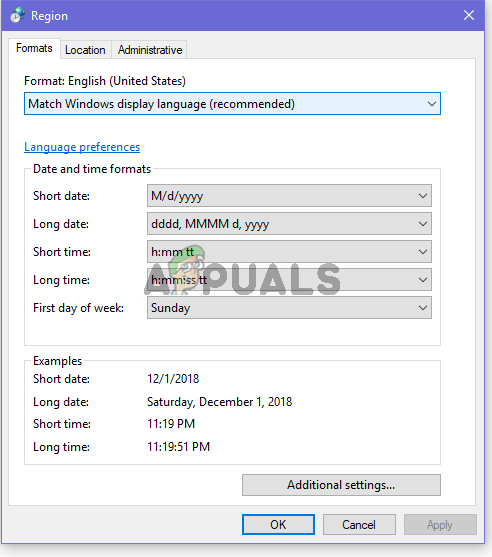
- Select Clock and Region from the Control Panel home and then click Region.
- Select English (United States) from the Format drop-down in the Region window.
 26")
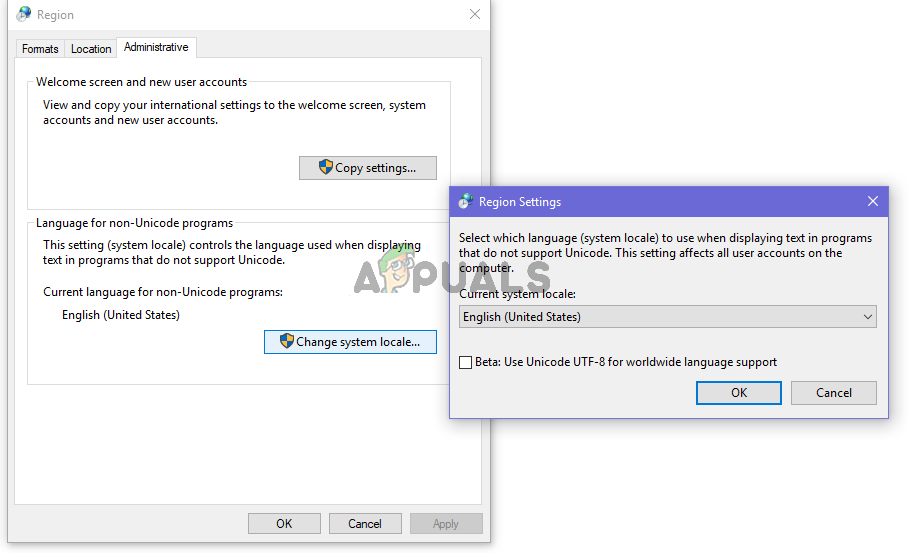
- Next, jump to the Administrative tab.
- Click Change system locale button.
- From the Current system locale dropdown, choose English (United States).
- Save the changes and try installing the update afterward.
 26")
 27")
Use Clean Boot Mode to Install the Updates
Clean boot mode is the most elementary boot mode available in Windows that lets the computer start only with the fundamental system files and drivers. If any third-party application is preventing the updates from installing, you can boot your system in a clean boot mode and try installing the update.
Here’s how to boot in a clean boot mode:
- Open Run dialog box by pressing Windows + R key simultaneously.
- Type
msconfigand hit Enter to open the System Configuration application. - Jump to the Services tab in the System Configuration window.
- Check Hide all Microsoft services.
- Uncheck all the services shown.
 28")
- Click Apply > OK
- Restart your computer and try installing the updates again.
 28")
Perform a System Restore
If you recently made some changes to your system, it might be troubling for you to install the updates. You can revert to the earlier version of Windows and try installing the updates.
Here’s how to perform a system restore:
- Open Control Panel.
- Type
recoveryin the search box of the Control Panel. - Choose the Recovery menu from the search result and then click Open System Restore.
 29")
- Follow the instructions in order to perform a system restore.
- Try installing the update once again after you successfully restore the system.
 29")
Use an Alternative Method to Install the Updates
You can also use an alternative method to install the updates. You normally install an update by double-clicking the MSU update installer file, but it may not always work.
You can further use DISM in the command prompt to install the updates. DISM stands for Deployment Image Servicing and Management. It is the command that can be used for installing the offline windows update files.
Follow the steps below to install the updates using DISM command:
- Double-click This PC from your desktop icon or hit the Windows + E key on your keyboard to open File Explorer.
- Open Local disk (C:) and right-click over the empty area.
- From the context menu, click New > Folder and rename the folder as updates.
- Now navigate to the folder where you have downloaded the update installer file. Click over the file and hit Ctrl + C to copy the file.
- Go to the updates folder you just created, open it, and hit Ctrl + V to paste the file.
- Rename the installer file as xyz.msu. Sometimes, the long file name creates problems executing the file; this is why we are renaming it.
 30")
- Then, right-click the Start button and select Run.
- Type cmd and hit Ctrl + Shift + Enter to open Command Prompt as an administrator.
- Copy and paste the command below:
Expand -F:* c:\updates\xyz.msu c:\updates\ 31")
- After executing this command, you will see the KB number of the update you are trying to install. For example, KB2919355.
- Again copy and paste the command below:
DISM.exe /online /add-package /packagepath:c:\updates\KB.cabReplace KB in the command with the KB number. Wait until you see an update completed message. 32")
- Restart your computer.
 30")
 31")
 32")
Troubled by the error message «the update is not applicable to your computer» when you try to install an update in Windows 10/8/7? Don’t worry! This problem is caused by some reasons and here we will give you specific reasons and full solutions to help you out.
This Update Is Not Applicable to Your Computer Windows 10/8/7
“I reformatted a few weeks ago and today I remembered some updates failed (15 to be exact). So I tried to download the updates that didn’t install manually and it gave me “updates not applicable to your computer” message for every single one of them.”BleepingComputer
Update is one of integrate parts of the Windows operating system. Without the installation of these updates, your computer will not perform up to its potential.
However, a number of users are reporting that they are troubled by an error message reading “the update is not applicable to your computer” when they try to install an update in Windows 10/8/7, just like the real example above from one forum.
Actually, it is a quite common issue if you install Windows 7 KB2999226, KB3033929, KB4012212, etc. or a certain KB update of Windows 10. In addition to Windows systems, some users say they also encounter inapplicable update error in Windows Server 2008 R2, Windows Server 2016, etc.
Well then, what problem can cause the error? In general, the error can be caused by unmatched update package, update already installed, Windows Updater problem, the recent update not installed, corrupted system files, etc.
Are you also bothered by this issue? If so, here is how you can fix the error Windows Standalone Installer not applicable.
Fixes for the Update Is Not Applicable to Your Computer Windows 7/8/10
As to the issue fix, we will offer you 9 possible solutions. Just try them one by one to get out of trouble.
Way 1: Check If the Update Package Matches Your Windows Version and Processor Architecture
Sometimes the update you are trying to install is not compatible with your system and your processor architecture. Thus, the first thing you need to do is to make sure the update matches your system specs.
You can go to Microsoft Update Catalog and then search for the name of the update you are installing in the search box on this website. If it is compatible with your Windows, the next step you need to do is to ensure you have compatible processor architecture to install the update.
Step 1: In Windows 10/8/7, right-click on This PC or Computer, and choose the Properties option.
Step 2: In the System interface, you can see the architecture of your Windows and your processor next to System type.
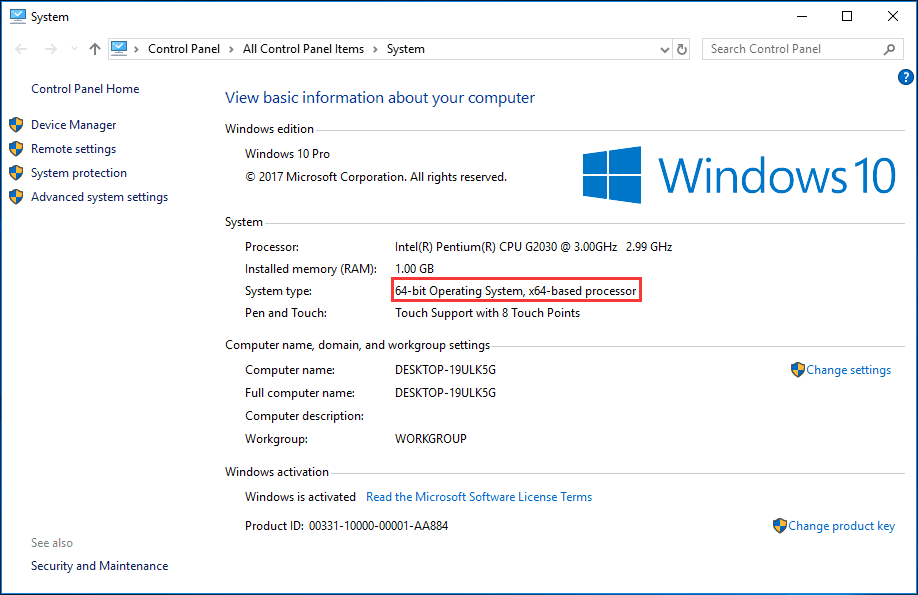
If the system type is 64-bit Operating System and x64-based processor, you cannot install x86-based Windows and vice versa.
Tip: If you are trying to install a Windows Server 2012-only update on a Windows Server 2012 R2-based computer, this is not allowed and the error the update is not applicable to your computer may happen.
Way 2: Check the Update History
If the update is compatible with your processor but Windows Update Standalone Installer error with inapplicable update appears, maybe the update you are trying to install has already been installed to your computer. And you can check it in the update history.
In Windows 7, click the Start button to click Control Panel. Then, go to Windows Update > View upgrade history. In Windows 10, go to Settings > System & security > Windows update > Update history.
Here, you need to match the code of each update in history with the update that you try to install and see if it is already installed on your PC. If no, proceed to the next solution.
Way 3: Check If a Prerequisite Update Is Missing
There is another thing you should do which is to check if a prerequisite update is missing. According to Microsoft, some updates need a prerequisite update before they can be applied to a system. Or else, Windows Update Standalone Installer not applicable will appear.
For instance, if the error message happens on Windows 8.1 or Windows Server 2012 R2, you have to install the April 2014 update KB 2919355 as a prerequisite and one or more pre-requisite servicing updates (KB 2919442 and KB 3173424).
To check whether you have installed these prerequisite updates, you can run the following PowerShell command:
get-hotfix KB3173424,KB2919355,KB2919442
If these updates have been installed, the command will return the installed date in the InstalledOn section of the output. This way is given by Microsoft.
Way 4: Run Windows Update Troubleshooter
You know, Windows has a variety of troubleshooters. And if there is a problem related to Windows Updater, it may cause the problem of not install. To fix this issue, you can run Windows Update Troubleshooter to solve the issue.
Tip: While troubleshooting, you may encounter an error in Windows 10/8/7. If so, perhaps this post – 8 Useful Fixes for an Error Occurred While Troubleshooting Are Here is helpful for you.
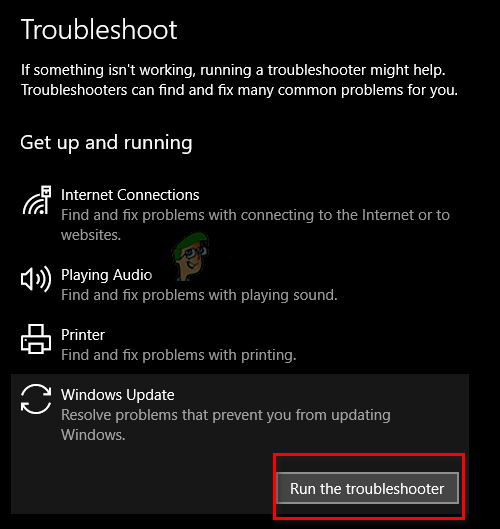
Step 1: Take Windows 10 as an example. Type Troubleshoot in the search box and click the program in the search box to run it. Or go to Settings > System & security > Troubleshoot.
Step 2: Go to the Get up and running section to find Windows Update, click it to choose Run the troubleshooter to start the process.
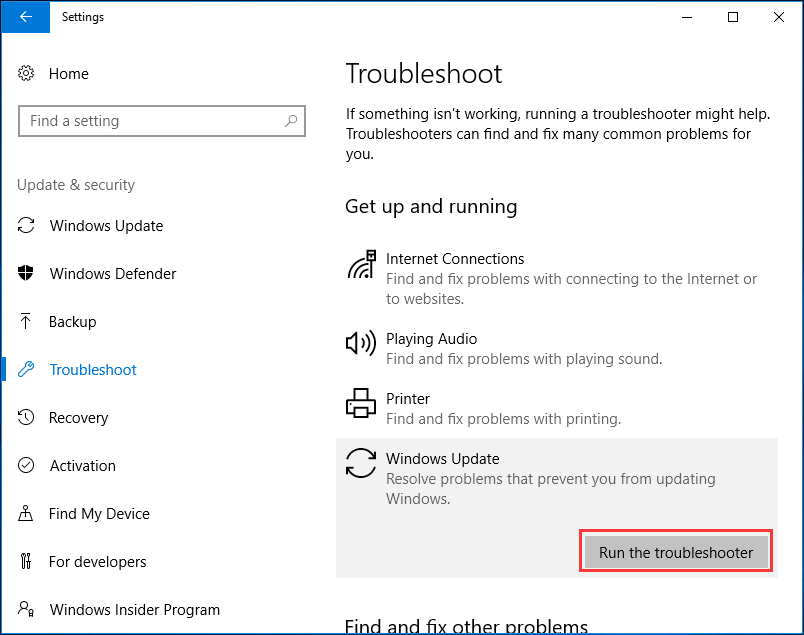
Step 3: Then the process will begin. This may take a while to diagnose the problem with Windows Update, just wait patiently until it completes. If some errors are found, click Apply repairs automatically to fix them.
Way 5: Install the Recent KB Update
If you haven’t installed the most recent KB update, you can consider installing that first to fix the error the update is not applicable to your computer in Windows 10/8/7.
Note: Installing any Windows update may cause file loss. Thus, to avoid data loss, you had better back up your important files.
Move 1: Back up Files before Windows Update
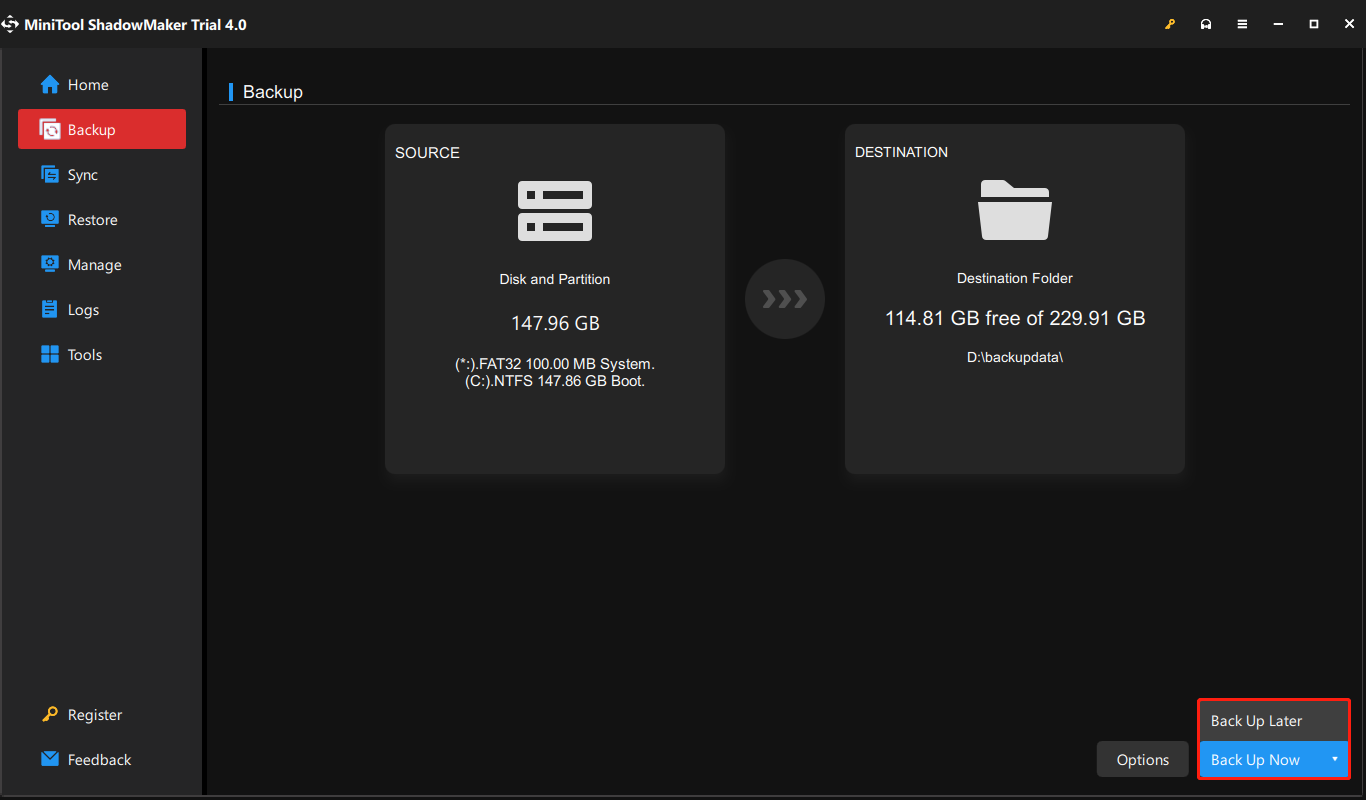
To back up files or folders well, you can use MiniTool ShadowMaker, a piece of professional PC backup software. It allows you to create a backup image for your important files. Additionally, it can also sync files or folders to one or more locations. Now, get the Trial Edition from the following button to have a 30-day free trial.
MiniTool ShadowMaker TrialClick to Download100%Clean & Safe
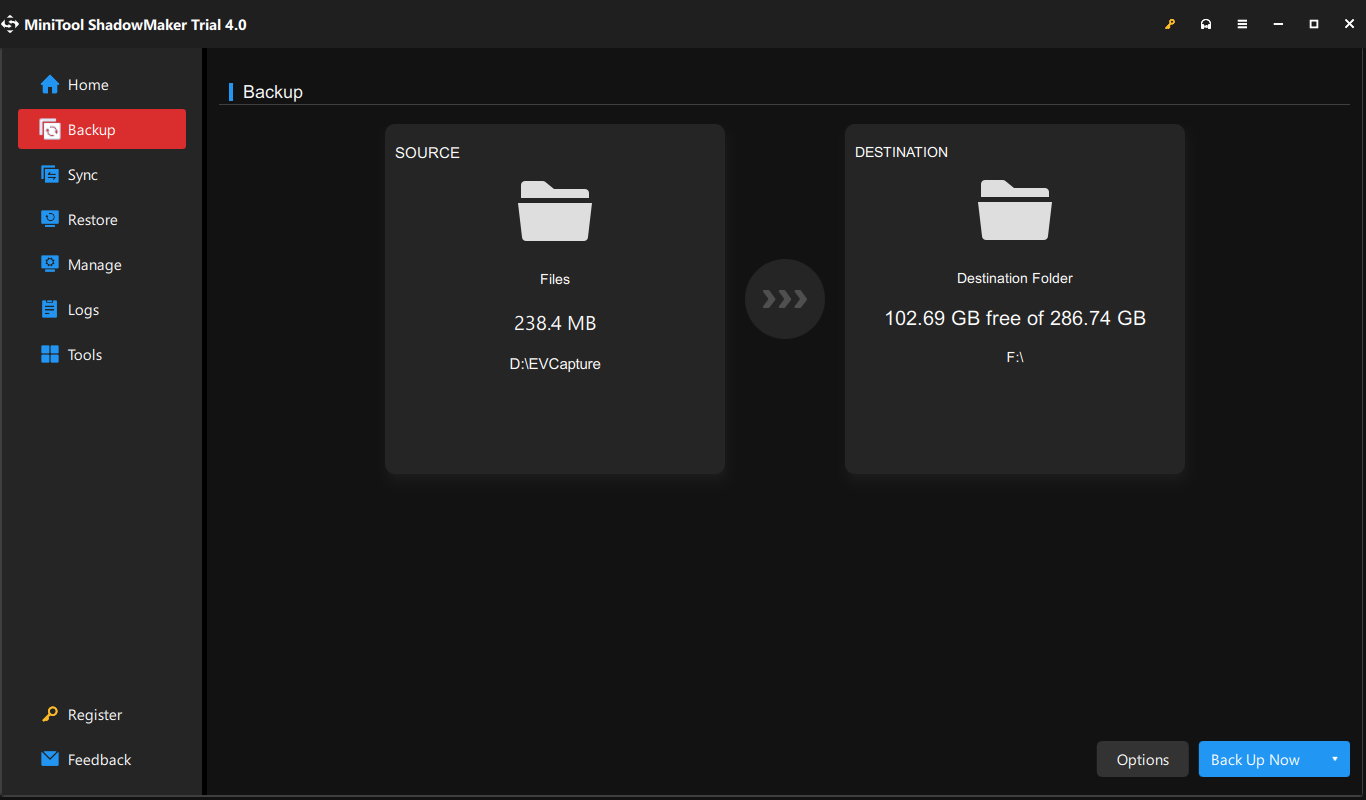
Step 1: Run MiniTool ShadowMaker to start file backup.
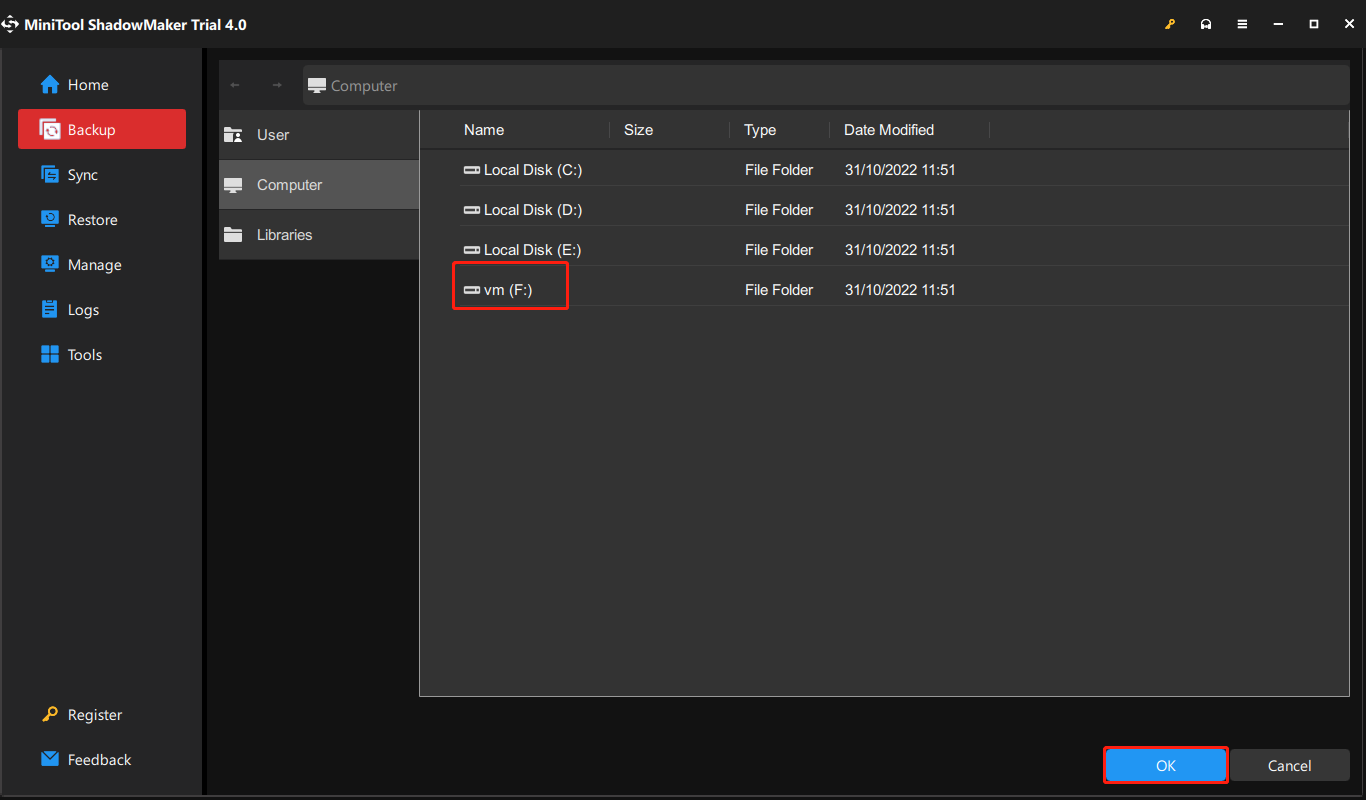
Step 2: Click the Backup feature in the toolbar, and go to SOURCE > Folders and Files to choose what you want to back up.
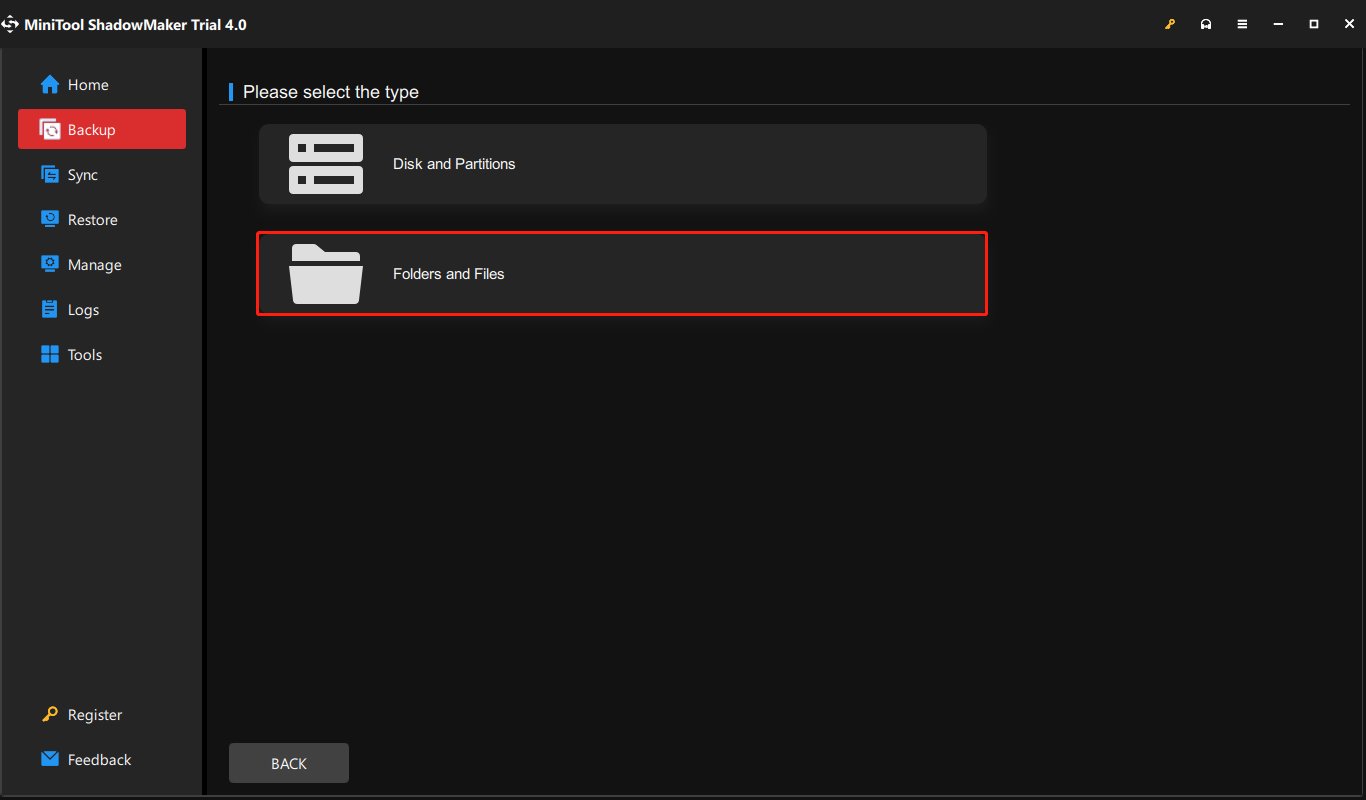
Next, go to DESTINATION to choose a partition on your USB drive, external hard drive, or internal hard drive to save the backup file.
Step 3: Finally, start to execute the file backup by hitting the Back Up Now button.
In addition, you can also take full advantage of its Sync feature to sync your files for backup. This way, it allows you to directly view the synchronized files in the destination folder.
Move 2: Start to Install the Latest KB Update
After finishing a backup, now you can install the recent KB update to fix Windows Standalone Installer not applicable issue.
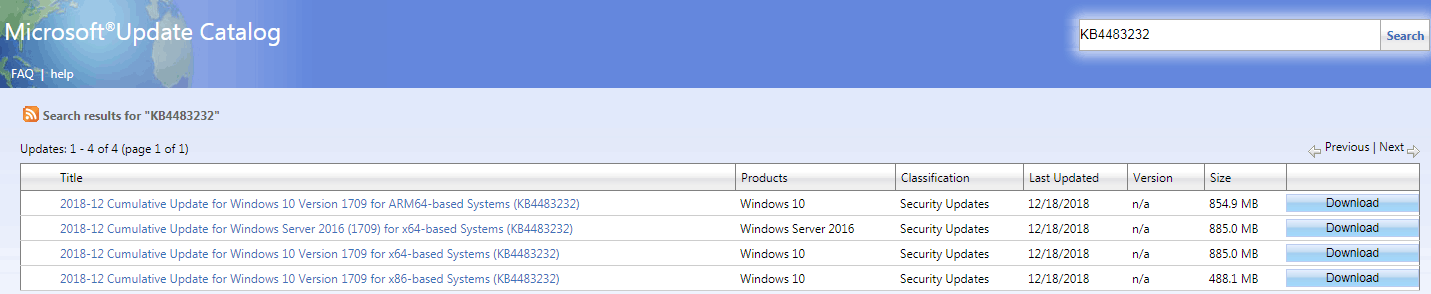
Step 1: If you are facing the update is not applicable to your computer Windows 10 1709, go to this web page, then you can see a list of Windows 10 KB updates in the left panel. Just find the recent KB update that is usually at the top of the list on that page and note down the KB number.
Step 2: Open Microsoft Update Catalog site (mentioned in way 1), and input the KB number into the search box.
Step 3: Choose a proper one based on your OS and click Download to save it to your PC. Later, install it on your computer to help you out.
Way 6: Run DISM and SFC Tools via CMD
DISM and SFC are the file scan tools which can be run via command prompt in Windows. With them, you can scan the integrity of system files and the registry files.
You know, any error in these files can cause a Windows Update issue, like Windows Update Standalone Installer error with the inapplicable update. Thus, running these two tools can feasibly fix update errors.
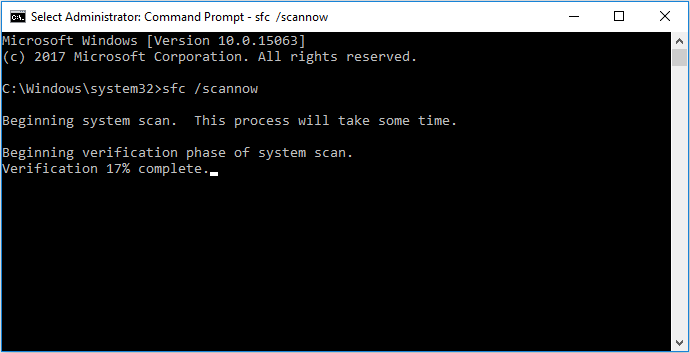
Step 1: In the Windows search box, type cmd and run it with administrative privilege.
Step 2: Enter DISM /Online /Cleanup-Image /RestoreHealth and press Enter on the keyboard.
Tip: If you are running Windows 7, DISM isn’t available and you can skip to step 3.

Step 3: After DISM is done, input sfc /scannow command line and hit Enter.
Tip: Some of you may encounter an error like Windows resource protection could not perform the requested operation or Windows Resource Protection could not start the repair service. If so, you can find solutions from this post – Quickly Fix – SFC Scannow Not Working (Focus on 2 Cases).
Later, close command prompt, restart your PC after SFC scan is completed and install the Windows update again.
Way 7: Set the System Locale to English
According to users, if you are unable to install certain updates with this Update is not applicable to your computer error message, changing your system locale to English should be a suggestion. If it is not set to English, the issue will appear in Windows 10/8/7.
To do that, follow the instructions below:
Step 1: Go to Control Panel, Region and Language (Windows 7) or Lock, Language, and Region (Windows 10) and click the Region section.
Step 2: In the Region window, set the format to English (United States) under the Formats tab.
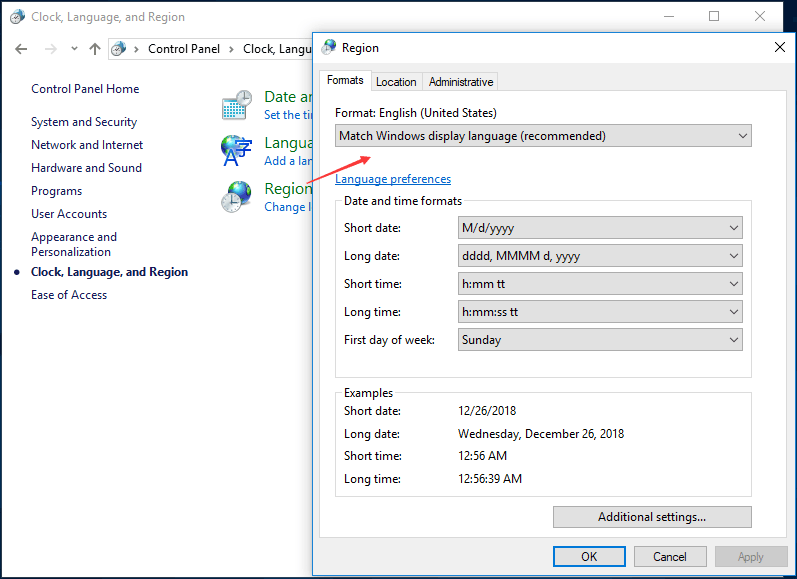
Step 3: Go to the Administrative tab, click Change system locale and set the Current system locale to English (United States).
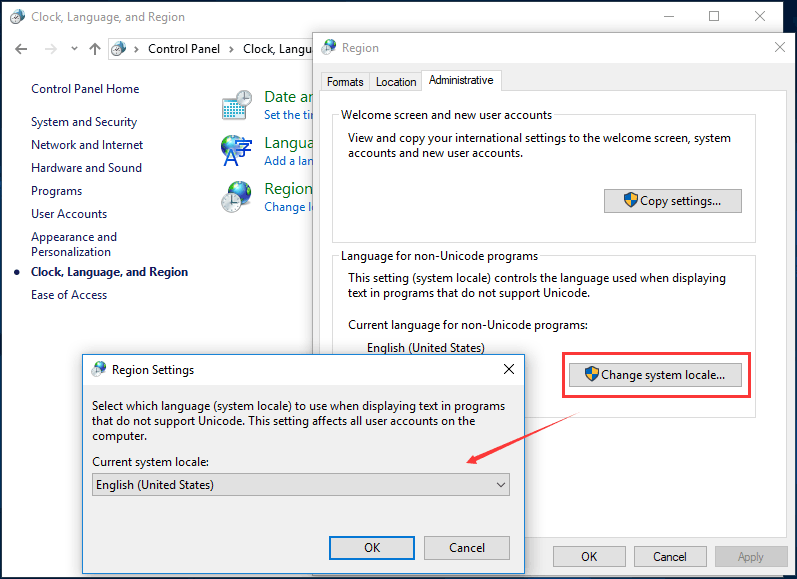
After that, try to install your Windows update again. You can revert the locale settings to the desired value.
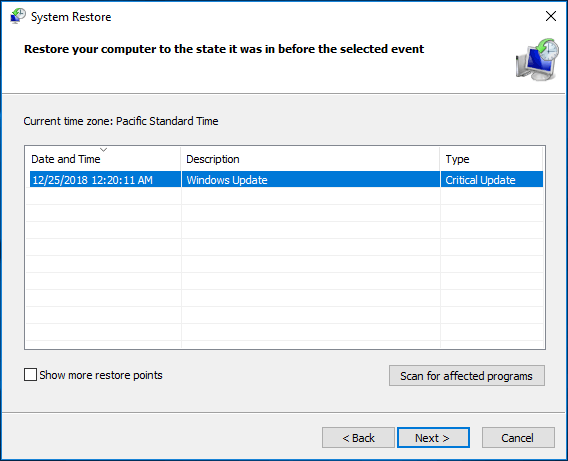
Way 8: Perform a System Restore
If you fail to fix “the update is not applicable to your computer Windows 10/8/7”, you can try to restore your computer to a previous state via a restore point. However, this way requires a premise which is that you have created a system restore point in advance.
Tip: If you have a system image created by MiniTool ShadowMaker, you can also perform a system image recovery to fix the inapplicable update error.
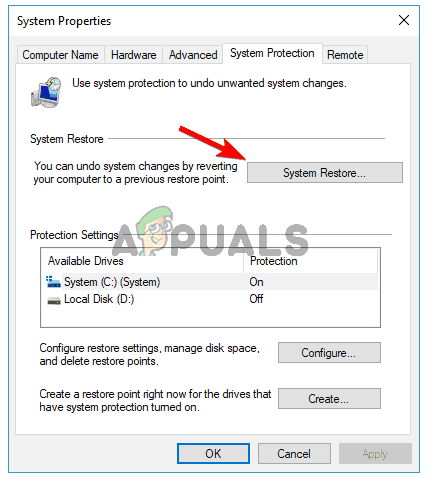
Step 1: Type create a restore point in the search box and click the result to open the System Properties window.
Step 2: Under the System Protection tab, click System Restore.
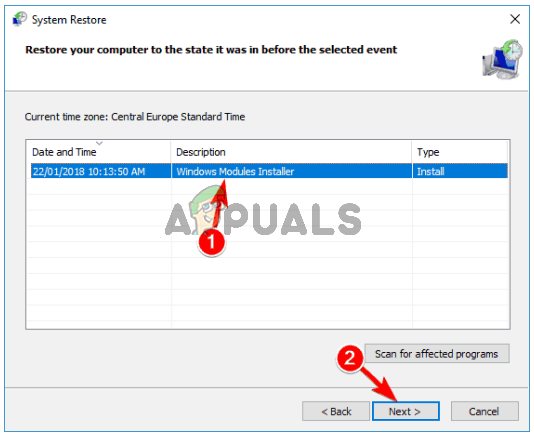
Step 3: Choose a restore point to start system restore.
Way 9: Perform an In-place Upgrade
If you can’t install Windows update with this update is not applicable to your computer error, the last thing you can try is to use Windows Media Creation Tool to troubleshoot the issue. This tool allows you to either install a fresh copy of Windows or upgrade it.
Tip: To avoid file loss or system breakdown, you can use MiniTool Shadowmaker to back up the OS and important files before an update.
Step 1: To perform an in-place upgrade, download Media Creation Tool.
Step 2: Once this tool is open, choose Upgrade this PC now.
Step 3: Windows setup will take a while to start preparing and download needed updates.
Step 4: Once it is ready, click the Change what to keep option in the Ready to install screen. Then, click Keep personal files, apps and Windows settings to continue.
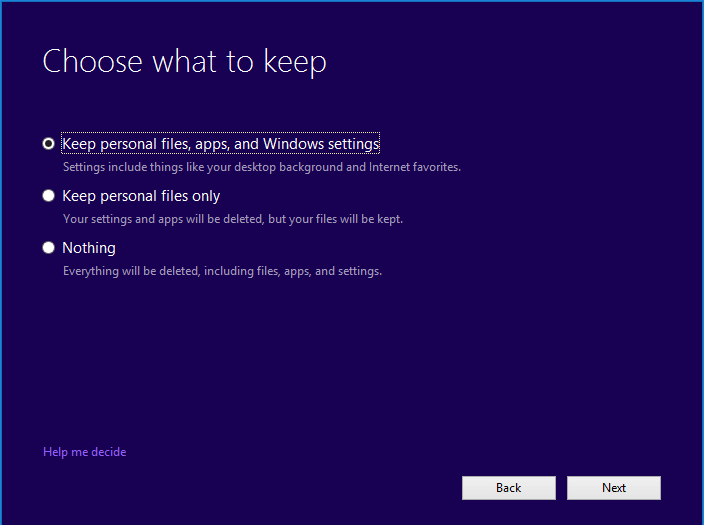
Step 5: Then, click Install button to start the installation.
Click to tweet
Back up Windows OS for PC Protection
Now, you have known all the potential fixes for the update is not applicable error. In order to protect your PC and perform a quick disaster recovery, now you should take action to create a system image backup with the professional and reliable backup software for Windows 10/8/7. The backup tool is MiniTool ShadowMaker which has been mentioned in way 5.
In addition to file backup, this freeware can help you to back up system, disk or partition. Now, get it for system image creation.
MiniTool ShadowMaker TrialClick to Download100%Clean & Safe
Step 1: Run MiniTool ShadowMaker Trial Edition to choose the local backup mode.
Step 2: In the Backup window, you see this tool will help back up the system by default. Besides, a destination path is also chosen. Of course, you can change the destination path to your desired one like USB drive, external hard drive, NAS, etc.
Then, hit Back up Now or Back up Later to execute the backup operation immediately or later.
Bottom Line
Receive the error message “the update is not applicable to your computer” in Windows 10/8/7? Now, try the above 9 solutions to fix this issue. To keep your PC safe and avoid accidents, it’s a better way to back up your important files and create a system image with MiniTool ShadowMaker.
If you encounter any question or have any suggestion, please let us know. Just send your idea to [email protected] or leave a comment below.
The “The update is not applicable to your computer” error during a Windows update means the update doesn’t match your system’s setup. This often happens when the update isn’t compatible with your Windows version, edition, or system type (32-bit vs. 64-bit).
Other reasons include missing required updates, installing an update that’s already applied, or disabled Windows Update services.
In this article, we will discuss different ways to solve this error.
1. Check Whether the Windows Update Package Matches Your Windows Version
Making sure the update package matches your Windows version is important because different versions or architectures (like 32-bit vs. 64-bit) can block installation. Checking compatibility ensures the update is meant for your Windows edition and avoids errors.
- Open the Start menu, type This PC, and press Enter.
Open This PC - Right-click in an empty area and select Properties.
Open the Properties of This PC - In the properties, check your processor architecture and Windows version next to System type. If it says 64-bit and x64, ensure the update catalog also shows 64-bit. Otherwise, the update cannot be installed.

View the System Type
2. Match Your Update with the Update History
Checking your Update History can show if the update you want to install is already applied or if you need another update first. By comparing the update with your history, you can ensure it is compatible and avoid reinstalling it or facing errors due to missing requirements.
- Open the Start menu by clicking the Start button and then type Control Panel to open it.
Open Control Panel - Click on Programs in the Control Panel.
- Under Programs and Features, click View installed updates to access the installed updates list.

Check if the update is already installed or not - Compare the update codes with the one you’re trying to install to see if it’s already installed. If not, move on to the next solution.
3. Run the Update Troubleshooter
When updates fail due to compatibility or system conflicts, the Windows Update Troubleshooter can automatically identify and fix the issues. It resets important update components, removes corrupt update files, and ensures necessary services are running, providing a clean environment for the update to proceed.
- Open the Start menu, type Troubleshoot, and press Enter.
Open Troubleshoot - In the Troubleshoot window, select Windows Update under the Troubleshoot menu, then click Run the troubleshooter.

Run the troubleshooter - The troubleshooter will diagnose Windows Update issues. Wait for it to complete.
- If errors are detected, you’ll be prompted to fix them. Click Apply repairs automatically to address any problems.
4. Install the Most Recent KB Update
Keeping your system updated with the latest KB updates ensures it works well with new patches and features. Installing the newest KB update fixes missing requirements and known problems, making future updates install smoothly.
- Visit this webpage to view the latest Windows 10 updates.
- Identify the most recent Windows 10 KB update, typically listed at the top left. Note the KB number.
- Go to the Microsoft Update Catalog by clicking here, enter the KB number in the search box, then download and install the update.
5. Run DISM and SFC Scans
Corrupted system files can prevent updates from installing correctly. Running DISM and SFC scans helps find and fix these files, ensuring the system is ready for the update. DISM repairs the Windows image, while SFC checks and fixes system files to solve installation problems effectively.
- Open the Start Menu, type CMD, and press Shift + Ctrl + Enter to launch the command prompt with admin rights. Click Yes for UAC prompts.
- In the command prompt, type DISM.exe /Online /Cleanup-Image /RestoreHealth and press Enter.

DISM Command - After DISM completes, initiate the SFC scan by typing sfc /scannow and pressing Enter.

Run sfc /scannow - When the SFC scan is done, restart Windows and try updating again.
6. Change the System Locale to English
Changing the system locale to English makes sure the language and regional settings match what the software needs. This prevents the system from misreading data or files, helping to fix compatibility issues with apps or updates that need specific language settings. This makes it easier for updates to work properly.
- Open the Start menu, type Control Panel, and click to open it.
Open the Control Panel - Go to the Region section.
- In the Region dialog, under the Formats tab, set the format to English (United States).

Select the Format as English - Click the Administrative tab, then Change system locale, and select English (United States). Try updating afterwards.

Set the System Locale as English
7. Use System Restore to Go Back to a Previous Version
Using System Restore to roll your system back can fix issues caused by incompatible updates or incorrect settings. This method returns your system files and settings to a previous working state, removing problematic updates while keeping your personal files intact.
- Click Start, type Restore, and select Create a restore point.
Run Create a Restore Point - In the System Protection tab, click System Restore, then Next.

Click on System Restore - Select the most recent restore point and hit Next.

Select a Recent Restore Point - After restoration, attempt to update your PC.
8. Upgrade Windows Through the Media Creation Tool
Sometimes, updates fail because of missing requirements or system problems. Using the Media Creation Tool to upgrade Windows fixes this by doing a full version update, replacing old parts, and ensuring everything works with the newest features and fixes.
- Download and run the Media Creation Tool as an administrator from here.
- Select Upgrade this PC now and follow the instructions.
- On the Ready to install screen, choose Keep personal files and click Next.
- The tool will download and install updates automatically.
Kevin Arrows
Kevin Arrows is a highly experienced and knowledgeable technology specialist with over a decade of industry experience. He holds a Microsoft Certified Technology Specialist (MCTS) certification and has a deep passion for staying up-to-date on the latest tech developments. Kevin has written extensively on a wide range of tech-related topics, showcasing his expertise and knowledge in areas such as software development, cybersecurity, and cloud computing. His contributions to the tech field have been widely recognized and respected by his peers, and he is highly regarded for his ability to explain complex technical concepts in a clear and concise manner.
Many a time when you try installing, updating or upgrading Windows 11/10, it simply says that The update is not applicable to your computer. That’s strange right because it was Windows that downloaded them in the first place. In this post, first, you need to take understand the reason behind it and then follow the suggested fix. This post is sure to resolve the issue for you.
The scenario is that, when you try to install Windows 11/10, using Windows Update Standalone Installer, you might receive this error message. This error might mean that your computer doesn’t have the required updates installed. The reasons could be many!
- The update is superseded: Sometimes, there is a newer version of Windows already available on the PC, and Windows, or maybe the version you are trying to install manually, is an older version. This is why it fails.
- The update is already installed: Sometimes while the update process is in progress, the earlier payload might have already installed the same update that the next payload has.
- Wrong update for architecture: 32 Bit or 64 Bit or maybe an ARM. Updates are designed according to PC architecture, and if the update you are trying to install does not match the architecture for your CPU, you may encounter this error message.
- Missing prerequisite update: Some updates depend on other updates. If that’s the case, any missing prerequisite will make other updates fail.
Here are a few things you should try to fix the issue.
1] Verify the Package
Updates are according to versions of Windows. If one of the updates are failing to install, you need to find out if it’s applicable. The best way is to search with the Windows Update name, on the official Windows website or search for it.
2] Check if it’s for your Processor Architecture
You need to make sure the update is for your system. If you have an X86-based processor, you cannot install x64-based installations of Windows and vice-versa. This usually happens when you have manually downloaded the update and tried installing it.
3] Check if the update is old
In case you are installing an older version of the same update, it will not work. Go to Settings > Update and Security > View Update history. Here you can search for the update.
4] Check if the update is already installed
Visit the Windows Update history again, and see if the update is already installed on your PC.
5] Check for prerequisites
Some updates depend on other updates which should be installed on your PC. The best way to figure it out is by checking on Microsoft Knowledge Base (KB). To determine if the prerequisite updates are installed, run the following PowerShell command:
get-hotfix KB1111111,KB2222222,KB3333333
Here we have mentioned ‘KB1111111, KB2222222, KB3333333’ randomly – you need to replace them with the actual Update KB numbers.
If the updates were already in place, the command would return the installed date in the “Installed on” section of the output.
6] Run Windows Update Troubleshooter
Run this inbuilt Windows Update Troubleshooter to fix the most common Update problems on Windows 11/10.
7] Run Microsoft’s online troubleshooter
You can also fix Windows Update Errors using Microsoft’s online troubleshooter. It will scan your PC for issues, and fix the problems.
8] Language issue
This issue can also occur if you have a different language version than the Windows-supported ones. What you can do is you can download the Windows 11/10 ISO and upgrade your Windows version. Here is the kicker – by doing so you’ll lose all the applications. According to the Windows FAQ, if you install Windows in a language that’s different from the language currently on your PC, you can only keep your files, not your apps or settings. Then if you’re running Windows OS and have installed a language pack or a language interface pack (LIP), then they’ll be removed when you install the later Windows OS version.
Now how do you get your language back?
Press Win + X and select Windows PowerShell (Admin)
Type dism /online /get-intl and hit Enter.
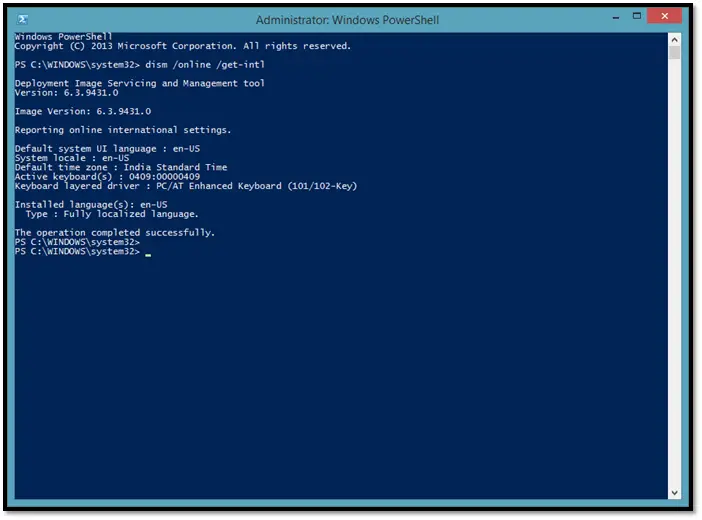
This should get you the language pack installed on your operating system. So this will be a good step to try to check if your machine is now compatible.
The other scenario is if you’re running Windows Enterprise. Then you’ll need to download the ISO image. I have to stress this point again you cannot upgrade or keep your Windows settings, personal files, or applications if you are performing a cross-language installation. You can only keep your files during a cross-language installation using Windows Setup.
9] Manually apply the Windows Update file
Another option is to manually apply the Windows update file.
Download the required Windows Update package by clicking on “Get the update.”
Then create a folder under C drive called – say – Win8. Then move the downloaded file there. Next, open a command prompt as administrator and type in
Expand -F:* C:\Win8\Windows8-RT-KB2849636-x64.msu C:\Win8\
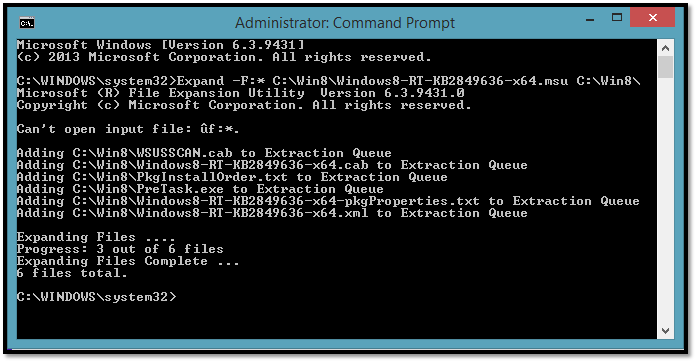
Now open a command prompt as administrator and type in
DISM.exe /Online /Add-Package /PackagePath:C:\Win8\Windows8-RT-KB2849636-x64.cab
The name of the folder and package is indicative and you have to use yours there.
Reboot your system, and you should be getting the notification to download Windows. If that does not work, then try to change the Language pack from Control Panel.
Open language Settings and click on Add a Language and download and install “English (United States)” and then set it as primary. Now it should work.
If the above does not work, then I’m afraid you need to do a clean install.
I hope you find this article helpful.