
Все способы:
- Способ 1: Сброс настроек в твикерах
- Способ 2: Проверка политики автообновления
- Способ 3: Проверка службы обновления
- Способ 4: Проверка реестра
- Способ 5: Откат к точке восстановления
- Вопросы и ответы: 6
Причиной появления этого сообщения является изменение некоторых настроек Windows 10, в частности, связанных с обновлениями и безопасностью. Причем изменения эти могли быть внесены как непосредственно администратором, так и с помощью специальных программ-твикеров.
Способ 1: Сброс настроек в твикерах
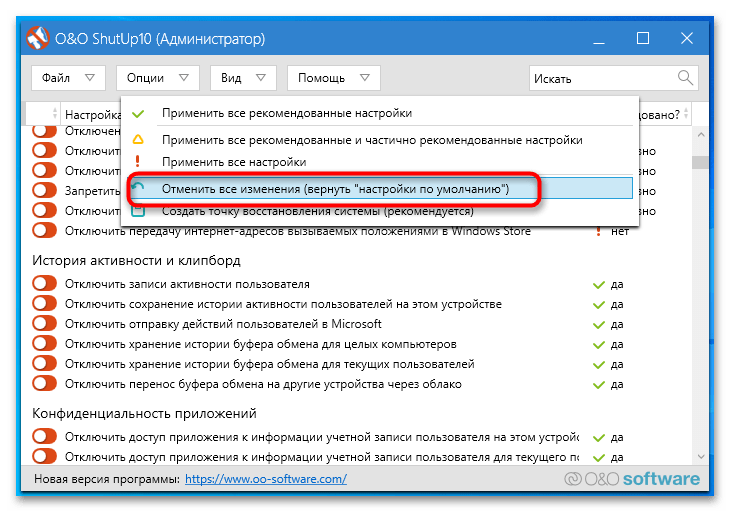
В Windows 10 программы-твикеры обычно применяются для тонкой настройки операционной системы, а также для отключения следящих функций. Пользоваться такими инструментами нужно с осторожностью, в противном случае можно нарушить работу компонентов системы. Если вы использовали подобные утилиты, восстановите измененные ими настройки — благо, большинство твикеров позволяют отменять изменения. Например, в популярном твикере OOSU10 для этого нужно выбрать опцию «Отменить все изменения» на одноименной вкладке.
Способ 2: Проверка политики автообновления
Уведомление «Ваша организация отключила автоматические обновления» появится, если пользователь или администратор отключил автоматическое обновление системы в локальных групповых политиках.
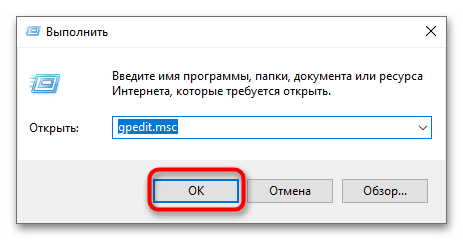
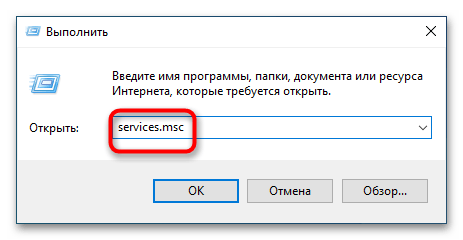
- Откройте нажатием Win + R окошко быстрого выполнения команд, введите в него команду
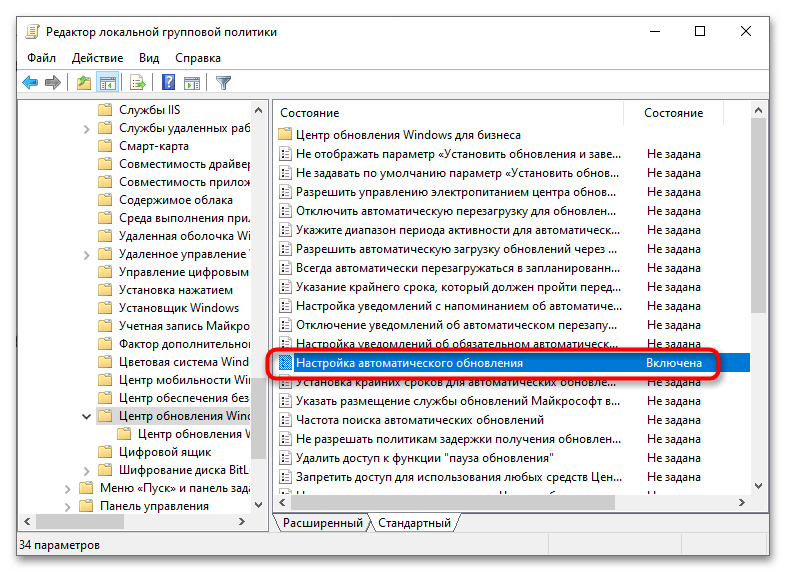
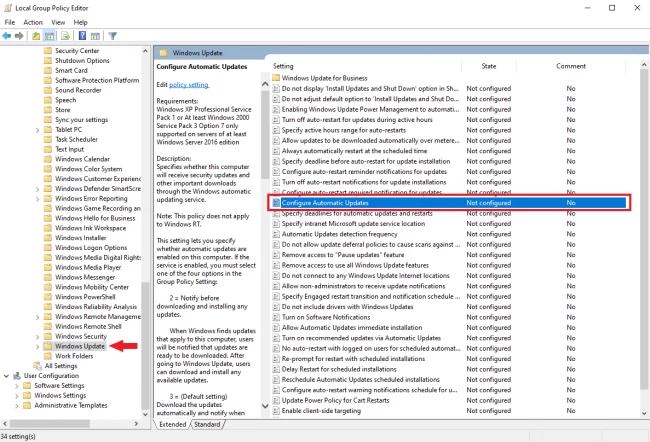
gpedit.mscи нажмите клавишу ввода. - Запустится «Редактор локальных групповых политик». Перейдите в нем по цепочке «Конфигурация компьютера» → «Административные шаблоны» → «Компоненты Windows» → «Центр обновления Windows» и отыщите в правой колонке политику «Настройка автоматического обновления».
- Если политика имеет статус «Включена», откройте двойным кликом ее свойства и выставьте для нее значение «Не задана» или «Отключена».
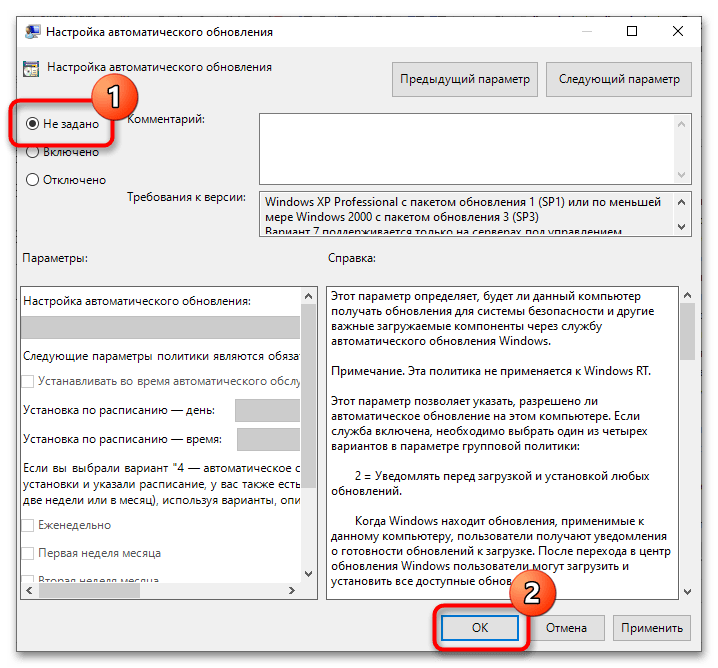
Сохраните настройки и перезагрузите компьютер.
Способ 3: Проверка службы обновления
Проверьте состояние службы, отвечающей за получение обновлений Windows. Она должна быть активной.
- Откройте оснастку управления службами, для чего в диалоговом окошке Win + R выполните команду
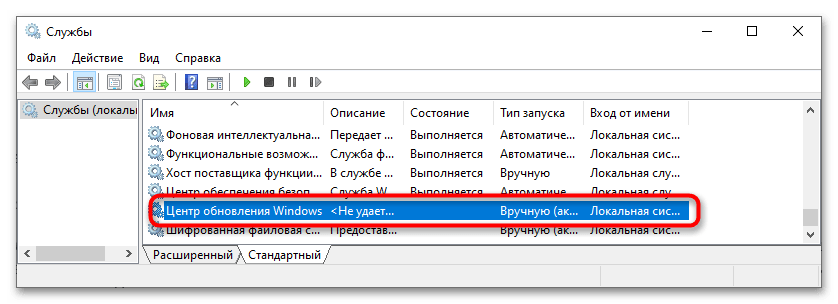
services.msc. - Отыщите в списке служб службу «Центр обновления Windows» и убедитесь, что она выполняется и имеет тип запуска «Автоматически» или «Вручную».
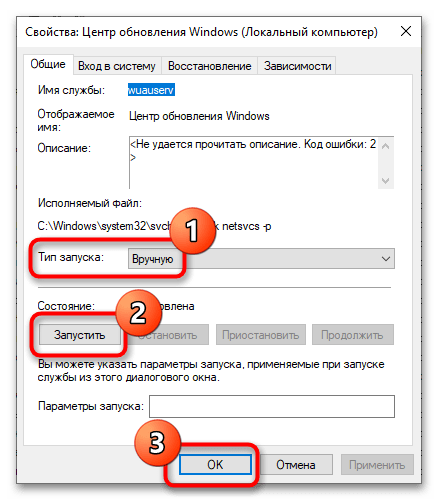
- В противном случае откройте «Свойства» службы двойным кликом и попробуйте ее запустить нажатием одноименной кнопки, изменив тип запуска на «Автоматически» или «Вручную».
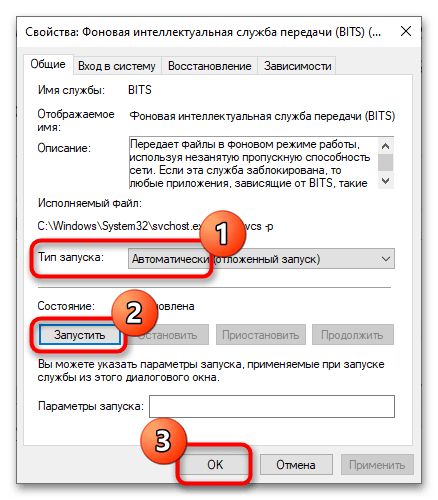
- Аналогичным образом найдите в списке службу «Фоновая интеллектуальная служба передачи (BITS)» и запустите ее, если не запущена. Тип запуска этой службы выставьте «Автоматически».
Способ 4: Проверка реестра
Для отключения автоматического обновления администраторы нередко применяют твик реестра. Проверьте указанный ниже ключ на предмет внесенных в него изменений.
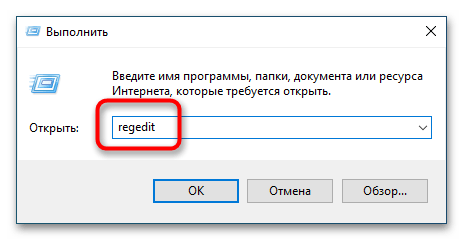
- Откройте «Редактор реестра» командой
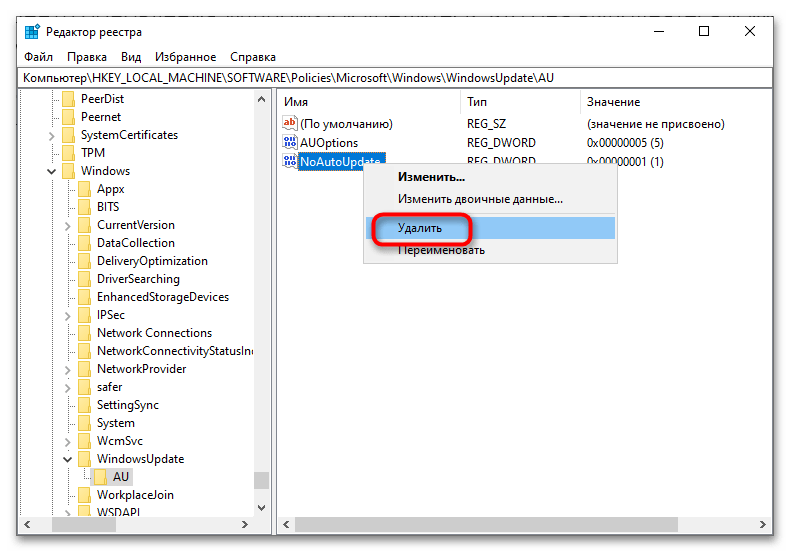
regeditв диалоговом окошке «Выполнить», вызванном нажатием комбинации клавиш Win + R. - Разверните в левой колонке ключ
HKLM\SOFTWARE\Policies\Microsoft\Windows\WindowsUpdate\AUи удалите из последнего подраздела все параметры. Это восстановит настройки обновления по умолчанию. - Перезагрузите компьютер.
Способ 5: Откат к точке восстановления
Если вы не нашли подходящего решения, выполните откат Windows 10 к ближайшей точке восстановления. Эта операция восстанавливает некоторые системные файлы и реестр, а вместе с ним и измененные настройки, которые могли привести к появлению уведомления «Ваша организация отключила автоматические обновления».
Подробнее: Откат к точке восстановления в Windows 10
Наша группа в TelegramПолезные советы и помощь
17 Dec, 22
by Oliver K
5 min Read
List of content you will read in this article:
- 1. What is Group policy?
- 2. Disable Windows Update From Group Policy [GPO Windows Update Setting]
- 3. How to Limit Windows Updates from Group Policy
- 4. Conclusion
As we all know, Windows update is an essential feature of Microsoft to ensure that Windows services stay up to date. Windows update generally includes files to update drivers, services, security, feature improvements, and other upgrades. We don’t recommend you disable these updates because they help maintain your system according to the latest upgrades. This article will explain windows update group policy settings and how to disable windows update group policy.
What is Group policy?
Group policy management is one more feature of Windows that offers the convenience of controlling multiple accounts in Windows and changing the advanced settings which are not accessible through the Windows Settings app. If you are annoyed with regular updates and want a permanent solution, you can use a group policy to disable the Windows update feature. So in this particular guide, we will give you brief details on disabling the Windows update from group policy.
Disable Windows Update From Group Policy [GPO Windows Update Setting]
The feature of the group policy editor in Windows 10 Pro offers multiple options to disable automatic updates permanently. Users can also change different Windows Update policies to decide when all updates should be installed on the system.
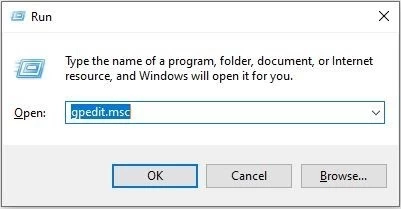
- First, open the start menu, search for gpedit.msc and open the Local Group Policy Editor or press Windows and R keys to open the Run utility.
- In the Run utility, type gpedit.msc and press Enter button to open Local Group Policy Editor.
- In the new window, go to the following:
Computer Configuration > Administrative Templates > Windows Components > Windows Update

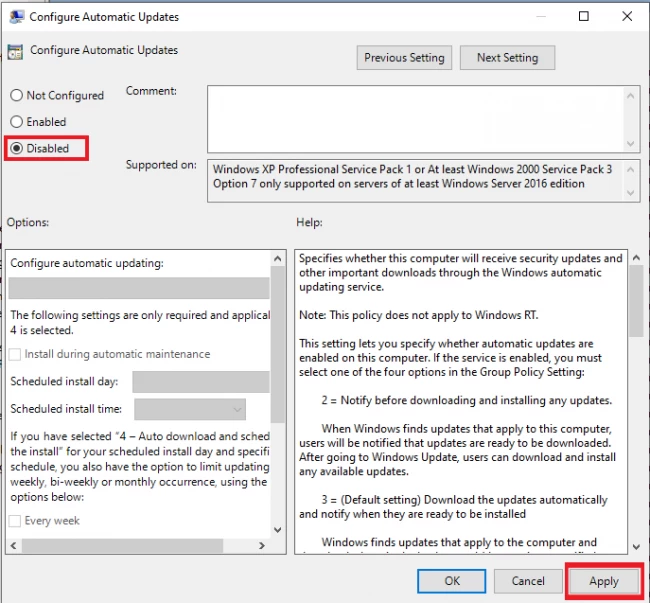
- Double-click the Configure Automatic Updates policy and turn on the disable option to disable the automatic update feature permanently.
- After that, click on the Apply and OK button to save changes.
- Once you save these changes, your system will not download the updates automatically, but you can manually check for updates from Settings.
- If you want to manually check the updates, open the Settings app and go to the Update & Security option, then Windows Update.
In the Windows Update option, click on the check for an update for downloading the latest update.
How to Limit Windows Updates from Group Policy
If you don’t want to permanently disable the Windows Update from the system, then you can limit the update. In other words, you can easily customize the policy to download the updates according to your requirements.
- To do it, open the Group Policy Editor again by searching it in the Start Menu or Run utility.
- Once you open it, go to the following file:
Computer Configuration > Administrative Templates > Windows Components > Windows Update
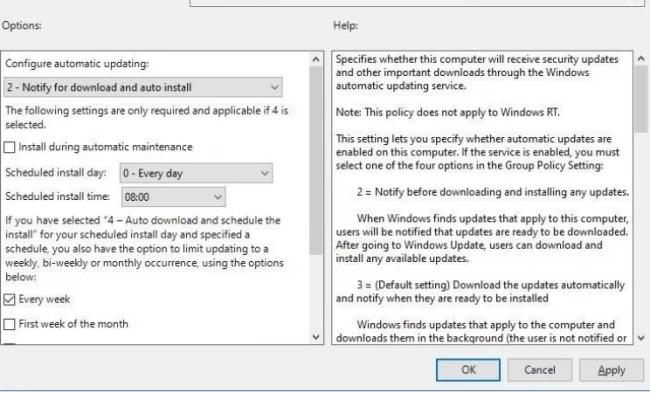
- Double-click on the Configure Automatic Updates policy and click on Enable to start the policy again.
- You will see a «Options» section in this window, so you can change these settings to download the update according to your requirements.
2 — Notify for download and auto-install
It will notify you about the latest update whenever it is available for the system.
3 — Auto download and notify for install
The system auto downloads and notify you about the installation
4 — Auto download and schedule the installation.
The system auto downloads and schedule the installation
5 — Allow the local admin to choose the setting.
It will allow a local admin to select the settings for Windows update
7 — Auto-Download, Notify to install, Notify to Restart.
The system will automatically download and notify you about installing and restarting the computer/laptop.
After successfully changing the settings, click the Apply then OK button to save changes.
After saving the changes, the Windows update will not download automatically. Still, you can install the new updates once your system receives any new patch, but you need to download it manually from the Windows update settings.
Conclusion
That’s it, and now you can easily change the Windows update setting from the Group policy and set it according to the requirements. We hope that our information will help you as we have divided the procedures into simple steps for easy understanding. Remember you need to follow all of the steps to get desired results otherwise, you will face errors while installing the updates for the system. If you are using windows 10, you can also disable automatic updates on windows 10. All these configurations can be done on Windows VPS Server & Dedicated Server.
People are also reading:
- How to Disable Automatic Updates in Windows 10
- Managing Windows services with PowerShell
- How to Repair Windows with DISM command?
- Configure Windows 10 Update Through Registry
Содержание
- Данная установка запрещена политикой, заданной системным администратором
- Ответ
- Временное отключение UAC
- Служба Windows Installer
- Групповая политика отключения установщика Windows
- Ключ реестра DisableMSI
- question
- 5 Answers
- question
- This install is prevented by policy. Ask your admin to enable Windows Update. Microsoft store Windows 10 Enterprise 1903
- 2 Answers
- This install is prevented by policy ask your admin to enable windows update
- Вопрос
- Ответы
- Все ответы
- Fix: The System Administrator Has Set Policies to Prevent This Installation
- Solution 1: Simply Try Running the Setup File as an Administrator
- Solution 2: A Simple Registry Fix
- Solution 3: Turn of User Account Control (UAC) and Try Installing Your Program
- Solution 4: Use the Hidden Administrator Account
- Solution 5: Use the Group Policy Editor
Данная установка запрещена политикой, заданной системным администратором
При попытке установить программу из MSI пакета на рабочей станции (права администратора имеются) возникает ошибка «Данная установка запрещена политикой, заданной системным администратором». Проверили – ни какой другой MSI файл также не запускается. Что делать?

Ответ
Сообщение «Данная установка запрещена политикой, заданной системным администратором» (The system administrator has set policies to prevent this installation) может появляться как во время запуска exe файлов, так и при установке MSI пакетов. Даже, если ограничения не настраивались специально, в некоторых случаях Windows или какая-т другая программа могла самостоятельно изменить параметры политики Software Restriction Policies (SRP). Вот что можно предпринять в таком случае:
Временное отключение UAC
Возможной причиной проблемы с установкой приложения может быть политики UAC. Попробуйте установить приложение при отключенном UAC (напомню, что отключение UAC это не рекомендуемый шаг, и после тестирования его нужно включить обратно).
Если это не помогло избавиться от уведомления, то попробуйте отключить политику блокировки, блокирующего выполнение MSI пакетов установщиком Windows через редактор локальной групповой политики или реестр.
Служба Windows Installer
Откройте консоль управления службами (services.msc) и убедитесь, что служба Windows Installer (Установщик Windows) присутствует в системе и запущена (если нет, запустите службу).
Откройте командную строку и выполните gpupdate /force.
Ключ реестра DisableMSI
Если вы используете операционную систему Windows редакции Home, то редактор локальной групповой политики в ней не будет доступен. Внести все необходимые изменения можно через реестр. Для этого:
После проделанных действий обязательно перезагрузите компьютер и запустите установку нужной программы. Ошибка больше не будет появляться.
Если решить проблему не получилось, попробуйте создать новую папку внутри Program Files или Windows, скопировать в нее дистрибутив и запустите его с правами администратора.
Источник
question
I have a problem in our domain with Microsoft Store. When we’re trying to install anything, it gives the following error message:
This install is prevented by policy. Ask your admin to enable Windows Update. Code: 0x8024500C
In the domain we’re using a central system to install updates (like WSUS), but we have an OU in our AD, where WSUS is disabled with these group policy settings:
Computer Configuration > Policies > Administrative Templates > Windows Components > Windows Updates:
Do not connect to any Windows Update Internet locations: Disabled
Specify intranet Microsoft update service location: Disabled
With these settings, Windows Update works, I can download and install Windows updates manually, if the computer account is in this OU, but Microsoft Store still gives the above error message.
It happens on every Windows 10 computers, with all versions we have from 1809 to 20H2.
Are there any other group policy settings which are disabling Microsoft Store, even if Windows Update is enabled?
Thank you in advance,
Hi,
Welcome to share your current situation if there are any updates.
Please feel free to let us know if you need further assistance.
5 Answers
I would ask the experts at the dedicated Microsoft Store for Windows 10 forum over here:
https://answers.microsoft.com/en-us/windows/forum/windows_10-windows_store
(If the reply was helpful please don’t forget to upvote or accept as answer, thank you)
Thank you for your answer! I’ve already posted this question on the Community Site, but there I was suggested to raise the question here, as it’s connected with WSUS and AD group policy settings.
Hi,
If you want to check the group policies, i would recommend you run command with administrator: gpresult /h report.html.
All the policies for the users you logged on and the computer will be listed in the result.
Check if any settings related to the update.
Best Regards,
Quest for OP, were you able to get to resolution on this question.
We also have GPO to prevent users from download updates from MS, but this blocks App Installs from MS Store. How did you workaround this issue?
Hi,
Unfortunately no, it’s still not working on our domain computers.
At my company we are using both WSUS/SCCM and Windows Update For Business to patch our systems. Intermittently, some clients on WSUS/SCCM were reporting this error in the Store. And I struggled with this issue for some time. My solution (workaround) was to temporarily switch the affected computers from using WSUS to using regular Windows Update / Windows Update For Business. The moment I did that, Windows updates and Store updates and apps started installing. Made sure that everything was up to date and then I switched the PC’s back to using WSUS/SCCM and everything was still ok. It’s like the Store was not able to reach Microsoft or something like that, which you would normally point to a proxy or firewall issue. But maybe it was just not reading the GPO settings correctly.. Guess I’ll never find out.
Hi,
Unfortunately it does not work. This was my first idea too, and I’ve created a GPO where Windows Update is enabled. On the computers in this OU Windows Update works fine, but Store still does not.
For our case both Windows Update and the Store were not working when this happened. Recently we fixed other computers using this method. Don’t have any other ideas though for your case.. :/
adrianr-0135, your solution, «My solution (workaround) was to temporarily switch the affected computers from using WSUS to using regular Windows Update / Windows Update For Business». Could you tell me how you did this? Through putting the device in a new GPO, or turned it off on the local machine?
Источник
question
This install is prevented by policy. Ask your admin to enable Windows Update. Microsoft store Windows 10 Enterprise 1903
When i try to install any app from Microsoft store on my Window s10 1903 Enterprise i get this error :
This install is prevented by policy. Ask your admin to enable Windows Update.
Hey i found a setting that allowed me to fix the problem
Do Windowskey-R then type gpedit.msc and then ok
go to computer Configuration > Administrative Templates > Windows Components > Windows Update >
then there should be an option thats ON saying: «do not connect to windows udate internet locations»
when you turn this OFF it should fix the Update issue and start downloading in the store
It works, thank you bro
2 Answers
You could try to do the following steps:
Select Windows Store Apps and run the troubleshooter.
If you enable the following group policy setting you will end up with the error.
The above should be set to Not Configured
This policy shows up in the registry under the following key.
Deleting the DoNotConnectToWindowsUpdateInternetLocations in the registry does not resolve the issue but changing it in group policy may helps.
You could try the method above.
Microsoft should review how this is working because this gpo setting is also used to prevent the users from using the «Check online for updates from Microsoft Update» in Windows Update.
So basically, if you allow the Store to download apps, you allow the user to bypass WSUS/SCCM patching because this gpo is the only way to hide the feature. in Windows Update..
Источник
This install is prevented by policy ask your admin to enable windows update
Вопрос
I have users that are getting the following message when try to do the actual install of a Windows Store app. They can browse fine, just not install. I cannot for the life of me figure out which particular GPO that is causing the issue.
Ответы
I found the culprit.
Computer Configuration > Policies > Administrative Templates > Windows Components > Windows Update Do not connect to any Windows Update Internet locations
Somehow this was set to enabled on these particular devices, even though the setting is not set in GPO anywhere.
Все ответы
I found the culprit.
Computer Configuration > Policies > Administrative Templates > Windows Components > Windows Update Do not connect to any Windows Update Internet locations
Somehow this was set to enabled on these particular devices, even though the setting is not set in GPO anywhere.
We could control Windows Update settings by using Group Policy.
You can find policy under Computer Configuration > Policies > Administrative Templates > Windows Components > Windows Update.
For this issue, it is related to the setting below:
The above should be set to Not Configured
This policy shows up in the registry under the following key.
Glad to hear that you have found a solution and thank you for sharing it here, it will be helpful to other community members who have same questions.
Источник
Fix: The System Administrator Has Set Policies to Prevent This Installation
Installing a program shouldn’t be a difficult thing to follow through but sometimes it’s been made impossible by errors similar to this one. This particular error occurs when the users is trying to install a program on their PC and the message goes like:
The System Administrator Has Set Policies to Prevent This Installation
Sometimes there is an error code displayed as well which should help users research the cause of this error. The error is not a dangerous one and it can be fixed by implementing some of the methods which you can see below. The methods are quite easy to follow through so make sure you try out each one.
Solution 1: Simply Try Running the Setup File as an Administrator
This fix is definitely the simplest one and the reason why it’s included is because it has definitely worked in several occasions. So, before trying the more complicated fixes, make sure that you have tried this one out and saved yourself a couple of hours.

Solution 2: A Simple Registry Fix
The first method on our list has been declared as quite a successful one so that is the reason why you should first try this one out. The method includes editing the registry which can be somewhat dangerous if you are not sure what you are doing or if you accidentally edit the wrong key.
Follow the instructions displayed in this article in order to safely backup your registry so that you can fix the potential damage if it occurs.
Solution 3: Turn of User Account Control (UAC) and Try Installing Your Program
Since Windows can sometimes overreact with their security warnings and messages, you can turn them off for a short period of time needed for you to install the program you are struggling with. You should undo these changes as soon as you are done with the process since the last thing you want to do is leave your computer unprotected.


Solution 4: Use the Hidden Administrator Account
Even though you are probably the administrator on your PC, this error message might implicate that you are not actually the real admin. This is a bug and it can be fixed for the particular program if you use the “hidden” administrator account which can be unlocked by several commands in Command Prompt.
net user administrator /active:yes
net user administrator /active:no
Solution 5: Use the Group Policy Editor
This error is explained in a way which tells us there may be something wrong with the Local Security Policy and it needs to be edited. You can safely edit these settings by following the instructions below and navigating to the settings which needs to be changed.

Источник
We all know that Windows Update is important to ensure safety of our Windows 10 system. It is often recommended to install the latest updates available to you. But if you’re not able to install updates or even access the Windows Update section, then this post is for you. You might get Windows Update is disabled message in such a case, as shown in the screenshot. The error code is 0x80070422.
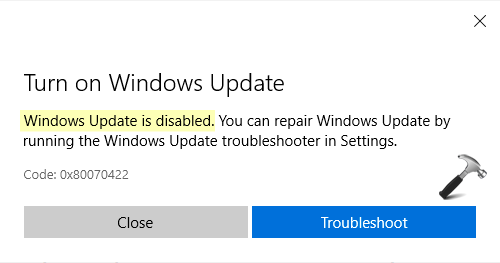
Recently one of my reader contacted me and asked about this issue. He tried to access Microsoft Store but couldn’t because of this error. Moreover, when he goes to Windows Update section under Settings app, then nothing is loaded. Running the Windows Update troubleshooter resolve the issue but it is back after sometime. I suggested him some of the recommendations mentioned below and that helped to resolve the problem. So in case if you’re also facing this issue, here is how you can fix it.
Page Contents
Fix: Windows Update Is Disabled In Windows 10
FIX 1 – Start Windows Update Related Services
Open Services snap-in by running services.msc command.
In Services window, locate following services and make sure they are Running.
- Cryptographic Services
- Windows Update
- Windows Update Medic Service
- Background Intelligent Transfer Service
- Remote Procedure Call
- RPC Endpoint Mapper
- DCOM Server Process Launcher
Once all of the above services are running, the issue will be automatically sorted.
Check FIX 2 mentioned next, if you continue to face the problem.
FIX 2 – Using Group Policy
NOTE: Group Policy is not available in Windows 10 Home.
1. Open GPO Editor by running gpedit.msc command.
2. In the GPO Editor window, navigate here: User Configuration > Administrative Templates > Windows Components > Windows Update
3. In the right pane, locate and double-click on Remove access to use all Windows Update Features policy setting.
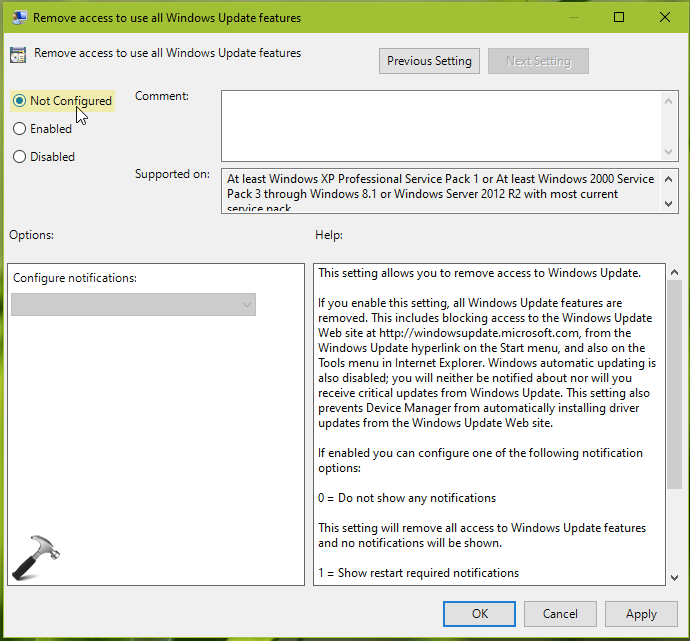
4. Set the policy setting to Not configured. Click Apply followed by OK.
5. Close GPO Editor window and update GP engine by running gpupdate /force command.
Now check Windows Update and you will find that issue is no longer appearing.
That’s it!
RELATED ARTICLES
Applies ToWindows Update Microsoft Update Microsoft Windows XP Professional
Symptoms
For computers that are running Microsoft Windows XP
You may experience one or more of the following symptoms:
-
When you access the Windows Update Web site or the Microsoft Update Web site, you receive an error message that is similar to the following:
Access DeniedNetwork policy settings prevent you from using Windows Update to download and install updates on your computer. If you believe you have received this message in error, please check with your system administrator.
-
When you click Windows Update or Microsoft Update on the Start menu, you receive an error message that is similar to the following:
Windows Update was disabled by your system administrator.
-
The Windows Update shortcut or Microsoft Update shortcut is missing on the Start menu.
-
The Windows Update shortcut or Microsoft Update shortcut is missing on the Tools menu in Microsoft Internet Explorer.
-
The Automatic Updates tab is missing in the System Properties dialog box.
-
After you configure Automatic Updates, you are not notified about critical updates. Additionally, you do not receive critical updates from Windows Update or from Microsoft Update.
-
Device Manager does not automatically install driver updates from Windows Update or from Microsoft Update.
-
When you click the Automatic Updates Control Panel tool, the Automatic Updates settings are unavailable. You receive a message that is similar to the following:
The Windows Update Service is unavailable.
Cause
This issue occurs if Windows Update is turned off by one of the following settings:
-
Group Policy
-
System policy
-
Registry
Resolution
For corporate users who are connected to a corporate network
To resolve this issue, contact the local system administrator to determine whether Windows Update access is disabled by Group Policy settings.
For home users who are not connected to a corporate network
To restore the missing Windows Update shortcut or Microsoft Update shortcut on a computer that is running Windows XP, follow these steps:
-
Log on to the computer as a local administrator.
-
Click Start, click Run, type gpedit.msc, and then click OK.
-
In the left pane, expand User Configuration, expand Administrative Templates, and then click Start Menu and Taskbar.
-
In the right pane, right-click Remove links and access to Windows Update, and then click Properties.
-
Click Disabled, click Apply, and then click OK.
To enable access to the Windows Update Web site, follow these steps:
-
Log on to the computer as a local administrator.
-
Click Start, click Run, type gpedit.msc, and then click OK.
-
In the left pane, expand User Configuration, and then expand Administrative Templates.
-
Expand Windows Components, and then click Windows Update.
-
In the right pane, right-click Remove access to use all Windows Update Features, and then click Properties.
-
Click Disabled, click Apply, and then click OK.
More Information
Windows XP Professional supports the Remove links and access to Windows Update Group Policy setting. On other Windows operating systems, you can use System policies, or you can modify the registry.
An administrator can use these policies to remove access to Windows Update and to Microsoft Update for individual users, for domain users, or for Active Directory objects.
For more information about how to troubleshoot Windows Update issues and Microsoft Update issues, click the following article number to view the article in the Microsoft Knowledge Base:
316524 You receive an «Administrators only» error message when you try to visit the Windows Update Web site or the Microsoft Update Web site
Need more help?
Want more options?
Explore subscription benefits, browse training courses, learn how to secure your device, and more.
What is WU_E_USER_ACCESS_DISABLED?
WU_E_USER_ACCESS_DISABLED is a kind of Windows Update error that is found in the Microsoft Windows operating systems. The file can be found for Windows Operating System. 0x80240025 has a popularity rating of 1 / 10.
Errors
This tutorial contains information on WU_E_USER_ACCESS_DISABLED or otherwise known as 0x80240025. Errors such as 0x80240025 indicate your machine has faulty hardware or software that should be fixed when possible. Below is information on how to repair WU_E_USER_ACCESS_DISABLED and get your computer back to normal.
Signs of WU_E_USER_ACCESS_DISABLED:
- When your computer freezes or locks up at random.
- When your computer crashes when you are running Windows Operating System.
- If 0x80240025 pops up and causes a program to shutdown or your computer to crash.
- Your computer is running slow, taking a long time to boot up, and you suspect WU_E_USER_ACCESS_DISABLED by Windows Operating System is the cause.
What Causes Windows Update Errors Like WU_E_USER_ACCESS_DISABLED?
There are many reasons for an update to fail to result in Windows Update Errors like WU_E_USER_ACCESS_DISABLED. These include compatibility issues, drive space issues, bugs, viruses, outdated drivers, poor or incomplete installation of Windows Operating System.
Sometimes, the configurations can also oppose the installation of an update or there might be an antivirus program blocking the update. The error code can help you find out the reason behind the error.
How to Fix 0x80240025
Follow the step by step instructions below to fix the WU_E_USER_ACCESS_DISABLED problem. We recommend you do each in order. If you wish to skip these steps because they are too time consuming or you are not a computer expert, see our easier solution below.
Step 1 — Uninstall and Reinstall Windows Operating System
If the 0x80240025 is a result of using Windows Operating System, you may want to try reinstalling it and see if the problem is fixed. Please follow these steps:
Windows XP
- Click “Start Menu”.
- Click “Control Panel”.
- Select the “Add or Remove” program icon.
- Find the WU_E_USER_ACCESS_DISABLED associated program.
- Click the Change/Remove button on the right side.
- The uninstaller pop up will give you instructions. Click “okay” or “next” or “yes” until it is complete.
- Reinstall the software.
Windows 7 and Windows Vista
- Click “Start Menu”.
- Click “Control Panel”.
- Click “Uninstall a Program” which is under the “Programs” header.
- Find the WU_E_USER_ACCESS_DISABLED associated program.
- Right click on it and select “Uninstall”.
- The uninstaller pop up will give you instructions. Click “okay” or “next” or “yes” until it is complete.
- Reinstall the software and run the program.
Windows 8, 8.1, and 10
- Click “Start Menu”.
- Click “Programs and Features”.
- Find the software that is linked to **insert file name**.
- Click Uninstall/Change.
- The uninstaller will pop up and give you instructions. Click “okay” and “next” until it is complete.
- Restart your computer.
- Reinstall the software and run the program.
Step 2 — Remove Registry Entry related to WU_E_USER_ACCESS_DISABLED
WARNING: Do NOT edit the Windows Registry unless you absolutely know what you are doing. You may end up causing more trouble than you start with. Proceed at your OWN RISK.
- Create a backup of registry files.
- Click “Start”.
- Type regedit, select it, and grant permission in order to proceed.
- Click HKEY LOCAL MACHINE>>SOFTWARE>>Microsoft>>Windows>>Current Version>>Uninstall.
- Find the 0x80240025 software from the list you wish to uninstall.
- Select the software and double click the UninstallString icon on the right side.
- Copy the highlighted text.
- Exit and go to the search field.
- Paste the data.
- Select Okay in order to uninstall the program.
- Reinstall the software.
Step 3 – Ensure Junk Isn’t Causing 0x80240025
Any space that isn’t regularly cleaned out tends to accumulate junk. Your personal computer is no exception. Constant web browsing, installation of applications, and even browser thumbnail caches slow down your device and in the absence of adequate memory, can also trigger a 0x80240025 error.
So how do you get around this problem?
- You can either use the Disk Cleanup Tool that comes baked into your Windows operating system.
- Or you can use a more specialized hard drive clean up solution that does a thorough job and flushes the most stubborn temporary files from your system.
Both solutions may take several minutes to complete the processing of your system data if you haven’t conducted a clean up in a while.
The browser caches are almost a lost cause because they tend to fill up quite rapidly, thanks to our constantly connected and on the go lifestyle.
Here’s how you can run the Window’s Disk Cleanup Tool, without performance issues or surprises.
- For Windows XP and Windows 7, the program can be ran from “Start” and from the “Command Prompt”.
- Click “Start”, go to All Programs > Accessories > System Tools, click Disk Cleanup. Next choose the type of files you wish to remove, click OK, followed by “Delete Files”.
- Open up the Command Prompt, type “c:\windows\cleanmgr.exe /d” for XP and “cleanmgr” for Windows 7. Finish by pressing “Enter”.
- For Windows 8 and Windows 8.1, the Disk Cleanup Tool can be accessed directly from “Settings”. Click “Control Panel” and then “Administrative Tools”. You can select the drive that you want to run the clean up on. Select the files you want to get rid of and then click “OK” and “Delete Files”.
- For Windows 10, the process is simplified further. Type Disk Cleanup directly in the search bar and press “Enter”. Choose the drive and then the files that you wish to wipe. Click “OK”, followed by “Delete Files”.
The progressive ease with which the Cleanup Tool can be used points to the growing importance of regularly deleting temporary files and its place in preventing 0x80240025.
PRO TIP:
Remember to run the Disk Cleanup as an administrator.
Step 4 – Fix Infections and Eliminate Malware in Your PC
How do you gauge if your system is infected with a malware and virus?
Well, for one, you may find certain applications misbehaving.
And you may also see the occurrence of WU_E_USER_ACCESS_DISABLED.
Infections and malware are the result of:
- Browsing the Internet using open or unencrypted public Wi-Fi connections
- Downloading applications from unknown and untrustworthy sources
- Intentional planting of viruses in your home and office networks
But thankfully, their impact can be contained.
- Enter “safe mode” by pressing the F8 key repeatedly when your device is restarting. Choose “Safe Mode with Networking” from the Advanced Boot Options menu.
- Back up all the data in your device to a secure location. This is preferably a storage unit that is not connected to your existing network.
- Leave program files as is. They are where the infection generally spreads from and may have been compromised.
- Run a thorough full-system scan or check of an on-demand scanner. If you already have an antivirus or anti-malware program installed, let it do the heavy lifting.
- Restart your computer once the process has run its course.
- Lastly, change all your passwords and update your drivers and operating system.
PRO TIP: Are you annoyed by the frequent updates to your antivirus program? Don’t be! These regular updates add new virus signatures to your software database for exponentially better protection.
Step 5 – Return to the Past to Eliminate WU_E_USER_ACCESS_DISABLED
The steps outlined up until this point in the tutorial should have fixed 0x80240025 error. But the process of tracking what has caused an error is a series of educated guesses. So in case the situation persists, move to Step 5.
Windows devices give users the ability to travel back in time and restore system settings to an uncorrupted, error free state.
This can be done through the convenient “System Restore” program. The best part of the process is the fact that using System Restore doesn’t affect your personal data. There is no need to take backups of new songs and pictures in your hard drive.
- Open “Control Panel” and click on “System & Security”.
- Choose the option “System”.
- To the left of the modal, click on “System Protection”.
- The System Properties window should pop-up. You’ll be able to see the option “System Restore”. Click on it.
- Go with “Recommended restore” for the path of least hassles and surprises.
- Choose a system restore point (by date) that will guarantee taking your device back to the time when WU_E_USER_ACCESS_DISABLED hasn’t been triggered yet.
- Tap “Next” and wrap up by clicking “Finish”.
If you’re using Windows 7 OS, you can reach “System Restore” by following the path Start > All Programs > Accessories > System Tools.
Step 6 — WU_E_USER_ACCESS_DISABLED Caused by Outdated Drivers
Updating a driver is not as common as updating your operating system or an application used to run front-end interface tasks.
Drivers are software snippets in charge of the different hardware units that keep your device functional.
So when you detect an 0x80240025 error, updating your drivers may be a good bet. But it is time consuming and shouldn’t be viewed as a quick fix.
Here’s the step-by-step process you can go through to update drivers for Windows 8, Windows 8.1 and Windows 10.
- Check the site of your hardware maker for the latest versions of all the drivers you need. Download and extract them. We strongly advice going with original drivers. In most cases, they are available for free on the vendor website. Installing an incompatible driver causes more problems than it can ever fix.
- Open “Device Manager” from the Control Panel.
- Go through the various hardware component groupings and choose the ones you would like to update.
- On Windows 10 and Windows 8, right-click on the icon of the hardware you would like to update and click “Update Driver”.
- On Windows 7 and Vista, you right-click the hardware icon, choose “Properties”, navigate to the Driver panel, and then click “Update Driver”.
- Next you can let your device automatically search for the most compatible drivers, or you can choose to update the drivers from the versions you have on your hard drive. If you have an installer disk, then the latter should be your preferred course of action. The former may often get the driver selection incorrect.
- You may need to navigate a host of warnings from the Windows OS as you finalize the driver update. These include “Windows can’t verify that the driver is compatible” and “Windows can’t verify the publisher of this driver”. If you know that you have the right one in line, click “Yes”.
- Restart the system and hopefully the 0x80240025 error should have been fixed.
Step 7 – Call the Windows System File Checker into Action
By now the 0x80240025 plaguing your device should have been fixed. But if you haven’t resolved the issue yet, you can explore the Windows File Checker option.
With the Windows File Checker, you can audit all the system files your device needs to operate, locate missing ones, and restore them.
Sound familiar? It is almost like “System Restore”, but not quite. The System Restore essentially takes you back in time to a supposedly perfect set up of system files. The File Checker is more exhaustive.
It identifies what is amiss and fills the gaps.
- First and foremost, open up an elevated command prompt.
- Next, if you are using Windows 8, 8.1 or 10, enter “DISM.exe /Online /Cleanup-image /Restorehealth” into the window and press Enter.
- The process of running the Deployment Image Servicing and Management (DISM) tool may take several minutes.
- Once it completes, type the following command into the prompt “sfc /scannow”.
- Your device will now go through all protected files and if it detects an anomaly, it will replace the compromised version with a cached version that resides at %WinDir%\System32\dllcache.
Step 8 – Is your RAM Corrupted? Find Out.
Is it possible? Can the memory sticks of your device trigger WU_E_USER_ACCESS_DISABLED?
It is unlikely – because the RAM chips have no moving parts and consume little power. But at this stage, if all else has failed, diagnosing your RAM may be a good move.
You can use the Windows Memory Diagnostics Tool to get the job done. Users who are on a Linux or Mac and are experiencing crashes can use memtest86.
- Open up your device and go straight to the “Control Panel”.
- Click on “Administrative Tools”.
- Choose “Windows Memory Diagnostic”.
- What this built-in option does is it burns an ISO image of your RAM and boots the computer from this image.
- The process takes a while to complete. Once it is done, the “Status” field at the bottom of the screen populates with the result of the diagnosis. If there are no issues with your RAM/memory, you’ll see “No problems have been detected”.
One drawback of the Windows Memory Diagnostic tool pertains to the number of passes it runs and the RAM segments it checks.
Memtest86 methodically goes over all the segments of your memory – irrespective of whether it is occupied or not.
But the Windows alternative only checks the occupied memory segments and may be ineffective in gauging the cause of the 0x80240025 error.
Step 9 – Is your Hard Drive Corrupted? Find Out.
Your RAM or working memory isn’t the only culprit that may precipitate an 0x80240025 error. The hard drive of your device also warrants close inspection.
The symptoms of hard drive error and corruption span:
- Frequent crashes and the Blue Screen of Death (BSoD).
- Performance issues like excessively slow responses.
- Errors like WU_E_USER_ACCESS_DISABLED.
Hard drives are definitely robust, but they don’t last forever.
There are three things that you can do to diagnose the health of your permanent memory.
- It is possible that your device may have a hard time reading your drive. This can be the cause of an 0x80240025 error. You should eliminate this possibility by connecting your drive to another device and checking for the recurrence of the issue. If nothing happens, your drive health is okay.
- Collect S.M.A.R.T data by using the WMIC (Windows Management Instrumentation Command-line) in the command prompt. To do this, simply type “wmic” into the command prompt and press Enter. Next follow it up with “diskdrive get status”. The S.M.A.R.T status reading is a reliable indicator of the longevity of your drive.
- Fix what’s corrupt. Let’s assume you do find that all isn’t well with your hard drive. Before you invest in an expensive replacement, using Check Disk or chkdsk is worth a shot.
- Open the command prompt. Make sure you are in Admin mode.
- Type “chkdsk C: /F /X /R” and press “Enter”. “C” here is the drive letter and “R” recovers data, if possible, from the bad sectors.
- Allow the system to restart if the prompt shows up.
- And you should be done.
These steps can lead to the resolution you’re seeking. Otherwise the 0x80240025 may appear again. If it does, move to Step 10.
Step 10 – Update Windows OS
Like the software applications you use to render specific tasks on your device, the Operating System also requires periodic updates.
Yes, we’ve all heard the troubling stories.
Devices often develop problems post unfinished updates that do not go through. But these OS updates include important security patches. Not having them applied to your system leaves it vulnerable to viruses and malware.
And may also trigger WU_E_USER_ACCESS_DISABLED.
So here’s how Windows 7, Windows 8, Windows 8.1 and Windows 10 users can check for the latest updates and push them through:
- Click the “Start” button on the lower left-hand corner of your device.
- Type “Updates” in the search bar. There should be a “Windows Update” or “Check for Updates” option, based on the OS version you’re using.
- Click it. The system will let you know if any updates are available.
- You have the convenience of choosing the components of the update you’d like to push through. Always prioritize the security updates.
- Click “OK” followed by “Install Updates”.
Step 11 – Refresh the OS to Eliminate Persistent 0x80240025 Error
“Windows Refresh” is a lifesaver.
For those of you who are still with us and nothing has worked to eliminate the WU_E_USER_ACCESS_DISABLED, until recently, a fresh install of Windows would have been the only option.
Not anymore.
The Windows Refresh is similar to reinstalling your Windows OS, but without touching your personal data. That’s hours of backup time saved in a jiffy.
Through the Refresh, all your system files become good as new. The only minor annoyance is the fact that any custom apps you’ve installed are gone and the system applications you had uninstalled are back.
Still, it is the best bet as the final step of this process.
- Enter the “Settings” of your PC and click on “Change Settings”.
- Click “Update and recovery” and then choose “Recovery”.
- Select “Keep my files”. This removes apps and settings, but lets your personal files live on.
- You’ll get some warning messages about the apps that will be uninstalled. If you’ve gone through a recent OS upgrade, the Refresh process makes it so that you can’t go back to your previous OS version – if you should ever feel the need to do it.
- Click the “Refresh” button.
Are you using an older version of Windows that doesn’t come with the power to “Refresh”?
Maybe it is time to start from scratch.
- Enter your BIOS set-up.
- This is where you need to change your computer’s boot order. Make it so that the boot happens not from the existing system files, but from the CD/DVD Drive.
- Place the original Windows disk in the CD/DVD drive.
- Turn on or restart the device.
- Choose where you’d like the system files to be installed.
- Your PC will restart several times as the process runs its course.
FAQ’s
How to Fix Windows Update Errors like WU_E_USER_ACCESS_DISABLED?
You can solve Windows Update Errors like WU_E_USER_ACCESS_DISABLED on your own. Go to Settings> Update> Security. You can also directly search for Security based on the version of Windows that you have.
Run the Windows Update Troubleshooter to identify the problem and find a solution. However, this method only fixes minor issues. For major issues, one needs to comprehend the error code first.
Copy and paste the code into Google and find out what’s causing the issue. This works but can be time-consuming and frustrating.
In addition to this, you may also opt to restore Windows to a previous version. We suggest that you create a System Restore Point before you start the update so you can roll back to it in case things do not go well.
However, if even this doesn’t work, then try a computer repair software. It’s probably the easiest solution especially for folks who are not computer experts.
Do Windows Update Errors Mean I Have to Buy a New Computer?
No. Update errors occur due to small reasons. There may be an Internet connection problem, the update package file might be damaged, there might not be enough disk space issue or there might be a virus in your computer. You can solve the problem without needing to buy a new computer. However, if your computer is very old or the hardware is not good enough then buying a new computer may be a better option.
Can Windows Update Errors Cause Identity Theft?
No. Windows update error has nothing to do with identity theft. It does not leak your information out or give access to anyone to your computer and files. However, it may indicate the presence of a virus, which may lead to identity theft.
Start Download Now
Author:
Curtis Hansen has been using, fiddling with, and repairing computers ever since he was a little kid. He contributes to this website to help others solve their computer issues without having to buy a new one.