
Здравствуйте, столкнулся с такой проблемой, буквально неделю назад юнити работала нормально, но я подхватил вирус и после этого компьютер будто отказался вообще что либо делать в среде юнити, а так же архиватор 7zip перестал работать, при открытии любого архива, писало «не удается найти (путь к файлу) Проверьте, правильно ли указано имя и повторите попытку.»
Что касается Юнити, он начал при открытии нового проекта выдавать 2 пустые ошибки, а при загрузки библиотек для работы в нем, появляются ошибки, что он не может выгрузить какие то файлы.
Искал решение этой проблемы в интернете, и вроде как мне не хватает net framework 3.5, но вот незадача, он не хочет устанавливаться, ибо нет службы «Центр обновления Windows», а так же в настройках «центр обновления Windows» пишет «что то пошло не так. Попытайтесь повторно открыть параметр позже.
Что касается DNS клиента в службах, он не кликабельный, тобишь я не могу открыть эту службу и нажать «остановить», или же «запустить», кнопки просто неактивны.
На счет вирусов мне помогли в соседнем разделе, но вот проблема с Юнити, центром обновлений и net framework еще осталась(7zip я переустановил и он заработал, но с юнити так не сработало).
Система Windows 11 22H2 ОС 22621.525 корпоративная x64
-
Home
-
News
- How to Fix Windows Update High CPU Usage
How to Fix Windows Update High CPU Usage
By Shirley | Follow |
Last Updated
Are you suffering from the “Windows update high CPU usage” issue? In this post from MiniTool, we will introduce several useful ways to help you get rid of the high disk and CPU usage during Windows update.
Windows updates help fix various issues with older versions and introduce new features. However, many users reported that Windows 11 update is causing high CPU usage, including Service Host Windows update high CPU usage and other services high CPU usage.
Generally, Windows update high CPU usage is caused by these reasons: too many actively running background applications, insufficient RAM, corrupted Windows update process, virus infection, and more.
Here we list several feasible solutions to help you resolve the issue.
Tips:
Windows updates may not only cause high CPU usage but also data loss. To recover files lost after a Windows update, you can use MiniTool Power Data Recovery, the best free data recovery software. It excels at recovering documents, pictures, videos, audio, etc. from hard drives, SD cards, USB drives, and so on.
MiniTool Power Data Recovery FreeClick to Download100%Clean & Safe
How to Fix Windows Update High CPU Usage
Fix 1. Disable Unnecessary Startup Programs
Startup programs will get started automatically every time you boot your computer. This may cause Windows update high CPU usage. So, you can follow the steps below to disable unnecessary startup programs.
Step 1. Right-click the Windows logo button to select Task Manager.
Step 2. Under the Startup tab, select the target program and then click the Disable button.
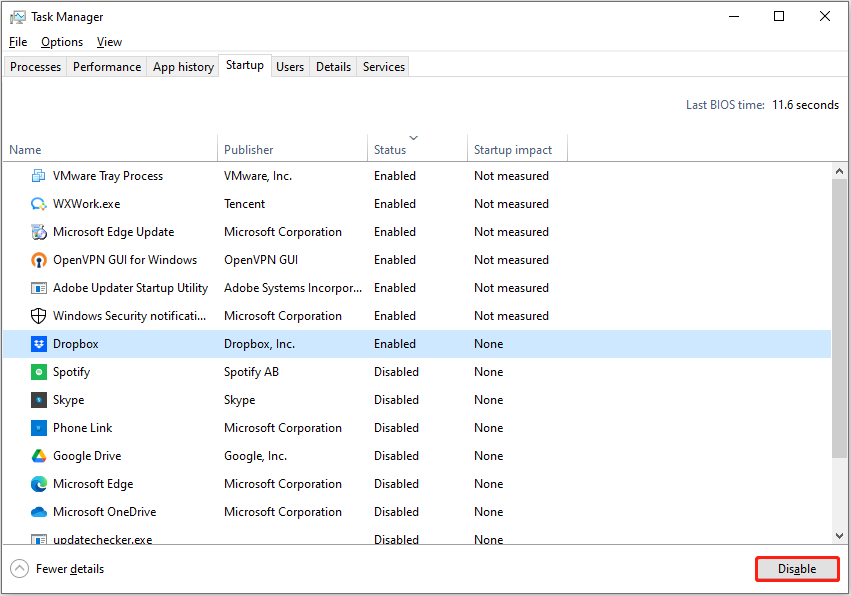
Step 3. Repeat similar steps to disable all unnecessary programs. The disabled startup program will not get started the next time your Windows boots.
See Also: Windows 10 High Memory Usage [Causes and Solutions].
Fix 2. Run the Windows Update Troubleshooter
Windows offers you a built-in troubleshooter that helps detect and repair Windows update related issues. Here you can see how to run the Windows Update troubleshooter.
Step 1. Press the Windows + I keyboard shortcut to open Windows Settings.
Step 2. Select the Update & Security option. Then move on to the Troubleshoot tab and click the Additional troubleshooters from the right panel.
Step 3. In the new window, click Windows Update > Run the troubleshooter.
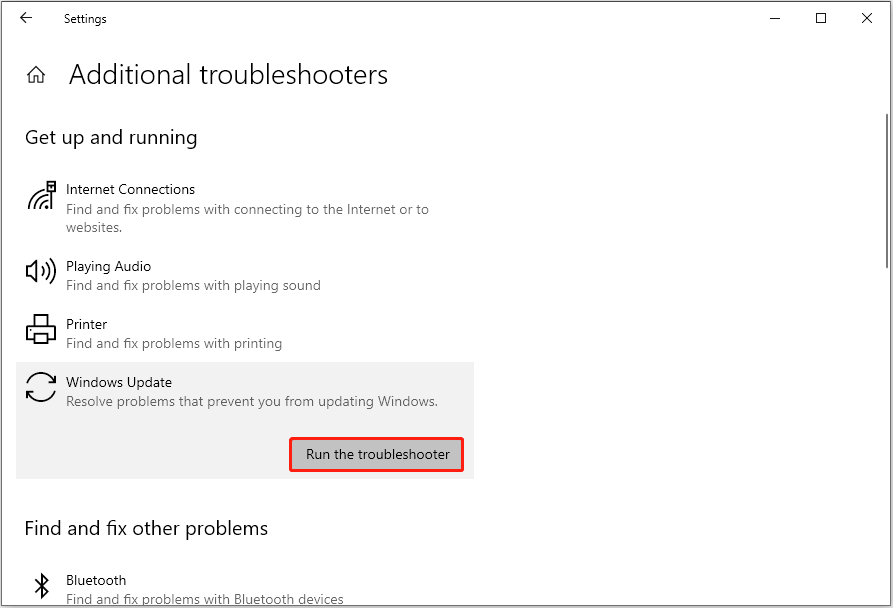
Step 4. Subsequently, the troubleshooter will start to detect and repair Windows update relevant issues. You need to wait patiently until the whole process completes.
Fix 3. Restart Windows Update Relevant Services
Restarting Windows update relevant services is also an effective way to reduce Windows update CPU usage.
Step 1. Type Services in the Windows search box and click Services from the best match result.
Step 2. Scroll down to find and right-click Windows Update, then select Restart from the context menu.
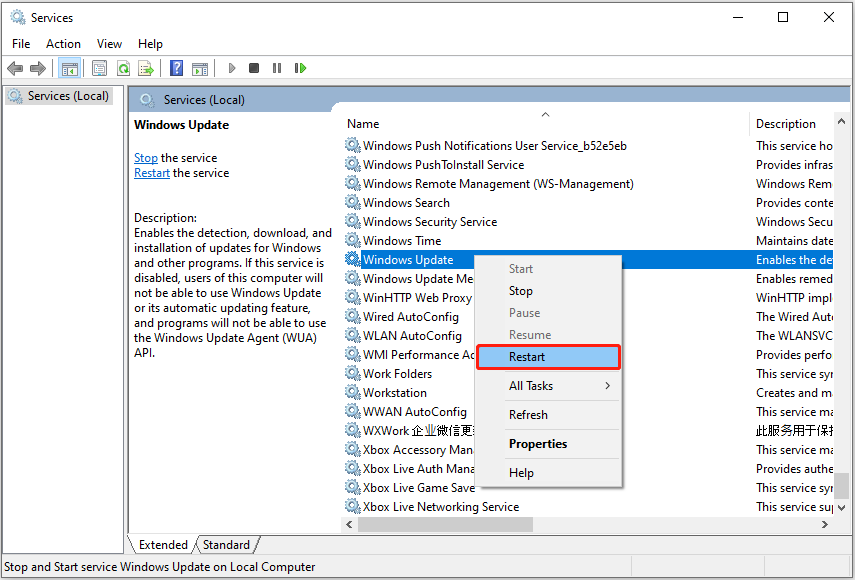
Step 3. Repeat the steps to restart the “Background Intelligent Transfer Service” service and the “Cryptographic Services” service.
After that, check if the CPU and disk usage are still high.
Fix 4. Change Windows Update Settings
Facing high disk and CPU usage during Windows update, you can also try to change Windows update settings.
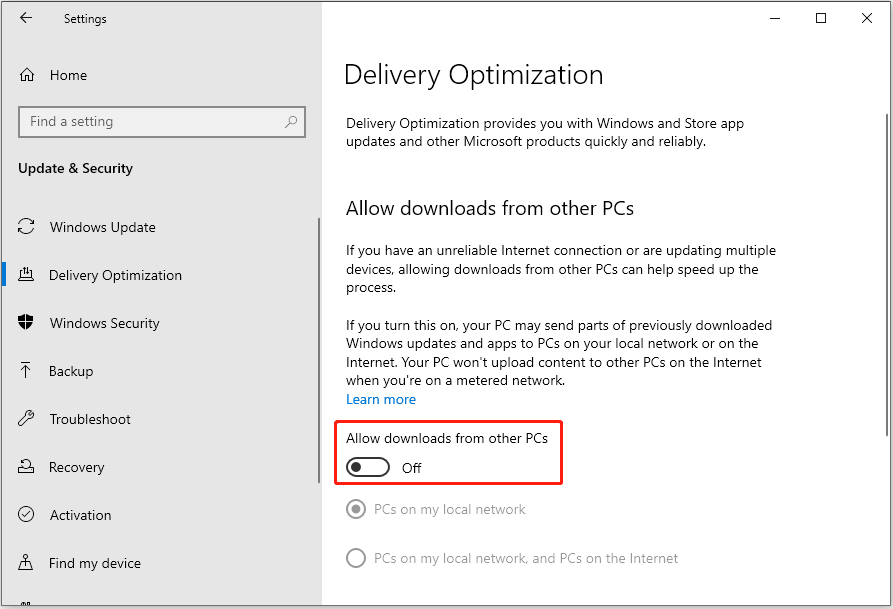
Step 1. Open Windows Settings by pressing the Windows + I key combination.
Step 2. Click Update & Security, then go to the Delivery Optimization section.
Step 3. In the right panel, make sure the Allow downloads from other PCs option is turned off.
Fix 5. Perform a Virus Scan
Viruses can consume large amounts of system memory and slow down your computer, leading to the “Windows update high CPU usage” issue. In this case, you need to perform a virus scan by using third-party antivirus software or Windows built-in antivirus – Windows Defender.
Here this article may be helpful: How to Open and Use Windows Defender in Windows 11/10.
Bottom Line
This article talks about how to fix Windows update high CPU usage in Windows 10/11. Hope you can get rid of this issue by applying the approaches above.
If you need to recover deleted files from Windows 11/10/8/7, try MiniTool Power Data Recovery Free.
MiniTool Power Data Recovery FreeClick to Download100%Clean & Safe
Should you have found other good solutions to the high CPU issue or have any questions about MiniTool Power Data Recovery, please feel free to send an email to [email protected].
About The Author
Position: Columnist
Shirley graduated from English major and is currently an editor of MiniTool Team. She likes browsing and writing IT-related articles, and is committed to becoming a professional IT problem solver. The topic of her articles are generally about data recovery, data backup, and computer disk management, as well as other IT issues. In spare time, she likes watching movies, hiking and fishing.
Служба wuauserv – это стандартная служба обновления Windows, которая используется для сканирования компьютера, поиска, закачки и установки новых обновлений с узлов Windows Update или локальных WSUS серверов. В некоторых случаях служба wuauserv может работать некорректно, вызывая сильную нагрузку на процессор компьютера или использую большую часть оперативной памяти. Т.к служба wuauserv работает внутри процесса-контейнера svchost.exe, с точки зрения пользователей это выглядит, как будто процесс svchost сильно грузит процессор и оперативную память на вашем устройстве Windows. В этой статье мы рассмотрим как решить проблему высокого потребления памяти и ресурсов ЦП процессом wuauserv в Windows 7 и Windows 10.
Содержание:
- Служба Wuauserv в Windows 7 грузит процессор и память на 50%
- Wuauserv грузит процессор и память в Windows 10
Служба Wuauserv в Windows 7 грузит процессор и память на 50%
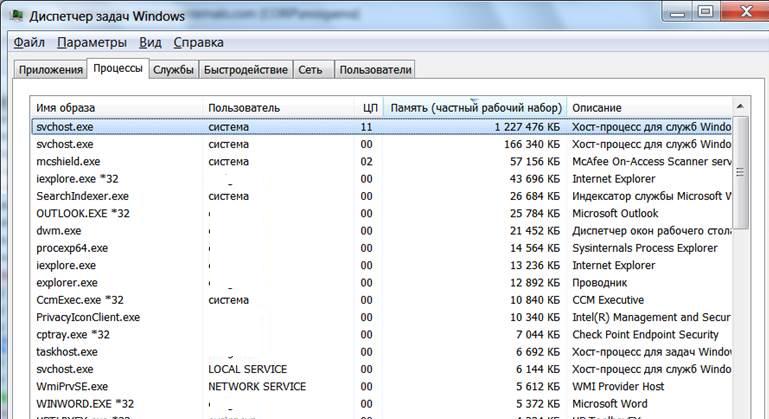
Часть пользователей стала жаловаться на проблемы с производительностью их компьютеров с Windows 7. Проблема проявляется следующим образом: ежедневно, примерно в одно и то же время (у каждого пользователя время свое), компьютер начинает сильно тормозить. В диспетчере задач до 1,2 -2 Гб и 100% CPU одного ядра памяти потребляет процесс svchost.exe. В результате в течении 30-60 минут работать с компьютером невозможно, все ужасно тормозит и виснет.
Проблемы наблюдались на клиентах Windows 7 SP1 x86 и x64, получающих обновления с локального сервера SCCM, используемого для управления обновлениями Microsoft на клиентах. На стороне клиента запускаем диспетчер задач (Task Manager) и на вкладке Процессы сортируем запущенные процесс по использованию памяти. Видим, что в настоящий процесс svchost.exe использует 11% CPU и 1,2 Гб оперативной памяти. На самом деле процесс svchost.exe – это процесс контейнер, внутри которого работают другие программы и потоки системных служб. С помощью Task Manager не получится понять, какой именно поток (служба) вызывает высокую нагрузку на систему.
Более подробную информацию о процессе и его потоках можно, к примеру, получить с помощью утилиты Process Explorer Марка Руссиновича.
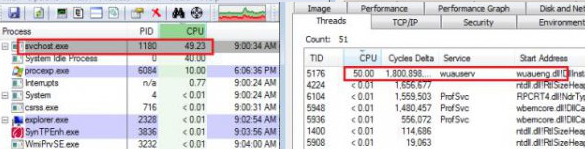
Запускаем утилиту procexp.exe и находим в списке процесс svchost.exe который потребляет слишком много памяти или % CPU.
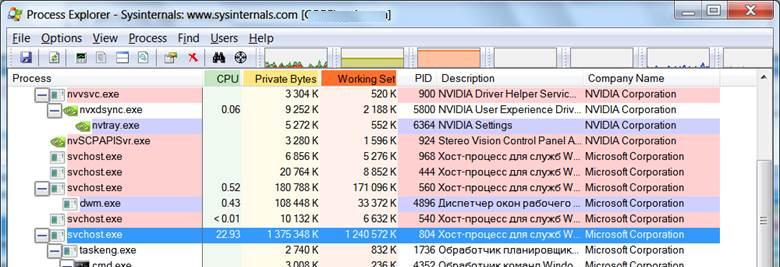
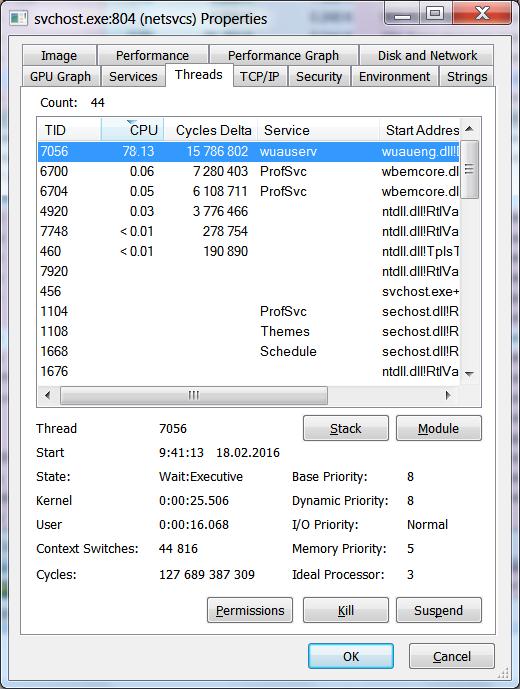
Открываем его свойства и переходим на вкладку Threads (Потоки). Здесь мы четко видим, что в рамках процесса svchost.exe больше всего ресурсов CPU и памяти потребляет поток службы wuauserv (Windows Update — Служба обновлений Windows). Служба wuauserv сканирует систему и сервер обновлений на предмет необходимости установки обновлений. В результате каких-то проблем в коде служба начинает «течь», потребляет всю доступную ей память вплоть до 1,5-2 Гб (максимума памяти который доступен процессу) и начинается активно использовать файл подкачки. Система от этого резко начинает тормозить.
Что интересно, проблеме в большей мере подвержены клиенты с 2 Гб оперативной памяти. На ПК с 4 и более Гб памяти, служба wuauserv также «утекает», но не выбирается из 2 Гб, и проблема не так явно проявляется для пользователей.
Если остановить службу wuauserv из консоли services.msc, нагрузка на систему резко уменьшиться. А потребление памяти процессом svchost.exe падает до 80-100 Мб.
Важно. Это не означает, что нужно отключать службу wuauserv и держать ее в отключенном состоянии, т.к. система перестанет получать обновления безопасности и будет подвержена риску взлома.
В первую очередь попробовали сбросить состояние агента Windows Update и обновили его версию по методике, описанной в статье: Восстановление исходных настроек агента Windows Update. Проблема решилась и в течении нескольких дней не повторялась, но через какое-то время все началось заново. Видимо размер локального кэша и базы обновлений достиг каких-то пределов, и служба wuauserv опять стала «течь».
Перебрали еще множество различных методик, но реально помогла только установка следующих патчей для агента обновлений Windows 7:
- https://support.microsoft.com/en-us/kb/3050265 (Обновление WIndows Update агента от июня 2015)
- https://support.microsoft.com/en-us/kb/3065987 (Обновление WIndows Update агента от июля 2015)
- https://support.microsoft.com/en-us/kb/3102810 (Патч для Windows / 2008 R2, решающий проблему высокой загрузки CPU и памяти при установке обновлений через WSUS, ноябрь 2015).
Совет. Патчи ставили не на все компьютеры с Windows 7, а только на ПК, на которых пользователи жаловались на аналогичную проблему.
После установки обновлений, использование памяти процессом wuauserv снизилось до 200 Мб, а сам процесс сканирования стал занимать гораздо меньше времени.
Wuauserv грузит процессор и память в Windows 10
Проблема, когда служба центра обновления Windows сильно грузит процессор и использует слишком много памяти встречается и в различных версиях Windows 10.
Откройте диспетчер задач и найдите процесс svchost.exe который потребляет слишком много памяти или ресурсов CPU. Щелкните по нему ПКМ и выберите пункт “Перейти к службам”.

Убедитесь, что в рамках данного процесса svchost.exe работает служба wuauserv (Центр обновления Windows).
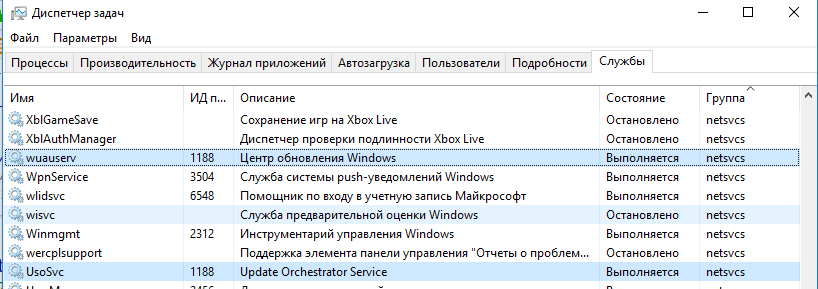
Т.к. диспетчер задач не позволяет определить какая именно из системных служб, работающих внутри одного процесса svchost сильно грузит компьютер, нужно воспользоваться Process Explorer (как описано выше). Убедитесь, что высокая загрузка CPU/памяти вызвана службой wuauserv (в нашем примере это библиотека C:\WINDOWS\system32\wuaueng.dll).
В отличии от рассмотренного выше кейса с утечкой памяти в процессе службы обновлений в Windows 7, для Windows 10 отсутствует универсальный патч, который позволяет исправить проблему. Поэтому ниже мы перечислим основные шаги, которые следует выполнить для уменьшения использования памяти и процессором службой обновления Windows.
Дождитесь окончания установки обновлений
Если служба обновлений Windows в данный момент времени выполняет сканирование вашего компьютера или установку обновлений, то высокая загрузка компьютера не должна вас удивлять. Попробуйте подождать (1-2 часа в зависимости от производительности компьютера) и дождаться пока wuauserv закончит загрузку и установку обновлений.
Запустите средство устранения неполадок центра обновлений Windows 10
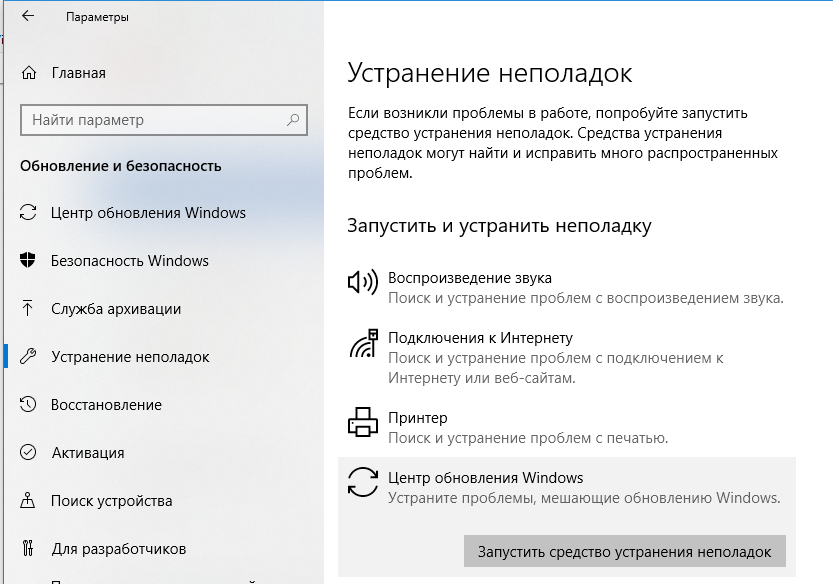
Попробуйте выполнить диагностику служба обновления Windows 10с помощью встроенного средства устранения неполадок (Window Update Troubleshooter). Перейдите в меню Параметры -> Обновление и безопасность -> Устранение неполадок. Выберите пункт “Центр обновления Windows (Устраните проблемы, мешающие обновлению Windows) -> Запустить средство устранения неполадок”.
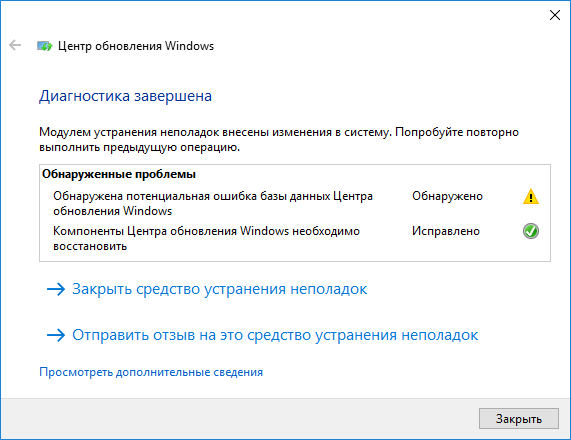
Утилита проверит состояние службы и попробует исправить найденные проблемы.
Очистите папки SoftwareDistribution и catroot2
Попробуйте выполнить очистку папок SoftwareDistribution и catroot2.
- В каталоге C:\Windows\SoftwareDistribution хранятся временные файлы службы Windows Update и файлы скачанных обновлений.
- В каталоге %windir%\System32\catroot2\ хранятся сигнатуры пакетов обновлений.
Попробуем очистить их с помощью следующего скрипта (сохраните код в текстовом файле с расширением *.bat и запустите с правами администратора):
attrib -h -r -s %windir%\system32\catroot2
attrib -h -r -s %windir%\system32\catroot2\*.*
net stop wuauserv
net stop CryptSvc
net stop BITS
ren %windir%\system32\catroot2 catroot2.old
ren %windir%\SoftwareDistribution SoftwareDistribution.old
ren "%ALLUSERSPROFILE%\application data\Microsoft\Network\downloader" downloader.old
net Start BITS
net start CryptSvc
net start wuauserv
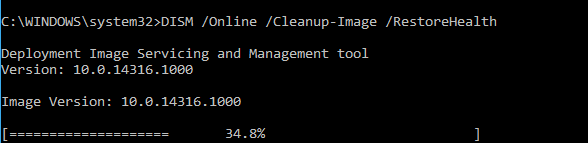
Проверьте целостность системных файлов Windows
Выполните проверку системных файлов вашего образа Windows с помощью команд:
sfc /scannow
и
DISM /Online /Cleanup-Image /RestoreHealth
Проверьте компьютер на вирусы
Проверьте вашу Windows на вирусы в офлайн режиме с помощью загрузочного образа (Kaspersky Rescue Disk или Dr.Web LiveDisk).
Обновите вашу Windows 10
Обновите вашу версию Windows 10, установив актуальный на данный момент времени билд. Вручную скачайте и установите с сайта Microsoft Update Catalog (https://www.catalog.update.microsoft.com/Home.aspx) последний кумулятивный апдейт для вашей версии Windows (Microsoft ежемесячно исправляет баги и различные ошибки Windows и добавляет исправления в кумулятивный пакет обнволений).
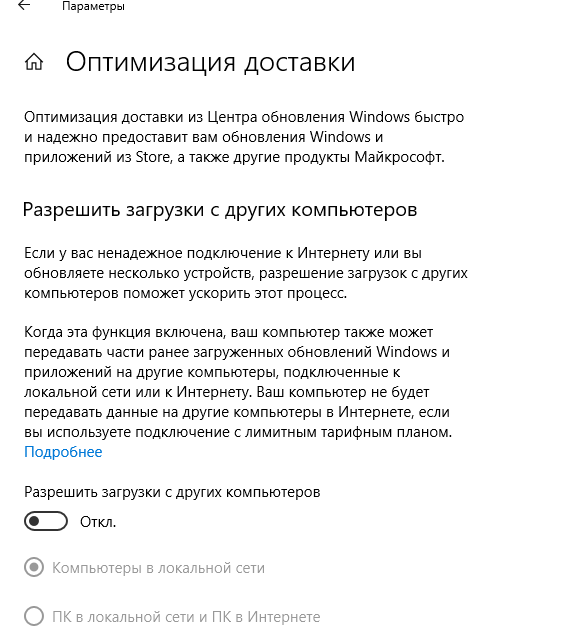
Отключите оптимизацию доставки
Перейдите в меню Параметры -> Обновление и безопасность -> Центр обновления Windows -> Дополнительные параметры -> Оптимизация доставки. Выключите пункт «Разрешить загрузки с других компьютеров» и перезагрузите компьютер.
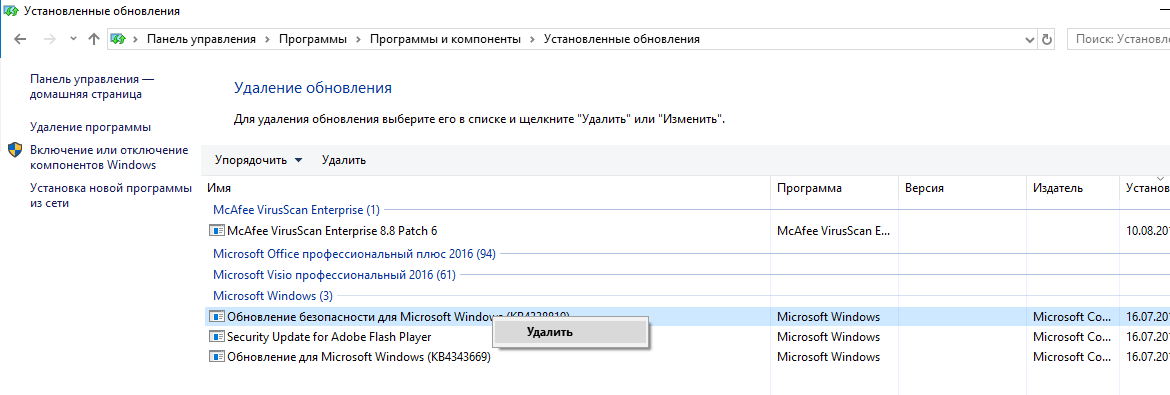
Удалите последние обновления
Если проблема с высокой загрузкой процессора и памятью службой wuauserv возникла сразу после установки новых обновлений Windows, попробуйте по очереди удалить последние обновления (Панель управления -> Программы и компоненты -> Просмотр установленных обновлений). Отсортируйте обновления по дате установки, щелкните ПКМ по обновлению и выберите Удалить.
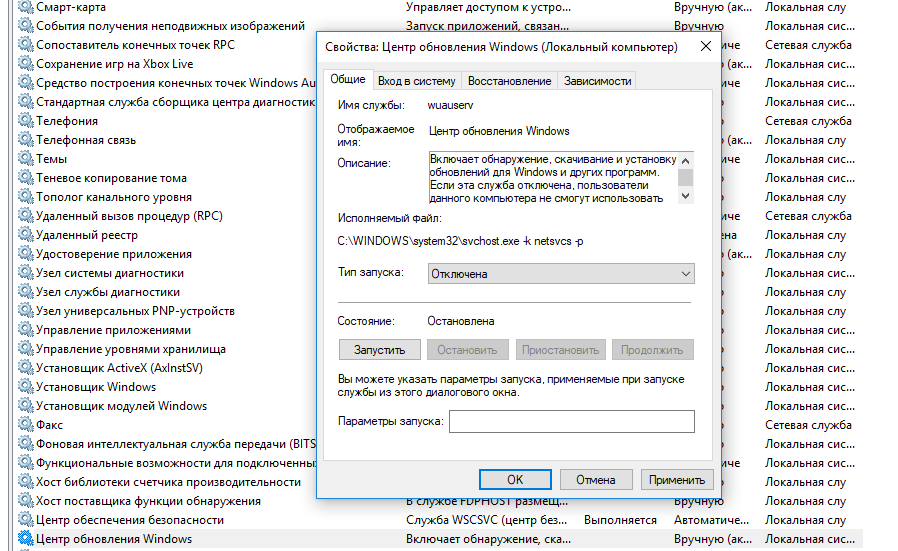
Отключите службу wuauserv
Я никогда не рекомендую отключать службу обновлений Windows, т.к. вы перестанете получать обновления безопасности и подвергаете ваш компьютер риску взлома или заражения. Отключение службы обновлений можно использовать как временный шаг, когда другие способы восстановить нормальную работу системы не помогают.
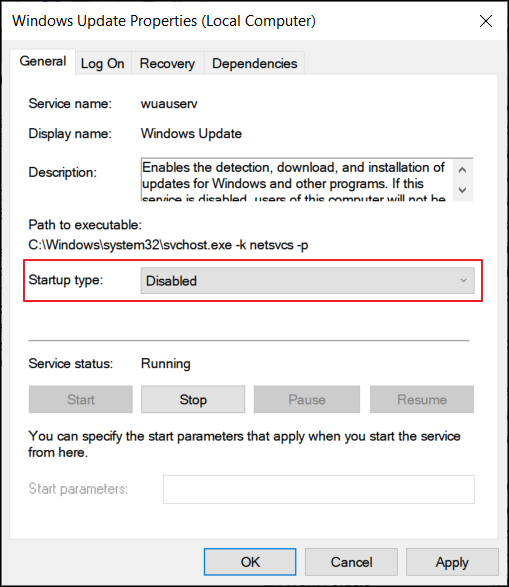
Откройте консоль управления службами (services.msc), найдите службу «Центр обновления Windows», остановите ее и измените тип запуска на Отключена. Сохраните изменения и перезагрузите компьютер.
Во второй вторник следующего месяца обязательно вручную скачайте и установите новые кумулятивные обновления для вашей версии Windows. Включите службу wuauserv. Возможно ваша проблема будет исправлена в новом обновлении.
Windows computers are known to provide many services based on improving the user experience and building up the system to avoid any anomalies. Wuauserv is a renowned utility offered in Windows computers, which serves many vital purposes. This article is all about discussing the utility and looking into the fixes that are leading to high CPU usage.
What Is Wuauserv?
Wuauserv, also known as Windows Update Service, provides direct access to the updates of the Windows operating system. From detection to downloading and installing the update, Windows Update Service is responsible for fulfilling the tasks. Any Windows update you see on your computer is because of the Wuauserv facility. It serves the purpose of putting your device in the latest versions and keeping the computer away from all outdated errors.
How to Disable Wuauserv?
There are instances where Wuauserv utilizes a lot of computer resources, i.e., the CPU, for searching for updates and executing tasks. In such cases, high CPU usage leads to the slowing down of the computer. To avoid this problem, it is better to disable the Wuauserv service, which can be done with the following steps:
Step 1. You must use the «Windows + R» to launch the Run program on your Windows computer. Proceed to type «services.msc» to launch the Services window on the computer.

Step 2. Look for the «Windows Update» option and double-click to expand the options.
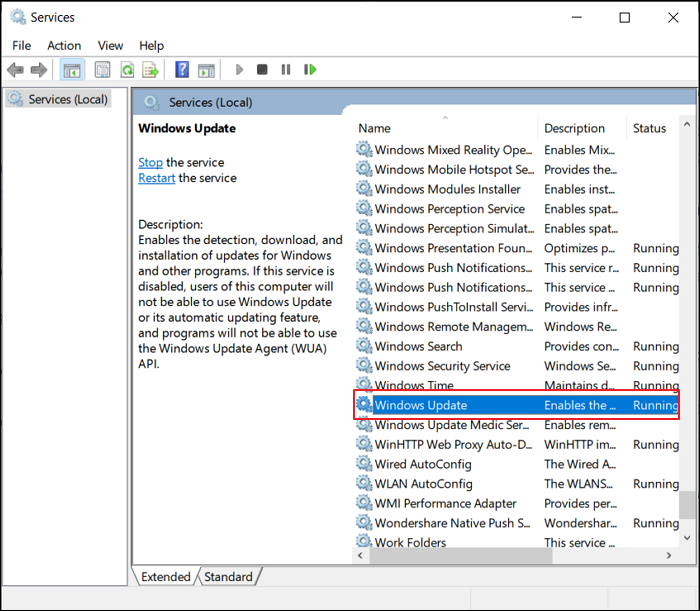
Step 3. You will be led to a new screen where you must look for the «Startup Type» option. Select the «Disabled» option from the drop-down menu and proceed to select the «Stop» button. Ensure you apply all the settings and restart your computer to disable the Wuauserv service properly.
How to Fix Wuauserv High CPU Usage?
The issue of high CPU (Central processing unit) usage can cause quite a weariness for you while using your Windows computer. Disabling the service has its own consequences; thus, it is best to consider some fixes that can help you fix the issue of high CPU usage and allow you to enable the Wuauserv service.
- Method 1. Uninstall the Latest Updates from the Computer
- Method 2. Wait for Windows Update to Complete
- Method 3. Delete the SoftwareDistribution Folder on Windows
- Method 4. Try SFC Scan
Method 1. Uninstall the Latest Updates from the Computer
You can consider uninstalling the latest updates installed on your Windows computer. This usually fixes the issue, as the installed updates might have problems causing issues in the device. To do this, you must follow the guidelines provided next:
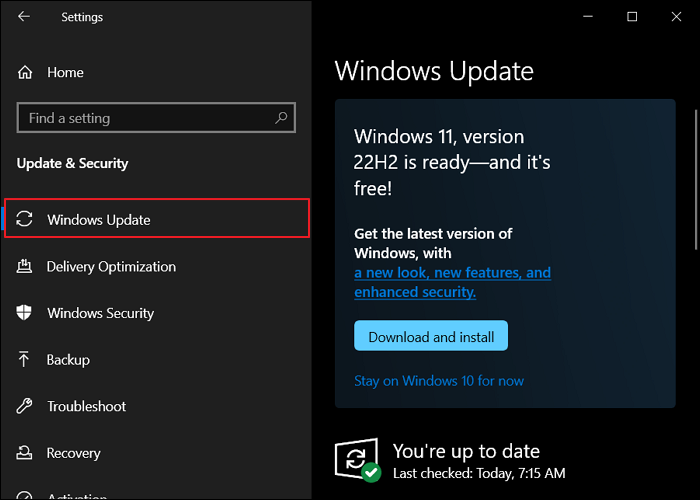
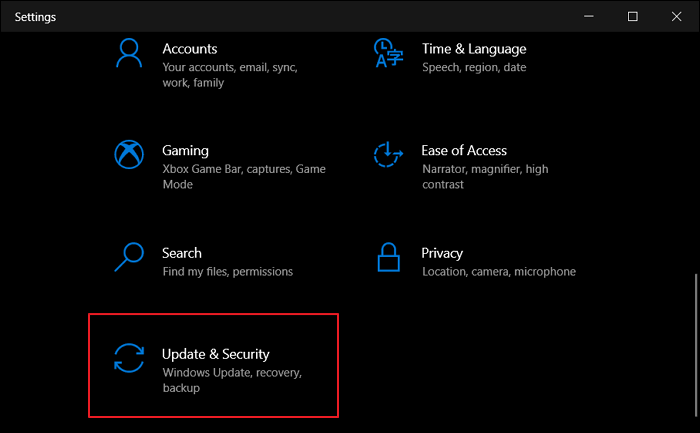
Step 1. Launch the «Settings» from the Search bar and lead to the «Update & Security» tab from the left. Look for «Windows Update» in the list of options provided on the adjacent screen.
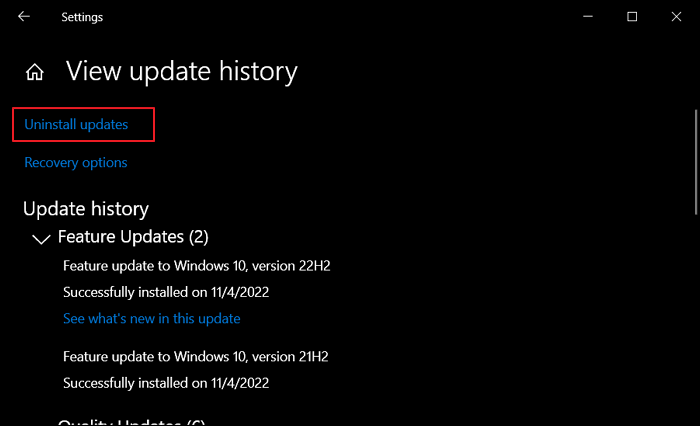
Step 2. Look for the option of «View update history» in the right panel and proceed to select «Uninstall updates» to observe the installed updates.
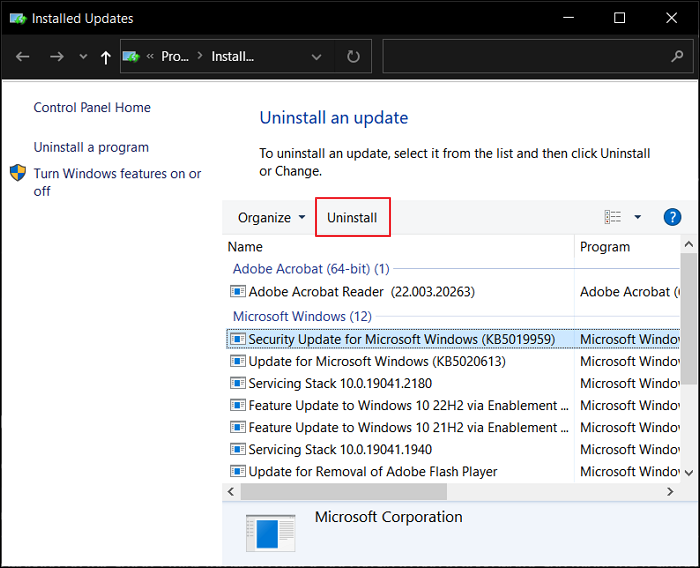
Step 3. Select the update that might be causing the issue and tap on the «Uninstall» button. Restart your computer following this step to ensure the Wuauserv problem is resolved.
Method 2. Wait for Windows Update to Complete
There might be a chance that your Windows computer might be undergoing some previous updates, which might be hindering CPU usage. In such circumstances, it is best for you to wait for it to complete the process. You can also check out the updates, which will essentially help you out in assessing the situation. For that, you must use these steps for effective results:
Step 1. Tap on the «Start» menu and select the «Settings» option from the left panel to open a new window.
Step 2. Look for the «Updates & Security» tab on the left panel to lead to the specific settings. There, you can use the «Check for updates» button to search for any prevailing updates. If there are some undergoing updates, you can let Windows conclude it properly.
Step 3. Whenever the updates conclude installation, you should try restarting your device. Try using the computer after the updates are installed.
Method 3. Delete the SoftwareDistribution Folder on Windows
The SoftwareDistribution folder on Windows adds temporary files to the folder when new updates are installed. It might be possible that the files added to the folder might be faulty, causing such issues. The perfect remedy to this is to delete the folder from your Windows through the proper means. For that, you must follow the steps guided below:
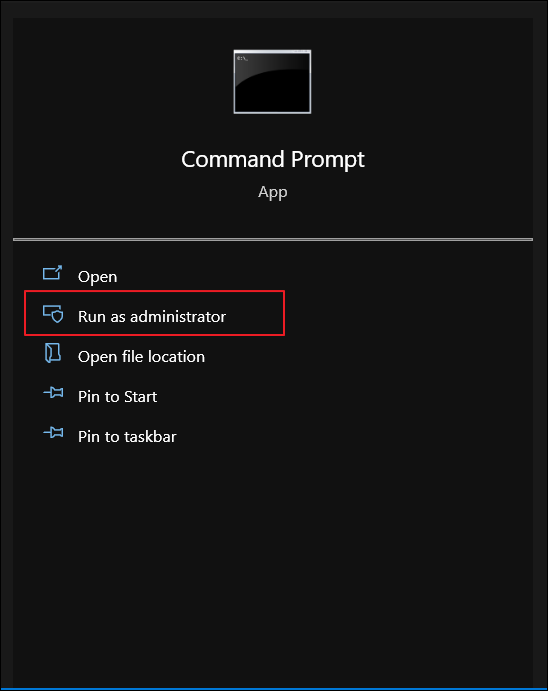
Step 1. Select the «Search» icon on the taskbar and type «cmd» to open the Command Prompt. While opening it, select «Run as administrator» from the right panel.
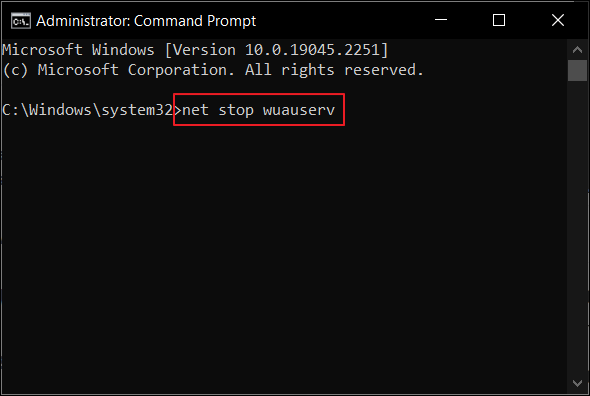
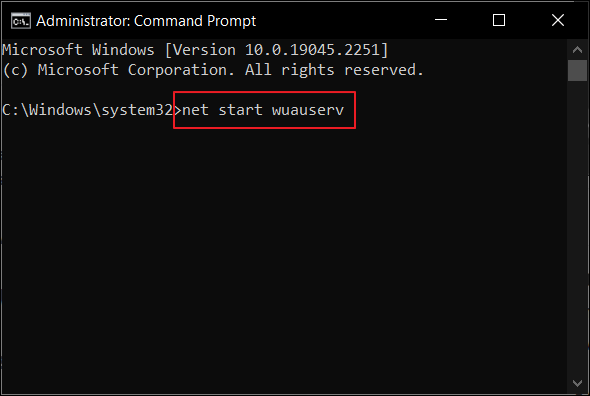
Step 2. Use the command «net stop wuauserv» and proceed to the following command of «net stop bits» to disable all services temporarily involving Wuauserv.
Step 3. Launch the «File Explorer» from the taskbar and navigate to the following location on your computer:
C:\Windows\SoftwareDistribution
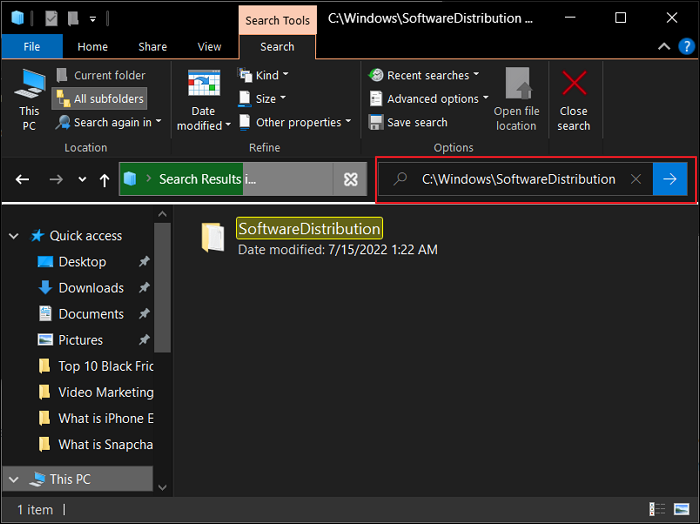
Step 4. As a folder opens, delete all the content within it and re-open Command Prompt that was minimized. Use the command «net start wuauserv» and «net start bits» to resume Windows Update Services.
Method 4. Try SFC Scan
If the problem persists, you should consider using the SFC scan feature to resolve the issue on your Windows computer. For that, you must follow the steps provided below:
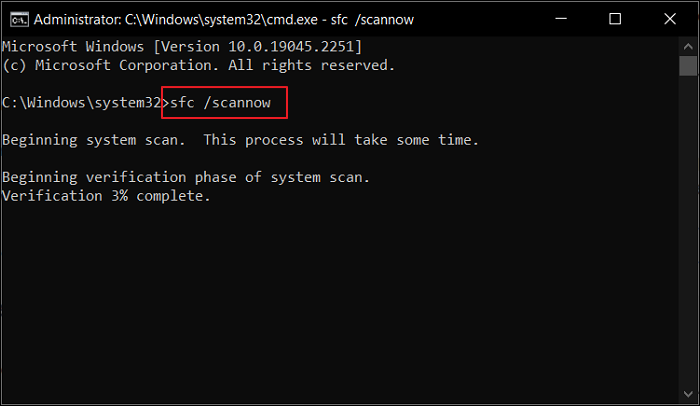
Step 1. Open the «Command Prompt» as admin by launching the Run program and typing «cmd» within it. You have to execute the command by pressing «CTRL + SHIFT» and clicking on the «OK» button simultaneously.
Step 2. As it opens, type «sfc /scannow» and proceed with the command. The computer searches for errors and resolves them automatically.
Bottom Line
This article has provided a complete overview of the Wuauserv error and has directed some apparent fixes on how to resolve the problem of high CPU usage within the service. With the help of these fixes, you will be able to figure out a proper resolution to the CPU problems and ensure that the Update Services are not disabled on your device.