
Keeping your Windows 10 operating system updated is crucial for maintaining system security and performance. Windows Updates often provide critical security patches, system enhancements, driver updates, and new features. However, there may be times when updates get delayed or fail due to various reasons such as software conflicts, network issues, or system errors. In this article, we will explore how to manually force update your Windows 10 system.
Understanding Windows Update
Windows Update is a built-in feature in Windows operating systems, designed to keep your system up to date. It automatically downloads and installs updates but can sometimes encounter issues. Thus, knowing how to manually install updates can be beneficial to ensure your system is secure and running smoothly.
Types of Windows Updates
-
Feature Updates: These are significant updates that offer new features and improvements. Typically released every six months, they can affect the overall functionality and capabilities of the system.
-
Quality Updates: These are smaller updates focused mainly on security improvements, bug fixes, and performance enhancements. They are usually rolled out monthly.
-
Driver Updates: These updates provide new drivers or updates to existing ones, which improves hardware performance or compatibility.
-
Optional Updates: These updates are not critical but can include optional features or driver updates that can sometimes enhance your computer’s functionality.
Why Force Update Windows 10?
While maintaining an updated system is vital, Windows sometimes may not automatically install updates as expected. Reasons might include:
-
Previous Failed Installations: If past updates didn’t install correctly, it could lead to issues blocking future installations.
-
Insufficient Disk Space: Windows needs a certain amount of free space to download and install updates. A lack of space can prevent updates from being processed.
-
Network Configuration: Sometimes, network issues—like firewall settings or an unstable connection—can interfere with the update process.
-
User Preferences: Some users may have specified their update settings to limit when and how updates are installed, thereby delaying critical updates.
Having a method to force updates can help you ensure that your system is running on the latest version, thereby providing you with better performance and security.
How to Force Install Windows 10 Updates
Method 1: Using Windows Update Settings
The simplest method to force Windows to search for and install updates is through the Windows Update settings.
-
Open Settings:
- Press the Windows key + I to open the Settings menu.
-
Go to Update & Security:
- In the Settings window, click on Update & Security.
-
Check for Updates:
- In the Windows Update section, click on the Check for updates button. Windows will search for any available updates and install them automatically.
-
Restart Your Computer:
- If updates are found and installed, you may be prompted to restart your PC. Make sure to save any work before doing so.
Method 2: Using the Windows Update Troubleshooter
If you are having difficulties updating Windows, the Windows Update Troubleshooter can help identify and resolve the problem.
-
Open Settings:
- Press the Windows key + I to open the Settings menu.
-
Navigate to Troubleshoot:
- Go to Update & Security and then Troubleshoot.
-
Run the Troubleshooter:
- Click on Additional troubleshooters, then select Windows Update and click Run the troubleshooter. Follow the prompts that appear; this will scan for issues and potentially fix them.
Method 3: Using the Command Prompt
For more advanced users, using the Command Prompt can provide a powerful way to manage Windows updates.
-
Open Command Prompt as Administrator:
- Right-click the Start button, select Command Prompt (Admin) or Windows PowerShell (Admin).
-
Stop Windows Update Services:
- Type the following commands, pressing Enter after each one:
net stop wuauserv
net stop cryptSvc
net stop bits
net stop msiserver
- Type the following commands, pressing Enter after each one:
-
Delete Temporary Windows Update Files:
- Open File Explorer and navigate to
C:WindowsSoftwareDistributionDownload. Delete all files and folders in this directory (don’t worry; Windows will recreate them).
- Open File Explorer and navigate to
-
Restart Windows Update Services:
- Go back to the Command Prompt and type:
net start wuauserv
net start cryptSvc
net start bits
net start msiserver
- Go back to the Command Prompt and type:
-
Force Check for Updates:
- Finally, to force Windows to look for updates, type:
usetrob.exe /updatenow
- Finally, to force Windows to look for updates, type:
After executing these commands, return to the Windows Update settings and check if updates are now available.
Method 4: Download and Install Updates Manually
For users who are unable to use Windows Update, Microsoft provides a mechanism to download and install updates manually.
-
Identify the Update:
- You may need to know the specific KB number of the update you want to install. You can find this number in the Windows Updates section of the Settings.
-
Visit the Microsoft Update Catalog:
- Go to the Microsoft Update Catalog website at https://www.catalog.update.microsoft.com/.
-
Search for the Update:
- Enter the KB number in the search bar. This will return a list of relevant updates.
-
Download the Update:
- Click on the Download button next to the appropriate update for your system architecture (32-bit or 64-bit).
-
Install the Update:
- Once downloaded, open the installer and follow the prompts to install the update. You may need to restart your computer afterward.
Method 5: Using Windows PowerShell
Another advanced option is to use Windows PowerShell to manually force updates.
-
Open Windows PowerShell as Administrator:
- Right-click the Start button, select Windows PowerShell (Admin).
-
Install Windows Update Module:
- Type the following and press Enter to install the necessary module:
Install-Module PSWindowsUpdate
- Type the following and press Enter to install the necessary module:
-
Use the Module to Check for Updates:
- Load the module by typing:
Import-Module PSWindowsUpdate
- Load the module by typing:
-
Fetch and Install Available Updates:
- Use the following command to check for updates:
Get-WindowsUpdate - To install the updates:
Install-WindowsUpdate -AcceptAll -AutoReboot
- Use the following command to check for updates:
This will automatically download and install any identified updates.
Tips and Tricks
-
Disk Space Management: Always ensure that there is sufficient disk space available before initiating updates. You can free up space by removing temporary files or unused applications.
-
Regular Maintenance: Regularly check for updates. Even if your system automatically installs updates, perform manual checks occasionally to ensure everything is up to date.
-
Safe Mode: If updates fail, consider booting into Safe Mode and attempting the updates again. Safe Mode can often circumvent software conflicts.
-
Create Restore Points: Before attempting any major updates, particularly feature updates, ensure that you create a system restore point. This will allow you to revert your system back to its previous state if necessary.
-
Backup Important Files: Regularly back up your important files. In the unlikely event that an update causes issues, having a backup can save you from potential data loss.
-
Stay Informed: Keep an eye on Microsoft’s official blog or forums for any alerts on problematic updates, known issues, or recommended fixes.
Conclusion
Manually installing updates can often resolve issues with Windows Update failures, ensures your system remains secure, and enhances your experience with the latest features. By utilizing the various methods outlined in this article, you can effectively manage and maintain your Windows 10 updates with confidence. Whether through Windows Settings, PowerShell, or the Microsoft Update Catalog, you have the tools available to keep your PC up to date.
Keeping your system updated no only enhances security but also improves performance and access to new features. With the knowledge acquired from this guide, you should now be equipped to tackle any update-related issues that might arise. Whether you are an experienced user or a novice, understanding how to force Windows 10 updates enhances your technical proficiency and guarantees you make the most of Microsoft’s offerings.
Microsoft announces a new Windows 10 build and everyone but you are getting their devices updated. When you check the Windows Update section in the Settings app, Windows says your device is up-to-date. Of course, there’s a new Windows version but you’re stuck on an older version. We explain why this happens, and how you can force a Windows 10 update.
Microsoft rolls out Windows 10 updates in trickles—not everyone receives an update at the same time. When a Windows Update is available to the public, you may get the update immediately, or it may take days sometimes. However, if the delay is running into weeks or taking longer than usual, the troubleshooting techniques in this guide will help you force install a Windows 10 update on your device.

Do You Have the Latest Windows 10 Version?
Before you try to force install an update, you need to first confirm that your device truly isn’t up-to-date. Go to Settings > System > About and scroll to the Windows specifications section, and take note of the OS build and version.

Now, head to the official Windows 10 release information page, and compare your PC’s OS details with the latest Windows 10 version and build number on the list. If you don’t have the latest version, proceed to the next section to learn how to manually trigger a Windows update.
There are several factors that delay a Windows 10 update. It could be due to low storage space, failure of essential system processes, and so on. If storage is the problem, the Windows Update agent will display an error informing you to free up additional storage space. Other factors, on the other hand, can be difficult to pinpoint.
We’ve compiled some possible ways to force install a Windows Update by eliminating issues causing the delay.
1. Restart the Windows Update Service
This service handles the delivery of software updates to Windows devices. Your PC may fail to automatically download or install a new update if the service is malfunctioning or inactive. Restarting the Windows Update Service can force Windows 10 to install an update. Follow the steps below to get it done.
1. Type services in the Windows Search bar and select Services in the results.
2. Right-click Windows Update and select Restart.

Return to the Windows Updates section in the Settings app and check if a new update is available for your computer.
2. Restart the Background Intelligent Transfer Service
The Windows Update Service depends on the Background Intelligent Transfer Service (BITS) to download updates from the Microsoft servers. Should BITS stop working, your PC may be unable to download and install updates. Restart the service and check if that fixes the problem.
1. Type services in the Windows Search bar and select Services.
2. Right-click Background Intelligent Transfer Service and select Restart.
If the service doesn’t start, try other troubleshooting techniques in this guide on fixing issues with the Background Intelligent Transfer Service.
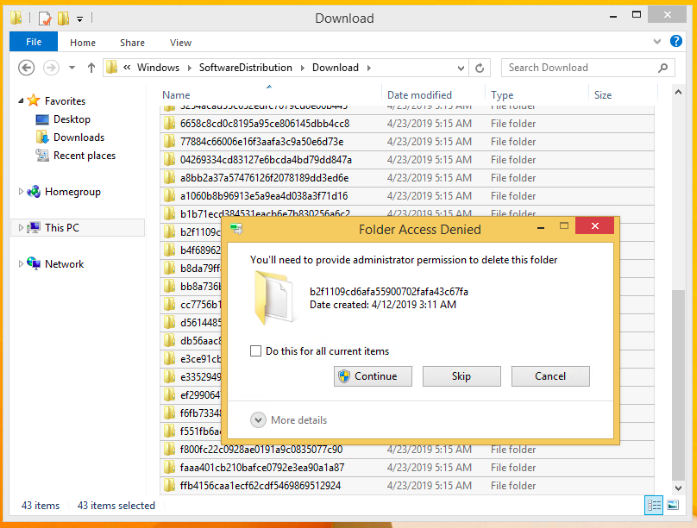
3. Delete the Windows Update Folder
The Software Distribution folder houses the necessary files required to install Windows on your computer. If you’re yet to receive a globally available update, deleting the content of the folder could force Windows to acquire and install the latest OS build. Windows will automatically recreate the folder and re-download the files needed to update your PC.

Before you proceed, there’s something important to note. The Software Distribution folder also holds files containing your PC’s Windows Update history. Therefore, deleting the folder means you can’t roll back to a previous Windows version.
Additionally, updating your computer may take longer than usual. That’s because the Windows Update Service must first repopulate the Software Distribution folder before it installs any available update.
To delete the Software Distribution folder or its content, you need to first stop the Windows Update Service and Background Intelligent Transfer Service.
1. Right-click the Start menu and select Command Prompt (Admin).
2. Paste the command below in the console and press Enter to stop the Windows Update Service
net stop wuauserv

3. Paste the next command and press Enter. That’ll terminate the Background Intelligent Transfer Service.
net stop bits
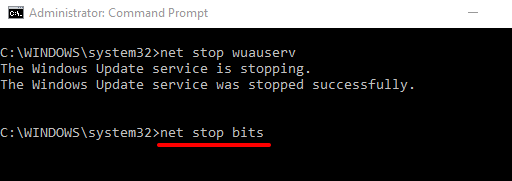
4. Launch the File Explorer and go to Local Disk (C:) > Windows > Software Distribution and delete all items in the folder.
If you can’t delete the files, or you’re getting an error message, restart your computer and try again. After deleting the Software Distribution files or folder, proceed to the next step to restart the background services you stopped earlier.
5. Open Command Prompt as an administrator and paste the command below in the console to restart the Windows Update Service.
net start wuauserv

6. Afterward, paste this next command and press Enter to restart the Background Intelligent Transfer Service.
net start bits
Windows will automatically re-download the files required to update your computer to the latest OS build. Now check if the latest Windows build is available.
4. Perform Windows Update Cleanup
When you install newer Windows 10 builds, Windows stores the system files of older updates on your device. This lets you uninstall an update or roll back the operating system to a previous version. However, these system files often consume storage space and cause problems with future Windows Updates.
Use the Disk Cleanup tool to perform a Windows Update cleanup and try installing the update again.
1. Type disk cleanup in the Windows Search bar and select Disk Cleanup in the result.
Wait for the tool to calculate how much freeable space you have on your PC. This might take some seconds, or minutes—depending on your PC’s storage size and configuration.
2. Click the Clean up system files button.
The Disk Cleanup tool will recalculate the freeable storage space on your local disk, taking system files into account this time.
3. Check Windows Update Cleanup, uncheck other options, and select OK to proceed.
5. Run Windows Update Troubleshooter
If you still can’t install a Windows Update after deleting all associated files, try using the built-in troubleshooting tool to diagnose and fix issues delaying the update. Go to Settings > Update & Security > Troubleshoot > Windows Update and click the Run the troubleshooter button.

The Windows Update Troubleshooter will scan for issues preventing your computer from installing an update.

When the diagnosis is complete, go to the Windows Update menu and check if you can now install an update. If nothing changes, restart your computer and try again.
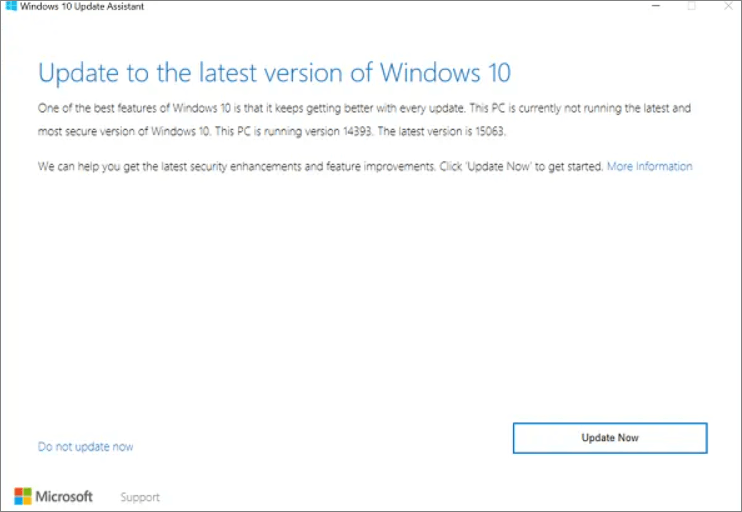
6. Use the Windows Update Assistant
Not only can the Windows Update Assistant force install an update, but it’ll also run a compatibility scan to ensure your computer meets the requirements for the latest Windows 10 build.

Head to the Windows 10 Download page on your browser and select the Update now button to download the Windows Update Assistant setup file.
Double-click the setup file to install and launch the Windows Update Assistant. Select Update now to proceed.

The tool will check if your device is compatible with the latest Windows 10 version. Select Next and the Update Assistant will download and install the update on your PC. This may take a while, depending on the size of the update, your internet speed, and other factors.
Sometimes, You Can’t Force Windows Updates
You may be unable to force a Windows Update if Microsoft places a Safeguard Hold on your PC. A “safeguard hold” is a technique used to temporarily prevent users from installing an unstable or potentially harmful update.
So, how do you identify a safeguard hold? Go to Settings > Updates & Security > Windows Update. If there’s a safeguard hold on your computer, you’ll find this error message on the page: “The Windows 10 Update is on its way. Once it’s ready for your device, you’ll see the update available on this page.”
Microsoft strongly advises against opting out of a safeguard hold—i.e., manually installing an update when there are known performance issues with the update. Wait until the issues with the update are fixed or when the safeguard is lifted.
Related Posts
- How to Fix a “This file does not have an app associated with it” Error on Windows
- How to Fix an Update Error 0x800705b4 on Windows
- How to Resolve “A JavaScript error occured in the main process” Error on Windows
- How to Fix the Network Discovery Is Turned Off Error on Windows
- How to Change Folder Icons in Windows
Microsoft released the Windows 24H2 version update on October 1, 2024, and said the rollout would be gradual. However, even after approximately two months, many users across the globe are still waiting for it. If you are among them and wish to force updates to Windows 11 24H2, we have gathered all the possible tips and tricks. So let us update.
- The new Phone Link box has been added to the Start menu, which now displays your Android phone’s battery level, connectivity status, and recent messages and calls.
- File Explorer gets new updates, allowing users to open compressed files like 7z and Tar, Edit metadata of PNG images, duplicate their current window, and more.
- Quick Panel Settings have changed so users can scroll down to access all options and drag and drop setting buttons to rearrange them.
- Copilot now features a dedicated app icon on the taskbar, which you can position wherever you like. Additionally, you can resize the icon to your preference and even have it overlap other app windows.
- The Microsoft Paint app now includes AI image generation on all Windows 11 PCs. However, on a Copilot+ PC, you get access to Cocreator. With Cocreator, you can create a basic sketch, instruct the AI to finish the image and receive a complete creation based on your initial drawing.
Prerequisites Before Force Update Windows 24H2
- Create a backup of your current operating system and important files to prevent data loss during the upgrade process.
- Windows 11 requires at least 64 GB of storage, so make sure you have enough space to install the new version of the OS.
Expert Tips & Tricks To Force Update To Windows 11 24H2
Method 1 – Use The Group Policy Editor
The Group Policy Editor is an important tool in the Windows OS that helps admins set up configurations for individual users and manage the settings for the PC as a whole. This management console enforces system settings and manages user permissions. We can change, Here are the steps –
1. Press the Windows button and type “gpedit.msc”.
2. Click on the “Edit Group Policy” result.

3. In the Group Policy window click on the following entries in the left panel.
4. Computer Configuration -> Administrative Templates -> Windows Components -> Windows Update
5. In the right section, double-click “Manage updates offered from Windows Update.”

6. The right panel now contains a list of policies. Locate and double-click on the “Select the Target feature update version” policy to open the properties box.

7. In this box, you have to click on the radio button before “Enabled,” and in the “Options” box below, type “Windows 11” in the first text box and “24H2” in the second text box.

8. Click on the Apply button and then hit the OK button.
9. Reboot your PC.
10. Now, press Win + I to open the Settings window.
11. Click on the Windows Update tab in the left panel.
12. Finally, click the “Check for Updates” button and see Windows 24H2 update.
Note : After successfully updating to Windows 24H2, follow the abovementioned steps and choose “Disabled” in Step 7.
Method 2 – Use The Windows Registry To Force Update To Windows 24H2
If you cannot access the Group Policy Editor, you can use the Windows Registry Editor to force update your Windows OS to 24H2.
The Windows Registry is a hierarchical database used by Microsoft Windows to store configuration settings and options for the operating system, installed applications, hardware
devices, and user preferences.
Note : Before making any changes to the registry, take a complete Windows registry backup. You can do it using Advanced System Optimizer or can do it manually.
Here are the steps you need to follow –
1. Press Win + R to launch the RUN box.
2. Type “regedit” and click on the OK button.
3. If the UAC prompt appears, click on “Yes”.
4. In the Windows Registry box, remove the address bar’s contents at the top by clicking on it once and then pressing and holding the backspace key until everything is erased.
5. Copy and paste the following path followed by the Enter key.
HKEY_LOCAL_MACHINE\SOFTWARE\Policies\Microsoft\Windows\WindowsUpdate

6. Right-click on the “WindowsUpdate” subkey and choose New -> String Value.

7. Rename the newly created key as “ProductVersion.”
8. Double-click this key, and a small box will open. Under Value data, type “Windows 11.” Click on OK.
9. Follow the above steps to create another key and rename this one as “TargetReleaseVersionInfo.”
10. Double-click this key and change the Value data to “24H2”. Click on OK.

11. The final step is to create the last key and rename it “TargetReleaseVersion.” Also, set the Value data to “1” and click OK.
12. Restart the computer and check for updates using Window Settings.
Note : Remember to repeat the steps and delete all the newly created keys after the PC has been updated to Windows 24H2.
Method 3 – Use The Update Assistant To Force Update Windows 24H2
If the above methods do not work, we suggest you use the Update Assistant to install Windows 24H2 on your PC. Here is what you need to do –
Download the update from the official Microsoft website.
Launch the Windows 11 Installation Assistant and click Accept and Install to agree to the license terms provided.

Once you accept, the Windows 11 Update Assistant will automatically download the update.

Method 4 – Use The Windows ISO File to Download Force Update Windows 24H2
If you prefer to upgrade to Windows 11 24H2 offline, you can download and use the installation media (ISO file). The ISO file for Windows 11 24H2 can be downloaded from the official Microsoft website. Follow these steps:
1. Go to the “Windows 11 download page”.
2. Scroll down to the “Download Windows 11 Disk Image” section, choose Windows 11 (multi-edition ISO), and click on the “Download Now” button.

3. Choose your preferred language and region and click on the Confirm button.

4. Click 64-bit Download to download the Windows 11 24H2 ISO file on your PC.

5. Once the download is complete, double-click the ISO file to begin the installation process.
6. Select “Not Right Now” for the “Get updates, drivers, and optional features” option, then click the Next button.
7. After the system checks your PC, you’ll see a message saying, “We are getting a few things ready.”
8. Confirm that your upgrade options are “Keep Files, Apps, and Settings”.
9. Click on the Install button, and the upgrade will begin.
10. Once completed, log in using your PIN, and the setup will finalize the upgrade.
Read Also: Ways to Fix Windows Upgrade Stuck on Checking for Updates Screen
Method 5 – Activate Windows Insider Program To Force Update Windows 24H2
The final method to force update your Windows OS to the 24H2 version is to join the Windows Insider Program. Microsoft offers this program, allowing users to receive early access to new features and updates for Windows 10 and 11 before they are released to the general public. This is done to receive user feedback and test stability and performance.
Joining the Insider Program may download all the latest Windows updates, including unstable ones. Hence, this method is the last resort to force update Windows 24H2 and should be used if the above-mentioned methods do not work. And yes, you are right if you think the users who joined the Windows Insider Program a long time ago might have received Windows 24H2 long before October 1, 2024. Here is what you need to do.
1. Press Win + X to launch the Power menu and choose Settings.
2. Click on the Windows Updates tab in the left panel.

3. Next, click the “Windows Insider Program” option in the right section.
4. Then, click the “Get Started” button in the top right corner.
5. Now, you must Link an Account to join the Insider program.
6. Choose your Microsoft account and hit the Continue button.
7. Agree to the Terms and Conditions and click on Continue.
8. You will have multiple options. Please choose the “Release Preview” option and hit the Continue button.
9. Follow the steps with positive responses (Continue) to the next options and click the Restart Now button.

10. After your PC restarts, press the Windows key and type “Check for Updates.” Then, click on the relevant result with the same name.
11. Hit the “Check For Updates” button to find multiple updates, including 24H2.
12. Click the Download & Install button to upgrade your PC to the 24H2 version.
13. After downloading and installing Windows 11 version 24H2, return to the Windows Insider Program page in Settings and select Stop getting preview builds.
14. Click on Unenroll this device when the next version of Windows is released.
Bonus Tip – How To Rollback Windows 24H2
If you successfully upgraded to Windows 24H2 but face hardware/software compatibility issues, you can roll back to the Windows 23H2 version. Here are quick steps to do that –
1. Right-click on the Windows start button and choose Settings.
2. Click on the Windows Update tab in the left panel and then click on Advanced options on the right section.
3. Next, click on Recovery.
4. You will see a Go Back option if you recently upgraded your Windows to 24H2. Click on the button and follow the onscreen steps.
5. Wait for some time, and your PC will restart to Windows 23H2.
Have You Updated Your Windows To 24H2
We hope the above methods have been useful in updating your OS to the Windows 24H2 version. In the comments section below, please let us know which method helped you update your PC.
Read Also: What to Do When Microsoft Ends Support for Windows 10
Are you looking to get the most out of your Windows 11/10 experience? Then you should ensure that your operating system is up-to-date with the latest build. Keeping up with the latest version of Windows 11/10 ensures you have access to all of its features, security fixes, and many other improvements. In this blog post, we’ll walk through how to force update Windows 10, so you can maximize performance on your PC.
| Workable Solutions | Step-by-step Troubleshooting |
|---|---|
| Force Update via Microsoft |
|
| Force Update Windows 10 with CMD |
|
Tip 1. Force Update Windows 10 to the Latest Build from Microsoft
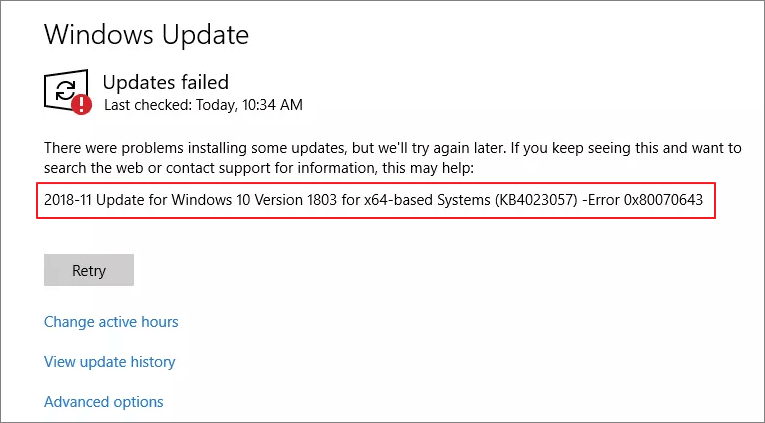
There are times that you download Windows 10 update, but Windows 10 update fails with error code 0x80070643 or other errors. Thus, you can’t update Windows 10 to the newest version in this way.
However, you can free download Windows 10 and force update to the newest Microsoft version. You can watch this video to force update Windows 10 to the newest version.
- 0:00 Introduction
- 0:46 How to update Windows 10
- 3:11 What to do after Windows 10 update
If you prefer a step-by-step guide, follow the steps below.
Step 1. Go to the Microsoft website and click «Update now».
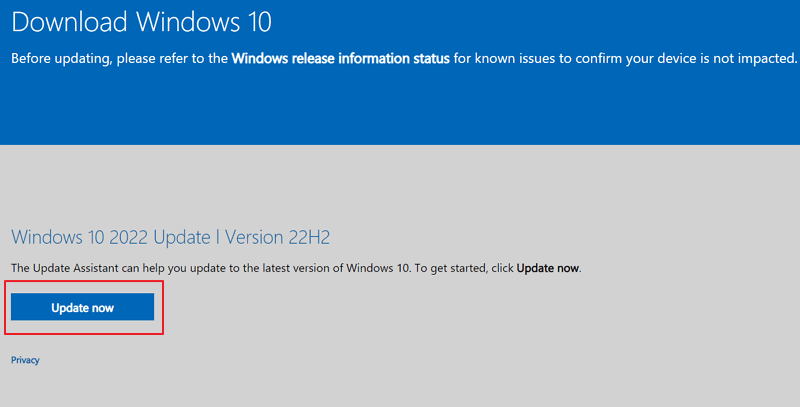
Step 2. Download the latest version of Windows 10 and open the file to install.
Step 3. Then, Windows 10 Update Assistant pops up. Follow the on-screen operations and force update Windows 10.
After the update, restart your computer and check your PC.
Tip 2. How to Force Update Windows 10 with CMD
For users confident with utilizing the command line viewer, force updating Windows 10 with CMD is a quick and effective way to install the latest updates. The process works by delivering a special command that downloads and installs all pending Windows updates. Follow the steps below to force update Windows 10 to the newest version.
Step 1. Run Command Prompt as administrator from the search box.
Step 2. Type wuauclt.exe /updatenow and hit Enter.
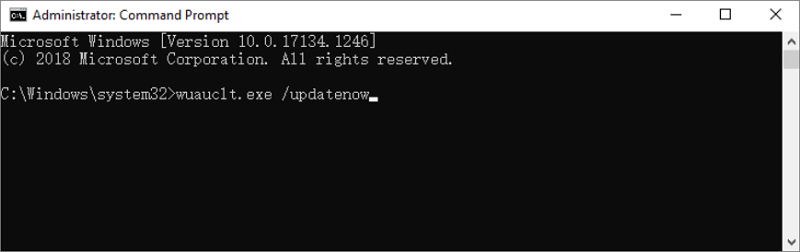
This command will force Windows 10 to check for updates and start downloading.
If you want to learn more details about Windows 10 force update, watch this video.
- 0:00 Introduction
- 0:22 Force update Windows 10
How to Recover Lost Data After Windows 10 Update
After the force update, you may lose data on your laptop or PC. You can recover lost files after Windows 10 update. All you need is EaseUS Data Recovery Wizard. This data recovery software works well in recovering deleted, formatted and other data with simple clicks.
- It can recover data from a hard drive, SSD, SD card, USB flash drive, and more.
- This software supports data recovery from Windows 11/10/8.1/8/7.
- You can perform photo recovery, video recovery, Word recovery, and file recovery with it.
Download this data recovery software and recover data after Windows 10 update.
Conclusion
A forced update is the last thing you want to do, but if you follow Tip 1 or 2 from our blog post, you can make sure your Windows 10 is up-to-date. If, by misfortune, you lost some data after Windows 10 update, don’t worry! Follow our tips to recover lost data and get your files back.
Force Windows 10 Update FAQs
Read the questions and answers below to get additional help.
1. Why is Windows 10 not getting updated?
Here are the reasons why Windows 10 won’t update:
- A file needed by Windows Update is likely damaged or missing
- A driver or other software on your PC isn’t compatible with Windows 10
- Your PC couldn’t connect to the Windows Update servers
- Your PC doesn’t meet the minimum requirements to download or install the upgrade to Windows 10
2. How do I force Windows 10 to update from the command line?
Follow the steps below to force Windows update with the command line:
- Type cmd in the search box, choose Run as administrator, and click Yes to continue.
- Type wuauclt.exe /updatenow and hit Enter.
- This command will force Windows Update to check for updates and start downloading.
3. How can I stop Windows 10 from an automatic update?
To disable Windows 10 updates in every way:
- Manually Disable Windows Update
- Change the Settings of the Group Policy Editor
- Meter Your Network Connection
- Change Update Settings Using Registry
The Windows 10 updates are a problem for many people since you either have to wait for Microsoft to give you the go on updating your system or are forced to update when you’re in the middle of a project.
However, if you want to take the matter into your own hands, this guide shows you how to force Windows to start downloading the Windows 10 update files without having to wait for Microsoft’s approval.
First, open to your Windows installation folder and navigate to the following path: “C:\Windows\SoftwareDistribution\Download” (depending on where you installed your Windows, you may need to adjust the drive letter) and delete all the files there.
1. Open Windows Update window, by hitting the Windows key, type “Windows update” and click on it.
2. Open the command prompt, by hitting the Windows key and type “cmd”. Right click on the Command Prompt icon and choose “Run as administrator”.
3. In the command prompt type (but, don’t hit enter) “wuauclt.exe /updatenow“ (this is the command to force Windows to check for updates).
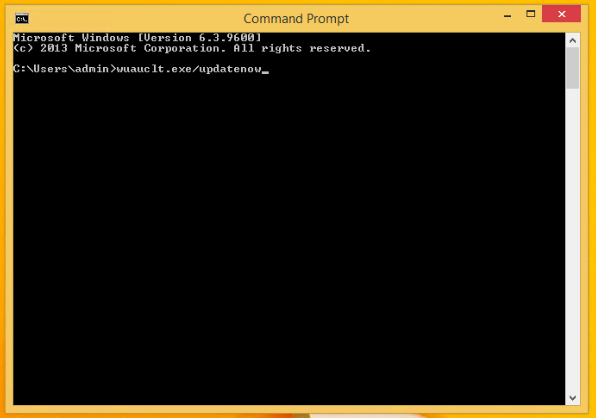
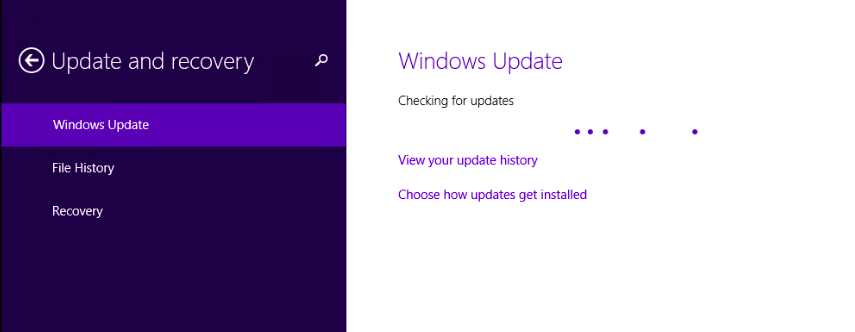
4. Back to Windows Update, click on “Check for updates” — you should see the following message “Checking for updates…”. While this is happening, go back to the command prompt and enter the command you typed at step 3.
5. Now you should see the Windows update window say that it is downloading Windows 10. Make sure you back everything up before you start installing it.
As an alternative, you could also use WuInstall
WuInstall is a Windows command line tool that enables IT Administrators to script Windows updates. It makes the entire updating process more controlled and user-friendly by enabling admins to enforce the query, download, and installation of Windows Updates at times when it makes sense.
The possibilities you have with WuInstall are huge, you can use it as a standalone tool or in combination with WSUS or other system management tools, you can manage a small network with 10 machines as well as huge networks with thousands of clients or servers.
1. Download and install WuInstall software
You can get WuInstall from the website http://www.wuinstall.com — there is a free, full functional 30-day trial where you can test whether WuInstall fits your IT infrastructure. After that, you can purchase your WuInstall version either online with a credit card or contact us if you would like to purchase via PO. For details check our FAQ page.
2. Open the command prompt
Open the command prompt, by hitting the Windows key and type “cmd”. Right click on the Command Prompt icon and choose “Run as administrator”.
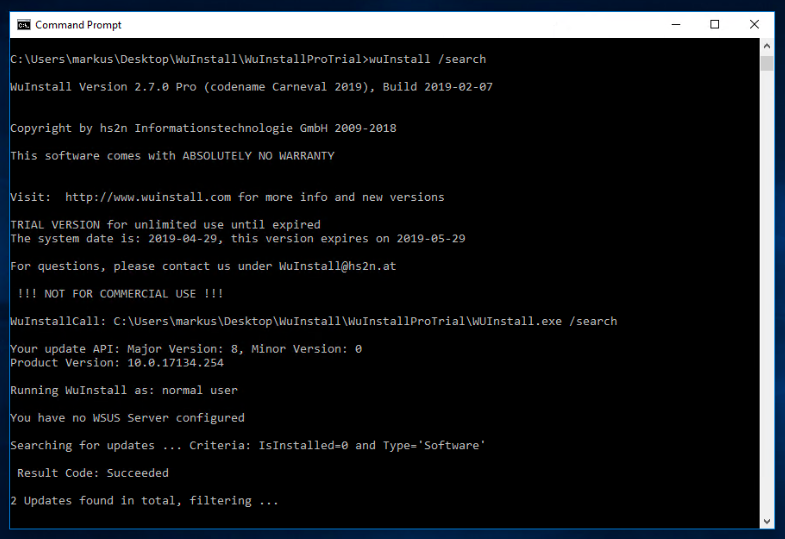
3. Search for Updates
A simple search is triggered via «wuInstall /search».
This command searches for all Microsoft Updates that are available for install on the current machine (Windows, Office, …) — in quite the same way you would also see it in the update menu of the Windows OS — and lists them on stdout.
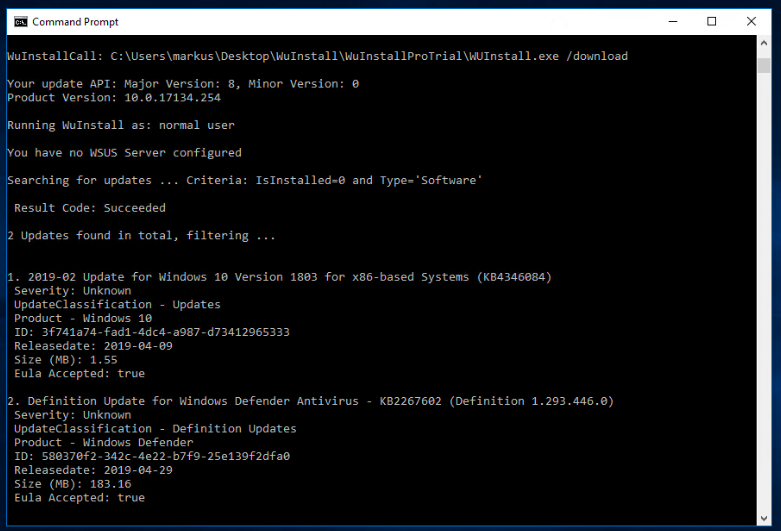
4. Download Updates
A download of updates is triggered via «wuInstall /download«.
First, the command does a search and downloads every update of the result list to the local cache of the machine. Those updates are now ready to be installed whenever it’s convenient with the /install option. If /download is triggered on an update that is already downloaded, nothing is done. The /download option can be used to download pending updates at times when bandwidth is available.
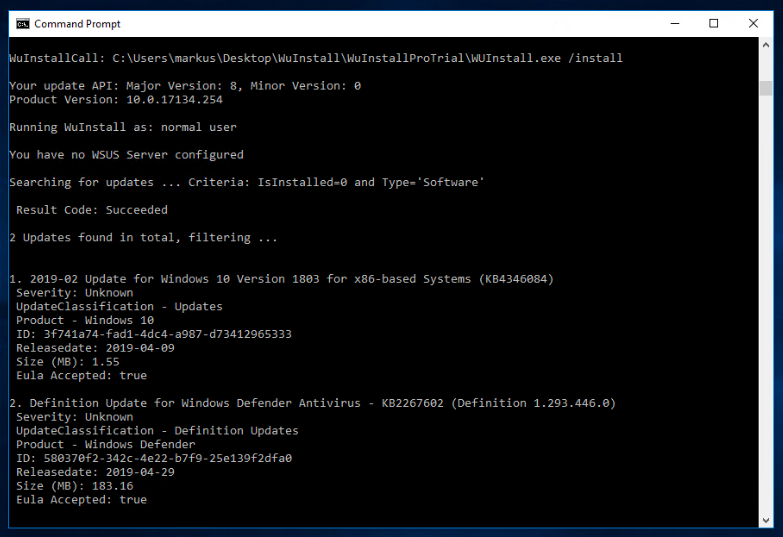
5. Install Updates
To install updates, use the option «wuInstall /install».
It does a search first, then triggers a download for the updates (if they have not been downloaded already) in the result list and then installs the updates on the system. There are a few options like /quiet, /disableprompt or /autoaccepteula in order to suppress user interaction and make installations unattended. Updates can also be installed over reboots using the /rebootcycle option.
For additional details, please check our documentation.
Do you need more than a command line tool? Check out XEOX!