
В этой инструкции о том, как исправить большинство типичных ошибок обновления Windows 11 или Windows 10, 8.1 и Windows 7 несколькими способами: путем использования утилиты с сайта Майкрософт, вручную в командной строке или с помощью простого скрипта, который полностью сбрасывает и очищает настройки Центра обновлений и другими методами.
С помощью описанных ниже методов можно исправить большинство ошибок, когда обновления в Центре обновлений не скачиваются или сообщается, что произошли ошибки при установке обновления. Дополнительную информацию по возможным решениям можно найти в конце руководства.
Использование средства устранения неполадок обновлений в Windows 11 и Windows 10
В Windows предусмотрено встроенное средство устранения неполадок при установке обновлений, это же средство можно скачать и с официального сайта Майкрософт.
При возникновении проблем с обновлениями рекомендую начать именно с этого варианта: он не самый результативный, но самый простой и безопасный:
- В Windows 11 зайдите в Параметры — Система — Устранение неполадок — Другие средства устранения неполадок — Центр обновления Windows и нажмите кнопку «Запуск».

- В Windows 10 средство устранения неполадок находится в Параметры — Обновление и безопасность — Устранение неполадок — Дополнительные средства устранения неполадок — Центр обновления Windows.
- Если доступа к Параметрам нет, вы можете скачать средство устранения неполадок обновлений Windows с официального сайта https://aka.ms/wudiag и запустить файл.

При использовании инструмента «Диагностики и предотвращения неполадок на компьютере» будет автоматически выполнен поиск возможных проблем со службами, отвечающих за установку обновлений и сброс некоторых параметров Центра обновлений.

После выполнения проверки и устранения неполадок можно попробовать установить обновления снова.
Очистка кэша обновлений Windows вручную
Этот способ срабатывает для большого количества ошибок при скачивании и установке обновлений в Windows 11, Windows 10 и Windows 8.1. Порядок действий следующий:
- Запустите командную строку от имени администратора. Для этого можно использовать поиск на панели задач: начните вводить «Командная строка», нажмите правой кнопкой мыши по результату и выберите пункт «Запуск от имени администратора».
- По порядку введите следующие команды, нажимая Enter после каждой:
net stop wuauserv
net stop cryptSvc
net stop bits
net stop msiserver
ren C:\Windows\System32\catroot2 catroot2.old
ren C:\Windows\SoftwareDistribution SoftwareDistribution.old
net start wuauserv
net start cryptSvc
net start bits
net start msiserver
- Закройте командную строку и попробуйте повторить поиск, скачивание и установку обновлений через Центр обновлений. Если проблема была решена, удалите папки catroot2.old в C:\Windows\System32 и SoftwareDistribution.old в C:\Windows.
Утилита Reset Windows Update Tool
Ранее на сайте Microsoft TechNet была доступна специальная утилита для полного сброса параметров центра обновлений Windows 10, 8.1 и Windows 7 — Reset Windows Update Tool, выполняющая полный набор действий, каждое из которых направлено на исправление различных моментов, способных мешать скачиванию и установке обновлений через Центр обновлений. Сейчас официальный сайт инструмента изменился, но эффективность — нет.Перед использованием утилиты рекомендую создать точку восстановления системы. Следующие шаги будут выглядеть следующим образом:
- Скачайте Reset Windows Update Tool в нужной разрядности с сайта https://wureset.com/downloads
- После установки, запустите Reset Windows Update Tool от имени администратора (правый клик — запуск от имени администратора) и выберите нужный язык, русский в наличии, но в моем случае отображается в неправильной кодировке, поэтому далее показаны действия на английском языке.

- Вам будет предложено согласиться с тем, что гарантий исправной работы утилиты не дается и ввести «Y», если вы согласны.
- Вы увидите меню, в котором можно выбрать, какие действия следует выполнить для исправления работы центра обновлений. Рекомендую следующий порядок: 2, 3, 6, 11, 12, 13 с последующей перезагрузкой компьютера.


Полный список доступных опций в утилите текущей версии:
- Открыть параметры защиты системы.
- Сброс компонентов Центра обновлений Windows.
- Удаление временных файлов.
- Открыть параметры Internet Explorer.
- Запуск chkdsk на системном разделе (проверка диска на ошибки).
- Запуск проверки целостности системных файлов.
- Проверка целостности хранилища компонентов.
- Проверка образа на наличие отметки «поврежденный».
- Автоматическое восстановление хранилища компонентов с помощью dism.exe
- Очистка устаревших компонентов.
- Удаление записей реестра с ошибками.
- Сброс и исправление параметров Winsock.
- Принудительное обновление локальных групповых политик.
- Запуск поиска обновлений Windows.
- Поиск ключа продукта Windows.
- Поиск других локальных исправлений (открывает устранение неполадок Windows).
- Поиск дополнительных способов исправления онлайн (открывает справку на сайте Майкрософт в браузере).
- Перезапуск ПК.
Подробно об использовании утилиты в отдельной статье: Как исправить ошибки обновлений с помощью Reset Windows Update Tool. Также, всё то, что утилита выполняет при выборе 2-го пункта можно выполнить в PowerShell, подробнее в инструкции про сброс компонентов Центра обновлений в PowerShell.
Сброс центра обновлений Windows для исправления ошибок с помощью bat-файла
Для того, чтобы исправить многие ошибки при установке и загрузке обновлений Windows 11, 10 и предыдущих версий, бывает достаточно полностью сбросить параметры центра обновлений. Я покажу, как сделать это автоматически. В дополнение к сбросу, предложенный скрипт запустит необходимую службу, если вы получаете сообщение о том, что Центр обновления не запущен.
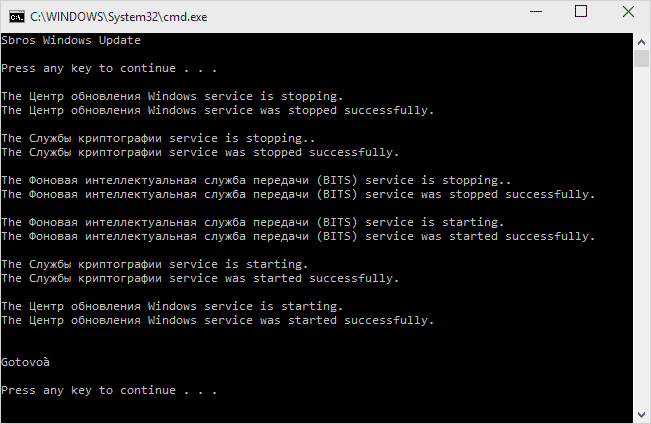
Кратко о том, что происходит при выполнении нижеследующих команд:
- Останавливаются службы: Центр обновления Windows, Фоновая интеллектуальная служба передачи BITS, Службы криптографии.
- Служебные папки центра обновления catroot2, SoftwareDistribution, downloader переименовываются в catroot2.old и т.д. (которые, если что-то пошло не так, можно использовать как резервные копии).
- Все ранее остановленные службы снова запускаются.
Для того, чтобы использовать скрипт, откройте блокнот Windows и скопируйте в него команды, представленные ниже. После этого сохраните файл с расширением .bat — это и будет сценарий для остановки, сброса и перезапуска Центра обновлений Windows (подробнее: Как создать BAT-файл).
@ECHO OFF
echo Sbros Windows Update
echo.
PAUSE
echo.
attrib -h -r -s %windir%\system32\catroot2
attrib -h -r -s %windir%\system32\catroot2\*.*
net stop wuauserv
net stop CryptSvc
net stop BITS
ren %windir%\system32\catroot2 catroot2.old
ren %windir%\SoftwareDistribution SoftwareDistribution.old
ren "%ALLUSERSPROFILE%\application data\Microsoft\Network\downloader" downloader.old
net Start BITS
net start CryptSvc
net start wuauserv
echo.
echo Gotovo
echo.
PAUSE
После того, как файл создан, кликните по нему правой кнопкой мыши и выберите пункт «Запуск от имени администратора», вам будет предложено нажать любую клавишу для начала, после чего по порядку будут выполнены все необходимые действия (еще раз нажимаем любую клавишу и закрываем командную строку).
И, наконец, обязательно перезагрузите компьютер. Сразу после перезагрузки снова зайдите в Центр обновления и посмотрите, исчезли ли ошибки при поиске, скачивании и установке обновлений Windows.
На сайте Майкрософт также приводятся шаги для выполнения всех необходимых действий по сбросу вручную: Сброс центра обновлений Windows вручную.
Скачивание и установка обновлений вручную
Если ошибки возникают при установке какого-то одного обновления, вы можете попробовать вручную скачать его из каталога центра обновления Майкрософт:
- Перейдите на страницу https://www.catalog.update.microsoft.com/Home.aspx
- В поле поиска на странице введите номер обновления, отображаемый в центре обновлений в формате: KB1234567

- Посмотрите, есть ли в результатах поиска доступное для загрузки обновление с этим номером для вашей версии операционной системы. При наличии — скачайте и установите его.

Быстрая переустановка системы с исправлением системных файлов и параметров, но без удаления программ и данных
Если простые способы не помогают, вы можете выполнить быструю переустановку системы с исправлением всех системных файлов и параметров, при этом все ваши программы и данные останутся на месте. Способ подходит для Windows 11 и Windows 10:
- Если у вас имеется ISO-файл с образом текущей ОС, просто смонтируйте его в системе и запустите файл setup.exe, а затем пройдите все этапы установки.

- Если файла образа нет, то для Windows 11 — скачайте оригинальный ISO Windows 11, смонтируйте в системе и запустите файл setup.exe с него. Для Windows 10 — зайдите на страницу https://www.microsoft.com/ru-ru/software-download/windows10 и нажмите кнопку «Скачать средство сейчас». Запустите скачанную программу и на экране «Что вы хотите сделать?» нажмите «Обновить этот компьютер сейчас», далее пройдите все необходимые шаги для установки системы.

К сожалению, не все возможные ошибки обновления Windows можно решить вышеописанным способом (хотя и многие). Если способ вам не помог, то обратите внимание на следующие возможные варианты:
- Попробуйте использовать сторонние программы управления обновлениями Windows для их загрузки и установки.
- Если ранее для отключения обновлений вы использовали какую-то стороннюю программу, попробуйте с помощью неё же вновь включить их.
- Если вы использовали какие-то утилиты для отключения слежки Windows 10, они могли заблокировать доступ к серверам Майкрософт, например, в файле hosts и брандмауэре.
- При наличии сторонних антивирусов на компьютере, попробуйте отключить антивирус и проверить, решило ли это проблему.
- Попробуйте установить DNS 8.8.8.8 и 8.8.4.4 в параметры Интернет-соединения. О том как это сделать: Как изменить адрес DNS-сервера в Windows.
- Отсутствие свободного места (или малое его количество) на системном разделе жесткого диска или SSD также может приводить к ошибкам при скачивании и установке обновлений. Здесь может быть полезным: Как очистить диск C от ненужных файлов.
- Проверьте, запущены ли все необходимые службы (их список приводился ранее).
- Выполните поиск в Интернете по сообщаемому коду ошибки, чтобы узнать о возможных причинах появления ошибки.
- Выполните проверку и восстановление целостности системных файлов Windows. Подробные инструкции: для Windows 11 и для Windows 10.
- Использование VPN или прокси также может влиять на возможность скачивания и установки обновлений.
- Попробуйте выполнить чистую загрузку Windows. Если при чистой загрузке ошибки пропадают, можно сделать вывод, что ошибки вызваны каким-либо сторонним ПО на компьютере.
На самом деле, разных причин, по которым не ищутся, не загружаются и не устанавливаются обновления, может быть множество, но, по моему опыту, представленная информация сможет помочь в большинстве случаев.
Время на прочтение6 мин
Количество просмотров265K
Windows 7 по-прежнему остается популярной операционной системой в корпоративной среде, несмотря на то, что уже вышли две новые версии клиентских ОС. Расширенная поддержка «семёрки» закончится лишь 14 января 2020 г., а это значит, что ближайшие 4 года для нее будут выходить обновления, исправляющие обнаруженные уязвимости.
Существует правило – если есть обновления, то есть и проблемы с их установкой. Давайте разберем, какие основные проблемы возникают при обновлении Windows 7 через Windows Server Update Services (WSUS) и как их исправить с наименьшими затратами.
Ошибка #1. Failed to find updates with error code 80244010
Эту ошибку вы практически гарантированно будете наблюдать на любой системе, впервые обратившейся к серверу WSUS. В WindowsUpdate.log также встретится предупреждение:
WARNING: Exceeded max server round trips
Причина проблемы в том, что список обновлений стал слишком большим, и клиент не может принять его за один заход. Подробности — blogs.technet.microsoft.com/sus/2008/09/18/wsus-clients-fail-with-warning-syncserverupdatesinternal-failed-0x80244010
Какое решение предлагает Microsoft? Если после ошибки запустить повторный поиск обновлений, то процесс загрузки метаданных продолжится с момента возникновения ошибки. Терпение господа, терпение. Три, пять попыток wuauclt /detectnow – и все образуется. Не забудьте при повторном поиске дождаться окончания предыдущего цикла поиска, иначе магия не сработает!
Ошибка #2. Не устанавливаются обновления Windows с ошибкой 0x80070308
Встречается эпизодически, и в одном случае из 100 у нее есть единственное и очень специфическое решение — удалить ключ
HKLM\Components\PendingRequired=1
Перезагрузиться. Здесь важно не переусердствовать, не следует удалять никакие другие ключи в этом разделе, даже если они вам очень не нравятся, потому что после этого обновления прекратят ставиться навсегда.
Ошибка #3. Все другие ошибки
Практически 100% других ошибок может решить System Update Readiness Tool (SURT) из статьи support.microsoft.com/en-us/kb/947821
Скачиваете пакет для вашей системы, устанавливаете, читаете лог %windir%\Logs\CBS\CheckSUR.log и если он заканчивается примерно так:
Summary:
Seconds executed: 1164
Found 16 errors
Fixed 4 errors
то вы наш клиент.
Проблема заключается в том, что во время установки обновлений в системе могут появиться битые файлы. Что является причиной — неисправная сеть, диск, оперативная память, сам Windows Update – выяснить не получится, а исправить ошибки для установки последующих обновлений придется.
Как правило, повреждаются *.cat, *.mum, *.manifest файлы. У кого-то повреждаются *.dll, но я на практике не сталкивался. И вроде бы средство SURT должно само исправить ошибки, поскольку внутри него есть огромный каталог эталонных файлов. Только в последний раз SURT обновлялся в октябре 2014 года, а исправлений на операционную систему с тех пор вышло бесчисленное множество, и многих файлов в каталоге не хватает.
Ниже я опишу последовательность действий, необходимых для исправления ошибок установки обновлений на Windows 7 x64 с использованием SURT. Для редакции x86 просто потребуется другой пакет SURT из KB947821.
Последовательность действий будет следующая.
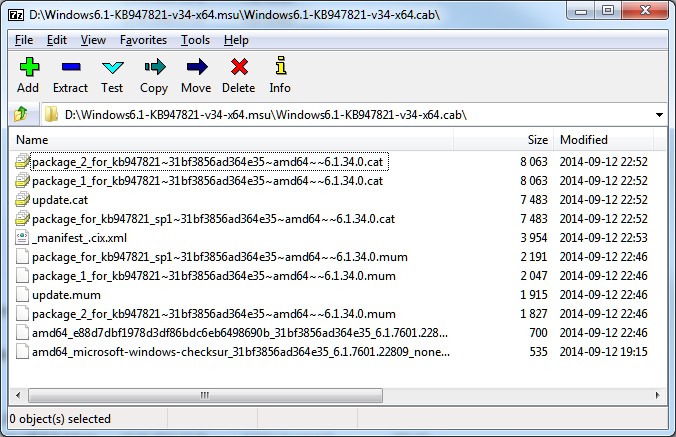
1. Запустить первый проход Windows6.1-KB947821-v34-x64.msu
Пользователя от работы отвлекать не потребуется, все сделаем удаленно. Создаем следующий командный файл и запускаем его:
set machine=BUHWKS02
xcopy Windows6.1-KB947821-v34-x64.msu \\%machine%\admin$\temp
psexec -s \\%machine% wusa "c:\windows\temp\Windows6.1-KB947821-v34-x64.msu" /quiet /norestart
pause
где BUHWKS02 – целевая машина.
Когда скрипт отработает и встанет на паузу, проверяем %windir%\Logs\CBS\CheckSUR.log
Если ошибок не найдено – дело не в битых обновлениях.
Если он заканчивается
Summary:
Seconds executed: 1164
Found 16 errors
Fixed 4 errors
CSI Manifest All Zeros Total count: 6
CSI Catalog Corrupt Total count: 3
Fixed: CSI Catalog Corrupt. Total count: 3
CBS MUM Corrupt Total count: 3
CBS Catalog Corrupt Total count: 3
CSI Catalog Thumbprint Invalid Total count: 1
Fixed: CSI Catalog Thumbprint Invalid. Total count: 1
Unavailable repair files:
winsxs\manifests\wow64_microsoft-windows-gdi32_31bf3856ad364e35_6.1.7601.19091_none_c19fa2719495aca9.manifest
winsxs\manifests\amd64_microsoft-windows-capi2-weakcrypto_31bf3856ad364e35_6.1.7601.23290_none_5e936c9c5ce2e8e6.manifest
winsxs\manifests\wow64_microsoft-windows-gdi32_31bf3856ad364e35_6.1.7601.23290_none_c22840d8adb43043.manifest
winsxs\manifests\amd64_microsoft-windows-gdi32_31bf3856ad364e35_6.1.7601.19091_none_b74af81f6034eaae.manifest
winsxs\manifests\amd64_microsoft-windows-capi2-weakcrypto_31bf3856ad364e35_6.1.7601.19091_none_5e0ace3543c4654c.manifest
winsxs\manifests\amd64_microsoft-windows-gdi32_31bf3856ad364e35_6.1.7601.23290_none_b7d3968679536e48.manifest
servicing\packages\Package_2_for_KB3123479~31bf3856ad364e35~amd64~~6.1.1.0.mum
servicing\packages\Package_2_for_KB3123479~31bf3856ad364e35~amd64~~6.1.1.0.mum
servicing\packages\Package_for_KB3123479_SP1~31bf3856ad364e35~amd64~~6.1.1.0.mum
то будем исправлять.
2. Копируем эталонные файлы на целевую машину
Microsoft предлагает нам длинную, путанную процедуру с извлечением хороших файлов из обновлений и размещением их в определенные каталоги средства SURT. При этом пути в статьях неверные. Где-то и вовсе рекомендуют подкладывать оригинальные msu файлы.
Самый простой и правильный вариант следующий — скопировать эталонные файлы с рабочей системы:
*.mum and *.cat из C:\Windows\servicing\Packages складываются в %windir%\Temp\CheckSUR\servicing\packages
*.manifest из C:\Windows\winsxs\Manifests складываются в %windir%\Temp\CheckSUR\winsxs\manifests\
Проблема в том, что битых файлов обычно десятки, и их очень сложно выбрать и скопировать. Тогда на помощь приходит следующий скрипт PowerShell (эталонной считается машина, с которой вы запускаете скрипт)
cls
$flag = $false
$destPC = "\\BUHWKS02"
$log=get-content $($destPC + "\admin$\Logs\CBS\CheckSUR.log")
$MUMCATSource = "C:\Windows\servicing\Packages\"
$MUMCATDest = $destpc + "\admin$\Temp\CheckSUR\servicing\Packages\"
$MANIFESTSource = "C:\Windows\winsxs\Manifests\"
$MANIFESTDest = $destpc + "\admin$\Temp\CheckSUR\winsxs\Manifests\"
If ((Test-Path -Path $MUMCATDest -PathType Container) -eq $false) {New-Item -Path $MUMCATDest -ItemType directory }
If ((Test-Path -Path $MANIFESTDest -PathType Container) -eq $false) {New-Item -Path $MANIFESTDest -ItemType directory}
foreach ($line in $log) {
    if ($flag -eq $True){
        if ($line.trim().Length -ne 0) {
            $fileArray=$($line.Split("\"))
            $file = $FileArray[$FileArray.Length-1]
            $extArray = $file.split(".")
            $ext = $extArray[$extArray.length-1]
            if ($ext -eq "manifest") {
                Write-Warning $("Copying " + $($MANIFESTSource+$file)+" to " + $MANIFESTDest)
                Copy-Item $($MANIFESTSource+$file) $($MANIFESTDest+$file)
            }
            if (($ext -eq "mum") -or ($ext -eq "cat") ) {
                Write-Warning $("Copying " + $($MUMCATSource+$file)+" to " + $MUMCATDest)
                Copy-Item $($MUMCATSource+$file) $($MUMCATDest+$file)
            }
        }
    }
    if ($line -eq "Unavailable repair files:") {$flag = $true}
}
Как видите, скрипт прост и может быть легко заточен напильником под вашу инфраструктуру.
3. Запускаем второй проход Windows6.1-KB947821-v34-x64.msu
После копирования файлов мы повторно запускаем SURT, используя командный файл из первого шага. При повторном запуске средство сможет подхватить скопированные нами эталонные файлы из %windir%\Temp\CheckSUR и заменить ими испорченные.
Если мы сделали все правильно, то %windir%\Logs\CBS\CheckSUR.log примет следующий вид:
=================================
Checking System Update Readiness.
Binary Version 6.1.7601.22471
Package Version 26.0
2016-03-03 09:15
Checking Windows Servicing Packages
Checking Package Manifests and Catalogs
Checking Package Watchlist
Checking Component Watchlist
Checking Packages
Checking Component Store
Summary:
Seconds executed: 1435
No errors detected
Теперь можно продолжить установку обновлений на целевую машину, например, следующими командными файлами:
set machine= BUHWKS02

psexec -i -s \\%machine% wuauclt /detectnow

pause
set machine= BUHWKS02
psexec -i -s \\%machine% wuauclt /updatenow
pause
Ошибка #4. Если SURT отработал нормально, а обновления все равно не ставятся
Попробуйте прибегнуть к старому приему – сбросить службу Windows Update в исходное состояние. Для этого необходимо удалить каталог %windir%\SoftwareDistribution.
Создаем файл WU-cleanupCMD.cmd:
net stop wuauserv

rmdir /s /q %windir%\SoftwareDistribution

net start wuauserv

wuauclt /detectnow
Запускаем:
set machine= BUHWKS02

psexec -c -s \\%machine% WU-cleanupCMD.cmd

pause
После этого возникнет Ошибка #1, но как бороться с ней мы уже знаем.
Ошибка #5
Клиент исчезает из консоли WSUS. Любопытная ошибка, связанная с неправильным клонированием машин и задвоением (затроением и т.д.) идентификаторов клиентов. Решается так:
net stop wuauserv
REG DELETE "HKLM\SOFTWARE\Microsoft\Windows\CurrentVersion\WindowsUpdate" /v SusClientId /f
REG DELETE "HKLM\SOFTWARE\Microsoft\Windows\CurrentVersion\WindowsUpdate" /v SusClientIdValidation /f
net start wuauserv
wuauclt /resetauthorization /detectnow /reportnow
Ошибка #6
GetCookie failure, error = 0x8024400D, soap client error = 7, soap error code = 300, HTTP status code = 200
SyncUpdates failure, error = 0x80072EE2, soap client error = 5, soap error code = 0, HTTP status code = 200
Windows Update Client failed to detect with error 0x80072ee2
Ошибка связана с нехваткой ресурсов в AppPool WSUS. Решение — снять лимит на потребляемую память. Как это сделать — статья.
Коротко: Открываем IIS, Application Pools, WsusPool, Advanced Settings.
Параметр Private Memory Limit устанавливаем в 0.
Продолжение темы настройки WSUS — в моей следующей статье: https://habrahabr.ru/post/329440/
PS:
Многие ошибки решены в новом клиенте WSUS:
1. KB3125574 «Windows 7 post SP1 Convenience Rollup Update». Внимательно ознакомьтесь с разделом Known issues!
Предварительно необходимо установить KB3020369 «April 2015 servicing stack update for Windows 7 and Windows Server 2008 R2».
Удачного администрирования!
While it has been more than five years since mainstream support for Windows 7 ended, many computers still run the beloved Windows 7 OS. Surprisingly, as of July 2020, almost 20% of computers running on the Windows operating system continue to use the older Windows 7 version. Although the latest and greatest by Microsoft, Windows 10, is much more advanced in terms of features and design, many computer users avoid updating from Windows 7 due to its simplicity and ability to run smoothly on older systems and less powerful hardware.
However, with Windows 7 nearing its end, new operating system updates are extremely rare and arrive only once in a blue moon. These updates, usually seamless, can sometimes be quite a headache to download and install. Windows update service has been designed to quietly work in the background, download new updates whenever available, install some, and save others for when a computer restart is performed. Although, users across Windows 7,8 and 10 have reported a number of issues when trying to update their OS.
The most common problem faced is Windows Update gets stuck at 0% when downloading the fresh updates or at the ‘searching/checking for updates’ phase. Users can solve these issues regarding Windows 7 updates by implementing one of the below-explained solutions.
Table of Contents
How to fix Windows 7 Updates Won’t Download issue?
Depending on the root of the issue, a variety of solutions seem to resolve the problem for users. The most common and easiest solution is to run the built-in Windows Update troubleshooter, followed by restarting the Windows Update Service. You can also disable your antivirus program temporarily or perform a clean boot and then try to download the update. Also, updating Windows 7 requires Internet Explorer 11 and the latest version of the .NET framework installed on your computer. So, first, check if you have these programs and, if not, download and install them to solve the ‘updates not downloading’ issue. Ultimately and unluckily, if nothing works, you can always manually download and install the new Windows 7 updates.
Method 1: Run the Windows Update Troubleshooter
Before moving to the advanced and more cumbersome methods, you should try running the Windows update troubleshooter to resolve any issues you might be facing with the updating process. The troubleshooter is available on all versions of Windows (7,8 and 10). The troubleshooter does a number of things automatically like restarting the Windows update service, renaming the SoftwareDistribution folder to clear the download cache, etc.
1. Click on the Start button or press the Windows key on your keyboard and search for Troubleshoot. Click on Troubleshooting to launch the program. You can also open the same from the Control Panel.

2. Under System and Security, click on Fix problems with Windows Update.

3. Click on Advanced in the following window.

4. Select Apply repairs automatically and finally click on Next to start troubleshooting.

The Windows Update troubleshooter may be absent on some computers. They can download the troubleshooter program from here: Windows Update Troubleshooter. Once downloaded, open the Downloads folder, double-click on the WindowsUpdate.diagcab file to run it, and follow the on-screen instructions to complete the troubleshooting process.
Method 2: Restart Windows Update Service
All software update related activities like downloading and installing are controlled by the Windows Update service that continually runs in the background. A corrupt Windows Update service can lead to updates being stuck at 0% download. Reset the problematic use and then try downloading the new updates. While the Windows Update troubleshooter performs the same action, doing it manually can help in resolving the issue.
1. Press Windows key + R on your keyboard to launch the Run command box, type services.msc, and click on OK to open the Services application.

2. In the list of local services, locate Windows Update.
3. Select the Windows Update service and then click on Restart present on the left (above the service description) or right-click on the service and select Restart from the ensuing context menu.

Method 3: Check if you have Internet Explorer 11 and .NET 4.7 (Prerequisites for updating Windows 7)
As mentioned earlier, to update Windows7, your computer needs to have Internet Explorer 11 and the latest .NET framework. Sometimes, you might be successful in performing an update without these programs, but that’s not always the case.
1. Visit Download Microsoft .NET Framework 4.7and click on the red Download button to start downloading the latest version of .NET Framework.

Once downloaded, locate the downloaded file and follow the on-screen instructions to install it. Also, ensure you have constant internet access when installing the .NET framework.
2. Now, it is time to enable/check the integrity of the newly installed .NET 4.7 framework.
3. Type Control or Control Panel in the Run command box or Windows search bar and press enter to open the Control Panel.

4. Click on Programs and Features from the list of All Control Panel Items. You can adjust the size of the icons to small or big by clicking on View by option to make looking for an item easier.

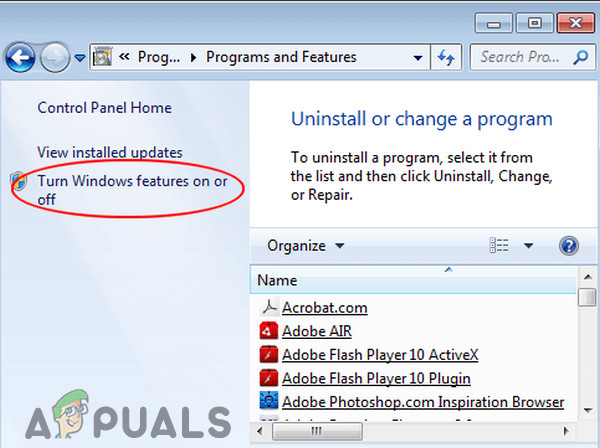
5. In the following window, click on Turn Windows feature on or off (present on the left.)

6. Locate the .NET 4.7 entry and check if the feature is enabled. If it isn’t, click on the checkbox next to it to enable. Click on OK to save the changes and exit.
Although, if .NET 4.7 was already enabled, we would need to repair/fix it and the process to do so is quite simple. First, disable the .NET framework by unticking the box next to it and then perform a computer restart to fix the tool.
Next, you will also need to have Internet Explorer 11 to be able to install any new Windows 7 updates that Microsoft releases.
1. Visit Internet Explorer in your preferred web browser and download the appropriate version of the application (either 32 or 64 bit) depending on the Windows 7 OS installed on your computer.
2. Open the downloaded .exe file (if you accidentally closed the downloads bar while the file was still being downloaded, press Ctrl + J or check your Downloads folder) and follow the on-screen instructions/prompts to install the application.
Method 4: Try to update after a clean boot
Apart from inherent problems with the Windows Update service, it is also quite possible that one of the many third-party applications you have installed on your computer might be interfering with the update process. If this is indeed the case, you can try to install the update after performing a clean boot in which only the essential services and drivers are loaded.
1. Open the system configuration tool by typing msconfig in the Run command box or search bar and then pressing enter.

2. Hop over to the Services tab of the msconfig window and tick the box next to Hide all Microsoft Services.
3. Now, click on the Disable All button to disable all the remaining third-party services.

4. Switch to the Startup tab and again click on Disable All.
5. Click on Apply, followed by OK. Now, restart your computer and then try downloading the new update.
If you were successful in installing the update, open the system configuration tool again, and enable all the services back on. Similarly, enable all the startup services and then restart your PC to boot back normally.
Method 5: Disable Windows Firewall
Sometimes, the Windows Firewall itself prevents the new update files from being downloaded, and some users have indeed reported solving the issue by temporarily disabling the Windows Firewall.
1. Open the control panel and click on Windows Defender Firewall.

2. In the following window, select Turn Windows Defender Firewall on or off from the left pane.

3. Lastly, click on the radio buttons next to Turn off Windows Defender Firewall (not recommended) under both Private and Public Network Settings. Click on OK to save and exit.

Also, disable any third-party antivirus/firewall program you might have running and then try downloading the updates.
Method 6: Modify Security Permissions of the SoftwareDistribution Folder
You also won’t download the Windows 7 updates if the Windows Update service fails to write the information from the .log file at C:\WINDOWS\WindowsUpdate.log to the SoftwareDistribution folder. This failure to report data can be rectified by allowing Full Control of the SoftwareDistribution folder to the user.
1. Open Windows File Explorer (or My PC in older versions of Windows) by double-clicking on its shortcut on the desktop or using the hotkey combination Windows key + E.
2. Navigate to the following address C:\Windows and locate the SoftwareDistribution folder.
3. Right-click on the SoftwareDistribution folder and select Properties from the ensuing context menu or select the folder and press Alt + Enter.

4. Switch to the Security tab of the SoftwareDistribution Properties window and click on the Advanced button.
5. Switch to the Owner tab and Click on Change next to the Owner.
6. Enter your username in the textbox under ‘Enter the object name to select’ or click on the Advanced option and then select your username.
7. Click on Check Names (your username will be verified in a couple of seconds, and you will be prompted to enter the password if you have one set) and then on OK.
8. Once again, right-click on the SoftwareDistribution folder and select Properties.
Click on Edit… under the Security tab.
9. First, choose the user name or user group by clicking on it and then check the box for Full Control under the Allow column.
Method 7: Download and install new updates manually
Finally, if none of the above solutions did the trick for you, then it is time to take matters into your hands and install the new OS updates manually. The Windows Update service might be failing to download the latest updates if it requires to be updated.
1. Based on your system architecture, download the 32-bit or 64-bit version of the servicing stack by visiting any of the following links:
Download Update for Windows 7 for x64-based Systems (KB3020369)
Download Update for Windows 7 for x32-based Systems (KB3020369)
2. Now, open Control Panel (Type control in Run command box and press OK) and click on System and Security.
3. Click on Windows Update, followed by Change Settings.
4. Expand the Important Updates drop-down menu and select ‘Never Check For Updates (Not Recommended)’.

5. Click on the OK button to save the changes and perform a computer restart.
6. Once your computer boots back up, head over to the Downloads folder and double-click on the KB3020369 file you downloaded in the first step. Follow all the on-screen instructions to install the servicing stack.
7. Now, it is time to install the July 2016 update for Windows 7. Again, based on your system architecture, download the appropriate file, and install it.
Download Update for Windows 7 for x64-based Systems (KB3172605)
8. After your computer restarts as part of the installation process, head back to Windows Update in the Control Panel and change the settings back to ‘Install updates automatically (recommended)’.
Now, click on Check for updates, and you should not face any problems in downloading or installing them via the Windows Update tool.
So those were seven different methods that have been reported to solve issues related to Windows 7 updates not downloading; let us know which one worked for you in the comments below.
,
This tutorial contains several methods to fix Windows Update Problems in Windows 7/8/8.1 & Server 2008/2012 OS. In many cases, even in fresh Windows installations, the Windows Update is not working as expected, or it stuck when checking for updates or it displays several errors whenever you try to search for the available updates.
In such cases your system may become slow or unresponsive, because the Windows Update service (svchost.exe) causes high CPU usage. The Windows Update service is an essential feature in all Windows versions, because it is needed to provide all the available important and optional updates needed for the proper Windows operation and security.

The Windows Update problems often occur on Windows 7 or Vista based computers and in most cases, the errors are caused without any obvious reason and without a permanent solution to fix them from Microsoft. For all these reasons, I decided to write this troubleshooting guide, with the most efficient methods to resolve Windows Update problems on Windows 8.1, 8, 7 & Server 2008 or Server 2012.
Problems-Symptoms that are solved with this guide:
Windows Update is checking for updates forever.
Windows Update stuck/freezes.
Windows Update cannot find new updates.
Windows Update cannot currently check for updates because the service is not running.
Windows Update occurred an Unknown error: Code 8007000E
How to Solve Windows Update Issues on Windows 7/8/8.1 & Server 2008/2012
Important:
1. Before proceeding to apply the methods below, in order to troubleshoot Window Update problems, make sure that the Date and Time settings are correct on your system.
2. Try the following trick: Change the Windows Update settings from «Install updates automatically» to «Never check for updates (not recommended)» & restart your system, After restart set the update settings back to «Install updates automatically« and then check for updates. If this trick fails then set the Windows Update Settings to «Check for updates but let me choose whether to download and install them» and then check for updates again.
3. If you have performed a fresh Windows 7 or Server 2008 installation, install Service Pack 1 for Windows 7 or Windows Server 2008 R2, before you continue.
4. Make sure that your computer is clean from viruses and malware. To accomplish this task you can use this Malware Scan and Removal Guide to check and remove viruses or/and malicious programs that may be running on your computer.
Method 1. Force Windows to re-create the Windows Update Store folder.
Method 2. Install the KB3102810 security Update.
Method 3. Install the latest Update Rollup.
Method 4. Run the Windows Update Troubleshooter.
Method 5. FIX Corrupted System Files and Services (SFC).
Method 6: FIX Windows corruption errors with the System Update Readiness tool (DISM).
Method 7: Update Windows by using the WSUS Offline Update tool.
Method 1. Force Windows to re-create the Windows Update Store folder
The Windows Update Store folder (commonly known as «SoftwareDistribution» folder), is the location where Windows stores the downloaded updates.
-If the SoftwareDistribution folder becomes corrupted then it causes problems with Windows Update. So, one of the most efficient solutions to resolve problems with Windows Update, is to recreate the SoftwareDistribution folder. To do that:
1. Simultaneously press the Windows + R keys to open run command box.
2. In run command box, type: services.msc and press Enter.

3. Right click on Windows Update service and select Stop.

4. Open Windows Explorer and navigate to C:\Windows folder.
5. Select and Delete the “SoftwareDistribution” folder.*
(Click Continue at «Folder Access Denied» window).
* Note: The next time that the Windows Update will run, a new empty SoftwareDistribution folder will be automatically created by Windows to store updates.

6. Restart your computer and then try to check for updates.
Method 2. Install the KB3102810 (KB3102812) security Update.
I have seen many times, that Windows Update is checking for updates forever (stuck) without finding updates, even in fresh Windows 8, 7 or Vista installations. Thankfully, Microsoft has released a security update to resolve the «Installing and searching for updates is slow and CPU utilization is high» issue. To apply the fix:
Step 1. Install Internet Explorer 11. *
* Note: This step is applied only to a fresh Windows 7 or Windows 2008 installation. If Internet Explorer 11 is already installed on your system, then skip this step and continue to step 2 below.
1. Download and install Internet Explorer 11 according to your OS version.
2. Restart your computer.
Step 2. Install the KB3102810 Update.
1. Download – but do not install it yet – the following security update according to your OS version, to your computer:
- Windows 7 & Server 2008: KB3102810
- Windows 8.1 & Server 2012: KB31028102
2. After the download, restart your computer.
3. After the restart, immediately install the security update, otherwise the installation hangs.
4. After the installation, restart your computer.
Step 3. Delete the SoftwareDistribution folder.
1. Follow the steps in Method-1 and delete the «SoftwareDistribution» folder.
2. Restart your computer.
2. Navigate to Windows Update and check for updates. Then, let it run at-least half to one hour. If you ‘re lucky, Windows will find all available updates.
Method 3. Install the latest Update Rollup to fix Windows Update issues.
The Windows Update Rollups, in most cases can fix issues with Windows Update. But before installing the latest Windows update rollup, first change the way that Windows install updates to «Never check for updates (not recommended«. To do that:
1. Simultaneously press the Windows + R keys to open run command box.
2. In run command box, type: wuapp.exe and press Enter.

3. Select Change settings on the left.

4. Set Never check for updates (not recommended).

6. Proceed and download the latest Windows Update rollup for your system, but don’t install it (yet).
July 2016 update rollup for Windows 7 SP1 and Windows Server 2008 R2 SP1
July 2016 update rollup for Windows 8.1 and Windows Server 2012 R2
September 2016 update rollup for Windows 7 SP1 and Windows Server 2008 R2 SP1
September 2016 update rollup for Windows 8.1 and Windows Server 2012 R2
7. After the download, restart your computer.
8. After restart, then proceed and install the downloaded rollup.
9. Check for updates.
Method 4. Run the Windows Update Troubleshooter.
Microsoft offered the Windows Update Troubleshooter tool, in order to fix problems with Windows Update.
1. Navigate to Control Panel > All Control Panel Items > Troubleshooting > Fix Problems with Windows Update.
2. Click Next and let Windows to try to fix the update problems.
3. When the repair is completed, restart you PC and check for updates again.
Method 5. FIX Corrupted System Files and Services (SFC).
The next method to solve Windows Update problems is to run the System File Checker (SFC) tool in order to fix Windows’ corrupted files and services. To do that:
1. Open an elevated command prompt:
- Right click at Windows start button and select Command Prompt (Admin)
2. In the command window, type the following command and press Enter.
- SFC /SCANNOW

3. Wait and do not use your computer until SFC tool checks and fixes the corrupted system files or services.
4. When SFC tool finishes, reboot your computer and check for Updates.
Method 6: FIX Windows corruption errors with the System Update Readiness tool (DISM).
The System Update Readiness tool is a Microsoft tool that can fix Windows corruption errors.
Windows 7, Vista & Server 2008:
1. Download and save to your desktop the System Update Readiness tool according to your Windows version.
2. Double click to install the downloaded file (e.g. Windows6.1-KB947821-v34-x86.msu).
3. When the installation is completed, restart your computer and try to install Windows Updates.
Windows 8, 8.1 & Server 2012:
1. Right click at Windows start button and select Command Prompt (Admin).
2. At the command prompt window, type the following command & press Enter:
- Dism.exe /Online /Cleanup-Image /Restorehealth

3. Be patient until DISM repairs component store.

4. When the operation is completed, you should be informed that the component store corruption was repaired.

5. Close command prompt window and restart your computer.
6. Check for updates.
Method 7: Update Windows by using the WSUS Offline Update tool. (Windows 10, 8.1, 8 or 7)
1. Download the latest version of WSUS Offline Update utility.
2. After the download, extract the «wsusoffline.zip» file.
3. From the «wususoffline» folder, double click at UpdateGenerator.exe application.
4. At Windows tab, select the Windows Edition, that you are using.
5. Press the Start button.

6. Be patient until the WSUS Offline Update utility downloads all the available updates.

7. When the download is completed, open the client folder (wsusoffline\client) and double click at «UpdateInstaller.exe» application.
8. Place a check at «Automatic reboot and recall» checkbox.
9. Finally press the Start button and be patient until the WSUS Offline Update installer, installs the downloaded updates to your system.

That’s it! Which method worked for you?
Let me know if this guide has helped you by leaving your comment about your experience. Please like and share this guide to help others.
If this article was useful for you, please consider supporting us by making a donation. Even $1 can a make a huge difference for us in our effort to continue to help others while keeping this site free:
- Author
- Recent Posts
Konstantinos is the founder and administrator of Wintips.org. Since 1995 he works and provides IT support as a computer and network expert to individuals and large companies. He is specialized in solving problems related to Windows or other Microsoft products (Windows Server, Office, Microsoft 365, etc.).
Even though Windows 7 is quite an old OS, plenty of people still choose to keep on their PCs and they avoid installing new operating systems because of the way Windows 7 was designed. However, as years go by, updates for Windows 7 are harder to acquire and Microsoft is simply not paying enough attention to the OS as they should.

If Windows 7 updates are not downloading properly, you will need to follow the methods located in the article below to fix it. The usual updating issue is that the downloading updates window simply hangs on at 0% downloaded. Let’s try and fix this.
But before moving on with the solution, make sure your internet connection is not marked as a metered connection. Even if it is not marked as a metered connection, turn on downloading over metered connections.
Moreover, leave the system in updating position for at least one or two hours and then check the software distribution folder, if its size has increased then wait till updates are finished.
Do not forget to create a system restore point before trying the solutions.
Solution 1: Download the Prerequisites Needed for the Install
The Windows 7 updating process needs to be prepared for by downloading and installing the prerequisites such as Internet Explorer 11 and .NET 4.6.1. The updating process will sometimes succeed without these tools but to make sure everything goes as it should, downloading these tools is a must.
It’s also to update and verify the integrity of your Microsoft .NET Framework installation, which should be updated fully. Even if you have the latest version installed on your PC, you will need to test its integrity and even repair it if it’s necessary.
Navigate to this link and click the red download button to download the latest version of the Microsoft .NET Framework. After the download has finished, locate the file you downloaded and run it. Note that you will need to have constant access to the Internet.
- After installing the latest version, it’s time to check its integrity. On your keyboard, use the Windows Key + R key combination to open the Run dialog box.
- Type in Control Panel and click OK to open it.
Open Control Panel - Click the Uninstall a Program option and click Turn Windows features on or off.

Turn Windows Features on or off - Make sure you locate the .NET Framework 4.6.1 entry and make sure it’s enabled.
- If the checkbox next to .NET Framework 4.6.1 is not enabled, enable it by clicking the box. Click OK to close the Windows Feature window and reboot the computer.
- If .Net Framework 4.6.1 is already enabled, you can repair .Net Framework by clearing the box and rebooting the computer. After the computer has restarted, re-enable .Net Framework and restart the computer again.
It’s also important to have Internet Explorer 11 installed on your computer before you can download and install the updates to Windows 7. Follow the instructions below to do so.
- Navigate to this link and choose which version of Internet Explorer 11 you would like to download. The most common choice will be to either choose the Internet Explorer 11 (32 or 64 bit) depending on the type of Windows 7 you currently have installed.

Download Internet Explorer 11 - Click on Next and download the installer file on your computer. Locate it in the Downloads folder or simply click on it in the browser download history and follow the instructions on the screen to install it successfully.
- Check to see if you are now able to update Windows 7 successfully.

Solution 2: Download and Install the Updates Manually
It’s always a good choice to try and solve the problem yourself instead of waiting for Windows to stop throwing the error. Manual updates are usually much less prone to errors as the process is not executed automatically. The process of installing is somewhat more complicated but it’s nothing too difficult and you will end up with a fully updated PC.
- Navigate to this page and locate the latest Servicing Stack Update for your version of Windows 7. The current version will be displayed in bold. You will need to install the Servicing Stack Update before you can download and install the July 2016 Rollup.

Download Servicing Stack Update - These updates are a must if you want to avoid the endless search for new updates on your computer as these updates contain the upgraded version of the Update Agent which means you won’t struggle with the future updates.
- Download the files to your computer, close all programs, run the files, and follow the instructions on the screen to complete the update. Make sure you first install the Servicing Stack Update and then the July Rollup.

Check to see if the search for updates is successful.
Note: You may notice that the updates fail to install as soon as you download them. That occurs because the Windows Update service has already started and you will need to disable it before you initiate the installation. Here is how to disable it:
- Open the Run dialog box by using the Windows Key + R key combination. Type “services.msc” without the quotation marks in the Run dialog box and click OK.
Open Services.msc - Locate the Windows Update Service, right-click on them and select Properties.

Windows Update Service - Make sure that the option under Startup type in Windows Store Services’ Properties is set to Delayed Start.

Startup Type Delayed Start - If the service is already running (you can check that just next to the Service status message), you can stop it immediately by clicking on the Stop button.


You may receive the following error message when you click on Stop:
“Windows could not stop the Windows Update Service on Local Computer. Error 1079: The account specified for this service differs from the account specified for other services running in the same process.”
If this occurs, follow the instructions below to fix it.
- Follow steps 1-3 from the instructions above to open Windows Update Service properties.
- Navigate to the Log On tab and click on the Browser… button.

Log On with Other Account - Under the “Enter the object name to select” box, type in your computer’s name and click on Check Names and wait for the name to become authenticated.

Enter Name to Search for the User - Click OK when you are done and type in the administrator password in the Password box when you are prompted with it.
- Click OK and close this window.


While you are still in the Services window, locate the Windows Modules Installer and check to see if its startup type is set to automatic. If it’s not, change its startup type do automatic and check to see if the problem is solved.
Solution 3: Use the Microsoft FixIt Tool
The FixIt tool was specifically designed by Microsoft to help with the updating issues and we highly recommend you try it out, especially if the updating process is stuck at 0%. Some users claim it worked perfectly, others claim it didn’t, but it’s worth a shot.
Download the file by navigating to this link. The file can no longer be found on Microsoft’s official website since they abandoned the project, but this link is more than enough.
You can also download and launch the Windows Update Troubleshooter, and then follow the instructions displayed on the screen to complete the troubleshooting process. Do note that this will require administrative access and some ample time. Once the process is started, it is recommended not to stop it till it completes.
Locate the file in your Downloads folder, run it, and follow the instructions on the screen. The tool will scan your computer for errors. Run the update settings after the scanner finishes and check to see if the updates are installing.
Solution 4: Modify the Permissions for the SoftwareDistribution Folder
Some users claim that the .log file from the location C:\WINDOWS\WindowsUpdate.log contains information that the update service was trying to write to the SoftwareDistribution folder but it failed to do so.
We recommend you navigate to the same location and check to see if a similar message is displayed. If it is, follow the instructions below to modify access and give permission to modify the contents of the folder.
- Open File Explorer, and then locate the SoftwareDistribution folder by navigating to this location:
C:\windows\SoftwareDistribution\
- Right-click the folder, click Properties, and then click the Security tab.
Open Security Tab - Click the Advanced button. The “Advanced Security Settings” window will appear. Here you need to change the Owner of the key.
- Click the Change link next to the “Owner:” label The Select User or Group window will appear.
- Select the user account via the Advanced button or just type your user account in the area which says ‘Enter the object name to select‘ and click OK.

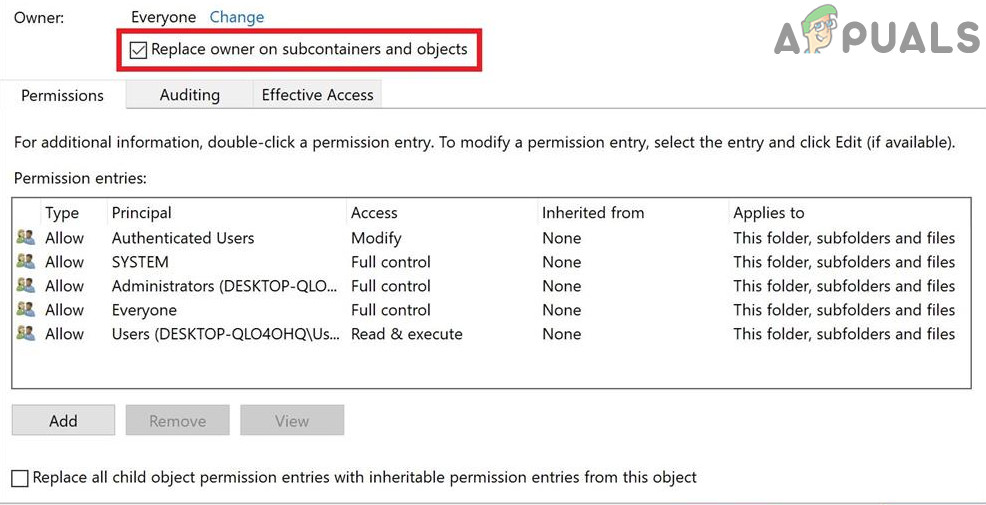
Find the user account - Optionally, to change the owner of all subfolders and files inside the folder, select the checkbox “Replace Owner on subcontainers and Objects” in the “Advanced Security Settings” window. Click OK to change the ownership.

Replace Owner on subcontainers and Objects - Now you need to provide full access to the file or folder for your account. Right-click the file or folder again, click Properties and then click the Security tab.
- Click the Add button. The “Permission Entry” window will appear on the screen: Windows 10 take ownership 7 permission for entry
- Click “Select a principal” and select your account. Set permissions to “Full control” and click OK. Optionally, click “Replace all existing inheritable permissions on all descendants with inheritable permissions from this object” in the “Advanced Security Settings” window to gain access to internal files and folders.

Solution 5: Update After Clean Booting the System
The problem may occur because of other services interfering with the updating process. This can only be fixed by running the update in the clean boot without anything unnecessary for the system to work.
While you are in clean boot, run the updating process and wait for it to finish. After the updates have downloaded and installed successfully, you can exit the clean boot mode and continue using your PC normally.
Solution 6: Turn off Firewall
Several users have reported that the Firewall caused these issues for them and the only thing they needed to do to fix the problem was to disable the Firewall. We will use Windows Firewall for illustration purposes, you may follow the instructions as per your Firewall.
- Open Control Panel by searching for it after pressing the Start button located at the bottom left part of your desktop.
- Change the View by option to Small icons and locate the Windows Defender Firewall option.

Open Windows Defender Firewall - Click on it and select the Turn Windows Firewall on or off option located at the menu on the left side of the window.
- Click the radio button next to the “Turn off Windows Firewall (not recommended)” option next to both the Private and Public network settings. And check if you can download updates.

Turn Off Windows Firewall


Solution 7: Install Updates Manually
Installing the updates automatically without warning the users is not recommended in all cases since the process can slow down your computer without your knowing it and it’s not recommended to everyone, but changing the settings like this may help you fix this problem in particular.
- Navigate to Control Panel >> System and Security >> Windows Update and locate the “Never check for updates (not recommended)” option and click OK.

Never check for updates (not recommended) - Install KB3020369& Restart
- Install KB3125574& Restart
- Install KB3138612& Restart
- Install KB3145739& Restart
- Install the cumulative rollup: January 2017 (KB3212646) & Restart.
- Also, Change the Windows Update setting to Install updates automatically (recommended) and click OK. This should reset the problem and the update should proceed to download.

We have covered similar issues in other articles which may help with this situation as well. If the methods listed above did not resolve the issue for you please do check the following guides: Windows 7 Stuck on Checking for Updates.