
While installing the Windows 10 cumulative updates, many users are reported getting error code 0x8024500c. Commonly, the stop code points out that the related Windows Update service has been blocked somehow. Misconfigured system files are also a reason behind this issue in both Windows 11 and Windows 10.
Additionally, an incomplete install/uninstall, deletion of basic programs/hardware and corrupted registry entries may also lead to Windows Update Error 0x8024500c. Once got affected, you may also encounter the same trouble during downloading app updates via Microsoft store.
Windows Update Error 0x8024500c Solutions
Here is how to fix Windows Update Error 0x8024500c in Windows 11/10 –
1] Download the updates manually
Error 0x8024500C mostly appears because of failed Windows Update specifically the cumulative and security updates. However, you are able to download them and manually install by going through Microsoft update catalog. First of all, you need to find out the update which has failed. Here is how to proceed –
For Windows 10 –
- Press Windows key and I simultaneously and choose Update & Security from the interface of Settings app.
- On the subsequent page, shift to right pane and click the option named View Update History.
- Feature updates don’t generate error code 0x8024500C, so you need to look into the Quality Updates and find out the particular KB number that has been failed to install.
- Thereafter, navigate to Windows update catalog and use its search to get the cumulative update version.
- Once you get it, download the same and install it as well.
For Windows 11
- Press – Windows + I.
- When Settings page appears, select – Windows Update from left column.
- Move to right and click – Check for updates.
- If any patch is available, it will be downloaded and installed automatically.
- After completion, click – Restart now to make the installation take place.
2] Look over the status of related Windows Update Services
Services that support Windows update predominantly often become disabled and stop functioning. As a result, Windows Update Error 0x8024500c makes appearance. To solve such issues, check the status of involved basic Windows service and take necessary steps accordingly. Steps are as follows –
- Right-click on Start button and select Run from the visible power user menu.
- Type services.msc in the text field and hit Enter.
- Once, Windows Services comes into sight, look for the following services –
1] Background Intelligent Transfer Service (BITS)
2] Delivery Optimization
3] Windows Update
4] Windows Update Medic Service
- If the status of any service mentioned above is blank or disabled, you need to turn it on. For that, right-click on the concerned service and choose Start.
3] Bring Windows update troubleshooter into play
Error code 0x8024500c is an update related issue and to fix it automatically you can take help of built-in Windows troubleshooter. After running the utility, it will identify the problem first and then suggest a fix to obliterate the stop code. Here is how to use it –
For Windows 10
- Click on the notification icon from the right end of Taskbar.
- Select All settings.
- On the Windows Settings app page, click Update & Security.
- Next, choose Troubleshoot from the left column and move to adjacent right.
- Click on Additional troubleshooters link.
- Look for Windows Update option. Once found, click on the same and hit Run the troubleshooter button.
- Once the action ends, apply the fix suggested by the utility to get rid of Windows Update Error 0x8024500c.
For Windows 11
- Right-click on Start button and choose – Settings.
- Move to the right pane of appearing window.
- Go down to find – Troubleshoot.
- Once you get it, select the same.
- From the next page, click – Other troubleshooters.
- Hit Run present next to Windows Update.
- Follow on-screen instructions to continue the process.
4] Run troubleshooter for Windows store app
If troubleshooting the Windows update didn’t work to fix the issue, there might be a possibility that the store app is throwing 0x8024500c. Therefore, it is wise to run troubleshooter for Windows store apps too. To do so –
- Open Control Panel first and then choose Troubleshooting from its user interface.
- On the consequent page, View all link located in the left pane.
- When All items show up, click Windows Store Apps from the list.
- Hit the Next button to initiate the troubleshooting process.
- Once the tool identifies the Windows update problem, do accordingly by viewing the result.
5] Reset Microsoft store
Once a quality update failed to install, you come across error code 0x8024500c while installing app updates. As the stop code is somehow linked to Microsoft store, reset the same to delete any existing junk files.
- Click the search icon located in the Taskbar and type in cmd.exe.
- When Command prompt in the result becomes visible, choose Run as administrator option evident in the right pane.
- A UAC will prompt up, click Yes to grant it.
- On the command prompt window, type the following line and hit Enter key to execute the same –
WSReset.exe
- Now, wait until Microsoft Store comes into the view and then try to install or update the apps to see if it’s working.
You me get also help from 5 Ways to Reset Microsoft Store in Windows 10.
6] Repair corrupted registry entries
Anything wrong in the registry entry may lead to Windows Update Error 0x8024500c. Hence, you need to check the entry first and if any value is incorrectly put, fix it up. To do so –
- Press Windows+R hotkey at once to invoke Run dialog box.
- Write down regedit in the empty text box and click the OK button.
- If a User Account Control appears to access permission, click the Yes button.
- When Registry Editor window turns up, navigate the following path –
HKEY_LOCAL_MACHINE\Software\Policies\Microsoft\Windows\WindowsUpdate
- Move to the right-hand side and double-click on the DWORD value named DisableWindowsUpdateAccess.
- In the Value data box, put 0 and click OK to save the changes.
- Finally, reboot your PC for the modifications to take effect.
7] Put proxy connections out of action
In case the proxy settings of your PC have gone corrupt, disable the same to be rescued from error code 0x8024500c. Follow along with the below instructions to move ahead –
- Open Run Dialog box and type inetcpl.cpl in the specific bar followed by hitting Enter.
- When the system pulls up Internet Properties wizard, jump to its Connections tab.
- From the bottom, click LAN settings button.
- On the imminent pop-up, uncheck the box assigned for Use a proxy server for your LAN (These settings will not apply to dial-up or VPN connections).
- Also, make sure the option entitled Automatically detect settings is checked.
- Thereafter, hit the OK button to save the modifications you made.
- In the end, restart Windows 10 or Windows 11 so that the changes can take effect.
8] Update graphics driver through device manager
Another reason for Windows Update Error 0x8024500c is faulty, obsolete, and corrupted Graphics drivers. So, update them immediately to annihilate the issue. Here’s how –
- Press Windows+S keyboard shortcut and put devmgmt.msc in the search bar.
- When you see Device Manager in the appearing result, click on it.
- On the upcoming window, locate Display adapters and double-click on the same.
- Once the driver list expands, right-click on graphics driver listed there and choose Update driver.
9] Reinstall Microsoft Store
If Microsoft store stops functioning properly or becomes corrupted, error code 0x8024500c may appear during updating apps through it. In such a case, reinstall the program so that the system wipes out the faulty items and bring back to default state of same. Here are the steps to follow –
- Click search icon from the taskbar.
- Type in – Powershell.
- Press – Ctrl+shift+Enter altogether.
- When a UAC turned up, click the Yes button to give your consent.
- When PowerShell becomes ready to execute command, input the following line after winking cursor and hit Enter –
Get-AppxPackage -allusers Microsoft.WindowsStore | Foreach

{Add-AppxPackage -DisableDevelopmentMode -Register

“$($_.InstallLocation)\AppXManifest.xml”}
- Let the command execute properly and thereafter close the PowerShell window.
10] Check the date and time of your system
There might be an instance when time and date settings of your PC doesn’t match with the server to download or update any application from Microsoft Store. If anything like this happens, Windows Update Error 0x8024500c will appear and the connection will be terminated as well. Follow the below procedures to configure the settings –
For Windows 10 –
- Open Windows Settings app and then click Time & Language.
- On the succeeding page, move to the right pane and turn on the toggle button of Set time automatically and Set time zone automatically.
- Now, select Region from the left pane of the same running page.
- Shift to corresponding right and change Country or region to United States.
- Lastly, restart your PC to experience the changes.
For Windows 11 –
- Press – Windows + I.
- From left sidebar, select – Time & language.
- Move to right and then click – Date & time.
- Switch on the toggle button of both Set time automatically and Set time zone automatically.
- Click the back icon from the top left corner of Settings window.
- This time, choose – Language & region from the right pane.
- Click the drop-down list located next to Country or region.
- Select – United States.
11] Execute DISM command line
In rare cases, damaged Windows image files put forward error code 0x8024500c. To fix it forthwith, make use of Deployment Image & Servicing Management tool. Here is how –
- Launch Command Prompt as administrator using any convenient way.
- Once it shows up, type following command tool after the blinking cursor –
DISM.exe /Online /Cleanup-image /Restorehealth
- Next, press Enter key to activate the DISM tool and patiently until the process finishes.
12] Perform a system restore
If the above-mentioned workarounds didn’t fix Windows Update Error 0x8024500c yet, use system restore to get back an issue-free state. Follow the below instructions to do so –
- Bring forward Taskbar Search with the help of Win+S hotkey.
- Type rstrui in the empty bar and then press Enter key.
- On the forthcoming wizard, click the Next button to proceed ahead.
- Hereafter, hit the option named Show more points.
- From the available list, click on the latest one and hit the Next button once again.
- Once the succeeding page loads successfully, select Finish and let the utility begin the process of restoring.
Methods:
1] Download the updates manually
2] Look over the status of related Windows Update Services
3] Bring Windows update troubleshooter into play
4] Run troubleshooter for Microsoft store
5] Reset Microsoft store
6] Modify the corrupted registry entries
7] Put proxy connections out of action
8] Update graphics driver through device manager
9] Reinstall Microsoft Store
10] Check the date and time of your system
11] Execute DISM command line
12] Perform a system restore
That’s all!!
Hi,
the Error 0x8024500c often occurs at Windows 10 in managed environments, which means the Windows Updates are delivered by WSUS or SCCM and no internet connection is available or it is not allowed to connect directly to Microsofts Windows Update.
In this case usually the policies (no internet connect and DualScan disabled)
Computer Configuration\Administrative Templates\Windows Components\Windows Update

    Do not connect to any Windows Update Internet location = 1
Computer Configuration\Administrative Templates\Windows Components\Windows Update

    Remove access to use all Windows = 1
Computer Configuration\Administrative Templates\Windows Components\Windows Update

    Do not allow update deferral policies to cause scans against Windows Update = 1
are set because all updates should be taken from the WSUS/SCCM Server and not from the internet.
If this error occurs and you set
Do not connect to any Windows Update Internet location = 0 or to unconfigured the Windows Search takes a long time and in WindowsUpdate.log has some entries like this are logged:
SLS             *FAILED* [80248007] Method failed [SlsDatastoreLookup:797]

SLS             Retrieving SLS response from server...

SLS             Making request with URL HTTPS://sls.update.microsoft.com/SLS/{9482F4B4-E343-43B6-B170-9A65BC822C77}...

SLS *FAILED* [80072EE2] Send request

SLS *FAILED* [80072EE2] WinHttp: SendRequestToServerForFileInformation (retrying with default proxy)

Misc            *FAILED* [80072EE2] Library download error. Will retry. Retry Counter:0
To generate the WindowsUpdate.log file use the powershell cmdlet Get-WindowsUpdateLog
PS D:\> Get-WindowsUpdateLog
PS D:\> & notepad C:\Users\$ENV:Username\Desktop\WindowsUpdate.log
I’ve done a lot of research against the 0x8024500c error:
Ensure that no Windows Update Settings for Business are set, the decision which Updates are send to the client should only be done at the Update Management framework (WSUS, SCCM)
Check if the regarding policies are set to none configured
Unfortunately it is not sufficient to disable the policies. There also some registry keys to delete (if set):
D:\> reg delete HKEY_LOCAL_MACHINE\SOFTWARE\Policies\Microsoft\Windows\WindowsUpdate /v DeferFeatureUpdates /f
D:\> reg delete HKEY_LOCAL_MACHINE\SOFTWARE\Policies\Microsoft\Windows\WindowsUpdate /v DeferQualityUpdates /f
D:\> reg delete HKEY_LOCAL_MACHINE\SOFTWARE\Policies\Microsoft\Windows\WindowsUpdate /v BranchReadinessLevel /f
D:\> reg delete HKEY_LOCAL_MACHINE\SOFTWARE\Policies\Microsoft\Windows\WindowsUpdate /v DeferFeatureUpdatesPeriodInDays /f
D:\> reg delete HKEY_LOCAL_MACHINE\SOFTWARE\Policies\Microsoft\Windows\WindowsUpdate /v PauseFeatureUpdatesStartTime /f
D:\> reg delete HKEY_LOCAL_MACHINE\SOFTWARE\Policies\Microsoft\Windows\WindowsUpdate /v DeferQualityUpdatesPeriodInDays /f
D:\> reg delete HKEY_LOCAL_MACHINE\SOFTWARE\Policies\Microsoft\Windows\WindowsUpdate /v PauseQualityUpdatesStartTime /f
D:\> reg delete HKEY_LOCAL_MACHINE\SOFTWARE\Policies\Microsoft\Windows\WindowsUpdate /v PauseDeferrals /f
D:\> reg delete HKEY_LOCAL_MACHINE\SOFTWARE\Policies\Microsoft\Windows\WindowsUpdate /v ManagePreviewBuilds /f
D:\> reg delete HKEY_LOCAL_MACHINE\SOFTWARE\Microsoft\WindowsUpdate\UpdatePolicy\PolicyState /f
D:\> reg delete HKEY_LOCAL_MACHINE\SOFTWARE\Microsoft\WindowsUpdate\UX\Settings /f
D:\> reg delete HKEY_LOCAL_MACHINE\SOFTWARE\Microsoft\WindowsUpdate\UX /v IsConvergedUpdateStackEnabled /f
Then refresh the policy
D:\> gpupdate /force
D:\> net stop wuauserv
D:\> net start wuauserv
and trigger Windows Update scan
D:\> UsoClient.exe startscan
And updates should appear
Michael
My Knowledgebase for things about Linux, Windows, VMware, Electronic and so on…
This website uses cookies to improve your experience and to serv personalized advertising by google adsense. By using this website, you consent to the use of cookies for personalized content and advertising. For more information about cookies, please see our Privacy Policy, but you can opt-out if you wish. Accept Reject Read More
Некоторые пользователи, пробуя установить апдейт системы с помощью центра обновлений Windows получают сообщение об ошибке 0x8024500C. Иногда эту же ошибку можно встретить обновляя программу UWP при помощи Microsoft Store. Что можно сказать по этому поводу? Вероятнее всего служба Центра обновлений заблокирована. Методы исправления рассмотрим в данном материале.
Ошибка 0x8024500C
Причин данной неполадки существует множество. Ей может стать и общий сбой, и неверно работающие службы, и сетевые проблемы, и повреждённые файлы системы, и VPN-клиенты и много других вариантов.
Для начала попробуем восстановить системные файлы, если вдруг они имеют повреждения. Попробуем применить системные утилиты.
1. Жмём Win+R. Пишем «cmd» и подтверждаем нажатием кнопки «Ок».
2. Прописываем строки
sfc /scannow
DISM /Online /Cleanup-Image /RestoreHealth
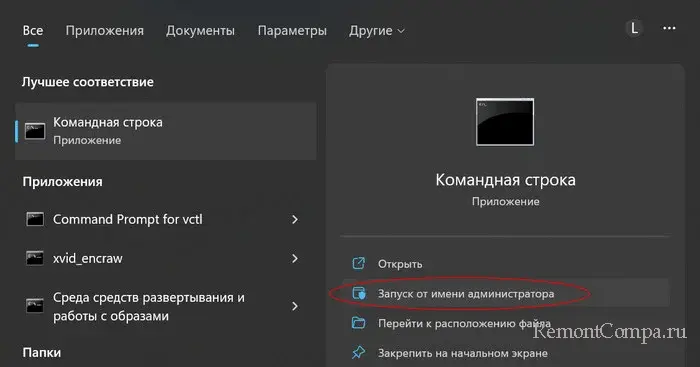
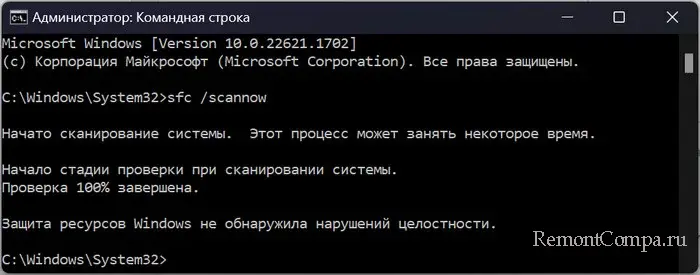
3. При выполнении данных команд важно, чтобы у вас было стабильное соединение с сетью. Дожидаемся окончания сканирования и восстановления файлов.
4. Перезапускаем ПК.
Теперь можно применить стандартное средство ликвидации неисправностей. Иногда оно помогает устранить сбои.
1. Жмём Win+I. Выбираем раздел «Система».
2. Теперь жмём «Устранение неполадок» — «Другие средства устранения неполадок».
3. Напротив «Центр обновления Windows» кликаем на «Запуск».
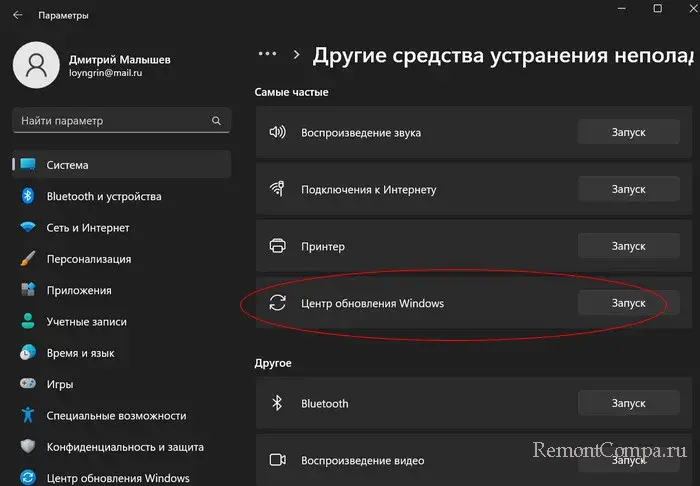
4. Далее следуем указаниям и ожидаем пока мастер не продиагностирует винду и не укажет на проблемы.
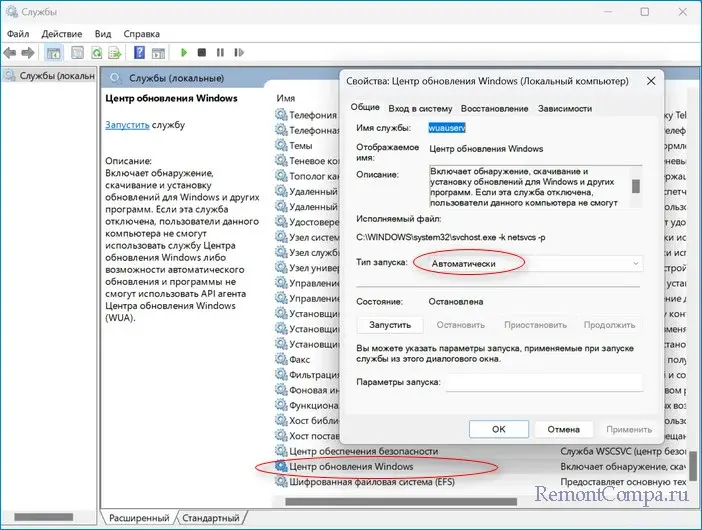
Теперь рекомендуется проверить работу служб. Нас интересует «Фоновая интеллектуальную службу передачи (BITS)», «Служба центра обновления Windows «, «Служба криптографии», «Установщик Windows». Для них мы будем выполнять поочерёдно такие действия:
1. Щелкаем Win+R, прописываем «services.msc», жмём «Ок».
2. Выбираем одну из служб представленных выше. Кликаем по ней два раза и попадаем в свойства.
3. Пункт «Тип запуска» выбираем «Автоматически».
4. Теперь жмём «Остановить» и «Запустить».
5. Повторяем действия с остальными службами.
6. Перезапускаем ПК.
Следующим из методов является очистка диска. Воспользоваться можно как сторонними приложениями по типу CCleaner, так и стандартным средством. Мы приведём пример утилиты от Microsoft.
1. Нажимаем Win+R. Печатаем «cleanmgr» и жмём Enter.
2. Выбираем системный локальный диск, обычно это «C».
3. Ставим везде отметки и жмём «Очистить системные файлы».
Устранить ошибку, одновременно обновив винду можно и через MediaControlTool.
1. Заходим на веб-ресурс Microsoft. Скачиваем приложение соответствующее вашей версии Windows. Запускаем его.
2. Выбираем «Обновить этот компьютер» — «С сохранением файлов».
3. Обновляем.
Причиной возникновения проблемы также может быть сторонний VPN-клиент или включенный прокси-сервер. Чтобы исключить такие варианты, отключим и то, и другое.
1. Нажимаем Win+R. Пишем «appwiz.cpl» и нажимаем Enter.
2. Выбираем наш VPN и удаляем его.
Теперь займёмся прокси.
1. Жмём Win+R, печатаем «ms-settings: network-proxy» и нажимаем Ввод.
2. Заходим в «Настройка прокси вручную» и ставим переключатель в положение «Выкл».
3. Перезапускаем ПК.
Установить апдейт также можно вручную. Для этого:
1. Нажимаем Win+I. Заходим в раздел «Обновления и безопасность».
2. Выбираем «Просмотреть историю обновлений».
3. Смотрим номер апдейта, который вызвал проблему.
4. Теперь переходим на сайт центра загрузки Microsoft и находим этот апдейт по коду.
5. Скачиваем его и устанавливаем.
6. Перезагружаем ПК.
Все вышеописанные способы исправления достаточно эффективны в борьбе с ошибкой 0x8024500C.
The Error Code 0x8024500c normally occurs when you are not able to update Windows 10 to its next available Build version. This may also appear when users can’t install or upgrade the new/existing apps from Microsoft Store.
Whichever problem you are currently facing on your computer, read this tutorial in detail. This post will help you to find and repair the persisting issue 0x8024500c in Windows 10.
- Update-related Error Code 0x8024500c
- Store-related Error Code 0x8024500c
Follow the below solutions sequentially if you are not able to update Windows 10 to its next available Build version –
1. Troubleshoot Windows Update
If you are not able to download and install the latest Build update on your device, try troubleshooting Windows Update. By doing so, you will get the exact cause that might be preventing this task. Here’s how to proceed –
- Press Win + I to open Settings.
- Select Update & Security > Troubleshoot.
- On the right pane, select Additional troubleshooters.
- Subsequently, click to expand Windows Update and hit Run the troubleshooter.
- Restart your computer so that changes made come into effect.

The troubleshooter immediately starts detecting possible issues on the computer and fix them. Once this is over, check if you are now able to upgrade Windows 10 without getting the error 0x8024500c or not.
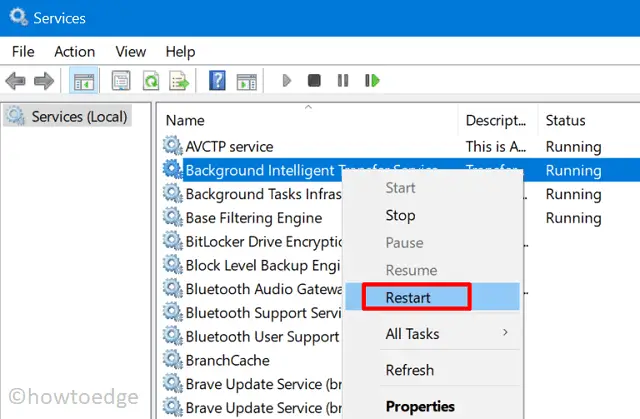
2. Restart All Windows Update Services
Many a time, the update-related problems arise simply because some of the essential services remain disabled. So, you must check the current status of the below services and if found stopped, start them. Or, just restart the services mentioned below –
- Background Intelligence Transfer Service
- Windows Update Medic Service
- Delivery Optimization
- Windows Update
Here’s how to re-enable these services –
- Launch the Search window by pressing Win + S.
- Type “services” and double-click the top result.
- Scroll down to “Background Intelligence Transfer Service”, make a right-click, and hit the restart button.
- Follow the same procedure for all other services mentioned above.
- After you have enabled all the services, restart Windows 10.
From the next logon, check restarting services indeed solves the problem or not. If not, try out the next set of solutions.
3. Purge Windows Update Folders
Microsoft releases new security or non-security patches every now and then. As a result, a huge cache gets stored inside the Update folders. If that’s the case, Windows 10 won’t update as it supposed to be. What you can do is either purge the related folders or simply rename them to something different.
The two such important folders are SoftwareDistribution and Catrrot2 and their locations are as follows –
SoftwareDistribution > C:\WindowsCatroot2 > C:\Windows\System32

4. Manually Install Latest Cumulative Update
If none of the above workarounds resolve the update error 0x8024500c, better download and install the pending updates manually. Following this way will surely fix any update-related problems on Windows 10.
Fix – Microsoft Store Error Code 0x8024500c
Follow this section if you are not able to install or update apps on the Microsoft Store –
1] Troubleshoot Windows Store App
Just like Windows Update Troubleshooter, there are numerous other troubleshooters that you may use to find and repair the reason behind any bug. In case you are not able to download/install or update any application on Microsoft Store, troubleshoot Windows Store Apps. Here are the essential steps to work upon –
- Navigate to – Windows Settings > Update & Security.
- Next, proceed as follows – Troubleshoot > Additional troubleshooters.
- Scroll down to Windows Store Apps, click once over it, and hit Run the troubleshooter.

- Let the troubleshooter find and repair the reasons behind it.
- Once over, reboot Windows 10.
2] Reset Windows Store Cache
A huge amount of stored cache may also prevent Microsoft Store from updating apps normally and trigger Error Code 0x8024500c instead. In order to fix this, you may take the help of WSreset.exe. Here’s how to clear the stored cache by executing a single line command.
- Open Command Prompt as Administrator.
- Type “wsreset.exe” and press Enter.
- Wait for a few seconds till all the accumulated cache gets cleared off.

- By the time this scan completes, Windows Store will open automatically.
- Reboot your device and check whether the error code 0x8024500c gets solved or not.
If this method does not take effect, try resetting the Windows Store app –
3] Reset Microsoft Store App
Here’s how to reset Microsoft Store App –
- Right-click over the Windows icon and select Apps & Features.
- On the right pane, scroll down to Microsoft Store.
- Click once to extend its pane and hit Advanced Options.
- Subsequently, scroll down again but this time locate the Reset section.
- Click once over it and let the system reset the Microsoft Store.

- In the end, restart your PC so that changes made become effective from the next logon.
I hope you are now able to fix both Update and Store Error Code 0x8024500c in Windows 10. In case you do have any queries or suggestions, let us know in the comment section.
Jun. 23, 2022 / Updated by
Bessie Shaw to
Windows 10
The 0x8024500c error code appears occasionally after Windows 10 Update or the Windows 10 Creators Update. When you are trying to download or install an APP in the Windows Store, the 0x8024500c error code may be returned with the prompt says, “Try that again. Something went wrong”. It also occurs

What Causes the Windows 10 Update Error 0x8024500C
The Windows 10 Update failure 0x8024500C error code, like the Windows 10 Store error code 0X80072EE7 is often caused by misconfigured system files on Windows 10. As for the misconfigured system file issue, there are many factors can result in system files errors, an incomplete installation/uninstall, or improper deletion of any programs or hardware, corruption entries in the system files etc.
If you fail to download/install the application or fail to upgrade to Windows 10 with the 0x8024500C error in Windows 10 store, this post introduces you a few effective solutions to end up the 0x8024500C error message.
How to Fix 0x8024500C Error Code in Windows 10 Update
Below are several ways to help you to figure out Windows 10 Update error code 0x8024500C and get the Windows Store back into normal track.
Method 1. Reset Windows Store to Fix Error Code 0x8024500C on Windows 10
Resetting the Windows store is the first-to-go fix to resolve the Windows store issues like the Windows store not working or the APP activation failure 0x8024500C error after Windows 10 update. Below is how.
1. Press the Windows shortcut keysWin + R to launch the Run.
2. Type WSReset.exe and then hit Enter.
Method 2. Use Windows Update Troubleshooter to Repair Error Code 0x8024500C
Windows built-in feature, Windows Troubleshooter also help to fix common Windows system error, including the update error 0x8024500C.
1. Press Win + I to bring up the Windows Settings.
2. Go to Update & Security ->Troubleshoot ->Windows Update and then click Run the troubleshooter.

3. Choose Try troubleshooting as an administrator.

And then follow the instructions to complete the troubleshooting process.
Method 3. Update Graphics Drivers to Resolve Windows 10 Update 0x8024500C Error
The Windows 10 update error 0x8024500C sometimes can relate to the computer display/Network since the drivers or software compatibility issue may appear due to the Windows 10 Upgrade, resulting in system inner issues like blue screen, Low FPS, black screen, error code 0x8024500C in Windows Store etc. In this case, you need to update the display/network drivers. To save your time, you can count on a professional driver manager to do so, say Driver Talent. Trusted by over 3,000,000 people, over 200 countries and areas, it can help to download and install the official and WHQL drivers for any devices on Windows OS.
Download Now
Click the Download button above to get the driver manager, Driver Talent. Then use it to update your improper drivers and get access to your Windows 10 Store or Windows 10 updates without 0x8024500C error message.
1. Click Scan to detect the outdated, missing or broken graphics driver, network driver and other faulty ones.
2. Click Update/Repair to download and install the latest driver updates.
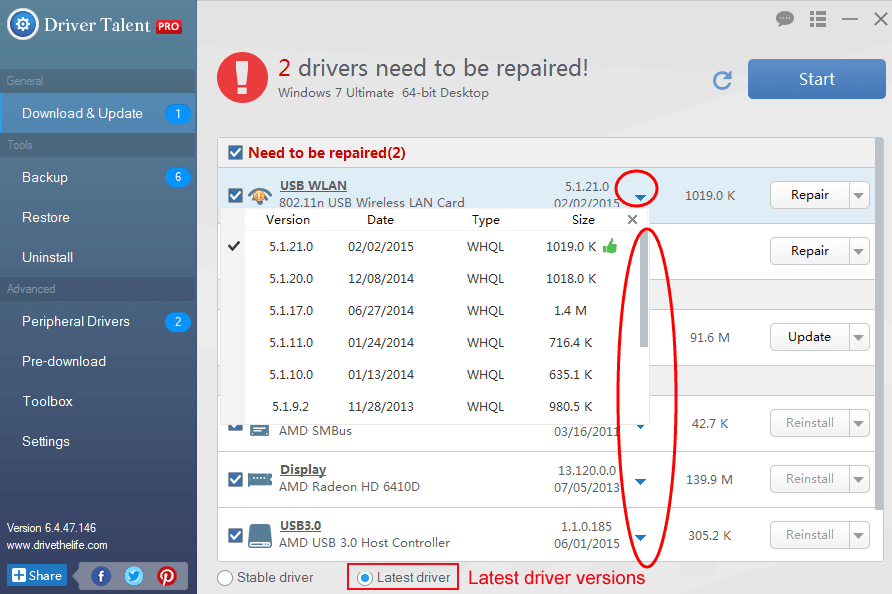
3. Reboot the computer to make the new drivers take effects.
Method 5. Disable the Proxy Connection
If you use any proxy connection, then follow the steps to disable the proxy connection.
1. Open the Internet Explorer and then press ALT + T.
2. Choose the Internet Options.
3. Turn to the Connections tab and then LAN settings.
4. Untick the checkbox “Use a proxy server for your LAN” and then OK to save changes.
Method 6. Restore System to Fix Windows 10 Update Error 0x8024500C
Should all the above 5 methods come out no avail to Windows 10 update bug 0x8024500C, you can revert to a previous Windows OS where there is no 0x8024500C error code.
1. Press Win + I to open Settings.
2. Go to Update & Security ->Recovery ->Advanced startup ->Restart now ->Troubleshoot.
3. Select the Go back to the previous build option.
See Also:
How to Use System Restore to Fix Windows 10 Issues
Here you can see the update history and then choose which Windows version you want to restore. Just follow the on-screen tutorials to roll back to Windows OS.
That’s all! Hope the above 6 methods could be helpful for you to get rid of the Windows 10 update error 0x8024500C or can’t install or update apps from store Windows 10. If you have any doubt on this post, please leave comments in below comments section. You can also click the SUPPORT BUTTON on the left of this page or turn to our OSToto official forum for help.
Recommended Download
|
ExplorerMax |
Driver Talent for Network Card | |||
| Smart and advanced file explorer tool for Windows platforms | Download & Install Network Drivers without Internet Connection | |||
|
30-day Free Trial |
Free Download |