
Getting Error 0x80092004 When Updating Windows 10? Our Troubleshooting Guide Will Help You Fix It
Error code 0x80092004 is yet another Windows Update error that prevents users from updating Windows 10. The good news is that it’s an easy error to fix.
What is Error 0x80092004?
Error 0x80092004 stands for «CRYPT_E_NOT_FOUND: Cannot find object or property,» which means that Windows Update could not find any cryptographic value and rejected the update. The error forces the Windows Update process to fail while searching for new updates or installing updates.
What Causes This Error?
- The most common cause for this error is corrupted update or system files. If important update or system files have become corrupt or are outright missing, the update process will fail and result in error 0x80092004.
- You may get error code 0x80092004 is if there’s something wrong with the update itself. Sometimes, Microsoft releases buggy updates that haven’t been appropriately tested, and Windows 10 won’t accept them, causing the update process to fail and roll back the installation.
- A corrupted SoftwareDistribution folder that temporarily stores files needed to install new updates.
Video Guide on How to Fix Windows Update Error 0x80092004
Table of Contents:
- Introduction
- Solution 1. Run the Windows Update Troubleshooter
- Solution 2. Clear the Windows Update Cache Folder
- Solution 3. Download Servicing Stack Update
- Solution 4. Install Updates Manually
- Solution 5. Run the Deployment Image & Servicing Management (DISM) Scan
- Solution 6. Run the System File Checker (SFC) Scan
- Video Guide on How to Fix Windows Update Error 0x80092004
Download Computer Malware Repair Tool
It is recommended to run a free scan with Combo Cleaner — a tool to detect viruses and malware on your device. You will need to purchase the full version to remove infections. Free trial available. Combo Cleaner is owned and operated by Rcs Lt, the parent company of PCRisk.com read more.
Solution 1. Run the Windows Update Troubleshooter
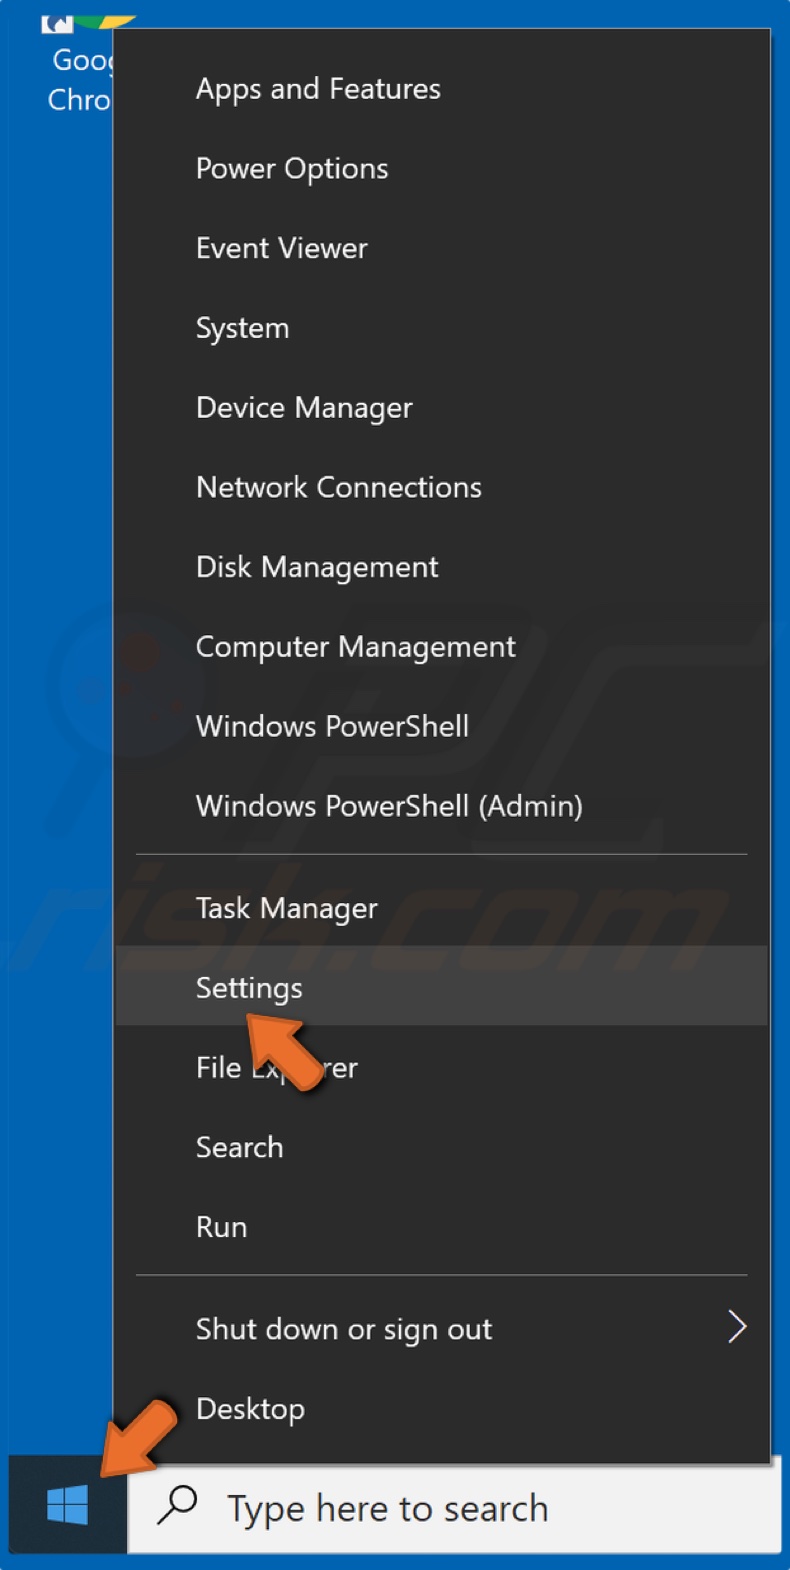
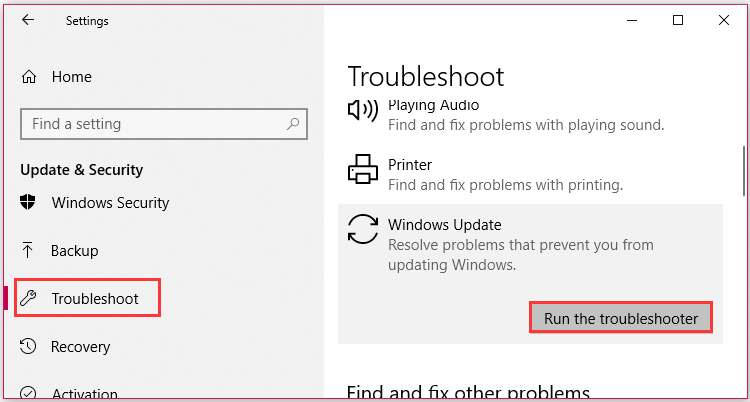
1. Right-click the Windows Start button and click Settings.
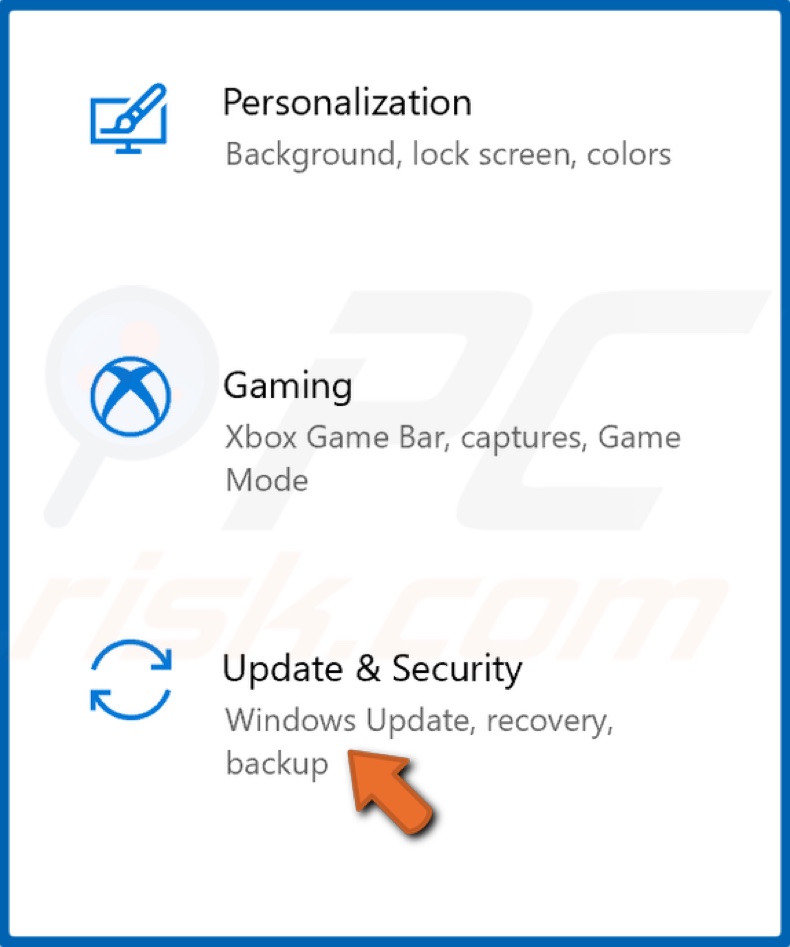
2. In the Settings menu, select Update & Security.
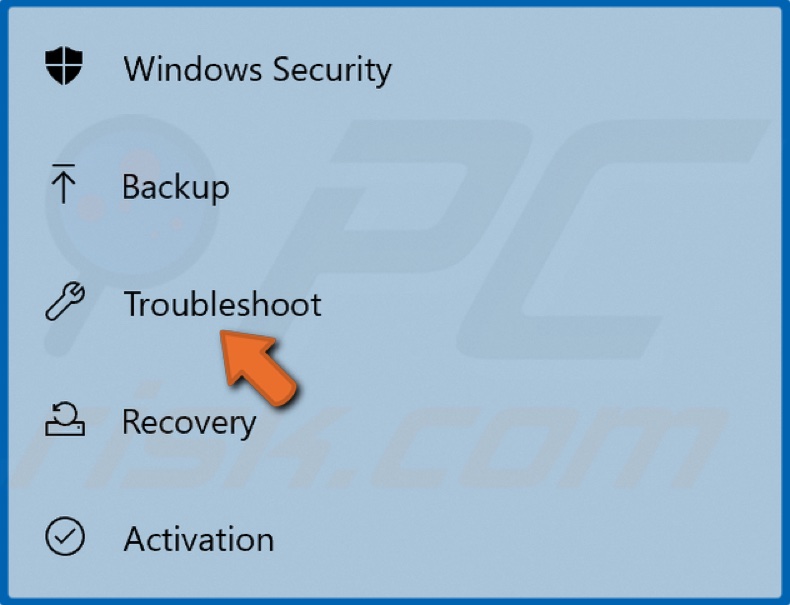
3. In the left pane, click Troubleshoot.
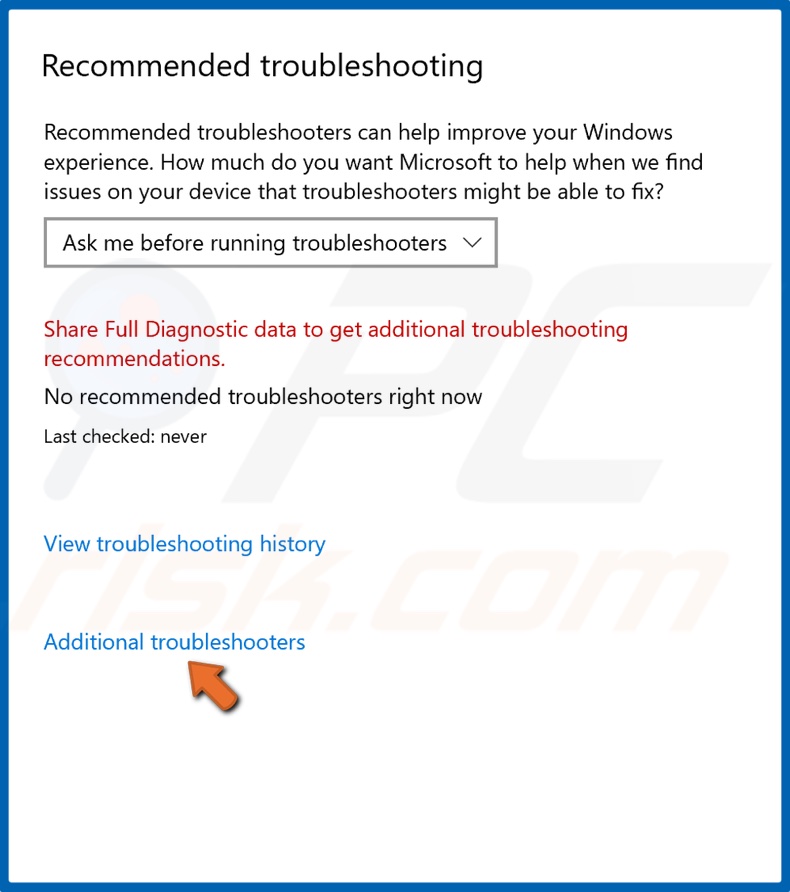
4. Click Additional troubleshooters.
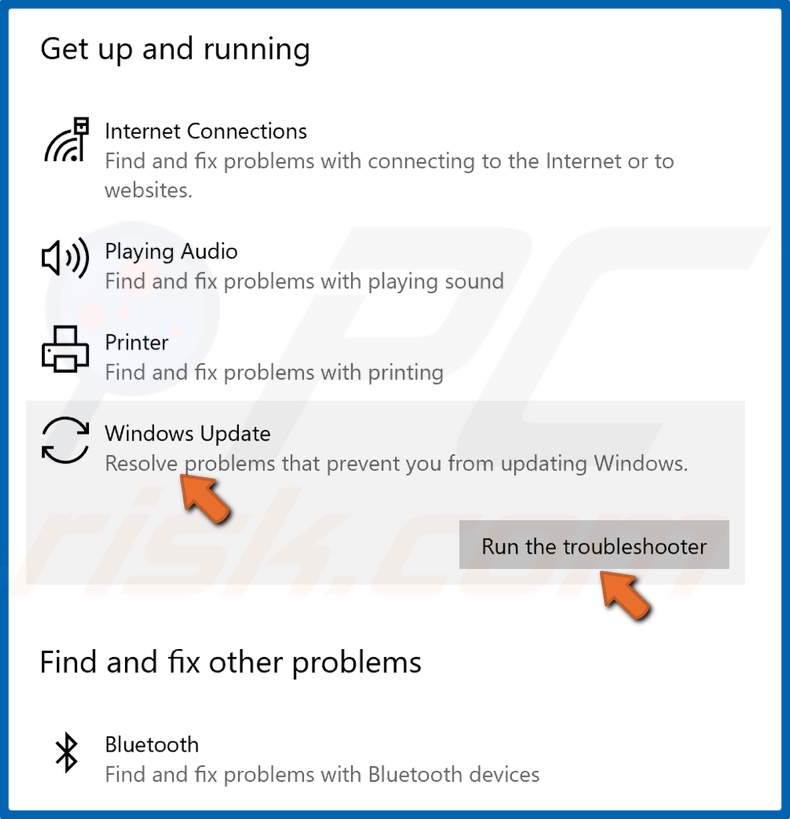
3. Select Windows Update and click Run the troubleshooter.
4. If the troubleshooter detects an issue, it will select and apply a fix automatically.
5. Try updating Windows.
[Back to Table of Contents]
Solution 2. Clear the Windows Update Cache Folder
1. Hold down Windows+R keys to open Run.
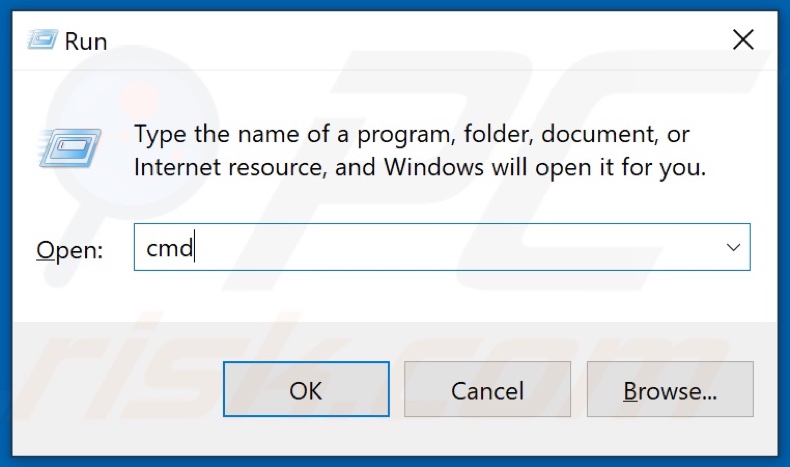
2. In the Run text box, type in CMD and hold down Ctrl+Shift+Enter keys to open the elevated Command Prompt.
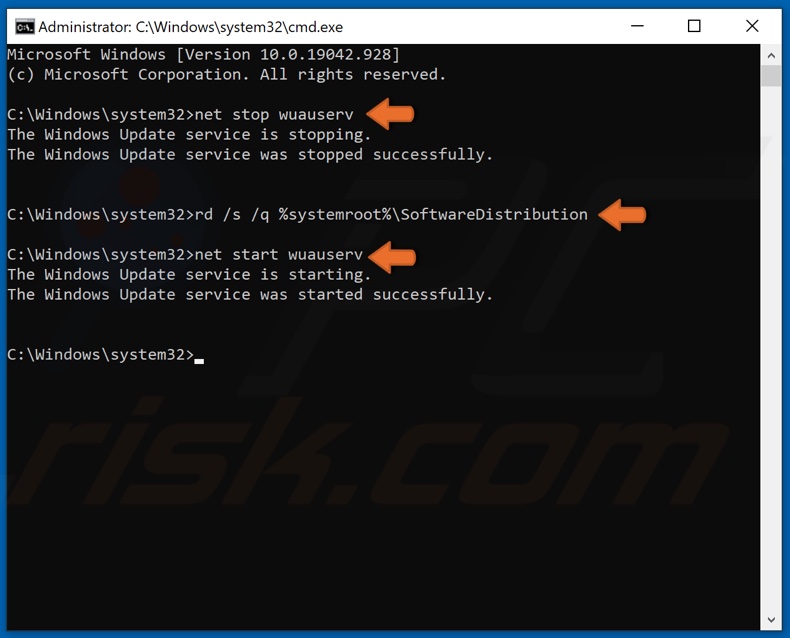
3. In the Command Prompt window, type in net stop wuauserv and hit Enter to stop the Windows Update service.
4. Then, type in rd /s /q %systemroot%\SoftwareDistribution and hit Enter to clear the SoftwareDistribution folder.
5. Lastly, type in net start wuauserv and hit Enter to restart the Windows Update service.
6. Close the Command Prompt and try updating Windows.
[Back to Table of Contents]
Solution 3. Download Servicing Stack Update

1. Go to the Microsoft Update Catalog webpage.
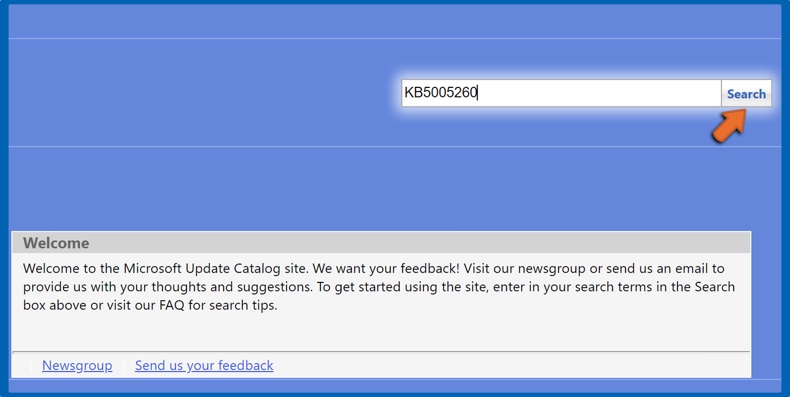
2. In the search box at the top right of the window, type in the servicing stack KB (Knowledge Base) code (e.g., KB5005260 for 2004 and 20H2) and click Search.
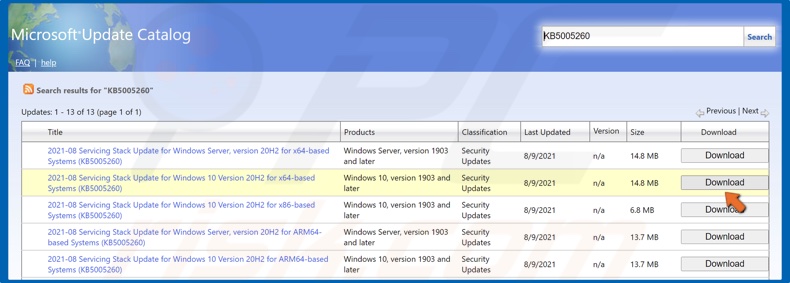
3. Then, select the version for your operating system and CPU architecture, and click Download.
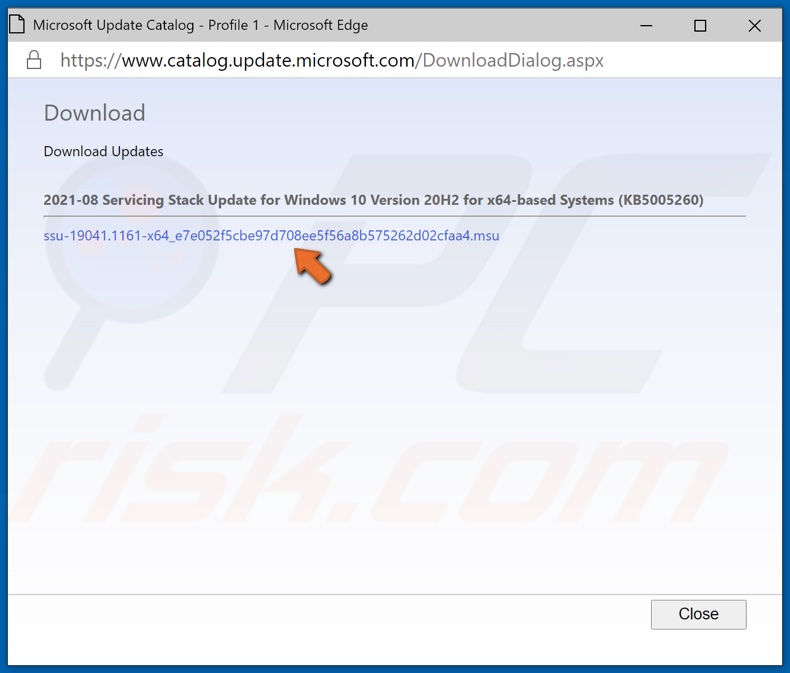
4. A new window will open. Click the update link, and the update will begin downloading.
5. Once the update has been downloaded, run its installer.
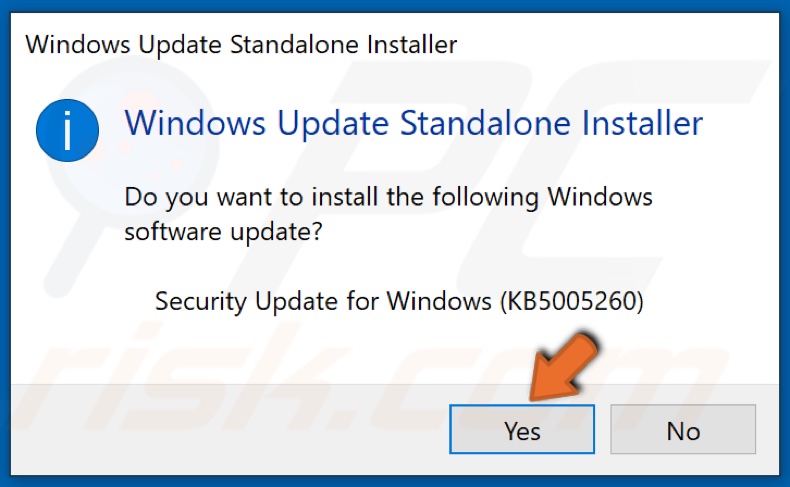
6. The installer will scan your PC for updates and then ask whether you want to install the update. Click Yes.
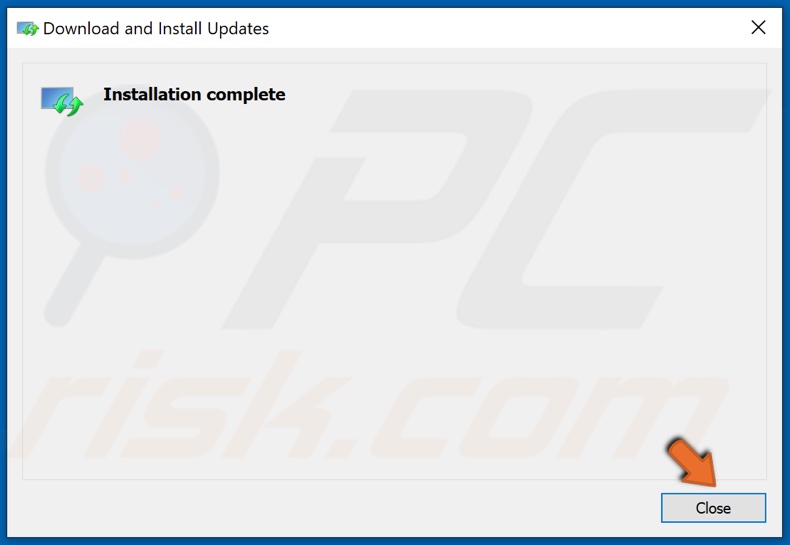
7. Click Close once the servicing stack update is installed.
8. Then try updating Windows.
[Back to Table of Contents]
Solution 4. Install Updates Manually
1. Go to the Microsoft Update Catalog webpage.
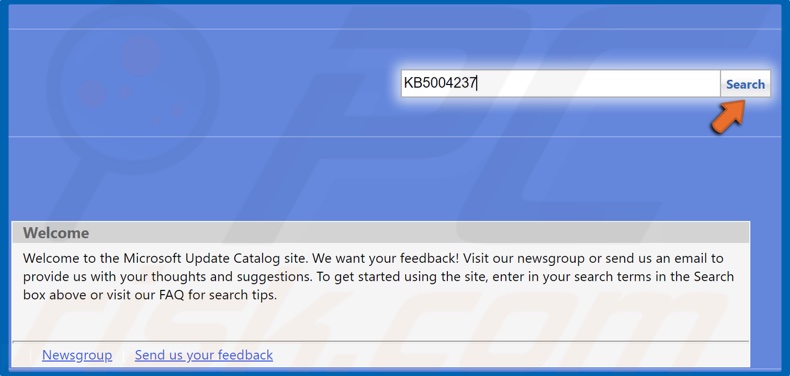
2. In the search box at the top right of the window, type in the KB (Knowledge Base) code (e.g., KB5004237) and click Search.
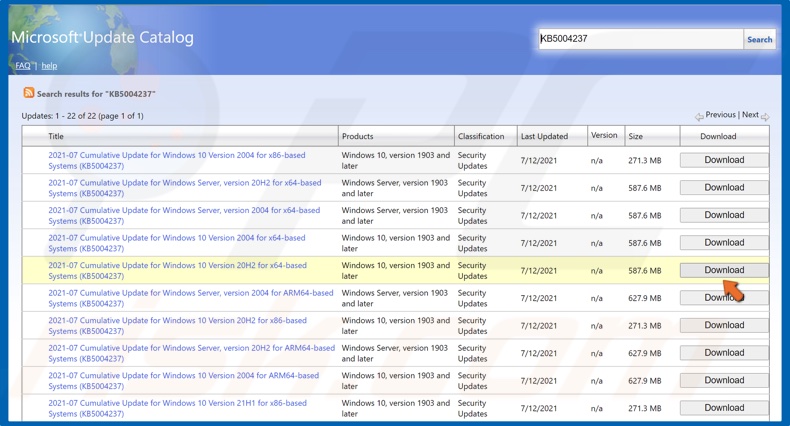
3. Then, select the version for your operating system and CPU architecture, and click Download.
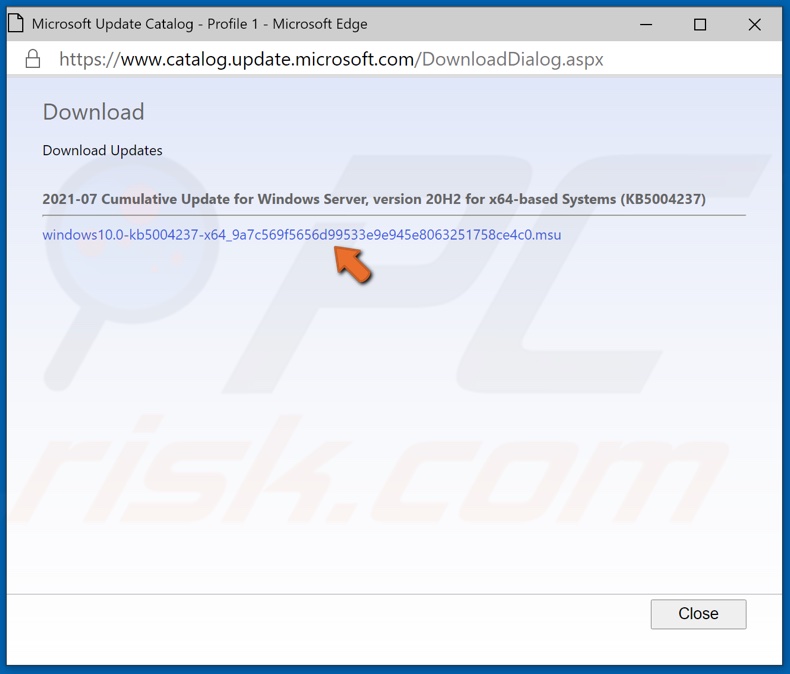
4. A new window will open. Click the update link, and the update will begin downloading.
5. Once the update has been downloaded, run its installer.

6. The installer will scan your PC for updates and then ask whether you want to install the update. Click Yes.
7. The Standalone installer will begin installing the update.
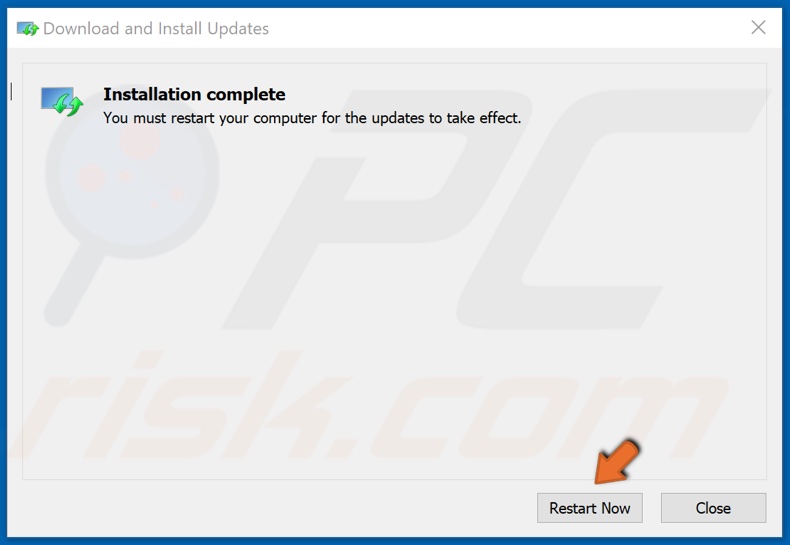
8. Once the update is installed, click Restart now.
[Back to Table of Contents]
Solution 5. Run the Deployment Image & Servicing Management (DISM) Scan
1. Hold down Windows+R keys to open Run.
2. In the Run text box, type in CMD and hold down Ctrl+Shift+Enter keys to open the elevated Command Prompt.
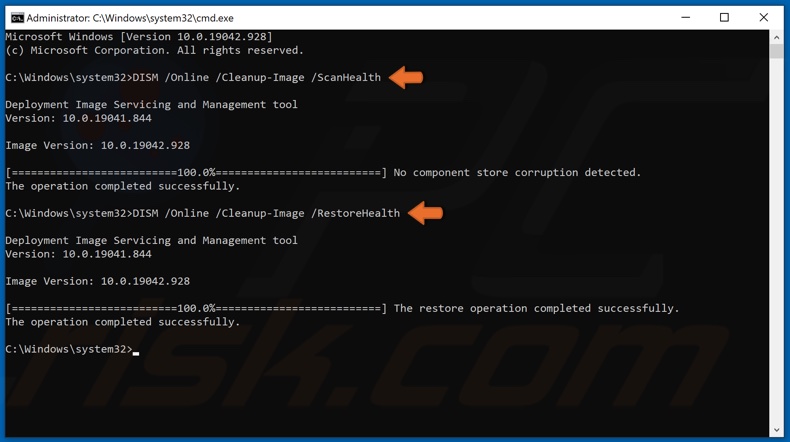
3. In the Command Prompt window, type in DISM /Online /Cleanup-Image /ScanHealth and hit the Enter key. This parameter will scan the component store for corruption.
4. Type in DISM /Online /Cleanup-Image /RestoreHealth and hit the Enter key.
5. Once the process has been completed, try updating Windows.
[Back to Table of Contents]
Solution 6. Run the System File Checker (SFC) Scan
1. Hold down Windows+R keys to open Run.
2. In the Run text box, type in CMD and hold down Ctrl+Shift+Enter keys to open the elevated Command Prompt.
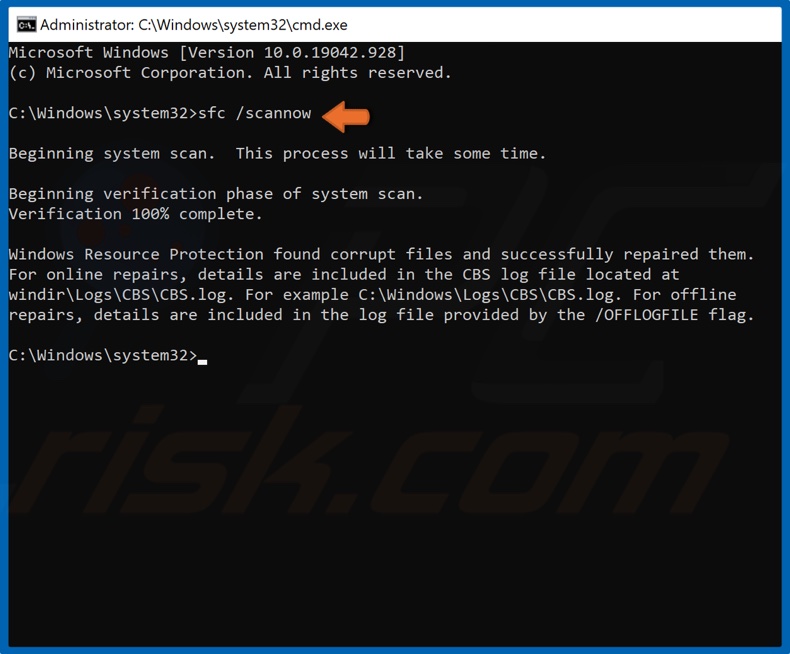
3. In the Command Prompt window, type in SFC /ScanNow and hit the Enter key.
4. Wait for the scan to complete.
5. Once the scan has been completed, restart your PC.
6. After the restart, try updating Windows.
[Back to Top]
Applies To.NET Framework 4.7.1 .NET Framework 4.7 .NET Framework 4.6 .NET Framework 4.6.1 .NET Framework 4.6.2
Эта статья также относится к .NET Framework 4.7.2.
Аннотация
В этой статье описывается ошибка «0x80092004», с которой пользователи могут столкнуться при попытке установить обновление безопасности и качества в июле 2018 года KB4340557 или KB4340558 на Windows 8.1, Windows Server 2012 R2 или Windows Server 2012 после того, как они Установить июнь 2018 .NET Рамочный Предварительный просмотр обновления качества Rollup KB4291497 или KB4291495 на системах, которые работают на .NET Framework 4.7.2, 4.7.1, 4.7, 4.6.2, 4.6.1, или 4.6.
Проблемы
Рассмотрим следующий сценарий.
-
Вы используете .NET Framework 4.6 или более позднюю версию на Windows 8.1, Windows Server 2012 или Windows Server 2012 R2.
-
Ранее вы установили июнь 2018 Предварительный обновления качества KB4291497 или KB4291495
-
Вы пытаетесь установить обновления безопасности и качества В июле 2018 года KB4340557 или KB4340558.
В этом случае обновление не устанавливается, и вы получаете сообщение об ошибке установки «0x80092004».
Заметка Чтобы проверить, какие обновления, которые вы установили, выберите кнопку «Пуск», а затем выберите Настройки (gt; Изменение настроек ПК) ( и обновление и восстановление ( иронов;Windows Update
Решение
Корпорация Майкрософт перевыпустила в июле 2018 года обновления системы безопасности и качества .NET Framework Security and quality Rollup, KB 4340558 и KB 4340557 для устранения проблемы с установкой. Вы можете сканировать эти обновления через обновление Windows. Вы также можете скачать и установить эти обновления непосредственно через следующие статьи Базы Знаний:
Обновления безопасности и качества Rollup для .NET Framework 3.5 SP1, 4.5.2, 4.6, 4.6.1, 4.6.2, 4.7 и 4.7.1 для Windows 8.1, RT 8.1 и Server 2012 R2 (KB 4340558)
Обновления безопасности и качества Rollup для .NET Framework 3.5 SP1, 4.5.2, 4.6, 4.6.1, 4.6.2, 4.7 и 4.7.1 для Windows Server 2012 (KB 4340557)
Статус
Эта проблема решена. Для получения дополнительной информации смотрите раздел «Разрешение».
Нужна дополнительная помощь?
Нужны дополнительные параметры?
Изучите преимущества подписки, просмотрите учебные курсы, узнайте, как защитить свое устройство и т. д.
Readers help support Windows Report. We may get a commission if you buy through our links.
Read our disclosure page to find out how can you help Windows Report sustain the editorial team. Read more
Windows Update errors are uncommon and usually point toward an issue at the user’s end. But there have been cases when the update itself was buggy and, subsequently, the problem was widespread. One such is the 80092004 update error.
When unable to install updates, the situation becomes problematic, given users miss out on the latest features and security patches.
But our experts did manage to identify the problem and came up with solutions that helped others. Keep reading to find out!
What is error code 8009204 Windows Update?
The code 80092004 indicates that the PC couldn’t find the correct cryptographic values in the update and, as a result, rejected it. This is because Microsoft stopped signing packages with SHA-1 and only uses SHA-2 ever since August’19. And if Windows looks for the former, the error code appears.
Here are a few reasons you might encounter the error:
- Problems with the update: In a few cases, the problem appeared only while installing specific updates for all users, which points to a bug in the update itself. So, you should verify whether others, too, are facing the problem.
- Corrupt system files: Even corrupt system files are likely to affect the update process and may trigger the 80092004 error in Windows 10.
- Issues with the update components: Windows Update Components are critical for installing updates, and misconfiguration here can lead to a range of errors.
How do I fix error code 80092004?
Before we head to the tricky fixes, here are a few quick ones:
- Restart the computer and retry the update.
- Disable the built-in Windows Security or any third-party antivirus installed on the PC. If that works, uninstall the program to fix things for good.
- Make sure you have fast Internet speed.
If none work, move to the solutions listed next.
1. Run the built-in troubleshooters
- Press Windows + I to open Settings, and click on Troubleshoot on the right in the System tab.

- Click on Other troubleshooters.
- Click on Run next to Windows Update.
- Wait for the troubleshooter to run and follow the on-screen instructions to complete the process.

- Similarly, run the Network Adapter and Internet Connections troubleshooter.


The quickest way to fix the 80092004 update error in Windows is to run the built-in troubleshooters. These built-in utilities automatically identify and resolve the underlying cause, requiring minimal effort from the user.
However, you have more effective methods to troubleshoot your PC, and that is with dedicated system repair software that can fix faulty files in minutes.
2. Run the DISM and SFC scan
- Press Windows + R to open Run, type cmd, and hit Ctrl + Shift + Enter.

- Click Yes in the UAC prompt.
- Paste the following three commands individually and hit Enter after each:
DISM /Online /Cleanup-Image /CheckHealthDISM /Online /Cleanup-Image /ScanHealthDISM /Online /Cleanup-Image /RestoreHealth - Next, execute the following command to run the SFC scan:
sfc /scannow
- Once done, restart the computer for the changes to come into effect and retry updates.


Corrupt system files are another reason for the problem, and running the DISM tool and SFC scan should get things up and running.
3. Reset Windows Update components
- Press Windows + S to open Search, type Command Prompt in the text field, and click on Run as administrator.

- Run the following commands to stop the related services:
net stop bitsnet stop wuauservnet stop appidsvcnet stop cryptsvc - Now, use this command to delete the qmgr*.dat files:
Del "%ALLUSERSPROFILE%\Application Data\Microsoft\Network\Downloader*.*"
- Execute the following two commands:
rmdir %systemroot%\SoftwareDistribution /S /Qrmdir %systemroot%\system32\catroot2 /S /Q - Use these commands to reset the BITS and Windows Update services:
sc.exe sdset bits D:(A;;CCLCSWRPWPDTLOCRRC;;;SY)(A;;CCDCLCSWRPWPDTLOCRSDRCWDWO;;;BA)(A;;CCLCSWLOCRRC;;;AU)(A;;CCLCSWRPWPDTLOCRRC;;;PU)sc.exe sdset wuauserv D:(A;;CCLCSWRPWPDTLOCRRC;;;SY)(A;;CCDCLCSWRPWPDTLOCRSDRCWDWO;;;BA)(A;;CCLCSWLOCRRC;;;AU)(A;;CCLCSWRPWPDTLOCRRC;;;PU) - Now, run this command:
cd /d %windir%\system32
- Once done, execute these commands individually to register the critical DLL files:


regsvr32.exe /s atl.dll
regsvr32.exe /s urlmon.dll
regsvr32.exe /s mshtml.dll
regsvr32.exe /s shdocvw.dll
regsvr32.exe /s browseui.dll
regsvr32.exe /s jscript.dll
regsvr32.exe /s vbscript.dll
regsvr32.exe /s scrrun.dll
regsvr32.exe /s msxml.dll
regsvr32.exe /s msxml3.dll
regsvr32.exe /s msxml6.dll
regsvr32.exe /s actxprxy.dll
regsvr32.exe /s softpub.dll
regsvr32.exe /s wintrust.dll
regsvr32.exe /s dssenh.dll
regsvr32.exe /s rsaenh.dll
regsvr32.exe /s gpkcsp.dll
regsvr32.exe /s sccbase.dll
regsvr32.exe /s slbcsp.dll
regsvr32.exe /s cryptdlg.dll
regsvr32.exe /s oleaut32.dll
regsvr32.exe /s ole32.dll
regsvr32.exe /s shell32.dll
regsvr32.exe /s initpki.dll
regsvr32.exe /s wuapi.dll
regsvr32.exe /s wuaueng.dll
regsvr32.exe /s wuaueng1.dll
regsvr32.exe /s wucltui.dll
regsvr32.exe /s wups.dll
regsvr32.exe /s wups2.dll
regsvr32.exe /s wuweb.dll
regsvr32.exe /s qmgr.dll
regsvr32.exe /s qmgrprxy.dll
regsvr32.exe /s wucltux.dll
regsvr32.exe /s muweb.dll
regsvr32.exe /s wuwebv.dll
8. Run these two commands to reset the network settings: netsh winsock reset netsh winsock reset proxy
9. Finally, use these commands to restart the services you disabled earlier: net start bits net start wuauserv net start appidsvc net start cryptsvc
10. Once done, restart the computer for the changes to apply.
Fixing the corrupt update components should help with the 80092004 Windows Update error, and you should now be able to install the latest version. Also, if this seems too complex, you can always run a reset script.
- Windows 11 24H2 is now broadly available, but there’s a catch
- Microsoft is now showing Microsoft 365 ads in the PC Manager app
4. Use the Microsoft Update Catalog
- Identify the KB (Knowledge Number) number for the update that failed to install in the Update History.

- Go to Microsoft Update Catalog, paste the KB number in the search bar, and hit Enter.

- Click on Download next to the version that matches the system architecture and OS iteration.
- Click on the link in the popup window to start the download.

- Run the setup and follow the instructions to install the update.


When the previous methods fail to fix 80092004 in Windows 11, you can always manually install the update from the Microsoft Update Catalog.
5. Perform an in-place upgrade
Tip
The steps listed here are for the latest iteration. In case you are running Windows 10, head to the official page, download the installation media and use it perform an in-place upgrade.
- Go to Microsoft’s official website, choose the required edition and product language, and download the Windows 11 ISO.

- Now, run the ISO file, and click Open in the confirmation prompt.

- Launch the setup.exe file.

- Click on Next in the setup window to proceed.

- Now, click Accept to agree to Microsoft’s license terms.
- Verify that the setup reads Keep personal files and apps, and click on Install.


As a last resort, you can always perform an in-place upgrade to get rid of 80092004 and a bunch of other issues without losing the saved files and apps. Besides, the process boosts the system’s performance by eliminating many minor problems.
After you have fixed the error, check the best Windows security settings for a safer OS experience.
For any queries or to share another solution with us, drop a comment below.
Kazim Ali Alvi
Windows Hardware Expert
Kazim has always been fond of technology, be it scrolling through the settings on his iPhone, Android device, or Windows PC. He’s specialized in hardware devices, always ready to remove a screw or two to find out the real cause of a problem.
Long-time Windows user, Kazim is ready to provide a solution for your every software & hardware error on Windows 11, Windows 10 and any previous iteration. He’s also one of our experts in Networking & Security.
Several users reported encountering an error 0x80092004 when they were trying to upgrade their Windows 10 PCs to the next available OS Build. In this article, we have discussed all possible reasons that may trigger this error code on Windows including seven fixes for this update-related issue. Let’s first learn the underlying causes behind this update issue on Windows 10.
Note: Recently, this error occurred when installing a .NET Framework update KB5022729 on Windows 10. If you encounter this issue as well, read on how to fix this issue in the below sections.

What causes an update error 0x80092004 in Windows?
The error code 0x80092004 primarily occurs when your system meets one or a combination of the following issues on your computer.
- Due to the presence of corrupt system files or folders
- The latest Servicing Stack update is missing from your computer
- You have installed a buggy update on your computer and hence the error 0x80092004
If you don’t want to go through the complex solutions, you may manually download and install the pending update on your Windows 10 PC. However, do note that this error code 0x80092004 might occur again when you try to install the next available security or non-security update.
If you are not able to install updates on your Windows 10 PC because of an error code 0x80092004, attempt the below fixes one after another –
1] Run Windows Update Troubleshooter
Windows Update Troubleshooter is an effective tool in Windows 10 that can find and resolve the pending update issues on your computer. Here’s how to run this tool on Windows 10 PC –
- Right-click on the Start button and select Settings.
- Select Update & Security > Troubleshoot.
- Head over to the right pane and click Additional troubleshooters.
- Under “Get up and running“, locate and click to expand Windows Update.
- When this expands, hit Run the troubleshooter.

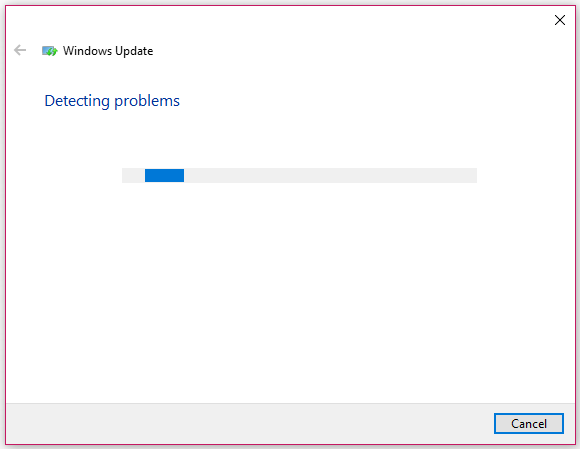
- On the troubleshooting window, click Next, and follow the on-screen instructions.
Wait for this troubleshooting task to complete and once it is over, make sure to restart your computer. From the next login, go to Settings > Update & Security > Windows Update, and hit Check for updates.
The system will connect to Microsoft servers online and download/install the pending update on your Windows 10 PC.
2] Download and Install the Recent Servicing Stack Update
It is required of users to keep the Servicing Stack up to date before installing any cumulative update on Windows 10 older versions. If you are still running Windows 10 version 1607 or an earlier version, make sure to download the recent SSU package and install it on your computer.
You may check for the same by viewing the release note of any recent update to Windows 10. Here’s how to perform this task –
- Go to Windows 10 Update history first, and select your Windows version from the left navigation.
- You will find all updates arranged as per their release date.
- Select the recent one and head over to the right pane.
- Scroll down to the How to Get this update section, and note down the latest SSU number.
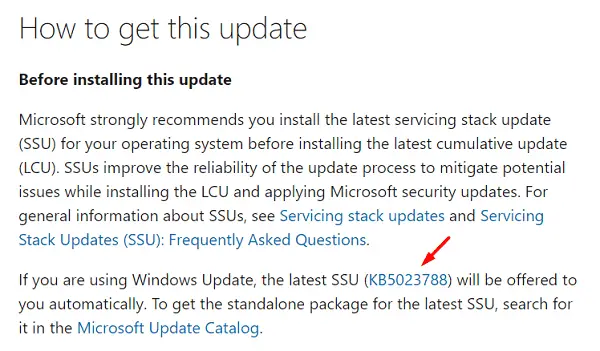
- Go to Microsoft Update Catalog next, and search for this SSU number in the text field.
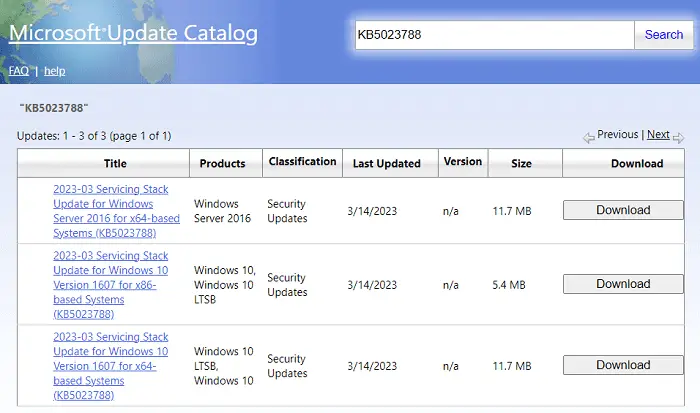
- Select the update matching your system architecture, and hit the Download button.
- Click the top link on the next page to begin downloading the chosen servicing stack update.
After the download completes, double-click on the setup file to begin its installation. Restart your PC and check if you can update Windows normally.
3] Run SFC and DISM Scans to fix Error 0x80092004
If the error 0x80092004 is still occurring, this must be due to the presence of some corrupt files or folders on Windows 10. SFC and DISM are two great tools that you may try to find and resolve internal corruption on your computer.
Here’s how to initiate the SFC scan in Windows –
- Press Win + R to launch the Run dialog.
- Type CMD on it and press Ctrl + Shift + Enter keys altogether.
- When the UAC window prompts, hit Yes to authorize accessing Command Prompt as administrator.
- On the elevated console, type the following and press the Enter key –
DISM.exe /Online /Cleanup-image /Restorehealth
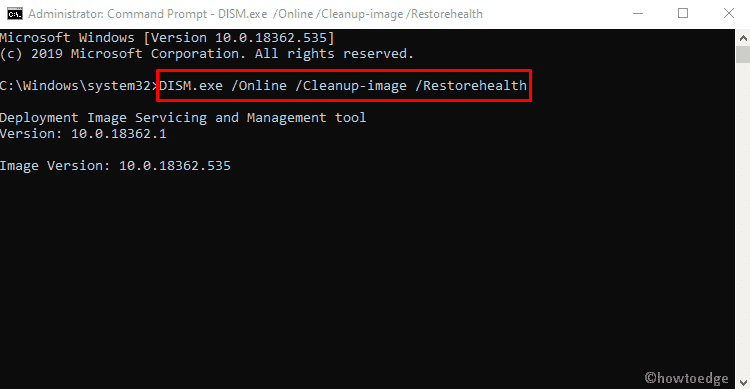
- This code will check for any file corruption within your system and resolve them automatically. The DISM utility will take 10-15 minutes to complete the scanning/repairing process, so wait patiently.
- After this command runs successfully, run the System File Checker command next. For this, copy/paste the following and press Enter –
sfc /scannow
- This utility will also take 10-15 minutes to find and repair the missing as well as corrupt system files inside the System32 folder.
- After successfully running the DISM and SFC Scans on Windows, close CMD, and restart your PC.
From the next login, check if you can update Windows normally without getting into an error code 0x80092004.
4] Remove the recently installed updates
If you have recently upgraded Windows 10 and this error 0x80092004 starts occurring afterward, you must have installed a buggy update. In such an event, you should remove the recently installed updates from your system and then purge the residual or leftover files using the Disk Cleanup tool.
Here’s how to perform this task –
- First of all, press Windows + I to launch Settings and navigate to the below path –
Update & Security > Windows Update > View update history
- You may see all the recent updates on the right pane.
- Note down the KB number of a recent update and then launch PowerShell as administrator.
- When the UAC window prompts, hit Yes to authorize the access.
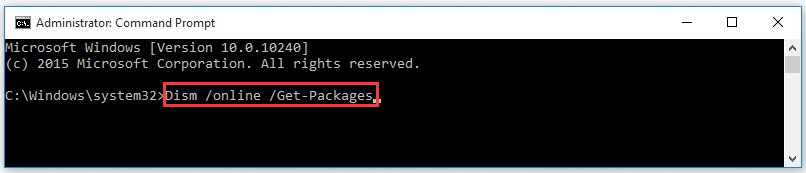
To remove recent updates from Windows 10 PC, you may use the DISM tool. Here’s what you need to execute on the elevated console –
Dism /online /Get-Packages
- The DISM will now display a list of recently installed updates on your computer.
- Note down the name of the package that has been recently installed.
- Next, execute the following code to remove that particular package from your system.
- For this, you may take the help of the following codes. Make sure to press the Enter key after each command.
Note: Ensure changing the package name in the below command. Else, you will end up deleting some old updates.
dism.exe /online /remove-package /packagename:Package_for_RollupFix_Wrapper~31bf3856ad364e35~amd64~~16299.248.1.17
- After you have removed the package from your system successfully, restart your computer.
- Sign back into your device again and launch CMD as an administrator.
- Execute the following code on the elevated Command prompt –
Dism.exe /online /Cleanup-Image /StartComponentCleanup
- This will clean up the running system image on your computer.
- Go to Settings > Update & Security > Windows Update, and hit Check for updates.
The pending updates should now install normally on your computer. If not, try the next set of solutions discussed below.
5] Purge the Software Distribution Folder
The Software Distribution folder is an important folder in Windows 10 that accumulates all the information related to updates that ever occurred on your computer. As time passes by, there is no need of having the old data or entries.
However, the information remains as it is unless you delete them manually. The problem here is that you don’t know which files to remove exactly and so you might end up deleting some important entries. There’s a solution by which you may purge the SoftwareDistribution folder without affecting the normal update process in Windows 10. Here’s how –
- Press Win + S together and type CMD in the text field.
- Right-click on Command Prompt and select Run as administrator.
- When the UAC window prompts on the display screen, click on the Yes button.
- Stop the Windows update services that might prevent deleting files inside the SoftwareDistribution folder. For this, you need to execute these two commands on the elevated console –
net stop wuauserv
net stop bits
net stop cryptsvc
- Doing so will stop the Windows Update, Background Intelligent Transfer Service (BITS), and Cryptographic services.
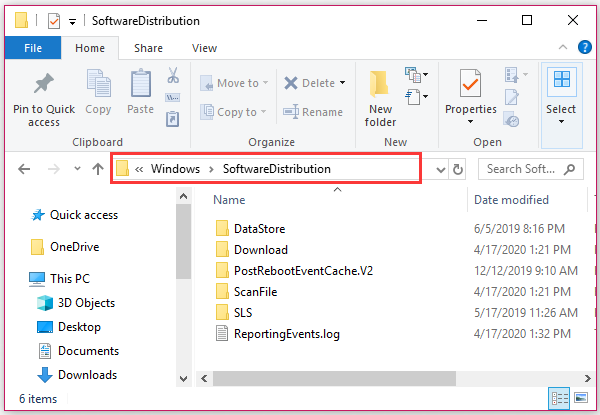
- Next, navigate to the path C:\Windows\SoftwareDistribution inside File Explorer.
- After you reach out to the above path, use Ctrl + A to select all items and then press the delete button.
- Next, head over to this path – C:\Windows\System32\Catroot2. Delete all the files and folders that are available inside this folder as well.
- After you delete all the files successfully, re-open the Command Prompt, and run the following codes on it –
net start wuauserv
net start bits
net start cryptsvc
- Close the Command Prompt and restart your computer so that the recent changes come into effect.
From the subsequent login, check if you can update Windows normally.
6] Pause Updates in Windows 10
The error code 0x80092004 must have been resolved by now. If not, you have only two solutions to go for and they are
- Pause Windows updates in Windows 10 till the next updates are available
- Or, manually download and install the pending updates
Here’s how to pause updates in Windows 10 –
- Press Windows + I altogether so that the Settings app opens up.
- Go to Update & Security > Windows Update, and click on Advanced options.
- Use the dropdown menu under Pause updates and choose a date.
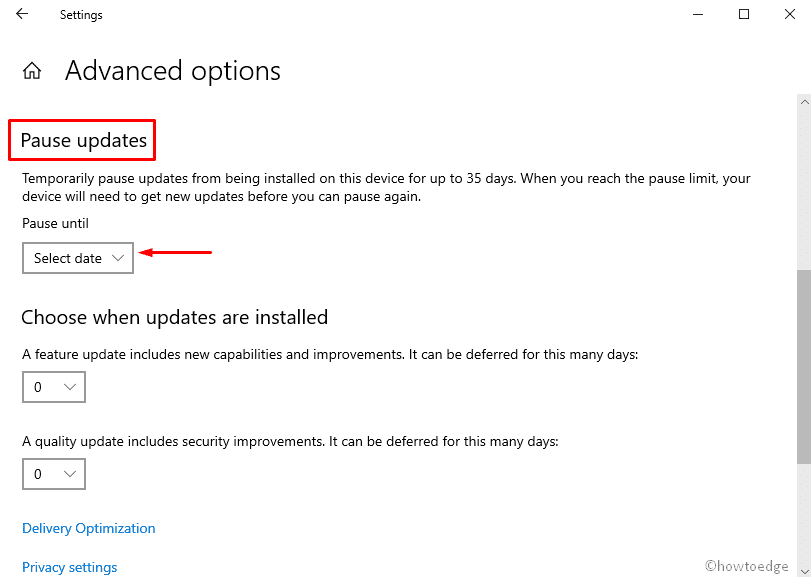
- The updates will be paused for the time you have selected using the drop-down menu.
- You may continue using your device without worrying about some pending updates pop-up.
Important – Using this setting, one can disable updates temporarily for 35 days. After that, you’ll need to select a new date to disable it again.
7] Manually install the pending update in Windows 10
If none of the above fixes work to resolve this error code 0x80092004, you may download the relevant standalone package from Update Catalog and manually install that on your computer. Here’s how to proceed with this task –
- Open Windows Settings by pressing Win + I altogether.
- Go to Update & Security > Windows Update > View Update History.
- On the following page, locate and note down the KB number of the failing update.
- Now, visit Microsoft Update Catalog on any browser and search for the copied KB number.
- Press Enter and you will find all the matching updates appearing on the display screen.
- Pick the update that best matches your system architecture, and hit the Download button.
- Click the top link to begin downloading the cumulative update.
After the download completes, you may double-click on this “.msu file” to begin upgrading to the next Build version on Windows 10.
In case you experience an error CRYPT_E_NOT_FOUND while installing this update, this means that your system declines the update on mismatching cryptographic values.
This happens only if the recent servicing update is not installed on your computer. Read this section on how to download and install the recent SSU package on your PC and then retry installing updates manually on Windows 10.
-
Home
-
Disk Recovery
- How to Fix Windows Update Error 0x80092004 [Complete Guides]
By Ariel | Follow |
Last Updated
When trying to install the Windows 2018 Security and Quality Rollup update, lots of users are trouble by the Windows Update error 0x80092004. Now, you come to the right place. MiniTool explores several effective troubleshooting methods for you.
The causes behind the Windows Update error 0x80092004 could be varied. These update errors often occur when Windows Updates cannot work the way they should. Sometimes, the updates you have downloaded get corrupted or faulty, which can also lead to error 0x80092004.
Now, let’s see how to fix Windows Update error 0x80092004. We will walk you through the top 5 troubleshooting methods.
Solution 1. Run Windows Update Troubleshooter
The first and simplest method is to run Windows Update troubleshooter. This utility is often used to troubleshoot many common Windows Update issues such as Windows Update stuck at 0%, error 0x80070422, etc. Here’s how to do that:
Step 1. Press Win + I keys to open the Setting window, and then click on Update & Security section to go on.
Step 2. Navigate to the Troubleshooter section on the left side, and then scroll down the right sidebar to find the Windows Update. Double click to open it and click on Run the troubleshooter button.
Step 3. Then this tool will start detecting the problems at once. Wait for this process to complete and check if you can install the Windows update without 0x80092004 error code.
Usually, you need to roll back and clean up all update files when an update fails. Here you can manually clean the package. Open the Update History to check how much KB updates were installed. Then follow the steps below to manually remove them.
Step 1. Press Win + R keys to open the Run dialog box, and then type cmd in it and press Ctrl + Shift + Enter keys to open the elevated command prompt.
Step 2. Type the Dism /online /Get-Packages command and hit Enter to open the list of packages you have installed currently.
Step 3. Then type the following commands and hit Enter to remove the installed packages.
Note: You should figure out the name for the installed package and replace the following commands with the package name.
dism.exe /online /remove-package /packagename:Package_for_RollupFix_Wrapper~31bf3856ad364e35~amd64~~16299.248.1.17 /packagename:Package_for_RollupFix~31bf3856ad364e35~amd64~~16299.125.1.6 /packagename:Package_for_RollupFix_Wrapper~31bf3856ad364e35~amd64~~16299.192.1.9 /packagename:Package_for_RollupFix~31bf3856ad364e35~amd64~~16299.192.1.9 /norestart
Step 4. Restart your computer and come back to the elevated command prompt. Then run the following command.
Dism.exe /online /Cleanup-Image /StartComponentCleanup
Now, you can try installing this update and check if the Windows Update error 0x80092004 disappears.
Solution 3. Perform a System Restore
In addition to the above method, you can perform a system restore to roll back your system to an earlier date. This operation will clean up the corrupted updates. After restoring your system, you can try installing the Windows updates again and check if the error 0x80092004 is fixed.
Click here to know more detailed steps.
Solution 4. Delete the Faulty Updates from Software Distribution Folder
To clean up the faulty update files, you can delete the Software Distribution folder in File Explorer. As you might know, the downloaded windows update files are saved in a dedicated folder called SoftwareDistribution. Here you can follow the steps below to delete it manually.
Step 1. Press Win + E keys to open the File Explorer window.
Step 2. Click on This PC on the left side, and then navigate to the C:WindowsSoftwareDistribution path. Then select the folder and click on the delete key.
Solution 5. Manually Install the Windows Updates
The last way to get rid of the 0x80092004 error code is to install the Windows update manually. You can check your pending Windows updates and try installing it from here. Click here to visit the Microsoft Update Catalog to download the KB update.
Step 1. Search for the updated version in the search box and download the update on your computer.

Step 2. Then double click to execute this update and check if the error still persists.
About The Author
Position: Columnist
Ariel has been working as a highly professional computer-relevant technology editor at MiniTool for many years. She has a strong passion for researching all knowledge related to the computer’s disk, partition, and Windows OS. Up till now, she has finished thousands of articles covering a broad range of topics and helped lots of users fix various problems. She focuses on the fields of disk management, OS backup, and PDF editing and provides her readers with insightful and informative content.