
What is Error 1053?
Error 1053 is a kind of Runtime error that is found in the Microsoft Windows operating systems. The file can be found for Windows Update. Windows Update Error 1053 has a popularity rating of 1 / 10.
Errors
This tutorial contains information on Error 1053 or otherwise known as Windows Update Error 1053. Errors such as Windows Update Error 1053 indicate your machine has faulty hardware or software that should be fixed when possible. Below is information on how to repair Error 1053 and get your computer back to normal.
Signs of Error 1053:
- When your computer freezes or locks up at random.
- When your computer crashes when you are running Windows Update.
- If Windows Update Error 1053 pops up and causes a program to shutdown or your computer to crash.
- Your computer is running slow, taking a long time to boot up, and you suspect Error 1053 by Windows Update is the cause.
What Causes Runtime Errors Like Error 1053?
There are several causes of runtime errors like Windows Update Error 1053, such as viruses, out of date drivers, missing files or folders, incomplete or poor installation, and registry errors. They can also occur due to an issue with the computer’s memory, which may often be due to a hardware problem. In some cases there was an issue installing Windows Update and an error occurred.
How to Fix Windows Update Error 1053
Follow the step by step instructions below to fix the Error 1053 problem. We recommend you do each in order. If you wish to skip these steps because they are too time consuming or you are not a computer expert, see our easier solution below.
Step 1 — Uninstall and Reinstall Windows Update
If the Windows Update Error 1053 is a result of using Windows Update, you may want to try reinstalling it and see if the problem is fixed. Please follow these steps:
Windows XP
- Click “Start Menu”.
- Click “Control Panel”.
- Select the “Add or Remove” program icon.
- Find the Error 1053 associated program.
- Click the Change/Remove button on the right side.
- The uninstaller pop up will give you instructions. Click “okay” or “next” or “yes” until it is complete.
- Reinstall the software.
Windows 7 and Windows Vista
- Click “Start Menu”.
- Click “Control Panel”.
- Click “Uninstall a Program” which is under the “Programs” header.
- Find the Error 1053 associated program.
- Right click on it and select “Uninstall”.
- The uninstaller pop up will give you instructions. Click “okay” or “next” or “yes” until it is complete.
- Reinstall the software and run the program.
Windows 8, 8.1, and 10
- Click “Start Menu”.
- Click “Programs and Features”.
- Find the software that is linked to **insert file name**.
- Click Uninstall/Change.
- The uninstaller will pop up and give you instructions. Click “okay” and “next” until it is complete.
- Restart your computer.
- Reinstall the software and run the program.
Step 2 — Remove Registry Entry related to Error 1053
WARNING: Do NOT edit the Windows Registry unless you absolutely know what you are doing. You may end up causing more trouble than you start with. Proceed at your OWN RISK.
- Create a backup of registry files.
- Click “Start”.
- Type regedit, select it, and grant permission in order to proceed.
- Click HKEY LOCAL MACHINE>>SOFTWARE>>Microsoft>>Windows>>Current Version>>Uninstall.
- Find the Windows Update Error 1053 software from the list you wish to uninstall.
- Select the software and double click the UninstallString icon on the right side.
- Copy the highlighted text.
- Exit and go to the search field.
- Paste the data.
- Select Okay in order to uninstall the program.
- Reinstall the software.
Step 3 – Ensure Junk Isn’t Causing Windows Update Error 1053
Any space that isn’t regularly cleaned out tends to accumulate junk. Your personal computer is no exception. Constant web browsing, installation of applications, and even browser thumbnail caches slow down your device and in the absence of adequate memory, can also trigger a Windows Update Error 1053 error.
So how do you get around this problem?
- You can either use the Disk Cleanup Tool that comes baked into your Windows operating system.
- Or you can use a more specialized hard drive clean up solution that does a thorough job and flushes the most stubborn temporary files from your system.
Both solutions may take several minutes to complete the processing of your system data if you haven’t conducted a clean up in a while.
The browser caches are almost a lost cause because they tend to fill up quite rapidly, thanks to our constantly connected and on the go lifestyle.
Here’s how you can run the Window’s Disk Cleanup Tool, without performance issues or surprises.
- For Windows XP and Windows 7, the program can be ran from “Start” and from the “Command Prompt”.
- Click “Start”, go to All Programs > Accessories > System Tools, click Disk Cleanup. Next choose the type of files you wish to remove, click OK, followed by “Delete Files”.
- Open up the Command Prompt, type “c:\windows\cleanmgr.exe /d” for XP and “cleanmgr” for Windows 7. Finish by pressing “Enter”.
- For Windows 8 and Windows 8.1, the Disk Cleanup Tool can be accessed directly from “Settings”. Click “Control Panel” and then “Administrative Tools”. You can select the drive that you want to run the clean up on. Select the files you want to get rid of and then click “OK” and “Delete Files”.
- For Windows 10, the process is simplified further. Type Disk Cleanup directly in the search bar and press “Enter”. Choose the drive and then the files that you wish to wipe. Click “OK”, followed by “Delete Files”.
The progressive ease with which the Cleanup Tool can be used points to the growing importance of regularly deleting temporary files and its place in preventing Windows Update Error 1053.
PRO TIP:
Remember to run the Disk Cleanup as an administrator.
Step 4 – Fix Infections and Eliminate Malware in Your PC
How do you gauge if your system is infected with a malware and virus?
Well, for one, you may find certain applications misbehaving.
And you may also see the occurrence of Error 1053.
Infections and malware are the result of:
- Browsing the Internet using open or unencrypted public Wi-Fi connections
- Downloading applications from unknown and untrustworthy sources
- Intentional planting of viruses in your home and office networks
But thankfully, their impact can be contained.
- Enter “safe mode” by pressing the F8 key repeatedly when your device is restarting. Choose “Safe Mode with Networking” from the Advanced Boot Options menu.
- Back up all the data in your device to a secure location. This is preferably a storage unit that is not connected to your existing network.
- Leave program files as is. They are where the infection generally spreads from and may have been compromised.
- Run a thorough full-system scan or check of an on-demand scanner. If you already have an antivirus or anti-malware program installed, let it do the heavy lifting.
- Restart your computer once the process has run its course.
- Lastly, change all your passwords and update your drivers and operating system.
PRO TIP: Are you annoyed by the frequent updates to your antivirus program? Don’t be! These regular updates add new virus signatures to your software database for exponentially better protection.
Step 5 – Return to the Past to Eliminate Error 1053
The steps outlined up until this point in the tutorial should have fixed Windows Update Error 1053 error. But the process of tracking what has caused an error is a series of educated guesses. So in case the situation persists, move to Step 5.
Windows devices give users the ability to travel back in time and restore system settings to an uncorrupted, error free state.
This can be done through the convenient “System Restore” program. The best part of the process is the fact that using System Restore doesn’t affect your personal data. There is no need to take backups of new songs and pictures in your hard drive.
- Open “Control Panel” and click on “System & Security”.
- Choose the option “System”.
- To the left of the modal, click on “System Protection”.
- The System Properties window should pop-up. You’ll be able to see the option “System Restore”. Click on it.
- Go with “Recommended restore” for the path of least hassles and surprises.
- Choose a system restore point (by date) that will guarantee taking your device back to the time when Error 1053 hasn’t been triggered yet.
- Tap “Next” and wrap up by clicking “Finish”.
If you’re using Windows 7 OS, you can reach “System Restore” by following the path Start > All Programs > Accessories > System Tools.
Step 6 — Error 1053 Caused by Outdated Drivers
Updating a driver is not as common as updating your operating system or an application used to run front-end interface tasks.
Drivers are software snippets in charge of the different hardware units that keep your device functional.
So when you detect an Windows Update Error 1053 error, updating your drivers may be a good bet. But it is time consuming and shouldn’t be viewed as a quick fix.
Here’s the step-by-step process you can go through to update drivers for Windows 8, Windows 8.1 and Windows 10.
- Check the site of your hardware maker for the latest versions of all the drivers you need. Download and extract them. We strongly advice going with original drivers. In most cases, they are available for free on the vendor website. Installing an incompatible driver causes more problems than it can ever fix.
- Open “Device Manager” from the Control Panel.
- Go through the various hardware component groupings and choose the ones you would like to update.
- On Windows 10 and Windows 8, right-click on the icon of the hardware you would like to update and click “Update Driver”.
- On Windows 7 and Vista, you right-click the hardware icon, choose “Properties”, navigate to the Driver panel, and then click “Update Driver”.
- Next you can let your device automatically search for the most compatible drivers, or you can choose to update the drivers from the versions you have on your hard drive. If you have an installer disk, then the latter should be your preferred course of action. The former may often get the driver selection incorrect.
- You may need to navigate a host of warnings from the Windows OS as you finalize the driver update. These include “Windows can’t verify that the driver is compatible” and “Windows can’t verify the publisher of this driver”. If you know that you have the right one in line, click “Yes”.
- Restart the system and hopefully the Windows Update Error 1053 error should have been fixed.
Step 7 – Call the Windows System File Checker into Action
By now the Windows Update Error 1053 plaguing your device should have been fixed. But if you haven’t resolved the issue yet, you can explore the Windows File Checker option.
With the Windows File Checker, you can audit all the system files your device needs to operate, locate missing ones, and restore them.
Sound familiar? It is almost like “System Restore”, but not quite. The System Restore essentially takes you back in time to a supposedly perfect set up of system files. The File Checker is more exhaustive.
It identifies what is amiss and fills the gaps.
- First and foremost, open up an elevated command prompt.
- Next, if you are using Windows 8, 8.1 or 10, enter “DISM.exe /Online /Cleanup-image /Restorehealth” into the window and press Enter.
- The process of running the Deployment Image Servicing and Management (DISM) tool may take several minutes.
- Once it completes, type the following command into the prompt “sfc /scannow”.
- Your device will now go through all protected files and if it detects an anomaly, it will replace the compromised version with a cached version that resides at %WinDir%\System32\dllcache.
Step 8 – Is your RAM Corrupted? Find Out.
Is it possible? Can the memory sticks of your device trigger Error 1053?
It is unlikely – because the RAM chips have no moving parts and consume little power. But at this stage, if all else has failed, diagnosing your RAM may be a good move.
You can use the Windows Memory Diagnostics Tool to get the job done. Users who are on a Linux or Mac and are experiencing crashes can use memtest86.
- Open up your device and go straight to the “Control Panel”.
- Click on “Administrative Tools”.
- Choose “Windows Memory Diagnostic”.
- What this built-in option does is it burns an ISO image of your RAM and boots the computer from this image.
- The process takes a while to complete. Once it is done, the “Status” field at the bottom of the screen populates with the result of the diagnosis. If there are no issues with your RAM/memory, you’ll see “No problems have been detected”.
One drawback of the Windows Memory Diagnostic tool pertains to the number of passes it runs and the RAM segments it checks.
Memtest86 methodically goes over all the segments of your memory – irrespective of whether it is occupied or not.
But the Windows alternative only checks the occupied memory segments and may be ineffective in gauging the cause of the Windows Update Error 1053 error.
Step 9 – Is your Hard Drive Corrupted? Find Out.
Your RAM or working memory isn’t the only culprit that may precipitate an Windows Update Error 1053 error. The hard drive of your device also warrants close inspection.
The symptoms of hard drive error and corruption span:
- Frequent crashes and the Blue Screen of Death (BSoD).
- Performance issues like excessively slow responses.
- Errors like Error 1053.
Hard drives are definitely robust, but they don’t last forever.
There are three things that you can do to diagnose the health of your permanent memory.
- It is possible that your device may have a hard time reading your drive. This can be the cause of an Windows Update Error 1053 error. You should eliminate this possibility by connecting your drive to another device and checking for the recurrence of the issue. If nothing happens, your drive health is okay.
- Collect S.M.A.R.T data by using the WMIC (Windows Management Instrumentation Command-line) in the command prompt. To do this, simply type “wmic” into the command prompt and press Enter. Next follow it up with “diskdrive get status”. The S.M.A.R.T status reading is a reliable indicator of the longevity of your drive.
- Fix what’s corrupt. Let’s assume you do find that all isn’t well with your hard drive. Before you invest in an expensive replacement, using Check Disk or chkdsk is worth a shot.
- Open the command prompt. Make sure you are in Admin mode.
- Type “chkdsk C: /F /X /R” and press “Enter”. “C” here is the drive letter and “R” recovers data, if possible, from the bad sectors.
- Allow the system to restart if the prompt shows up.
- And you should be done.
These steps can lead to the resolution you’re seeking. Otherwise the Windows Update Error 1053 may appear again. If it does, move to Step 10.
Step 10 – Update Windows OS
Like the software applications you use to render specific tasks on your device, the Operating System also requires periodic updates.
Yes, we’ve all heard the troubling stories.
Devices often develop problems post unfinished updates that do not go through. But these OS updates include important security patches. Not having them applied to your system leaves it vulnerable to viruses and malware.
And may also trigger Error 1053.
So here’s how Windows 7, Windows 8, Windows 8.1 and Windows 10 users can check for the latest updates and push them through:
- Click the “Start” button on the lower left-hand corner of your device.
- Type “Updates” in the search bar. There should be a “Windows Update” or “Check for Updates” option, based on the OS version you’re using.
- Click it. The system will let you know if any updates are available.
- You have the convenience of choosing the components of the update you’d like to push through. Always prioritize the security updates.
- Click “OK” followed by “Install Updates”.
Step 11 – Refresh the OS to Eliminate Persistent Windows Update Error 1053 Error
“Windows Refresh” is a lifesaver.
For those of you who are still with us and nothing has worked to eliminate the Error 1053, until recently, a fresh install of Windows would have been the only option.
Not anymore.
The Windows Refresh is similar to reinstalling your Windows OS, but without touching your personal data. That’s hours of backup time saved in a jiffy.
Through the Refresh, all your system files become good as new. The only minor annoyance is the fact that any custom apps you’ve installed are gone and the system applications you had uninstalled are back.
Still, it is the best bet as the final step of this process.
- Enter the “Settings” of your PC and click on “Change Settings”.
- Click “Update and recovery” and then choose “Recovery”.
- Select “Keep my files”. This removes apps and settings, but lets your personal files live on.
- You’ll get some warning messages about the apps that will be uninstalled. If you’ve gone through a recent OS upgrade, the Refresh process makes it so that you can’t go back to your previous OS version – if you should ever feel the need to do it.
- Click the “Refresh” button.
Are you using an older version of Windows that doesn’t come with the power to “Refresh”?
Maybe it is time to start from scratch.
- Enter your BIOS set-up.
- This is where you need to change your computer’s boot order. Make it so that the boot happens not from the existing system files, but from the CD/DVD Drive.
- Place the original Windows disk in the CD/DVD drive.
- Turn on or restart the device.
- Choose where you’d like the system files to be installed.
- Your PC will restart several times as the process runs its course.
FAQ’s
Why Fix Runtime Errors Like Error 1053?
Runtime errors like Error 1053 can halt your computer, resulting in loss of data which can lead to delays and frustration. It can get annoying to have to constantly deal with these pop up errors while you are working or using a program. Since they can be fixed, we recommend doing so as soon as you can.
Can I Fix Runtime Errors Myself?
You can solve Runtime Errors like Windows Update Error 1053 on your own, however we only recommend this for folks who are a little more experienced than others with diagnosing and fixing computer errors. The right way to fix the error depends largely on the cause of the error, which may be a little hard to diagnose if you do not know much about computers. Also there is a danger of unintentionally causing additional problems.
Will Removing Runtime Errors Like Error 1053 Improve My Start Up Speed?
Runtime errors have no impact on the start up speed since the error occurs while the program is running. It may, however, cause the OS to crash during or after start up. Correcting runtime errors will have no impact on the startup speed of the computer. It may just help you save time by reducing crashes and errors which may cause the computer to keep starting up.
Start Download Now
Author:
Curtis Hansen has been using, fiddling with, and repairing computers ever since he was a little kid. He contributes to this website to help others solve their computer issues without having to buy a new one.
When you try to start a service on your PC, but if your service refuses to respond in the time window, you will face Error 1053: The service did not respond to the start or control request in a timely fashion. You may encounter the error in numerous variations where you might not be able to launch the custom services. Unfortunately, few developers have reported service error 1053 often occurs in their PC when they try to develop any custom software. In this guide, you will learn the reasons that cause the error message, along with the troubleshooting methods to get rid of the problem. So, continue reading!

Table of Contents
Error 1053: The service did not respond to the start or control request in a timely fashion occurs in Windows 10 whenever there is a timeout response for a particular request.
- If your applications or services do not meet Timeout settings’ default preferences, you will face service error 1053. Tweaking registry keys could manipulate the settings, thereby fixing the problem.
- If your PC does not have the essential DLL & System data files, you may face service error 1053. Corrupt or altered files, and whenever a vital data piece is unavailable, you will face service error 1053.
- The presence of malware may lead to the loss of data, thereby causing service error 1053. Running an antivirus scan might demolish all the harmful data from your PC and prevent your data from being altered or damaged.
- Affected system files could be due to a corrupt Windows update. If you have an outdated Operating System, corrupt data and bugs (if any) will stay back in your PC, causing service error 1053. Always ensure you are using an updated version of Windows to resolve any kind of issue.
- If there are corrupt installation files, incorrect configuration of files & folders, issues in admin rights of apps might cause service error 1053. To resolve this, reinstall any particular application causing the error.
Still, if you are confused about procedures to be followed to eradicate Error 1053: The service did not respond to the start or control request in a timely fashion, you are not alone! Follow the troubleshooting methods to fix the said error as discussed in the next section.
This section has compiled a complete list of methods to fix error 1053: the service did not respond. Make sure you follow the listed methods in the same order to attain the best results.
Method 1: Perform Clean Boot
Issues concerning error 1053: the service did not respond and can be fixed by a clean boot of all essential services and files in your Windows 10 system, as explained in this method.
Note: Make sure you log in as an administrator to perform Windows clean boot.
1. Launch the Run dialog box by hitting the Windows + R keys together.
2. Type msconfig and click the OK button to open System Configuration.

3. The System Configuration window will appear. Next, switch to the Services tab.
4. Check the box next to Hide all Microsoft services and click on Disable all button as shown highlighted.

5. Now, switch to the Startup tab and click the link to Open Task Manager as depicted below.

6. The Task Manager window will now pop up. Switch to the Startup tab.
7. Next, select the startup tasks that are not required and click Disable displayed in the bottom right corner.

8. Exit the Task Manager and System Configuration window.
9. Now, press Alt+ F4 keys simultaneously. You will see a pop-up window as shown below.

10. Now, click on the drop-down box and select the Restart option.

11. Finally, hit Enter or click on OK to reboot your system.
Method 2: Tweak Timeout Settings
To resolve service error 1053, the primary step is to alter the timeout settings via Registry editor. Whenever you try to start a service, a time frame will start of its own with default values. If the response time does not meet this time frame, you will face Error 1053: The service did not respond to the start or control request in a timely fashion. Now, in this troubleshooting method, you can change the registry value of the time frame and if it is not present, you will create the same. Here is how to do it.
1. Press and hold Windows + R keys together to open the Run dialog box.
2. Now type regedit and hit Enter key to launch Registry Editor.

3. Navigate to the following key folder path from the address bar.
Computer\HKEY_LOCAL_MACHINE\SYSTEM\CurrentControlSet\Control\SecurePipeServers
4A. If you did not find SecurePipeServers in the Control folder, right-click on the space in the right pane and click on New > DWORD (32-bit) Value.

4B. If you have SecurePipeServers in the Control folder, right-click on the Default key in the right pane and select the Modify option.

5. Set the Value data to 18000 as shown.

6. Save the changes and reboot the PC.
Now check if you have fixed Error 1053: The service did not respond to the start or control request in a timely fashion.
Also Read: Fix Device Not Migrated Error on Windows 10
Method 3: Repair System Files
Corrupt files and folders in PC often lead to service error 1053. Analyze if your PC has any corrupt files contributing to the error by SFC, DISM commands as instructed in this method. As a result, if there are any discrepancies, all the corrupt files will be automatically removed or replaced. In addition, it is a built-in tool that lets the user delete files and fix service error 1053. Also, follow the below-mentioned steps to implement the same.
1. Hit the Windows key, type Command Prompt and click on Run as administrator.

2. Click on Yes in the User Account Control prompt.
3. Type chkdsk C: /f /r /x command and hit Enter key.

4. If you are prompted with a message, Chkdsk cannot run…the volume is… in use process, then, type Y and hit the Enter key.
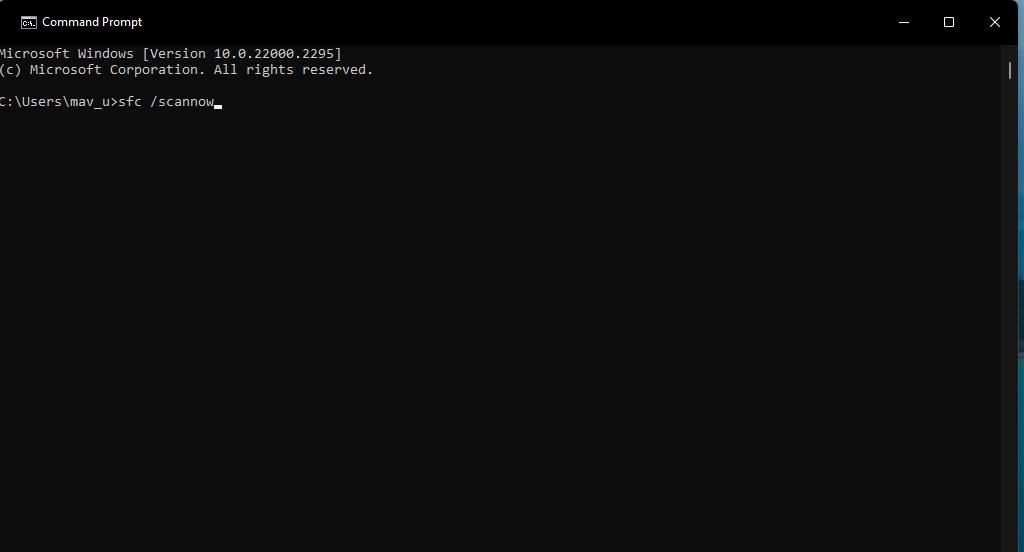
5. Again, type the command: sfc /scannow and press Enter key to run the System File Checker scan.

Note: A system scan will be initiated and it will take a couple of minutes to finish. Meanwhile, you can continue performing other activities but be mindful of not accidentally closing the window.
After completing the scan, it will show either of these messages:
- Windows Resource Protection did not find any integrity violations.
- Windows Resource Protection could not perform the requested operation.
- Windows Resource Protection found corrupt files and successfully repaired them.
- Windows Resource Protection found corrupt files but was unable to fix some of them.
6. Once the scan is finished, restart your PC.
7. Again, launch Command Prompt as administrator and execute the given commands one after the other:
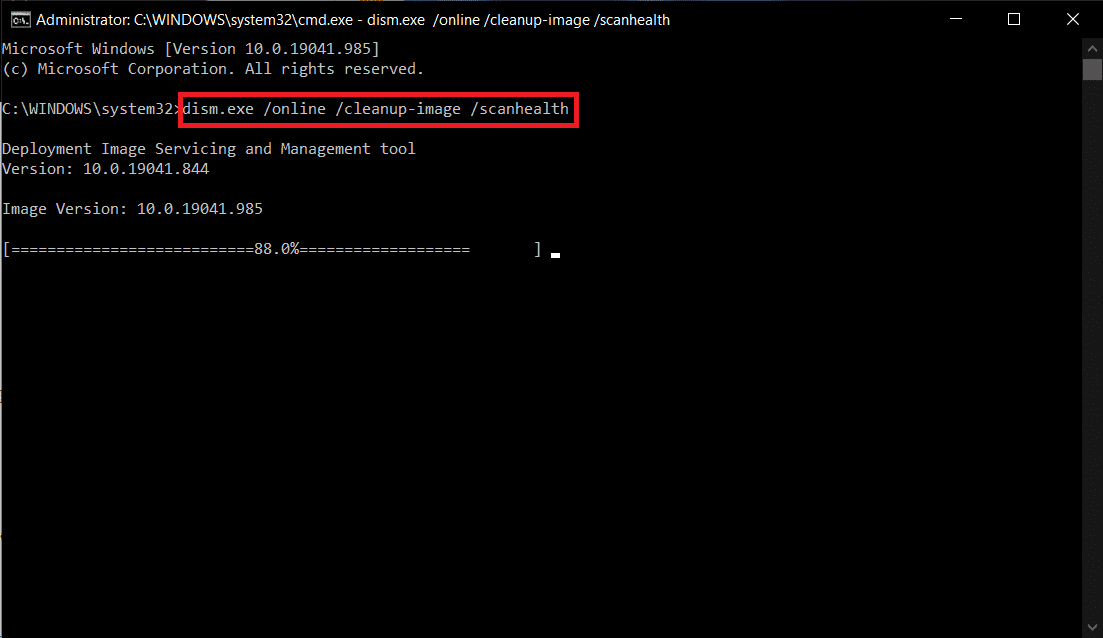
dism.exe /Online /cleanup-image /scanhealth
dism.exe /Online /cleanup-image /restorehealth
dism.exe /Online /cleanup-image /startcomponentcleanup
Note: You must have a working internet connection to execute DISM commands properly.
Method 4: Run Malware Scan
Windows Defender can help you in getting rid of malicious software. It routinely scans and safeguards your system. Therefore, to avoid service error 1053, run an antivirus scan in your system and check if the problem is solved. Then, follow the below-mentioned steps to do so.
1. Hit Windows + I keys simultaneously to launch Settings.
2. Here, click on Update & Security settings as shown.

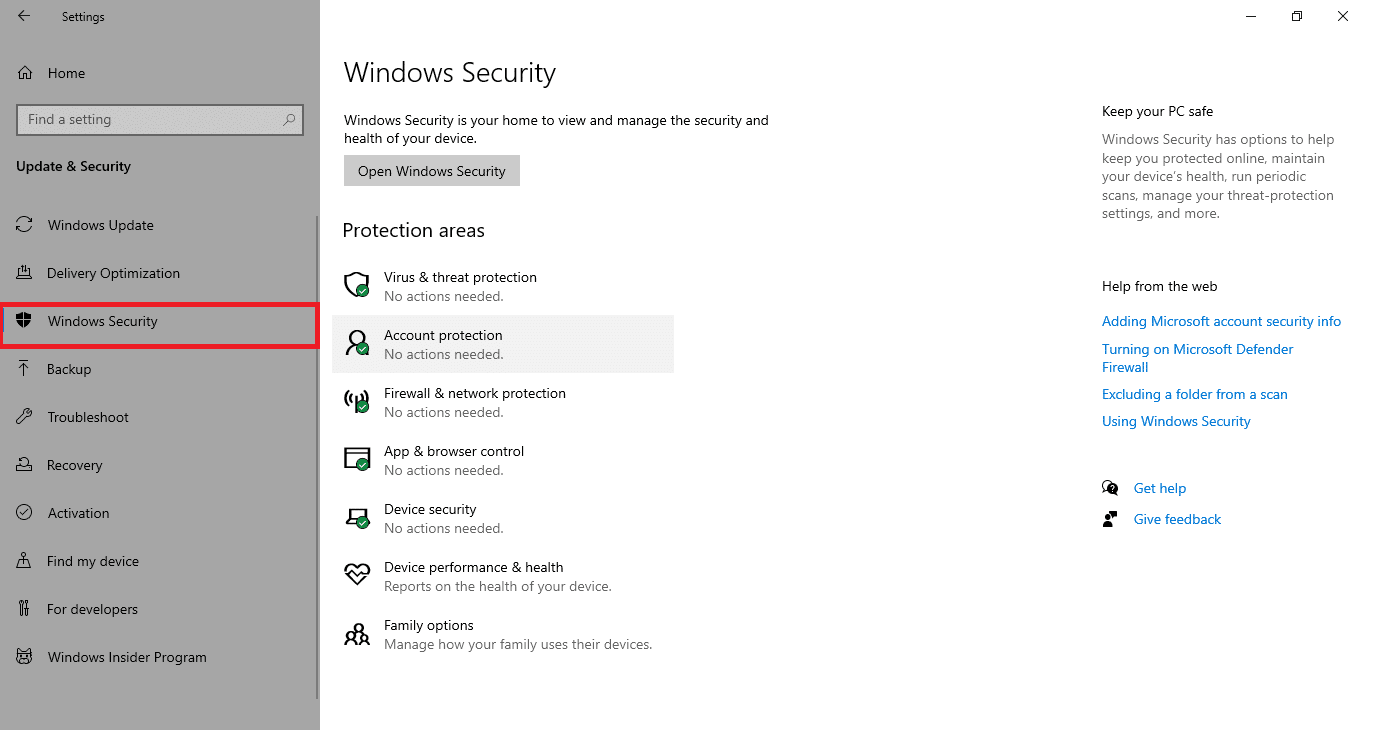
3. Go to Windows Security in the left pane.
4. Click on the Virus & threat protection option in the right pane.

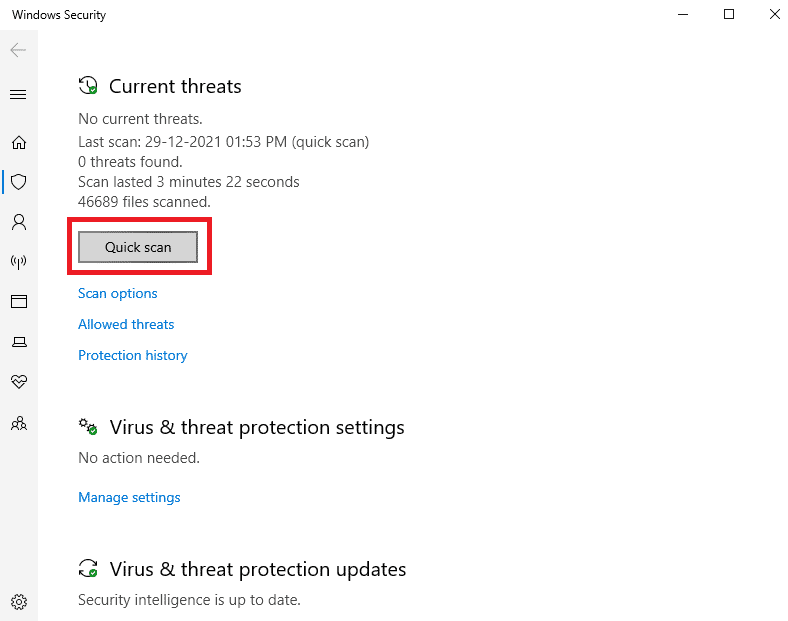
5. Click on the Quick Scan button to search for malware.
6A. Once the scan is done, all the threats will be displayed. Click on Start Actions under Current threats.
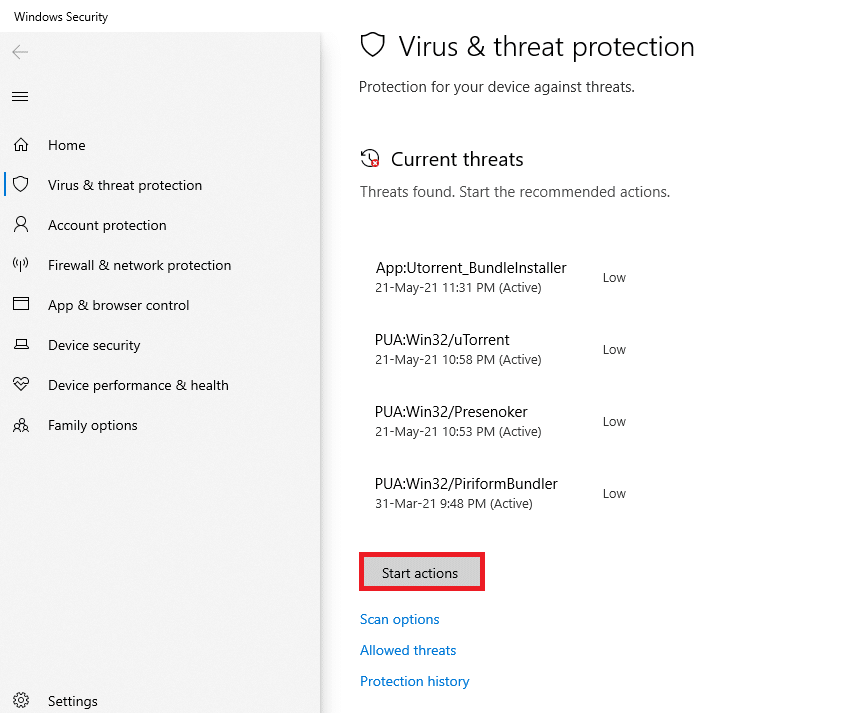
6B. If there is no threat in your device, the device will show the No current threats alert.

Windows Defender will remove all viruses and malware programs once the scanning process is complete. First, check if you have fixed error 1053: the service did not respond.
Also Read: How to Fix Error 0x80300024
Method 5: Reset Network Configurations
If you are trying to start a service that connects to the internet for its function, you may try to reset network configurations to fix error 1053: the service did not respond. In some cases, internet connectivity problems might contribute to the said error, and thus resetting them might help you fix the same. Here are a few instructions to reset network configurations.
1. Hit the Windows key, type Command Prompt, and click on Run as administrator.

2. Now, type the following commands one by one in the command window and hit Enter after each command.
ipconfig /flushdns
ipconfig /registerdns
ipconfig /release
ipconfig /renew
netsh winsock reset

3. Finally, wait for the commands to be executed and reboot your PC.
Check if you have fixed Error 1053: The service did not respond to the start or control request in a timely fashion.
Also Read: Fix Failed to Enumerate Objects in the Container error on Windows 10
Method 6: Change Ownership of Application
This is a rare case where you might face Error 1053: The service did not respond to the start or control request in a timely fashion when you do not have proper ownership of any particular application. If you do not have all the elevated accesses to the application, you will not be able to read a response from a (system) service or send a response to a (system) service. This contributes to error 1053: the service did not respond. You can get rid of the error by changing the ownership of the application as follows.
1. Find the application causing the error and navigate to its installation location. Right-click on the file/folder and select Properties.

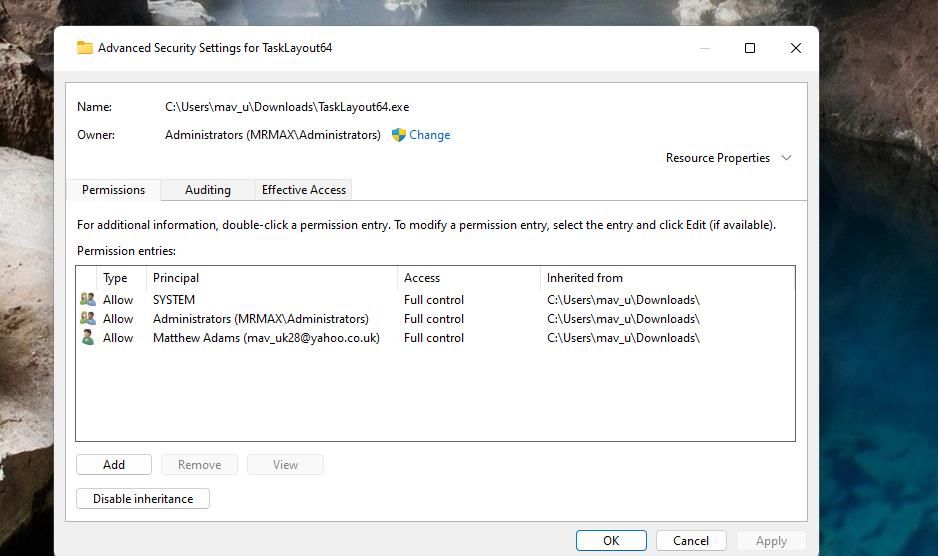
2. Now, switch to the Security tab and select the Advanced option as highlighted below.

3. Now, click on the Change option as shown.

4. Now, type the user account name in Enter the object name to select field and select the Check Names option as highlighted. Once you have found your account, click on OK.

Note: When you could not find your account name on the list, manually select it from the user groups list. To do this, click on the Advanced option followed by Find Now. Then, choose your account from the list and click on OK.
5. Now, check the following boxes in the preceding window, and click on Apply>>OK to save the changes.
- Replace owner on subcontainers and objects
- Replace all child object permission entries with inheritable permission entries from this object

6. Click on Yes to proceed with the Windows Security prompt.

7. Again, click on OK to proceed as depicted.

8. Close the existing window and navigate to the Properties window. In the Security tab, click on the Advanced option as highlighted.

9. Here, in the Permissions tab, click on Add as highlighted.

10. In the next window, click on Select a principal as shown.

11. Now, type the user account name in Enter the object name to select field and select the Check Names option as you did earlier, and click on OK.

12. Now, check all the boxes under Basic permissions as shown and click on OK.

13. Now, check the Replace all child object permission entries with inheritable permission entries from this object box in the preceding window.

14. Click on Apply > OK to save the changes and close all the windows, reboot your PC.
Check if this fixes service error 1053 for you.
Also Read: How to Fix Error Code 0x80004005
Method 7: Update Windows
Installing new updates will help you to fix the bugs in your system. Hence, always ensure that you are using your system in its updated version. Otherwise, the files in the system will not be compatible with the service files leading to error 1053: the service did not respond. Follow the steps mentioned below to update Windows to the latest version.
1. Press Windows + I keys simultaneously to launch Settings.
2. Click on the Update & Security tile, as shown.
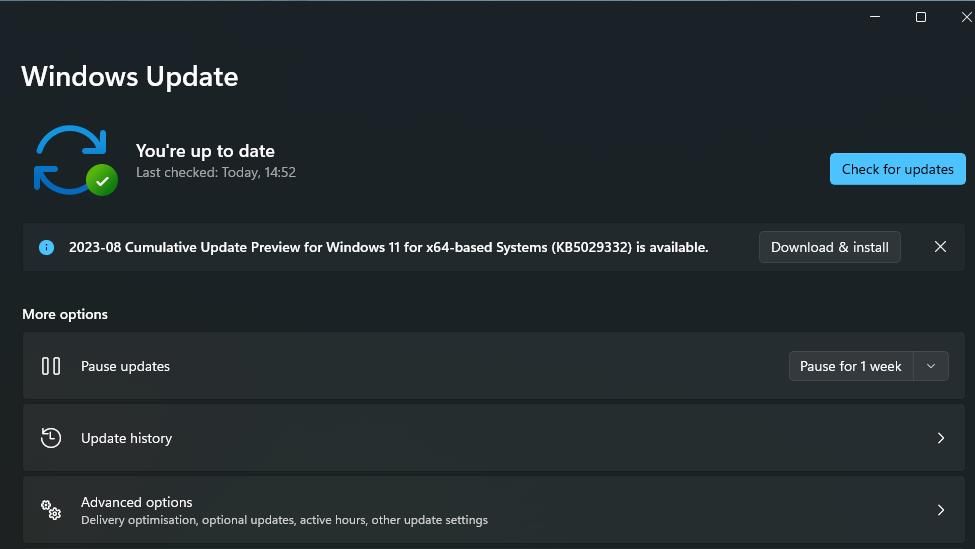
3. In the Windows Update tab, click on Check for updates button.

4A. If a new update is available, then click Install Now and follow the instructions to update.

4B. Otherwise, if the Windows is up-to-date, then it will show You’re up to date message.

Method 8: Reinstall Apps
The last chance to fix the problem is reinstalling the particular application, which throws the error 1053. However, if you install any third-party applications excluding those from the MS store, chances of missing or corrupt components will lead to the said problem. Hence, you may not be responded to your request for the corresponding Windows services. Therefore, uninstall the application from your PC and re-download the latest version of it from its official site.
1. Launch the Run dialog box and type appwiz.cpl. Then, click on OK.

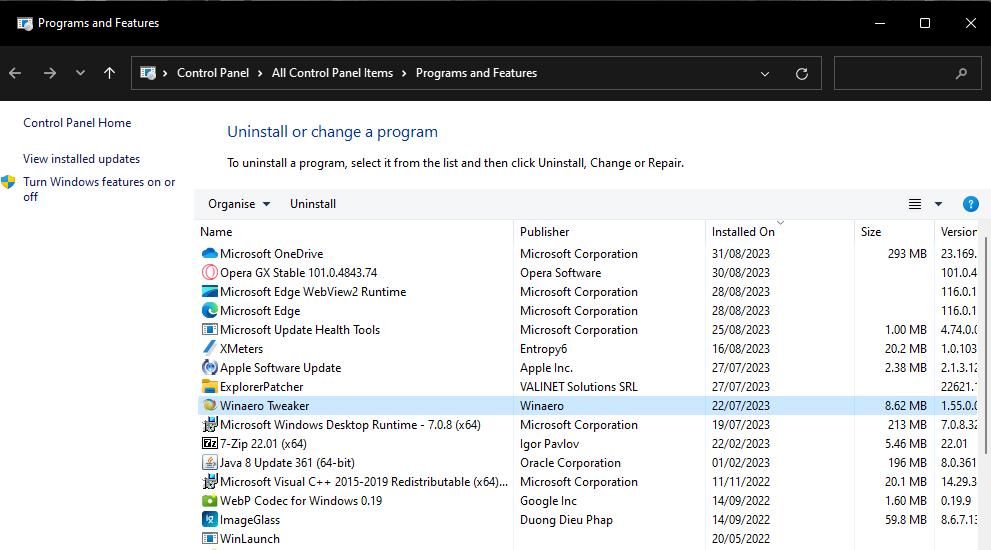
2. In Programs and Features window, search for your application.
3. Now, click on Application and select Uninstall option.

4. Now, confirm the Are you sure want to uninstall Application? prompt by clicking Yes.
5. Restart your computer once you have completed all the steps mentioned above. Then, reinstall the app from its respective official site and check if you have fixed the issue.
Recommended:
- Fix Google Chrome STATUS BREAKPOINT Error
- Fix 0x80004002: No Such Interface Supported on Windows 10
- Fix The Feature You Are Trying to Use is on a Network Resource That is Unavailable
- Fix Square Enix Error Code i2501
We hope that this guide was helpful and you could fix service error 1053 on Windows 10. Let us know which method worked for you the best. Also, if you have any queries/suggestions regarding this article, then feel free to drop them in the comments section.
При входе в Windows 10 и Windows 11, а иногда — при работе в системе или запуске программ вы можете столкнуться с сообщением об ошибке: «Не удалось запустить службу. Ошибка 1053: Служба не ответила на запрос своевременно». В некоторых случаях в сообщении фигурирует название службы. Иногда — нет.
В этой инструкции подробно о том, чем бывает вызвана ошибка и как исправить ошибку 1053 «Служба не ответила на запрос своевременно».
Причины и основные способы исправить ошибку 1053 «Служба не ответила на запрос своевременно»

При запуске Windows 10 или Windows 11, входе в систему, некоторых действиях в системе, а иногда — при запуске сторонних программ может производиться запуск необходимых служб. При этом ОС ждёт их запуска определенное время и, если в течение этого времени сообщение об успешном запуске не было получено, вы видите ошибку 1053 «Служба не ответила на запрос своевременно».
Основные способы исправить ошибку:
- Изменить (увеличить) время ожидания запуска службы
- Отключить запуск службы, если она не является обязательной
Начнём с первого варианта. При необходимости вы можете увеличить время ожидания запуска службы с помощью редактора реестра, для этого:
- Нажмите правой кнопкой мыши по кнопке «Пуск», выберите пункт «Выполнить», введите regedit и нажмите Enter — запустится редактор реестра.
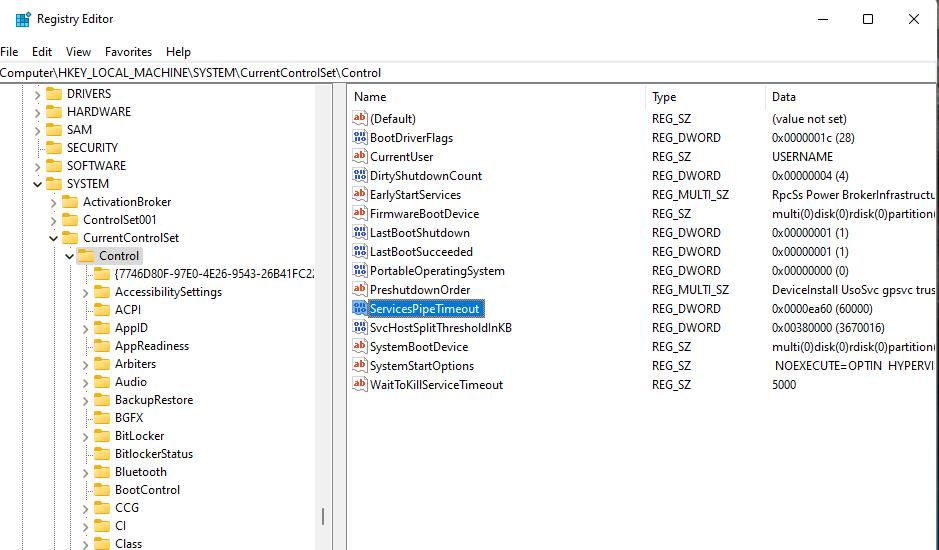
- Перейдите в раздел реестра
HKEY_LOCAL_MACHINE\SYSTEM\CurrentControlSet\Control
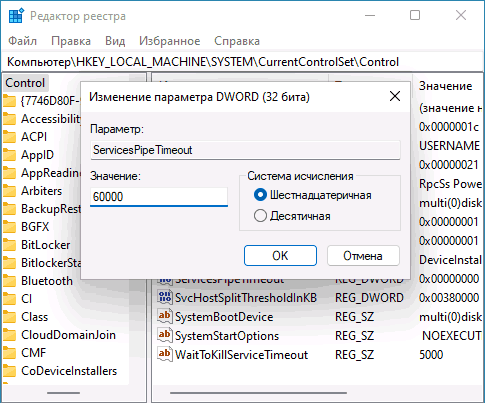
- Нажмите правой кнопкой мыши в пустом месте правой панели реестра и создайте новый параметр DWORD, задайте имя ServicesPipeTimeout для него.
- Дважды нажмите по вновь созданному параметру, переключите систему счисления в десятичный вид и укажите значение времени ожидания. 60000 будет соответствовать одной минуте (60 секунд), можно выставить и более высокое значение, например — 180000.

- Нажмите «Ок», закройте редактор реестра, перезагрузите компьютер и проверьте, появляется ли ошибка вновь.
В случае, если в сообщение об ошибке отображается имя службы, с которой возникла проблема, при этом это сторонняя, а не системная служба и не является необходимой для работы Windows или программ, её можно попробовать отключить:
- Нажмите клавиши Win+R на клавиатуре, введите services.msc и нажмите Enter (подробнее — Способы открыть службы Windows).
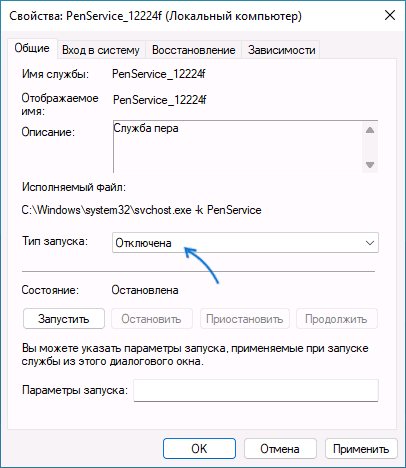
- В списке служб найдите нужную службу и дважды нажмите по ней.
- В поле «Тип запуска» установите «Отключена», нажмите «Ок».

- Закройте окно служб и перезагрузите компьютер.
Проверьте, всё ли работает исправно и перестала ли появляться ошибка. Учитывайте, что не следует отключать системные службы, особенно если вы не знаете, обязательны ли они для работы Windows.
Дополнительные способы решения проблемы
Если предыдущие простые варианты не помогли, можно попробовать следующие подходы:
- Если служба относится к какой-то сторонней программе, а отключение службы мешает её запуску, можно попробовать выполнить переустановку программы.
- Если вы меняли права доступа к папкам на компьютере, это также может привести к ошибке. Среди примеров — службы Autodesk. Если к папкам с файлами службы нет доступа для «Пользователи» и «Локальная служба», можно получить ошибку 1053.
- Если ошибка стала появляться после того, как вы изменили параметры запуска каких-либо системных служб Windows, попробуйте восстановить исходные параметры. Подробнее: Службы по умолчанию в Windows 10
- В случае, если неизвестна служба, вызывающая проблему, использовать чистую загрузку Windows, чтобы её определить, затем попробовать вариант с её отключением.
- Если проблема стала появляться недавно, использовать точки восстановления системы на дату, когда ошибки не было. Об этом в статьях: Точки восстановления системы Windows 11, Точки восстановления системы Windows 10.
- В некоторых случаях запуску служб (или получению сообщений об успешном запуске) может мешать повреждение системных файлов Windows. Попробуйте выполнить их восстановление: Восстановление целостности системных файлов Windows 11, Восстановление системных файлов Windows 10.
В случае, если проблема не была решена, опишите ситуацию в комментариях, с указанием имени службы и в каких случаях появляется ошибка. Я буду рад помочь.
Windows has many services that it needs for the running of OS features and task operation. Error 1053 is an issue some users report occurring when they try to manually start required services via the Services app. It can also happen when users start programs. The error 1053 message says, “The service did not respond to the start or control request in a timely fashion.”
Windows can’t start whatever service for which error 1053 occurs. Consequently, Windows features, software packages, and tasks that need affected services won’t work. This is how you can fix error 1053 on a Windows PC.
1. Repair Corrupted System Files With SFC and DISM Scans
It could be the case that some corrupted system files required for a service operation are causing error 1053. To address such a possibility, run System File Checker and Deployment Image Service Management command scans.
Our guide to repairing corrupt Windows files gives you the full lowdown on how to run both the SFC and DISM tools via the Command Prompt.
2. Check for and Install Any Pending Windows Updates
Microsoft often rolls out patch updates to fix Windows 11/10 bugs and issues. Although there isn’t a specific Microsoft hotfix for error 1053, installing available Windows cumulative or patch updates might still resolve this issue for some users.
Our guide to manually installing Windows updates includes instructions for how you can apply this potential solution.
3. Tweak the Control Registry Key
Tweaking the Control registry key is one of the most widely user-confirmed potential fixes for error 1053. Applying this potential fix sets a new timeout value for services, which extends the response time frame. This gives services more time to respond. So, try editing the Control registry key as follows:
- To open Registry Editor, press the Windows logo + R keys simultaneously, input a regedit command into Run, and click OK.
- Click within the Registry Editor’s address bar and erase the current path.
-
Bring up the Control key by inputting this path in the address bar and pressing Enter:
HKEY_LOCAL_MACHINE\SYSTEM\CurrentControlSet\Control\ -
Skip to step six if you can see a ServicesPipeTimeout DWORD in the Control key. If that DWORD isn’t there, click the Control key with your right mouse button and select New > DWORD (32-bit) Value.

-
Next, enter ServicesPipeTimeout in the DWORD text box.

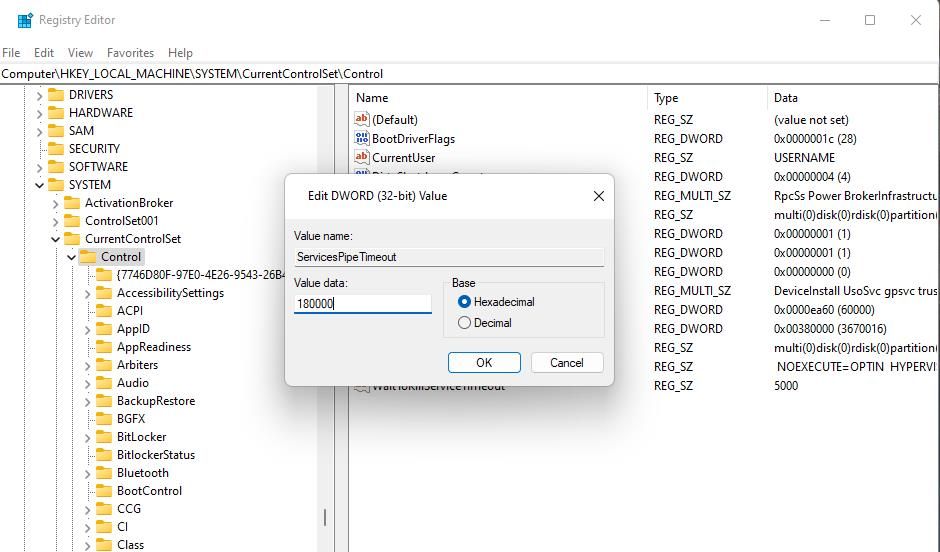
- Double-click ServicesPipeTimeout to bring up a window for editing that DWORD value.
-
Then input 180000 into the Value box and select OK.

- Click X at the top right of the Registry Editor window.
- Select Power and Restart on your Windows Start menu.

4. Run Network Reset Commands
This potential resolution could work when error 1053 occurs for network-related services. Clearing the DNS cache and resetting the Winsock catalog can address network configuration issues causing error 1053.
Fortunately, it’s very easy to reset the Winsock catalog and flush the DNS cache on a Windows PC.
5. Take Ownership of Affected Software’s Installation Directory
If error 1053 occurs when utilizing or starting software, the affected program might not be able to execute a service because you don’t have ownership of it. To remedy that, try taking ownership of the software’s EXE (application) file.
To do so, check out this article about taking ownership of a folder in Windows 11/10. The steps for taking ownership of a software package’s EXE file are the same as for a folder.
6. Reinstall the Affected Software Packages
Reinstalling affected software is another potential fix for error 1053 when it occurs when you try to start a desktop app. Applying this possible solution will likely address any issues with the software that could be causing the error. Uninstall the affected desktop app with a suitable method in this article about removing software on Windows.
Restart Windows before reinstalling the software. Download the newest version of the same software from the publisher’s website. Then open the folder that includes your file downloads and double-click on the downloaded installer pack to reinstall the desktop app.
Get Error 1053 Sorted on Your Windows PC
Error 1053 is an annoying service issue that can hinder feature and software utilization on Windows PCs. Many users have been able to resolve error 1053 by applying the possible solutions covered here. Resolution three often works, but you might have to try some of the alternative potential fixes to address other possible causes.