
Все способы:
- Способ 1: Проверка даты и времени
- Способ 2: Встроенное средство устранения неполадок
- Способ 3: Утилиты SFC и DISM
- Способ 4: Очистка данных в кеше обновлений
- Способ 5: Ручное обновление
- Вопросы и ответы: 0
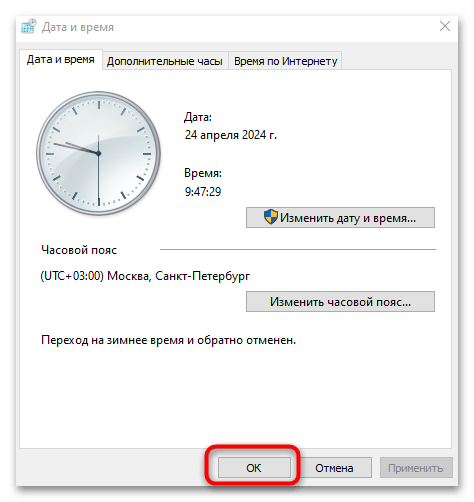
Способ 1: Проверка даты и времени
Чаще всего с ошибкой 0x800b0101 пользователи сталкиваются, если на компьютере установлены неверные значения даты и времени. В этом случае решение довольно простое – нужно вручную отредактировать эти параметры.
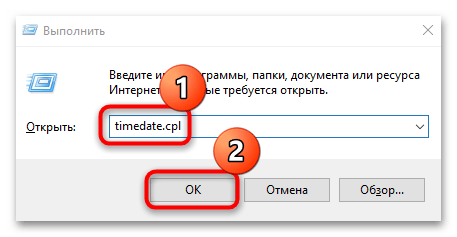
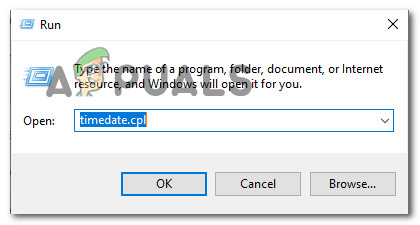
- Используйте сочетание клавиш «Win + R», чтобы вызвать окно «Выполнить», затем введите в поле запрос
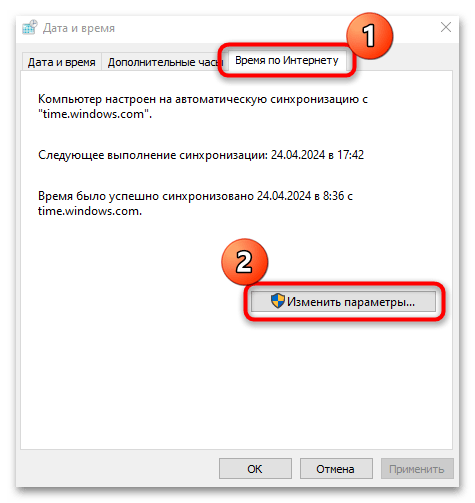
timedate.cplи нажмите на кнопку «ОК». - В появившемся окне перейдите на вкладку «Время по Интернету» и кликните по кнопке «Изменить параметры».
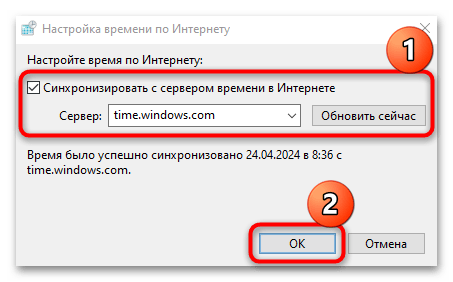
- Убедитесь, что в поле «Сервер» установлено значение
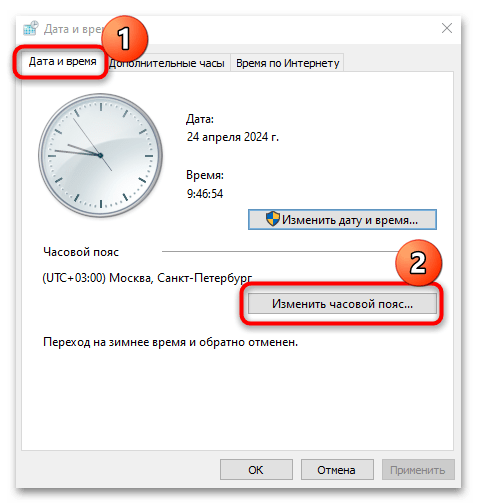
time.windows.com. Если нет, тогда выставьте его и подтвердите новые параметры, нажав на кнопку «ОК». - Далее в окне «Дата и время» переключитесь на одноименную вкладку и проверьте часовой пояс, который соответствует вашему региону. Если он неверен, нажмите на «Изменить часовой пояс» и из выпадающего меню выберите нужное значение, сохраните настройки.
- Снова сохраните изменения, нажав на «ОК», если они были внесены.
После потребуется перезагрузить компьютер. Если все дело в сбитых настройках времени, тогда обновление должно завершиться успешно. Также можете обратиться к нашему отдельному материалу с дополнительными способами смены даты и времени на компьютере с Windows 10.
Подробнее: Изменение времени в ОС Windows 10
Если через некоторое время параметры снова беспричинно сбиваются, следует заменить батарейку-«таблетку» CR2032, установленную на материнскую плату. Это необходимо сделать потому, что именно она отвечает за правильные дату и время, даже если устройство выключено. С годами она разряжается и базовые параметры ПК, хранящиеся на одном из чипов и зависящие от энергии, сбиваются.
Читайте также: Как разобрать компьютер / ноутбук
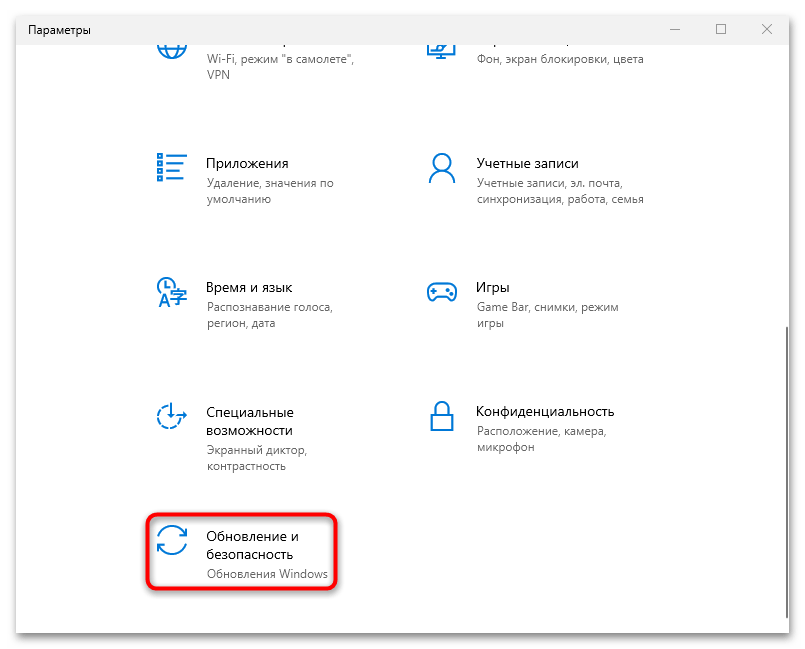
Способ 2: Встроенное средство устранения неполадок
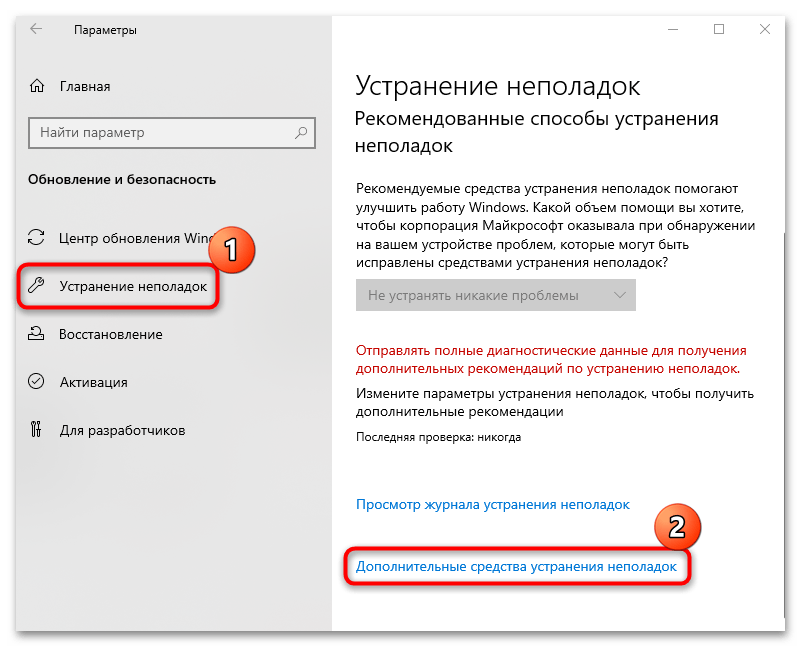
Как правило, ошибка под кодом 0x800b0101 появляется во время обновления операционной системы. Если это происходит при использовании автоматизированного средства «Центр обновления Windows», можно прибегнуть к помощи встроенного инструмента, которое предназначено для поиска и устранения неполадок, связанных с ним:
- Нажмите на кнопку «Пуск» и выберите запуск штатных «Параметров».
- Перейдите в раздел «Обновление и безопасность».
- Далее выберите вкладку «Устранение неполадок» на панели слева, а в основной части окна кликните по строке «Дополнительные средства устранения неполадок».
- В списке найдите строку «Центр обновления Windows», щелкните по ней, затем выберите запуск средства устранения неполадок.
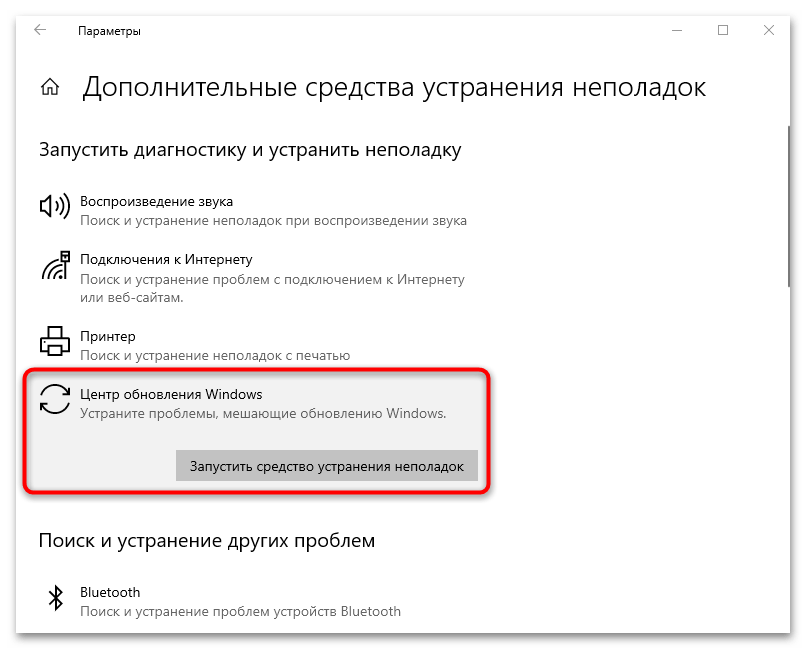
Начнется поиск проблем, которые могут быть причиной появления рассматриваемой ошибки при установке апдейтов через «Центр обновления Windows». В некоторых случаях, в зависимости от характера и причины неполадки, могут потребоваться дополнительные действия со стороны пользователя, где достаточно следовать инструкциям пошагового мастера. В остальных случаях исправление ситуации происходит автоматически.
Способ 3: Утилиты SFC и DISM
При повреждении файловой системы, а именно файлов и их хранилища, и также при обновлении Windows 10 могут появляться различные ошибки, включая 0x800b0101. В операционных системах от Microsoft реализованы специальные утилиты для восстановления целостности системы – SFC и DISM. Применяются они посредством специальных команд, выполненных в консольной оболочке:
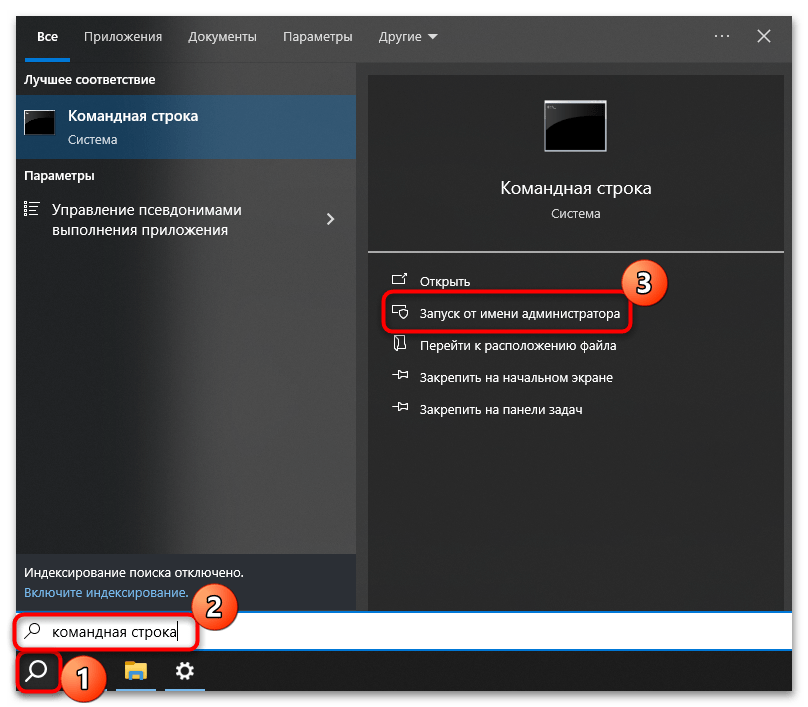
- С помощью строки системного поиска найдите консоль «Командная строка», введя соответствующий запрос, затем нажмите на строку «Запуск от имени администратора».
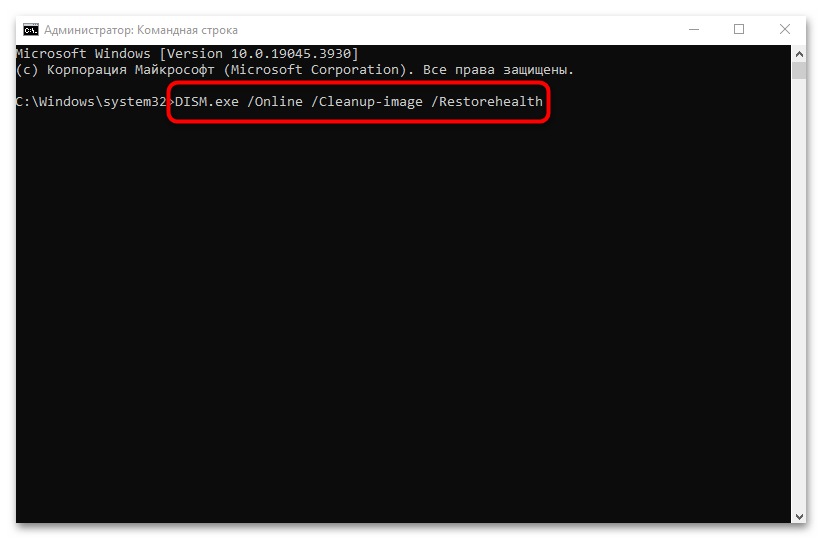
- Вставьте команду
DISM.exe /Online /Cleanup-image /Restorehealthи нажмите на клавишу «Enter». - Следует отметить, что утилита DISM обращается к «Центру обновления Windows» для получения файлов, которые смогут устранить неполадки. Если же поврежден сам компонент («Центр обновления»), тогда придется воспользоваться другой командой, но предварительно нужно создать накопитель с источником восстановления, то есть оригинальным образом Windows. Затем подсоедините его, если это флешка, или используйте привод для оптического накопителя.
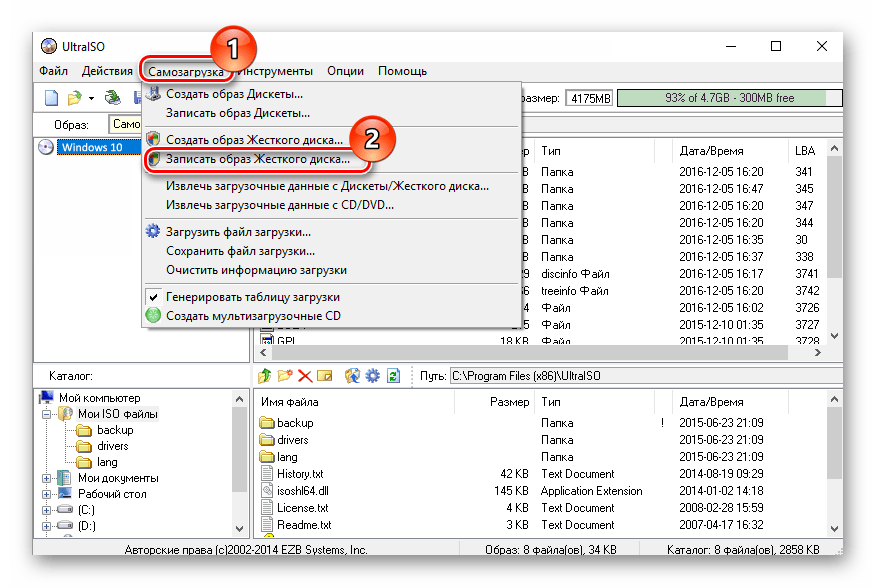
Подробнее: Руководство по созданию загрузочной флешки / диска с Windows 10
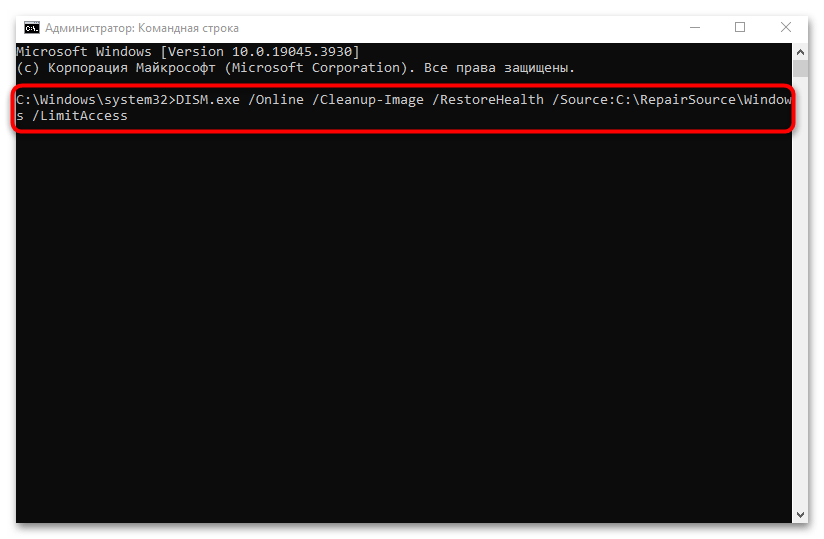
- Что касается самой команды, то введите следующее:
DISM.exe /Online /Cleanup-Image /RestoreHealth /Source:C:\RepairSource\Windows /LimitAccess, где под «C:\RepairSource\Windows» подразумевается ваш путь к источнику восстановления.Уточним, что вам понадобится указать путь до файла «install.wim» или «install.esd», записанного на флешку/диск. Путь определяется так: откройте «Проводник», нажмите ПКМ по флешке или диску и выберите пункт «Открыть в новом окне» — это позволит просмотреть записанные на носитель файлы. Перейдите в папку «sources» и посмотрите формат файла «install» — «.wim» или «.esd». Затем через адресную строку вверху окна скопируйте путь, вернитесь в консоль, вставьте его и допишите название файла «install» с форматом. К примеру, должно получиться:
E:\sources\install.wim - После проверки хранилища программных компонентов также можно использовать утилиту System File Checker для проверки и восстановления целостности системных файлов. Для этого выполните команду
sfc /scannow.
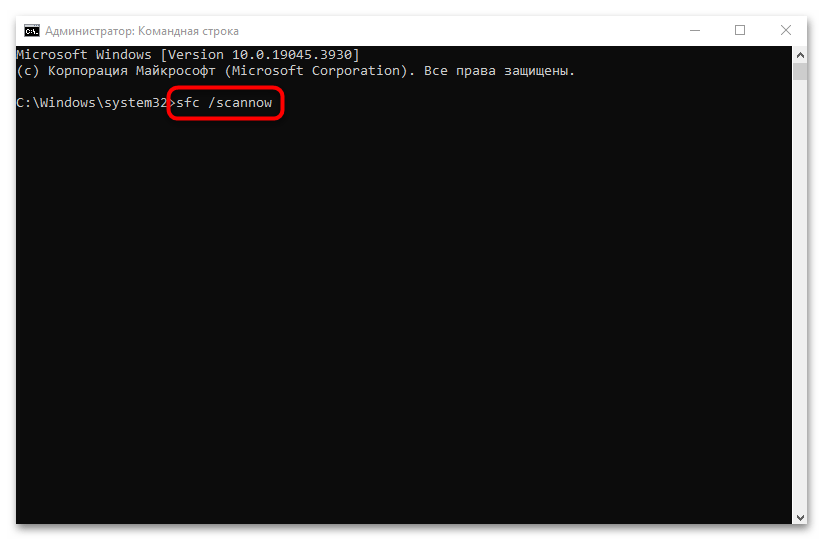
После сканирования закройте «Командную строку» и проверьте, устранена ли ошибка при обновлении через «Центр обновления Windows».
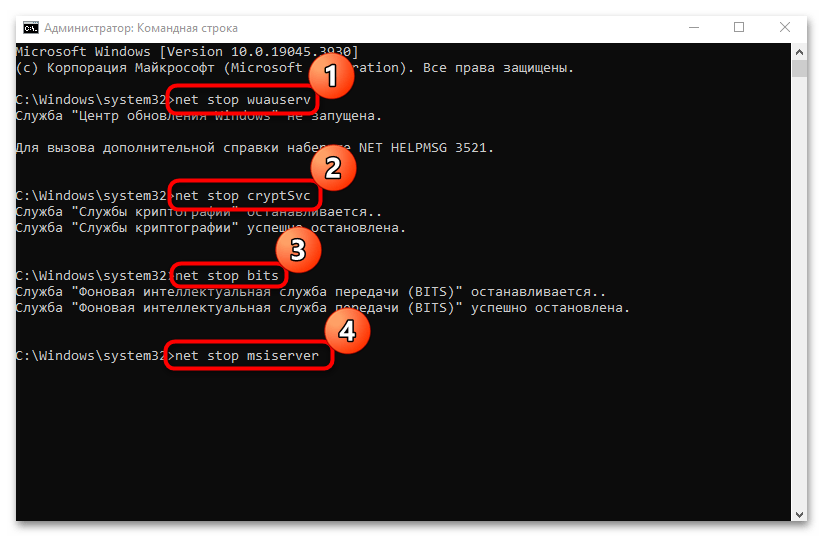
Способ 4: Очистка данных в кеше обновлений
Если ранее были скачаны файлы обновлений, но с ошибками или повреждениями, может происходить конфликт между программными компонентами, поэтому стоит очистить папки с кешем апдейтов. Делается это как вручную, так и с помощью «Командной строки». Так как второй вариант проще, разберем его:
- Запустите консоль «Командная строка» с расширенными правами так же, как было показано ранее. Затем с помощью команд отключите «Центр обновления Windows» и несколько связанных с ним служб, поочередно выполнив следующие команды:
net stop wuauserv
net stop cryptSvc
net stop bits
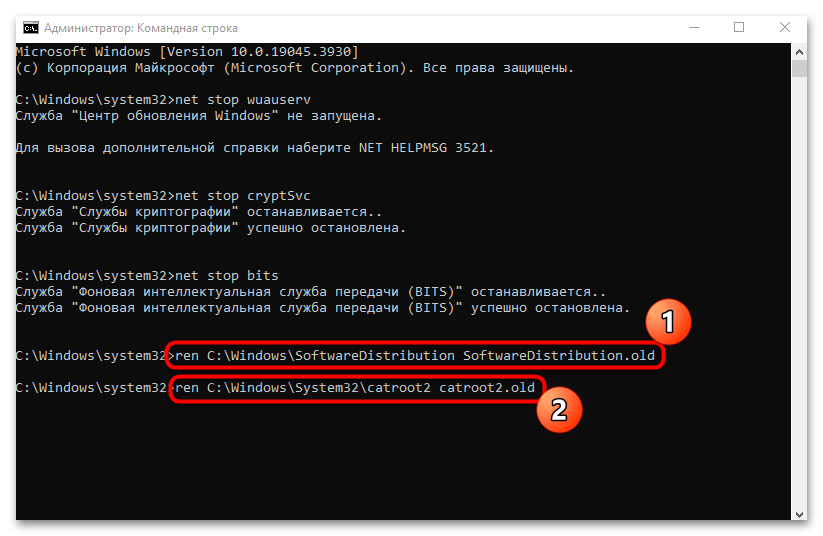
net stop msiserver - Следующие команды предназначены для изменения имени каталогов с кешем: система создаст новые автоматически, а старые (с припиской «.old») можно будет удалить, если обновление в итоге пройдет успешно. Поочередно введите следующие команды, нажимая после каждой на клавишу «Enter»:
ren C:\Windows\SoftwareDistribution SoftwareDistribution.old
ren C:\Windows\System32\catroot2 catroot2.old - Теперь потребуется запустить службы и сам «Центр обновления Windows», работу которых мы остановили на Шаге 1/ Используйте команды:
net start wuauserv
net start cryptSvc
net start bits
net start msiserver
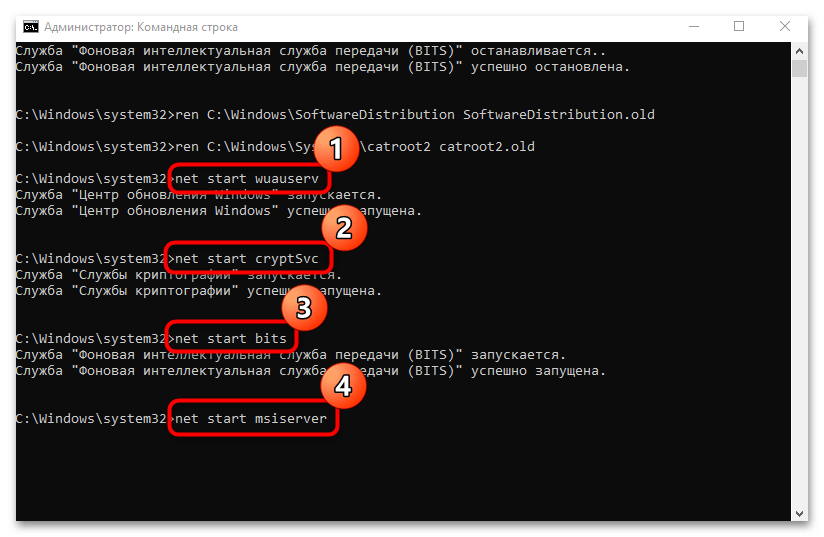
После того как все процессы, необходимые для автоматического обновления, будут вновь активны, перезагрузите компьютер и выполните повторную загрузку и инсталляцию апдейтов.
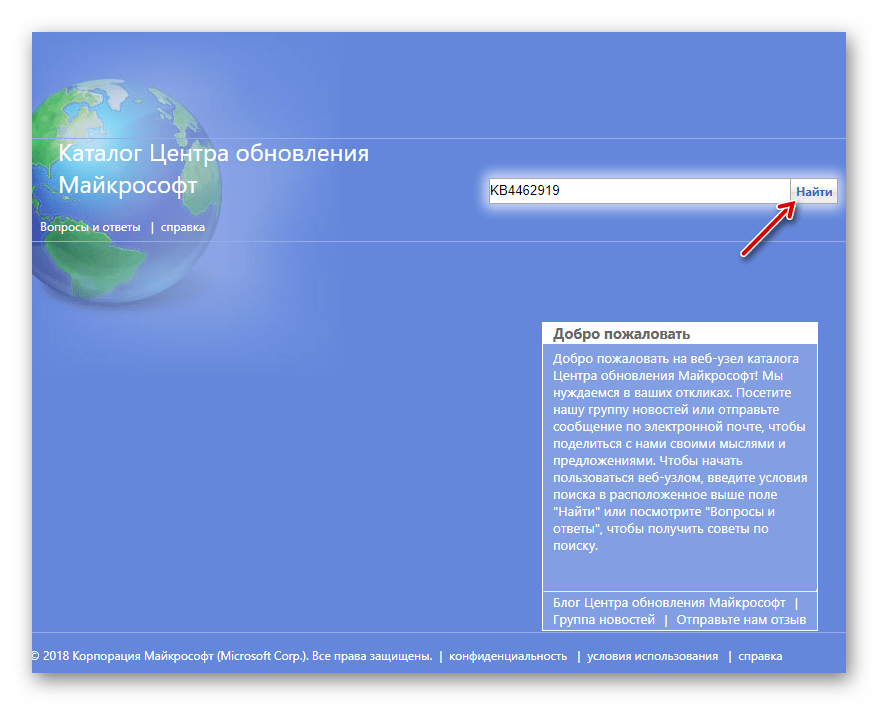
Способ 5: Ручное обновление
Если ни один способ не помог, можно попробовать обойти рассматриваемую ошибку, скачав проблемное обновление вручную. Не всегда это позволяет избежать возможных проблем с автоматическими обновлениями в дальнейшем, но в некоторых апдейтах могут содержаться исправления, с помощью которых подобная ошибка не появится вновь.
Чтобы вручную обновить операционную систему, потребуется посетить «Каталог Центра обновления Майкрософт» на официальном сайте этой компании, отыскать проблемный апдейт, скачать его и инсталлировать самостоятельно. Ранее мы писали об этом более детально в отдельном руководстве.
Подробнее: Устанавливаем обновления для Windows 10 вручную
Наша группа в TelegramПолезные советы и помощь
Updated May 2025: Stop error messages and fix your computer problem with this tool. Get it now at this link
- Download and install the software.
- It will scan your computer for problems.
- The tool will then fix the issues that were found.
Windows 10 is very popular operating system among computer users. However, it faces several issues like slow performance, crashing, etc. If you are facing such problems, then there is no need to worry because we have come up with some best solutions to fix those errors. In this article, I am going to tell you how to fix Windows update error 0x800b0102. Let us see what causes this problem and how to solve it.
What Causes Windows Update Error Code 800b0102?
There are many reasons behind this error code. Some common ones are listed here.
1. Your PC does not meet the requirements for Windows Updates.
2. Your PC is infected with malware.
3. Your PC is running low on disk space.
4. Your internet connection is unstable.
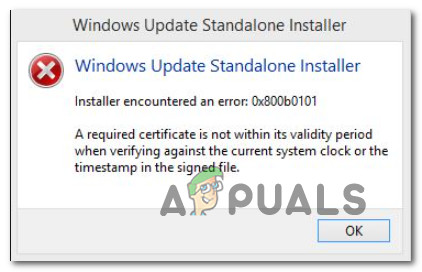
Error 0x800b0101 Windows Update Stand-Alone Installer
Users are often greeted with a prompt stating that the Windows Update Standalone installer could not be run due to an error. This issue occurs because there is a conflict between the Microsoft Universal CRT DLL and the Windows Update Standalone installation package. To resolve this issue, delete the following files:
C:\Program Files\Microsoft SDKs\Windows\v7.1A\Bootstrapper\Packages\UniversalCRTDll_x86.cab
C:\Program Files (x86)\Microsoft Visual Studio 10.0\VC\redist\ucrt\x86\crt_x86.dll
C:\Program Files(x86)\Microsoft VisualStudio10.0\Common7\IDE\PublicAssemblies\ucrt\x64\crt_x64.dll
C:\WINDOWS\system32\ucrtbase.dll
C:\PROGRA~2\MICROSOFTSDK~1.0\lib\ucrtbase.lib
C:\PROGRAM FILES\MICROSOFT VISUAL STUDIO 9.0\COMMON7\LIB\MSVCR90.dll
How to Fix Error 0x800b0101 in Windows Update Standalone Installer
The standalone installer error occurs when you try to install Microsoft Office 2016 on a computer running Windows 7 or 8.1. If you want to fix this problem, follow these steps:
Step 2: Click the button next to “Windows Components.”
Step 3: Scroll down to the bottom and uncheck the box next to “Microsoft.NET Framework 4 Client Profile.”
Step 4: Click OK.
Step 5: Restart your PC.
Run Windows Update Troubleshooter
• If you receive errors while trying to update Windows 10, try running the Windows Update troubleshooters.
If the troubleshooter does not resolve the issue, it is recommended to run the Windows Update troubleshoot again.
To open the Windows Update troubleshoter, follow these steps:
Step 2: In the list of problems, select the problem category that applies to you. For example, select “Windows Update”.
Step 3: Select “Troubleshoot”, and then select “More options”.
Correct System Date and Time
Your system date and time might not be accurate. This could cause problems with programs and apps. If you don’t know how to change it, here are some tips:
1. Select Clock under Hardware and Sound.
2. In the General tab, select Change the way dates & times are displayed.
3. Choose one of the following options: Automatically adjust clock based on my region, Set date and time automatically, or Never display a digital clock.
4. Click OK.
5. Follow steps 2 – 4 to set your regional settings.
Updated: May 2025
We highly recommend that you use this tool for your error. Furthermore, this tool detects and removes common computer errors, protects you from loss of files, malware, and hardware failures, and optimizes your device for maximum performance. This software will help you fix your PC problems and prevent others from happening again:
- Step 1 : Install PC Repair & Optimizer Tool (Windows 11, 10, 8, 7, XP, Vista).
- Step 2 : Click Start Scan to find out what issues are causing PC problems.
- Step 3 : Click on Repair All to correct all issues.
Clear Software Distribution folder
When you install software, it usually creates a temporary folder where it stores files while installing. This folder is called the “Temporary Files Folder”. If you are having problems with your computer, this could be one of the reasons why. You can clear out this folder completely to free up space.
Steps To Clear Out Temporay Files Folder
1. Click Start button
2. Type %temp% into the Search box and hit Enter key.
3. Press CTRL + A shortcut keys to select all items in Temp folder.
4. Right click on selected items and delete them using Del key.
5. Restart your system.
Scan for Corrupted System Files
The Microsoft Security Essentials program scans for corrupt system files. If it finds one, it replaces it with a copy from the Windows Update catalog. This prevents the file from being damaged during installation. You can use the command prompt to run sfc /scannov to scan for corrupted system files. To restart the computer, press the power button on the front of the computer.
Repair Windows image
DISM scans your computer for problems and fixes any issues it finds. This tool is great because you don’t have to worry about having to manually go into each folder and file to find what you’re looking for. Instead, DISM does it for you.
You should always keep an eye open for error messages and repair them before they become serious issues. If you see something in the event log, take note of it and contact support immediately.
Remove Expired Certificates
Microsoft recommends keeping track of your expired certificates to avoid problems with the Windows Update StandAloneInstaller. If you don’t know what certificate is associated with a specific file, use the Certificate Manager to find out. You can also check the expiration date of a certificate manually.
To remove expired certificates:
1. Open the Start menu.
2. Type “certmgr”.
3. Click “Certificates”, then select “Personal”.
4. Select the certificate you want to delete.
5. Right-click the certificate name and choose “Delete”.
6. Repeat steps 4 and 5 for each certificate you wish to delete.
7. Restart the computer to make sure the changes take effect.
RECOMMENATION: Click here for help with Windows errors.
Frequently Asked Questions
Why Should I Install Windows Updates?
If you don’t keep your computer up to date, viruses could be hiding in your system, waiting for a chance to attack. Your operating system may ask you to download security patches when you install new software or update existing programs. These patches are made to keep bad code from getting on your PC.
Is there a way to stop Windows from downloading updates on its own?
Yes! Using Group Policy Editor, you can stop Windows 10 from downloading updates on its own (GPE). You must be an administrator or a member of the local Administrators group to use this method.
Some Windows 10 users are encountering the 0x800b0101 when trying to install a pending update via Windows Update Standalone installer or when trying to install a different Windows component via Windows Installer. This issue seems to be restricted to Windows 10.
After investigating this particular issue thoroughly, it turns out that there are several different underlying causes that are known to cause this particular error on Windows 10. Here’s a list of potential culprits:
- Incorrect Date & Time – As it turns out, if your system has date & time values that are way off the expected equivalents by the security certificate, you might see this error as the connection with the server is terminated. To resolve this problem, you’ll need to change the date & time values of your system to the correct ones.
- Running SFC and DISM scans – System file corruption is also known to trigger this particular error, particularly if you’re experiencing this error code with every pending Windows Update that you attempt to install. In this case, you can get the issue fixed by running SFC and DISM scans and applying the recommended fixes.
- Missing Update Requirements – According to some affected users, you can also expect to see this error code in situations where you are trying to install a pending update for the System Center Configuration manager when a couple of update requirements are missing. In this case, installing the missing updates first (via the Windows Update Catalog) should take care of the issue for you.
- Bad AccountRight installer – In case you are only seeing this error while attempting to install or update AccountRight, chances are you’re dealing with a bad installer package. In this case, downloading the patched installer should take care of the issue for you.
Now that you are familiar with every potential cause of the code 0x800b0101, here’s a list of potential fixes that other affected users have successfully used to get to the bottom of this issue:
1. Change the Date & Time to correct values
As the message of this error is pointing out, chances are this error is occurring due to a security certificate that fails to be validated by WU because the time or date (or both) is way off from the values expected by the validation server.
There aren’t a lot of conditions that you (as a visitor) need to meet in order to be allowed to download pending Windows Updates, but passing the timestamp check is one of them.
Go ahead and check if your system’s date & time is not off by a manner of days (or months, or years).
If it is, here’s a quick guide on how to ensure that you’re using the correct time and date:
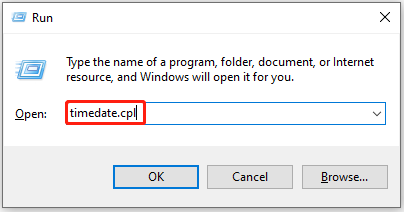
- Press Windows key + R to open up a Run dialog box. Then, type “timedate.cpl” and press Enter to open up the Date and Time panel.

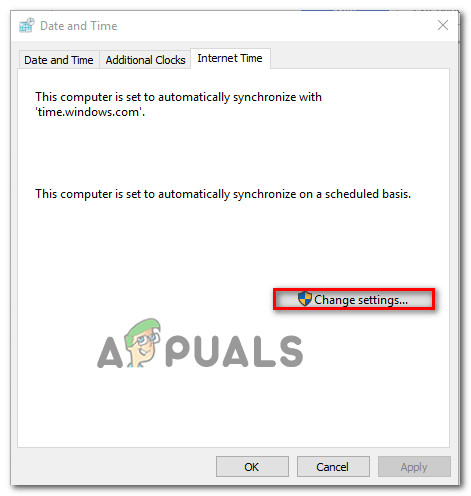
Opening the Time Date window - Once you’re inside the Date and Time window, go over to the Internet Time tab and click on Change settings. When you are prompted by the UAC (User Account Control), click Yes to grant admin access.

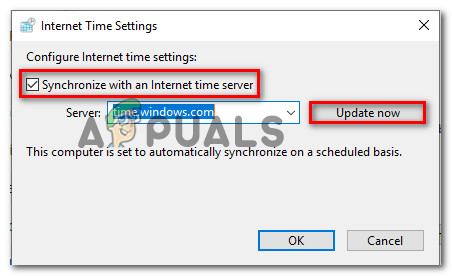
Accessing the Date and time menu - Inside the Internet Time settings, check the box associated with Synchronize with an Internet time server, set the Server to time.windows.com, and click on Update now.

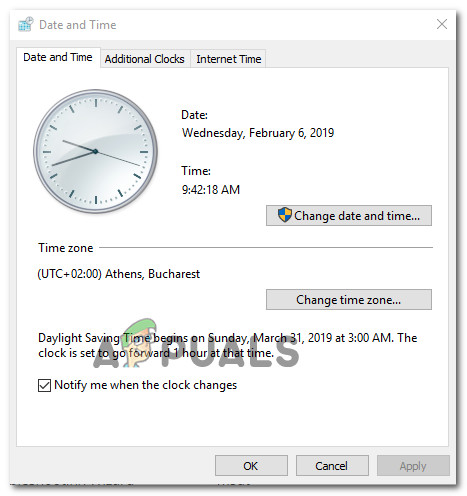
Accessing the Internet Settings - Move over to the Date and Time tab, click on Change time zone and make sure you’re using the correct one. Next, click on Change date and time and ensure that the date is selected properly.

Accessing the Correct Date and Time - Restart your computer and see if the issue has been resolved by repeating the action that was previously triggering the 0x800b0101.
If the same error occurs while attempting to use the Windows Update Standalone installer, move down to the next potential fix below.
2. Run the SFC and DISM scans
Since the issue is most likely related to some kind of corruption affecting either Windows Update or Windows Installer, one of the troubleshooting fixes that you should definitely explore is to scan for any corrupted Windows files.
To do this, you’ll need to run a couple of scans with two built-in utilities – System File Checker (SFC) and Deployment Image Servicing and Management(DISM).
Note: These two tools share some similarities, but they are not meant to replace one another. We recommend that you run both scans in quick succession in order to improve your chance of fixing the corrupted system files.
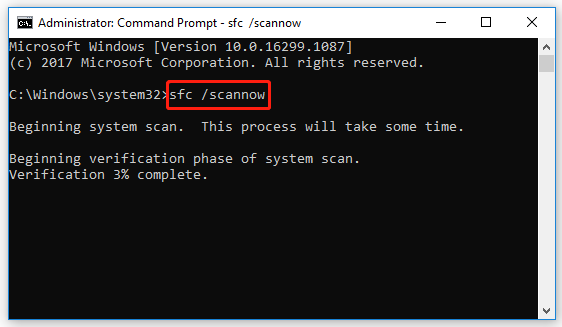
You should start with a simple SFC scan.
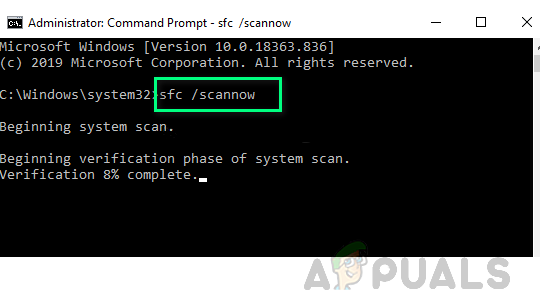
Note: This tool is entirely local, so you won’t be required to be actively connected to the Internet.
Important: Once you initiate this procedure, it’s very important to not close the CMD window even if the utility looks like it froze. Wait until the process is complete because interrupting the operation might cause logical errors on your HDD/SSD.
Once the SFC scan is completed successfully, go ahead and reboot your computer and see if the issue is fixed once the next computer startup is complete by attempting to perform the action that was previously triggering the 0x800b0101 error.
I the same error is still popping up when you do this, deploy a DISM scan and follow the on-screen prompts to complete the operation.
Note: Different from SFC, this tool uses a sub-component of Windows Update to download healthy equivalents to replace corrupted system files. Because of this, you need to make sure that you have reliable Internet before initiating this operation.
Once the DISM scan has been completed successfully, restart your computer once again and see if the 0x800b0101 error is now fixed.
In case you’re still dealing with the same issue, move down to the next potential fix below.
3. Use the Windows Update Catalog (if applicable)
If you are seeing this error while trying to install a pending update for System Center Configuration Manager, the error 0x800b0101 is most likely occurring due to the missing of a few critical updates that need to be installed in first – Update KB2756872 and KB2749655.
If this scenario is applicable in your particular case, follow the instructions below to utilize the Microsoft Update Catalog to download and install the required updates first (before installing the System Center Configuration Manager update)
If you’re looking for step by step instructions on how to do this, follow the instructions below:
- Access the official Microsoft Update Catalog page on the affected machine from your favorite browser.
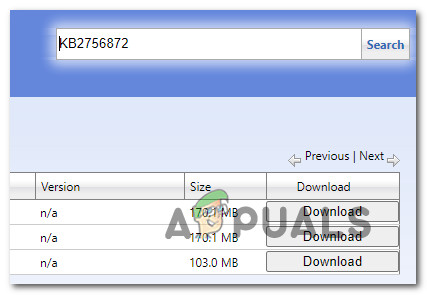
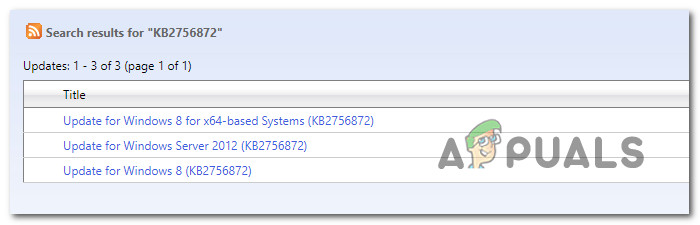
- Next, use the search function (on the right) to search for the KB2756872 update and press Enter to generate the results.

Searching for the missing updates - Once the results appear, identify the version that’s compatible with your Windows build by looking at the OS architecture and the Windows version.

Downloading the Correct version of the update
Note: If you don’t know your OS architecture, right-click on This PC in File Explorer and choose Properties from the context menu. Next, from the list of results, look at the System type and check the bit version of your OS.
- After you decide on the correct update that you need to install on your computer, click on the Download button and wait for the process to complete.
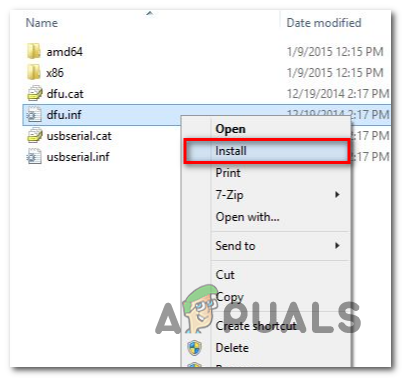
- After the download is complete, navigate to the location where the update was downloaded, right-click on the .inf file and choose Install.

Installing the correct update - Follow the on-screen instructions to complete the installation, then repeat steps 2 to 5 with the remaining update (KB2749655)/
- After every pending update is successfully installed, reboot your machine before finally installing the failing System Center Configuration Manager Windows Update.
If this particular scenario was not applicable to your particular situation, move down to the next potential fix below.
4. Download the latest version of AccountRight (if applicable)
If you are encountering the 0x800b0101 while attempting to update or install AccountRight, it’s almost certain that the problem occurs due to a badly written security certificate that got attached to the application version available for download.
This is due to a mess-up by AccountRight developers that assigned a years old expiration date.
Fortunately, the issue was since fixed, so the problem can be responded to simply by downloading the patched version of AccountRight.
If you find yourself in this particular scenario, follow the instructions below to download & install the correct version of AccountRight:
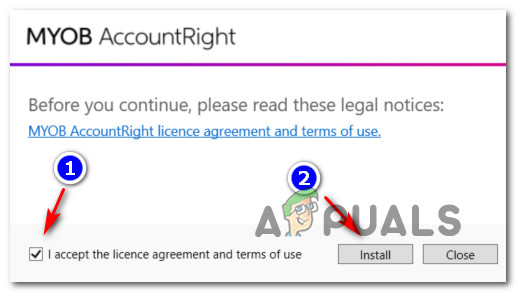
- Open your default browser and visit this link here to download the patched version of the AccountRight installer.
- Once the download is complete, right-click on it and choose Run as administrator. This is essential since the installation needs admin access in order to complete without errors.
- At the first installation prompt, check the box associated with I accept the license agreement and terms of use, then click on Install and follow the remaining prompts.

Installing the patched version of the AccountRight app - After the installation is complete, reboot your computer and open the app once the next startup is complete, and complete the installation of the remaining updates.
-
Home
-
Partition Magic
- [Solved] Installer Encountered an Error: 0x800b0101?
By Yamila | Follow |
Last Updated
When you attempt to install a pending update through Windows Update Standalone installer or install a different Windows component via Windows Installer, you may receive the error message: Installer encountered an error 0x800b0101. Here, this post from MiniTool Partition Wizard introduces several solutions to the error.
The “Installer encountered an error 0x800b0101” error message may come out due to various factors and the following are some of them:
- Incorrect Date & Time
- Hardware or driver conflicts
- Corrupted system files
- Missing update components
- …
Once you run into the Windows Update Standalone Installer error 0x800b0101, you should take immediate actions to fix it. Here are several solutions available.
Solution 1: Change Date and Time
The “Installer encountered an error 0x800b0101” message may appear due to wrong date and time on your system. Therefore, when you see this error message, the first thing you can try is to check and correct Date & Time.
Step 1: Press Windows + R to open the Run dialog.
Step 2: Type timedate.cpl in the text box and then press Enter.
Step 3: After you enter the Date and Time panel, go to Internet Time and click Change settings.
Step 4: In the pop-up window, check Synchronize with an Internet time server and make sure the server is time.windows.com. Then click Update now and OK.
Step 5: Go to the Date and Time tab. Then click Change date and time and Change time zone one by one to make sure your settings are correct.
Once done, restart your computer to see if the error code 0x800b0101 is fixed.
Solution 2: Run the Windows Update Troubleshooter
Usually, the Windows Update troubleshooter can repair plenty of issues that are related to Windows updates. So, you can also try to get rid of the “Installer encountered an error 0x800b0101” message via the troubleshooter.
Step 1: Press Windows and I keys to open Windows Settings and select Update & Security.
Step 2: Go to Troubleshoot and then click Additional troubleshooters from the right side.
Step 3: In the next window, select Windows Update and click Run the troubleshooter.

Step 4: After that, this troubleshooter will begin detecting problems that may cause the error code 0x800b0101. Follow the on-screen instructions to repair the found issues.
Solution 3: Clear Windows Update Cache
Another way that may help you solve the Windows Update Standalone Installer error 0x800b0101 is to clear Windows Update cache. To do this, there are three different ways for you in this article: How to Clear Windows Update Cache (3 Ways for You).
Solution 4: Rename the Pending.xml File
If the “Installer encountered an error 0x800b0101” error message comes out during the process of installing a pending update, you can try to resolve it by renaming the current pending.xml file. To do this, follow the steps below.
Step 1: Run Command Prompt as an administrator.
Step 2: Type the following command in the panel and then press Enter to rename the pending.xml file to pending.old:
Ren c:windowswinsxspending.xml pending.old
Step 3: After the process is completed, restart your computer to check if the error code 0x800b0101 is removed.
Solution 5: Run SFC and DISM Scans
In some cases, the “Installer encountered an error 0x800b0101” message may show up as well due to certain corrupted system files. On this occasion, we recommend you use SFC (System File Checker) and DISM (Deployment Image Servicing and Management) utilities to fix this error.
Step 1: Open the elevated Command Prompt. Then type sfc /scannow and press Enter.
Step 2: Once the scan completes, restart your computer to see if the error is resolved. If not, open Command Prompt as an administrator again.
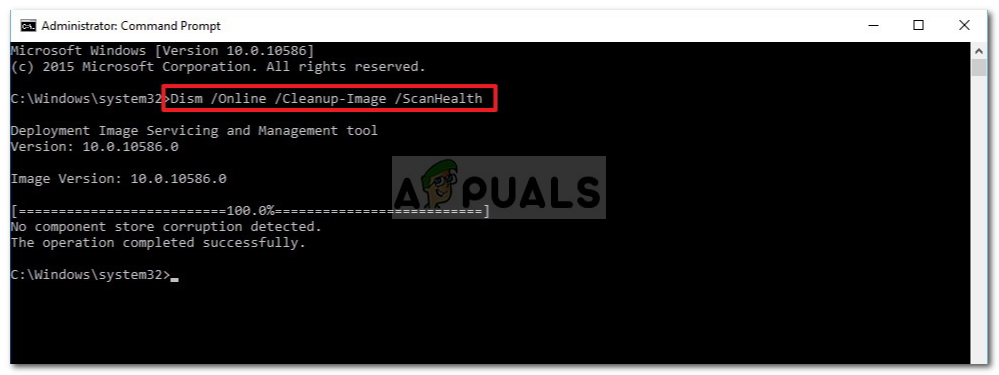
Step 3: In the Command Prompt panel, type the following command and then press Enter to execute the DISM scan:
DISM /Online /Cleanup-Image /ScanHealth
Step 4: After the process finishes, restart your computer and the error may appear.
All these methods mentioned in this post are feasible. When you are facing the message: Installer encountered an error 0x800b0101, follow them one by one until you fix the error. If you have any problems with this error, you can leave a message in our comment part.
If you are interested in MiniTool Partition Wizard – the best partition management software, you can visit its official website to have a better understanding of it.
About The Author
Position: Columnist
Yamila is a fan of computer science. She can solve many common issues for computer users by writing articles with simple and clear words. The very aspect that she is good at is partition management including create partition, format partition, copy disk and so on.
When she is free, she enjoys reading, doing some excerpts, listening to music and playing games.
Readers help support Windows Report. We may get a commission if you buy through our links.
Read our disclosure page to find out how can you help Windows Report sustain the editorial team. Read more
Updates are critical to the effective functioning of the PC, be it for Windows or the installed apps. An up-to-date computer delivers faster performance and is better protected against threats. But many users reported getting the 0x800b0101 update error.
The error code affects the PC’s ability to install Windows updates via Settings, using the MSU standalone installer, and when downloading apps from Microsoft Store. So, let’s find out how you can get things up and running in these cases.
What is failed to install 0x800b0101?
The error is encountered when you try to install a missing update from the standalone installer downloaded from Microsoft Update Catalog. Normally, we head to the catalog when unable to update the OS normally. But, when it starts to throw an error, users are left in a pickle.
Here are a few reasons your might be getting the error:
- Issues with certificates: One of the reasons users get the 0x800b0101 error is when a required certificate is not within its validity period. This is usually due to an incorrect time set on the PC.
- Corrupt update components: When the Windows Update Components are corrupt, users are bound to run into issues updating the OS.
- Corrupt system files: Even corrupt system files can trigger a wide range of issues, including reduced functionality, app crashes, and update errors.
How do I fix Windows Update error 0x800b0101?
Before we move ahead, try these quick tips:
- Restart the computer and check for updates.
- Connect to a different network, preferably a wired one, and verify whether the 0x800b0101 error disappears.
If these don’t work, head to the fixes listed next.
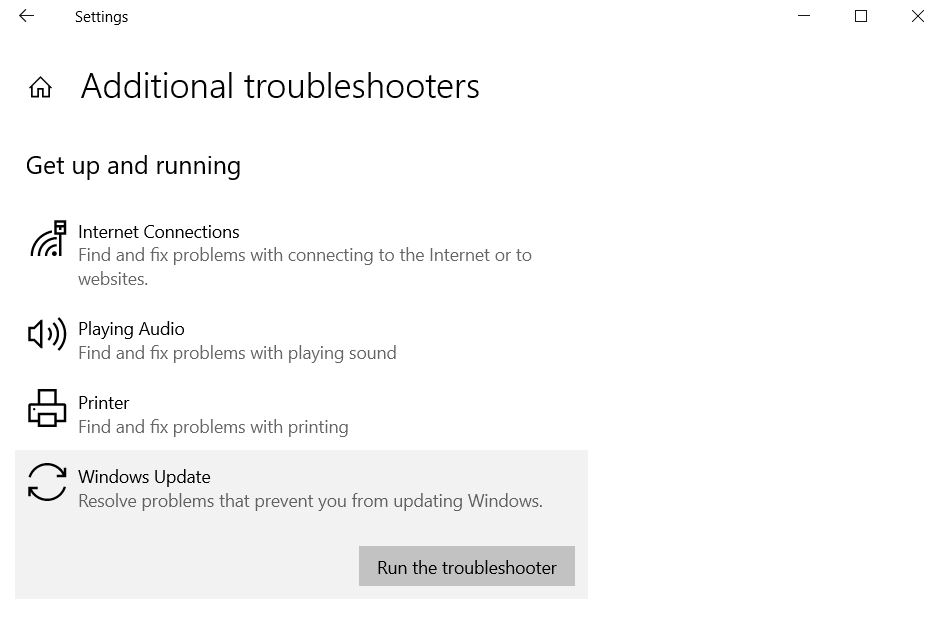
1. Run the Windows Update troubleshooter
- Press Windows + I to open Settings, and then click on Troubleshoot on the right in the System tab.

- Click on Other troubleshooters.
- Locate Windows Update and click the Run button next to it.
- Now, wait for the troubleshooter to identify and eliminate the problem automatically.


When getting the 0x800b0101 error, your primary approach should be to run the dedicated Windows Update troubleshooter. Once done, try installing the same update via the built-in method, and if it still fails, use the update catalog.
2. Correct the PC time
- Press Windows + I to launch Settings, select Time & language from the navigation pane, and click on Date & time on the right.
- Now, you can either enable the Set time automatically setting, or click on the Change button to manually configure it.
- Choose the present date and time from the various dropdown menus, and click on Change to confirm.


3. Run the DISM and SFC scan
- Press Windows + R to open Run, type cmd, and then hit Ctrl + Shift + Enter.

- Click Yes in the UAC prompt.
- Paste the following three commands one at a time, and press Enter after each:
DISM /Online /Cleanup-Image /CheckHealthDISM /Online /Cleanup-Image /ScanHealthDISM /Online /Cleanup-Image /RestoreHealth - Once done, run this command for the SFC scan:
sfc /scannow


If it’s the corrupt system files to blame for the error, we recommend you run the DISM tool and the SFC (System File Checker) scan to repair/replace any corrupt system files, as well as fix other issues with the Windows image.
Otherwise, you may also opt for a proficient system repair technology that can fully scan your Windows PC to detect malfunctioned files or programs, broken registry, and many more issues. Such a tool is a suitable choice when you’re dealing with these types of errors that prevent your OS from running properly.
- Recent Windows 11 update lets you disable profanity filter in voice typing
- Windows 11 KB5055627 update makes File Explorer more fluid
4. Perform an in-place upgrade
NOTE
The steps here are to perform an in-place upgrade in Windows 11. If you are facing the error on Windows 10, directly download the Media Creation Tool, and run it to repair the Windows installation.
- Go to Microsoft’s dedicated Windows 11 page, select the desired ISO edition, and click Download.

- Choose the OS language and click Confirm.
- Now, click on the provided link to start the download.
- Double-click on the ISO file to view its contents and click Open in the prompt that appears.

- Run the setup.exe file.

- Click Next to continue.

- Now, click Accept to agree to the license terms.
- Finally, make sure the setup lists, Keep personal files and apps, and click on Install to proceed.


That’s it! Wait for the in-place upgrade to complete (may take a few hours). Once done, things should be up and running like before, and you shouldn’t get the 0x800b0101 error. An in-place upgrade will fix any issues with the OS without affecting the installed apps or stored files.
Also, before you leave, check some quick tips to boost the PC’s performance in no time.
Tell us which fix worked for you in the comments section below.
Kazim Ali Alvi
Windows Hardware Expert
Kazim has always been fond of technology, be it scrolling through the settings on his iPhone, Android device, or Windows PC. He’s specialized in hardware devices, always ready to remove a screw or two to find out the real cause of a problem.
Long-time Windows user, Kazim is ready to provide a solution for your every software & hardware error on Windows 11, Windows 10 and any previous iteration. He’s also one of our experts in Networking & Security.