
FAQ
[Windows 11/10] How to Use Windows Update to Update System and BIOS
Applicable Products: Notebook, Desktop, All-in-One PC, Gaming Handheld, MiniPC
Maintaining the latest state of the operating system helps ensure device security and performance. The Windows operating system provides a convenient update mechanism through Windows Update, enabling users to easily access the latest features, patches, and security updates.
This article will guide you on how to use Windows Update to obtain the latest updates and the BIOS of your device.
Please go to the corresponding instruction based on the current Windows operating system on your device:
- Windows 11
- Windows 10
Windows 11 operating system
Obtaining the Latest Updates via Windows Update
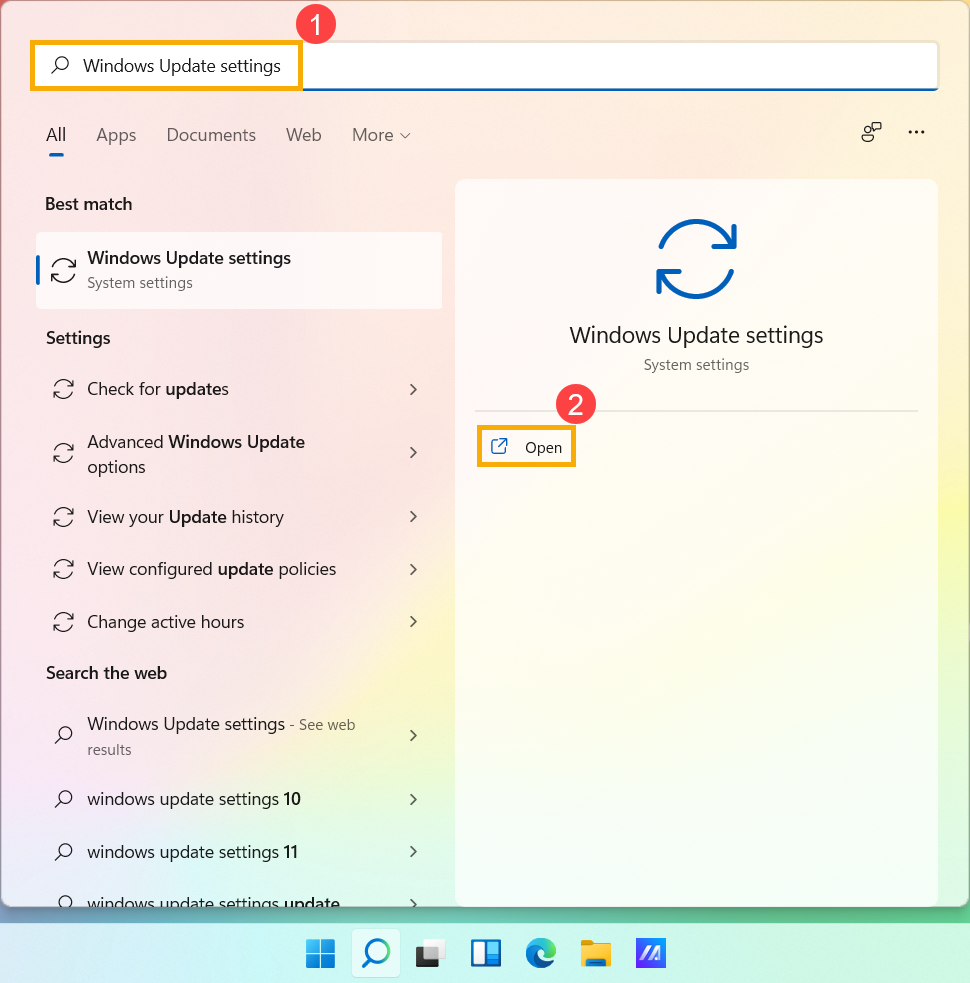
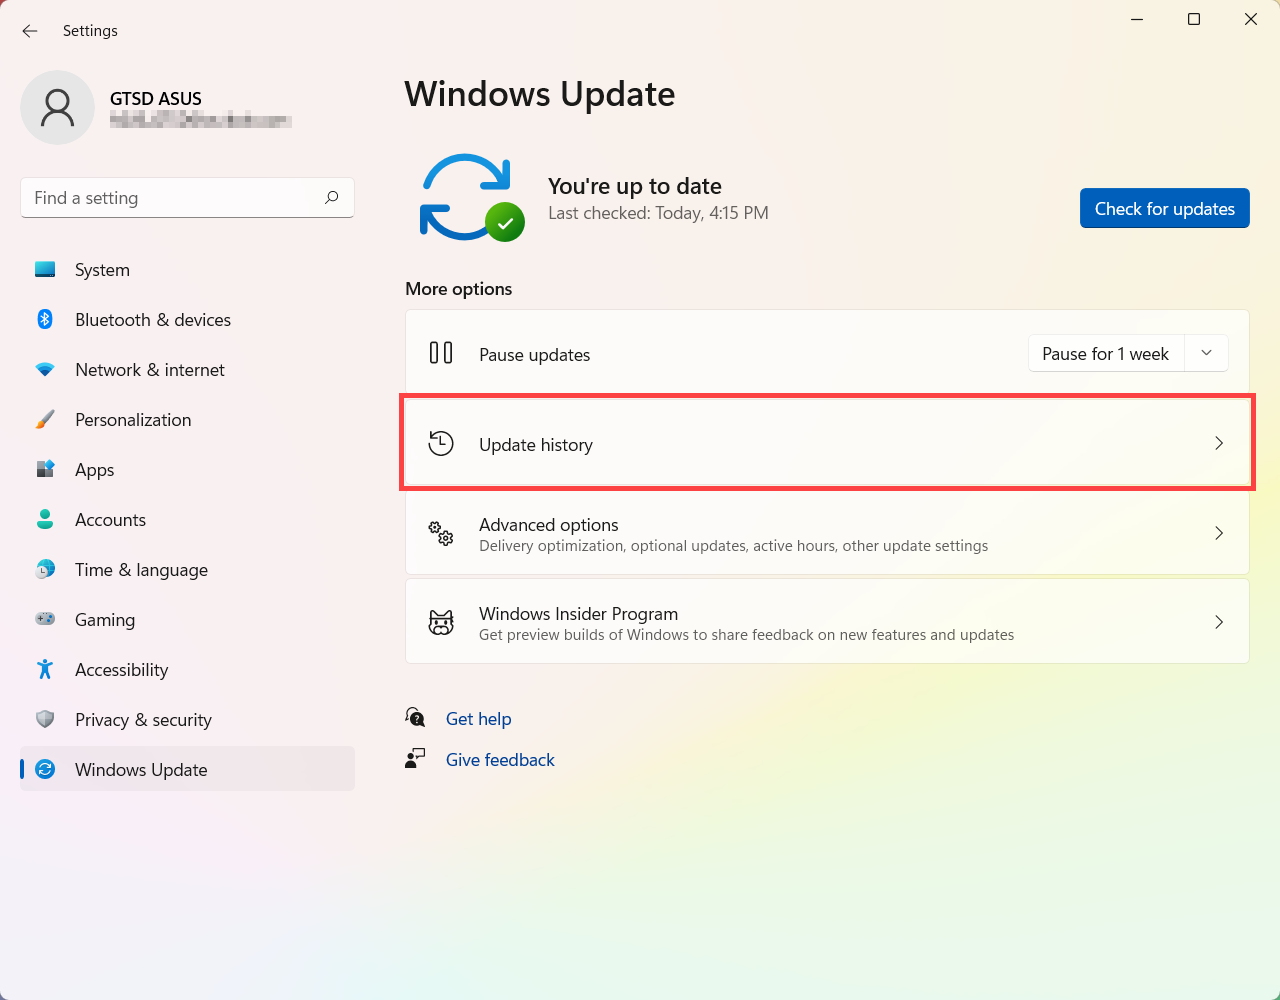
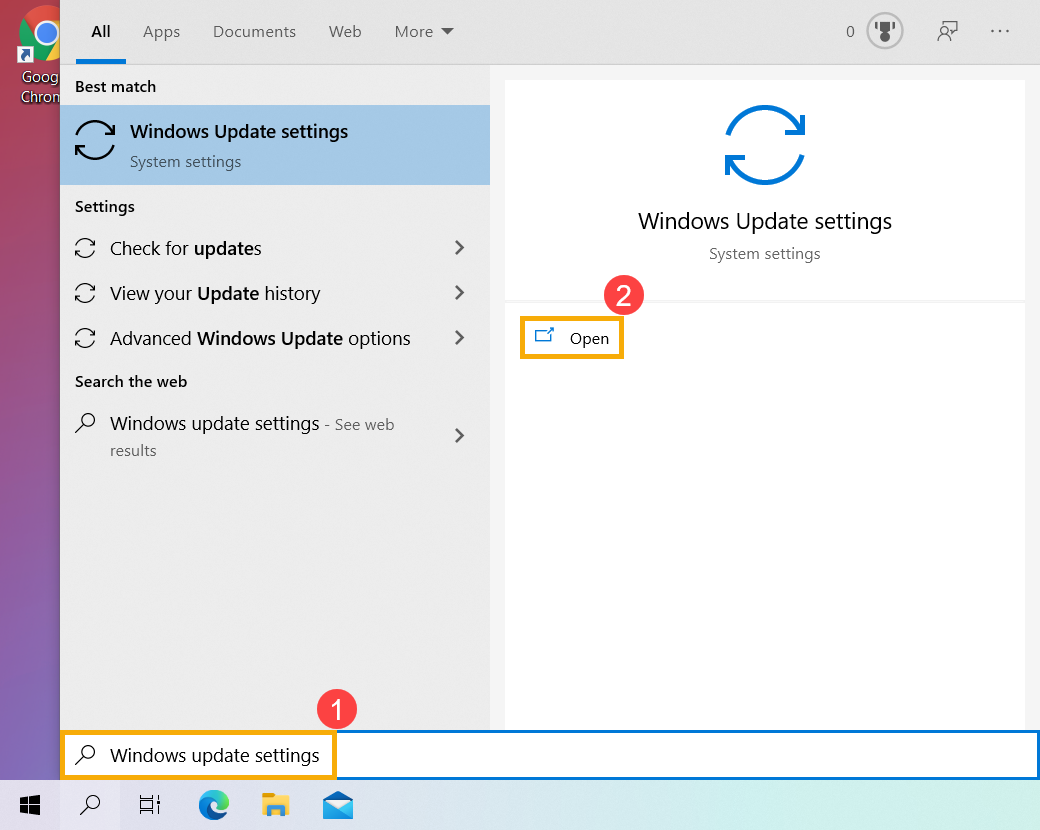
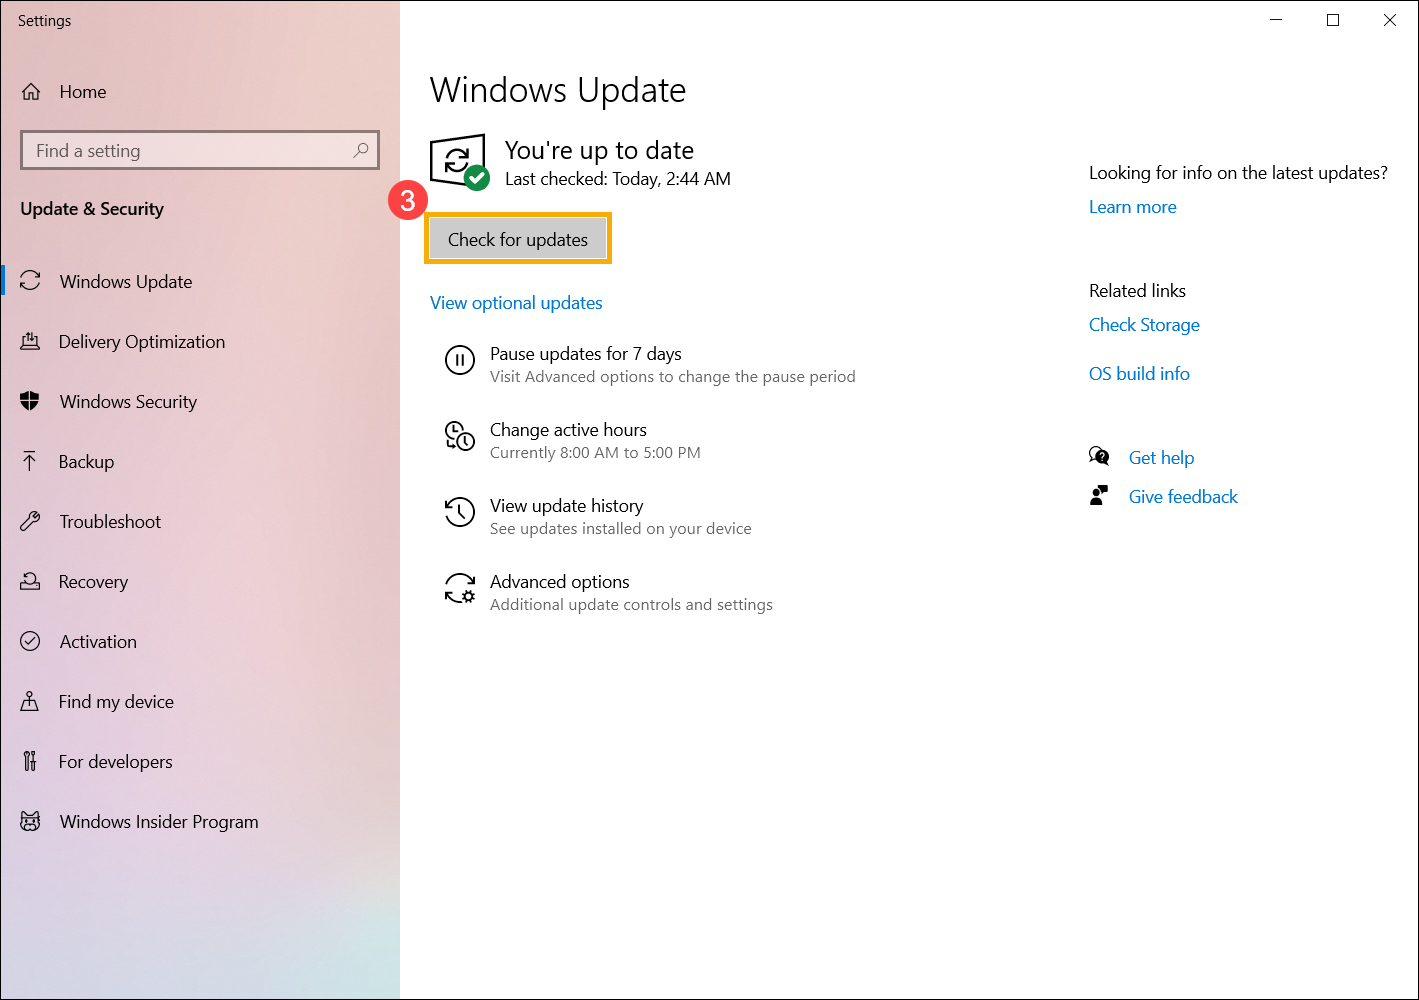
- Type and search [Windows Update settings]① in the Windows search bar, then click [Open]②.

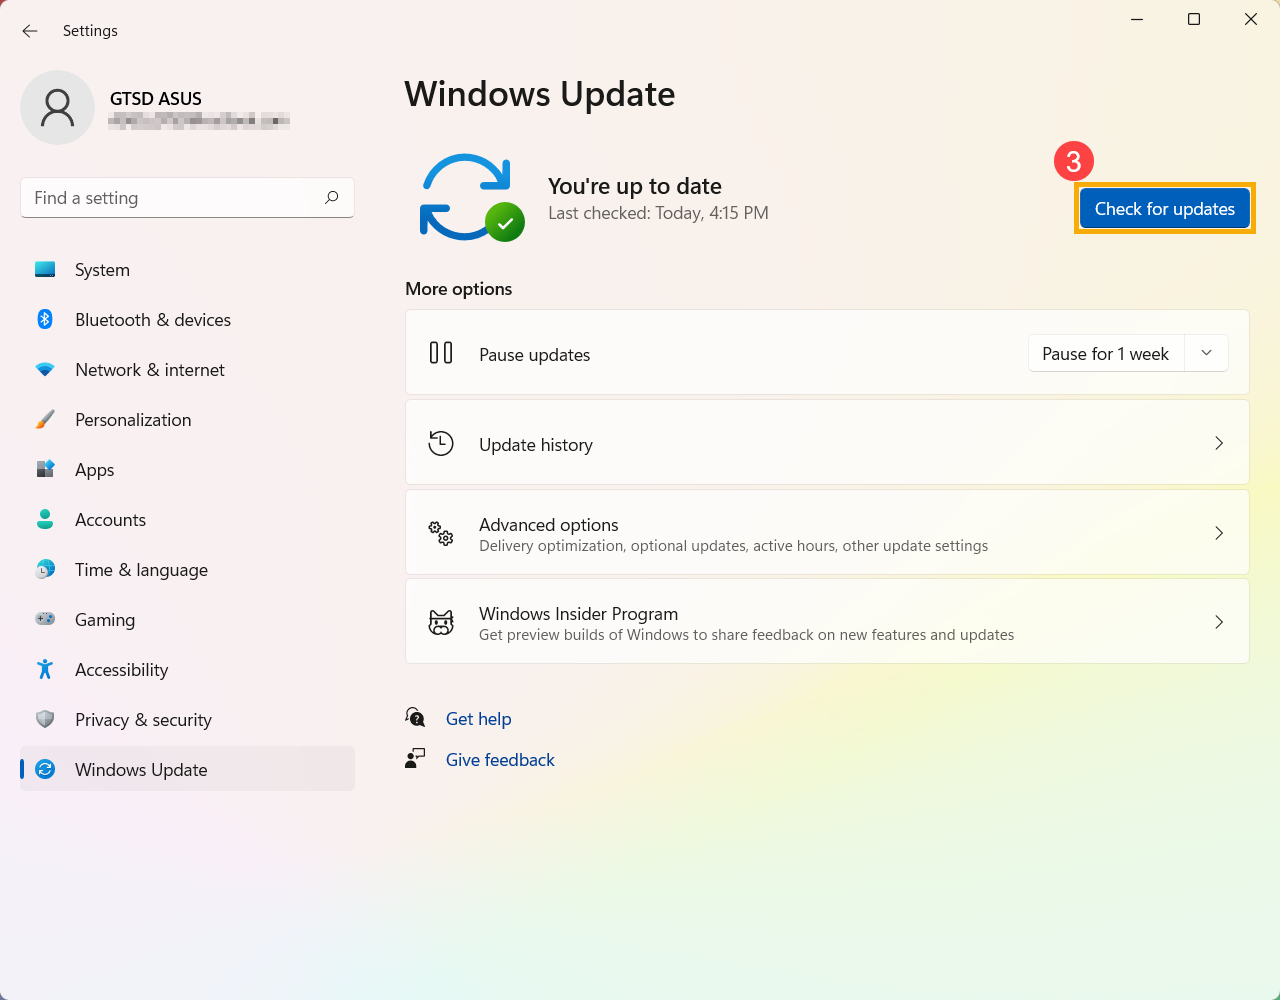
- Click [Check for updates]③.
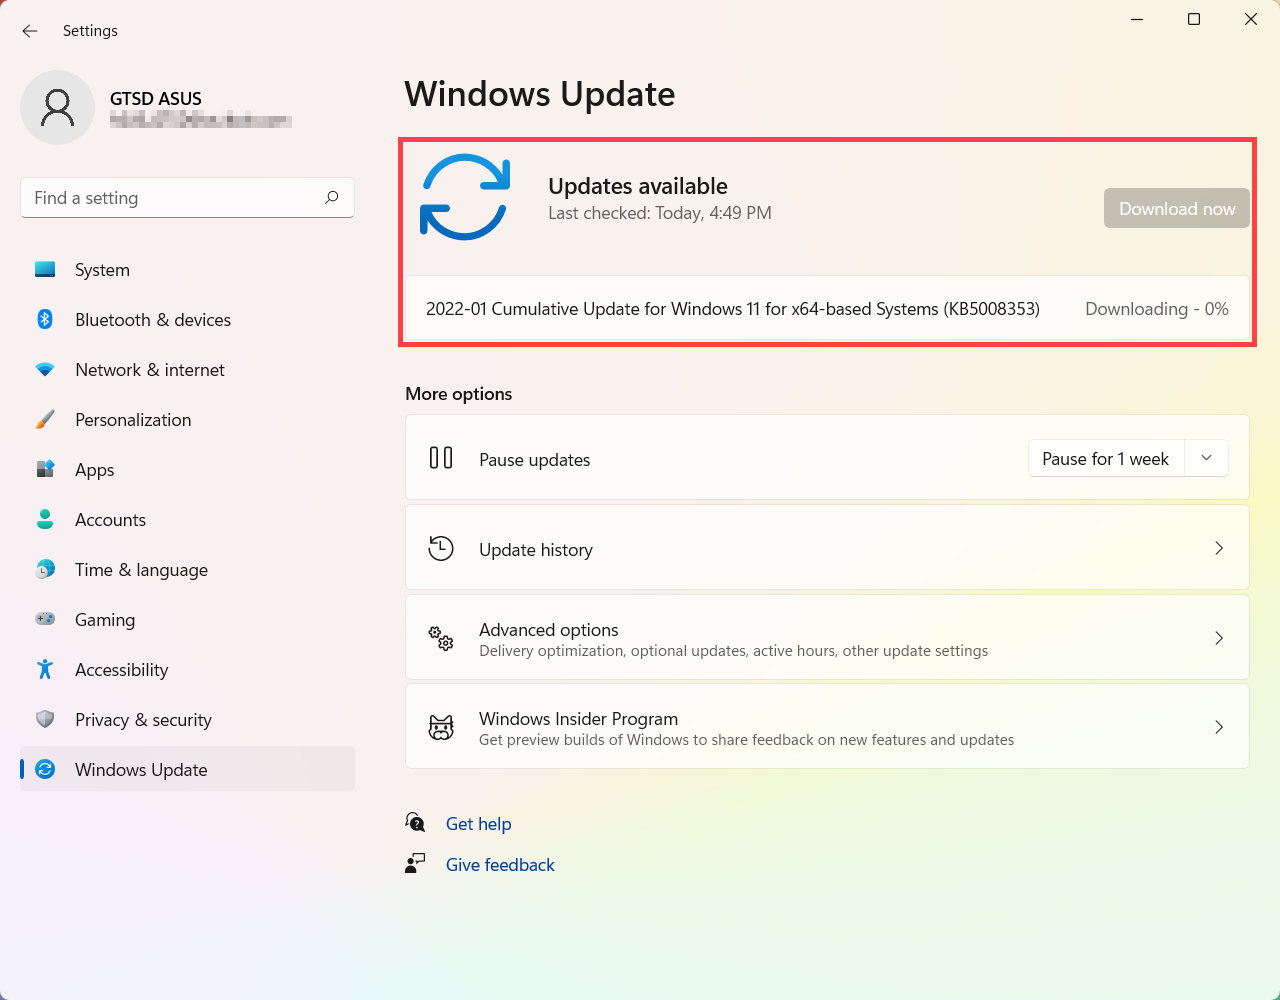
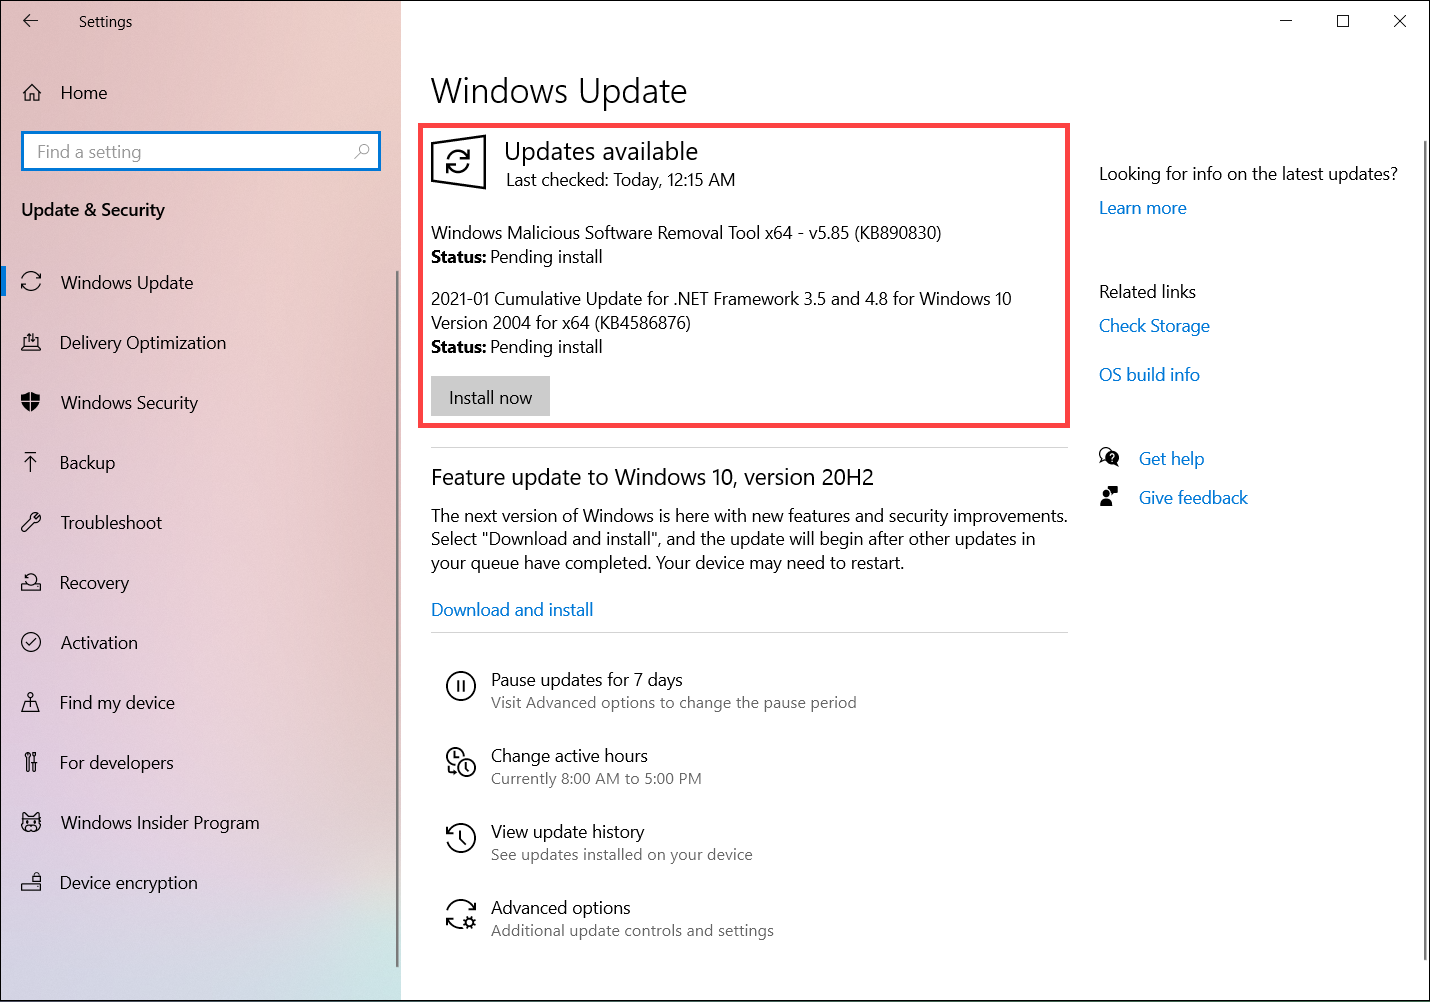
- If a feature update is available for your device, it will appear separately on the Windows Update page and start to download and install. Some updates may need to be additionally clicked ‘Install now’ by yourself.
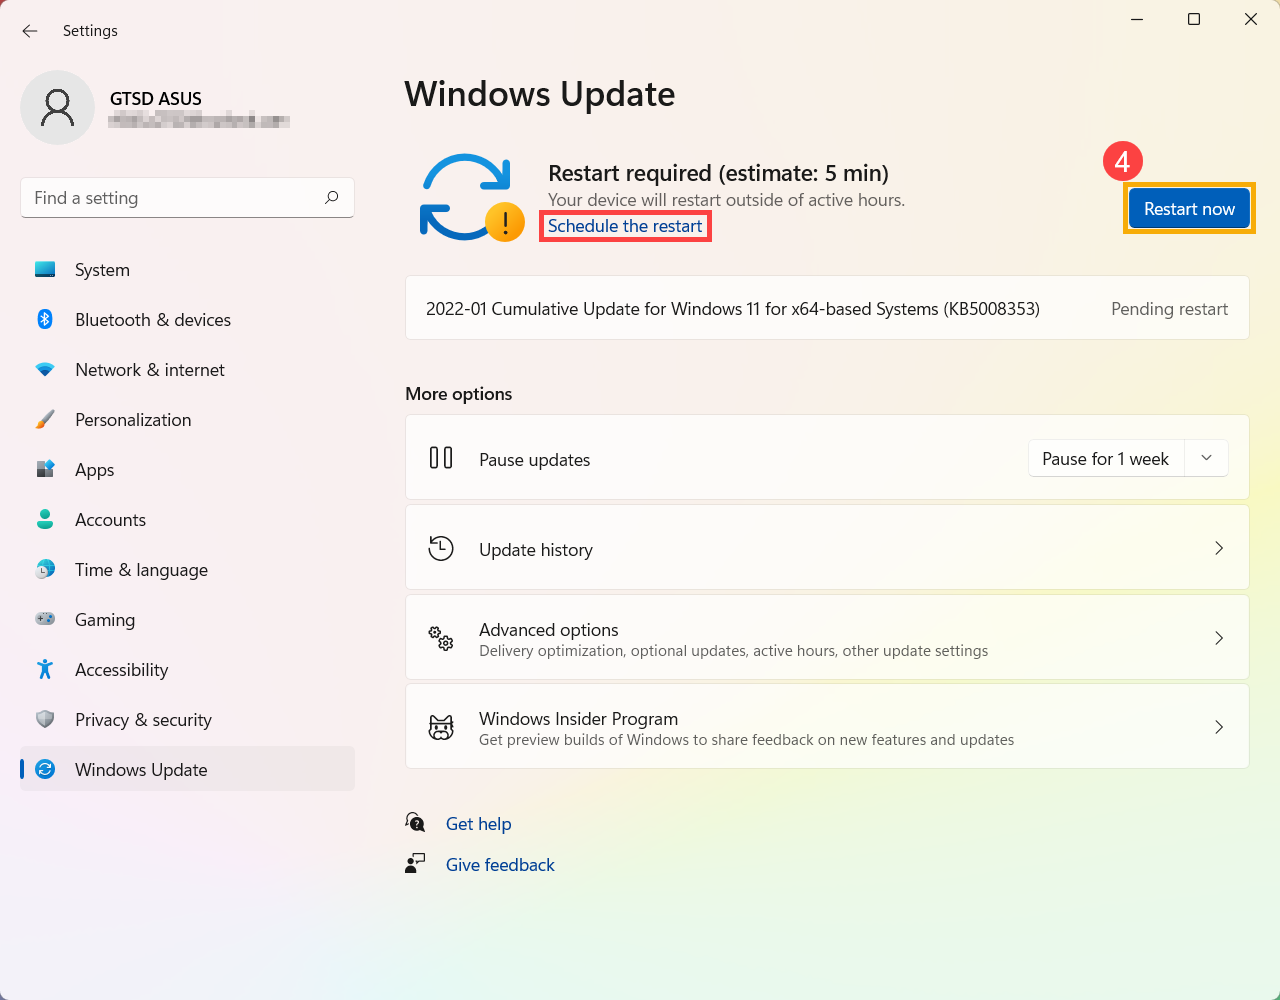
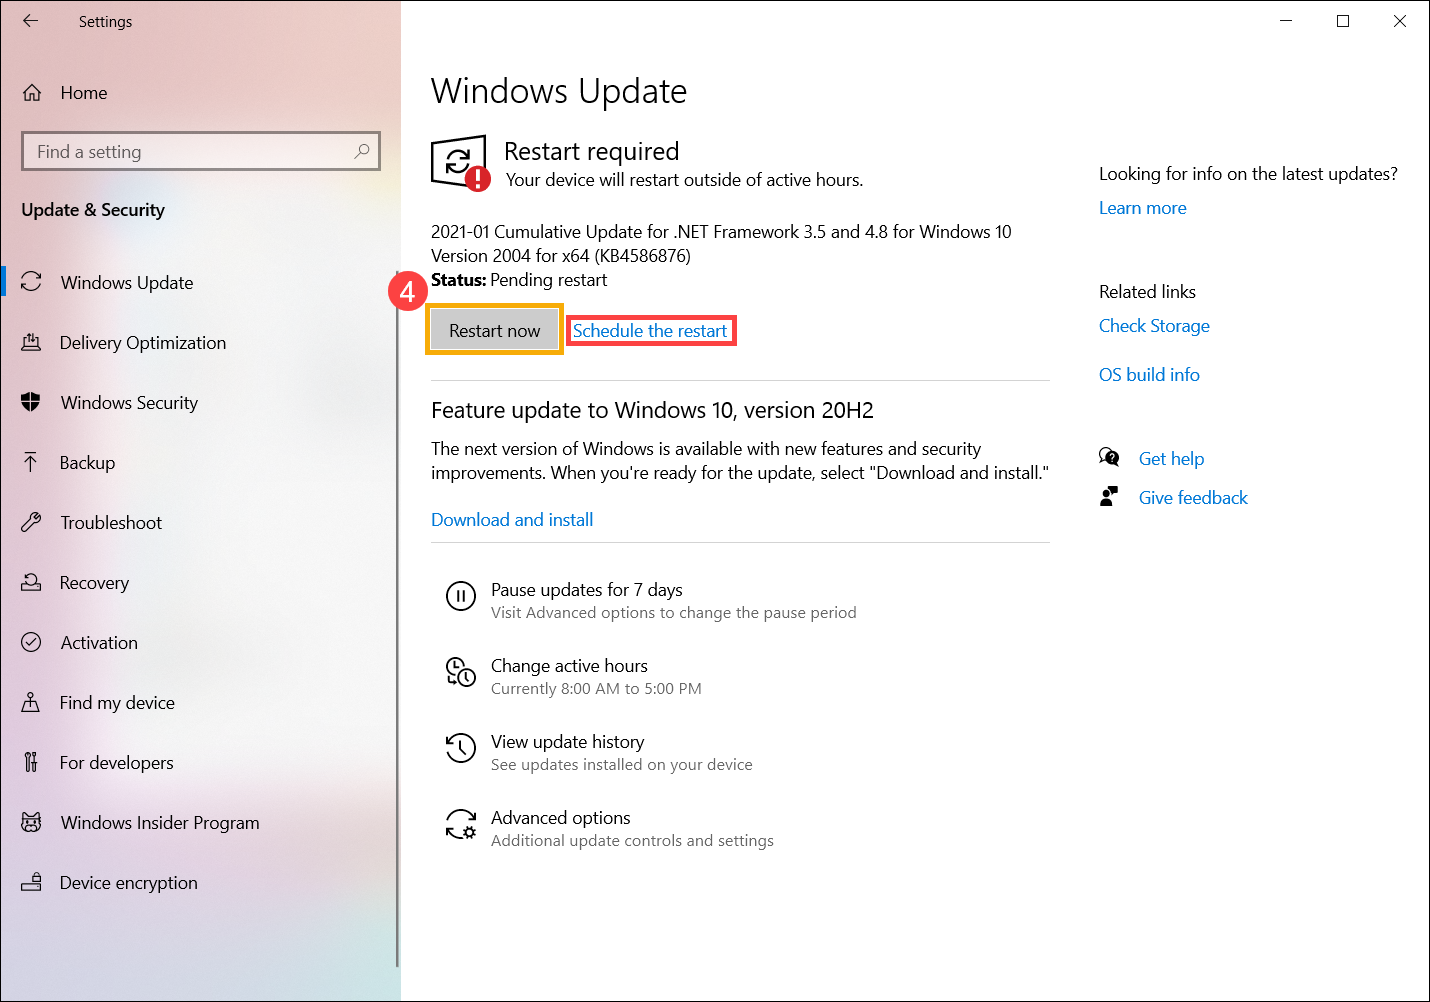
- Some updates may ask restarting your device, so you can select [Restart now]④. Otherwise, if you don’t want to restart the device yet, you can select Schedule the restart to set up the restart schedule.
Note: Before restarting the device, please save your current work.
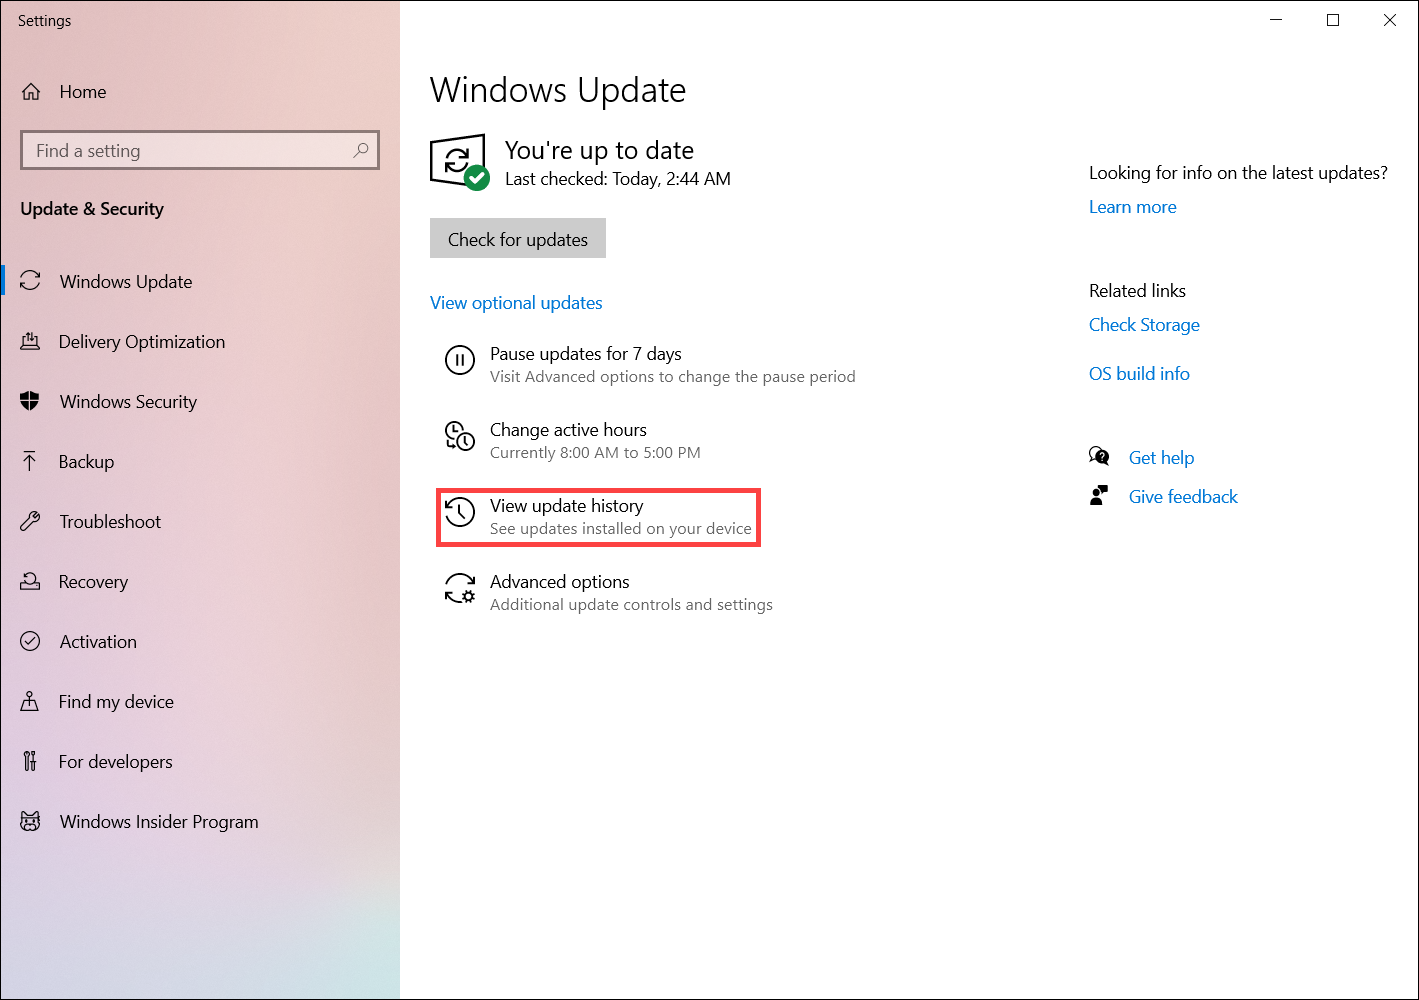
- After you finish and complete the update procedures, you can select Update history to see the information of previous update data.
Updating BIOS via Windows Update
Windows 8.1 and earlier operating system versions cannot automatically update BIOS through Windows Update. Only ASUS products pre-installed with Windows 10/11 can update BIOS through Windows Update.
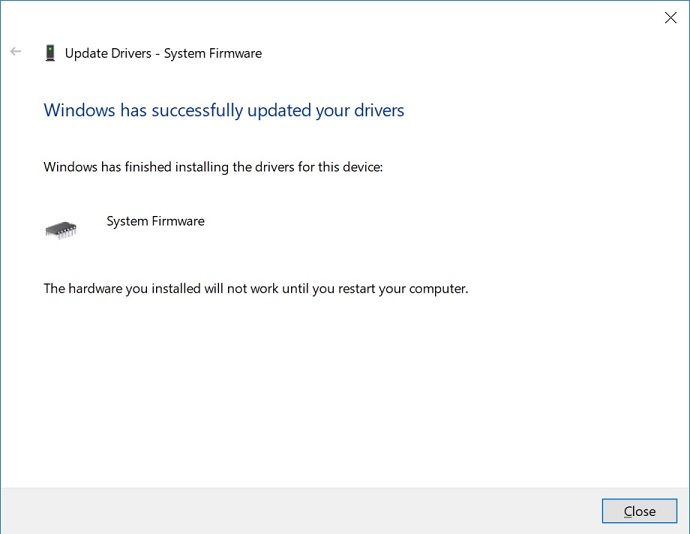
- When the BIOS update has been downloaded and is awaiting installation, you may receive a message similar to the one shown below, indicating that a system restart is required before BIOS update.
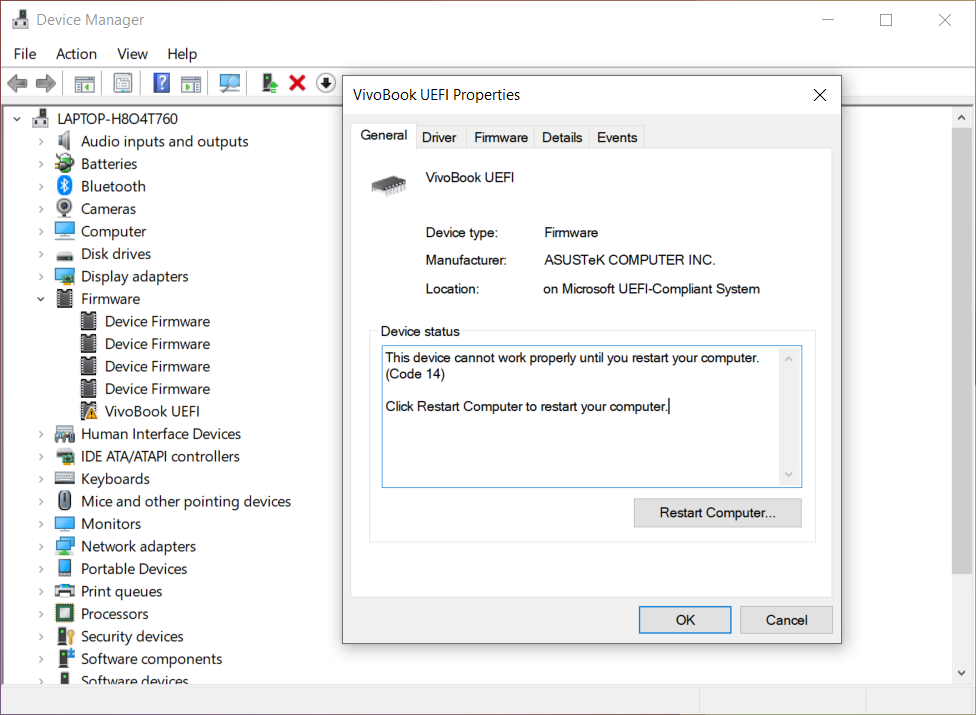
Alternatively, you may find a similar message by checking Device Manager > Firmware > System Firmware > Properties.
- Save your current work and restart your device. Your device will display a screen similar to the one below for updating BIOS. (The BIOS update screen may vary slightly depending on the model)
During the BIOS update, a progress bar will move from left to right automatically. No manual intervention is required, as the BIOS update will proceed automatically.
Note: Ensure that your device is plugged in during the BIOS update, and do not disconnect the power supply. If the BIOS update is interrupted, the system may not function properly, and it will require service at a repair center.
- Once your device restarts and boots into the Windows operating system, the BIOS update is complete. Learn more about How to check the BIOS version to confirm the successful completion of the update.
If the BIOS update is interrupted for any reason, ensure that the power is connected and restart to check if the update resumes automatically. If the update cannot continue, and the system does not display, please send the device to a repair center for service.
Windows 10 operating system
Obtaining the Latest Updates via Windows Update
- Type and search [Windows Update settings]① in the Windows search bar, then click [Open]②.
- Click [Check for updates]③.
- If a feature update is available for your device, it will appear separately on the Windows Update page and start to download and install. Some updates may need to be additionally clicked ‘Install now’ by yourself.
- Some updates may ask restarting your device, so you can select [Restart now]④. Otherwise, if you don’t want to restart the device yet, you can select Schedule the restart to set up the restart schedule.
Note: Before restarting the device, please save your current work.
- After you finish and complete the update procedures, you can select View update history to see the information of previous update data.
Updating BIOS via Windows Update
Windows 8.1 and earlier operating system versions cannot automatically update BIOS through Windows Update. Only ASUS products pre-installed with Windows 10/11 can update BIOS through Windows Update.
- When the BIOS update has been downloaded and is awaiting installation, you may receive a message similar to the one shown below, indicating that a system restart is required before BIOS update.
Alternatively, you may find a similar message by checking Device Manager > Firmware > System Firmware > Properties.
- Save your current work and restart your device. Your device will display a screen similar to the one below for updating BIOS. (The BIOS update screen may vary slightly depending on the model)
During the BIOS update, a progress bar will move from left to right automatically. No manual intervention is required, as the BIOS update will proceed automatically.
Note: Ensure that your device is plugged in during the BIOS update, and do not disconnect the power supply. If the BIOS update is interrupted, the system may not function properly, and it will require service at a repair center.
- Once your device restarts and boots into the Windows operating system, the BIOS update is complete. Learn more about How to check the BIOS version to confirm the successful completion of the update.
If the BIOS update is interrupted for any reason, ensure that the power is connected and restart to check if the update resumes automatically. If the update cannot continue, and the system does not display, please send the device to a repair center for service.
Was this information helpful?
Yes
No
- Above information might be partly or entirely quoted from exterior websites or sources. please refer to the information based on the source that we noted. Please directly contact or inquire the sources if there is any further question and note that ASUS is neither relevant nor responsible for its content/service
- This information may not suitable for all the products from the same category/series. Some of the screen shots and operations could be different from the software versions.
- ASUS provides the above information for reference only. If you have any questions about the content, please contact the above product vendor directly. Please note that ASUS is not responsible for the content or service provided by the above product vendor.
- Brand and product names mentioned are trademarks of their respective companies.
Содержание статьи:
- Прошивка / обновление UEFI: что делать по шагам
- Способ 1
- Способ 2
- Вопросы и ответы: 0
Доброго времени!
Сегодня на повестке довольно узкая тема (// обновление BIOS/UEFI), и касается это только пользователей ноутбуков Asus (хотя, сам процесс на др. устройствах идет аналогично).
Вообще, данную операцию (в основном) приходится проводить относительно редко (если и приходится — то обычно не более 1-2 раз за все время использования устройством). Например, когда производитель в новой версии исправил какие-то серьезные ошибки или добавил новые функции.
На сегодняшний день есть 2 способа, как произвести обновление (прошивку) UEFI/BIOS: 1. через спец. утилиту прямо из-под Windows (удобный вариант, но не всегда доступен); 2. с помощью заранее подготовленной USB-флешки (с которой нам вручную нужно будет указать файл-прошивку в UEFI/BIOS).
Ниже рассмотрю оба варианта чуть подробнее… 😉
*
📌 Примечание:
- имейте ввиду, что процедура обновления UEFI (BIOS) иногда может закончиться походом в ремонтную мастерскую (например, некоторые пользователи ошибаются и загружают не те версии прошивок…). Поэтому, обновлять его нужно только по необходимости!
- далеко не всегда самая новая прошивка — самая стабильная!
- самостоятельная прошивка устройства может стать причиной отказа в гарантийном обслуживании (см. условия гарантии).
*
Прошивка / обновление UEFI: что делать по шагам
Способ 1
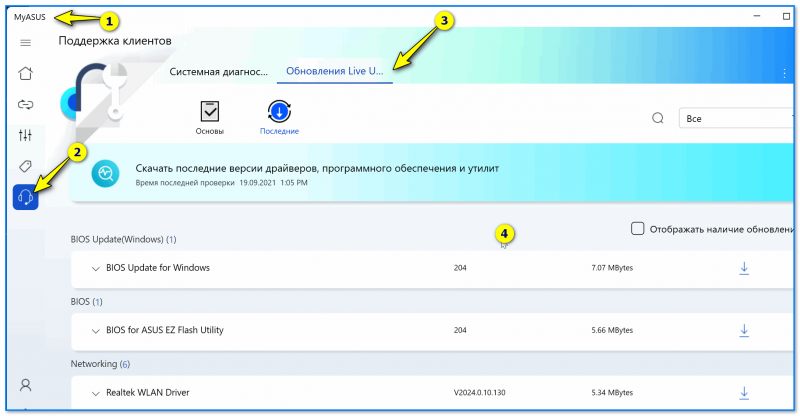
Если у вас на ноутбуке предустановлено «родное» ПО — то в утилите MyASUS (проверьте меню ПУСК) есть спец. раздел «Поддержка клиентов / Обновления Live…» (см. скрин ниже). 👇
С ее помощью можно быстро найти последние версии программ, драйверов и BIOS.
👉 Далеко не все устройства поддерживают утилиту MyASUS (если у вас оной нет — перейдите ко второму варианту, см. ниже).
👉 Стоит отметить, что процесс обновления BIOS (UEFI) я бы все же рекомендовал выполнять с загрузочной флешки (на мой взгляд это безопаснее // По крайней мере создайте такую флешку, записав на нее несколько версий прошивок, чтобы в случае чего — вы могли ей воспользоваться!).
MyAsus — устройство обновлено!
*
Способ 2
ШАГ 1
Сначала необходимо определить модель своего ноутбука. Сделать это можно разными способами…
*
📌 Вариант 1: запустить 👉 командную строку, ввести systeminfo и нажать Enter.
Далее среди большого списка свойств и характеристик найти строку «Модель системы» (собственно, нам нужна лишь аббревиатура вида «TP420UA», см. пример ниже 👇).
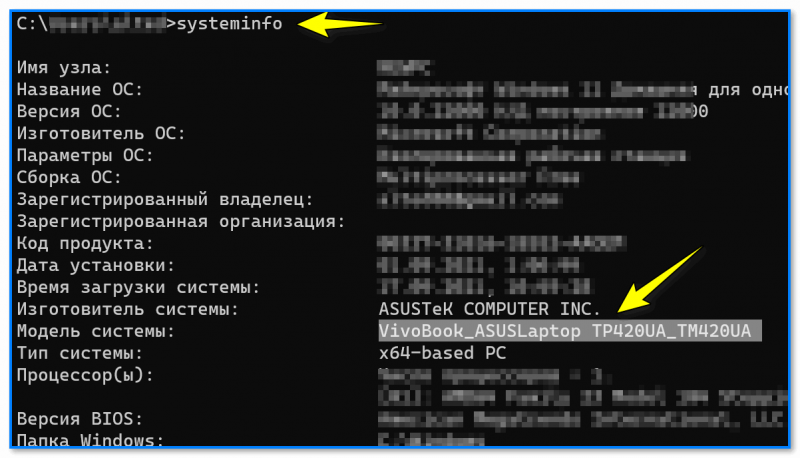
CMD — модель системы
*
📌 Вариант 2: если у вас предустановлено все «заводское» ПО от Asus — найдите в меню ПУСК утилиту «MyASUS» и запустите ее. Далее откройте в ней вкладку «Информация о системе» — там должна присутствовать модель устройства…
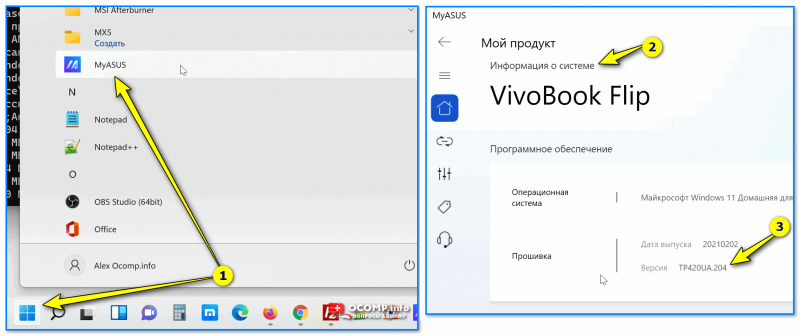
Приложение MyASUS — информация о системе
*
📌 Вариант 3: можно просто посмотреть документы, которые шли вместе с ноутбуком. 😉 Также см. в помощь одну мою старую заметку по этой теме.
*
ШАГ 2
Офиц. сайт Asus (центр загрузок драйверов и ПО): https://www.asus.com/ru/support/Download-Center/
*
Далее нужно перейти на офиц. сайт Asus и ввести модель в строку поиска (ссылку на центр загрузок я привел, куда вводить аббревиатуру тоже — см. скриншот ниже 👇).

Поиск на сайте Asus (скрин с офиц. сайта)
После перед вами должен появиться список прошивок UEFI (BIOS) — загрузите самые новые из них (рекомендую загружать сразу несколько версий, если оные будут)!
📌 Важно: не загружайте прошивки не для своего устройства! Если перепрошить неподходящей прошивкой — ноутбук после может не включиться… (само собой без мастерской уже будет не обойтись…).
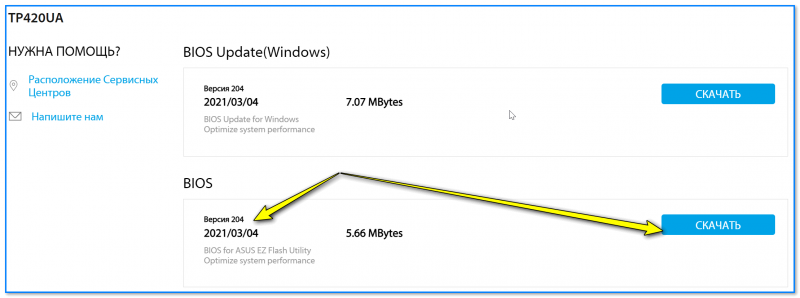
Смотрим дату и загружаем
📌 Важный момент: как правило, прошивка требуется более новая, чем у вас установлена на устройстве. Чтобы узнать текущую версию прошивки на устройстве — попробуйте в командной строке набрать wmic bios get SMBIOSBIOSVersion (см. пример ниже). 👇
Если войти в UEFI (BIOS) — в меню тоже можно узнать их версию.
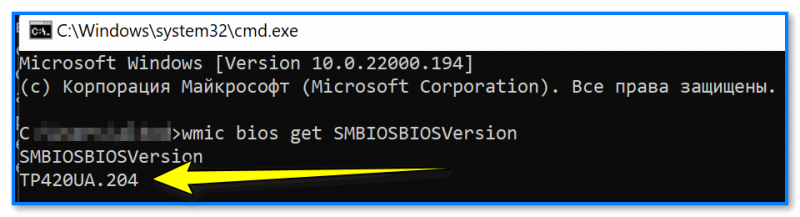
wmic bios get SMBIOSBIOSVersion
*
ШАГ 3
Затем нужно извлечь файл прошивки из архива и записать на обычную USB-флешку. (В помощь: как распаковать архив RAR, 7Z, ZIP и др. архивы)
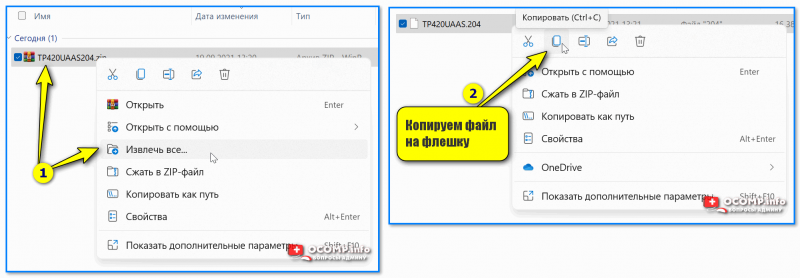
Копируем файл прошивки на флешку
*
ШАГ 4
Следующий момент: нужно проверить насколько заряжена батарея ноутбука (процедуру желательно проводить при зарядке не менее 30% и подключенном кабелем питания).
Прим.: дело в том, что на некоторых устройствах есть ограничение, которое не позволит обновить BIOS, если батарея разряжена!
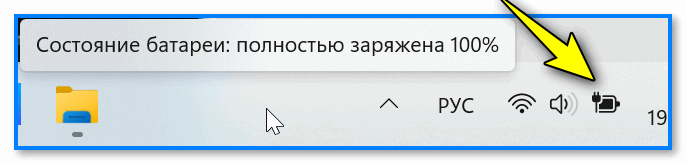
Зарядить батарею
*
📌 Собственно, далее:
- отключаем от ноутбука всё, кроме адаптера питания и «нашей подготовленной» флешки;
- выключаем/перезагружаем устройство;
- заходим в UEFI (BIOS): на ноутбуках Asus для этого достаточно зажать кнопку Esc перед включением устройства. Также см. инструкцию, ссылку на которую привожу чуть ниже. 👇
*
👉 В помощь!
Как зайти в BIOS (UEFI) на ноутбуке ASUS — [см. инструкцию]
*
ШАГ 5
В UEFI (BIOS) нужно открыть расширенный режим — Advanced Mode (клавиша F7).
После перейти во вкладку «Advanced» и запустить утилиту «ASUS EZ Flash 3 Utility».

EZ Flash Utility — режим Advanced Mode
Утилита отобразит все подключенные съемные диски: нужно открыть нашу подготовленную флешку, указать на ней файл-прошивки и нажать Enter. Далее утилита попросит подтвердить операцию… 👌
📌 Важно: при непосредственно процессе обновления BIOS — рекомендую абсолютно ничего не делать с ноутбуком: не подключать к нему никаких устройств, не нажимать клавиш, не отключать питание и т.д.
Если вы правильно выбрали прошивку и «не мешали» устройству — то через 3-4 мин. процесс будет завершён, ноутбук перезагрузится и будет готов к работе! 👌
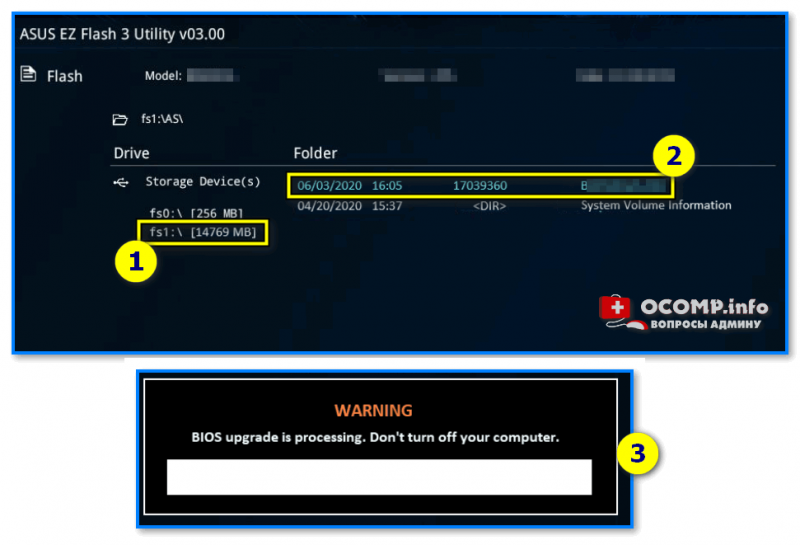
Выбираем прошивку с флешки и подтверждаем операцию прошивки
*
Дополнения по теме — будут весьма кстати (комментарии открыты!)
Всех благ!
👋
Если во время установки Windows на ноутбук или компьютер с процессором Intel вы попали в ситуацию, когда система не распознает ни одного накопителя и пишет «Нам не удалось найти драйверы», не переживайте — это достаточно распространенная проблема. Она связана с особенностями технологии Intel Rapid Storage Technology (IRST), используемой для нормализации работы накопителей, в частности в RAID-массивах.
Собственно, из-за нее последующая установка ОС становится затруднительной. Рассказываем, с чем связана данная проблема и как ее решить, на примере ноутбука ASUS.
Почему накопители не распознаются
Основная причина возникновения этой проблемы — отсутствие в стандартном установочном пакете Windows драйверов IRST, необходимых для корректного взаимодействия операционной системы с накопителями. Без нужного драйвера Windows просто не может распознать диск, даже если с ним все в порядке и другие устройства его читают.
Как скачать и подготовить драйвер IRST для установки
Для устранения проблемы вам потребуется скачать драйвер IRST самостоятельно, после чего добавить его в установочный пакет Windows. Драйвер именно для вашей модели ноутбука можно найти на официальном сайте ASUS или на сайте Intel — потребуется зарубежный IP-адрес для подключения.
Узнать модель вашего ноутбука можно, перевернув его, — снизу будет наклейка. Либо осмотрите коробку от устройства, если она сохранилась.
У меня возникла проблема с ASUS VivoBook S5506MA, показываю процесс на его примере
На сайте введите модель устройства и перейдите в раздел Driver & Utility.
Также можно ввести серийный номер устройства, однако и названия модели будет достаточно
После перехода в раздел с драйверами выберите операционную систему и подходящую архитектуру (например, x64). Они должны совпадать с версией Windows, которую вы устанавливаете. Далее нажмите на EXPAND ALL, чтобы развернуть список всех драйверов, в разделе Chipset найдите Intel Rapid Storage Technology и нажмите кнопку Download.
Нашли — нажмите на Download
После загрузки драйвера его нужно загрузить на установочный накопитель с Windows. Для этого подготовьте диск — как это сделать, мы уже рассказывали.
Далее нужно извлечь компоненты драйвера на установочную флешку — создайте на ней папку drivers, запустите скачанный файл и нажмите «Далее».
Затем выберите «Извлечь», укажите путь к ранее созданной папке drivers, нажмите «ОК» и «Далее»
Далее нажмите на клавишу «Установить». По окончании в папке окажутся файлы с драйверами IRST.
Устанавливаем Windows и драйвер
Вставьте флешку в ноутбук и запустите его. В процессе запуска несколько раз нажмите кнопку Esc, пока не откроется Boot Menu. Или нажимайте F2, пока не откроется BIOS, из которого, нажав F8, вы сможете попасть в Boot Menu.
Установите приоритет на USB-устройство, название которого должно начинаться на UEFI, — просто перетащите его на первую строчку.
Интерфейс может отличаться в зависимости от версии BIOS
Нажмите F10, чтобы перезагрузить устройство и начать установку Windows. После начала установки выберите язык системы, а затем нажмите на «Выборочную установку», чтобы выбрать накопитель. На этом экране у вас появится сообщение «Нам не удалось найти драйверы» — это то, с чем мы и будем разбираться.
На экране выбора накопителя нажмите на кнопку «Загрузить» (Load driver) и укажите путь к папке, в которую вы ранее скопировали файлы драйвера IRST на флешке.
Подтвердите выбор и нажмите «Далее», чтобы установить драйвера.
На установку уйдет пара минут. Как итог — в системе отобразятся все доступные диски.
На все процедуры по решению проблемы потребуется около 10 минут. Далее можно приступать к установке Windows.
Какие еще проблемы могут быть и как их решить
В некоторых случаях даже при выполнении всех вышеупомянутых шагов могут возникнуть сложности. Например, если драйвер не подходит для вашей модели ноутбука, накопители в Boot Menu все равно не будут отображаться. В этом случае убедитесь, что вы скачали драйвер именно для вашей модели ноутбука и версии Windows.
Если флешка не читается, проверьте ее на наличие ошибок на другом устройстве или попробуйте использовать другой USB-разъем. Если накопитель все равно не распознается, обновите BIOS. Для этого зайдите на сайт ASUS, скачайте последнюю версию BIOS для вашей модели ноутбука и выполните обновление, следуя инструкции производителя.
Что в итоге
При проблемах с распознаванием накопителей ноутбуками Asus не стоит волноваться. Процесс установки Windows становится длиннее всего на три шага: скачать драйвер IRST для вашего устройства, перенести его на установочный носитель и загрузить на компьютер. В редких случаях может потребоваться обновление BIOS.
У нас ещё много всего интересного
Оставьте почту и получайте подборку лучших материалов от главного редактора
раз в две недели.
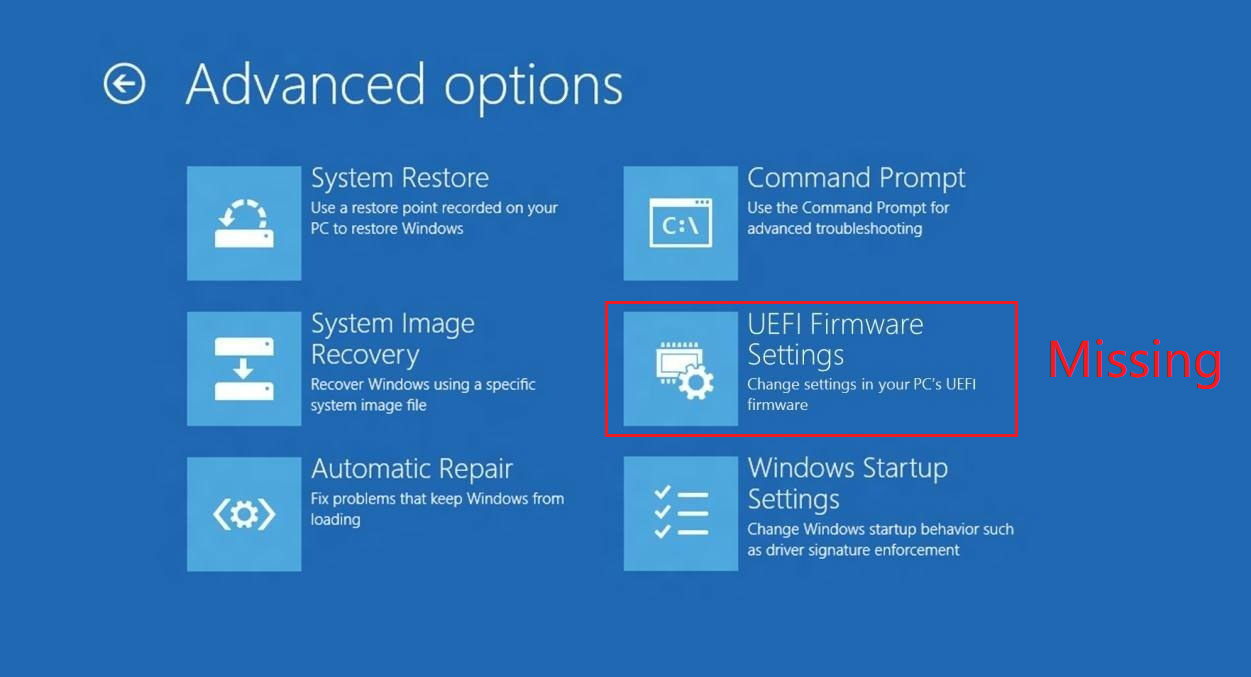
Unified Extensible Firmware Interface (UEFI) is one of the most important pieces of software to boot an operating system on a computer. BIOS being an alternative to UEFI already is less preferred when compared to it. Whether UEFI or BIOS is supported depends on the motherboard. Some users who use UEFI, have reported that they are experiencing an issue where the UEFI Firmware settings are missing in the Advanced Options screen on Windows 11/10.

Why is UEFI not showing in BIOS?
UEFI firmware settings can be missing for several reasons. Maybe Extra Fast Startup is Enabled, Access to the UEFI Menu is blocked, the operating system is installed in Legacy Mode, and so on. Let’s see how we can fix it.
If the UEFI firmware settings are missing from the Advanced Options, then this post will show you how to troubleshoot, enable & access UEFI firmware settings in Windows 10, using these methods:
- Check if your computer supports UEFI
- Disable Fast Startup
- Bypass the Extra Fast Startup feature
- Use a boot to UEFI shortcut
- Clear the CMOS settings
Let’s get into the details of each method.
1] Check if your computer supports UEFI
If the motherboard of your computer does not support UEFI, there is no point in looking for the option that says UEFI Firmware Settings inside of the Advanced Options. You can try to check if your computer supports UEFI.
2] Disable Fast Startup
To disable Fast Startup, boot your computer into the Safe Mode.
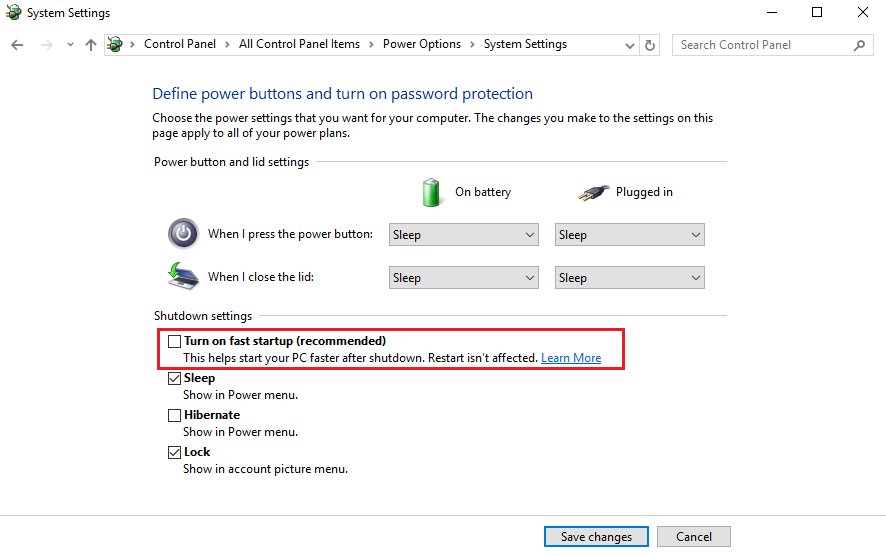
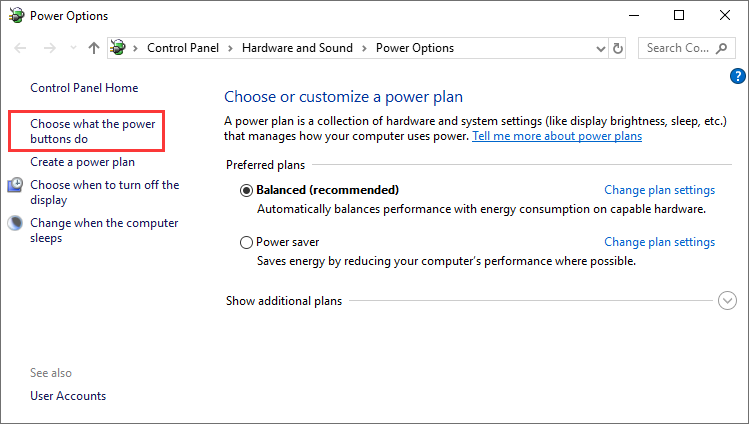
Press the WIN + R shortcut on your keyboard to launch the Run utility. Type in control to launch the Control Panel and Then click on Hardware and Sound > Power Options.
Now, from the left side menu pane, select Choose what the power buttons do and then click on Change settings that are currently unavailable. Uncheck the button besideTurn on Fast Startup (recommended) and click on Save Changes.
Reboot your computer to check if the issue is fixed or not.
3] Bypass the Extra Fast Startup feature
You can press and hold the Shift key when you click on the Shutdown button from the Start Button.
It will boot your computer with UEFI booting from the beginning, and then you can use the hotkey for your motherboard to boot into the UEFI Setup.
4] Use a boot to UEFI Shortcut
Right-click anywhere on the Desktop and select New > Shortcut.
Type in the following in the text field of the mini window that opens-
shutdown /r /fw
Click on Next.
Name the Desktop Shortcut and click on Finish.
Now, on the newly created shortcut, right-click and select Properties. Click on the Advanced button and select Run as administrator. Click OK to save the changes.
Now, whenever you execute this shortcut, you will be booted to the UEFI Firmware Settings automatically.
5] Clear the CMOS settings
Resetting or clearing CMOS settings will fix if the UEFI firmware settings are missing in the advanced options. You need to do it on the motherboard and not at the software level. Be careful while doing it as you may damage it. If you are new to hardware or have no experience with it, get help from a professional.
6] Toggle from Legacy to UEFI
Another fix you can use is to change from Legacy to UEFI. This method only works when your motherboard supports both Legacy and UEFI and your computer should be running the latest Windows 11/10 on an MBR partition.
Also read: How to recover or reset a BIOS or UEFI Password for Windows computers
Why can’t I find my UEFI firmware settings?
If you cannot find UEFI firmware settings in the Advanced Options, your motherboard might not support it, or the Fast Startup feature has been enabled which is preventing UEFI firmware settings. To fix it, you can disable Fast Startup, create a shortcut on the desktop to boot into UEFI firmware, change from Legacy mode to UEFI, or clear CMOS settings.
Related read: Using HP PC Hardware Diagnostics UEFI on Windows 11/10
Have you encountered UEFI Firmware Settings Missing Windows 10 issue? If you find UEFI firmware settings is missing on your Windows 10, you can try some top solutions in this post from MiniTool to fix the missing UEFI firmware settings Windows 10 error.
Nowadays, most new computers support UEFI firmware as UEFI enjoys more security feature, faster boot times and support larger hard drive.
However, some users reported that they came across UEFI firmware settings missing Windows 10 issue. The UEFI Firmware settings are missing in the Advanced Options screen. So they are unable to see the UEFI menu, which could cause inconvenience.
Well, what causes Windows 10 UEFI firmware settings missing issue? After analyzing several posts, we have summarized some possible reasons. Let’s have a look together.
What Causes UEFI Firmware Settings Missing Windows 10
1. The motherboard on your computer doesn’t support UEFI
Not all computer motherboards support UEFI. Older computers may only support BIOS and boot into BIOS (Legacy Mode). In this case, you will encounter Windows 10 UEFI firmware settings missing. To make sure that your computer supports UEFI, you need to use the MSINFO utility to figure it out.
2. Windows 10 was installed in Legacy Mode
If your motherboard supports UEFI firmware but your system drive is formatted with MBR instead of GPT, you will encounter UEFI firmware settings missing Windows 10, as BIOS uses the MBR to save information about the hard drive data while UEFI uses the GPT.
If this is the case, you can convert MBR to GPT and then change legacy to UEFI without reinstall to fix the issue.
3. Fast startup feature blocks the access to the UEFI menu
Fast Startup may prevent the Windows user from accessing the UEFI menu to speed up the boot process. If this is the reason for UEFI firmware settings missing Windows 10, you can fix it by disabling the fast startup.
4. Extra Fast Startup is enabled.
Extra Fast Startup is only available with a limited number of UEFI-based motherboard. With this option set, it will disable keystrokes during the boot sequence, which could make the UEFI menu inaccessible. By clearing the CMOS battery, you can reset the setting.
After knowing the reasons for the UEFI firmware settings missing Windows 10 issue, it’s time to show you the corresponding solutions. This following will provide you with the detailed troubleshooting process.
Solution 1. Check If the Computer Motherboard Supports UEFI
It’s important to check if your computer has the necessary UEFI firmware. If not, it is sure that you are unable to access the UEFI firmware settings menu. If you’re using an older computer which has an older motherboard, chances are the motherboard only supports BIOS Mode is Legacy, so UEFI firmware setting is unavailable.
To check if your computer motherboard supports UEFI, you can run the MSINFO utility to find out the BIOS Mode inside the System Information screen. If you don’t know how to run MSINFO utility, you can follow the steps below.
Step 1. Press Windows log key + R to bring up the Run dialog box. Then type msinfo32 and hit Enter to open the System Information screen.
Step 2. On the left side pane of the System Information window, select System Summary.
Step 3. Then scroll down to find BIOS Mode. If the BIOS Mode is UEFI, then your computer motherboard supports UEFI firmware. If it is shown as Legacy, then UEFI is not supported with this motherboard. So you are unable to see UEFI firmware settings.
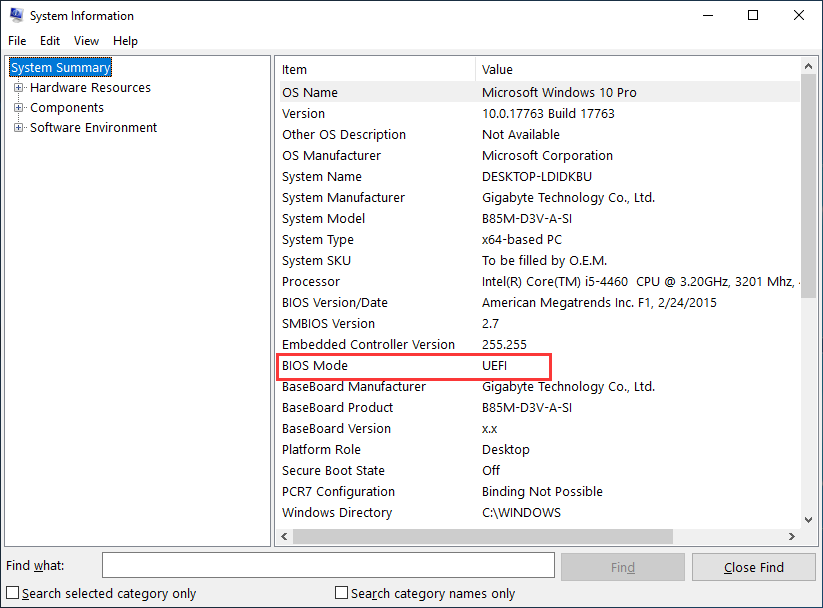
And if you want to make your computer support UEFI firmware, you need to change a new motherboard which supports UEFI. If the BIOS mode is UEFI but you are unable to access UEFI firmware setting, you can try the following fixes to get rid of the issue.
Solution 2. Disable or Bypass Windows 10 Fast Startup
As mentioned before, Fast Startup feature could give rise to Windows 10 UEFI firmware setting missing issue. If you have enabled the Fast Startup feature in Windows 10, it will probably bypass the delay in BIOS that allows you to press the specific key to enter BIOS when you start up your computer, leading to UEFI firmware settings missing Windows 10 issue.
You can try disabling the Fast Startup feature to fix the error. Here are some detailed steps.
Disable Windows 10 Fast Startup
Step 1. Press Windows log key + R to open the Run dialog box. Type the powercfg.cpl and hit Enter to open the Power Options menu.
Step 2. On the Power Options window, click on Choose what the power buttons do.
Step 3. On the System Settings menu, click the Change settings that are currently unavailable.
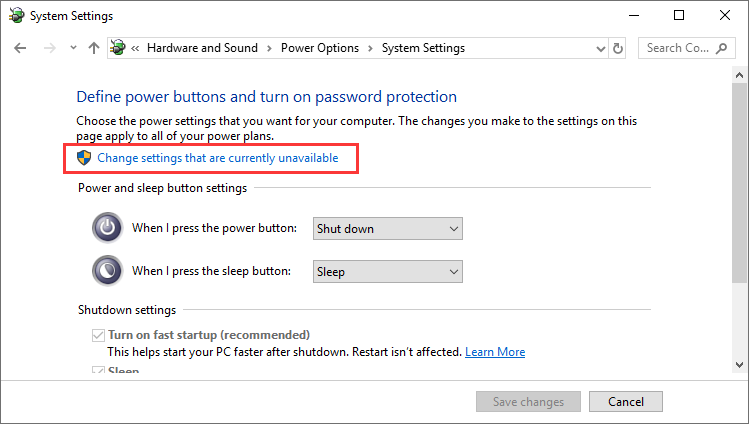
Step 4. Then under the Shutdown settings, uncheck the box next to the option Turn on fast startup (recommended).
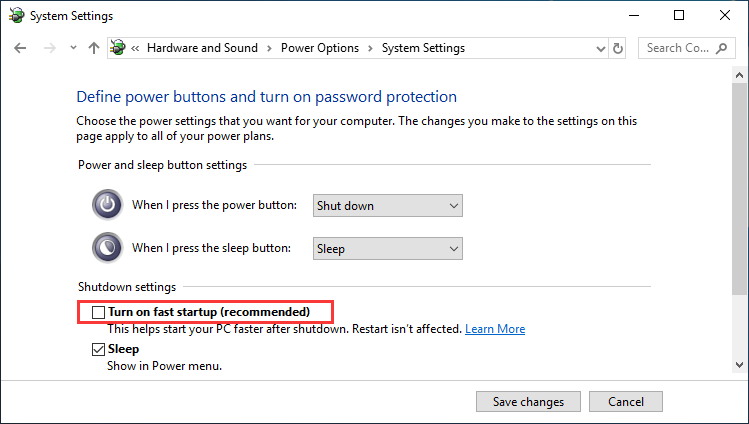
Step 5. Then click on Save Changes to allow the change. Then restart your computer and check if can access the UEFI settings menu now.
Bypass Windows 10 Fast Startup
If you don’t want to disable Fast Startup on Windows 10, you could also bypass Windows 10 Fast Startup and then access UEFI firmware setting, which enables you to get into UEFI firmware setting menu.
If you don’t know how to bypass Windows 10 Fast Startup, you can follow the steps below.
Step 1. Click the Start icon and then click the power icon.
Step 2. Hold down the Shift key and then click on Shut down in the power icon options. This will bypass Windows 10 fast startup and shut down your computer completely.
Step 3. Power on your computer again and press the specific key to enter the BIOS setup. The key to enter BIOS setup will be displayed on the screen with a message like “Press Del to enter BIOS setup”. Pay attention to that. Normally the keys to enter BIOS could be Esc, Del, F2, F1, F4, F8, F10, F12.
After bypassing Fast Startup feature, you should be able to access your UEFI settings. If the UEFI firmware settings missing Windows 10 is not caused by Fast Startup and this fix doesn’t help, you can try the next resolution.
If this still doesn’t work, try the next method.
Solution 3. Create Boot to UEFI Shortcut
You can create a boot to UEFI desktop shortcut, which may help you boot into the UEFI Firmware settings menu. If the above fixes don’t help, you can try accessing the UEFI Firmware settings menu with this method.
Here are detailed steps.
Step 1. Right-click on the empty space on the Desktop and select New > Shortcut.
Step 2. Copy and paste the following command to the text field of the window that opens.
shutdown /r /fw
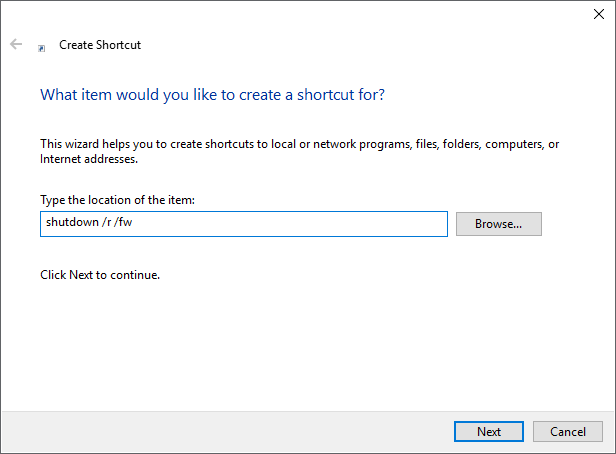
Step 3. Click on Next button to continue.
Step 4. Name the newly created desktop shortcut and click on Finish.
Step 5. Right click on the newly created shortcut and select Properties.
Step 6. Click on the Advanced button and then check the box next to Run as administrator. And click OK button.
Step 7. At last, click Apply and OK to save the changes.
Then you can execute this boot to UEFI shortcut to access the UEFI Firmware Settings.
Solution 4. Clear the CMOS
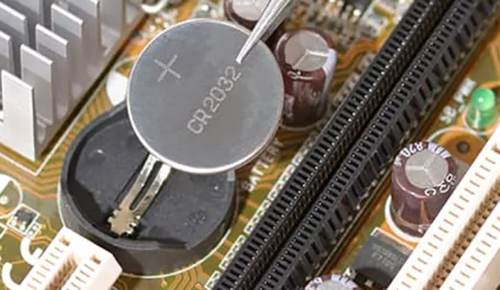
Another work around for UEFI firmware settings missing Windows 10 issue is to clear the CMOS.
Extra Fast Startup feature is only available in UEFI systems. With the feature set, it’s possible that no keypress will take your PC into the BIOS setup, which leads to Windows 10 UEFI firmware settings missing issue. If this is the case, you can fix it by clearing the CMOS.
Step 1. Turn off your computer and remove all the peripheral devices.
Step 2. Disconnect the power cord and remove the computer cover.
Step 3. On the computer motherboard, find the CMOS battery. Use a non-conductive screwdriver to remove the CMOS battery.
Step 4. Wait about 1–5 minutes and then put it back.
Step 5. Put the computer cover back on and plug your computer and reconnect all peripheral devices.
Then check if you can access the UEFI firmware settings menu.
Solution 5. Change Legacy to UEFI Without Reinstall
If your computer is using legacy BIOS to boot up your computer, you will not see UEFI firmware setting menu.
If your computer’s motherboard supports both Legacy and UEFI and you want to change from Legacy to UEFI, you can convert MBR disk to GPT disk to convince your computer to use the UEFI menu.
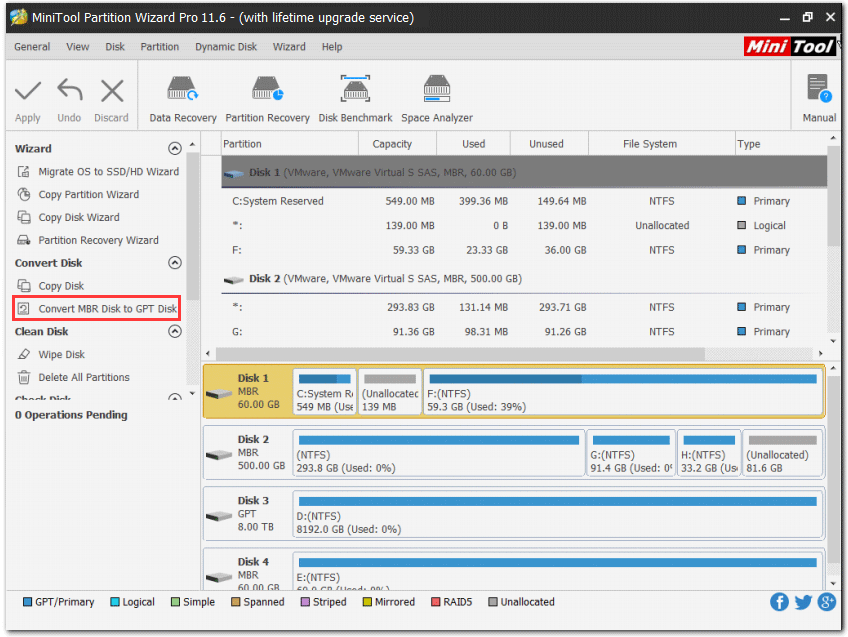
Well, how to convert MBR to GPT without losing data? Here is a handy tool for you – MiniTool Partition Wizard Pro Edition. MiniTool Partition Wizard Pro is an all-in-one partition manager, which can help you move/resize partition, extend partition, convert NTFS to FAT, convert MBR to GPT, migrate OS to SSD/HD, copy disk/partition, wipe disk/partition, etc.
If you want to convert MBR disk to GPT disk or perform other operations with MiniTool Partition Wizard Pro, you can click the following button to get one.
Considering that you are converting a system disk, it is best to do the followings in advance in case of any accidents after the conversion:
- Create a bootable USB drive with MiniTool Partition Wizard Pro.
- Create a system image or back up the whole system disk.
Then you can follow the steps below to convert MBR disk to GPT disk with MiniTool Partition Wizard Bootable Edition.
Step 1. Connect the USB bootable USB drive to the computer that has UEFI firmware settings missing Windows 10 issue.
Step 2. Press a specific key on the keyboard to enter BIOS. And set the USB drive as the first boot device. Then save the changes and exit from BIOS.
Step 3. On the MiniTool PE Loader interface, MiniTool Partition Wizard Bootable Edition will be launched automatically.
Step 4. On the main interface of MiniTool Partition Wizard, select the system disk and choose Convert MBR Disk to GPT Disk from the left action panel.
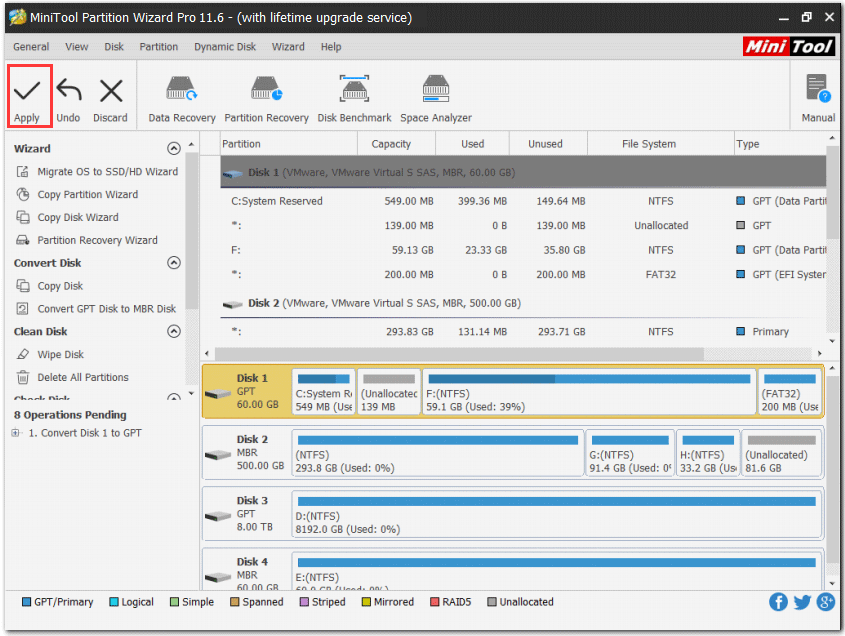
Step 5. Click the Apply button to allow the pending operation. After conversion, you can remove the USB bootable drive and boot Windows from the GPT disk.
Note: To boot from the GPT disk successfully, UEFI mode should be enabled. If your computer fails to boot after conversion, you can access the BIOS setup and change the boot type from Legacy Mode to UEFI.
By following the steps in this post, I successfully fixed the UEFI firmware settings missing Windows 10 issue. I’d like to share this post with more friends who have the same issue.Click to Tweet
Bottom Line
Now, you should know how to fix UEFI firmware settings Windows 10 missing issue. If you have any question about how to fix UEFI firmware settings missing Windows 10 or if you have other better solutions, you can leave a message in the following comment zone and we will reply as soon as possible.
If you need any help when using MiniTool software, you may contact us via [email protected].
UEFI Firmware Settings Missing Windows 10 FAQ
How do I get UEFI firmware settings in Windows 10?
- Right click Windows Start menu and choose Settings.
- On the Settings window, scroll down to find and click Update & security.
- Switch to the Recovery tab and click on Restart now under Advanced startup.
- Select Troubleshoot > Advanced options > UEFI Firmware Settings.
How do I access UEFI?
To access the UEFI, you can boot Windows 10 in advanced boot options, then click the Troubleshoot and Advanced Options, and select UEFI Firmware Settings. Click the Restart button and then your computer will reboot into the UEFI firmware settings screen.
What are the advantages of UEFI?
UEFI supports unlimited number of partitions, and enables users to use drives that are larger than 2 TB. The biggest advantage of BIOS is that UEFI firmware has faster booting process. To explorer more advantages of UEFI, you can check this post: UEFI vs. BIOS – What’s the Differences and Which One Is Better.
How do I reset UEFI settings to setup defaults?
Boot your computer and press a specific key to enter BIOS/UEFI setup. Press F9 and then hit Enter to load the default configuration or find options like Load Setup Defaults, Reset to Default, Factory Default, or Setup Default and hit Enter to load default configuration. Then press F10 to save the change and restart.