
Одна из проблем, с которой часто сталкиваются пользователи — сообщение о том, что вы вошли в систему с временным профилем в Windows 10, 8 и Windows 7 с дополнительным текстом «Вы не можете получить доступ к своим файлам, и файлы, созданные в этом профиле, будут удалены при выходе из системы». В этой инструкции подробно о том, как исправить эту ошибку и войти с обычным профилем.
В большинстве случаев, проблема возникает после изменения (переименования) или удаления папки профиля пользователя, однако это не единственная причина. Важно: если у вас проблема возникла именно из-за переименования папки пользователя (в проводнике), то верните ей первоначальное имя, а затем прочтите: Как переименовать папку пользователя Windows 10 (для предыдущих версия ОС то же самое).
Примечание: в этой инструкции приведены решения для рядового пользователя и домашнего компьютера с Windows 10 — Windows 7, не находящегося в домене. Если вы управляете учетными записями AD (Active Directory) в Windows Sever, то тут я деталей не знаю и экспериментировать не доводилось, но обратите внимание на сценарии входа в систему или просто удалите профиль на компьютере и снова зайдите в домен.
Как исправить временный профиль в Windows 10
Сначала об исправлении «Вы вошли в систему с временным профилем» в Windows 10 и 8, а в следующем разделе инструкции — отдельно по Windows 7 (хотя и описываемый здесь способ тоже должен работать). Также, при входе с временным профилем в Windows 10 вы можете видеть уведомления «Стандартное приложение сброшено. Приложение вызвало проблему с настройкой стандартного приложения для файлов, поэтому оно сброшено».
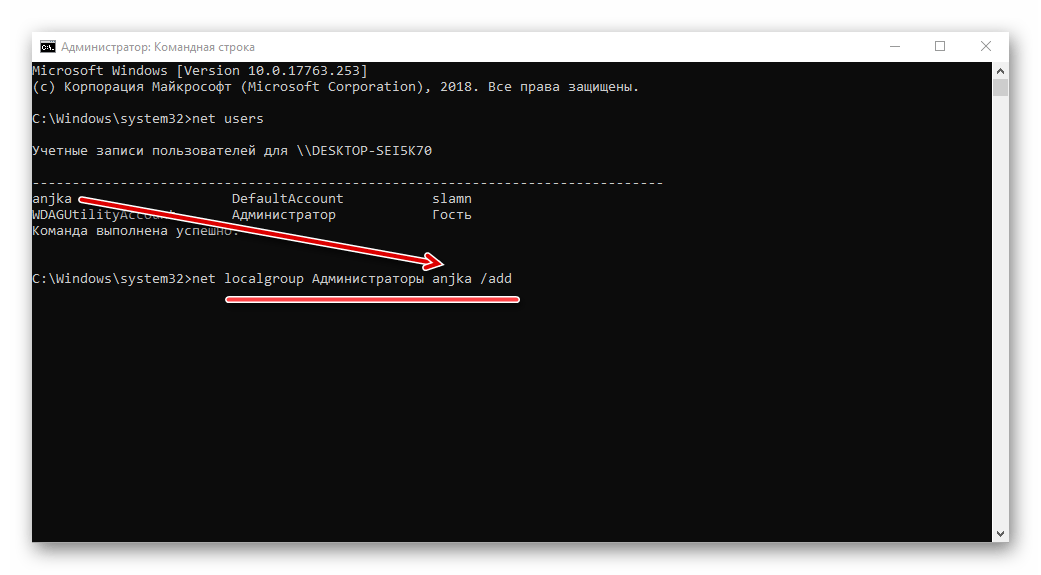
Прежде всего, для всех последующих действий потребуется иметь учетную запись администратора. Если до появления ошибки «Вы вошли с временным профилем» ваша учетная запись имела такие права, то имеет и сейчас, и можно продолжать.
Если же у вас была учетная запись простого пользователя, то выполнять действия придется либо под другой учеткой (администратора), либо зайти в безопасный режим с поддержкой командной строки, активировать скрытую учетную запись администратора, а затем из неё выполнять все действия.
- Запустите редактор реестра (нажмите клавиши Win+R, введите regedit и нажмите Enter)
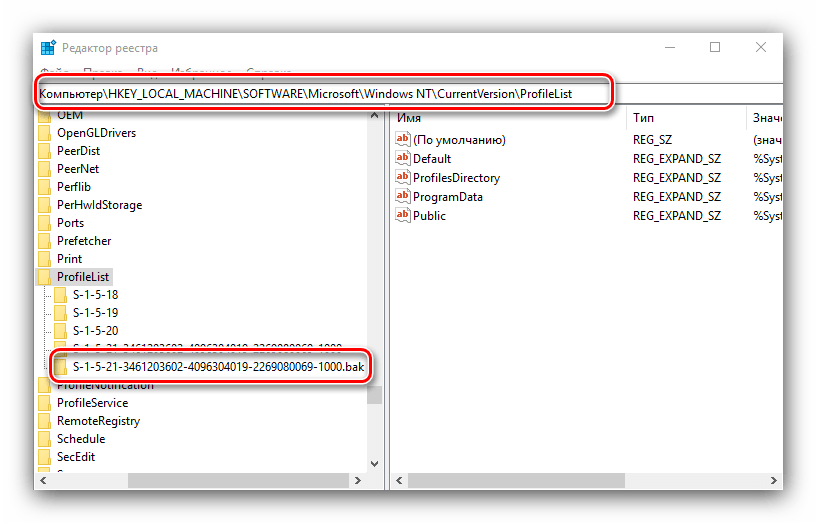
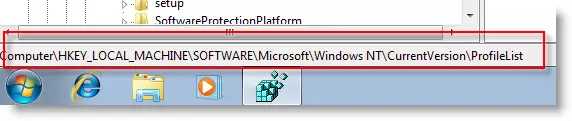
- Раскройте раздел (слева) HKEY_LOCAL_MACHINE\ SOFTWARE\ Microsoft\ Windows NT\ CurrentVersion\ ProfileList и обратите внимание на наличие в нем подраздела с .bak в конце, выберите его.
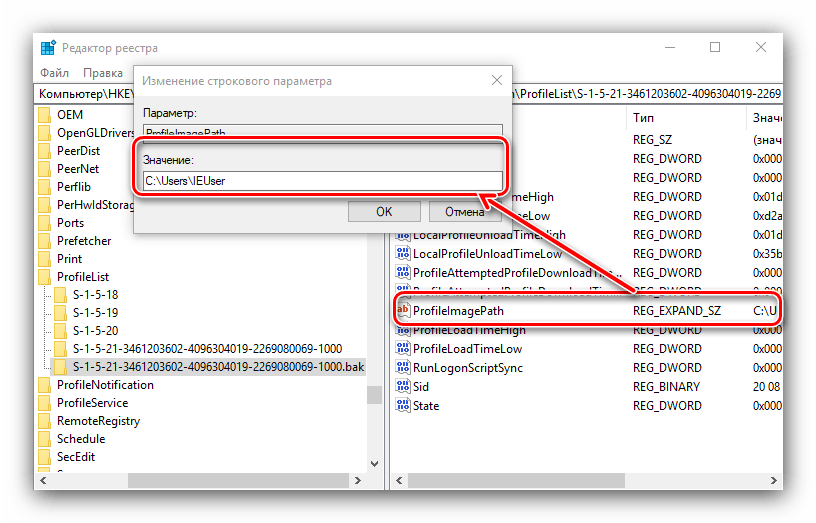
- В правой части посмотрите на значение ProfileImagePath и проверьте, совпадает ли имя папки пользователя, указанное там с именем папки пользователя в C:\Пользователи (C:\Users).


Далее действия будут зависеть от того, что у вас получилось в пункте 3. Если имя папки не совпадает:
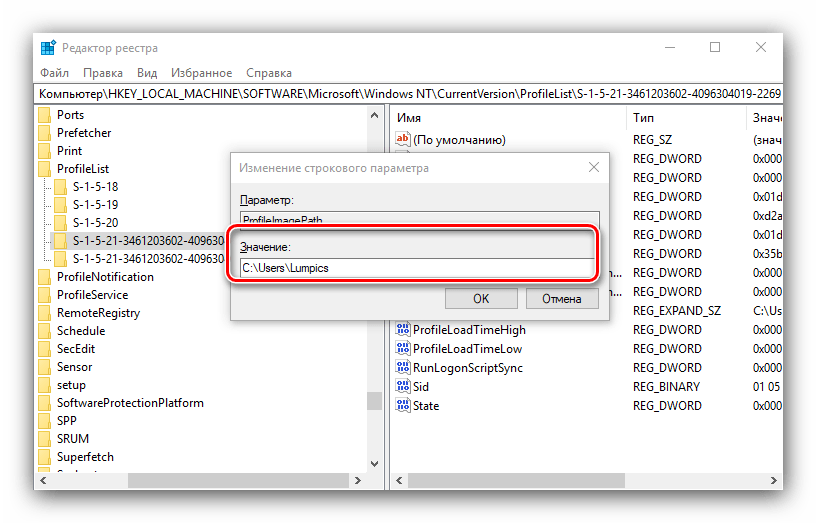
- Дважды кликните по значению ProfileImagePath и измените его так, чтобы в нем был правильный путь к папке.
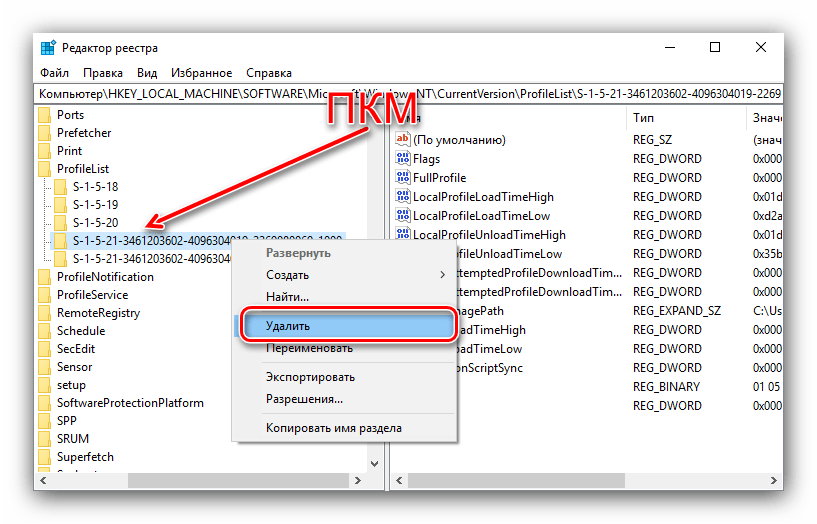
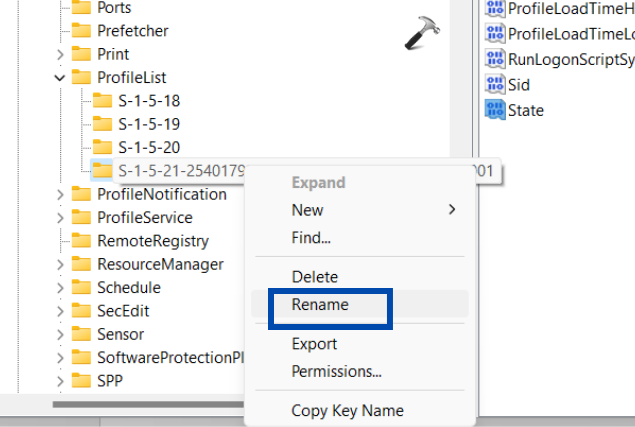
- Если в разделах слева есть раздел точно с таким же именем, как текущий, но без .bak, кликните по нему правой кнопкой мыши и выберите «Удалить».
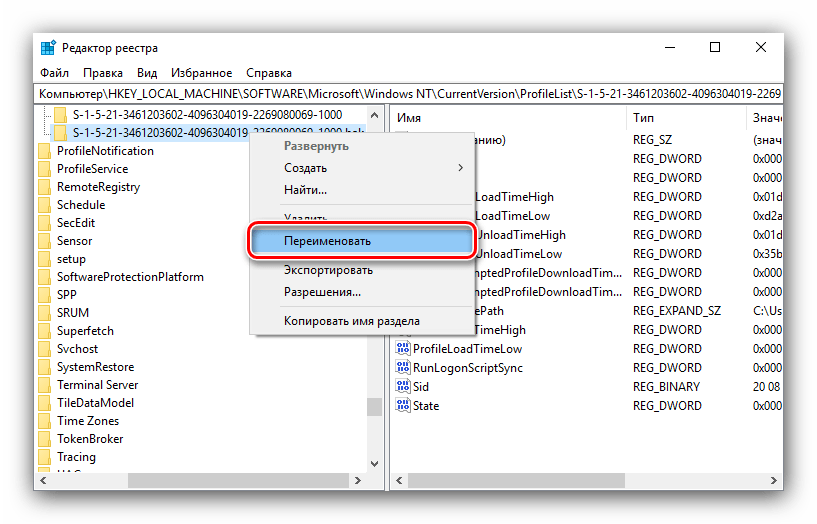
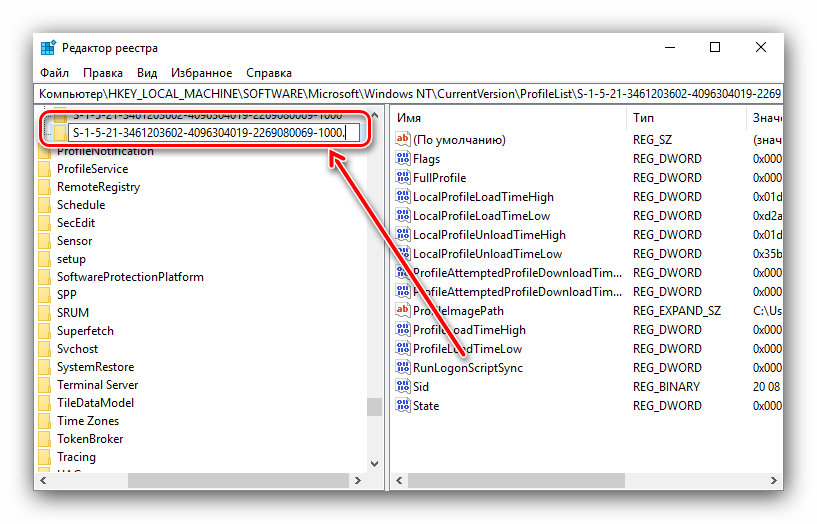
- Кликните правой кнопкой мыши по разделу с .bak на конце, выберите пункт «Переименовать» и уберите .bak.
- Закройте редактор реестра, перезагрузите компьютер и попробуйте зайти под тем профилем, где была ошибка.
Если путь к папке в ProfileImagePath верный:
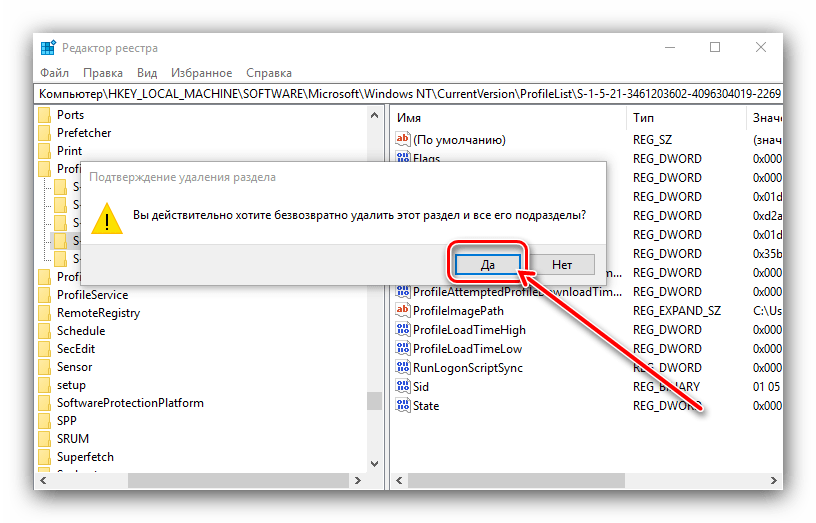
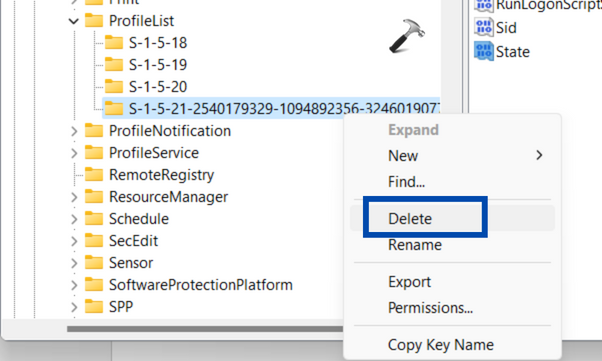
- Если в левой части редактора реестра присутствует раздел с тем же именем (все цифры совпадают), что и раздел с .bak на конце, кликните по нему правой кнопкой мыши и выберите «Удалить». Подтвердите удаление.
- Кликните правой кнопкой мыши по разделу с .bak и также его удалите.
- Перезагрузите компьютер и попробуйте снова войти в поврежденную учетную запись — данные для нее в реестре должны будут создаться автоматически.
Далее способы, являющиеся удобными и быстрыми для исправления ошибки в 7-ке.
Исправление входа с временным профилем в Windows 7
По сути, это вариация способов, описанных выше, и, более того данный вариант должен сработать и для 10-ки, но опишу его отдельно:
- Войдите в систему под учетной записью администратора, отличающейся от той учетной записи, в которой есть проблема (например, под учеткой «Администратор» без пароля)
- Сохраните все данные из папки проблемного пользователя в другую папку (или переименуйте ее). Эта папка находится в C:\Пользователи (Users)\ Имя_пользователя
- Запустите редактор реестра и перейдите к разделу HKEY_LOCAL_MACHINE\ SOFTWARE\ Microsoft\ Windows NT\ CurrentVersion\ ProfileList
- Удалите в нем подраздел, заканчивающийся на .bak
- Закройте редактор реестра, перезагрузите компьютер и зайдите под учетной записью, с которой была проблема.
В описанном способе снова будет создана папка пользователя и соответствующая запись в реестре Windows 7. Из папки, в которую вы ранее копировали данные пользователя, вы можете вернуть их во вновь созданную папку, чтобы они оказались на своих местах.
Если же вдруг способы, описанные выше, не смогли помочь — оставляйте комментарий с описанием ситуации, постараюсь помочь.
Все способы:
- Избавляемся от временного профиля
- Решение дополнительных проблем
- После изменений в реестре невозможно войти в систему
- Проблема решена, но через некоторое время появляется снова
- Вопросы и ответы: 5
Иногда при входе в свою учётную запись в Виндовс 10 пользователь сталкивается со следующим явлением – на «Рабочем столе» отсутствуют файлы, оформление системы имеет стандартный вид и отображается уведомлением с текстом «Вы вошли в систему с временным профилем». Далее расскажем, что это за сбой и как от него можно избавиться.
Избавляемся от временного профиля
Чаще всего описываемая проблема появляется из-за ошибки в системном реестре, а способ её устранения заключается в изменении записей через соответствующий менеджер.
- Перед началом исполнения инструкции далее убедитесь, что у текущей учётной записи есть права администратора. Если их нет, обратитесь к инструкции по ссылке ниже.

Урок: Как получить права администратора в Windows 10
- Затем откройте оснастку «Выполнить» сочетанием клавиш Win+R, введите в её строку запрос
regeditи нажмите «ОК». - После запуска «Редактора реестра» перейдите по следующему адресу:
HKEY_LOCAL_MACHINE\SOFTWARE\Microsoft\Windows NT\CurrentVersion\ProfileListУвидите там одну или несколько директорий, название которых начинается с S-1. У одной из них будет приписка .bak, откройте её.
- Найдите в этой папке запись с именем «ProfileImagePath» и проверьте, какое имя учётной записи там обозначено.

От значения этого параметра зависят ваши дальнейшие действия – если адрес совпадает с адресом вашей учётки, переходите к следующему шагу, если нет, используйте шаг 6.
- Внимательно посмотрите на список всех каталогов – скорее всего, среди них будет названный так же, но без .bak в конце. Выделите его, кликните правой кнопкой мыши и нажмите «Удалить».

Подтвердите удаление.
Таким же образом удалите и второй, с припиской.
- Если в «ProfileImagePath» указан неверный адрес, дважды кликните по параметру и впишите правильный путь.
Если обнаружится дубликат пользовательской папки без .bak, удалите его по методу из шага 5. Из названия оставшегося каталога приписку потребуется убрать – выделите его, вызовите контекстное меню и используйте пункт «Переименовать».
Удалите символы .bak и сохраните изменения.
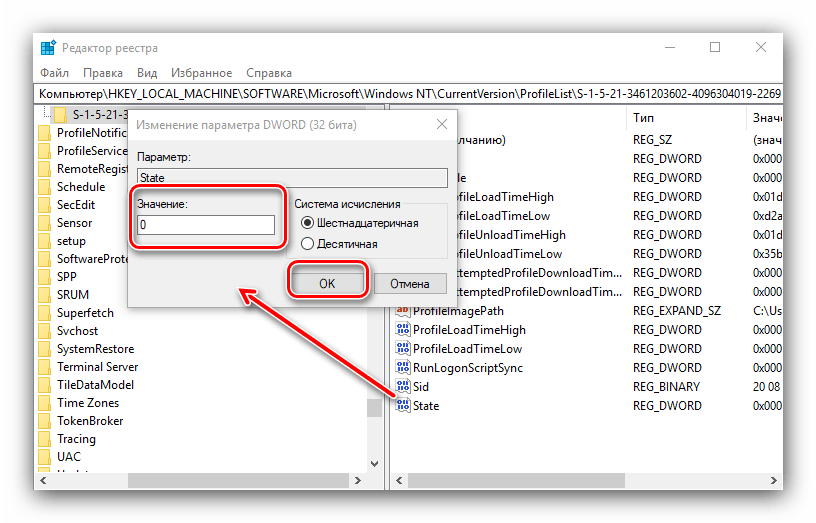
В этой же папке откройте параметр «State» и замените значение в нём на «0».
- Закрывайте «Редактор реестра» и перезагрузите компьютер. Попробуйте войти в свою учётную запись – скорее всего, проблема с временным профилем будет устранена.

Решение дополнительных проблем
Нередко описываемый сбой сопровождается дополнительными. Давайте разберёмся, что они собой представляют и как с ними бороться.
После изменений в реестре невозможно войти в систему
В некоторых случаях описанная выше инструкция приводит к дополнительной проблеме – не получается войти в аккаунт, и это сопровождается сообщением, что операция невозможна. В такой ситуации понадобится заняться восстановлением компонентов ОС.
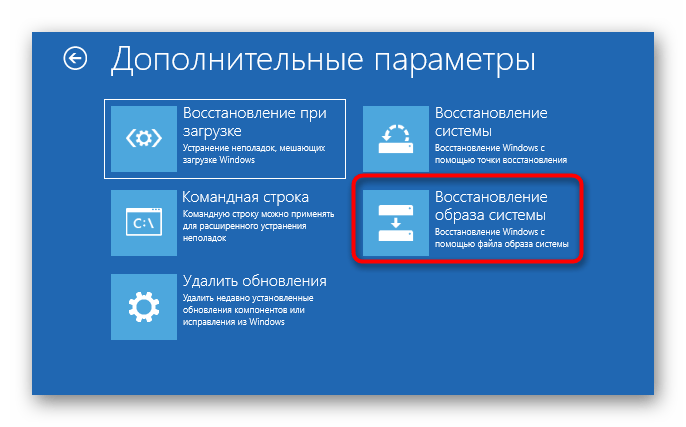
Подробнее: Восстановление Windows 10 с флешки
Проблема решена, но через некоторое время появляется снова
Если рассматриваемый сбой повторяется, вероятнее всего, вы столкнулись с вирусным заражением. Проверьте операционную систему на предмет наличия вирусов.
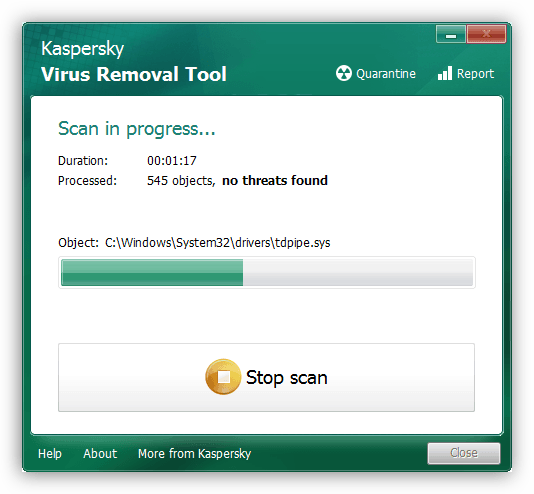
Урок: Борьба с компьютерными вирусами
Мы рассмотрели проблему с появлением временного профиля в Windows 10 и методы её решения.
Наша группа в TelegramПолезные советы и помощь
Sometimes users come across a very annoying bug in which they get signed in with a temporary profile. Due to this, they cannot access many files on their PC. As much annoying as it can get, there are ways you can fix it. That is what we present in this blog. We show you three ways you can fix Temporary profile in Windows 11/10 device.
If you are facing this error, this is how the message may be appearing on your screen
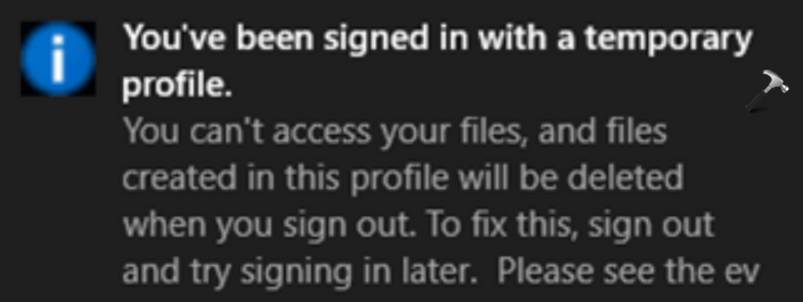
You may be signed in with a temporary profile because your user profile maybe corrupted or there are corrupted files and folders on your current user profile. Whatever the case may be, here are some fixes you can try to resolve it.
Page Contents
Fix 1: Create a new user account
- Open the Settings app and go to Accounts > Other accounts.
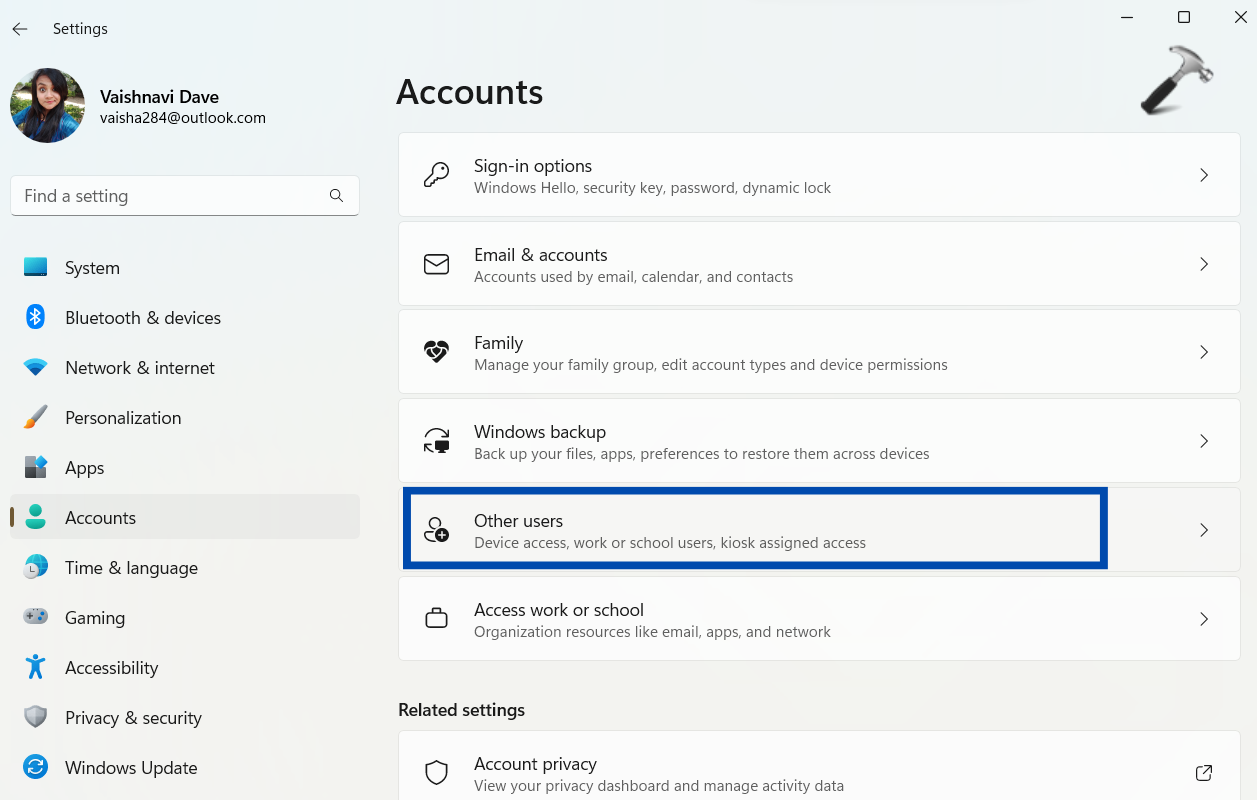
- Click on Add account button against the Add other user under other users.
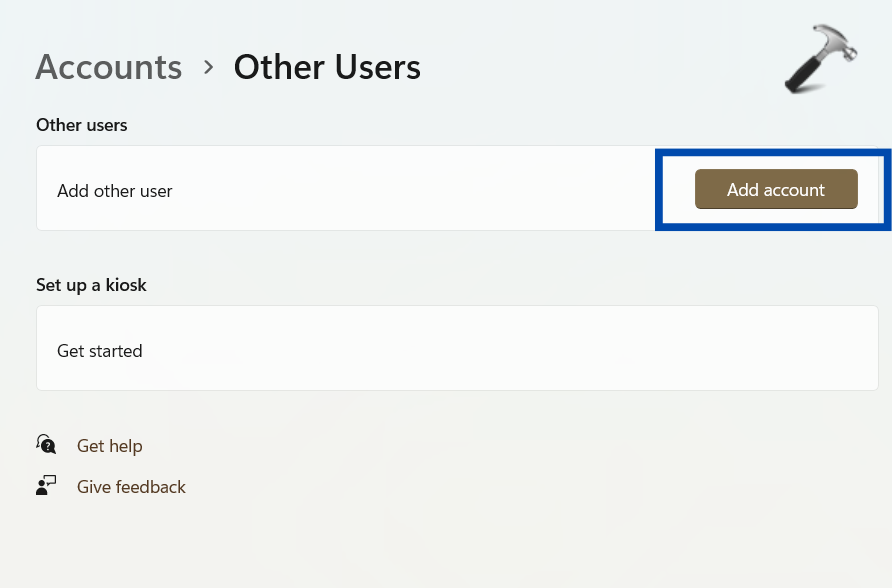
- Click on I don’t have this person’s sign-in information and then Add a user without a Microsoft account if you see them on the screen.
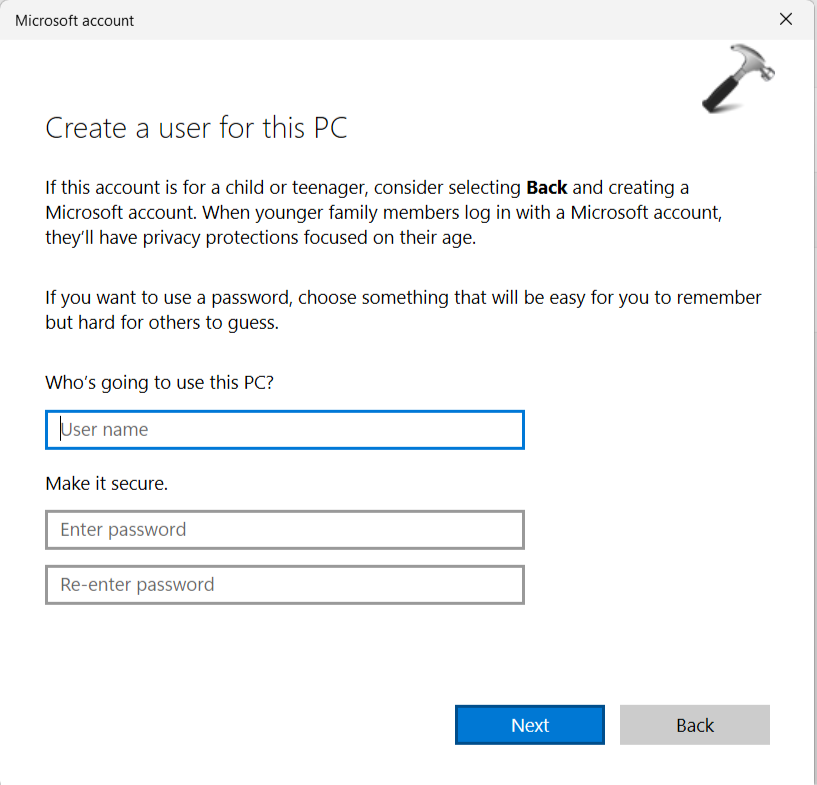
- Add the username, password and other info asked and click on Next in the next screen.
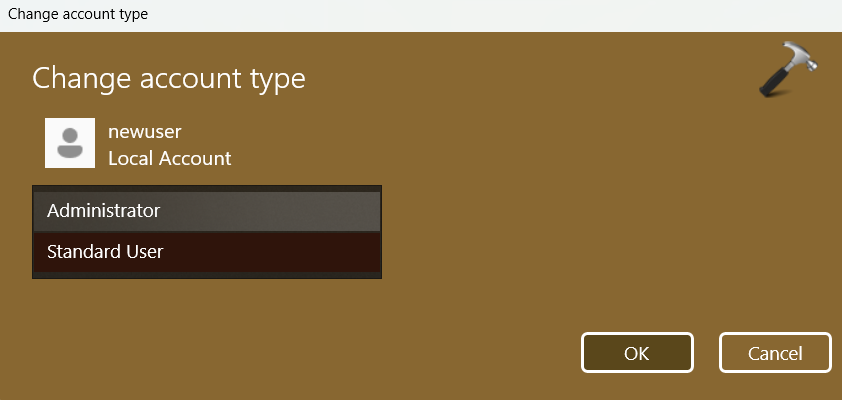
- Once you are done with it, go to Settings > Accounts > Other users and you will find the new account you just created. Click on Change account type button against it.
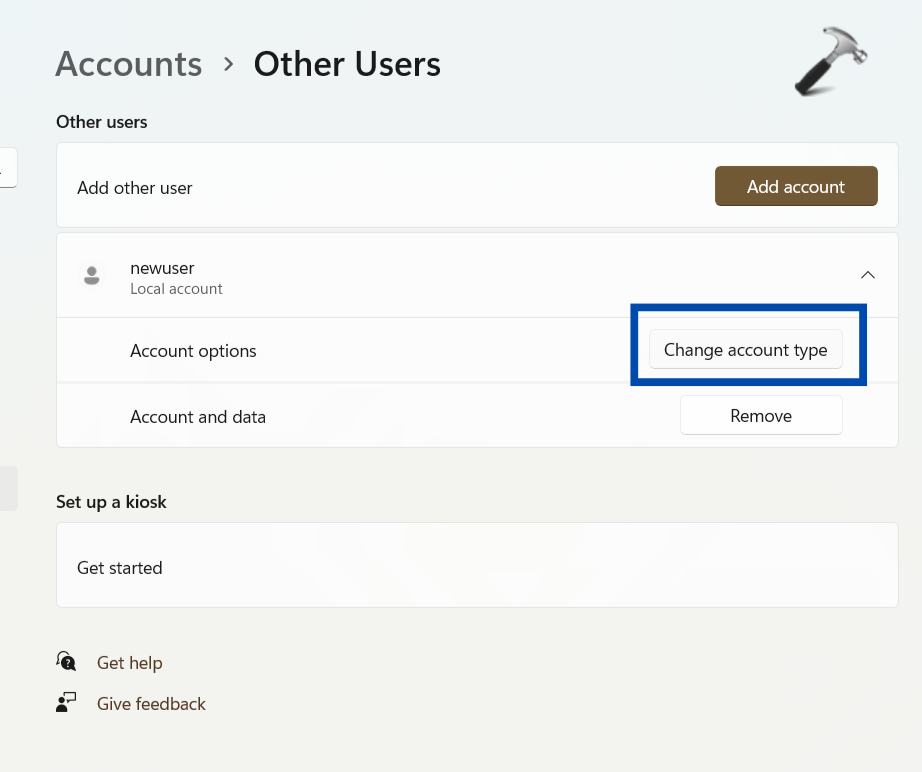
- Select Administrator and click OK.
- Log in to the new account now and open file explorer. Here, click on the C: drive > Users and choose your old account. Copy all the content from here to this new account.
And there you go. This fix will allow you to access your files and folders.
Fix 2: Go to Safe Mode
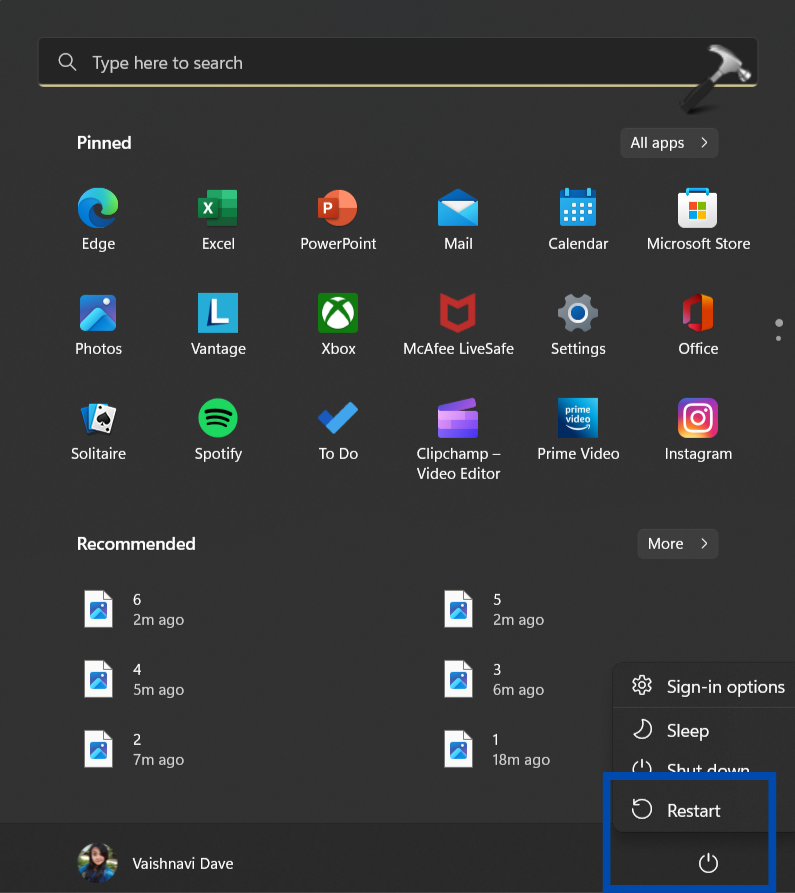
- Open the Start Menu.
- Press and hold the Shift key while you click on the Power button > Restart.
- Once your PC Restarts, choose Troubleshoot > Advanced Options > Startup Settings. Then click on the Restart button.
- When you see the list of Startup Settings, select Safe Mode by pressing the appropriate key. Then login to your original user profile.
If it does not work, follow the steps below
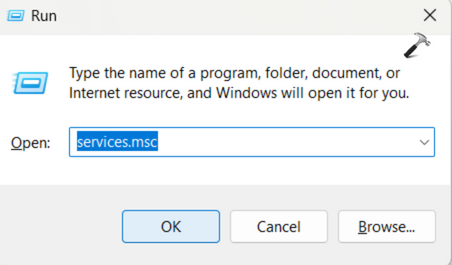
- Press Win + R to open Run and search for services.msc there.
- In the Services window, right click on Windows Defender Advanced Threat Protection and open its Properties.
- Set Startup type to Disabled and click on OK.
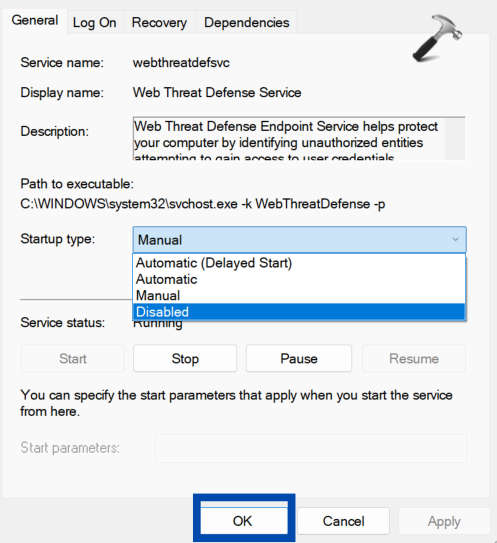
- Now, go back and right click on Microsoft Defender Antivirus service to open its properties.
- Set the Startup type to Disabled here as well and click on OK as in step 3.
- Disable any third-party antivirus that you may have and Restart your PC.
This can solve your issue at hand.
Fix 3: Solve Temporary profile in Windows 11 issue using registry
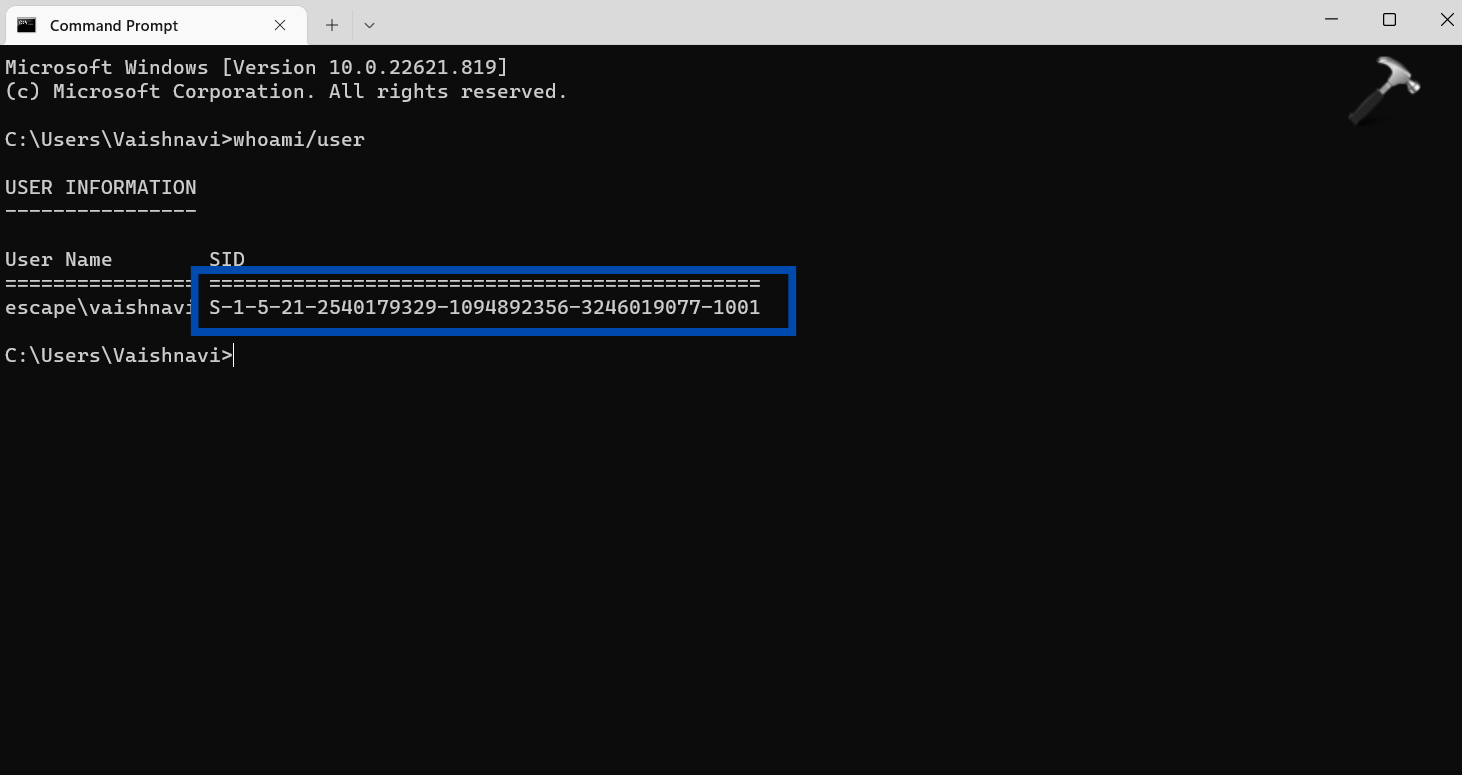
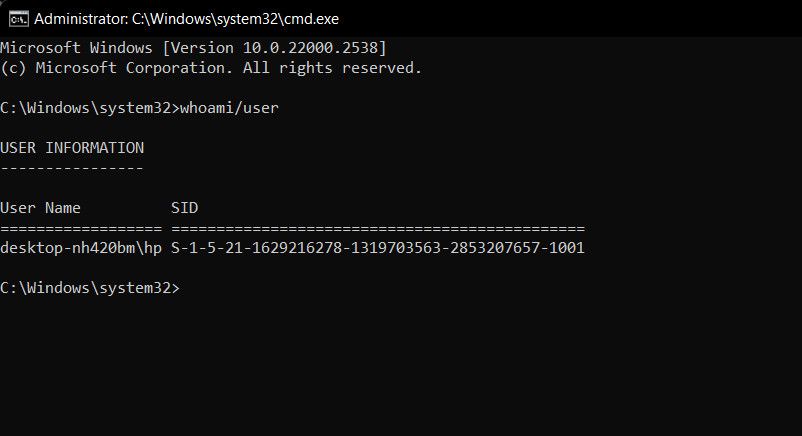
- Search for Command Prompt in the Windows menu and open it.
- Type the command shown below and press Enter.
whoami/user
- This will show the Security Identifier (SID) for the current account. Note it down.
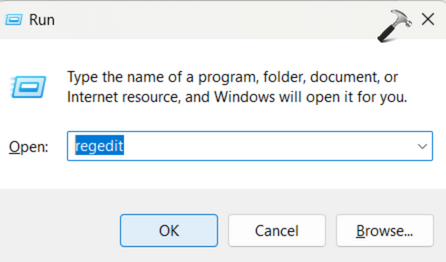
- Now, open the Registry Editor by searching for regedit in the Run dialog box. Select YES in the UAC prompt.
- Go to the following location in the Registry Editor.
HKEY_LOCAL_MACHINE\SOFTWARE\Microsoft\WindowsNT\CurrentVersion\ProfileList
- Expand the ProfileList and check whether the SID you noted in step 3 ends with ‘.bak’, without it, or does it have two variations.
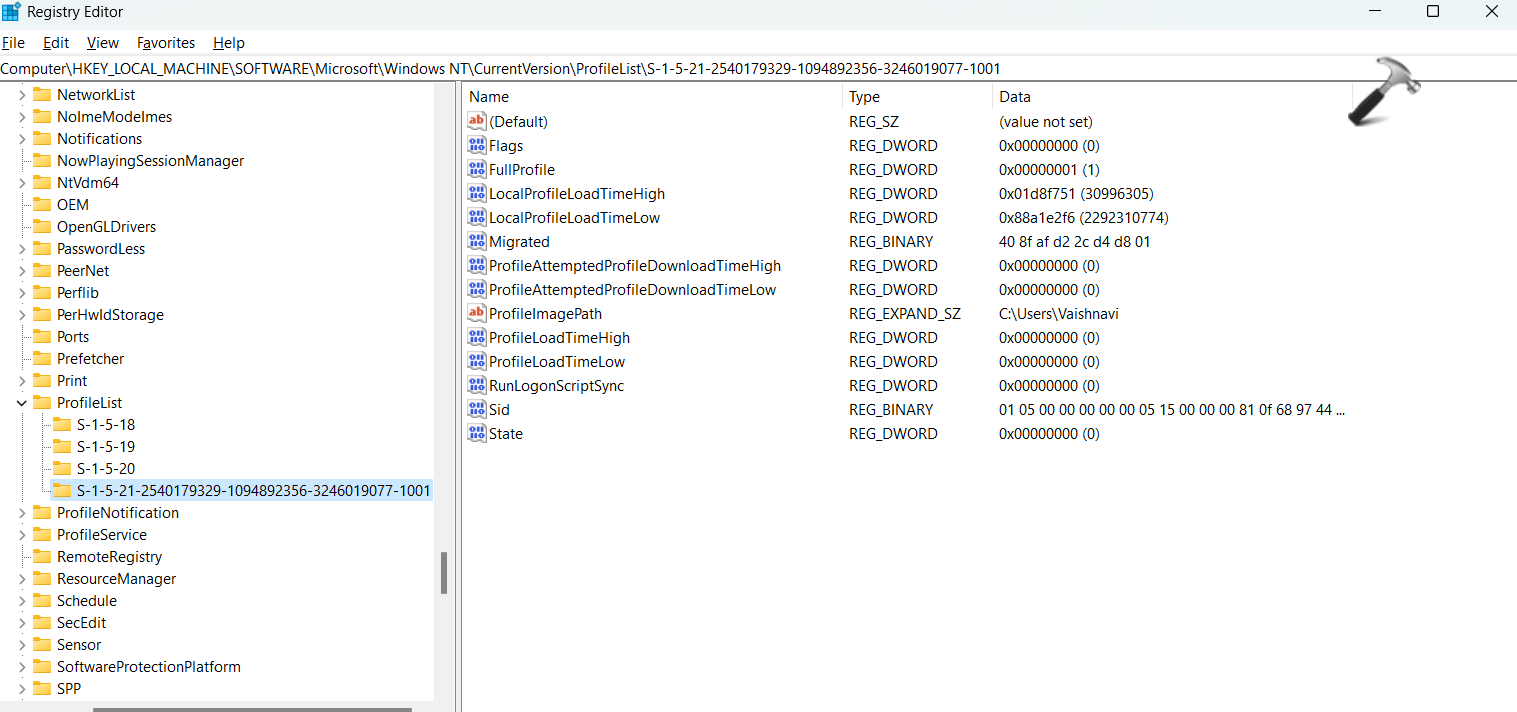
If it ends without .bak:
- Double click on a value named ProfileImagePath on the screen and change the value data to the correct profile path. You can find the correct user path from the File Explorer. It would be something like C:/User/<username>. Then click OK.

- Next, check if a DWORD named State has 0 as its value. If not, set it to 0 by double clicking on it and close the Registry Editor.
If it ends with .bak:
- Right click on the SID key and select Rename and remove .bak from the name.
- Now, follow steps 7 and 8 described above.
In case it has both the variations:
- Right click on the SID without .bak and select Delete. Click Yes to confirm the action.
- Once you have deleted it, right click on the SID ending with .bak and Rename it to remove .bak from the name. Refer to the picture in step 9 for reference.
- Then, follow steps 7 and 8.
- Restart your computer now and log in with the correct user profile. It must have solved your issue.
Hope these fixes help you solve the problem of temporary profile in your PC.
RELATED ARTICLES
After typing the login password, if you see ‘you have been logged on with a temporary profile’ in Windows 7 (or sometimes in Windows 8.1), it clearly indicates a temporary profile in Windows 7.
Sometimes Windows 7 or Win 8 OS will not read the user profile properly. Therefore, it will load with a temporary profile that looks like a new user profile. In that case, you will be surprised to see the brand new desktop without your files, folders, program shortcut icons, and personalized settings.
This step-by-step guide shows you how to fix the temporary profile issue in Windows 7/8.1/10 and Windows Vista.
This guide has been updated with several methods, more information, inputs, related links and my experience on this issue in a domain and workgroup environment.

Why Does Windows 7/8.1 (& Vista) Load with a Temporary Profile?
- Your profile (the files and folders located under C:\Users\user_name) is corrupted.
- Another chance is a delay in reading your profile files due to an Antivirus scan or something else during boot up. Usually, after typing your username and password, Windows tries to read and load your profile. If it gets corrupted or delayed in reading, Windows will load with a temp profile to give temporary access to the computer.
Temporary Profile Issue in Windows 10 and 8.1
Windows 10 or 8.1 computers rarely load with the temporary profile. These Operating Systems handle this issue better than older Windows 7. If you face the same temp profile issue on Windows 10 or 8.1, you can follow the steps below. The registry modification should fix the problem easily.
How to Temporary Profile in Windows 7- Workgroup & Domain
The below screenshots are taken from several Operating Systems but are still valid for all desktop Windows OS.
1) Restart the Computer
Before doing anything, restart the computer 2 or 3 times to see whether it’s returning to your old correct profile. Go to the next step if this doesn’t work.
2) Registry Modification
Rename the temp profile registry and revert to the old registry settings for the correct profile. Most probably, this method will fix the problem.
- Log in to the computer with the temp profile.
- Start the registry editor by typing regedit in the search box of Windows 7/8.1 or Windows 10.
- Navigate to the following location.
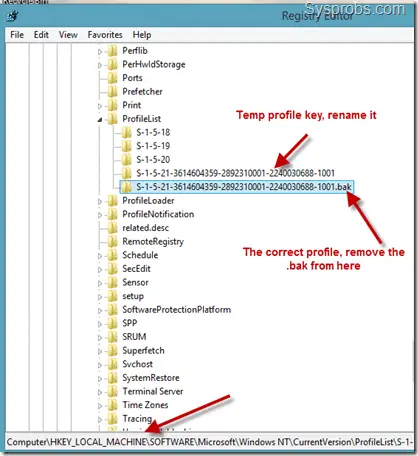
- You will see similar keys under the profile list, but one with .bak, as shown below.
- The key with .bak is your correct old user profile. Your Windows 7 computer is currently logged in with a fresh (temporary) profile with the same key. So, rename the new profile key (not having .bak) and remove .bak from the correct profile key.
After modifying the registry correctly, log off and log in (or restart) with your user name and password. If you are lucky enough, you must get your correct profile with icons and settings back in Windows 7.
Still, if the Windows 7 laptop or desktop loads with the temporary profile and creates a registry key with .bak, that means the user profile is corrupted badly, and the Operating System is not reading it properly.
3) Scan and Repair Disk in Windows 7/8.1
A few times, repairing the corrupted files worked for me. Usually, the corrupted ‘Ntuser’ files cause the temporary profile issue. So, run the check disk for the partition with the user profile.
After restarting the computer to continue the check disk tool, you can hope for recovery if you see corrupted entries and the repairing process inside your user profile folder.
If it finds and repairs files, especially the Ntuser files, you may get your old Windows 7 profile back.
Even though Windows 8 and 8.1 does the disk error checking automatically as part of ‘Automatic Maintenance’, you can still run it manually when you face this temp profile issue. If any system files corruption is found, that will be fixed during the scan.
a) Right-click on C drive, Tools and Error checking.
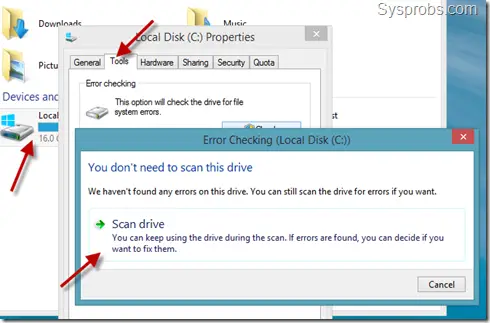
b) The recommended way to find and replace corrupted files in Windows 8 and 8.1 is by running the ‘SFC’ scan.
Start the command prompt as administrator like shown below (search for cmd, right-click and select ‘Run as administrator‘)
Type sfc /scannow and press enter to start the process.
You may need to have Windows installation DVD with you for this process; it is required to replace corrupted files from the original installation medium.
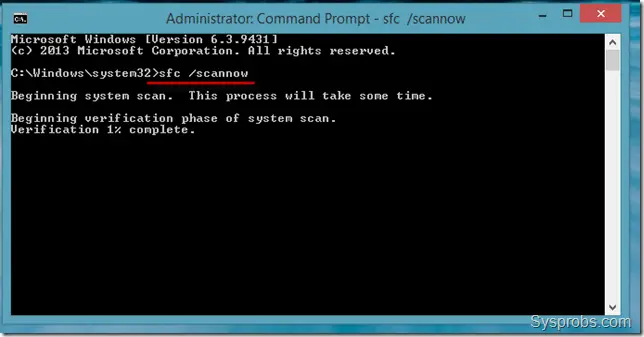
Restart the PC after repairing/replacing corrupted files (if found). Possibly, this could fix the issue.
4) Try System Restore
System restore is another solution you can try before going to the next step. System restore does not affect the user file. It will revert the system state to a certain date.
Few users reported this method as a solution for temporary profile loading issues in Windows 8.1/10 and 7 computers.
Also, you can try a system restore or re-installation (repair) of the Windows 8 Operating System if none of the steps works for you.
If the above steps do not help you out, then you need to create a new profile with the new username.
5) Create a New User Account
We need to create a new user account, log in with it and transfer the data from the old user profile to the new user profile. It is easy in a workgroup (home and individual PCs) environment as you can create a new username locally, but it is tricky in the domain environment.
Because the existing user account is already there on the domain server, and there is nothing wrong with it. Also, creating a new different domain user account will cause issues with corporate emails, domain group membership and shared permissions.
So, we need to treat both cases separately.
1) Create a new username in the non-domain (workgroup) environment from the control panel or computer management. Make sure to add the new user to the administrators’ group.
Login with the new user name and start copying your old data from the old profile. I normally copy the below data,
a) My Documents (Music, videos and downloads)
b) Desktop
c) Favorites
d) Any outlook PST files (find more information about the location of PST files here)
But Microsoft suggests copying the entire old user profile (except 3 files) as shown in this official site link.
2) New user profile in the domain environment.
Since we can’t delete and create the new domain user account for this purpose, we will only play around with the client’s computer. Let’s completely remove the user profile and recreate it again.
Copy the important user data (a to d in step 1) or entire folders from the corrupted profile to a new location (like D drive or a different folder in C drive). Ensure you copied all required folders and files from the old profile before deleting the original folder.
Go to Advanced settings of System as shown below, click on Settings (user profiles), select the corrupted user profile not loading properly in Windows 7, and then press the Delete button.
The delete button will be enabled only if you log in with a different user account.
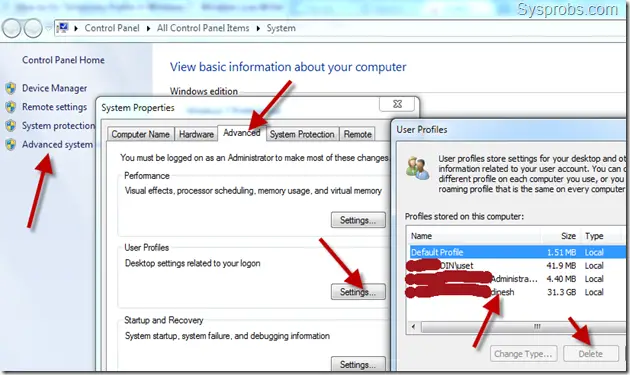
This step will remove the entire user profile data and related user SID from the computer, including the registry keys we discussed earlier. You can cross-check the proper removal of a user account (SID) by checking the C:\Users folder.
Once it is removed properly, restart the computer and log in with the same username (which was not loading earlier). The computer should create a new user profile like the first time the user logs on.
You need to copy back your old important data to the new profile and set email outlook clients etc..if required.
I’m sure one of the above steps will fix the temporary profile issue on the Windows computer. Do let us know which one worked for you.
Logging into your Windows computer for something important only to find that you’ve been signed in with a temporary profile can be a frustrating experience. It can disrupt your workflow and leave you wondering what went wrong.
Below, we explore the causes of Windows signing you in with a temporary profile and provide you with a range of practical fixes to resolve this issue.
Why Is Windows Signing You In With a Temporary Profile?
If Windows signs you in with a temporary profile, it typically indicates an issue with your user profile. Here are some common reasons for encountering this problem:
- Your user profile might be corrupted or inconsistent, causing it to malfunction.
- Insufficient free space on your system drive (usually C:) can prevent Windows from loading your user profile.
- Problems within the Registry Editor can disrupt the User Profile Service’s normal operation, resulting in this error.
- If you’re using a third-party security program, it might flag a potential threat within your user profile, temporarily blocking access. Sometimes, these programs mistakenly restrict access to user profile files, leading to profile loading issues.
- Your system itself may have corruption or inconsistencies that hinder proper functioning.
Now that you’re aware of the common causes, let’s explore troubleshooting methods that can help resolve this issue, regardless of its source.
1. Apply a Registry Fix
The Registry Editor in Windows stores various settings and configurations for user profiles. If the registry entries related to your profile become corrupted or altered, the User Profile Service (which is responsible for loading user profiles and settings during the login process) may fail to load your profile as intended.
Thus, the first thing that we recommend doing upon facing this problem is applying a Registry fix. To proceed with this method, you must have administrative access to the system. If the temporary profile Windows has signed you in with does not have administrative access to the system, you need to first change this configuration.
Simply head over to the Settings app and navigate to Accounts > Family & other users. Expand the dropdown for the current profile and click on the Change the account type button. In the following prompt, expand the dropdown for Account type and choose Administrator.
Once this is done, create a Registry backup. This is essential before altering the Registry Editor settings, just to be safe.
After creating a Registry backup, follow these steps:
- Press the Win + R keys together to open Run.
- Type «cmd» in Run and click Ctrl + Shift + Enter keys together to launch Command Prompt as an administrator.
- Click Yes in the following prompt.
-
Now, type the following command in the Command Prompt and click Enter.
whoami/user

- You should now have a Security Identifier (SID) for your current account. Copy this somewhere safe.
Now, open Run again. Once it’s open:
- Type «regedit» and click Enter.
- Hit Yes in the UAC prompt.
-
In the Registry, navigate to the location below:
HKEY_LOCAL_MACHINE\SOFTWARE\Microsoft\WindowsNT\CurrentVersion\ProfileList
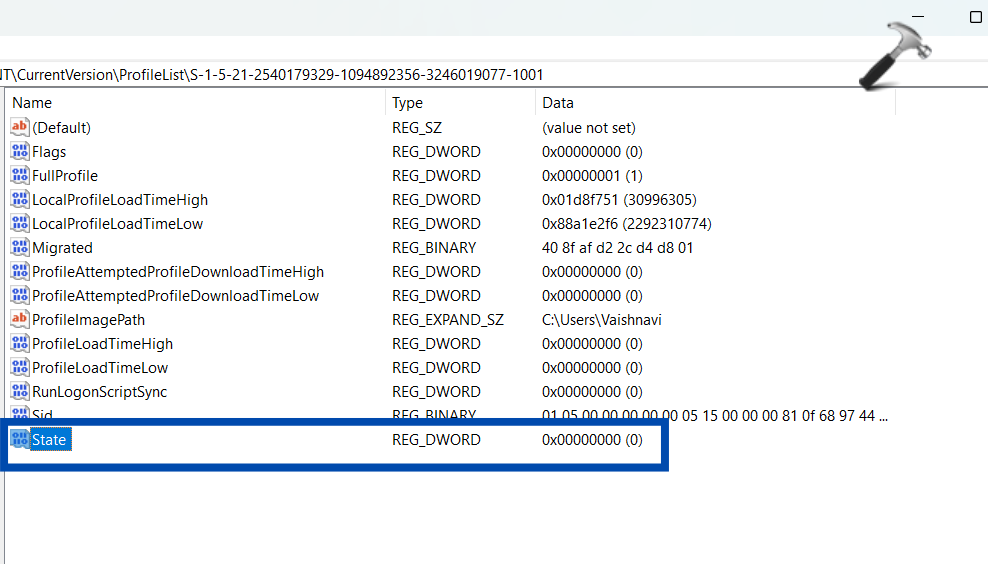
- In the ProfileList key, look for the SID key you noted earlier. If the SID key does not have .bak associated with it, double-click on it.
- Right-click on the ProfileImagePath value and choose Modify from the context menu.
-
Replace the Value data with the user path of your current profile. You can check it in the File Explorer.

- Click OK to save the changes. In the same window, also ensure that the State data has a DWORD value of 0.
- In case the SID key has a .bak at the end, right-click on the key and choose Rename from the context menu.
- Remove .bak from the end and follow the steps 10-12 mentioned above for this key.
- In case your Registry Editor has two keys (one with .bak and one without it), delete the one without .bak and follow steps 13-14 for the key with .bak.

Finally, close the Registry Editor and restart your computer. Hopefully, upon restarting, you will be logged in with your targeted user profile successfully.
2. Fix Any Corruption in Your User Account
If the Registry Editor fix did not help, then the next thing you should try is fixing any issues within the user account that might be contributing to the problem.
There are several ways to fix a corrupt user account but below are some most effective tips you can try to fix the issue. To begin, launch the system with Safe Mode. Once you are in the Safe Mode, try these solutions:
- Perform an SFC scan: The user profile might be dealing with a corruption error which is preventing it from functioning properly. The easiest way to identify and resolve such corruption issues is by running an SFC scan. The System File Checker, as the name implies scans your system’s critical files for problems. If a problematic file is found, it will replace it with its healthier cached counterpart.
- Restart the essential services: We also recommend restarting the User Profile Service, which will fix any issues that might be preventing the service from working properly. For this, open Run, type «services.msc,» and click Enter. In the following window, look for the User Profile Service, right-click on it, and choose Restart. While you are at it, we also recommend disabling the Windows Defender Advanced Threat Protection and Microsoft Defender Antivirus services.
- Disable your antivirus: As mentioned earlier, your security program might be interfering with the proper loading of your user profile, causing the issue. To fix this, temporarily disable your security program and check if the user profile loads.
- Perform a system restore: Did the issue start occurring after making a certain change to the system? If so, you can use the System Restore utility to revert the system to an earlier state where the problem was not present.

3. Create a New User Account Temporarily
If none of the methods have proven effective, we recommend contacting the official Microsoft support team with a description of the problem. They can help pinpoint the exact cause and provide a corresponding solution.
Keep in mind that this process may take some time. In the meantime, consider creating a new user account in Windows to ensure your work is not disrupted.
Regain Access to Your Windows User Account
Not being able to access your main account and dealing with a temporary user profile can be frustrating. Hopefully, the solutions we have listed above in this guide will help you fix the issue once and for all. Once you’ve regained access to your user account, it’s a good practice to keep regular backups of your important data and settings to prevent any future inconveniences.