
Download Windows Speedup Tool to fix errors and make PC run faster
There are two states of the Recycle Bin – one is the Recycle Bin with deleted items, and the other is the empty Recycle Bin. Both states of Recycle Bin have a different set of icons. In this post, we will show you the steps you can take to change the Recycle Bin icon in Windows 11 or Windows 10. You can make the icon dark or black or set any other icon of choice. The dark icons would blend well, with the dark theme you have set for your PC.
The Recycle Bin is a location where all the deleted files and folders are temporarily stored in every version of the Windows operating system. The Recycle Bin can be used to recover deleted files. Mostly you can find the Recycle Bin icon on the desktop.
To change the Recycle Bin icon in Windows 11/10, carry out these steps:
- Open Settings > Personalization > Themes
- Click on the Desktop Icon Settings link you see
- Select the Recycle Bin (full) icon
- Press Change icon
- Choose the icon and set it
- Repeat the process for Recycle Bin (empty) icon.
You can set a dark or any icon of your choice – but the images have to me in the .ico format.
Read: How to change File and Folder Icons.
As an example, let us change the icon to a dark one. Before changing the Recycle Bin icon, you first need to download the Recycle Bin dark icons. There are many websites that can offer a lot of decorative icons in the ico format.
Let’s begin.
- First, head over to DeviantArt and download the Recycle Bin dark icons.
- Next, right-click on the desktop and choose Personalize > Themes.
- On the right pane, scroll down and under Related Settings, click Desktop icon settings.
- In Desktop icon settings window, choose the Recycle Bin(full) icon.
- Click on Change icon and browse the location where you downloaded the Recycle Bin icons.
- Choose the icon and click OK.
- Now repeat the same steps for Recycle Bin (empty) icon.
- Click Apply > OK.
Note: If you constantly switch themes, then make sure the Allow themes to change desktop icons option is unchecked, to avoid themes to change the desktop icons.
If you wish to restore the native icons, right-click on the desktop and choose Personalize > Themes > Desktop icon settings > Restore Default to change the Recycle Bin icons to default.
Read next: How to change Drive Icons.
Anand Khanse is the Admin of TheWindowsClub.com, a 10-year Microsoft MVP (2006-16) & a Windows Insider MVP (2016-2022). Please read the entire post & the comments first, create a System Restore Point before making any changes to your system & be careful about any 3rd-party offers while installing freeware.
Reader Interactions
Provide feedback
Saved searches
Use saved searches to filter your results more quickly
Sign up
Appearance settings
Applies ToWindows 11 Windows 10
Support for Windows 10 will end in October 2025
After October 14, 2025, Microsoft will no longer provide free software updates from Windows Update, technical assistance, or security fixes for Windows 10. Your PC will still work, but we recommend moving to Windows 11.
Learn more
Can’t find the Recycle Bin on your Windows device? Whether it’s hidden or missing after an update, this article will help you quickly locate and restore it.
The desktop doesn’t show any icons
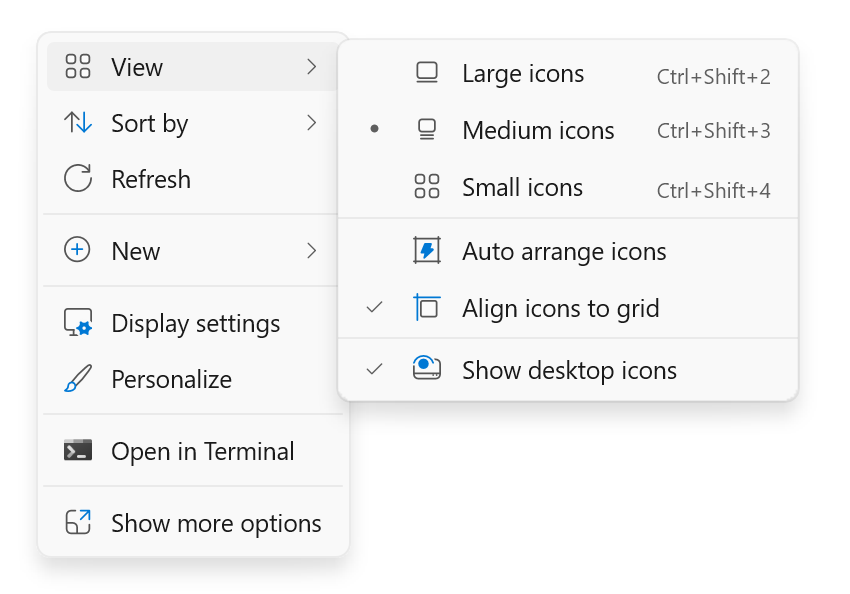
If your desktop doesn’t show any icons, right-click (or press and hold on a touch device) on the desktop and select View. Ensure that Show desktop icons is checked. If not, select it.
The desktop shows icons, but the Recycle Bin is missing
If your desktop shows icons, but the Recycle Bin is missing, verify that it’s not disabled in your desktop settings.
-
In the Settings app on your Windows device, select Personalization > Themes or use the following shortcut:
Themes
-
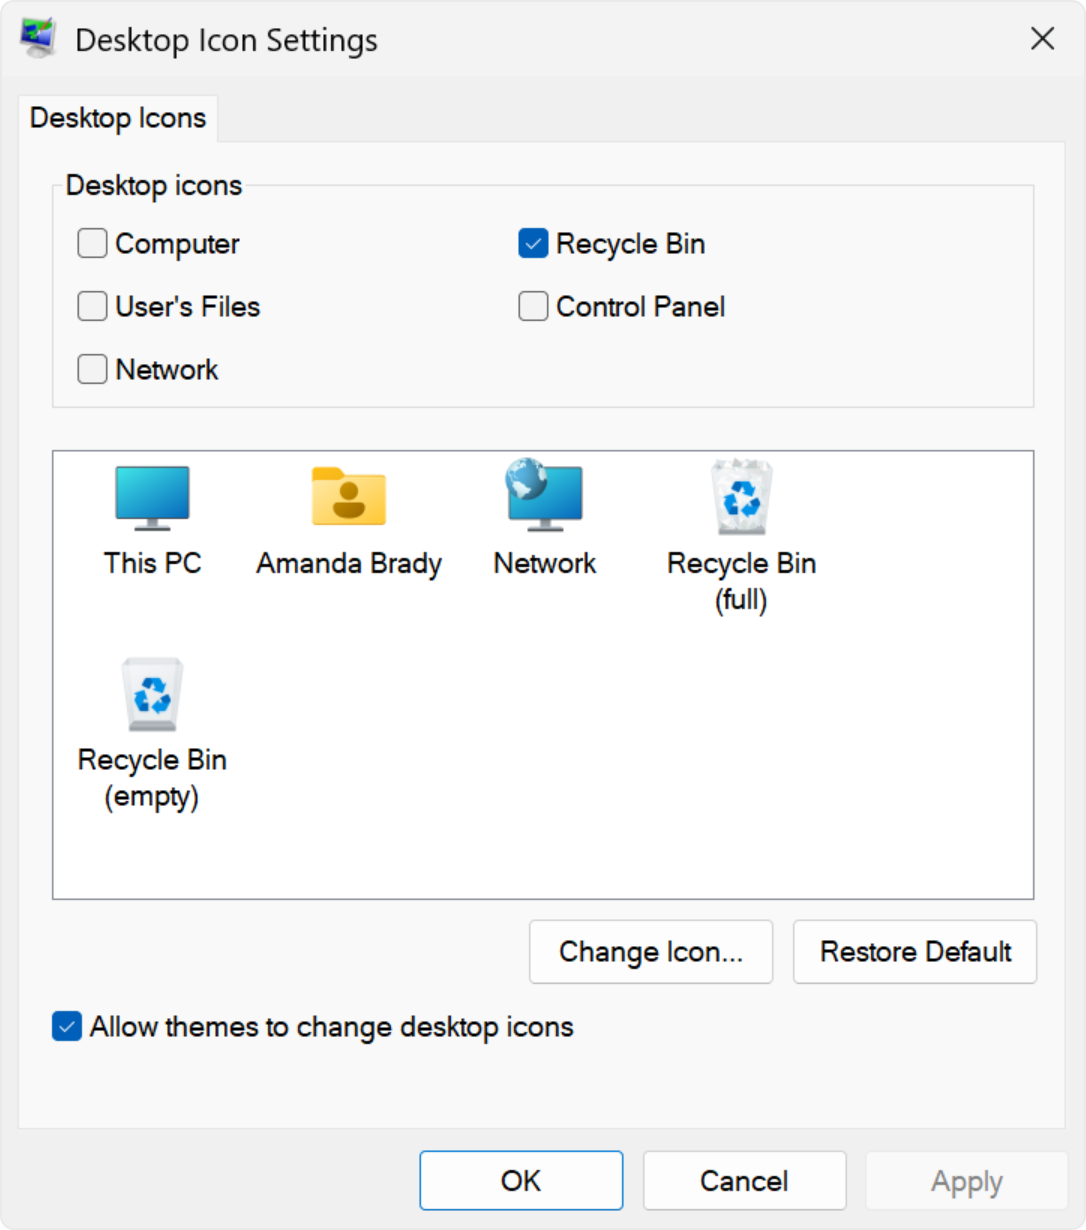
Select Desktop icon settings
-
Make sure the check box for Recycle Bin is checked, then select OK
The Recycle Bin icon should be displayed on your desktop.
Need more help?
Want more options?
Explore subscription benefits, browse training courses, learn how to secure your device, and more.
In today’s digital age, personalizing our devices has become a common desire. From wallpapers to icons, we seek ways to make our technology reflect our unique personalities. When it comes to our desktops, even the smallest details like the trash icon hold significance. Did you know that you can change the trash icon in Windows 11 to something that resonates more with your personal style? Whether you want to replace it with a custom design or a unique symbol, the process is surprisingly simple.
Changing the trash icon in Windows 11 is a simple yet powerful way to customize your desktop experience. This feature allows you to add a personal touch and make your computer truly yours. With just a few steps, you can transform the generic trash icon into something that brings joy and represents your individuality. So, let’s dive in and explore how to change the trash icon in Windows 11.
If you want to change the trash icon in Windows 11, follow these steps:
- Right-click on the desktop and select «Personalize» from the context menu.
- In the Personalization settings, click on «Themes» in the left sidebar.
- Scroll down and click on «Desktop icon settings.»
- In the Desktop Icon Settings window, select «Recycle Bin» and click on «Change Icon.»
- Choose the desired icon from the list or click on «Browse» to select a custom icon from your computer.
- Click «Apply» and then «OK» to save the changes.
Customizing the Trash Icon in Windows 11
The trash icon, also known as the recycle bin, is a familiar sight on the Windows desktop. It serves as a temporary holding place for files and folders that have been deleted from your computer but can be restored if needed. While Windows 11 offers a default trash icon, you may want to personalize it to better match your preferences or aesthetic. In this article, we will guide you through the process of changing the trash icon in Windows 11, allowing you to add a touch of personalization to your desktop.
Step 1: Find a Suitable Icon
The first step to changing the trash icon in Windows 11 is to find a suitable replacement icon. You can choose from a variety of icon sources available online, such as icon websites or icon packs. Look for an icon that appeals to you and matches your desktop theme. Make sure to download the icon in a format compatible with Windows 11, such as .ico or .png.
Once you have downloaded the icon file, make sure to save it in a location on your computer where you can easily find it later.
Step 2: Access the Desktop Icon Settings
After obtaining the desired icon, the next step is to access the desktop icon settings in Windows 11. Follow these steps:
- Right-click on an empty area of your desktop to open a context menu.
- Select «Personalize» from the menu to open the Windows Settings.
- In the Settings window, click on «Personalization» in the left sidebar.
- Scroll down and click on «Themes and related settings.»
- In the Themes window, scroll down and click on «Desktop icon settings.»
Step 3: Change the Recycle Bin Icon
With the desktop icon settings open, you can now proceed to change the recycle bin icon. Here’s how:
- In the Desktop Icon Settings window, select the «Full» or «Empty» Recycle Bin icon from the list.
- Click on the «Change Icon» button.
- A new window will appear. Click on the «Browse» button to locate the downloaded icon file.
- Select the icon file and click «Open.»
- Back in the «Change Icon» window, you will see the newly selected icon. Click «OK» to apply the changes.
- Click «Apply» in the Desktop Icon Settings window to save the changes.
Step 4: Check the New Trash Icon
After following the above steps, you have successfully changed the trash icon in Windows 11. To ensure that the new icon is applied, navigate to your desktop and check if the trash icon has been replaced with your selected icon.
If the new icon does not appear immediately, try refreshing the desktop or restarting your computer.
Additional Tips
Here are some additional tips to keep in mind when changing the trash icon in Windows 11:
- Make sure the downloaded icon file is in a compatible format, such as .ico or .png.
- If you want to revert to the default trash icon, you can follow the same steps and select the original icon from the list.
- You can experiment with different icon designs and switch between them to find the one you like best
- Consider using icon packs or customizing other desktop icons to create a cohesive look.
- Keep a backup of your original icons in case you want to restore them in the future.
Alternate Method: Using Icon Customization Software
While the previous method involved changing the recycle bin icon through Windows settings, there is an alternate method that involves using icon customization software. These software applications allow for more extensive customization options for various desktop icons, including the trash icon.
There are several icon customization software available online. Here are the general steps to follow:
- Download and install a reputable icon customization software on your computer.
- Open the software and navigate to the specific customization options for the recycle bin icon.
- Follow the instructions provided by the software to change the trash icon.
- Once you have selected a new icon, apply the changes and check if the new icon appears on your desktop.
Using icon customization software offers more flexibility in terms of icon selection and customization. However, it is crucial to choose a reliable software and follow the instructions provided to avoid any potential issues.
Conclusion
Customizing the trash icon in Windows 11 allows you to personalize your desktop and add a personal touch to your computer’s appearance. Whether you choose to change the icon through Windows settings or use icon customization software, the process is straightforward and offers the opportunity to create a unique desktop environment. Experiment with different icons and find the one that best represents your style and preferences.
Changing the Trash Icon in Windows 11
If you’re tired of the default trash icon in Windows 11 and want to customize it, you’re in luck. While Windows 11 doesn’t offer a built-in feature to change the trash icon, you can use third-party software to make this modification. Here’s how:
- First, search for third-party icon customization software compatible with Windows 11.
- Download and install the software onto your computer.
- Open the icon customization software and navigate to the folder where the trash icon is stored.
- Select and apply the custom icon you want to use as your new trash icon.
- Once you’ve applied the changes, the new trash icon should appear on your desktop.
It’s important to note that modifying system icons can potentially affect the stability and performance of your operating system. Therefore, it’s recommended to exercise caution and backup your system before making any changes.
Key Takeaways: How to Change Trash Icon in Windows 11
- You can easily change the trash icon in Windows 11 using a simple method.
- First, right-click on the desktop and select «Personalize» from the context menu.
- In the Personalization settings, click on «Themes» in the left sidebar.
- Scroll down and click on «Desktop icon settings» under the Related Settings section.
- In the Desktop Icon Settings window, select the «Recycle Bin» option and click on the «Change Icon» button.
Frequently Asked Questions
Here are some common questions about changing the Trash icon in Windows 11:
1. Can I change the Trash icon in Windows 11?
Yes, you can change the Trash icon in Windows 11. The operating system allows you to customize various aspects of your desktop, including the icons. This allows you to personalize your computer’s appearance and make it truly your own.
To change the Trash icon, you will need to follow a few simple steps. First, right-click on your Desktop and select «Personalize» from the context menu. Then, click on «Themes» in the left sidebar and scroll down to find «Related Settings.» Click on «Desktop icon settings» and select the «Recycle Bin» icon from the list. Finally, click on «Change Icon» and choose the desired icon from the available options or browse for an icon file on your computer.
2. Can I use my own custom icon for the Trash in Windows 11?
Yes, you can use your own custom icon for the Trash in Windows 11. While the operating system provides a selection of pre-installed icons to choose from, you also have the option to browse for an icon file on your computer and use that as the Trash icon.
To use your own custom icon, follow the same steps mentioned earlier to access the «Desktop icon settings» window. When you click on «Change Icon,» instead of selecting one of the pre-installed icons, click on «Browse» and navigate to the folder where your custom icon file is located. Select the icon file and click «Open» to set it as the new Trash icon.
3. Are there any restrictions on the type of icon I can use for the Trash in Windows 11?
Yes, there are some restrictions on the type of icon you can use for the Trash in Windows 11. The icon file should be in either the ICO or DLL format. These are the standard formats for icons in Windows. If your custom icon is in a different format, you may need to convert it to ICO or DLL before you can use it as the Trash icon.
Additionally, it is recommended to use an icon with a square shape and a transparent background for the best visual appearance. Icons with irregular shapes may not display properly or may appear distorted.
4. Can I revert back to the default Trash icon in Windows 11?
Yes, you can revert back to the default Trash icon in Windows 11 if you decide to change it back. To do this, follow the steps to access the «Desktop icon settings» window. When you click on «Change Icon,» instead of selecting a custom icon or browsing for a file, choose the default Recycle Bin icon from the list. Click «OK» to apply the changes, and the Trash icon will be restored to its default appearance.
5. Will changing the Trash icon in Windows 11 affect the functionality of the Recycle Bin?
No, changing the Trash icon in Windows 11 will not affect the functionality of the Recycle Bin. The Recycle Bin remains the same and functions as it should, regardless of the icon you choose to represent it. The icon is purely a visual element that allows you to personalize your desktop.
In summary, changing the trash icon in Windows 11 is a simple process that can help personalize your desktop experience. By following the steps outlined in this article, you can easily replace the default trash icon with a custom icon of your choice. This allows you to add a personal touch to your computer and make it feel more unique.
Remember, when changing the trash icon, it’s important to use icons in the .ico format and ensure they are saved in a location where you can easily access them. Additionally, be cautious when downloading icons from third-party websites to ensure you’re not inadvertently introducing malware or other security risks to your computer.
Are you tired of the default trash icon on Windows 11? Want to personalize your desktop and give it a fresh look? Well, changing the trash icon is easier than you might think. In just a few simple steps, you can customize the trash icon on your Windows 11 computer to reflect your own style and preferences. Whether you’re a professional seeking a sleek design or simply someone who wants to add a touch of creativity to their desktop, the process is quick and hassle-free.
To change the trash icon on Windows 11, you’ll need to access the desktop personalization settings. Simply right-click on an empty area of your desktop and select «Personalize» from the dropdown menu. Once the settings window opens, navigate to the «Themes» tab and click on «Desktop icon settings» at the top. In the new window that appears, you’ll see a list of icons, including the trash icon. Choose the trash icon and click on the «Change icon» button. From here, you can browse through the available icon options or upload your own icon file. Select the desired icon, click «OK,» and then «Apply» to save the changes. Voila! Your trash icon has been successfully changed to give your desktop that personalized touch.
This feature to change the trash icon has been a welcomed addition for Windows 11 users who want to make their desktops more visually appealing. It allows individuals to express their unique style and preferences, adding a personal touch to their computing experience. With a variety of icon options to choose from, including custom icons that can be downloaded from the internet, the possibilities are endless. So, whether you want a modern, minimalist trash icon or a fun and whimsical one, Windows 11 gives you the flexibility to
To change the trash icon in Windows 11, follow these steps:
- Right-click on the desktop and select «Personalize.»
- Click on «Themes» in the left sidebar.
- Scroll down and click on «Advanced settings.»
- Click on «Icons» and then select «Change Icon» next to the Recycle Bin option.
- Choose the new icon from the list or click «Browse» to find a custom icon.
- Click «OK» to save the changes.
Customizing the Trash Icon in Windows 11
The trash icon in Windows 11 is a visual representation of the Recycle Bin, where deleted files and folders are temporarily stored. While the default trash icon in Windows 11 may be functional, you may want to personalize it to suit your preferences or give your desktop a unique look. Fortunately, Windows 11 offers different methods to change the trash icon, allowing you to customize it to your liking. In this article, we will explore various ways to change the trash icon in Windows 11, providing you with step-by-step instructions and tips to make the process easier.
Method 1: Using the «Properties» Menu
The first method to change the trash icon in Windows 11 involves using the «Properties» menu. Here’s how:
Step 1: Right-click on the Desktop
To begin, right-click on an empty area of your desktop. A context menu will appear.
Step 2: Select «Personalize» from the Context Menu
From the context menu, select the «Personalize» option. This will open the Personalization settings in the Settings app.
Step 3: Open the Desktop Icon Settings
In the Personalization settings, click on the «Themes» tab on the left sidebar. Then, scroll down and click on the «Desktop icon settings» link.
Step 4: Change the Trash Icon
In the Desktop Icon Settings window, under the «Desktop Icons» section, you will find a list of icons including the Recycle Bin. Select the «Recycle Bin (full)» or «Recycle Bin (empty)» icon and click on the «Change Icon» button. Choose a new icon from the list or click «Browse» to find a custom icon on your computer. Once you’ve selected the desired icon, click «OK» to apply the changes.
Method 2: Modifying the Registry
If you prefer a more advanced method, you can modify the registry to change the trash icon. Here’s how:
Step 1: Open the Registry Editor
Press the Windows key + R on your keyboard to open the Run dialog box. Type «regedit» and press Enter to open the Registry Editor.
Step 2: Navigate to the Recycle Bin Key
In the Registry Editor, navigate to the following key:
HKEY_LOCAL_MACHINE\SOFTWARE\Microsoft\Windows\CurrentVersion\Explorer\Shell Icons
If the «Shell Icons» key does not exist, you can create it by right-clicking on the «Explorer» key, selecting «New,» and choosing «Key.» Rename the new key as «Shell Icons.»
Step 3: Modify the Value of «Full» and «Empty»
In the «Shell Icons» key, you will find the values «Full» and «Empty.» These correspond to the full and empty trash icons, respectively. Double-click on each value to modify its data.
Step 4: Enter the Path of the Icon File
In the value data field, enter the path to the icon file that you want to use for the trash icon. This can be a system icon or a custom icon file. Make sure to use the correct path and enclose it in double quotation marks. For example:
%SystemRoot%\System32\shell32.dll,31
Once you’ve entered the path, click «OK» to save the changes.
Method 3: Using Third-Party Software
If you prefer a more user-friendly approach, you can use third-party software to change the trash icon in Windows 11. There are several software options available that provide a graphical interface for customizing icons, including the trash icon. Here are a few popular options:
- XWidget
- Stardock IconPackager
- Winstep Nexus
These software solutions offer a wide range of customization options and icon libraries to choose from, making it easy to change the trash icon to your liking.
Method 4: Using Icon Packs
An alternative method to change the trash icon in Windows 11 is by using icon packs. Icon packs contain a collection of icons that can be applied to various elements of the Windows interface, including the trash icon. Here’s how:
Step 1: Download and Install an Icon Pack
Search for and download an icon pack of your choice from a trusted source. Once downloaded, install the icon pack following the provided instructions.
Step 2: Apply the Icon Pack
After installation, right-click on an empty area of your desktop and select «Personalize» from the context menu. In the Personalization settings, click on the «Themes» tab on the left sidebar. Then, click on the «Change icon pack» button. Select the installed icon pack from the list and click «Apply» to change the icons, including the trash icon.
Step 3: Fine-Tune the Icon Pack
Some icon packs may provide additional customization options. Explore the settings or options of the installed icon pack to further customize the trash icon or other icons to your preference.
Enhance Your Windows 11 Experience with a Personalized Trash Icon
By following one of these methods, you can easily change the trash icon in Windows 11 and give your desktop a personalized touch. Whether you prefer a simple method using the properties menu or a more advanced approach through registry modifications, Windows 11 provides flexibility for customization. Furthermore, third-party software and icon packs offer additional options to enhance your Windows 11 experience. So go ahead, explore the possibilities, and make your trash icon a reflection of your style and preferences.
Changing the Trash Icon in Windows 11
If you’re looking to customize your Windows 11 experience, changing the trash icon is a great way to add a personal touch. Here’s a step-by-step guide on how to do it:
Method 1: Using the File Explorer Properties
1. Right-click on the desktop and select «Personalize» from the context menu.
2. In the Personalization settings, click on «Themes» in the left sidebar and then click on «Desktop icon settings» in the main window.
3. In the Desktop Icon Settings dialog box, select «Recycle Bin» and click on the «Change Icon» button.
4. Choose a new icon from the list or click on «Browse» to select a custom icon from your computer.
5. Click «OK» to save the changes and close the dialog box.
Method 2: Modifying the Registry
1. Press «Win + R» to open the Run dialog box, type «regedit» and hit Enter to open the Registry Editor.
2. Navigate to «HKEY_CURRENT_USER\SOFTWARE\Microsoft\Windows\CurrentVersion\Explorer\CLSID\{645FF040-5081-101B-9F08-00AA002F954E}\DefaultIcon».
3. Double-click on the «(Default)» value and enter the path of the new icon file, or the path of the icon library followed by the index number of the desired icon.
4. Click «OK» to save the changes and close the Registry Editor.
Key Takeaways:
- To change the trash icon in Windows 11, you need to download a new icon file.
- Ensure that the downloaded icon file is in the .ico format.
- Right-click on the desktop and select «Personalize» from the context menu.
- In the Personalization settings, click on «Themes» in the left sidebar.
- Scroll down and click on «Desktop icon settings» under the «Related Settings» section.
Frequently Asked Questions
Here are some commonly asked questions about changing the trash icon in Windows 11:
1. How can I change the trash icon in Windows 11?
To change the trash icon in Windows 11, you can follow these steps:
Step 1: Right-click on the desktop and select «Personalize» from the context menu.
Step 2: In the Settings app, click on «Themes» in the left sidebar.
Step 3: Scroll down and click on «Desktop icon settings» under the «Related settings» section.
Step 4: In the Desktop Icon Settings window, select «Recycle Bin» and click on the «Change Icon» button.
Step 5: Choose a new icon from the list or click on «Browse» to select a custom icon from your computer.
Step 6: Click on «OK» and then «Apply» to save the changes.
2. Can I use any image as the trash icon in Windows 11?
Yes, you can use any image as the trash icon in Windows 11. When you click on the «Browse» button in the Desktop Icon Settings window, you can navigate to any image file on your computer and select it as the new icon for the trash.
However, it’s important to note that the image you choose should be in ICO (icon) format for best compatibility. If you have a regular image file (e.g., JPEG or PNG), you can convert it to ICO format using online converters or dedicated software.
3. Is it possible to restore the default trash icon in Windows 11?
Yes, you can restore the default trash icon in Windows 11 by following these steps:
Step 1: Right-click on the desktop and select «Personalize.»
Step 2: In the Settings app, click on «Themes» in the left sidebar.
Step 3: Scroll down and click on «Desktop icon settings» under the «Related settings» section.
Step 4: In the Desktop Icon Settings window, select «Recycle Bin» and click on the «Restore Default» button.
Step 5: Click on «OK» and then «Apply» to save the changes.
4. Can I customize other desktop icons in Windows 11?
Yes, you can customize other desktop icons in Windows 11 using the same method described earlier. In the Desktop Icon Settings window, you can select icons like «This PC,» «Control Panel,» «Network,» and more, and change their icons to your preferred ones.
If you have a collection of icons in ICO format, you can use them to personalize your desktop icons and give your Windows 11 desktop a unique look.
5. Do I need administrative rights to change the trash icon in Windows 11?
No, you do not need administrative rights to change the trash icon in Windows 11. The option to change desktop icons, including the trash icon, is available to all users.
However, if your computer is managed by an administrator, they may have restricted access to certain settings. In such cases, you may need to contact your administrator to make changes to the desktop icons.
Changing the trash icon in Windows 11 is a simple and straightforward process. By following the steps outlined in this guide, you can personalize your desktop and make it truly reflect your style.
Remember to choose an icon that is easily recognizable as it will be replacing the default trash icon. With just a few clicks, you can transform the look of your desktop and make it more visually appealing.