
Windows To Go is a complete Windows operating system on a USB flash drive (or an external USB hard drive) that you can take it with you anywhere you want, plug it into any computer and use it just like you use your own desktop or laptop in your office or home. You don’t even need any network connectivity for booting into your Windows To Go. Imagine visiting your friend and instead of using her computer that is loaded with junk software by the manufacturer (no they don’t dislike your friend, they get paid for installing junk software on her new computer), you whip out your Windows To Go flash drive and while you whistle your favorite song you plug your flash drive and boot into your Windows To Go. She looks at your stunning desktop background and your fancy apps and go “Wow! man, you’re cool.” and you give her a wicked smile and say “Yeah! I get that a lot.”
Windows To Go is a essentially a complete computer in a pocket. All the useful features and technologies in Windows 8.1 Enterprise that are available to businesses on desktop computers are also available in Windows To Go. These include Group Policy, BitLocker, BranchCache, AppLocker, App-V, UE-V, and DirectAccess. This is great because you can secure your Windows To Go drive with BitLocker To Go which will encrypt your USB drive.
Are We Limited to Using Only Certified USB 3.0 Drives?
The short answer is no. When Windows To Go was first released a few years ago you had to use only USB 3.0 drives certified by Microsoft for Windows To Go and back then there were only three drives. Later Microsoft tested and certified additional drives from various vendors. These drives are tested by Microsoft to work efficiently and are basically optimized for Windows To Go. These expensive drives are great for businesses but you are no longer limited to these expensive drives. Luckily you can use pretty much any USB 3.0 drive to install Windows To Go, even if it is not tested and certified by Microsoft. The USB drives that are certified by Microsoft are all 32GB or larger but you can use USB 3.0 flash drives that are much smaller, e.g. 16GB, although Microsoft recommends a minimum size of 20GB. Obviously larger drives will allow you to install more applications and utilities.
Here are the USB 3.0 drives that are certified by Microsoft at the time I am writing this article (December 6, 2014).
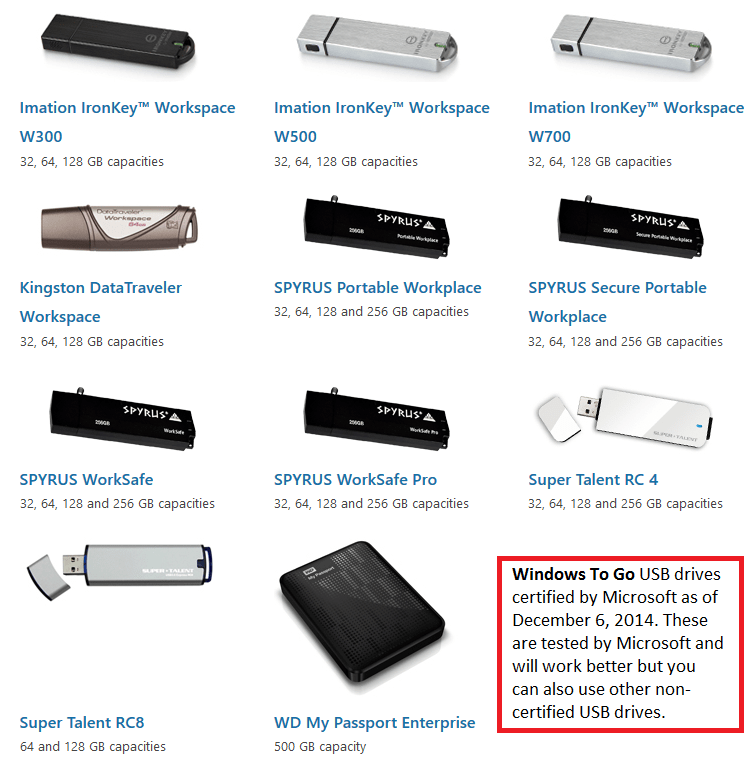
These drives are outrageously expensive. For example, the Kingston USB 3.0 drives can cost you anywhere from $86.99 for 32GB to $259.99 for 128GB. Compare these to the competitors who sell brand name 32GB USB 3.0 drives for less than $20 and even the 128GB USB 3.0 drives can be purchased for less than $35. By the way, these are today’s prices. That is not to say that these expensive drives are not good. Obviously, they are of higher quality and perhaps even better warranty but at the end of the day they are just USB flash drives and storing important data on Windows To Go drives, or on any flash drive, is not recommended. Having said all this, if you want to save money and spend time experimenting with non-certified USB drives that’s your prerogative. However, if you don’t have too much time on your hand and are willing to pay more then I recommend using a certified Windows To Go drive.
Windows To Go Host System Requirements
According to Microsoft, the following are the minimal requirements necessary to run Windows To Go on a host computer.
- 1 GHz or faster processor.
- 2 GB RAM or more.
- USB boot enabled. PCs certified for use with Windows 7 or later can be configured to boot directly from USB.
- Must support the image on the Windows To Go drive.
- USB hubs are not supported. You must connect the Windows To Go drive directly to the host machine.
- DirectX 9 graphics device that has a Windows Display Driver Model (WDDM) 1.2 or later version driver.
- USB 2.0 port or greater.
In this article I will show you how to install Windows 8 Enterprise on a Windows To Go 32GB USB 3.0 drive manufactured by Transcend that is not certified by Microsoft. Frankly, the entire process is fairly simple. The amount of time that will take you type all the commands is perhaps less than 5 minutes. Most of the time is spent waiting for the image to be deployed to the USB drive and then letting Windows To Go configure Windows 8 for first use. If you just go run your errands and come back while the image is being deployed you will feel you hardly did any work to create the Windows To Go drive. I will share two different options for creating Windows To Go drive. One is manual and the other is using Windows To Go Creator wizard.
NOTE: I tried installing Windows 8.1 using the Windows To Go Creator as well as the manual method but couldn’t get it to work. I then used Windows 8 with Windows to Go Creator and it worked flawlessly. I didn’t try Windows 8 using the manual method but there are lots of people who have tried that and it works.
Assumptions
For the purpose of this article, here are some of the assumptions I am making.
- The operating system on my desktop computer is Windows 8.1 Pro.
- I am using a 32GB non-certified USB 3.0 drive manufactured by Transcend. “Non-certified” simply means it has not been tested or approved by Microsoft and therefore Microsoft can’t guarantee that it will work.
- I will install Windows 8.1 Enterprise on my USB 3.0 drive.
- The drive letter K: represents the USB drive on my computer.
- the drive letter L: represents the drive letter where my Windows 8.1 ISO file is mounted.
There are a couple of ways to create the Windows To Go drive. I will cover both of these options in this article.
OPTION 1 – Install Windows To Go Using “Windows To Go Creator” Wizard
OPTION 2 – Install Windows To Go Using the Manual Method
I recommend the first method because it is as simple as specifying where the install.wim file is located and the wizard does the formatting, makes the drive bootable and everything else. With this method you will barely spend a minute to enter the information. The second method will take a bit longer and it may take you up to 4 or 5 minutes to enter the information. Most of the time, with both methods, is spent waiting for the image to be deployed and then waiting for Windows To Go drive to be configured for the first time, which involves a couple of automatic reboots. The following estimated times are based on my computer. Your timing may vary.
Estimated time for image deployment = 90 minutes
Estimated time for initial Windows 8 configuration = 25 minutes
OPTION 1 – Install Windows To Go Using “Windows To Go Creator” Wizard
- Download and install the AOMEI Partition Assistant Standard, which is free, from http://www.disk-partition.com/download.html. We will use the program’s wizard to create the Windows To Go drive.
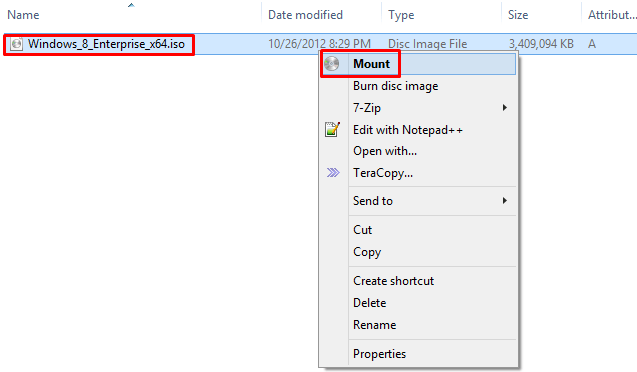
- Locate your Windows 8 Enterprise ISO file, right-click and select Mount. By mounting the ISO file we have a new drive letter in Windows File Manager and it essentially looks and acts exactly as if you have inserted a DVD in a DVD ROM drive. In my case the system assigned a drive letter L. If the ISO file is on another computer you will not be able to use it. Just copy the file from another computer to the local host computer where you are performing these steps.

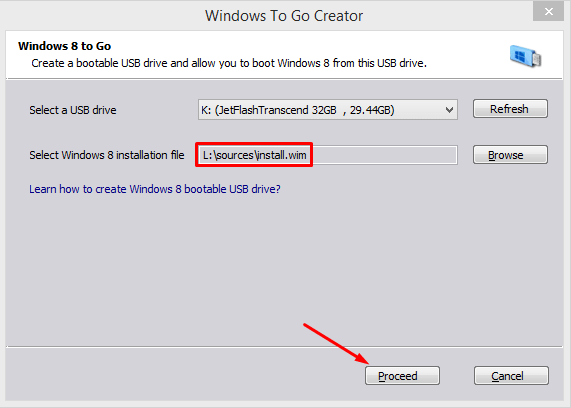
- Start the AOMEI Partition Assistant that you installed in Step 1 above and on the main menu select Wizard, Windows To Go Creator.
- Your USB drive should already be selected. Click Browse and add the Windows 8 installation file. You can either point to the ISO file or do what I did, point to the install.wim file in the sources folder. In my case the path is L:\sources\install.wim. Click Proceed to start the deployment.

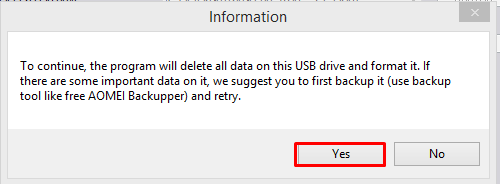
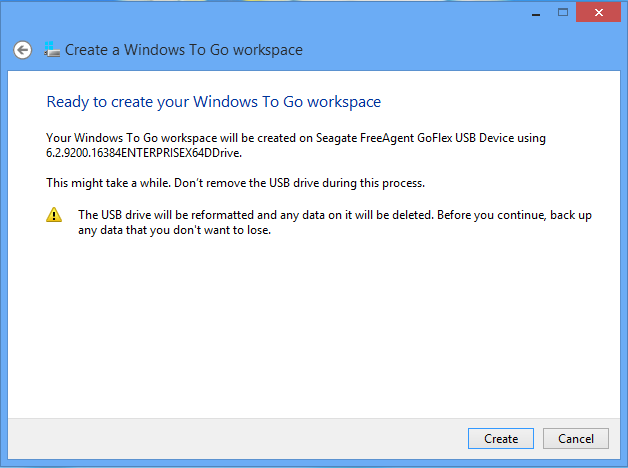
- You will see the following warning that your USB drive will be formatted and that you should back up your data if necessary. Click Yes to proceed.

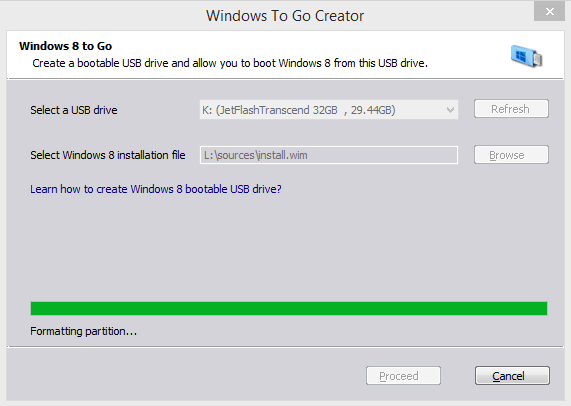
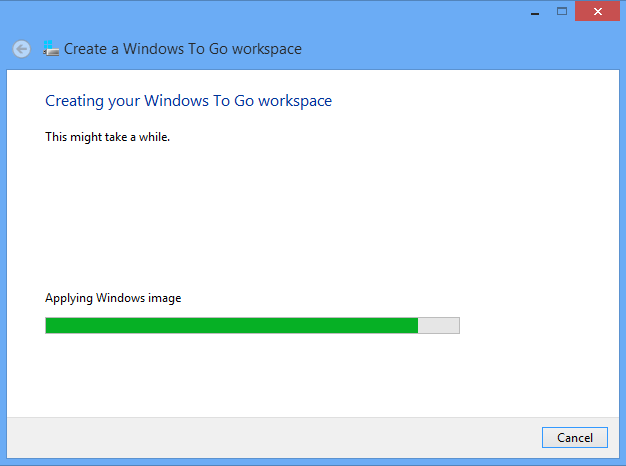
- Your USB drive will be formatted and the program will start deploying the image. This may take up to 90 minutes. You will see the time remaining on the screen so now will be a good time to take a break.

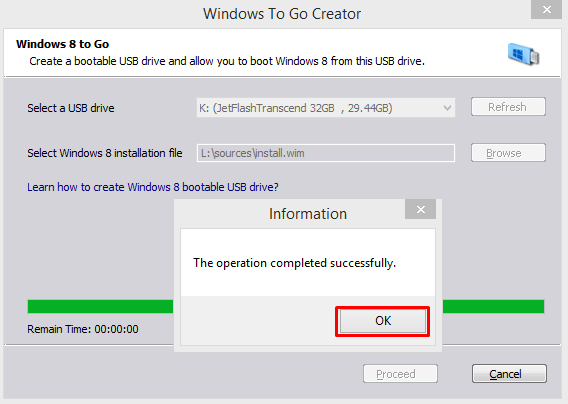
- After the deployment is complete you will see the prompt that the operation completed successfully. Click OK.

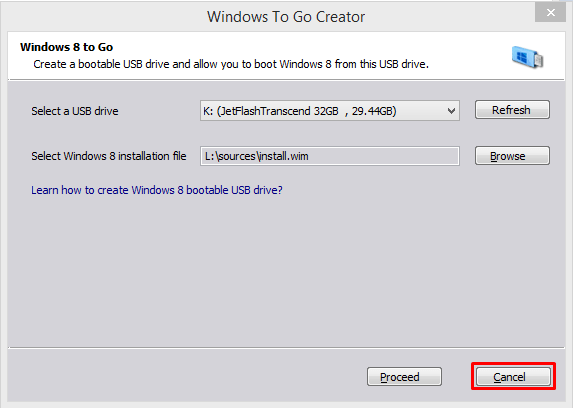
- This next screen is not what I was expecting. I was expecting a Finish button but I taken to the same screen that you see in Step 3 above. I clicked on Proceed but I got the warning that my USB drive will be formatted. What? I just deployed the image, I don’t want to format it again. That made no sense. I opened a File Explorer Window and went to the L: drive and noticed it has all the Windows 8 files. Well, my mama raised no dummies. I figured I better hit Cancel because my deployment is complete. I was right. I am not sure if there is a bug in the software or something else went wrong but just be careful otherwise you can end up in a loop.WARNING! If you end up seeing the following screen and clicking Proceed brings up the prompt to format the drive like you saw in Step 4, simply click Cancel and exit the Partition Assistant software. Your image is deployed and you are ready to configure your new Windows To Go drive.

Getting Windows To Go Workspace Ready for First Use
Microsoft refers to the Windows To Go drive running Windows 8 as Windows To Go Workspace. To get it ready for first use follow these instructions.
- Make sure your computer supports booting from a USB drive and if does, you need to ensure that the BIOS is configured to boot from a USB drive.
- To configure Windows To Go, turn off your host computer and then boot off your Windows To Go drive. I configured Windows To Go on my laptop because I had too many applications open on my desktop computer and didn’t really want to reboot my host computer. I turned off the laptop, inserted my Windows To Go drive, and then restarted the system. It went through the configuration options and rebooted once or twice. I was working on other things at that time so didn’t play close attention. It was just like installing Windows 8 on any other computer. After about 25 minutes I saw the screen to accept the license terms. This is the first time that you need to interact with the system. Here are the steps that you will take.
- Accept the license terms.
- Personalize the color scheme and name the PC.
- Select a wireless network or connect to a wireless network later.
- Enter the wireless network password if you opted to connect to it now.
- Select Express or Customize settings. As a best practice always use custom settings.
- Enter an account name and password.
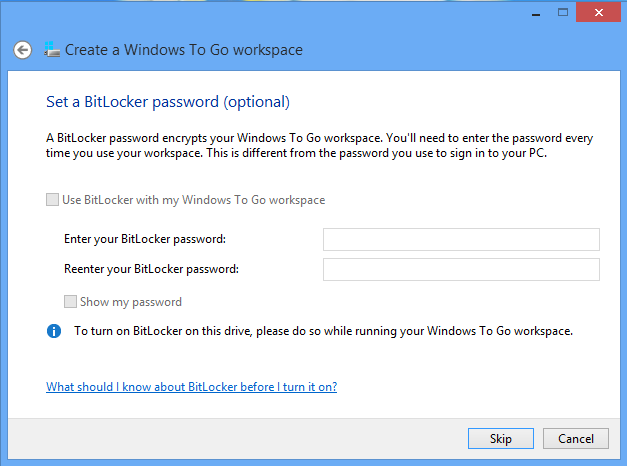
Don’t forget to encrypt your drive with BitLocker if you want to secure information on your Windows To Go drive. I strongly recommend that you use BitLocker to encrypt your drive.
OPTION 2 – Install Windows To Go Using the Manual Method
As I mentioned earlier, I have a Transcend 32GB USB 3.0 drive. We will prepare this drive to make sure everything goes smoothly. If this drive was in use before, copy the data to another drive because we will wipe this drive clean.
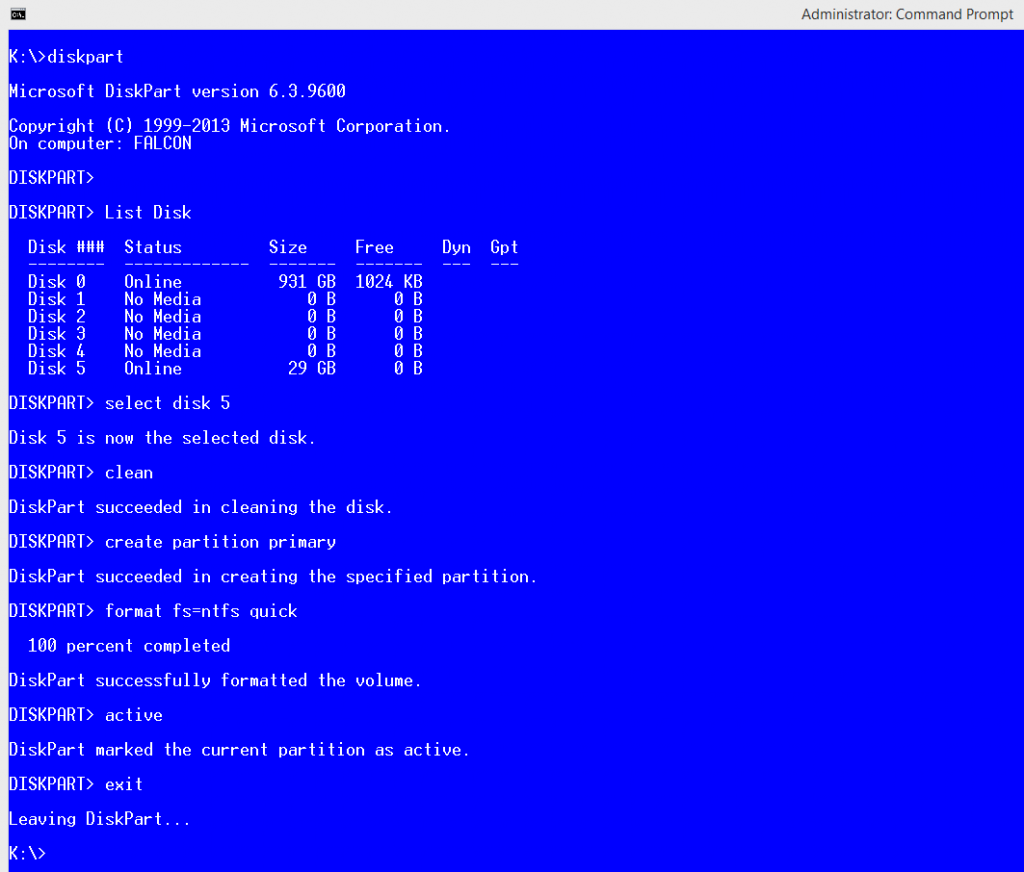
- On your Windows 8 host computer start the Command Prompt with Administrative credentials.
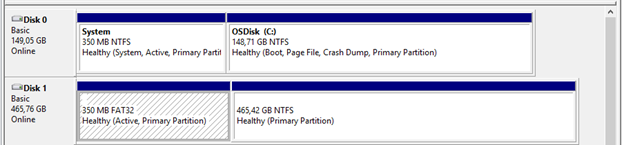
- You will use the built-in DISKPART utility in Windows 8 to configure the USB 3.0 drive. Before you start using the DISKPART utility here is a warning and a few comments that you will find helpful as you work with the commands.WARNING! It is important that you select the correct disk number after you use the command List Disk. Because in our case disk 5 is the USB drive (it’s a 32GB drive but it shows 29GB because it was formatted with NTFS in the past). In the next step we need to make sure that we use select disk 5 because we will format disk 5.COMMENTS:
– The clean command is used to remove all data, formatting, and initialization information from the drive.
– The quick at the end of format command saves us time because the drive had been formatted in the past and there is no need to do a complete format.
– When we mark the partition active we ensure that we can boot off of this active partition.
– I am going to use the Windows 8.1 Enterprise ISO file. Copy it on my Windows 8 Pro computer and then Mount it as a drive.
– You don’t have to switch to the USB drive but in this example I will switch to the K: drive and then run the DISKPART.Let’s get started with the DISKPART utility. You can use either the screenshot or the commands listed below in green. The commands are not case-sensitive.
K:\>diskpartMicrosoft DiskPart version 6.3.9600Copyright (C) 1999-2013 Microsoft Corporation.
On computer: WINDOWS8DISKPART> List DiskDisk ### Status Size Free Dyn Gpt
——– ————- ——- ——- — —
Disk 0 Online 931 GB 1024 KB
Disk 1 No Media 0 B 0 B
Disk 2 No Media 0 B 0 B
Disk 3 No Media 0 B 0 B
Disk 4 No Media 0 B 0 B
Disk 5 Online 29 GB 0 BDISKPART> select disk 5Disk 5 is now the selected disk.
DISKPART> clean
DiskPart succeeded in cleaning the disk.
DISKPART> create partition primary
DiskPart succeeded in creating the specified partition.
DISKPART> format fs=ntfs quick
100 percent completed
DiskPart successfully formatted the volume.
DISKPART> active
DiskPart marked the current partition as active.
DISKPART> exit
Leaving DiskPart…
K:\>
- Let’s make the USB drive bootable. At the Command Prompt run the following command.
bcdboot k:\windows /s k: /f all
Notice there is a space between the switch /f and the word all. The letter K in both places represents my USB drive.
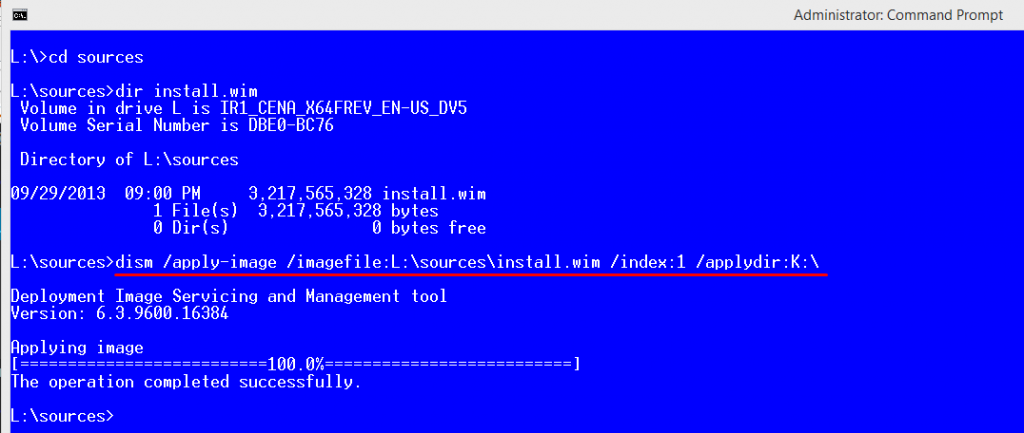
- Now that the USB drive is configured let’s mount our ISO file in Windows 8. Locate the ISO file, right-click and select Mount. By mounting the ISO file we have a new drive letter in Windows File Manager and it essentially looks and acts exactly as if you have inserted a DVD in a DVD ROM drive. In my case the system assigned a drive letter L.
- In this step you will use Deployment Image Servicing and Management (DISM) tool to deploy the Windows 8 Enterprise image. DISM can be used to service a Windows image (.wim) file or a virtual hard disk (.vhd or .vhdx). With DISM you can mount, unmount, capture, append, delete and query .wim, .vhd and .vhdx files. The command line options used in DISM are not case sensitive. Capitalization is only used for readability. Because DISM is built into Windows 8 I recommend using DISM to create a Windows To Go USB drive rather than using the old IMAGEX tool. Follow the instructions in the screenshot below.At the Command Prompt, switch to the drive letter L: where the ISO file is mounted. Change to the Sources folder by typing cd sources. There is a file called install.wim that we need. If you type dir install.wim you will see it listed.
Type the following command where L: is our mounted drive letter for the ISO file and K: is the USB drive. The index should always be 1.dism /apply-image /imagefile:L:\sources\install.wim /index:1 /applydir:K:\
In the above command there was no need for us to use the full path L: \sources\install.wim because we are already in the Sources folder on drive L. I only used it so in case you are on a different drive the command will still work as long as you use the full path for the install.wim file. On my computer it took a little over an hour to complete the process. Depending on your computer, RAM, CPU etc. it may take several hours but at least you can see the progress displayed in percentage on your screen. On my computer it took about 90 minutes for this operation. Once the operation is complete you are done with the deployment.

Getting Windows To Go Workspace Ready for First Use
Microsoft refers to the Windows To Go drive running Windows 8 as Windows To Go Workspace. To get it ready for first use follow these instructions.
- Make sure your computer supports booting from a USB and if does, you need to ensure that the BIOS is configured to boot from a USB drive.
- To configure Windows To Go, turn off your host computer and then boot off of your Windows To Go drive. It will go through the configuration options and reboot a couple of times. After about 25 minutes you will see the screen to accept the license terms. This is the first time that you need to interact with the system. Here are the steps that you will need to take.
- Accept the license terms.
- Personalize the color scheme and name the PC.
- Select a wireless network or connect to a wireless network later.
- Enter the wireless network password if you opted to connect to it now.
- Select Express or Customize settings. As a best practice always use custom settings.
- Enter an account name and password.
Don’t forget to encrypt your drive with BitLocker if you want to secure information on your Windows To Go drive. You see, the entire process wasn’t really difficult at all. Other than the waiting time for the image to be deployed and configuring it for first use, you just drank your coffee, tweeted a couple of times, checked out the weather report, and the next thing you know you have a Windows To Go in your pocket. How cool is that?
Windows To Go Highlights
Here are some important points to know. Some of them are from Windows To Go FAQs page.
- Windows To Go is supported by Microsoft on USB 3.0 drives that are certified for Windows To Go but will also work on non-certified USB 3.0 drives. It’s just that it won’t be supported by Microsoft if you install it on a non-certified USB drive.
- Windows To Go is fully supported on either USB 2.0 ports or USB 3.0 ports on PCs that are certified for Windows 7/8/8.1.
- Microsoft officially supports Windows To Go only on Windows 8 Enterprise and Windows 8.1 Enterprise. However, there are workarounds to make it work with any version of Windows 8 or Windows 8.1.
- Windows To Go doesn’t require a USB 3.0 port, it only requires a USB 3.0 drive. Because USB 3.0 drives are backwards compatible, they will also boot off of a USB 2.0 port just fine.
- By default Windows To Go supports all power states except hibernation. This can be changed in local Group Policy (gpedit.msc) located at \Computer Configuration\Administrative Templates\Windows Components\Portable Operating System\.
- Windows To Go is not supported on a Mac.
- Windows To Go is not supported on a Windows RT computer.
- You cannot upgrade a Windows To Go USB drive. For example, you cannot upgrade Windows 8 to Windows 8.1. You will have to create a new image of Windows 8.1 on Windows To Go.
- You may need to configure your BIOS to allow your computer to boot from a USB drive. Obviously, your computer must support booting from USB drives. If you have an older computer it many not.
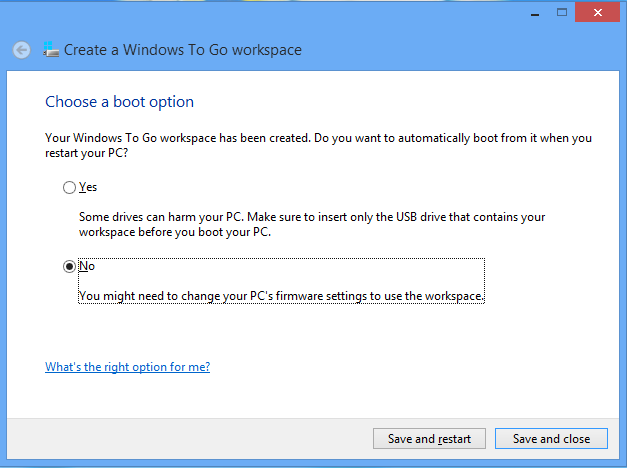
- When you create a Windows To Go workspace, you’ll be asked if you want to boot your PC from the USB drive automatically. You should answer Yes, otherwise you will have to go into your PC’s firmware and make changes to the startup options.
- By default, hibernation is disabled in Windows To Go.
Best Practices for Using Windows To Go
Here are some of my best practices for using Windows To Go.
- Use USB 3.0 port on your computer with Windows To Go because it will be much faster than USB 3.0 port.
- Don’t plug your Windows To Go drive in your computer while the operating system is running on the host computer. Turn off the computer first, plug Windows To Go drive and then restart the computer.
- Microsoft recommends that you don’t install non-Microsoft core USB drivers on Windows To Go.
- Do not remove Windows To Go drive if your host PC is hibernating. If you have removed the Windows To Go drive, you should plug it back into the same USB port it was using before waking the host system from hibernation.
- If you accidentally remove the Windows To Go drive while it’s running, which is a bad idea, you should plug it back within 60 seconds in the exact same port as before otherwise your host computer will turn off and bad things can happen to your host computer, Windows To Go drive, or both.
- When you start your host computer to boot with Windows To Go USB drive just make sure that it is the only removable USB drive plugged into your computer.
- If you plan on using BitLocker, which I strongly encourage, then configure it at the beginning when there isn’t much content on your drive.
Resources
You may find the following links helpful. Although I have highlighted some of the important points from the FAQs in the Windows To Go highlights section, I strongly recommend going through the entire Windows To Go FAQs page.
- Windows To Go FAQs
- Best Practice Recommendations for Windows To Go
- Security and Data Protection Considerations for Windows To Go
- DISM Image Management Command-Line Options
Hope you enjoy using Windows To Go. Please share your experiences by commenting on this article and let me know how you feel about Windows To Go.
Copyright ©1999-2015 SeattlePro Enterprises, LLC. All rights reserved.
Время на прочтение6 мин
Количество просмотров137K
Технология Windows To Go (WTG) – одна из новых возможностей Windows 8 – позволяет создать должным образом сконфигурированный образ ОС с установленным необходимым ПО, который будет загружаться непосредственно с USB-носителя вне зависимости от того, какая ОС установлена на компьютере, к которому подключается данный USB-носитель. В рамках поста кратко обсудим возможные сценарии применения WTG, настройку и некоторые особенности использования.
Зачем это нужно?
Прямым результатом применения технологии WTG является загрузочный USB-носитель (флэшка или внешний HDD), на котором располагается полностью готовая к использованию ОС Windows 8. «Полностью готовая» означает, что эта ОС должным образом сконфигурирована в соответствии с требованиями организации: включена в домен, если необходимо, к ней применены групповые политики, включая политики безопасности, патчи, настроены технологии удаленного доступа (VPN/DirectAccess), установлен требуемый набор ПО и т.д. Такой носитель достаточно подключить к любому компьютеру, совместимому с Windows 7 или Windows 8, и загрузиться прямо с него. При этом вы получаете вашу персональную ОС со всеми настройками и никак не влияете на ОС, установленную непосредственно на жесткий диск данного компьютера.
Соответственно, WTG относится к корпоративным возможностям Windows 8, то есть ориентирована на использование, в первую очередь, на предприятии. Наиболее очевидные сценарии применения WTG:
- Мобильные сотрудники. Сотрудники, которые, например, часто перемещаются между филиалами компании и при этом нуждаются в каждом из них в доступе в корпоративную сеть с использованием своих настроек, документов и пр. Иметь с собой вместо ноутбука весом пару-тройку килограмм небольшой внешний жесткий диск или даже флэшку, для многих может оказаться весьма привлекательным вариантом. Приехав на очередную площадку, достаточно воткнуть носитель в подходящий компьютер.
- Временные сотрудники, работающие, например, в рамках какого-либо проекта. У такого сотрудника может быть свой ноутбук, который никак не отвечает требованиям безопасности вашей сети. Снабдите его подготовленным носителем с образом WTG, и этот сотрудник сможет на своем ноутбуке использовать ваш образ для работы над проектом.
- Сотрудники без фиксированных рабочих мест (или работающие посменно), которым, тем не менее, необходимо выходить в корпоративную сеть в офисе или же за его пределами.
- Работа из дома. При необходимости сотрудник может загрузить домашний компьютер с помощью подготовленного образа WTG и получить доступ в корпоративную сеть и к бизнес-приложениям.
Этот список, конечно, можно расширить. Также очевидно, что все перечисленные выше сценарии могут быть реализованы другими способами, без WTG. Однако, наличие дополнительного варианта в виде WTG может стать неплохим подспорьем для ИТ-отдела организации.
Как настроить WTG?
Сначала рассмотрим аппаратные требования, которые существуют как для USB-носителей, так и для хостов, к которым носители будут подключаться.
Требования к носителю
Чтобы решение было
поддерживаемым
, необходимо использовать носители, сертифицированные для WTG. На момент написания поста согласно информации с портала TechNet в список сертифицированного оборудования входят:
- Kingston DataTraveler Workspace for Windows To Go (http://www.kingston.com/wtg/)
- Spyrus Portable Workplace (http://www.spyruswtg.com/)
- Spyrus Secure Portable Workplace (http://www.spyruswtg.com/)
- Super Talent Express RC8 for Windows To Go (http://www.supertalent.com/wtg/)
- Western Digital My Passport Enterprise (http://www.wd.com/wtg)
На практике я использовал, например, полутерабайтный Seagate FreeAgent GoFlex с USB 3.0, не входящий в данный список. Технических проблем не было никаких, но надо помнить, что во-первых, устройство должно быть USB 3.0, во-вторых, раз HDD не является сертифицированным, то в случае проблем обращаться в техподдержку Microsoft не стоит.
Требования к хосту
Любой компьютер, сертифицированный для Windows 7 или Windows 8. Но опять же, с практической точки зрения можно говорить о любой не сильно устаревшей x86 или x64 системе с USB 2.0 и выше и с возможностью загрузки с USB-устройства.
Варианты развертывания WTG
Можно выделить три основных варианта развертывания WTG:
- с помощью мастера Windows To Go Creator Wizard;
- с помощью скрипта (PowerShell + утилиты работы с образами DISM или ImageX);
- с помощью инструмента User Self-Provisioning в System Center 2012 Configuration Manager SP1.
Поддерживаемые редакции Windows 8
Какой бы вариант развертывания вы не выбрали, вам потребуются wim-файлы, содержащие сконфигурированные образы ОС и необходимое ПО. Внутри wim-файла должна быть Windows 8 Enterprise. Другие редакции не поддерживаются. Кроме того, мастер Windows To Go Creator Wizard также есть только в Windows 8 Enterprise, поэтому именно эта редакция рекомендуется для машины, на которой вы планируете создавать WTG.
Создание имиджа с помощью Windows To Go Creator Wizard
Предполагая, что хотя бы один wim-файл у вас уже есть, и необходимый USB-носитель подключен, рассмотрим по шагам создание WTG с помощью мастера. Настройку с помощью командной строки можно посмотреть здесь. Найти мастер можно нажав Win+W и набрав “Windows To Go”.
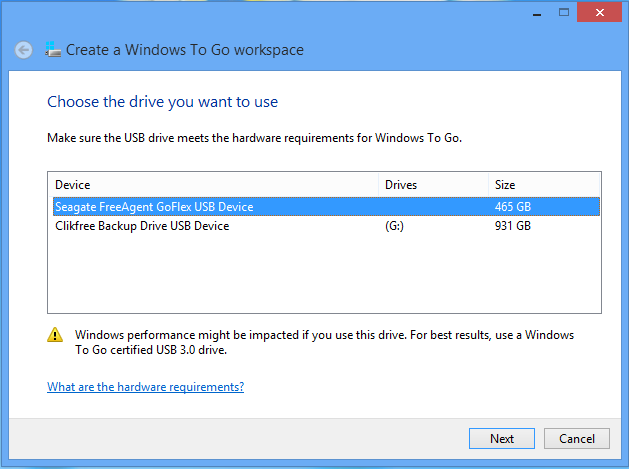
На первом экране выбираем нужный носитель.
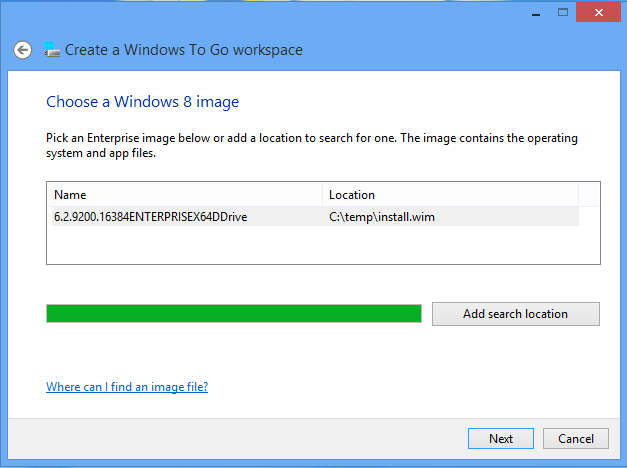
С помощью кнопки “Add search location” указываем папку с wim-файлом (-ами).
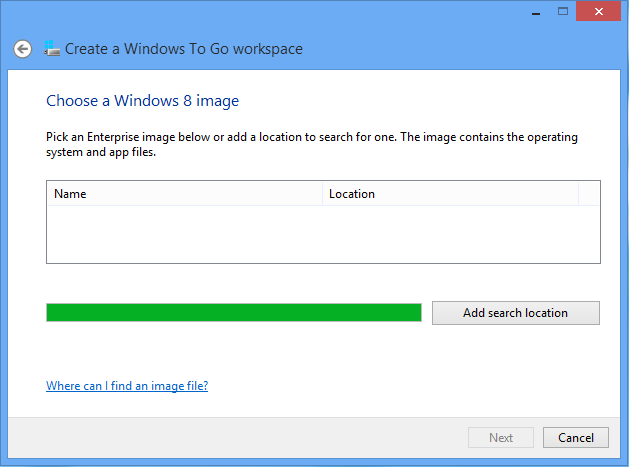
Мастер анализирует и отображает найденные образы.
На следующем экране можно включить шифрование носителя с помощью BitLocker.
Все готово для создания WTG, остается нажать “Create”.
Создание имиджа занимает некоторое время. В моем случае wim-файл имел объем примерно 3 GB, располагался на SSD-диске, время создания носителя WTG составило 12 минут.
На последнем экране мастер предлагает изменить порядок загрузки вашего компьютера с тем, чтобы в следующий раз машина грузилась с USB.
Собственно, это все. Остается загрузиться с подготовленного носителя и начать работу.
Особенности использования WTG
Есть ряд особенностей WTG, которые следует иметь в виду при эксплуатации технологии.
При первой загрузке с WTG-носителя на некотором компьютере происходит определение оборудования и установка соответствующих драйверов. Этот процесс, разумеется, занимает какое-то время. Однако система запоминает конфигурацию для данного компьютера и последующие загрузки на нем происходят без задержек.
По соображениям безопасности, по умолчанию, локальный жесткий диск компьютера, на котором мы загрузились с помощью WTG, находится в состоянии offline, и доступ к разделам этого диска запрещен. Данная настройка может быть изменена. Кроме того, если у пользователя есть административные права на компьютер, он может вручную перевести диск в online и получить доступ к разделам.

По тем же соображениям в обратной ситуации, когда, работая за компьютером, вы подключаете WTG-носитель, Windows монтирует этот носитель без присвоения литер разделам носителя. Таким образом, в Windows Explorer WTG-устройство не видно.
При запуске на новом железе Windows должна быть активирована. Напомню, WTG позиционируется как корпоративная возможность, поэтому предполагается, что в организации настроен сервис KMS или активация через Active Directory (новая возможность Windows Server 2012), и тогда для пользователя процесс активации пройдет незамеченным.
При использовании WTG доступны все возможности Windows, кроме Windows Store. Сделано это, поскольку покупки в Windows Store привязываются к конкретному компьютеру, и соответствующие приложения отключаются при запуске на другой машине. Тем не менее, если необходимо, чтобы Windows Store был доступен, можно включить его для имиджей WTG через групповую или локальную политики: \\Computer Configuration\Administrative Templates\Windows Components\Store\.
Последнее замечание связано с настройкой загрузки компьютера с USB-носителя. Если нужно, чтобы пользователь самостоятельно мог изменить порядок загрузки компьютера без залезания в BIOS или нажатия какой-то волшебной комбинации клавиш, можно воспользоваться специальной утилитой, присутствующей в любой редакции Windows 8. Найти ее можно уже известным способом, нажав Win+W и набрав “Windows To Go”.

Выберите нужный пункт, и при очередном рестарте система начнет загрузку с USB.

Таким образом, WTG – простой и безопасный способ создания управляемого мобильного образа Windows 8 для ваших сотрудников.
Дополнительную информацию о технологии Windows To Go можно получить в докладе «Обзор технологии Windows To Go: новые возможности, сценарии применения и способы развёртывания в корпоративной среде» конференции TechEd Russia 2012.
Возможности Active Directory в Windows Server 2012, включая активацию через AD, рассматриваются в первом модуле курса «Новые возможности Windows Server 2012. Часть 2. Безопасность, управление, удаленный доступ, веб-платформа» на портале MVA.
Надеюсь, материал был полезен.
Спасибо!
What’s Windows To Go
— From Wikipedia, the free encyclopedia
«Windows To Go is a feature in Windows 8.1 Enterprise, Windows 8 Enterprise, Windows 10 Enterprise, and Windows 10 Education that allows them to boot and run from certain USB mass storage devices such as USB flash drives and external hard disk drives which have been certified by Microsoft as compatible. It is a fully manageable corporate Windows environment.»
According to Wiki’s explanation, the creation of Windows To Go drives provides users with an imaged version of Windows, which allows them to take Windows OS anywhere on any compatible device. It’s particularly useful when Windows startup issues occurred, such as your PC couldn’t start properly.
However, the Windows To Go feature is confined and only available in Windows 10 Education and Windows 8/8.1/10 Enterprise. Can Windows users out of the supported Windows editions enjoy the Windows To Go convenience and create bootable USB of their own?
It’s possible, actually, by either using Diskpart command line or third-party Windows To Go creator.
The Best Windows To Go Creator for Windows 10/8.1/8/7
When it comes to creating a portable Windows USB drive that performs like Windows To Go drive, we’d like to introduce you EaseUS Todo Backup. It’s Windows backup software, USB bootable software as well as disk/partition clone utility that supports to migrate OS to a new drive along with all its configuration. Besides, you can create a portable Windows USB drive under its system clone feature.
Video tutorial:
To create a Windows To Go bootable USB drive, follow this guide.
Step 1. Insert your USB flash drive into a Windows computer. Launch EaseUS Todo Backup and click System Clone.

Step 2. Choose the USB drive as the destination disk to clone system disk (Only make sure that your USB drive has to be bigger than the source disk). Click on Advanced options and then Create Portable Windows USB drive. Click Next.

Step 3. Now the system disk containing your personalized operating system and boot files will be imaged to the USB flash drive.
Когда речь заходит о программах для создания загрузочной флешки, большинство пользователей вспоминают о таких утилитах как Rufus или Ventoy, но это не единственные отличные инструменты для этой цели.
В этом обзоре о Hasleo WinToUSB Free, создании загрузочного установочного накопителя Windows в этой программе и дополнительных функциях, которые могут оказаться полезными. Также может пригодиться: Лучшие программы для создания загрузочной флешки.
WinToUSB — использование и возможности
Официальный сайт WinToUSB, где можно скачать программу — https://www.easyuefi.com/wintousb/, утилита доступна в двух версиях: бесплатной и платной, для большинства пользователей бесплатной версии будет более чем достаточно. Русский язык интерфейса присутствует.

В главном окне программы вам будет предложен выбор между тремя основными её возможностями:
- Создание USB-накопителя Windows To Go — то есть загрузочной флешки с полноценной установкой Windows, позволяющей работать с неё на разных компьютерах.
- Установочный USB с Windows — создание загрузочной флешки для чистой установки Windows на ПК или ноутбук.
- Загрузочный USB с WinPE — создание загрузочной флешки из образа WinPE, пример такого образа описан в этой инструкции.
Загрузочная установочная флешка Windows в WinToUSB
Создание загрузочной флешки для установки Windows 11, 10 или других версий в WinToUSB не сложнее чем в других аналогичных программах:
- В окне создания установочного USB с Windows нажмите по пункту «Выберите источник установки» и укажите образ ISO, WIM или ESD на своем компьютере. Там же есть опция для скачивания ISO образа, которая будет рассмотрена в конце инструкции.

- Выберите флешку в пункте «Выберите целевой диск».
- Выберите схему разделов диска, на сегодня оптимальным выбором для большинства систем будет GPT для UEFI. Для образов Windows 11 вы можете установить отметку «Обход системных требований Windows 11».
- Нажмите кнопку «Начать» для начала записи загрузочного установочного накопителя и дождитесь завершения процесса.

На этом всё, установочная флешка готова, достаточно поставить загрузку с флешки и использовать её для чистой установки системы.
Windows To Go
Создание накопителя Windows To Go — одна из самых интересных возможностей в WinToUSB. Вы можете записать загрузочный USB накопитель для запуска нужной версии Windows с него без необходимости установки на компьютер.
Шаги достаточно простые:
- Следует выбрать образ для установки (ISO, ESD, WIM), либо скопировать текущую установку Windows, либо — использовать возможность загрузки ISO образа с сайта Майкрософт.
- Выбрать целевой диск (флешку), схему разделов, режим установки (для Windows 7 лучше выбрать VHD, но даже в этом случае может не заработать правильно в режиме Windows To Go, лучше использовать Windows 11 или Windows 10), при необходимости —внедрить дополнительные драйверы и включить шифрование BitLocker.
- Нажать кнопку «Начать» и дождаться завершения процесса записи (установки) Windows на флешку. Учитывайте, что он займет продолжительное время, значительно дольше чем простое создание загрузочной флешки.


По завершении вы сможете использовать созданный накопитель Windows To Go на любом компьютере (но на некоторых могут быть проблемы с совместимостью) для запуска системы прямо с флешки.
Учитывайте следующие нюансы:
- Windows с флешки работает куда медленнее чем напрямую с жесткого диска и тем более с SSD. Также при записи накопителя вы можете увидеть сообщение о том, что производительность USB-накопителя недостаточна для Windows To Go — желательно использовать быстрые USB 3.0 или более новые флешки. При отсутствии, можно поэкспериментировать и с медленной, но следует быть готовыми к отсутствию комфорта при работе.

- Для запуска в некоторых случаях может потребоваться отключить Secure Boot на компьютере.

WinPE
В части записи ISO образов WinPE всё ещё проще, чем в предыдущих случаях:

Всего три шага: выбрать образ ISO, накопитель, на который он будет записан и нажать кнопку «Начать». После завершения процесса загрузочная флешка с нужным вам LiveCD на базе WinPE будет готова к работе.
Скачивание ISO Windows 11, Windows 10 и 8.1 с сайта Майкрософт в WinToUSB
При выборе образа для накопителя Windows To Go или загрузочной установочной флешки, вам будет доступна опция «Скачать ISO образ». Она откроет вкладку WinToUSB с возможностью выбора версии Windows и загрузки официального образа с сайта Майкрософт:

В РФ выбор образа и получение ссылки работает только с VPN, но: получив прямую ссылку на оригинальный файл образа вы сможете его скачать напрямую через браузер даже без использования VPN (учитывайте, что такая ссылка имеет ограниченный срок действия).
Подводя итог, программа отличная и стоит внимания, особенно если вам требуется средство для создания Windows To Go накопителей для запуска Windows с флешки без установки на компьютер.
Добрый день уважаемая каста обладателей Steam Deck. Относительно недавно я настрочил графоманский гайд по самой базированной установке игр.
Учимся основам деководства.
Пост посвящён неофитам, которые вот только что влились в «семью деководов» и не знают с какой стороны подойти к этой чудесной вундервафле. Ну и подойдёт ещё тем, кто долгое время особо не вникал и играл в нативные версии игр для линухи из Steam (извращенцы). В этой статье мы научимся обходиться штатными средствами Дека, не прибегая к помощи других…
И в комментариях под этой статьёй всплыл очень интересный вопрос, который мучает умы всех неофитов готовящихся вот-вот войти в наши дружные ряды.
Отвечу на вопрос Алксандра. Да, такое сделать можно. Я бы даже сказал, что нужно, ибо насиловать свой Дек установкой виндузы на внутренний SSD, со сносом родной оси, будет только самый сумасшедший мазохист и извращенец.
Итак, пришло время представить героя нашей статьи и это…барабанная дробь…Windows To Go.
Windows To Go это идейное продолжение Windows PE, но намного лучше. Ибо идёт полноценная установка ОС со всеми драйверами и программами, да и она своими тентаклями не лезет на ваш внутренний накопитель
Итак, для закатки нашей пердузы на съёмный накопитель нам понадобятся:
- Съёмный накопитель (желательно NVME)
- Дистрибутив ОС
- Драйвера для нашего Steam Deck
- Программа Hasleo WinToUSB
Перво наперво скачаем драйвера на наш Steam Deck. Посещаем вот этот сайт.
На этом сайте есть драйвера для двух версий Steam Deck. Выбирайте только для своей версий.
Все архивы распаковать по своим папкам, а потом все папки запихнуть в одну, откуда программа будет тянуть драйвера.
Итак, посещаем сайт программы и скачиваем её бесплатную версию и устанавливаем.
Через бесплатную версию этой программы можно установить только Home версию Windows. Если хотите Pro, то покупайте лицензию или ищите крякнутую версию на трекерах.
В общем, мы закончили с подготовлением. Теперь приступаем к основной части этого гайда.
Запускаем Hasleo WinToUSB.
Выбираем пункт USB с Windows To Go и попадаем в другое окно.
Итак, в источнике установки выбираем образ нашей операционной системы, а целевым диском выступит наш съёмный накопитель. Всё должно выглядеть вот так.
Снизу будет маленькая стрелочка. Нужно на неё нажать, чтобы развернуть дополнительные настройки.
В пункте дополнительные драйверы выбираем папку с нашими заранее распакованными драйверами. И если у вас не стоит галочка на Автономные внутренние диски при загрузке Windows To Go то лучше её поставьте, иначе винда будет лезть своими тентаклями в наш внутренний накопитель.
Всё, подготовка закончена. Жмём Начать и ждём окончание процесса установки. Время установки составляет примерно 20-30 минут. Статус установки можно будет отследить тут.
После установки можно смело отключать наш съёмный накопитель.
Теперь берём наш Steam Deck и заходим в BIOS. Чтобы зайти в BIOS нужно на выключенном устройстве зажать + и один раз нажать на кнопку power. Держим палец на + до тех пор, пока не попадём в сам BIOS.
В биосе выбираем пункт Setup Utility. Переходим во вкладку Boot и активиру��м параметр USB Boot. После активации этого параметра вы можете загружаться с внешних носителей
Подключаем наш внешний накопитель. Заходим в Bios. Выбираем пункт Boot Menu. Вуаля, у вас пошёл запуск винды. После каждого перезапуска запускаемся через Бут меню. А так дальнейший сценарий будет точно таким же, как при первом запуске винды. Подключение к сети, своему аккаунту, загрузка обновлений и т.д. С этим вы сами разберётесь. Дам только пару советов.
- Сначала установите все обновления.
- Потом установите клиент Steam.
Если с самого начала не установить все обновления, то у вас будет тупо глохнуть Steam при запуске. А без клиента Steam, управление в самой системе будет очень кастрированное.