
Provide feedback
Saved searches
Use saved searches to filter your results more quickly
Sign up
Appearance settings

Files for Windows 10 was recently updated to version 1.5 with a ton of new features and performance improvements.
This new update also introduced support for custom themes which can be manually installed and applied to change the overall feel of the user interface.
Getting Started
First things first, you need to have version 1.5 installed on your Windows 10 PC. Get it here.
In order to select a theme within the app settings, we will create a new xaml resource dictionaries file and place it in the Themes folder in the app’s LocalState folder.
Navigate to this location in the file explorer and leave it open until you are finished with the steps below. Alternatively, Open Run Window (Win + R), paste the line below and hit enter on the keyboard.
C:\Users\%userprofile%\AppData\Local\Packages\49306atecsolution.FilesUWP_et10x9a9vyk8t\LocalState\Themes
Steps to follow
- Open notepad on your PC and paste in the template located below. Then, save the file as %userprofile%\AppData\Local\Packages\49306atecsolution.FilesUWP_et10x9a9vyk8t\LocalState\Themes\
NightTime.xaml - Open files app and go to settings > appearance.
- From the drop-down menu labeled “color scheme“, select your newly installed theme.
- Restart Files when prompted and your theme will now be loaded in.


Bonus
With the Fluent XAML Theme Editor, you can easily design and load your theme.
Looking for inspirational themes and/or want to upload your own for the community, visit here.
Template
<!-- Free Public License 1.0.0 Permission to use, copy, modify, and/or distribute this code for any purpose with or without fee is hereby granted. -->
<ResourceDictionary xmlns="http://schemas.microsoft.com/winfx/2006/xaml/presentation"
                    xmlns:x="http://schemas.microsoft.com/winfx/2006/xaml"
                    xmlns:Windows10version1809="http://schemas.microsoft.com/winfx/2006/xaml/presentation?IsApiContractPresent(Windows.Foundation.UniversalApiContract, 7)"
                    xmlns:BelowWindows10version1809="http://schemas.microsoft.com/winfx/2006/xaml/presentation?IsApiContractNotPresent(Windows.Foundation.UniversalApiContract, 7)">
    <ResourceDictionary.ThemeDictionaries>
        <ResourceDictionary x:Key="Default">
            <ResourceDictionary.MergedDictionaries>
                <Windows10version1809:ColorPaletteResources Accent="#FFCC4D11" AltHigh="#FF000000" AltLow="#FF000000" AltMedium="#FF000000" AltMediumHigh="#FF000000" AltMediumLow="#FF000000" BaseHigh="#FFFFFFFF" BaseLow="#FF2F7BAD" BaseMedium="#FF8DBFDF" BaseMediumHigh="#FFA5D0EC" BaseMediumLow="#FF5E9DC6" ChromeAltLow="#FFA5D0EC" ChromeBlackHigh="#FF000000" ChromeBlackLow="#FFA5D0EC" ChromeBlackMedium="#FF000000" ChromeBlackMediumLow="#FF000000" ChromeDisabledHigh="#FF2F7BAD" ChromeDisabledLow="#FF8DBFDF" ChromeGray="#FF76AED3" ChromeHigh="#FF76AED3" ChromeLow="#FF093B73" ChromeMedium="#FF134B82" ChromeMediumLow="#FF266B9F" ChromeWhite="#FFFFFFFF" ListLow="#FF134B82" ListMedium="#FF2F7BAD" />
                <ResourceDictionary>
                    <BelowWindows10version1809:Color x:Key="SystemAccentColor">#FFCC4D11</BelowWindows10version1809:Color>
                    <BelowWindows10version1809:Color x:Key="SystemAltHighColor">#FF000000</BelowWindows10version1809:Color>
                    <BelowWindows10version1809:Color x:Key="SystemAltLowColor">#FF000000</BelowWindows10version1809:Color>
                    <BelowWindows10version1809:Color x:Key="SystemAltMediumColor">#FF000000</BelowWindows10version1809:Color>
                    <BelowWindows10version1809:Color x:Key="SystemAltMediumHighColor">#FF000000</BelowWindows10version1809:Color>
                    <BelowWindows10version1809:Color x:Key="SystemAltMediumLowColor">#FF000000</BelowWindows10version1809:Color>
                    <BelowWindows10version1809:Color x:Key="SystemBaseHighColor">#FFFFFFFF</BelowWindows10version1809:Color>
                    <BelowWindows10version1809:Color x:Key="SystemBaseLowColor">#FF2F7BAD</BelowWindows10version1809:Color>
                    <BelowWindows10version1809:Color x:Key="SystemBaseMediumColor">#FF8DBFDF</BelowWindows10version1809:Color>
                    <BelowWindows10version1809:Color x:Key="SystemBaseMediumHighColor">#FFA5D0EC</BelowWindows10version1809:Color>
                    <BelowWindows10version1809:Color x:Key="SystemBaseMediumLowColor">#FF5E9DC6</BelowWindows10version1809:Color>
                    <BelowWindows10version1809:Color x:Key="SystemChromeAltLowColor">#FFA5D0EC</BelowWindows10version1809:Color>
                    <BelowWindows10version1809:Color x:Key="SystemChromeBlackHighColor">#FF000000</BelowWindows10version1809:Color>
                    <BelowWindows10version1809:Color x:Key="SystemChromeBlackLowColor">#FFA5D0EC</BelowWindows10version1809:Color>
                    <BelowWindows10version1809:Color x:Key="SystemChromeBlackMediumColor">#FF000000</BelowWindows10version1809:Color>
                    <BelowWindows10version1809:Color x:Key="SystemChromeBlackMediumLowColor">#FF000000</BelowWindows10version1809:Color>
                    <BelowWindows10version1809:Color x:Key="SystemChromeDisabledHighColor">#FF2F7BAD</BelowWindows10version1809:Color>
                    <BelowWindows10version1809:Color x:Key="SystemChromeDisabledLowColor">#FF8DBFDF</BelowWindows10version1809:Color>
                    <BelowWindows10version1809:Color x:Key="SystemChromeGrayColor">#FF76AED3</BelowWindows10version1809:Color>
                    <BelowWindows10version1809:Color x:Key="SystemChromeHighColor">#FF76AED3</BelowWindows10version1809:Color>
                    <BelowWindows10version1809:Color x:Key="SystemChromeLowColor">#FF093B73</BelowWindows10version1809:Color>
                    <BelowWindows10version1809:Color x:Key="SystemChromeMediumColor">#FF134B82</BelowWindows10version1809:Color>
                    <BelowWindows10version1809:Color x:Key="SystemChromeMediumLowColor">#FF266B9F</BelowWindows10version1809:Color>
                    <BelowWindows10version1809:Color x:Key="SystemChromeWhiteColor">#FFFFFFFF</BelowWindows10version1809:Color>
                    <BelowWindows10version1809:Color x:Key="SystemListLowColor">#FF134B82</BelowWindows10version1809:Color>
                    <BelowWindows10version1809:Color x:Key="SystemListMediumColor">#FF2F7BAD</BelowWindows10version1809:Color>
                    <Color x:Key="SystemChromeAltMediumHighColor">#CC0D2644</Color>
                    <Color x:Key="SystemChromeAltHighColor">#FF2F7BAD</Color>
                    <Color x:Key="SystemRevealListLowColor">#FF134B82</Color>
                    <Color x:Key="SystemRevealListMediumColor">#FF2F7BAD</Color>
                    <AcrylicBrush x:Key="SystemControlAcrylicWindowBrush" BackgroundSource="HostBackdrop" TintColor="{ThemeResource SystemChromeAltHighColor}" TintOpacity="0.8" FallbackColor="{ThemeResource SystemChromeMediumColor}" />
                    <!-- Override system shape defaults -->
                    <CornerRadius x:Key="ControlCornerRadius">2,2,2,2</CornerRadius>
                    <CornerRadius x:Key="OverlayCornerRadius">4,4,4,4</CornerRadius>
                    <!-- Override system borders -->
                    <Thickness x:Key="MenuBarItemBorderThickness">1,1,1,1</Thickness>
                    <Thickness x:Key="GridViewItemMultiselectBorderThickness">1,1,1,1</Thickness>
                    <Thickness x:Key="CheckBoxBorderThemeThickness">1</Thickness>
                    <x:Double x:Key="GridViewItemSelectedBorderThemeThickness">1</x:Double>
                    <x:Double x:Key="RadioButtonBorderThemeThickness">1</x:Double>
                    <Thickness x:Key="ButtonBorderThemeThickness">1,1,1,1</Thickness>
                    <Thickness x:Key="CalendarDatePickerBorderThemeThickness">1,1,1,1</Thickness>
                    <Thickness x:Key="TimePickerBorderThemeThickness">1,1,1,1</Thickness>
                    <Thickness x:Key="DatePickerBorderThemeThickness">1,1,1,1</Thickness>
                    <Thickness x:Key="ToggleSwitchOuterBorderStrokeThickness">1,1,1,1</Thickness>
                    <Thickness x:Key="RepeatButtonBorderThemeThickness">1,1,1,1</Thickness>
                    <Thickness x:Key="SearchBoxBorderThemeThickness">1,1,1,1</Thickness>
                    <Thickness x:Key="ToggleButtonBorderThemeThickness">1,1,1,1</Thickness>
                    <Thickness x:Key="TextControlBorderThemeThickness">1,1,1,1</Thickness>
                    <Thickness x:Key="ButtonRevealBorderThemeThickness">1,1,1,1</Thickness>
                    <Thickness x:Key="RepeatButtonRevealBorderThemeThickness">1,1,1,1</Thickness>
                    <Thickness x:Key="ToggleButtonRevealBorderThemeThickness">1,1,1,1</Thickness>
                    <Thickness x:Key="AppBarEllipsisButtonRevealBorderThemeThickness">1,1,1,1</Thickness>
                    <Thickness x:Key="AppBarButtonRevealBorderThemeThickness">1,1,1,1</Thickness>
                    <Thickness x:Key="AppBarToggleButtonRevealBorderThemeThickness">1,1,1,1</Thickness>
                    <Thickness x:Key="ListViewItemRevealBorderThemeThickness">1,1,1,1</Thickness>
                    <Thickness x:Key="GridViewItemRevealBorderThemeThickness">1,1,1,1</Thickness>
                    <Thickness x:Key="ComboBoxItemRevealBorderThemeThickness">1,1,1,1</Thickness>
                    <x:Double x:Key="PersonPictureEllipseBadgeStrokeThickness">1</x:Double>
                    <!-- Override system generated accent colors -->
                    <Color x:Key="SystemAccentColorDark1">#FFD4632D</Color>
                    <Color x:Key="SystemAccentColorDark2">#FFDC7949</Color>
                    <Color x:Key="SystemAccentColorDark3">#FFE58E66</Color>
                    <Color x:Key="SystemAccentColorLight1">#FFB93E0E</Color>
                    <Color x:Key="SystemAccentColorLight2">#FFA62F0A</Color>
                    <Color x:Key="SystemAccentColorLight3">#FF932107</Color>
                    <Color x:Key="RegionColor">#FF0D2644</Color>
                    <SolidColorBrush x:Key="RegionBrush" Color="{StaticResource RegionColor}" />
                </ResourceDictionary>
            </ResourceDictionary.MergedDictionaries>
        </ResourceDictionary>
        <ResourceDictionary x:Key="Light">
            <ResourceDictionary.MergedDictionaries>
                <Windows10version1809:ColorPaletteResources Accent="#FFCC4D11" AltHigh="#FFFFFFFF" AltLow="#FFFFFFFF" AltMedium="#FFFFFFFF" AltMediumHigh="#FFFFFFFF" AltMediumLow="#FFFFFFFF" BaseHigh="#FF000000" BaseLow="#FF7CBEE0" BaseMedium="#FF3282A8" BaseMediumHigh="#FF005A83" BaseMediumLow="#FF196E96" ChromeAltLow="#FF005A83" ChromeBlackHigh="#FF000000" ChromeBlackLow="#FF7CBEE0" ChromeBlackMedium="#FF005A83" ChromeBlackMediumLow="#FF3282A8" ChromeDisabledHigh="#FF7CBEE0" ChromeDisabledLow="#FF3282A8" ChromeGray="#FF196E96" ChromeHigh="#FF7CBEE0" ChromeLow="#FFC1E9FE" ChromeMedium="#FFB3E0F8" ChromeMediumLow="#FFC1E9FE" ChromeWhite="#FFFFFFFF" ListLow="#FFB3E0F8" ListMedium="#FF7CBEE0" />
                <ResourceDictionary>
                    <BelowWindows10version1809:Color x:Key="SystemAccentColor">#FFCC4D11</BelowWindows10version1809:Color>
                    <BelowWindows10version1809:Color x:Key="SystemAltHighColor">#FFFFFFFF</BelowWindows10version1809:Color>
                    <BelowWindows10version1809:Color x:Key="SystemAltLowColor">#FFFFFFFF</BelowWindows10version1809:Color>
                    <BelowWindows10version1809:Color x:Key="SystemAltMediumColor">#FFFFFFFF</BelowWindows10version1809:Color>
                    <BelowWindows10version1809:Color x:Key="SystemAltMediumHighColor">#FFFFFFFF</BelowWindows10version1809:Color>
                    <BelowWindows10version1809:Color x:Key="SystemAltMediumLowColor">#FFFFFFFF</BelowWindows10version1809:Color>
                    <BelowWindows10version1809:Color x:Key="SystemBaseHighColor">#FF000000</BelowWindows10version1809:Color>
                    <BelowWindows10version1809:Color x:Key="SystemBaseLowColor">#FF7CBEE0</BelowWindows10version1809:Color>
                    <BelowWindows10version1809:Color x:Key="SystemBaseMediumColor">#FF3282A8</BelowWindows10version1809:Color>
                    <BelowWindows10version1809:Color x:Key="SystemBaseMediumHighColor">#FF005A83</BelowWindows10version1809:Color>
                    <BelowWindows10version1809:Color x:Key="SystemBaseMediumLowColor">#FF196E96</BelowWindows10version1809:Color>
                    <BelowWindows10version1809:Color x:Key="SystemChromeAltLowColor">#FF005A83</BelowWindows10version1809:Color>
                    <BelowWindows10version1809:Color x:Key="SystemChromeBlackHighColor">#FF000000</BelowWindows10version1809:Color>
                    <BelowWindows10version1809:Color x:Key="SystemChromeBlackLowColor">#FF7CBEE0</BelowWindows10version1809:Color>
                    <BelowWindows10version1809:Color x:Key="SystemChromeBlackMediumColor">#FF005A83</BelowWindows10version1809:Color>
                    <BelowWindows10version1809:Color x:Key="SystemChromeBlackMediumLowColor">#FF3282A8</BelowWindows10version1809:Color>
                    <BelowWindows10version1809:Color x:Key="SystemChromeDisabledHighColor">#FF7CBEE0</BelowWindows10version1809:Color>
                    <BelowWindows10version1809:Color x:Key="SystemChromeDisabledLowColor">#FF3282A8</BelowWindows10version1809:Color>
                    <BelowWindows10version1809:Color x:Key="SystemChromeGrayColor">#FF196E96</BelowWindows10version1809:Color>
                    <BelowWindows10version1809:Color x:Key="SystemChromeHighColor">#FF7CBEE0</BelowWindows10version1809:Color>
                    <BelowWindows10version1809:Color x:Key="SystemChromeLowColor">#FFC1E9FE</BelowWindows10version1809:Color>
                    <BelowWindows10version1809:Color x:Key="SystemChromeMediumColor">#FFB3E0F8</BelowWindows10version1809:Color>
                    <BelowWindows10version1809:Color x:Key="SystemChromeMediumLowColor">#FFC1E9FE</BelowWindows10version1809:Color>
                    <BelowWindows10version1809:Color x:Key="SystemChromeWhiteColor">#FFFFFFFF</BelowWindows10version1809:Color>
                    <BelowWindows10version1809:Color x:Key="SystemListLowColor">#FFB3E0F8</BelowWindows10version1809:Color>
                    <BelowWindows10version1809:Color x:Key="SystemListMediumColor">#FF7CBEE0</BelowWindows10version1809:Color>
                    <Color x:Key="SystemChromeAltMediumHighColor">#CCCFEAFF</Color>
                    <Color x:Key="SystemChromeAltHighColor">#FF7CBEE0</Color>
                    <Color x:Key="SystemRevealListLowColor">#FFB3E0F8</Color>
                    <Color x:Key="SystemRevealListMediumColor">#FF7CBEE0</Color>
                    <AcrylicBrush x:Key="SystemControlAcrylicWindowBrush" BackgroundSource="HostBackdrop" TintColor="{ThemeResource SystemChromeAltHighColor}" TintOpacity="0.8" FallbackColor="{ThemeResource SystemChromeMediumColor}" />
                    <!-- Override system shape defaults -->
                    <CornerRadius x:Key="ControlCornerRadius">2,2,2,2</CornerRadius>
                    <CornerRadius x:Key="OverlayCornerRadius">4,4,4,4</CornerRadius>
                    <!-- Override system borders -->
                    <Thickness x:Key="MenuBarItemBorderThickness">1,1,1,1</Thickness>
                    <Thickness x:Key="GridViewItemMultiselectBorderThickness">1,1,1,1</Thickness>
                    <Thickness x:Key="CheckBoxBorderThemeThickness">1</Thickness>
                    <x:Double x:Key="GridViewItemSelectedBorderThemeThickness">1</x:Double>
                    <x:Double x:Key="RadioButtonBorderThemeThickness">1</x:Double>
                    <Thickness x:Key="ButtonBorderThemeThickness">1,1,1,1</Thickness>
                    <Thickness x:Key="CalendarDatePickerBorderThemeThickness">1,1,1,1</Thickness>
                    <Thickness x:Key="TimePickerBorderThemeThickness">1,1,1,1</Thickness>
                    <Thickness x:Key="DatePickerBorderThemeThickness">1,1,1,1</Thickness>
                    <Thickness x:Key="ToggleSwitchOuterBorderStrokeThickness">1,1,1,1</Thickness>
                    <Thickness x:Key="RepeatButtonBorderThemeThickness">1,1,1,1</Thickness>
                    <Thickness x:Key="SearchBoxBorderThemeThickness">1,1,1,1</Thickness>
                    <Thickness x:Key="ToggleButtonBorderThemeThickness">1,1,1,1</Thickness>
                    <Thickness x:Key="TextControlBorderThemeThickness">1,1,1,1</Thickness>
                    <Thickness x:Key="ButtonRevealBorderThemeThickness">1,1,1,1</Thickness>
                    <Thickness x:Key="RepeatButtonRevealBorderThemeThickness">1,1,1,1</Thickness>
                    <Thickness x:Key="ToggleButtonRevealBorderThemeThickness">1,1,1,1</Thickness>
                    <Thickness x:Key="AppBarEllipsisButtonRevealBorderThemeThickness">1,1,1,1</Thickness>
                    <Thickness x:Key="AppBarButtonRevealBorderThemeThickness">1,1,1,1</Thickness>
                    <Thickness x:Key="AppBarToggleButtonRevealBorderThemeThickness">1,1,1,1</Thickness>
                    <Thickness x:Key="ListViewItemRevealBorderThemeThickness">1,1,1,1</Thickness>
                    <Thickness x:Key="GridViewItemRevealBorderThemeThickness">1,1,1,1</Thickness>
                    <Thickness x:Key="ComboBoxItemRevealBorderThemeThickness">1,1,1,1</Thickness>
                    <x:Double x:Key="PersonPictureEllipseBadgeStrokeThickness">1</x:Double>
                    <!-- Override system generated accent colors -->
                    <Color x:Key="SystemAccentColorLight1">#FFD4632D</Color>
                    <Color x:Key="SystemAccentColorLight2">#FFDC7949</Color>
                    <Color x:Key="SystemAccentColorLight3">#FFE58E66</Color>
                    <Color x:Key="SystemAccentColorDark1">#FFB93E0E</Color>
                    <Color x:Key="SystemAccentColorDark2">#FFA62F0A</Color>
                    <Color x:Key="SystemAccentColorDark3">#FF932107</Color>
                    <RevealBackgroundBrush x:Key="SystemControlHighlightListLowRevealBackgroundBrush" TargetTheme="Light" Color="{ThemeResource SystemRevealListMediumColor}" FallbackColor="{ StaticResource SystemListMediumColor}" />
                    <Color x:Key="RegionColor">#FFCFEAFF</Color>
                    <SolidColorBrush x:Key="RegionBrush" Color="{StaticResource RegionColor}" />
                </ResourceDictionary>
            </ResourceDictionary.MergedDictionaries>
        </ResourceDictionary>
        <ResourceDictionary x:Key="HighContrast">
            <StaticResource x:Key="RegionColor" ResourceKey="SystemColorWindowColor" />
            <SolidColorBrush x:Key="RegionBrush" Color="{StaticResource RegionColor}" />
        </ResourceDictionary>
    </ResourceDictionary.ThemeDictionaries>
</ResourceDictionary>
Windows 10 supports themes which may include custom desktop backgrounds, sounds, mouse cursors, desktop icons, and an accent color. There are a number of methods you can use to change a theme in Windows 10. Let’s review them all.
In Windows 10, you can get extra themes using Windows Store or install them from a themepack file. Themes may include:
- Desktop background: An image, a set of images, or a solid color which can be used as a wallpaper.
- Colors. Windows 10 allows changing the color of the window frame, window borders, active elements and selected items.
- Sounds. A set of sounds that are assigned to various events like notifications, message dialogs, window operations, emptying the Recycle Bin, and so on.
- Screen Saver. Screen savers were created to save very old CRT displays from being damaged by issues like screen burn-in. These days, they are mostly used to personalize the PC with entertaining visuals or improve its security with additional password protection.
- Pointers. By default, Windows 10 comes with no custom cursors bundled and uses the same cursors as Windows 8. Users who love customizing their OS may want to change them.
- Desktop Icons. Themes can change icons like This PC, Recycle Bin, and so on.
Where Windows 10 stores themes
Windows 10 stores themes under different folders.
- Themes that you’ve installed manually, saved, or synced from your Microsoft account are stored in the folder
%LocalAppData%\Microsoft\Windows\Themes. - Default themes are the ones that come pre-installed with Windows 10. They can be found in the folder
C:\Windows\Resources\Themes. - High Contrast Themes. — Themes that make items on your screen easier to see. They are part of the Ease of Access feature of Windows 10. They can be found in the folder
C:\Windows\Resources\Ease of Access Themes.
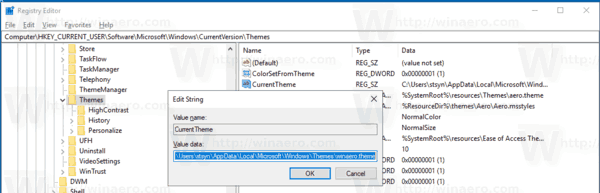
The current theme can be found in the Registry. See the CurrentTheme string (REG_SZ) value under the following key:
HKEY_CURRENT_USER\SOFTWARE\Microsoft\Windows\CurrentVersion\Themes
See the following screenshot:
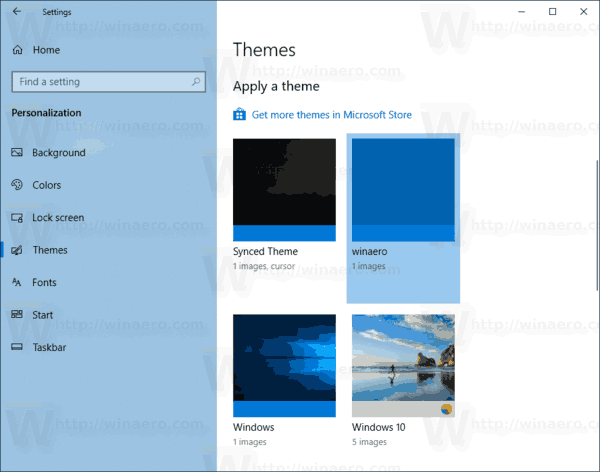
To change the theme in Windows 10, do the following.
- Open the Settings app.

- Go to Personalization -> Themes.
- On the right, click on a theme you like under Apply a theme.

- The theme is now applied.

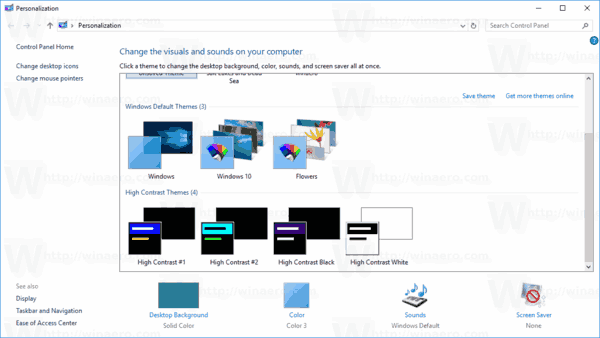
Alternatively, you can use the classic Control Panel applet to quickly apply a custom theme, or any of the default themes, or the High Contrast theme.
Change the theme in Windows 10 using the Control Panel
- Press the Win + R keys on the keyboard.
- Type or copy-paste the following command in the Run box:
explorer.exe shell:::{ED834ED6-4B5A-4bfe-8F11-A626DCB6A921}. - This will open the classic Personalization applet. Click on the desired theme in the list to install it.

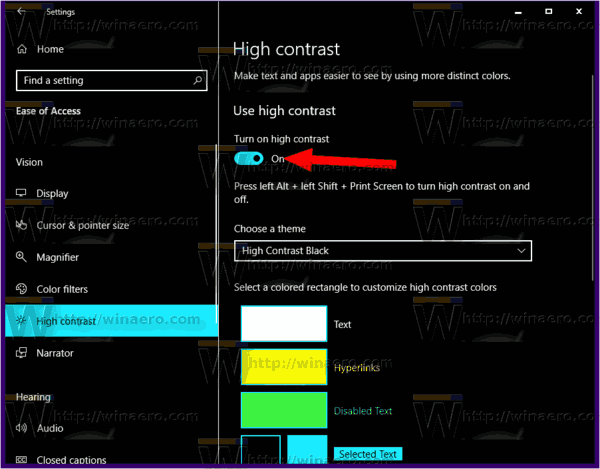
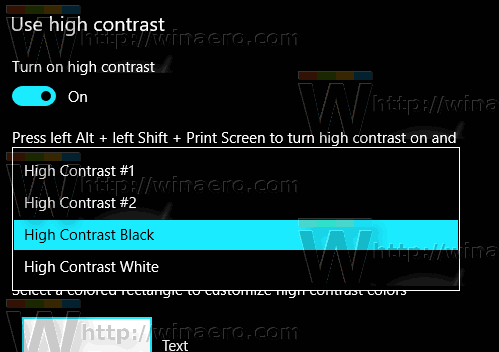
Apply a High Contrast theme using Settings
- Open the Settings app.
- Go to Ease of Access -> High Contrast.
- On the right, set the option Turn on high contrast.

- From the Choose a theme drop down list, choose one of the four pre-installed High Contrast themes.

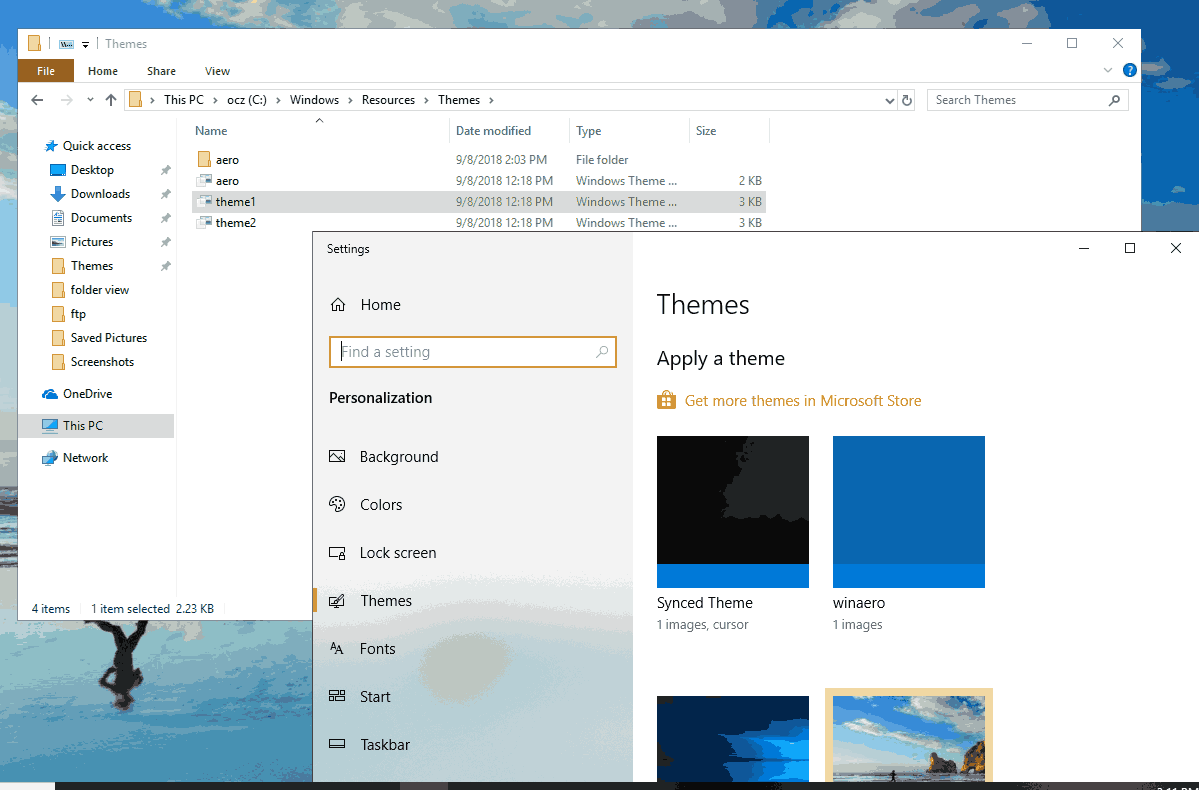
Finally, you can apply a theme from a file manager app like File Explorer.
Change the Windows theme from File Explorer
- Open File Explorer app.
- Navigate to the folder which contains the *.theme file of the theme you want to apply. The default folders are mentioned in the beginning of this article. e.g., visit the folder
C:\Windows\Resources\Themes. - Double-click on the *.theme file to apply the theme. The theme will be applied. Also, Windows 10 will open the Themes page of the Settings app.

Change your theme with Winaero Theme Switcher
Winaero Theme Switcher is an application which allows you to change a Windows theme from the command line. It is primarily intended to be used with the command prompt or in a batch file where you want to automate the applying of a custom theme.
The syntax is as follows:
ThemeSwitcher.exe path_to_file.theme
To apply one of the default themes, you can run the following command:
themeswitcher.exe c:\Windows\Resources\Themes\theme1.theme
Running the app without parameters will open the following GUI.
Please refer to the following article to learn useful tips and tricks about this app:
https://winaero.com/blog/change-windows-10-theme-from-the-command-prompt/
That’s it.
Support us
Winaero greatly relies on your support. You can help the site keep bringing you interesting and useful content and software by using these options:
If you like this article, please share it using the buttons below. It won’t take a lot from you, but it will help us grow. Thanks for your support!
Written By
published
April 1, 2019
Did you know you can change File Explorer to a theme that’s easier on the eyes, thanks to the Windows 10 October 2018 Update?

As the Windows Insider blog explains, “Adding a dark theme to File Explorer has long been a top Insider request,” but it meant “breaking new ground to provide a dark theme to legacy parts of the shell.”
The post goes on to explain the process of creating and refining the UI design, with the help of Windows Insiders’ feedback.
“For example, Insiders told us that they’d like to see more use of grey tones — which we added to areas like the view pane. We also adjusted the address bar and ribbon colors. (The effect is that your eye is drawn more to the content in the center of the screen.) And take a close look below at the Navigation Pane. We removed the folder backplates from the folder icons and enlarged the icons to make them stand out more on high DPI displays.”
Detailed suggestions like these helped the team move from a basic dark theme into the kind of functional design that users demand with applications like File Explorer.
Want to try out dark theme on your PC? Go to Settings > Personalization > Colors, scroll to the bottom of the page and change the default app mode from Light to Dark.
Check it out in action:
If you’re using the Windows 10 October 2018 Update, File Explorer will automatically update from light to dark after you change this option. To confirm whether or not your PC is running this version, you can go to Settings > System > About, where it will say Version 1809 in the Windows Specifications section. If you see Version 1803 or a lower version number, the Windows Update Assistant can help you update to the latest version of Windows 10.
Check out more Windows 10 Tips.
Windows 10 File Explorer dark theme? This is what you need? The following blog post will guide you in quick and easy steps on how to get it.

With default settings, the Windows 10 offer users a white color light theme. In case, you’re not a great fan of a light theme? Fret not; the Windows 10 OS also has a dark theme too.
Previously when users enable the Dark mode in Windows 10, its effect was limited to preinstalled apps like Windows Store, Calendar, Mail, and other Universal Windows Platform app.
This means the universal dark mode setting will have no effect on the File Explorer. You will see the same white color File Explorer even when the dark mode is enabled.
Due to the massic demand for the File Explorer dark theme, the company first introduced the dark theme for File Explorer in the Windows 10 build 17666.
The users running the same build were able to activate the dark theme right from the “Choose your default app mode” option available in Personalization settings. To enable File Explorer Dark Theme, you need to enable dark theme in Windows 10. Here is what you need to do:
Launch the Settings app > Personalization > Color. On the right pane, scroll down to “Choose your color” and select Dark.

After doing this, if you launch File Explorer it will open up with dark mode. It looks perfect, at least to me. This is how it looks like:

Do you like the new Windows 10 File Explorer Dark theme? How desperately, you’re waiting for it? Let me know in the comments.
Viney Dhiman, the mind behind GeekerMag, is a seasoned content writer with over 12 years of experience. Specializing in simplifying complex tech concepts, he covers Windows OS, Android, iOS, web apps, and product reviews. His work can be found on popular tech websites like Gizmodo and The Verge, and he has been interviewed by the Microsoft Edge team.