
Download Windows Speedup Tool to fix errors and make PC run faster
This post will help you change font size for a Windows Terminal profile on Windows 11/10 computer. There are so many interesting Windows Terminal Tips and Tricks available that users find quite useful. One of such tips is to change the default font size. You can set the font size between 1 to 128 for any profile (like Command Prompt, PowerShell, etc.). The default font size set for a profile in Windows Terminal is 12. While some users find it satisfactory, others want to increase or decrease font size from time to time. If you also want to do that, this post covers some simple steps for that.

Apart from changing the font size, Windows Terminal also provides the feature to set font-weight. You will be able to set font-weight to Normal, Bold, Semi-Light, Thin, Extra-Light, Semi-Bold, Medium, Black, Extra-Black, Extra-Bold, or custom (between 0 to 1000). So, depending on the font size set by you, you can select a font-weight that will best fit that font size.
To change the font size for a profile in Windows Terminal, you need to follow these steps:
- Open Windows Terminal
- Open Settings page
- Select a Windows Terminal profile
- Access the Appearance page for the selected profile
- Set font size
- Use the Save button.
First of all, use the Start menu or Search box to open the Windows Terminal app. It will open with the default profile set by you.
After this, open its Settings page. Use Ctrl+, hotkey to open it. Alternatively, you can simply click on the drop-down menu present on the top part and select the Settings option to open it.

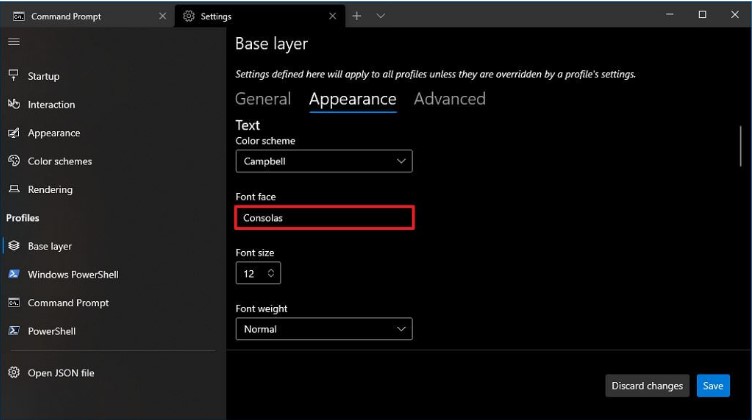
Now you need to select a profile for which you want to change the font size. Use the Profiles section available on the left side and select a profile. After that, access the Appearance page using the right section.

Finally, you can change the font size using the given option. The option to set font-weight is also there. Once the font size is changed, use the Save button.

Now access that Windows Terminal profile and you will see that font size is changed.
This post will help you if CTRL+ does not increase Font size in Windows Terminal.
I hope it helps.
Read next: How to change default profile in Windows Terminal.
Laxman has done Bachelor’s in Computer Science, followed by an MBA. Writing about Windows OS and the free software and services that are available for the Windows operating system is what excites him.
On Windows 11 or 10, the Windows Terminal app comes with a predefined set of customization settings, including the “Cascadia Mono” as the default font on every profile.
However, changing the default font face to anything you want is possible. For example, if you prefer the “Consolas” font, the original default for Command Prompt, or any other font face available on your device with the settings UI or the “settings.json” file.
This guide will teach you how to change the default font face for the Windows Terminal app on Windows 11 or 10.
- Change default Windows Terminal font face with settings UI
- Change default Windows Terminal font face with settings.json
Change default Windows Terminal font face with settings UI
To change the default font face with the settings UI, use these steps:
-
Open Windows Terminal.
-
Use the Shift + Ctrl + , (comma) keyboard shortcut to open the settings UI.
-
Click on Defaults.
-
Click the Appearance tab.
-
Under the “Text” section, use the “Font face” setting and type the name of the style – for example, Consolas.

-
Click the Save button in the bottom-right corner.

Once you complete the steps, the new font style will apply immediately to every profile configured on the Windows Terminal.
Configure default specific profile font face
To change the font style for a specific command-line tool, use these steps:
-
Open Windows Terminal.
-
Use the Shift + Ctrl + , (comma) keyboard shortcut to open the settings UI.
-
Click on the profile to change the settings — for example, Windows PowerShell or Command Prompt.
-
Click the Appearance tab.
-
Under the “Text” section, use the “Font face” setting and type the name of the style – for example, Consolas.
-
Click the Save button.

After you complete the steps, only the command-line tool you configured will start using the new font family.
Change default Windows Terminal font face with settings.json
To set a new default font face for the terminal with the settings.json file, use these steps:
-
Open Windows Terminal.
-
Use the Ctrl + Alt + , (comma) keyboard shortcut to open the settings.json file with the default code editor.
Quick tip: It is recommended to use Visual Studio Code. You can also open the file by clicking the menu (down-arrow) button next to the tab and selecting the Settings option.
-
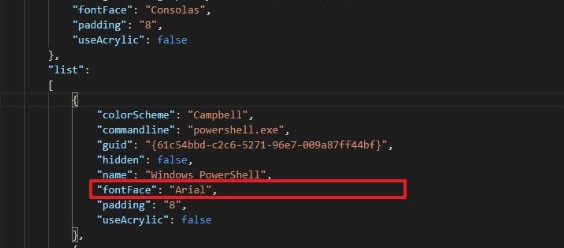
Under the “profiles” section, inside the “defaults” brackets, type the following command to change the font face:
"fontFace": "Consolas"

In the command, make sure to change the Consolas for the name of the font style you want to use.
Quick tip: If you have more than one line of code inside the bracket, ensure all the lines end with a comma (,) except for the last line. Otherwise, the settings may not save correctly. You can find the name of all the available font faces on Settings > Personalization > Fonts.
- Use the Ctrl + S keyboard shortcut to save the file.

After you complete the steps, the font settings will apply automatically.
Configure default specific profile font face
To specify a new font style for a command-line tool with the settings.json file, use these steps:
-
Open Windows Terminal.
-
Use the Ctrl + Alt + , (comma) keyboard shortcut to open the settings.json file with the default code editor.
-
Under the “profiles” section, inside the brackets of the profile you want to update, type the following command to change the font face:
"fontFace": "Consolas"
In the command, make sure to change the Consolas for the name of the font style you want to use.
Quick tip: If you have more than one line of code inside the bracket, ensure all the lines end with a comma (,) except for the last line. Otherwise, the settings may not save correctly.
-
Use the Ctrl + S keyboard shortcut to save the file.

Once you complete the steps, only the profile you configured will start using the new font family.
Why You Can Trust Pureinfotech
The author combines expert insights with user-centric guidance, rigorously researching and testing to ensure you receive trustworthy, easy-to-follow tech guides. Review the publishing process.
Windows Terminal change font it’s an easy task to try and there are a broad range of options. On Windows ten, the Windows Terminal app comes with a predefined set of customization settings that allows you to modification the font face globally and one by one for every console.
If you’re spending a lot of time using Command Prompt in Windows, then you’ll in all probability wish to customize its look. You may want to change the font and colors because you like a certain style or just because you find it easier to read, or it gets easier for your eyes over an extended period of time. For those that want to customize Command Prompt, doing therefore is comparatively easy and during this guide, you will learn and try how to do it for the Windows Terminal app on Windows ten.
In addition to any or all this, Windows Terminal has intensive customization choices to allow it a make-over to fit your style. With simply a number of clicks, you’ll be able to do the modification of the Windows Terminal background such as: color schemes, pointer sorts, acrylic effects, text rendering, anti-aliasing, etc. we are going to cover them in later guides.
Windows Terminal change font – Method 1
The Windows Terminal lets you change the default font face directly from its Settings page. Specifically, you can change the font of each shell individually. Here is how.
- Open the Windows Terminal app.
- Click on the dropdown icon on the title bar.
- Select “Settings” from the menu.
- Select the shell of your choice on the sidebar.
- Go to the “Appearance” tab.
- Type the full font name in the “Font Face” field.
- Click the “Save” button.
- Close and reopen Windows Terminal.
- With that, you’ve changed the default font face in Windows Terminal.
windows terminal change font
Tip: You can get the font face name from the Font directory. Open the Start menu, search for “Font Settings,” find the font of your choice, and type the name as you see it.
Windows Terminal change font – Method 2
1.Open the Windows Terminal app.
2.Use the Ctrl + Alt + , (comma) keyboard shortcut to open the settings.json file with the default code editor.
3.Under the “profiles” section, inside the “defaults” brackets, type the following command to change the font face.
"fontFace": "Consolas"
windows terminal change font using json
In the command, make sure to change the Consolas for the name of the font style you want to use.
4.Use the Ctrl + S keyboard shortcut to save the file
5.Close and reopen Windows Terminal.
6.With that, you’ve changed the default font face in Windows Terminal.
Windows Command Prompt – How to Change the Font
To configure Command Prompt, the first thing you need to do is to open it.
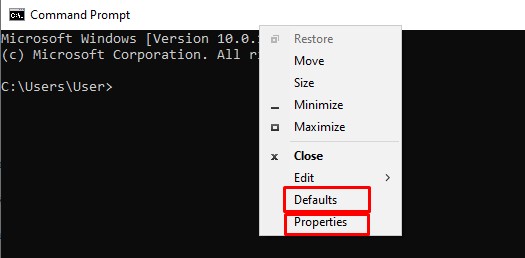
- Press the Windows key, type “cmd” or “Command Prompt”, then hit enter.
- Right-click on the top bar of Command Prompt
The bottom two options are important, “Defaults” and “Properties”. “Defaults” sets system wide Command Prompt settings, that will apply to any shortcut used to open Command Prompt. “Properties” overrides the “Defaults” for that one shortcut to open Command Prompt. As long as you never edit “Properties”, then “Defaults” will apply to all Command Prompt windows. If you ever make a change to the “Properties” of a Command Prompt window, the changes will always override the “Defaults” when that shortcut is used to open Command Prompt.
Tip: The settings in “Defaults” or “Properties” are identical, the difference is in where the changes are applied.
Windows Command Prompt change font
To configure the appearance of the text in Command Prompt, switch to the “Font” tab. Here you can edit the font size and the specific font used in the “Size” and “Font” sections respectively. The “Bold fonts” checkbox, allows you to make all fonts slightly more defined. A preview of the window size is shown in the top-right corner, and a preview of the text appearance in the bottom-left corner.
change font cmd
Windows Command Prompt – How to Change Colors
To configure Command Prompt’s colors, switch to the “Colors” tab. There are four settings you can change, the Screen Text, Screen Background, Popup Text, and Popup Background. “Screen Text” affects the color of text, while “Screen Background” affects the background color of Command Prompt. To set the color, select a setting you want to change, then either set an RGB value in the “Selected Color Values” section in the top-right corner, or select a pre-set color from the row of color boxes just below. The changes are previewed in the “Selected Screen Colors” section.
The two “Popup” settings affect the content of any popup boxes, such as the command history popup when you press F7. Again, “Popup Text” affect the text colour in popup boxes and “Popup Background” affects the background color.
Tip: You can also set the two “Screen” colours in the “Terminal” tab via the “Terminal Colours” section at the top. This method doesn’t have the convenient pre-set colours selection though.
change color cmd
- Do not forget to click the “OK” button.
- Close and reopen Windows Command Prompt
- With that, you’ve changed the default font face in Command Prompt
Conclusions
For those that want to customize Command Prompt or Windows Terminal, doing therefore is comparatively easy and during this guide, we showed you how to do it for the Windows Terminal app on Windows ten.

Anson Heung
Posted on
• Edited on
Windows Terminal is a modern terminal application for developers who frequently uses command-line tools such as Powershell. In this article, I’ll show you how to customize the hell out of Windows Terminal and Powershell so that you can flex on your friends and colleagues 😎.
Here’s our final result 👇

Before we begin, please download Windows Terminal from the Microsoft Store.
Table of Contents:
- Windows Terminal Settings
- Oh My Posh
- Winfetch
Windows Terminal Settings
You can open settings via the Ctrl+, shortcut or the dropdown menu:

Color Scheme
My color scheme is a slightly modified version of Sonokai Shusia. To install the color scheme:
- Open Settings in Windows Terminal and press the “Open JSON file” button at the bottom left corner. It will open
settings.jsonin Notepad. -
In
settings.json, scroll down to find the"schemes"field, which accepts an array of color scheme objects. Next, paste in my color scheme object before the first object in the array (note that object order does not matter).{ ... "schemes": [ { "name": "Sonokai Shusia", "background": "#2D2A2E", "black": "#1A181A", "blue": "#1080D0", "brightBlack": "#707070", "brightBlue": "#22D5FF", "brightCyan": "#7ACCD7", "brightGreen": "#A4CD7C", "brightPurple": "#AB9DF2", "brightRed": "#F882A5", "brightWhite": "#E3E1E4", "brightYellow": "#E5D37E", "cursorColor": "#FFFFFF", "cyan": "#3AA5D0", "foreground": "#E3E1E4", "green": "#7FCD2B", "purple": "#7C63F2", "red": "#F82F66", "selectionBackground": "#FFFFFF", "white": "#E3E1E4", "yellow": "#E5DE2D" }, ... ] } -
Save your changes and head back to Windows Terminal. Go to Settings → «Windows Powershell» profile → «Appearance» tab → «Color Scheme», and choose the new color scheme. Then, press «Save».


If you don’t like my custom theme, check out Windows Terminal Themes website. There are 200+ themes to choose from and you get a quick preview of each theme 🌈.
Nerd Font
Nerd Fonts refer to programming fonts that are patched with a high number of glyphs (icons). Using a nerd font in Windows Terminal is essential because normal monospace fonts cannot render icons properly:

It’s likely that the programming font you’re using (eg. Cascadia Code, Fira Code) already has a Nerd Font version. Check out this link to see the full list of patched Nerd Fonts that you can install.
In my setup, I use Fira Code Nerd Font. The link will download a ZIP file that contains many TrueType font files. It’s OK to only install the files where the name looks something like Fira Code XXXXX Nerd Font Complete Windows Compatible.
After installing Nerd Font:
- Restart your Windows Terminal by closing and re-opening it.
- Go to Settings → “Windows Powershell” profile → “Appearance” tab → “Font face”, and choose your newly installed Nerd Font:

Now, your Terminal should look a bit more pleasing to the eyes:

Oh My Posh
Oh My Posh is a prompt theme engine that lets you beautify the prompt string. This engine requires your Terminal to use a Nerd Font so make sure that you followed along the previous steps.
Setup
-
Install “App Installer” from Microsoft Store to get the
wingetWindows Package Manager CLI.- ⚠ Requires Windows 10 1809 (build 17763) or later
- Check out Oh My Posh’s documentation for alternative installation options.
-
Restart your Windows Terminal and run
wingetto check if the package manager is correctly installed. -
In your Windows Terminal, run
winget install JanDeDobbeleer.OhMyPosh -
Restart your Windows Terminal. Next, try running
oh-my-poshin Powershell to see if it’s correctly installed.
-
Run the following command to open your Powershell profile.
notepad $PROFILEIf notepad shows a prompt saying that “Microsoft.Powershell_profile.ps1” is not found and asks if you would like to create the file, press “Yes” to create the file.
-
Inside the file, paste in the following code and save the file. This will load Oh My Posh on start-up with the default theme.
oh-my-posh --init --shell pwsh --config ~/AppData/Local/Programs/oh-my-posh/themes/jandedobbeleer.omp.json | Invoke-Expression -
Restart your Terminal. Your Powershell should now load Oh My Posh automatically


Change Theme
Oh My Posh comes with >70 themes included out-of-the-box. Check out the “Themes” page documentation for a gallery of preinstalled themes.
All themes are located in ~\AppData\Local\Programs\oh-my-posh\themes if you used winget to install Oh My Posh. If you used an alternative installation method, visit the documentation and select your installation method to see where the themes are located.
Suppose you want to use the powerlevel10k_rainbow preinstalled theme:
-
Open Windows Terminal and run
notepad $PROFILEin Powershell just like we did previously. -
In the opened file, change the path after
--configso that it usespowerlevel10k_rainbow.omp.json:oh-my-posh --init --shell pwsh --config ~/AppData/Local/Programs/oh-my-posh/themes/powerlevel10k_rainbow.omp.json | Invoke-Expression -
Restart your Terminal:


Custom Themes
You can easily create your own theme by writing your own JSON files. Here are some useful links:
- “Configuration → General” page of the docs — Learn how to create custom themes
- Nerd Font’s cheatsheet — List of different glyphs that you can use
I created a custom theme called p10k_classic, which is inspired by a preinstalled theme called powerlevel10k_classic.
To use my theme:
-
Visit the GitHub Gist link and click the “Download ZIP” button at the top right corner.
-
Extract
p10k_classic.omp.jsoninto a location of your choice. For example, let’s place it in the root folder (~). -
Open Windows Terminal and run
notepad $PROFILEin Powershell. -
In the opened file, change the path after
--configso that it uses~/p10k_classic.omp.jsonoh-my-posh --init --shell pwsh --config ~/p10k_classic.omp.json | Invoke-Expression -
Restart your Terminal:


Winfetch
As an added bonus, we’ll install winfetch, a command-line tool that prints out system information. This is a great alternative to neofetch, which only works on Linux.
Setup
This wiki page lists several ways to install winfetch. We’re using the first recommended method: PSGallery.
-
Run Windows Terminal as administrator. To do that, search “Windows Terminal” in the Start Menu, right click the item, and press “Run as administrator”

-
In Powershell, run the command:
Install-Script -Name pwshfetch-test-1Choose “Yes” for any prompts you encountered.
-
Run
notepad $PROFILEto open Powershell profile. Add the following line of code at the end:Set-Alias winfetch pwshfetch-test-1 -
Restart your Terminal. Then, run
winfetchto see if it’s correctly installed.


The default winfetch config is saved to ~\.config\winfetch\config.ps1. Check out the “Configuration” wiki page to see all available configuration options.
Custom Image
The Windows logo at the left can be changed to a custom “image” (more like a low resolution pixel art because Windows Terminal cannot render full resolution images).
For example, I want to display my GitHub profile picture, which is a 8-bit Luigi art:
-
Save this image and place it in a location of your choice. For example, I save it at the root folder (
~) with the nameluigi.png. -
Open
~\.config\winfetch\config.ps1in Notepad. Change the first two variables to the following:# ===== WINFETCH CONFIGURATION ===== $image = "C:\Users\User\luigi.png" # ABSOLUTE path $noimage = $false⚠ I used absolute path in
$imagebecause winfetch in my PC is having trouble processing a relative path (~/luigi.png). The full path of my root folder isC:\Users\User. -
Save the file and run
winfetchin Powershell:

More Configuration
By default, winfetch only shows information about your C drive. To show all available drives, open ~\.config\winfetch\config.ps1 and uncomment the field:
# Configure which disks are shown
# $ShowDisks = @("C:", "D:")
# Show all available disks
$ShowDisks = @("*")
Enter fullscreen mode
Exit fullscreen mode
You can also display a bar chart for the memory (RAM) and disk usage:
# Configure how to show info for levels
# Default is for text only.
# 'bar' is for bar only.
# 'textbar' is for text + bar.
# 'bartext' is for bar + text.
# $cpustyle = 'bar'
$memorystyle = 'bartext'
$diskstyle = 'bartext'
# $batterystyle = 'bartext'
Enter fullscreen mode
Exit fullscreen mode
Here’s our final result:

That’s all the steps you needed to beautify your Terminal 🌈. Now it’s time for you to show off in front of your friends and colleagues! 😁
Thanks for reading! If you find it useful, don’t forget to like and share this post 🙌
- My GitHub
- Personal website
To further customize the look and feel of Windows Terminal, you can change the default font face. Here is how you can do it.
After a long, Microsoft finally took the plunge and decided to make a brand-new terminal application for Windows 10. The good thing is, rather than reinventing the wheel, Microsoft chose to improve the overall user experience and performance. As such, the new Windows Terminal acts as a hub for all your console needs and lets you add almost any shell installed in Windows 10.
In addition to all this, Windows Terminal has extensive customization options to give it a make-over to suit your taste. For example, with just a few clicks, you can change the Windows Terminal background, color schemes, cursor types, acrylic effects, text rendering, anti-aliasing, etc. In the same manner, you can also change the default font in Windows Terminal. Changing the default font face is very helpful if you don’t like the existing font face or use your favorite font.
This brief and straightforward article lets me show you how to change the default font face in the Windows Terminal application in Windows 10.
Note: Before changing the font, make sure the font you want to use is already installed. If it is not, install it and proceed with the below steps. Google Fonts is an excellent place to start if you are looking for new fonts.
The Windows Terminal lets you change the default font face directly from its Settings page. Specifically, you can change the font of each shell individually. Here is how.
- Open the Windows Terminal app.
- Click on the dropdown icon on the title bar.
- Select “Settings” from the menu.
- Select the shell of your choice on the sidebar.
- Go to the “Appearance” tab.
- Type the full font name in the “Font Face” field.
- Click the “Save” button.
- Close and reopen Windows Terminal.
- With that, you’ve changed the default font face in Windows Terminal.
First, open the Start menu, search and open the “Windows Terminal.” After opening the app, click on the down arrow icon on the title bar and select the “Settings” option.

The above action will open the Settings tab in Windows Terminal. On the Settings page, select the shell of your choice. For example, I want to change the default font for Windows PowerShell. So, I picked it on the sidebar.
Now, go to the “Appearance” tab in the right panel. Here, type the full font name in the “Font face” field and hit the “Save” button.
Tip: You can get the font face name from the Font directory. Open the Start menu, search for “Font Settings,” find the font of your choice, and type the name as you see it.

After that, restart Windows Terminal to apply the changes. Once restarted, you will see the new font face.
Change global default font in Windows Terminal
Suppose you want to change the global font face. i.e., the default font for all shells, you can do that via the Windows Terminal’s settings.json file. Here is how.
Open the Windows Terminal app, click on the dropdown menu, and then click on the “Settings” option.
In the Settings tab, click on the “Open JSON file” option on the sidebar.
Here, find the “default” value, set the text cursor between the curly brackets, and press “Enter.”

Now, type fontFace: "<Full Font Name>". Replace <Full Font Name> with the actual font name. For example, if the font name is “Roboto,” the line you need to add will look like this fontFace: "Roboto". The font name must be between quotes.

Finally, save the file by clicking the “Ctrl + S” shortcut, and restart the Terminal app.
From now on, you will see the new font face in the Windows Terminal app.
That is it. It is that simple to change the default font face in Windows Terminal.
I hope that helps.
If you are stuck or need some help, comment below, and I will try to help as much as possible.
Like this article, check out how to set a background in Windows Terminal.