
In this blog post, we will learn how to customize Windows Terminal. First, we will understand the two important settings.json and defaults.json configuration files to build a better understanding. If you are completely new to Windows Terminal, then I would highly recommend you to go through the introductory post of installing and understanding Windows Terminal. At the time of writing the current version of Windows Terminal is 1.0
“Windows Terminal is a modern terminal application for users of command-line tools and shells like Command Prompt, PowerShell, and Windows Subsystem for Linux (WSL). Its main features include multiple tabs, panes, Unicode and UTF-8 character support, a GPU accelerated text rendering engine, and the ability to create your own themes and customize text, colors, backgrounds, and shortcut key bindings“. [source: Microsoft Docs]
Configuration Files
The best feature of Windows Terminal is the ability to customize it. The user can customize, its text color, cursor shape, background color, background image, opacity, icon settings, etc. The user can have multiple customized profiles and can have global settings to apply to all the available profiles as well. All these settings are stored in different JSON configuration files. Let us look into these files and have a brief overview of them.
settings.json
This file contains details about the default profiles, settings that can be applied to all available profiles, a list of available profiles, a place to declare custom color schemes and custom key bindings.
The settings.json file can be opened by using the shortcut “Ctrl + ,” or from the drop-down menu and select Settings

The content of the settings.json file is given below, please note that your file will have the details based on your machine and the details might look a bit different then what is given below.
// This file was initially generated by Windows Terminal 1.0.1401.0
// It should still be usable in newer versions, but newer versions might have additional
// settings, help text, or changes that you will not see unless you clear this file
// and let us generate a new one for you.

// To view the default settings, hold "alt" while clicking on the "Settings" button.
// For documentation on these settings, see: https://aka.ms/terminal-documentation
{
  "$schema": "https://aka.ms/terminal-profiles-schema",

  "defaultProfile": "{61c54bbd-c2c6-5271-96e7-009a87ff44ba}",

  // You can add more global application settings here.
  // To learn more about global settings, visit https://aka.ms/terminal-global-settings

  // If enabled, selections are automatically copied to your clipboard.
  "copyOnSelect": false,

  // If enabled, formatted data is also copied to your clipboard
  "copyFormatting": false,

  // A profile specifies a command to execute paired with information about how it should look and feel.
  // Each one of them will appear in the 'New Tab' dropdown,
  //   and can be invoked from the commandline with `wt.exe -p xxx`
  // To learn more about profiles, visit https://aka.ms/terminal-profile-settings
  "profiles": {
    "defaults": {
      // Put settings here that you want to apply to all profiles.
      "theme": "dark"
    },
    "list": [
      {
        // Make changes here to the powershell.exe profile.
        "guid": "{61c54bbd-c2c6-5271-96e7-009a87ff44ba}",
        "name": "Windows PowerShell",
        "commandline": "powershell.exe",
        "hidden": false
      },
      {
        // Make changes here to the cmd.exe profile.
        "guid": "{0caa0dad-35be-5f56-a8ff-afceeeaa6102}",
        "name": "Command Prompt",
        "commandline": "cmd.exe",
        "hidden": false
      },
      {
        "guid": "{b453ae62-4e3d-5e58-b989-0a998ec441b9}",
        "hidden": false,
        "name": "Azure Cloud Shell",
        "source": "Windows.Terminal.Azure"
      }
    ]
  },

  // Add custom color schemes to this array.
  // To learn more about color schemes, visit https://aka.ms/terminal-color-schemes
  "schemes": [

  ],

  // Add custom keybindings to this array.
  // To unbind a key combination from your defaults.json, set the command to "unbound".
  // To learn more about keybindings, visit https://aka.ms/terminal-keybindings
  "keybindings": [
    // Copy and paste are bound to Ctrl+Shift+C and Ctrl+Shift+V in your defaults.json.
    // These two lines additionally bind them to Ctrl+C and Ctrl+V.
    // To learn more about selection, visit https://aka.ms/terminal-selection
    {
      "command": {
        "action": "copy",
        "singleLine": false
      },
      "keys": "ctrl+c"
    },
    {
      "command": "paste",
      "keys": "ctrl+v"
    },

    // Press Ctrl+Shift+F to open the search box
    {
      "command": "find",
      "keys": "ctrl+shift+f"
    },

    // Press Alt+Shift+D to open a new pane.
    // - "split": "auto" makes this pane open in the direction that provides the most surface area.
    // - "splitMode": "duplicate" makes the new pane use the focused pane's profile.
    // To learn more about panes, visit https://aka.ms/terminal-panes
    {
      "command": {
        "action": "splitPane",
        "split": "auto",
        "splitMode": "duplicate"
      },
      "keys": "alt+shift+d"
    }
  ]
}
defaults.json
The defaults.json file as the name suggests contains all the default configuration of the terminal application. This file contains details like the launch settings, tab configurations, default color schemes, profile details, and all available default key bindings.
One thing to note is this file is an auto-generated file and changes made to this file will not work if you want to apply any changes this needs to be done in settings.json file. To open the defaults.json file, go to the Settings menu item and hold your Alt key and click Settings.

The content of the file is shown below, please note your default.json might look a bit different based on your available profiles on your machine, but most of the details will be the same.
// THIS IS AN AUTO-GENERATED FILE! Changes to this file will be ignored.
{
    "defaultProfile": "{61c54bbd-c2c6-5271-96e7-009a87ff44bf}",

    // Launch Settings
    "initialCols": 120,
    "initialRows": 30,
    "launchMode": "default",

    // Selection
    "copyOnSelect": false,
    "copyFormatting": true,
    "wordDelimiters": " /\\()\"'-.,:;<>~!@#$%^&*|+=[]{}~?\u2502",

    // Tab UI
    "alwaysShowTabs": true,
    "showTabsInTitlebar": true,
    "showTerminalTitleInTitlebar": true,
    "tabWidthMode": "equal",

    // Miscellaneous
    "confirmCloseAllTabs": true,
    "theme": "system",
    "rowsToScroll": "system",
    "snapToGridOnResize": true,

    "profiles":
    [
        {
            "guid": "{61c54bbd-c2c6-5271-96e7-009a87ff44bf}",
            "name": "Windows PowerShell",
            "commandline": "powershell.exe",
            "icon": "ms-appx:///ProfileIcons/{61c54bbd-c2c6-5271-96e7-009a87ff44bf}.png",
            "colorScheme": "Campbell",
            "antialiasingMode": "grayscale",
            "closeOnExit": "graceful",
            "cursorShape": "bar",
            "fontFace": "Cascadia Mono",
            "fontSize": 12,
            "hidden": false,
            "historySize": 9001,
            "padding": "8, 8, 8, 8",
            "snapOnInput": true,
            "startingDirectory": "%USERPROFILE%",
            "useAcrylic": false
        },
        {
            "guid": "{0caa0dad-35be-5f56-a8ff-afceeeaa6101}",
            "name": "Command Prompt",
            "commandline": "cmd.exe",
            "icon": "ms-appx:///ProfileIcons/{0caa0dad-35be-5f56-a8ff-afceeeaa6101}.png",
            "colorScheme": "Campbell",
            "antialiasingMode": "grayscale",
            "closeOnExit": "graceful",
            "cursorShape": "bar",
            "fontFace": "Cascadia Mono",
            "fontSize": 12,
            "hidden": false,
            "historySize": 9001,
            "padding": "8, 8, 8, 8",
            "snapOnInput": true,
            "startingDirectory": "%USERPROFILE%",
            "useAcrylic": false
        }
    ],
    "schemes":
    [
        // A profile can override the following color scheme values:
        //   - "foreground"
        //   - "background"
        //   - "cursorColor"
        {
            "name": "Campbell",
            "foreground": "#CCCCCC",
            "background": "#0C0C0C",
            "cursorColor": "#FFFFFF",
            "black": "#0C0C0C",
            "red": "#C50F1F",
            "green": "#13A10E",
            "yellow": "#C19C00",
            "blue": "#0037DA",
            "purple": "#881798",
            "cyan": "#3A96DD",
            "white": "#CCCCCC",
            "brightBlack": "#767676",
            "brightRed": "#E74856",
            "brightGreen": "#16C60C",
            "brightYellow": "#F9F1A5",
            "brightBlue": "#3B78FF",
            "brightPurple": "#B4009E",
            "brightCyan": "#61D6D6",
            "brightWhite": "#F2F2F2"
        },
        {
            "name": "Campbell Powershell",
            "foreground": "#CCCCCC",
            "background": "#012456",
            "cursorColor": "#FFFFFF",
            "black": "#0C0C0C",
            "red": "#C50F1F",
            "green": "#13A10E",
            "yellow": "#C19C00",
            "blue": "#0037DA",
            "purple": "#881798",
            "cyan": "#3A96DD",
            "white": "#CCCCCC",
            "brightBlack": "#767676",
            "brightRed": "#E74856",
            "brightGreen": "#16C60C",
            "brightYellow": "#F9F1A5",
            "brightBlue": "#3B78FF",
            "brightPurple": "#B4009E",
            "brightCyan": "#61D6D6",
            "brightWhite": "#F2F2F2"
        },
        {
            "name": "Vintage",
            "foreground": "#C0C0C0",
            "background": "#000000",
            "cursorColor": "#FFFFFF",
            "black": "#000000",
            "red": "#800000",
            "green": "#008000",
            "yellow": "#808000",
            "blue": "#000080",
            "purple": "#800080",
            "cyan": "#008080",
            "white": "#C0C0C0",
            "brightBlack": "#808080",
            "brightRed": "#FF0000",
            "brightGreen": "#00FF00",
            "brightYellow": "#FFFF00",
            "brightBlue": "#0000FF",
            "brightPurple": "#FF00FF",
            "brightCyan": "#00FFFF",
            "brightWhite": "#FFFFFF"
        },
        {
            "name": "One Half Dark",
            "foreground": "#DCDFE4",
            "background": "#282C34",
            "cursorColor": "#FFFFFF",
            "black": "#282C34",
            "red": "#E06C75",
            "green": "#98C379",
            "yellow": "#E5C07B",
            "blue": "#61AFEF",
            "purple": "#C678DD",
            "cyan": "#56B6C2",
            "white": "#DCDFE4",
            "brightBlack": "#5A6374",
            "brightRed": "#E06C75",
            "brightGreen": "#98C379",
            "brightYellow": "#E5C07B",
            "brightBlue": "#61AFEF",
            "brightPurple": "#C678DD",
            "brightCyan": "#56B6C2",
            "brightWhite": "#DCDFE4"
        },
        {
            "name": "One Half Light",
            "foreground": "#383A42",
            "background": "#FAFAFA",
            "cursorColor": "#4F525D",
            "black": "#383A42",
            "red": "#E45649",
            "green": "#50A14F",
            "yellow": "#C18301",
            "blue": "#0184BC",
            "purple": "#A626A4",
            "cyan": "#0997B3",
            "white": "#FAFAFA",
            "brightBlack": "#4F525D",
            "brightRed": "#DF6C75",
            "brightGreen": "#98C379",
            "brightYellow": "#E4C07A",
            "brightBlue": "#61AFEF",
            "brightPurple": "#C577DD",
            "brightCyan": "#56B5C1",
            "brightWhite": "#FFFFFF"
        },
        {
            "name": "Solarized Dark",
            "foreground": "#839496",
            "background": "#002B36",
            "cursorColor": "#FFFFFF",
            "black": "#073642",
            "red": "#DC322F",
            "green": "#859900",
            "yellow": "#B58900",
            "blue": "#268BD2",
            "purple": "#D33682",
            "cyan": "#2AA198",
            "white": "#EEE8D5",
            "brightBlack": "#002B36",
            "brightRed": "#CB4B16",
            "brightGreen": "#586E75",
            "brightYellow": "#657B83",
            "brightBlue": "#839496",
            "brightPurple": "#6C71C4",
            "brightCyan": "#93A1A1",
            "brightWhite": "#FDF6E3"
        },
        {
            "name": "Solarized Light",
            "foreground": "#657B83",
            "background": "#FDF6E3",
            "cursorColor": "#002B36",
            "black": "#073642",
            "red": "#DC322F",
            "green": "#859900",
            "yellow": "#B58900",
            "blue": "#268BD2",
            "purple": "#D33682",
            "cyan": "#2AA198",
            "white": "#EEE8D5",
            "brightBlack": "#002B36",
            "brightRed": "#CB4B16",
            "brightGreen": "#586E75",
            "brightYellow": "#657B83",
            "brightBlue": "#839496",
            "brightPurple": "#6C71C4",
            "brightCyan": "#93A1A1",
            "brightWhite": "#FDF6E3"
        },
        {
            "name": "Tango Dark",
            "foreground": "#D3D7CF",
            "background": "#000000",
            "cursorColor": "#FFFFFF",
            "black": "#000000",
            "red": "#CC0000",
            "green": "#4E9A06",
            "yellow": "#C4A000",
            "blue": "#3465A4",
            "purple": "#75507B",
            "cyan": "#06989A",
            "white": "#D3D7CF",
            "brightBlack": "#555753",
            "brightRed": "#EF2929",
            "brightGreen": "#8AE234",
            "brightYellow": "#FCE94F",
            "brightBlue": "#729FCF",
            "brightPurple": "#AD7FA8",
            "brightCyan": "#34E2E2",
            "brightWhite": "#EEEEEC"
        },
        {
            "name": "Tango Light",
            "foreground": "#555753",
            "background": "#FFFFFF",
            "cursorColor": "#000000",
            "black": "#000000",
            "red": "#CC0000",
            "green": "#4E9A06",
            "yellow": "#C4A000",
            "blue": "#3465A4",
            "purple": "#75507B",
            "cyan": "#06989A",
            "white": "#D3D7CF",
            "brightBlack": "#555753",
            "brightRed": "#EF2929",
            "brightGreen": "#8AE234",
            "brightYellow": "#FCE94F",
            "brightBlue": "#729FCF",
            "brightPurple": "#AD7FA8",
            "brightCyan": "#34E2E2",
            "brightWhite": "#EEEEEC"
        }
    ],
    "keybindings":
    [
        // Application-level Keys
        { "command": "closeWindow", "keys": "alt+f4" },
        { "command": "toggleFullscreen", "keys": "alt+enter" },
        { "command": "toggleFullscreen", "keys": "f11" },
        { "command": "openNewTabDropdown", "keys": "ctrl+shift+space" },
        { "command": "openSettings", "keys": "ctrl+," },
        { "command": "find", "keys": "ctrl+shift+f" },

        // Tab Management
        // "command": "closeTab" is unbound by default.
        //   The closeTab command closes a tab without confirmation, even if it has multiple panes.
        { "command": "newTab", "keys": "ctrl+shift+t" },
        { "command": { "action": "newTab", "index": 0 }, "keys": "ctrl+shift+1" },
        { "command": { "action": "newTab", "index": 1 }, "keys": "ctrl+shift+2" },
        { "command": { "action": "newTab", "index": 2 }, "keys": "ctrl+shift+3" },
        { "command": { "action": "newTab", "index": 3 }, "keys": "ctrl+shift+4" },
        { "command": { "action": "newTab", "index": 4 }, "keys": "ctrl+shift+5" },
        { "command": { "action": "newTab", "index": 5 }, "keys": "ctrl+shift+6" },
        { "command": { "action": "newTab", "index": 6 }, "keys": "ctrl+shift+7" },
        { "command": { "action": "newTab", "index": 7 }, "keys": "ctrl+shift+8" },
        { "command": { "action": "newTab", "index": 8 }, "keys": "ctrl+shift+9" },
        { "command": "duplicateTab", "keys": "ctrl+shift+d" },
        { "command": "nextTab", "keys": "ctrl+tab" },
        { "command": "prevTab", "keys": "ctrl+shift+tab" },
        { "command": { "action": "switchToTab", "index": 0 }, "keys": "ctrl+alt+1" },
        { "command": { "action": "switchToTab", "index": 1 }, "keys": "ctrl+alt+2" },
        { "command": { "action": "switchToTab", "index": 2 }, "keys": "ctrl+alt+3" },
        { "command": { "action": "switchToTab", "index": 3 }, "keys": "ctrl+alt+4" },
        { "command": { "action": "switchToTab", "index": 4 }, "keys": "ctrl+alt+5" },
        { "command": { "action": "switchToTab", "index": 5 }, "keys": "ctrl+alt+6" },
        { "command": { "action": "switchToTab", "index": 6 }, "keys": "ctrl+alt+7" },
        { "command": { "action": "switchToTab", "index": 7 }, "keys": "ctrl+alt+8" },
        { "command": { "action": "switchToTab", "index": 8 }, "keys": "ctrl+alt+9" },

        // Pane Management
        { "command": "closePane", "keys": "ctrl+shift+w" },
        { "command": { "action": "splitPane", "split": "horizontal" }, "keys": "alt+shift+-" },
        { "command": { "action": "splitPane", "split": "vertical" }, "keys": "alt+shift+plus" },
        { "command": { "action": "resizePane", "direction": "down" }, "keys": "alt+shift+down" },
        { "command": { "action": "resizePane", "direction": "left" }, "keys": "alt+shift+left" },
        { "command": { "action": "resizePane", "direction": "right" }, "keys": "alt+shift+right" },
        { "command": { "action": "resizePane", "direction": "up" }, "keys": "alt+shift+up" },
        { "command": { "action": "moveFocus", "direction": "down" }, "keys": "alt+down" },
        { "command": { "action": "moveFocus", "direction": "left" }, "keys": "alt+left" },
        { "command": { "action": "moveFocus", "direction": "right" }, "keys": "alt+right" },
        { "command": { "action": "moveFocus", "direction": "up" }, "keys": "alt+up" },

        // Clipboard Integration
        { "command": { "action": "copy", "singleLine": false }, "keys": "ctrl+shift+c" },
        { "command": { "action": "copy", "singleLine": false }, "keys": "ctrl+insert" },
        { "command": "paste", "keys": "ctrl+shift+v" },
        { "command": "paste", "keys": "shift+insert" },

        // Scrollback
        { "command": "scrollDown", "keys": "ctrl+shift+down" },
        { "command": "scrollDownPage", "keys": "ctrl+shift+pgdn" },
        { "command": "scrollUp", "keys": "ctrl+shift+up" },
        { "command": "scrollUpPage", "keys": "ctrl+shift+pgup" },

        // Visual Adjustments
        { "command": { "action": "adjustFontSize", "delta": 1 }, "keys": "ctrl+=" },
        { " command": { "action": "adjustFontSize", "delta": -1 }, "keys": "ctrl+-" },
        { "command": "resetFontSize", "keys": "ctrl+0" }
    ]
}
Default Color Schemes
The windows terminal comes preloaded with 9 different color schemes, the details of the schemes can be found defaults.json.
- Campbell
- Campbell Powershell
- Vintage
- One Half Dark
- One Half Light
- Solarized Dark
- Solarized Light
- Tango Dark
- Tango Light
Applying Default Color Scheme to a Profile
In order to apply any color scheme to a selected profile, use the following JSON key-value pair: “colorScheme”: “[Name of the color profile]”. For example, if I want to apply the “Solarized Dark” scheme to my PowerShell profile. I will add the following key-value pair inside the PowerShell object inside the profile list. The changes are reflected as soon as you save the settings.json file.
"list": [
  {
    "guid": "{61c54bbd-c2c6-5271-96e7-009a87ff44bz}",
    "name": "Windows PowerShell",
    "commandline": "powershell.exe",
    "hidden": false,
    "colorScheme": "Solarized Dark"
  },

Creating a custom color scheme
If the user wants to create a custom color scheme, the best way to do it is to make a copy of any existing scheme from defaults.json and paste the same inside scheme array inside the settings.json file and rename it. After pasting, the user can change the hex code of any value to suit his needs and then use the scheme name in the profile of choice.
  "schemes": [
    {
      "name": "My Custom",
      "foreground": "#FFFFFF",
      "background": "#012456",
      "cursorColor": "#FFFF00",
      "black": "#0C0C0C",
      "red": "#C50F1F",
      "green": "#13A10E",
      "yellow": "#C19C00",
      "blue": "#0037DA",
      "purple": "#881798",
      "cyan": "#3A96DD",
      "white": "#CCCCCC",
      "brightBlack": "#767676",
      "brightRed": "#E74856",
      "brightGreen": "#16C60C",
      "brightYellow": "#F9F1A5",
      "brightBlue": "#3B78FF",
      "brightPurple": "#B4009E",
      "brightCyan": "#61D6D6",
      "brightWhite": "#F2F2F2"
    }
  ],

Using Open Source Free Themes
If you don’t want to create your own color schemes, then you can use the freely available Windows Terminal themes on GitHub [Link: https://atomcorp.github.io/themes/]. A huge list is available with the demo. You can copy the theme of your choice and paste the same inside your scheme array in the settings.json file and start using it with your respective profiles.
Here is the sample “Blue Matrix” themes from the link.
{
  "name": "Blue Matrix",
  "black": "#101116",
  "red": "#ff5680",
  "green": "#00ff9c",
  "yellow": "#fffc58",
  "blue": "#00b0ff",
  "purple": "#d57bff",
  "cyan": "#76c1ff",
  "white": "#c7c7c7",
  "brightBlack": "#686868",
  "brightRed": "#ff6e67",
  "brightGreen": "#5ffa68",
  "brightYellow": "#fffc67",
  "brightBlue": "#6871ff",
  "brightPurple": "#d682ec",
  "brightCyan": "#60fdff",
  "brightWhite": "#ffffff",
  "background": "#101116",
  "foreground": "#00a2ff"
}

Customizing Cursor Shape and Color
Windows Terminal also provides a way to customize the cursor shape, color, and height. The settings for cursor are applicable at the profile level. One thing to note is the cursor-height is applicable only when its shape is set to vintage.
There are a total of 5 cursor shape, they are bar, underscore, filledBox , emptyBox, and vintage. Each of them is displayed below.
Cursor Type: Bar and Color Red
{
    "guid": "{61c54bbd-c2c6-5271-96e7-009a87ff44ba}",
    "name": "Windows PowerShell",
    "commandline": "powershell.exe",
     "hidden": false,

    "cursorShape": "bar",
    "cursorColor": "#FF0000"
},Cursor Type: FilledBox and Color Red
"cursorShape": "underscore",
"cursorColor": "#FF0000"
Cursor Type: Underscore and Color Red
"cursorShape": "filledBox",
"cursorColor": "#FF0000"
Cursor Type: EmptyBox and Color Red
"cursorShape": "emptyBox",
"cursorColor": "#FF0000"
Cursor Type: Vintage, Color Red and Height 80
The vintage cursor type supports height parameter.
"cursorShape": "vintage",
"cursorColor": "#FF0000",
"cursorHeight": 70
Adding Background Image
A background image can be added at an individual profile level. A static or a GIF image can be added. To add a background image add the following JSON key-value pair at the profile level: “backgroundImage” : “image-path”.
Add a Static Background Image
{
    "guid": "{61c54bbd-c2c6-5271-96e7-009a87ff44ba}",
    "name": "Windows PowerShell",
    "commandline": "powershell.exe",
    "hidden": false,
    "backgroundImage": "C:\\Windows.jpg"
 },

Add a GIF Background Image
To add a GIF Image, provide the path of GIF image
{
    "guid": "{61c54bbd-c2c6-5271-96e7-009a87ff44ba}",
    "name": "Windows PowerShell",
    "commandline": "powershell.exe",
    "hidden": false,
    "backgroundImage": "C:\\matrix.gif"
},Supported Image properties
Background Image can be stretched, align, or have opacity values attached to them.
To stretch an image use the key-value pair “backgroundImageStretchMode”:”value”, where value can be any one of the following: none, fill, uniform, uniformToFill (default value)
To align an image use the key-value pair “backgroundImageAlignment”:”value”, where value can be any one of the following: left, top, right, bottom, topLeft, topRight, bottomLeft, bottomRight, center (default value)
Top apply opacity to an image use the key-value pair “backgroundImageOpacity”:value, where value can range from 0-1.0
I hope you found this post on how to customize Window Terminal Application helpful to you, thanks for visiting, Cheers!!!
[Further Readings: How to customize Windows Terminal Key Bindings | How to Install Windows Terminal in Windows 10 | Important Debugging Shortcuts of Visual Studio 2019 | How to publish a Blazor Server Application to IIS | Top 7 Visual Studio 2019 extensions for Web Projects | The difference in Blazor Server and WebAssembly Application | Exploring Blazor WebAssembly App Project Structure | Top 10 Productivity Tips and Tricks in Visual Studio 2019 | CRUD Operations in WPF using EntityFrameworkCore and SQLite | How to implement Dependency Injection in WPF | How to use External Tool in Visual Studio 2019 | Top Features of Visual Studio 2019 Community Edition ]
Windows Terminal gets its way in right at Microsoft Build 2019 release with version 1.0 finally available with Build 2020 release. The company has even provided the roadmap for Terminal 2.0 available to us all by the 2021 Build Event. Lately, the company has announced three ways that you can use to customize Windows Terminal Preview on your computer. If you have not yet downloaded the preview release, get the same visiting the Store app.
The developers are working to turn Windows Terminal into a modern, reliable, efficient, and powerful application combining all of the shells together at one platform. For now, this supports command prompt, PowerShell, WSL, Azure, and Ubuntu. Its prime features include – multiple tabs, panes, and Unicode. Additionally, this also supports a GPU accelerated text rendering engine and UTF-8 character support. Users may even create their own themes, customize text, colors, change backgrounds, and select shortcut key bindings. In this post, we focus on how to customize colors, cursor, and tabs on Windows Terminal Preview.
Three Ways to Customize Your Windows Terminal
1] Choose your Colors
The best thing to customize on Windows Terminal Preview is the color schemes. One may find the related settings inside the defaults.json file. To access .json file settings, hold the Alt key on the keyboard and click Settings. Here’s a list of available color schemes on this file –
- Campbell
- Campbell Powershell
- Vintage
- One Half Dark
- One Half Light
- Solarized Dark
- Solarized Light
- Tango Dark
- Tango Light
How to set up your own color scheme
To pick up your own scheme for any of your command-line profiles, just add the colorScheme property within the color scheme’s name as the value.
- “colorScheme”: “COLOR SCHEME NAME”
Note: Every setting, aside from a name, accepts a color as a string in hex format: “#rgb” or “#rrggbb”. The cursor color and background selection are still optional and you may change as per your likings. Apart from this, you may also opt for either Dark or Light theme inside Windows Terminal Preview.
- Property name: theme
- Necessity: Optional
- Accepts: “system”, “dark”, “light”
- Default value: “system”
2] Design Your Cursor
Windows 10 users may also customize the cursor options inside Terminal Preview. This includes changing the color, shape, and height of the pointer. There are several other things that you may prefer to change the overall cursor look. For example – horizontal or vertical, a line or a box, etc.
As of now, Windows Terminal lets users choosing either of the following looks – “bar” ( ┃ ), “vintage” ( ▃ ), “underscore” ( ▁ ), “filled box” ( █ ), and “emptyBox” ( ▯ ).
- Property name: cursorShape
- Necessity: Optional
- Accepts: “bar”, “vintage”, “underscore”, “filledBox”, “emptyBox”
- Default value: “bar”
Furthermore, one can override the cursor color set by modifying the color scheme. However, do note that Terminal Preview accepts only “#rgb” or “#rrggbb” changes.
Modifying the cursorHeight value will prefix the default height of the cursor starting from the bottom. Again, this will only work if cursorShape is set to “vintage”. At last, any integers ranging between 25-100 are accepted.
3] What’s in a (Tab) Name?
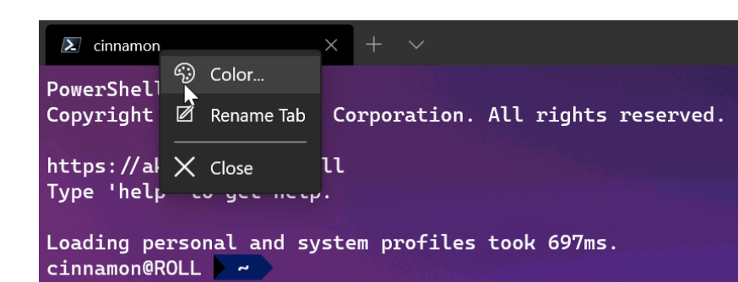
From now onward, you can easily rename or recolor tabs inside Windows Terminal Preview. All you need is to put a right-click on the Tab and hit rename Tab. The new name continues to appear as long as the current session lasts.

- Pressing this option will point a blinking cursor so that you can edit the title of the Tab.
Putting a right-click on the “Tab” lets you change its color as well. You can either pick a predefined color or hit Custom to choose a color based on RGB/HSV or hex fields.

Tip: We suggest picking the same hex field for both i.e. tab color and the background color. Doing so will provide a seamless look to the Terminal Preview.
The company even provides a tab title tutorial for setting a name to this for each terminal instance. They are going to release monthly updates for Windows Terminal at the beginning of July 2020. You can check the same either at the Microsoft Store or from the GitHub releases page.
Windows Terminal is here! From the buzz of the announcement at Microsoft Build 2019 to the release of 1.0 at Build 2020, it’s generated excitement and interest from the dev community. Get started by downloading the Preview here.
As a refresher, Windows Terminal is a new, modern, fast, efficient, powerful, and productive terminal application for users of command-line tools and shells like Command Prompt, PowerShell, and WSL.
Its main features include multiple tabs, panes, Unicode and UTF-8 character support, a GPU accelerated text rendering engine, and the ability to create your own themes and customize text, colors, backgrounds, and shortcut key bindings.
Today, we’re digging into three ways to tailor the Terminal to your preference: colors, cursor, and tabs.
Choose your Colors
Windows Terminal includes the following named color schemes inside the defaults.json file, which can be accessed by holding alt and selecting the settings button.
- Campbell
- Campbell Powershell
- Vintage
- One Half Dark
- One Half Light
- Solarized Dark
- Solarized Light
- Tango Dark
- Tango Light
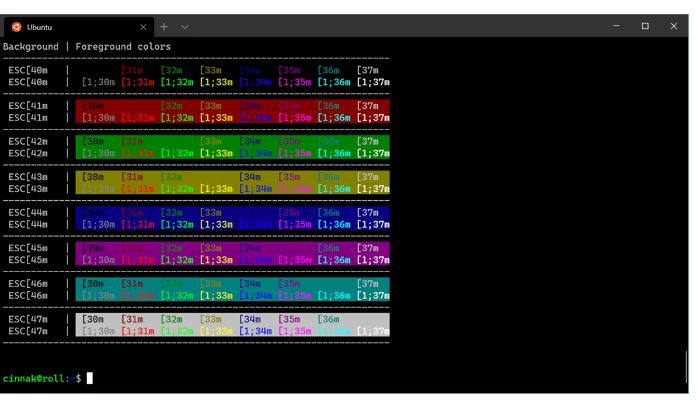
This is what Vintage looks like:
To set up your scheme inside one of your command-line profiles, add the colorScheme property with the color scheme’s name as the value.
“colorScheme”: “COLOR SCHEME NAME”
Every setting, aside from name, accepts a color as a string in hex format: “#rgb” or “#rrggbb”. The cursorColor and selectionBackground settings are optional.
Dark and light theme are also available in the Terminal’s chrome.
Property name: theme
Necessity: Optional
Accepts: “system”, “dark”, “light”
Default value: “system”
Design Your Cursor
Old school or modern, there’s a full set of cursor options for shape, color, and height.
Do you prefer horizontal or vertical? A line or a box? Just tell the Terminal.
This sets the cursor shape for the profile. The possible cursors are as follows: “bar” ( ┃ ), “vintage” ( ▃ ), “underscore” ( ▁ ), “filledBox” ( █ ), “emptyBox” ( ▯ )
Property name: cursorShape
Necessity: Optional
Accepts: “bar”, “vintage”, “underscore”, “filledBox”, “emptyBox”
Default value: “bar”
You can override cursorColor set in the color scheme if colorScheme is set. Color as a string in hex format: “#rgb” or “#rrggbb” are accepted.
cursorHeight sets the percentage height of the cursor starting from the bottom. This will only work when cursorShape is set to “vintage.” Integers from 25-100 are accepted.
What’s in a (Tab) Name?
You can easily rename and recolor tabs in Windows Terminal Preview. Just right click on a tab and select Rename Tab to rename a tab for that session. This option will change your tab title into a text field, where you can then edit the title.
Do the same to recolor your tab. Select from a predefined list of colors or click Custom to use the color picker or the RGB/HSV or hex fields. One cool tip is to use the hex field to set your tab to the same color as your background color for a seamless look.

To set the tab title for a profile for every terminal instance, check out the Tab title tutorial.
Monthly updates for Windows Terminal begin in July 2020. Don’t forget to download Windows Terminal Preview from the Microsoft Store or from the GitHub releases page. This is the channel where you can be involved with the development of Windows Terminal and use the latest features as soon as they are developed.
Windows Terminal is a powerful and versatile application designed for command-line users on Windows. With its rich feature set, including multiple tabs, support for various shells like PowerShell, Command Prompt, and WSL (Windows Subsystem for Linux), and customization options, it allows for a highly personalized command-line experience. One of the most sought-after customization features is color scheme adjustment, which can help enhance readability and create an aesthetically pleasing working environment. In this article, we’ll break down how to change colors in Windows Terminal, covering everything from basic modifications to creating your own custom color schemes.
Understanding the Importance of Customization
Customization in any software enhances user experience and productivity. For terminal users, this is especially important as the command line can become monotonous and challenging to read over extended periods. Custom colors also help in categorizing different types of tasks or alerts, so a user can visually distinguish between environments, shells, or even specific tasks through color coding.
With Windows Terminal, you have the flexibility to:
- Improve Visual Comfort: Reduce eye strain through adequate contrast and suitable color choices.
- Enhance Readability: Create high contrast between text and background to improve legibility.
- Express Creativity: Customize your environment to reflect your personal style or brand.
Basic Syntax of Colors in Windows Terminal
Windows Terminal uses JSON files to configure settings, including color profiles. The color scheme in Windows Terminal is defined using the RGBA color model, which consists of Red, Green, Blue, and Alpha (opacity). Each color can be specified using either RGB in decimal format or hex color codes.
Color Attributes
- Foreground: The color of the text displayed in the terminal.
- Background: The color behind the text.
- Cursor Color: The color of the terminal cursor.
- Selection Color: The color of text selection.
A simple RGB tuple would look like this: "rgba(255, 0, 0, 1)", which represents full red with no transparency.
Accessing the Settings in Windows Terminal
Before changing colors, you’ll need to access the settings in Windows Terminal:
- Open Windows Terminal: Click on the Windows Terminal icon or find it through the Start menu.
- Open Settings: Click on the dropdown arrow next to the tabs where you usually select profiles and choose Settings. Alternatively, you can press
Ctrl + ,(Control key and Comma key) to open the settings directly.
This will open a new settings tab displaying a UI interface, but behind the scenes, it is editing a JSON file that defines various aspects of the terminal’s behavior and appearance.
Changing Color Schemes
Windows Terminal comes with built-in color schemes, which can be easily applied. Here’s how to change the color scheme of your profile:
- Navigate to the Profiles section in the settings.
- Select the profile you want to customize (for example, PowerShell, Command Prompt, or any WSL distribution).
- In the color scheme dropdown, choose one of the built-in options (such as ‘Campbell’, ‘One Half Dark’, ‘Vintage’, etc.) or leave it blank for default settings.
- Save your changes and restart Windows Terminal for the changes to take effect.
Pre-defined Color Schemes
Built-in color schemes offered by Windows Terminal include:
- Campbell: A classic color scheme based on the default colors of Windows Console.
- One Half Dark / Light: A soothing scheme, excellent for prolonged use.
- Solarized Dark / Light: Popular among programmers for its wide acceptance and aesthetic appeal.
These schemes come pre-configured, saving you the effort of defining each color setting manually.
Creating Custom Color Schemes
If the pre-defined schemes don’t suit your style or requirements, creating your own custom color scheme is simple.
Step-by-Step Process
- Access Settings: Just like before, open Windows Terminal settings.
- Navigate to Schemes: Look for the Color schemes section.
- Add New Scheme: Click on “Add new” (you might see a button or a «+» icon).
- Define Your Colors: You’ll need to input properties like the name of your scheme and the color attributes like foreground, background, cursor color, and so on.
Example of a Custom Color Scheme JSON
Here’s a basic example of how you might define a custom color scheme in JSON format:
{
  "name": "MyCustomScheme",
  "black": "#1D1F21",
  "red": "#CC342B",
  "green": "#198844",
  "yellow": "#FBA922",
  "blue": "#3971ED",
  "purple": "#A36AC7",
  "cyan": "#01A252",
  "white": "#C5C8C6",
  "brightBlack": "#969896",
  "brightRed": "#CC342B",
  "brightGreen": "#198844",
  "brightYellow": "#FBA922",
  "brightBlue": "#3971ED",
  "brightPurple": "#A36AC7",
  "brightCyan": "#01A252",
  "brightWhite": "#FFFFFF",
  "background": "#282A2E",
  "foreground": "#C5C8C6",
  "cursorColor": "#AEAEAE",
  "selectionBackground": "#4D4D4D",
}
Implementing Your Custom Color Scheme
Once you have created your color scheme:
- Go to the Profiles section again.
- Select the profile you want to apply the custom scheme to.
- In the color scheme dropdown, select the name of your new scheme (e.g., «MyCustomScheme»).
- Save settings, and the profile will now reflect your new colors.
Color Scheme Management
Windows Terminal’s settings file is in JSON format, making it easy to manage and back up. If you are creating multiple custom schemes, consider organizing them at the beginning of your settings file for easier access.
You can also share your color schemes with others by exporting the relevant part of your JSON configuration. Peers can simply import or copy the color scheme data into their own terminal settings.
Advanced Customization Tips
Using Background Images and Transparency
Windows Terminal supports adding background images and modifying opacity, which allows users to create stunning visual effects:
-
Set Background Image:
- In the profile settings, add
"backgroundImage": "C:/path/to/your/image.jpg"to define a background. - Use
"backgroundImageOpacity": 0.8to set the transparency (range is from 0 to 1).
- In the profile settings, add
-
New Visual Effects:
- Background images can make your terminal feel more dynamic and less like a plain text environment. Just be wary that overly busy backgrounds can reduce readability.
Using the Terminal Color Picker
For those unsure about colors, Windows Terminal also provides a built-in color picker.
- Within the color settings, you can use the color square beside color attributes (like foreground).
- This gives you a visual representation to select colors, allowing you to see changes in real time before finalizing.
Leveraging Community Resources
The community around Windows Terminal is very active. Numerous resources are available online where users share their color schemes. Websites and forums often provide downloadable JSON snippets that you can incorporate into your own terminal settings.
GitHub repositories dedicated to Windows Terminal customization can also serve as inspiration. Most of these will include a collection of color schemes, providing a good starting ground for achieving a desired aesthetic.
Testing and Tweaking Performance
After customizing your terminal with colors and possibly images, you should take a moment to test how the new settings perform.
Performance in Different Lighting
- Check your new settings in different lighting conditions. A scheme that appears attractive in dim light might become a strain in bright surroundings.
- Modify warmth and hue based on your working conditions.
Match Different Shells
If you use different shells such as WSL, PowerShell, or Command Prompt, remember that these can inherit different profiles. Ensure that the color scheme fits well across different environments for a unified work experience.
Finalizing and Exporting Settings
Once you are satisfied with your customization, remember to back it up:
- Export Settings: You can simply save or export the settings once you’ve finalized your preferences.
- Use Version Control: For users who often customize their environment, consider using Git or another version control system to track changes over time.
Shifting to JSON Editing
If you’re comfortable with JSON files, switching from the GUI settings to editing the actual settings file directly can be faster and offers more control. You can even create a dedicated color section, copy schemes around, or create a new profile easily.
Common Troubleshooting
Although changing the color scheme in Windows Terminal is straightforward, you may run into some issues. Here are common challenges and their solutions:
No Changes Visible
If your changes don’t appear, check the following:
- Ensure you’ve saved the settings after editing.
- Verify that there are no syntax errors in your JSON that could prevent it from loading correctly. Use a JSON validator to check for issues.
Compatibility Issues
Sometimes, specific color codes may look different based on monitor settings, color profiles, or operating system configurations. Testing across devices can be beneficial to ensure the colors appear as desired.
Resets to Default
If you find that your customizations revert back to defaults after certain updates or restarts, check whether you are modifying the correct user profile. Policy settings might be overriding your preferences in a managed environment.
Conclusion
With Windows Terminal’s flexibility and customization options, changing colors enhances both aesthetics and usability. Whether you opt for a ready-made color scheme or create your own, the process is straightforward and fast. This ability to tailor your command-line environment allows you to elevate your workflow and make your terminal reflect your personal or professional style.
By taking the time to explore and implement these customizations, you transform not just the appearance, but also your interaction with the command line, encouraging productivity and enjoyment in your everyday tasks. So dive in, experiment with colors, and embrace the true potential of Windows Terminal!
Время на прочтение3 мин
Количество просмотров16K
Привет, Хабр! Начиная с момента анонса на Microsoft Build 2019 и заканчивая выпусками версий 1.0, 1.1 и 1.2, Терминал вызывает большой интерес со стороны сообщества разработчиков. Мы очень рады этому и стараемся реализовывать все больше полезных и интересных функций.
Сегодня представляем вашему вниманию 3 пути кастомизации Windows Terminal. Среди них настройки цветовых схем, настройки вкладок, настройки курсоров. Заглядывайте под кат!
Windows Terminal представляет собой новое, современное, быстрое, эффективное, мощное и производительное приложение терминала для пользователей таких программ и оболочек командной строки, как Command Prompt, PowerShell и WSL.
К его основным функциям можно отнести поддержку нескольких вкладок, панелей, символов Unicode и UTF-8, модуль отрисовки текста с ускоренным GPU, а также возможность создания собственных тем и настройки текста, цвета, фона и привязок клавиш.
Сегодня мы рассмотрим три варианта настройки Терминала в соответствии с вашими предпочтениями цвета, курсора и вкладок.
Выберите свои цвета
Windows Terminal включает следующие цветовые схемы в файл defaults.json:
- Campbell
- Campbell Powershell
- Vintage
- One Half Dark
- One Half Light
- Solarized Dark
- Solarized Light
- Tango Dark
- Tango Light
Доступ к данному файлу можно получить, удерживая клавишу Alt и нажимая кнопку «Settings».
Для наглядности ниже представлена схема Vintage:

Чтобы настроить схему внутри одного из профилей командной строки, добавьте свойство colorScheme с именем цветовой схемы в качестве значения.
“colorScheme”: “COLOR SCHEME NAME”Каждый параметр, кроме имени, принимает значение цвета в виде строки в шестнадцатеричном формате («#rgb» или «#rrggbb»). Параметры cursorColor и selectionBackground являются необязательными.
Имя свойства: theme
Степень необходимости: Необязательный
Принимает: “system”, “dark”, “light”
Значение по умолчанию: “system”
Создайте свой курсор
Вне зависимости от того, являетесь ли вы приверженцем «старой школы» или «современной», Терминал предлагает полный набор параметров (отвечающих за форму, цвет и высоту), позволяющих создать курсор на любой вкус.
Вы предпочитаете горизонтальный или вертикальный курсор? Линию или «box»? Просто скажите Терминалу.
Этот параметр задает форму курсора для профиля. Возможны следующие курсоры: “bar” ( ┃ ), “vintage” ( ▃ ), “underscore” ( ▁ ), “filledBox” ( █ ), “emptyBox” ( ▯ ).
Имя свойства: cursorShape
Степень необходимости: Необязательный
Принимает: “bar”, “vintage”, “underscore”, “filledBox”, “emptyBox”
Значение по умолчанию: “bar”
Вы можете переопределить cursorColor, установленный в цветовой схеме, если задано значение colorScheme. Принимает значение цвета в виде строки в шестнадцатеричном формате (“#rgb” или “#rrggbb”).
cursorHeight задает процентную высоту курсора, начиная с нижнего. Это будет работать только в том случае, если для параметра cursorShape задано значение “vintage”. Принимаются целые числа от 25 до 100.
Настройте вкладки по своему вкусу
В Windows Terminal вы можете легко переименовывать и перекрашивать вкладки. Просто щелкните правой кнопкой мыши вкладку и выберите «Rename Tab», чтобы переименовать вкладку для текущего сеанса. Этот параметр изменит заголовок вкладки на текстовое поле, куда можно будет ввести свое название.
Сделайте то же самое, чтобы перекрасить вкладку. Выберите цвет в заранее определенном списке или нажмите «Custom», чтобы выбрать цвет из палитры либо задать нужный с помощью значения RGB/HSV или шестнадцатеричного значения.
Совет: используйте тот же оттенок, который используется в качестве цвета фона для получения красивого бесшовного окна!
Для получения большей информации о параметрах вкладок, рекомендуем ознакомиться с данным руководством.
Также советуем загрузить Windows Terminal Preview из Microsoft Store или со страницы выпусков на GitHub. Благодаря ему вы можете быть вовлечены в разработку Windows Terminal и использовать новейшие функции, как только они будут разработаны.