
less than 1 minute read
If you are coming from using any *nix terminal to Windows Terminal, there is probably one feature you are really missing. Copy on select, immediately copying any text you highlight to the clipboard, is not enabled by default.
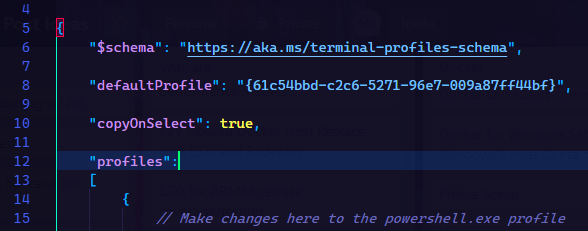
Luckily, this can easily be remediated by adding the following line to the global defaults area of your settings file.
"copyOnSelect": true,
Leave a comment
You may also enjoy
Hacktoberfest 2020
4 minute read
In this crazy year that is 2020, I have made some time to participate in my second Hacktoberfest. This is a yearly event sponsored by Digital Ocean and DEV a…
Format a Linux USB or SD Card Using Windows
1 minute read
You may have noticed that if you connect a disk with Linux partitions to your Windows box, that you cannot view all of the files or the size of the drive see…
Upgrade Ubuntu from the Command-line
less than 1 minute read
Here is the quick down and dirty on how to upgrade Ubuntu via the command line. If you have a firewall or an older version installed, then there may be some …
boost your productivity when working with WSL2 in Windows Terminal
403
2 mins
I am a heavy macOS user but my current work requires the use of Windows and its Terminal for WSL2. Working with Windows Terminal was very frustrating until I changed a couple of settings:
- Copy-on-select.
- Set the word delimiters setting to match the one of iTerm2.
§copy-on-select
Selecting text automatically copies it to the clipboard. No need to hit CTRL+C to copy. This is a massive time saver. To enable copy-on-select:
- Open Windows Terminal Settings.
- Go to the Interaction tab.
- Enable Automatically copy selection to clipboard.
§word delimiters
There are two main text selection methods in Windows Terminal:
- Click-and-drag to select desired text portion.
- Double-click on text to select.
The double-click with copy-on-select speeds up working in terminal.
However, double-click must select the right thing. The default Windows Terminal word delimiters setting isn’t very well suited to working with Linux-based systems.
As a—primarily—macOS user, I work with iTerm2 which comes with the best word delimiter setting out there, in my humble opinion. It correctly selects strings representing complex variable names and paths. Consider the following example:
hello-world_example=/path/to/a/file.md
With the default Windows Terminal setting, double-clicking on:
- hello selects hello only.
- world selects world_example only.
- any part of the path selects only that part of the path, for example clicking on file selects file only.
To make it better, change the Word delimiters setting in Settings / Interaction to:
()"':,;<>~!@#$%^&*|=[]{}?│
There’s a space as the first character. In settings.json, this would be:
|
|
If you’re having trouble updating the setting to the proposed value due to the «, use the Open JSON file button in the bottom left corner to modify the settings.json file directly.
After that change, double-clicking on:
- hello selects hello-world_example.
- any part of the path selects the complete /path/to/a/file.md.
This is a productivity boost when working with:
- Tools like find, grep, tree, and so on.
- Various outputs. For example textual, JSON and YAML kubectl outputs.
- Editing bash programs or any other files directly in the terminal.
Don’t dismiss this advice based on the fact that it originates from macOS. At least give it a try, if you don’t like it, you can always change it back.
§bonus: trim whitespace on paste
Two more settings I always make sure are enabled:
- Remove trailing white-space in rectangular selection.
- Remove trailing white-space when pasting.
Both available under the same Interaction section.
productivity
windows
terminal
In the era of digital communication and programming, the terminal remains an essential tool for developers, system administrators, and power users alike. The terminal provides users with a powerful interface to interact with their operating system through command lines, allowing them to execute commands, run scripts, and manage files efficiently. However, working in the terminal can involve repetitive tasks and processes that can become monotonous—especially when it comes to copying and pasting information.
Today, we’ll discuss an essential feature that can significantly enhance your productivity: enabling automatic copying of selections to the clipboard in the terminal. This functionality not only streamlines your workflow but also reduces the friction involved in manual copying and pasting. Let’s dive into the topic by exploring the terminal environment, the significance of clipboard management, and specific methods to enable this feature across different systems.
Understanding the Terminal Environment
The terminal, also known as the command line interface (CLI), allows users to interact with their operating system using text-based commands. Unlike graphical user interfaces (GUIs) that rely on visual elements like buttons and menus, the terminal operates on textual inputs and outputs.
Benefits of Using the Terminal
- Speed and Efficiency: Experienced users can perform tasks much faster through command-line inputs than through a GUI.
- Access to Advanced Features: Many system features are only accessible via the terminal, making it indispensable for advanced users.
- Scripting and Automation: The terminal allows for automation through scripts, reducing the need for manual input.
- Flexibility: The terminal can be accessed on various operating systems and can be customized to fit user needs.
As effective as the terminal can be, managing the clipboard remains a slight inconvenience. When copying data manually, users need to highlight text and right-click or use keyboard shortcuts, which can interrupt the flow of work. Enabling automatic clipboard copying can mitigate this issue.
Clipboard Management in the Terminal
Clipboard management is a critical component of productivity, particularly for developers who frequently transfer text between the terminal and other applications. To facilitate the seamless sharing of information, automatic clipboard copying should be made available.
How the Clipboard Works
The clipboard is a temporary storage space that temporarily holds data of various kinds, typically text or images, enabling users to cut, copy, and paste information. The process usually involves three actions:
- Cut/Copy: The user selects content and transfers it to the clipboard.
- Store: The data remains in the clipboard until it is replaced or the system is restarted.
- Paste: The user retrieves the data from the clipboard to place it elsewhere.
In the context of the terminal, users often need to copy command outputs, file paths, or error messages. To improve efficiency, enabling the automatic copying of selected text can turn a tedious process into a seamless operation.
Enabling Auto Copy in Different Terminal Emulators
Different terminal emulators offer various settings for managing clipboard behavior. Below, we will discuss how to enable automatic clipboard copying in several popular terminal emulators used across different operating systems: MacOS (Terminal app and iTerm2), Linux (GNOME Terminal and other emulators), and Windows (Windows Terminal and Command Prompt).
MacOS Terminal App
The default Terminal app on macOS does not support automatic copying to the clipboard out of the box. However, users can achieve a similar effect through the following solution:
-
Use the Accessibility Features:
- Go to System Preferences → Accessibility.
- Navigate to Mouse & Trackpad.
- Enable «Copy to clipboard» for selected text. This allows you to simply select text to copy it automatically.
-
Using iTerm2:
- If you prefer iTerm2, a popular alternative to the built-in Terminal app, follow these steps:
- Open iTerm2 and navigate to iTerm2 → Preferences.
- Select the General tab and check the «Copy to clipboard on selection» checkbox.
- This setting allows text selection in iTerm2 to automatically copy it to the clipboard, allowing you to simply paste it wherever needed using Command + V.
- If you prefer iTerm2, a popular alternative to the built-in Terminal app, follow these steps:
Linux Terminal (GNOME Terminal)
The behavior for clipboard management in various Linux terminal emulators can differ. However, GNOME Terminal, a common choice for many users, can facilitate automatic copying as follows:
- Settings:
- Open GNOME Terminal and click on the hamburger menu icon in the upper right corner.
- Select Preferences.
- Choose a profile and navigate to the Text tab.
- Enable the option labeled «Copy to clipboard on selection».
This will ensure that any text you select within GNOME Terminal will be automatically copied, ready for pasting in any application.
Enabling Auto Copy in Other Linux Terminal Emulators
If you are using a different terminal emulator, such as Konsole (KDE’s terminal) or Terminator, you can typically find similar settings within the preferences or settings menu.
-
Konsole:
- Open Konsole and select Settings from the top menu.
- Click on Edit Current Profile and navigate to the General tab.
- Enable «Copy selected text to clipboard».
-
Terminator:
- Open Terminator, right-click on the terminal window, and select Preferences.
- Under the Global tab, enable the setting that allows selections to auto-copy to the clipboard.
Windows Terminal (Windows 10/11)
Windows Terminal is a modern terminal emulator for command-line applications on Windows. Its clipboard handling has improved dramatically compared to older systems. Enable automatic clipboard copying through the following steps:
- Settings:
- Open Windows Terminal and click on the down arrow in the title bar and select Settings.
- In the settings file (typically in JSON format), find the profiles section.
- Locate the profile you wish to enable auto-copy for (such as PowerShell or Command Prompt).
- Add
"copyOnSelect": trueto the profile settings.
By doing this, any text you select in Windows Terminal will automatically be copied to your clipboard. This setting makes the terminal usage experience much smoother, especially for frequent command-line users.
Additional Tips for Enhancing Clipboard Management
By enabling automatic clipboard copying, you’ll notice a boost in your productivity. However, here are some additional tips to further optimize your clipboard management:
Understanding Clipboard History
Many operating systems and applications now allow users to access clipboard history. This feature keeps a log of copied items, allowing users to paste previously copied text easily. Depending on your operating system, this can usually be enabled via settings.
-
Windows 10/11:
- Go to Settings → System → Clipboard and enable Clipboard history.
-
MacOS:
- macOS does not natively support clipboard history, but users can download third-party applications like Clipy or Paste.
-
Linux:
- Various clipboard managers like Clipman or Diodon can be installed to enhance clipboard capabilities.
Using Clipboard Managers
If you find yourself frequently copying and pasting multiple items, consider using clipboard managers. These applications allow for more comprehensive management of clipboard contents, including organizing, restoring, and searching through copied items.
Popular clipboard managers include:
- Ditto (Windows)
- ClipClip (Windows)
- CopyQ (Cross-platform)
- Flycut (MacOS)
Keyboard Shortcuts for Efficiency
While automatic copying simplifies workflow, incorporating keyboard shortcuts can enhance your productivity even further. Ensure you are familiar with the standard copy (Ctrl + C or Command + C) and paste (Ctrl + V or Command + V) shortcuts. Additionally, familiarize yourself with other command-line shortcuts for quick navigation and execution.
Automating ZSH and Bash
For users who employ Zsh or Bash, writing scripts that utilize the clipboard programmatically can provide even more options for automatically copying data. For instance, you can use commands like pbcopy on MacOS, xclip or xsel on Linux, and clip on Windows to send outputs directly to the clipboard.
Example in Zshell:
echo "Hello, World!" | pbcopyThis can be useful for copying command outputs directly without needing to select anything manually.
Considerations for Security and Privacy
As with any technological tool, it is essential to be aware of security and privacy implications. Automatically copying sensitive information can inadvertently lead to data leaks. If you frequently handle sensitive data through your terminal, employ security measures like:
- Ensure you are not copying sensitive data unintentionally.
- Regularly clear clipboard history if your system supports it.
- Use secure methods of data transfer, like SSH or SFTP, to handle sensitive operations.
Conclusion
Enabling automatic copying of selections to the clipboard in the terminal is a powerful feature that can significantly enhance productivity and streamline workflows. By configuring the settings of your terminal emulator and employing additional tips and tools, you can manage your clipboard more efficiently and reduce interruption to your work.
Whether you’re using MacOS, Linux, or Windows systems, there are tools and settings available that allow for seamless data management. Additionally, employing clipboard managers, understanding clipboard history, and using automation can provide you with extra layers of efficiency in your day-to-day terminal tasks.
With the information provided in this comprehensive guide, you’re now equipped to enable automatic copying in your terminal environment, paving the way for a more efficient, streamlined, and productive coding experience. Happy terminal-ing!
Similar to #523, except the reverse: selected data in the terminal is not copyable to other apps.
Your Windows build number: (Type ver at a Windows Command Prompt)
Can’t tell you, because when I select it it won’t paste into this form!
But using another terminal app (and fixing the command to work with Windows default shell):
$ #[Environment]::OSVersion.VersionString
Microsoft Windows NT 10.0.18890.0
What you’re doing and what’s happening: (Copy & paste specific commands and their output, or include screen shots)
Both:
- Highlighting text to select it then pasting it fails
- Highlighting text, pressing Ctrl C (which shouldn’t be necessary) and then pasting it fails
What’s wrong / what should be happening instead:
Different data is pasted
It should be pasting whatever was selected in the terminal.
Here’s the options provided by Fluent Terminal:

This article explains turning on or off the “Automatically copy selection to clipboard” feature in the Terminal app on Windows 11.
Windows Terminal is a modern host application for the command-line shells, including Command Prompt, Windows PowerShell, and bash (via Windows Subsystem for Linux (WSL)).
The Terminal app in Windows allows many customizations. You can change the language, adjust the launch size, set the default profile, change the startup behavior, open the admin window, open Terminal automatically at startup, and more.
Another feature of the Terminal app is automatically copying selections to the clipboard.
Turning on or off the “Automatically copy selection to clipboard” feature in the Terminal app on Windows 11 can be useful for different reasons. You may want to keep this feature turned on if you frequently copy and paste text from the Terminal app to other applications.
This will allow you to select text in the Terminal app and have it automatically copied to your clipboard without manually right-clicking and selecting “Copy.” However, if you prefer more control over what gets copied to your clipboard, you may want to turn this feature off.
This can help avoid accidentally copying sensitive information or unwanted characters to your clipboard. Whether to turn this feature on or off depends on your preferences and usage habits.
Automatically copy selection to clipboard in Terminal
As mentioned, users can enable or disable automatically copying selections to the clipboard in the Terminal app.
Here’s how to do that.
First, open the Windows Terminal app.
You can do that by clicking on the Start menu and searching for Terminal. Then, under “Best match,” select and open the Windows Terminal app.

When the Terminal app opens, click the down arrow button on the top bar and select Settings (Ctrl +,).

On the Settings window, click on the Interaction tab on the left. Then, select the “Automatically copy selection to clipboard” tile and toggle the switch button to the On position to enable it.
To disable it, toggle the switch button to the Off position.

Click the Save button at the bottom to save your changes, then exit.
That should do it!
Conclusion:
- Enabling the “Automatically copy selection to clipboard” feature offers convenience when working with the Terminal app, allowing seamless text copying.
- Disabling this feature provides greater control over clipboard contents, ensuring sensitive information is not inadvertently copied.
- Customizing Windows Terminal settings allows personalized user experiences tailored to individual preferences and usage habits.
- Please use the comments section below for further assistance or to contribute to this guide.