
How to Change Text Color in a Windows Terminal
A quick overview and a simple Windows CMD script to make your terminal output a little more lively
Introduction
The default text output to a terminal is monochromatic and doesn’t provide a simple method to provide context. For instance, you may want an error to appear in red, success in green, or important info to be output in bold.
Adding color to your terminal output is straightforward and involves outputting the correct control characters before your text.
This is a companion article to How to change text color in a Linux terminal.
Terminal Colors
To output colored text, you need to echo the control characters for the required color, then output your text, and then (to be tidy) reset the output back to defaults. The following table lists the codes:
| Color | Foreground | Background |
|---|---|---|
| Default | ESC[39m | ESC[49m |
| Black | ESC[30m | ESC[40m |
| Dark red | ESC[31m | ESC[41m |
| Dark green | ESC[32m | ESC[42m |
| Dark yellow (Orange-ish) | ESC[33m | ESC[43m |
| Dark blue | ESC[34m | ESC[44m |
| Dark magenta | ESC[35m | ESC[45m |
| Dark cyan | ESC[36m | ESC[46m |
| Light gray | ESC[37m | ESC[47m |
| Dark gray | ESC[90m | ESC[100m |
| Red | ESC[91m | ESC[101m |
| Green | ESC[92m | ESC[101m |
| Orange | ESC[93m | ESC[103m |
| Blue | ESC[94m | ESC[104m |
| Magenta | ESC[95m | ESC[105m |
| Cyan | ESC[96m | ESC[106m |
| White | ESC[97m | ESC[107m |
and the reset code is ESC[0m where ESC is the escape code.
The format of the string for foreground color is:
"ESC[" + "<0 or 1, meaning normal or bold>;" + "<color code> + "m"
and for background:
"ESC[" + "<color code>" + "m"
These codes can be output together in order to change fore- and back-ground colors simultaneously.
Using the Code
Before you can output the color code, you need to generate the ESC sequence. It’s probably easiest to do that once and store it for later:
:: Sets up the ESC string for use later in this script
:setESC
    for /F "tokens=1,2 delims=#" %%a in ('"prompt #$H#$E# & echo on & for %%b in (1) do rem"') do (
      set ESC=%%b
      exit /B 0
    )
    exit /B 0
This will set a variable ESC with the correct sequence.
A simple example of outputting red text:
setlocal enabledelayedexpansion call :setESC echo !ESC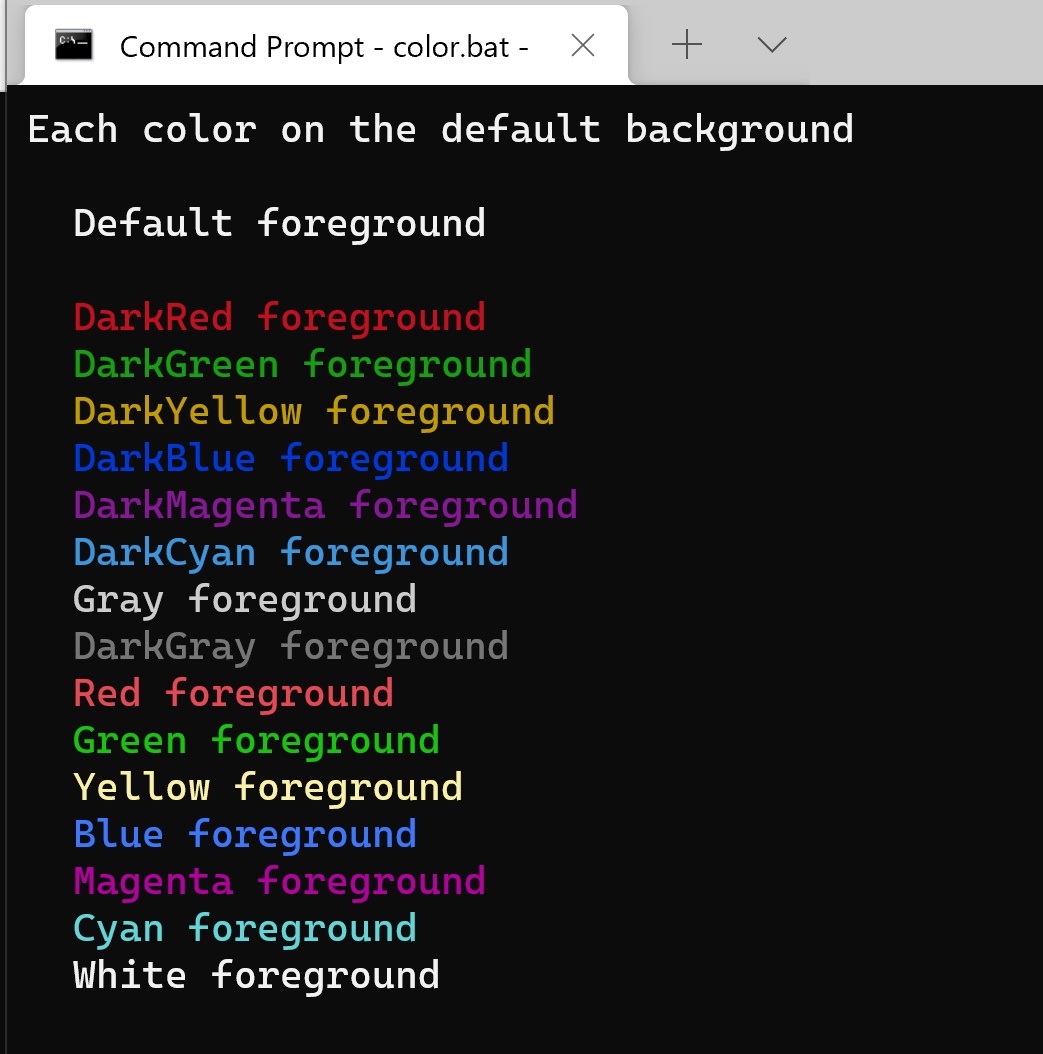
Handling Contrast
Suppose we have defined a set of predefined colors and we want to use them to ensure consistency:
set color_primary=Blue
set color_mute=Gray
set color_info=Yellow
set color_success=Green
set color_warn=DarkYellow
set color_error=Red
If we output text using these as background colors, we get:
call :WriteLine
call :WriteLine "Default color on predefined background"
call :WriteLine

call :WriteLine "  Default colored background" "Default"
call :WriteLine "  Primary colored background" "Default" %color_primary%
call :WriteLine "  Mute colored background"    "Default" %color_mute%
call :WriteLine "  Info colored background"    "Default" %color_info%
call :WriteLine "  Success colored background" "Default" %color_success%
call :WriteLine "  Warning colored background" "Default" %color_warn%
call :WriteLine "  Error colored background"   "Default" %color_error%
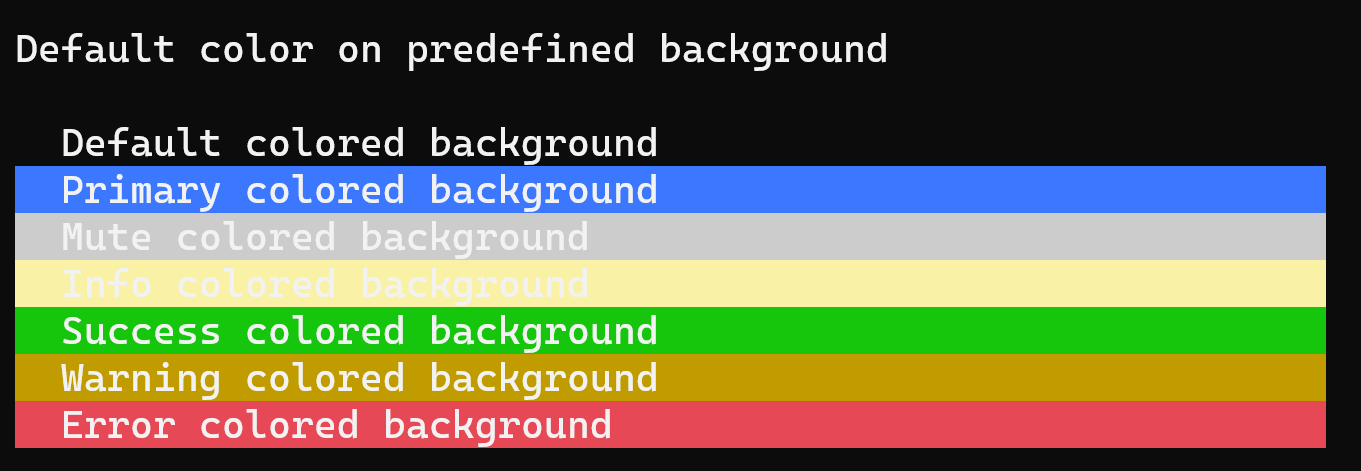
Things are a bit murky so let’s add one more function that will provide a contrasting foreground on whatever background we choose.
:: Sets the name of a color that will providing a contrasting foreground
:: color for the given background color.
::
:: string background color name.
:: on return, contrastForeground will be set
:setContrastForeground

    set background=%~1

    if "!background!"=="" background=Black

    if /i "!background!"=="Black"       set contrastForeground=White
    if /i "!background!"=="DarkRed"     set contrastForeground=White
    if /i "!background!"=="DarkGreen"   set contrastForeground=White
    if /i "!background!"=="DarkYellow"  set contrastForeground=White
    if /i "!background!"=="DarkBlue"    set contrastForeground=White
    if /i "!background!"=="DarkMagenta" set contrastForeground=White
    if /i "!background!"=="DarkCyan"    set contrastForeground=White
    if /i "!background!"=="Gray"        set contrastForeground=Black
    if /i "!background!"=="DarkGray"    set contrastForeground=White
    if /i "!background!"=="Red"         set contrastForeground=White
    if /i "!background!"=="Green"       set contrastForeground=White
    if /i "!background!"=="Yellow"      set contrastForeground=Black
    if /i "!background!"=="Blue"        set contrastForeground=White
    if /i "!background!"=="Magenta"     set contrastForeground=White
    if /i "!background!"=="Cyan"        set contrastForeground=Black
    if /i "!background!"=="White"       set contrastForeground=Black

    exit /B 0
We’ve already wired this up in the Write methods: If the foreground color is set as «Contrast«, then the foreground will be set as something that has a decent contrast to the given background.
To use, we simply do:
call :WriteLine "  Primary colored background" "Contrast" %color_primary%
call :WriteLine "  Mute colored background"    "Contrast" %color_mute%
call :WriteLine "  Info colored background"    "Contrast" %color_info%
call :WriteLine "  Success colored background" "Contrast" %color_success%
call :WriteLine "  Warning colored background" "Contrast" %color_warn%
call :WriteLine "  Error colored background"   "Contrast" %color_error%

Interesting Points
A challenge in this was outputting text via a CMD shell without a newline. The <var>echo</var> command, by default, adds a line feed. To output text in a CMD script without including a line feed, simply use:
<NUL set /p ="My string goes here"
A quick overview and a simple Windows CMD script to make your terminal output a little more lively
- Download source code — 1.9 KB
Introduction
The default text output to a terminal is monochromatic and doesn’t provide a simple method to provide context. For instance, you may want an error to appear in red, success in green, or important info to be output in bold.
Adding color to your terminal output is straightforward and involves outputting the correct control characters before your text.
This is a companion article to How to change text color in a Linux terminal.
Terminal Colors
To output colored text, you need to echo the control characters for the required color, then output your text, and then (to be tidy) reset the output back to defaults. The following table lists the codes:
| Color | Foreground | Background |
|---|---|---|
| Default | ESC[39m | ESC[49m |
| Black | ESC[30m | ESC[40m |
| Dark red | ESC[31m | ESC[41m |
| Dark green | ESC[32m | ESC[42m |
| Dark yellow (Orange-ish) | ESC[33m | ESC[43m |
| Dark blue | ESC[34m | ESC[44m |
| Dark magenta | ESC[35m | ESC[45m |
| Dark cyan | ESC[36m | ESC[46m |
| Light gray | ESC[37m | ESC[47m |
| Dark gray | ESC[90m | ESC[100m |
| Red | ESC[91m | ESC[101m |
| Green | ESC[92m | ESC[101m |
| Orange | ESC[93m | ESC[103m |
| Blue | ESC[94m | ESC[104m |
| Magenta | ESC[95m | ESC[105m |
| Cyan | ESC[96m | ESC[106m |
| White | ESC[97m | ESC[107m |
and the reset code is ESC[0m where ESC is the escape code.
The format of the string for foreground color is:
"ESC[" + "<0 or 1, meaning normal or bold>;" + "<color code> + "m"
and for background:
"ESC[" + "<color code>" + "m"
These codes can be output together in order to change fore- and back-ground colors simultaneously.
Using the Code
Before you can output the color code, you need to generate the ESC sequence. It’s probably easiest to do that once and store it for later:
:: Sets up the ESC string for use later in this script
:setESC
    for /F "tokens=1,2 delims=#" %%a in ('"prompt #$H#$E# & echo on & for %%b in (1) do rem"') do (
      set ESC=%%b
      exit /B 0
    )
    exit /B 0
This will set a variable ESC with the correct sequence.
A simple example of outputting red text:
setlocal enabledelayedexpansion call :setESC echo !ESC
Handling Contrast
Suppose we have defined a set of predefined colors and we want to use them to ensure consistency:
set color_primary=Blue
set color_mute=Gray
set color_info=Yellow
set color_success=Green
set color_warn=DarkYellow
set color_error=Red
If we output text using these as background colors, we get:
call :WriteLine
call :WriteLine "Default color on predefined background"
call :WriteLine

call :WriteLine "  Default colored background" "Default"
call :WriteLine "  Primary colored background" "Default" %color_primary%
call :WriteLine "  Mute colored background"    "Default" %color_mute%
call :WriteLine "  Info colored background"    "Default" %color_info%
call :WriteLine "  Success colored background" "Default" %color_success%
call :WriteLine "  Warning colored background" "Default" %color_warn%
call :WriteLine "  Error colored background"   "Default" %color_error%

Things are a bit murky so let’s add one more function that will provide a contrasting foreground on whatever background we choose.
:: Sets the name of a color that will providing a contrasting foreground
:: color for the given background color.
::
:: string background color name.
:: on return, contrastForeground will be set
:setContrastForeground

    set background=%~1

    if "!background!"=="" background=Black

    if /i "!background!"=="Black"       set contrastForeground=White
    if /i "!background!"=="DarkRed"     set contrastForeground=White
    if /i "!background!"=="DarkGreen"   set contrastForeground=White
    if /i "!background!"=="DarkYellow"  set contrastForeground=White
    if /i "!background!"=="DarkBlue"    set contrastForeground=White
    if /i "!background!"=="DarkMagenta" set contrastForeground=White
    if /i "!background!"=="DarkCyan"    set contrastForeground=White
    if /i "!background!"=="Gray"        set contrastForeground=Black
    if /i "!background!"=="DarkGray"    set contrastForeground=White
    if /i "!background!"=="Red"         set contrastForeground=White
    if /i "!background!"=="Green"       set contrastForeground=White
    if /i "!background!"=="Yellow"      set contrastForeground=Black
    if /i "!background!"=="Blue"        set contrastForeground=White
    if /i "!background!"=="Magenta"     set contrastForeground=White
    if /i "!background!"=="Cyan"        set contrastForeground=Black
    if /i "!background!"=="White"       set contrastForeground=Black

    exit /B 0
We’ve already wired this up in the Write methods: If the foreground color is set as «Contrast«, then the foreground will be set as something that has a decent contrast to the given background.
To use, we simply do:
call :WriteLine "  Primary colored background" "Contrast" %color_primary%
call :WriteLine "  Mute colored background"    "Contrast" %color_mute%
call :WriteLine "  Info colored background"    "Contrast" %color_info%
call :WriteLine "  Success colored background" "Contrast" %color_success%
call :WriteLine "  Warning colored background" "Contrast" %color_warn%
call :WriteLine "  Error colored background"   "Contrast" %color_error%

Interesting Points
A challenge in this was outputting text via a CMD shell without a newline. The <var>echo</var> command, by default, adds a line feed. To output text in a CMD script without including a line feed, simply use:
<NUL set /p ="My string goes here"
Использование цвета в терминале
Время на прочтение7 мин
Количество просмотров9.1K
Я пишу небольшие скрипты для работы в программах-оболочках «Windows PowerShell» версии 5.1 и «PowerShell» версии 7 в операционной системе «Windows 10». Иногда тянет подсветить текстовый вывод в консоль разными цветами. В этой статье я хочу рассказать о паре грабель, на которые можно при этом наступить.
Окунемся в историю
Чтобы понять проблемы с использованием цвета в терминалах (сегодня — в эмуляторах терминалов), полезно в двух словах представлять, как цвет появился в терминалах и как он развивался.
Когда терминалы были физическими устройствами, возможность использования разных цветов была ограничена на уровне устройства. Меньшее количество цветов в терминале означало более дешевое устройство, а, значит, более массовое (больше продаж — больше прибыль; вообще это не всегда так, но в данном случае это работало).
Сначала были монохромные терминалы (два цвета — для текста и для фона). Потом появился трехбитный цвет: пользователю терминала стали доступны 8 разных цветов. Именно тогда из ограничения в 3 бита родилась знаменитая восьмерка названий цветов, ставшая «родной» для терминалов:
000  #000000  black    черный
001  #0000ff  blue     синий
010  #00ff00  green    зеленый
011  #00ffff  cyan     голубой
100  #ff0000  red      красный
101  #ff00ff  magenta  пурпурный (лиловый и т.д.)
110  #ffff00  yellow   желтый
111  #ffffff  white    белый
Во второй редакции стандарта «ECMA-48» от 1979 года (первая редакция — от 1976 года, но я не смог найти ее в интернете) за этими названиями цветов уже закреплены соответствующие управляющие последовательности (коды). (Действующая редакция этого стандарта — пятая, от 1991 года.) В редакции от 1979 года есть еще управляющий код, с помощью которого можно было выделять текст. В разных терминалах это делалось по-разному: увеличением толщины (насыщенности) шрифта или увеличением яркости цвета. Таким образом из 8 имеющихся цветов выжимали 16 разных вариантов для текста (для фона использовали 8 базовых цветов):
black   | bright (bold) black
blue    | bright (bold) blue
green   | bright (bold) green
cyan    | bright (bold) cyan
red     | bright (bold) red
magenta | bright (bold) magenta
yellow  | bright (bold) yellow
white   | bright (bold) white
Эти 16 названий цветов часто называют «цветами ANSI», хотя в соответствующем стандарте «ANSI X3.64» эти названия появились позже, чем в «ECMA-48», в 1980-е (сейчас стандарт «ANSI X3.64» не действует).
Следует отметить, что в упомянутых стандартах указаны только названия цветов, а не точные значения. Разные производители терминалов использовали для этих названий разные значения цветов. Поэтому цвет с одним и тем же названием мог выглядеть очень по-разному на терминалах разных производителей. Из этого в современных эмуляторах терминалов родились цветовые схемы с ограниченной палитрой из 8, 16 или более цветов.
Грабли первые
Цвет текста по умолчанию и цвет фона по умолчанию.
При ограничении цвета 3 битами на уровне устройства цвет текста по умолчанию и цвет фона по умолчанию приходилось выбирать из 8 доступных цветов. Обычно цветом фона по умолчанию выбирался черный (000), а цветом текста по умолчанию — белый (111).
При переходе от терминалов-физических устройств к эмуляторам терминалов (к программам) цветовые схемы с ограниченной палитрой в 8 и 16 цветов перешли в эмуляторы терминалов «по наследству». Несмотря на то, что сегодня физическое ограничение количества цветов в палитре цветовой схемы исчезло, никто не торопится увеличивать палитры цветовых схем. Главная причина этого в том, что с точки зрения дизайна пользовательских интерфейсов увеличение количества цветов в пользовательском интерфейсе увеличивает сложность нахождения гармоничного сочетания цветов, имеющихся в палитре (поэтому дизайнеры предпочитают обходиться как можно меньшим количеством цветов при проектировании пользовательских интерфейсов, да и не только их).
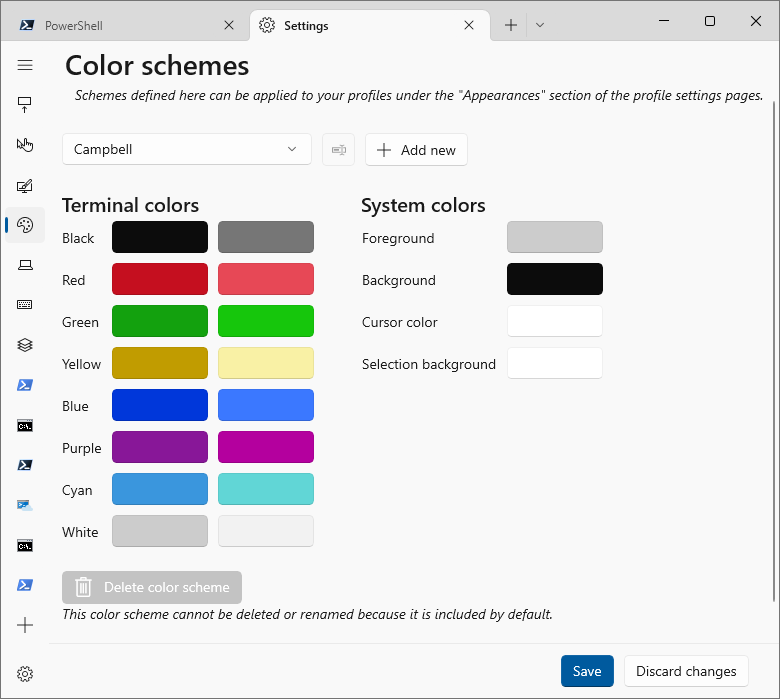
В самых свежих версиях современных эмуляторов терминалов для цвета текста по умолчанию и цвета фона по умолчанию в палитру цветовой схемы добавлены отдельные слоты, то есть вместо, к примеру, палитры из 16 слотов мы имеем палитру в 18 слотов (16 цветов ANSI, цвет текста по умолчанию, цвет фона по умолчанию). Но большинство авторов цветовых схем отказывается от использования этой возможности, назначая отдельному слоту для цвета текста по умолчанию то же значение цвета, что и для слота цвета «белый», а отдельному слоту для цвета фона по умолчанию — то же значение цвета, что и для слота цвета «черный».
Иллюстрация этой ситуации на примере эмулятора терминала «Windows Terminal». Видно палитру из 16 цветов ANSI и добавочные слоты палитры для цвета текста по умолчанию и цвета фона по умолчанию (в столбце «System colors»). Слот «Foreground» совпадает по значению цвета со слотом «White», а слот «Background» совпадает по значению цвета со слотом «Black». Это одна из цветовых схем этого эмулятора терминала, она называется «Campbell» и является цветовой схемой по умолчанию в этом эмуляторе терминала, но ее, конечно, можно поменять как на одну из встроенных, так и на созданную самостоятельно (или загруженную из интернета в формате JSON):
К чему это приводит? Предположим, я подсветил текст в терминале цветом из «черного» слота палитры установленной в терминале цветовой схемы. При этом я не учел, что во многих цветовых схемах «черный» цвет также является цветом фона по умолчанию. Таким образом, во многих терминалах мой скрипт выведет в консоль текст, который никто не увидит, так как текст «черного» цвета сольется с фоном по умолчанию («черного») цвета.
То же самое случится, если я захочу подсветить какой-нибудь текст, изменив цвет фона под ним на цвет из слота «белый» палитры текущей цветовой схемы, но оставив цвет самого текста цветом по умолчанию. Во многих терминалах такой текст никто не увидит, так как текст цвета по умолчанию («белого») сольется с цветом «белый» фона.
Как избежать этой проблемы? Хоть вам никто не может запретить использовать в терминале подсветку текста черным цветом на фоне по умолчанию или подсветку фона белым цветом у текста цвета по умолчанию, я советую избегать этих сочетаний.
Причина проблемы
Описанная выше проблема, а также ряд других, появляется в том случае, когда мы меняем только одну составляющую: или цвет текста, или цвет фона под текстом, оставляя другую составляющую на волю настроек цвета, произведенных пользователем эмулятора терминала. Очевидно, что избежать этих проблем можно, если во всех случаях контролировать обе составляющие: и цвет текста, и цвет фона под текстом. Однако, такое решение может не понравиться пользователю: вы навяжете ему свою цветовую схему вместо той, которую выбрал он для своего эмулятора терминала. Кроме того, создание своей цветовой схемы — не такая простая задача, как это кажется на первый взгляд. В среде пользователей терминалов не так много популярных цветовых схем, одна из них — знаменитая «Solarized». На сайте автора этой схемы можно узнать о множестве подводных камней, которые могут попасться при разработке цветовой схемы.
Грабли вторые
Использование 24-битного цвета.
Мне, как человеку, привыкшему писать тексты в интернете с использованием языков HTML и CSS, удобнее пользоваться цветовой моделью RGB. В этой модели для каждой составляющей (красная, зеленая, синяя) отводится один байт, то есть в целом это три байта, а, значит, 24 бита. 24-битный цвет (TrueColor) позволяет использовать более 16 миллионов различных цветов (224). Современные эмуляторы терминалов предоставляют возможность пользоваться таким цветом.
В одном из своих скриптов я захотел подсветить некоторые слова в тексте, выводимом в консоль. На языке PowerShell это можно исполнить достаточно просто с помощью соответствующего управляющего кода:
$text = "слово"
$Esc = [char]27           #  с PowerShell версии 6 доступны `e и `u{1B}
$color = "38;2;255;255;0" #  желтый цвет, RGB: 255;255;0
"$Esc[$color`m" + $text + "$Esc[0m"
В моем эмуляторе терминала «Windows Terminal» при установленной цветовой схеме «One Half Dark» это выглядит достаточно симпатично. Однако, я не учел, что существуют не только темные («ночные») цветовые схемы, но и светлые («дневные»). (Хотя я считаю использование светлых цветовых схем в терминалах кощунством.)
Иллюстрация моего вывода в терминал при цветовой схеме «One Half Dark» и при цветовой схеме «One Half Light»:
Видно, что при светлой цветовой схеме выделенные желтым слова хоть и видны, но имеют малую контрастность с цветом фона по умолчанию.
Кстати, тут следует упомянуть, что понятие «контрастность» можно выразить в числах, а, следовательно, это понятие объективное, а не субъективное. По крайней мере, это верно для веба: формула вычисления контрастности двух цветов определена в документе «WCAG» (действующая версия этого документа — 2.1, она опубликована в 2018 году). Этот же документ устанавливает критерий приемлемой контрастности цветов, разделенный на несколько уровней: «AA» и «AAA» (последний — более строгий). Согласно этому документу минимально приемлемая контрастность двух цветов равна 3:1 (яркость двух цветов должна отличаться в три раза). Нахождение хорошей контрастности всех пар цветов — это, кстати, один из подводных камней построения хорошей цветовой схемы для терминала.
Контрастность желтого #ffff00 цвета и цвета фона по умолчанию (для цветовой схемы «One Half Dark» #282c34 и для цветовой схемы «One Half Light» #fafafa): 13,03:1 и 1,02:1. Ясно, что второй случай под критерий не подходит, да это видно и невооруженным взглядом.
Как избежать этой проблемы? Либо искать цвет, который подойдет для большинства используемых цветовых схем, но это аналогично построению своей цветовой схемы, о чем уже говорилось выше. Либо положиться на ограниченную палитру популярных цветовых схем для терминалов. То есть вместо цвета по модели RGB можно использовать цвет из текущей цветовой схемы. Для этого используется другой управляющий код, в котором цвет задается одним числом из 8, 16, 18 или более доступных слотов палитры текущей цветовой схемы.
Например, в моем случае я использовал слот с названием «желтый» из палитры текущей цветовой схемы. Вот как это выглядит в коде на языке PowerShell:
$text = "слово"
$Esc = [char]27 #  с PowerShell версии 6 доступны `e и `u{1B}
$color = "33"   #  желтый цвет, палитра текущей цветовой схемы
"$Esc[$color`m" + $text + "$Esc[0m"
Иллюстрация моего вывода в терминал при цветовой схеме «One Half Dark» и при цветовой схеме «One Half Light» с использованием слота из палитры этих цветовых схем:
Как видно из вышеприведенной иллюстрации, такое использование цвета выглядит намного приятнее. Тут мы не выдумываем своё, а полагаемся на уже придуманное другими людьми цветовое решение. Контрастность цвета из «желтого» слота палитры двух указанных цветовых схем по сравнению с цветом фона по умолчанию:
-
«One Half Dark»:
#E5C07B«желтый» и#282C34(фон по умолчанию) — 8,1:1; -
«One Half Light»:
#C18301«желтый» и#FAFAFA(фон по умолчанию) — 3,08:1.
Оба варианта удовлетворяют критерию приемлемой контрастности из документа «WCAG». Контрастность можно вычислить самому или воспользоваться для ее вычисления одним из веб-сервисов (например).
Заключение
Использование цвета в эмуляторах терминала может вызвать проблемы. Следует учитывать и обходить некоторые узкие моменты. Например, не стоит подсвечивать текст черным цветом при фоне цвета по умолчанию или не стоит подсвечивать фон белым цветом при тексте цвета по умолчанию. Кроме этого, вместо использования любых цветов, какие придут в голову, стоит рассмотреть возможность использования цветов из ограниченных палитр распространенных цветовых схем для терминалов. Это поможет сохранить рекомендуемую стандартами контрастность цветов, что сохранит зрение пользователям. Как вариант — создание собственной цветовой схемы для терминала. Но это не так просто, как кажется, а также может быть воспринято пользователем как навязывание цветовой схемы.
Originally released in preview back in 2019, Windows Terminal has since been updated with additional new features and functionalities. We have already published a detailed article on how to install and use Windows Terminal. And now, we will show you how to customize your Windows Terminal. We will see who to change its theme, colors, font, and even background image to personalize the app to your liking.
Customize Windows Terminal by Changing its Theme
The Windows Terminal can run Command Prompt, PowerShell, and Bash commands in the same window. It’s also highly customizable, which means you can change its background and foreground color, font, and more. So today, we will see how you can easily customize Windows Terminal on your PC using the ‘Settings’ option. You can download the app from the Microsoft Store (Free) if you haven’t already.
Note: Originally, you needed to use a highly technical and long-winded process to change themes and color profiles in the Windows Terminal. However, Microsoft has since introduced a GUI option that requires little technical know-how to customize the app.
Use Dark Theme in Windows Terminal
- To change the theme in Windows Terminal, you first need to click on the drop-down button in the title bar. Then, click on Settings. The Settings UI will open in a new tab.

- In the Settings tab, hit ‘Appearance‘ on the left sidebar and select the Dark Theme option on the right pane. You can also make other changes, like hiding tabs, hide the title bar, and more. Be sure to hit ‘Save‘ at the bottom-right once you have made the changes.

Change Color Scheme and Font
- You can choose your own color schemes using hexadecimal strings or a simple GUI in Windows Terminal. To do that, go to the ‘Color schemes‘ section on the left pane of the Settings window. Here, you can either select a built-in color scheme from the drop-down menu or create your own. For the second option, hit the ‘Add New‘ button.

- To select your own background, foreground, and cursor colors for your custom theme, click on the respective boxes in the ‘Color schemes’ settings window. Now make your selection either through the GUI color picker or the hexadecimal field. As you can see, I’ve created a color scheme that gives the PowerShell profile on my Windows Terminal the look of an old CRT monitor.

- To change the font color and style, select one of the ‘Profile’ in the left pane. That means you need to choose whether you want to customize the PowerShell UI or the Command Prompt UI, etc. For this demo, we will change the PowerShell UI.

- Once in the PowerShell settings, go to the ‘Appearance‘ tab. You can now change the text color in Windows Terminal using the first drop-down menu. You can also set the font face, font size, cursor style, and more here. Be sure to hit ‘Save‘ after making the changes.

Change Background Image
- To change the background image on Windows Terminal, scroll down to the bottom of the ‘Appearance‘ tab. Here, you can either use your desktop wallpaper as your Terminal background or choose any image file on your PC.

- Here’s how my Windows Terminal looks with a background image:

Easily Change Windows Terminal Theme on Your PC
So now that you know how to change the theme on Windows Terminal, we suggest you go ahead and customize the UI to your heart’s content. Meanwhile, both the Command Prompt and Windows PowerShell also allow users plenty of customization options. So if either of those is your command line tool of choice, check out how you can customize the Command Prompt and the PowerShell in Windows 10 by following our tutorials. For more power-user options, check out how to use God Mode and how to use PowerToys on a Windows 10 PC.

Anson Heung
Posted on
• Edited on
Windows Terminal is a modern terminal application for developers who frequently uses command-line tools such as Powershell. In this article, I’ll show you how to customize the hell out of Windows Terminal and Powershell so that you can flex on your friends and colleagues 😎.
Here’s our final result 👇

Before we begin, please download Windows Terminal from the Microsoft Store.
Table of Contents:
- Windows Terminal Settings
- Oh My Posh
- Winfetch
Windows Terminal Settings
You can open settings via the Ctrl+, shortcut or the dropdown menu:

Color Scheme
My color scheme is a slightly modified version of Sonokai Shusia. To install the color scheme:
- Open Settings in Windows Terminal and press the “Open JSON file” button at the bottom left corner. It will open
settings.jsonin Notepad. -
In
settings.json, scroll down to find the"schemes"field, which accepts an array of color scheme objects. Next, paste in my color scheme object before the first object in the array (note that object order does not matter).{ ... "schemes": [ { "name": "Sonokai Shusia", "background": "#2D2A2E", "black": "#1A181A", "blue": "#1080D0", "brightBlack": "#707070", "brightBlue": "#22D5FF", "brightCyan": "#7ACCD7", "brightGreen": "#A4CD7C", "brightPurple": "#AB9DF2", "brightRed": "#F882A5", "brightWhite": "#E3E1E4", "brightYellow": "#E5D37E", "cursorColor": "#FFFFFF", "cyan": "#3AA5D0", "foreground": "#E3E1E4", "green": "#7FCD2B", "purple": "#7C63F2", "red": "#F82F66", "selectionBackground": "#FFFFFF", "white": "#E3E1E4", "yellow": "#E5DE2D" }, ... ] } -
Save your changes and head back to Windows Terminal. Go to Settings → «Windows Powershell» profile → «Appearance» tab → «Color Scheme», and choose the new color scheme. Then, press «Save».


If you don’t like my custom theme, check out Windows Terminal Themes website. There are 200+ themes to choose from and you get a quick preview of each theme 🌈.
Nerd Font
Nerd Fonts refer to programming fonts that are patched with a high number of glyphs (icons). Using a nerd font in Windows Terminal is essential because normal monospace fonts cannot render icons properly:

It’s likely that the programming font you’re using (eg. Cascadia Code, Fira Code) already has a Nerd Font version. Check out this link to see the full list of patched Nerd Fonts that you can install.
In my setup, I use Fira Code Nerd Font. The link will download a ZIP file that contains many TrueType font files. It’s OK to only install the files where the name looks something like Fira Code XXXXX Nerd Font Complete Windows Compatible.
After installing Nerd Font:
- Restart your Windows Terminal by closing and re-opening it.
- Go to Settings → “Windows Powershell” profile → “Appearance” tab → “Font face”, and choose your newly installed Nerd Font:

Now, your Terminal should look a bit more pleasing to the eyes:

Oh My Posh
Oh My Posh is a prompt theme engine that lets you beautify the prompt string. This engine requires your Terminal to use a Nerd Font so make sure that you followed along the previous steps.
Setup
-
Install “App Installer” from Microsoft Store to get the
wingetWindows Package Manager CLI.- ⚠ Requires Windows 10 1809 (build 17763) or later
- Check out Oh My Posh’s documentation for alternative installation options.
-
Restart your Windows Terminal and run
wingetto check if the package manager is correctly installed. -
In your Windows Terminal, run
winget install JanDeDobbeleer.OhMyPosh -
Restart your Windows Terminal. Next, try running
oh-my-poshin Powershell to see if it’s correctly installed.
-
Run the following command to open your Powershell profile.
notepad $PROFILEIf notepad shows a prompt saying that “Microsoft.Powershell_profile.ps1” is not found and asks if you would like to create the file, press “Yes” to create the file.
-
Inside the file, paste in the following code and save the file. This will load Oh My Posh on start-up with the default theme.
oh-my-posh --init --shell pwsh --config ~/AppData/Local/Programs/oh-my-posh/themes/jandedobbeleer.omp.json | Invoke-Expression -
Restart your Terminal. Your Powershell should now load Oh My Posh automatically


Change Theme
Oh My Posh comes with >70 themes included out-of-the-box. Check out the “Themes” page documentation for a gallery of preinstalled themes.
All themes are located in ~\AppData\Local\Programs\oh-my-posh\themes if you used winget to install Oh My Posh. If you used an alternative installation method, visit the documentation and select your installation method to see where the themes are located.
Suppose you want to use the powerlevel10k_rainbow preinstalled theme:
-
Open Windows Terminal and run
notepad $PROFILEin Powershell just like we did previously. -
In the opened file, change the path after
--configso that it usespowerlevel10k_rainbow.omp.json:oh-my-posh --init --shell pwsh --config ~/AppData/Local/Programs/oh-my-posh/themes/powerlevel10k_rainbow.omp.json | Invoke-Expression -
Restart your Terminal:


Custom Themes
You can easily create your own theme by writing your own JSON files. Here are some useful links:
- “Configuration → General” page of the docs — Learn how to create custom themes
- Nerd Font’s cheatsheet — List of different glyphs that you can use
I created a custom theme called p10k_classic, which is inspired by a preinstalled theme called powerlevel10k_classic.
To use my theme:
-
Visit the GitHub Gist link and click the “Download ZIP” button at the top right corner.
-
Extract
p10k_classic.omp.jsoninto a location of your choice. For example, let’s place it in the root folder (~). -
Open Windows Terminal and run
notepad $PROFILEin Powershell. -
In the opened file, change the path after
--configso that it uses~/p10k_classic.omp.jsonoh-my-posh --init --shell pwsh --config ~/p10k_classic.omp.json | Invoke-Expression -
Restart your Terminal:


Winfetch
As an added bonus, we’ll install winfetch, a command-line tool that prints out system information. This is a great alternative to neofetch, which only works on Linux.
Setup
This wiki page lists several ways to install winfetch. We’re using the first recommended method: PSGallery.
-
Run Windows Terminal as administrator. To do that, search “Windows Terminal” in the Start Menu, right click the item, and press “Run as administrator”

-
In Powershell, run the command:
Install-Script -Name pwshfetch-test-1Choose “Yes” for any prompts you encountered.
-
Run
notepad $PROFILEto open Powershell profile. Add the following line of code at the end:Set-Alias winfetch pwshfetch-test-1 -
Restart your Terminal. Then, run
winfetchto see if it’s correctly installed.


The default winfetch config is saved to ~\.config\winfetch\config.ps1. Check out the “Configuration” wiki page to see all available configuration options.
Custom Image
The Windows logo at the left can be changed to a custom “image” (more like a low resolution pixel art because Windows Terminal cannot render full resolution images).
For example, I want to display my GitHub profile picture, which is a 8-bit Luigi art:
-
Save this image and place it in a location of your choice. For example, I save it at the root folder (
~) with the nameluigi.png. -
Open
~\.config\winfetch\config.ps1in Notepad. Change the first two variables to the following:# ===== WINFETCH CONFIGURATION ===== $image = "C:\Users\User\luigi.png" # ABSOLUTE path $noimage = $false⚠ I used absolute path in
$imagebecause winfetch in my PC is having trouble processing a relative path (~/luigi.png). The full path of my root folder isC:\Users\User. -
Save the file and run
winfetchin Powershell:

More Configuration
By default, winfetch only shows information about your C drive. To show all available drives, open ~\.config\winfetch\config.ps1 and uncomment the field:
# Configure which disks are shown
# $ShowDisks = @("C:", "D:")
# Show all available disks
$ShowDisks = @("*")
Enter fullscreen mode
Exit fullscreen mode
You can also display a bar chart for the memory (RAM) and disk usage:
# Configure how to show info for levels
# Default is for text only.
# 'bar' is for bar only.
# 'textbar' is for text + bar.
# 'bartext' is for bar + text.
# $cpustyle = 'bar'
$memorystyle = 'bartext'
$diskstyle = 'bartext'
# $batterystyle = 'bartext'
Enter fullscreen mode
Exit fullscreen mode
Here’s our final result:

That’s all the steps you needed to beautify your Terminal 🌈. Now it’s time for you to show off in front of your friends and colleagues! 😁
Thanks for reading! If you find it useful, don’t forget to like and share this post 🙌
- My GitHub
- Personal website