
How to enable xterm 256 colors in ConEmu
- Vim note
- xterm 256 color mode requirements
- Example 1: Vim
- Example 2: 256colors2.pl
- Example 3: scroll console to the bottom
- TechInfo
Vim note
NB If ‘Inject ConEmuHk’ is off, you can still use ANSI in vim (or any other application)
if you run them via ConEmuC.exe but not directly. For example, run vim from bash.
conemuc -c C:/GIT/share/vim/vim73/vim.exe 1.cpp
Of course, you may omit full path to vim.exe if it may be found in %PATH% environment variable.
NB ConEmu will disable scroll buffer automatically, when vim.exe is started.
For any other application — you must do it yourself.
xterm 256 color mode requirements
- Options must be turned on
- ‘TrueMod (24bit color) support’ on Colors page
- ‘ANSI and xterm sequences’ on Features page
- ‘Inject ConEmuHk’ on Features page (required for second level programs)
- Turn off scrolling (extended attributes works only in the ‘work’ area — the bottom of the console)
- Cygwin and Msys applications do not pass ANSI to terminal. At all. More information here.
- As workaround for cygwin and msys you may use cygwin/msys terminal connector.
Example 1: Vim
vim.exe -cur_console:h0 <Vim arguments here>
Example 2: 256colors2.pl
Script 256colors2.pl must be executed from cmd.exe as following:
256colors2.pl -cur_console:h0
Example 3: scroll console to the bottom
When you run not ‘fullscreen’ application (not Far/Vim/Hiew/…),
you may scroll console to the bottom (^[ must be replaced with real ESC symbol, ASCII code \x1B):
TechInfo
ANSI escape sequences are processed when console program uses functions:
WriteConsoleA, WriteConsoleW or WriteFile. For example:
cmd /c type "Colors-256.ans"
Text output with current extended attributes (xterm 256 color)
is possible with WriteConsoleOutputCharacterA and WriteConsoleOutputCharacterW
functions.
Related articles
- Configuring Vim
- X3.64 and Xterm-256 Support
- Cygwin and Ansi
- Far Manager ExtendedConsole
- Keys and Colors in Bash On Windows (WSL)
- Terminal input and output modes
Разукрашиваем вывод в консоли: теория и практика
Время на прочтение5 мин
Количество просмотров79K

Консоль привлекает многих своей минималистичностью и эстетикой, но даже в ней иногда хочется выделить определённый фрагмент, чтобы показать его роль или значимость. Например, отметить зелёным текстом сообщение об успешном выполнении операции или обозначить длинный текст ошибки курсивом. О том, как это делать, а также о реализации на питоне — читайте далее.
Управляющие последовательности ANSI
ANSI escape sequences или Управляющие последовательности ANSI — это стандарт, дающий возможность управлять курсором, цветами, начертание в текстовых консолях. Такие последовательности воспринимаются отрисовщиком терминала, как команды отображать последующий текст в определенном формате. Есть также последовательность, которая сбрасывает предыдущие команды, и отображение текста становиться обычным. Существует несколько форматов управляющих последовательностей, различающихся возможностями и появившимися в разных версиях кодировок. Поговорим об этих форматах подробнее.
8 основных цветов и стили
Для обычного пользователя разнообразия цветов этого формата будет более чем исчерпывающим. Но прежде чем задумываться о том, что терракотовый цвет гораздо круче красного, и он вам уж точно нужен, давайте разберемся, как устроена самая простая версия управляющей последовательности ANSI для форматирования текста.
Чтобы изменить текущий цвет шрифта или фона можно использовать следущий синтаксис:
- Начинается управляющая последовательность с любого из этих трёх представлений:
\x1b[(hex) или\u001b[(Unicode) или\033[(oct) - Далее следуют аргументы, разделённые между собой
;(можно указывать в любом порядке) - В конце ставится буква
m
Возможные аргументы
-
Изменения стиля
-
Изменения цвета шрифта
-
Изменения цвета фона
Бонус: другие интересные модификаторы, которые могут поддерживаться не всеми платформами
Пример корректного синтаксиса: \033[3;36;44m. После вывода этой конструкции стиль будет изменён для всего последующего текста. Чтобы вернуться к изначальному состоянию можно использовать \033[0m, тогда весь текст с этого места вернётся к изначальному форматированию.
Давайте поэкспементируем. Для примеров я буду использовать Python.

Важно заметить, что форматирование повлияло и на консоль питона, а не только на ее вывод. Именно поэтому очень важно закрывать все «тэги» изменения форматирования.
Часто используемые сочетания (copy-paste-able)
Больше цветов: аж целых 256
Некоторые терминалы поддерживают вывод целых 256 цветов. Если команда echo $TERM выводит xterm-256color, то ваш терминал всё корректно обработает.
В этом формате синтаксис немного другой:

Для генерации кодов цветов можно использовать генератор.
А палитру доступных цветов можно увидеть на картинке ниже.
Палитра цветов

Совсем много цветов
Этот формат не всегда поддерживается стандартными консолями.
Некотрые будут негодовать: «256 цветов и нет моего любимого терракотового, какой ужас!». Для таких ценителей существует формат, который уже поддерживает 24 битные цвета (3 канала RGB по 256 градаций).
Для не ценителей поясню, что терракотовый кодируется как — (201, 100, 59) или #c9643b.
Синтаксис в этом формате выглядит вот так:
\033[38;2;⟨r⟩;⟨g⟩;⟨b⟩m— цвет текста\033[48;2;⟨r⟩;⟨g⟩;⟨b⟩m— цвет фона

Python: Использование библиотеки Colorama
Библиотека Colorama позволяет форматировать текст, не запоминая коды цветов. Рассмотрим её использование на примере:
from colorama import init, Fore, Back, Style

init()

print(Fore.RED + 'some red text\n' + Back.YELLOW + 'and with a yellow background')
print(Style.DIM + 'and in dim text\n' + Style.RESET_ALL + 'back to normal now')
Вывод программы:

Style позволяет изменить стиль, Fore — цвет шрифта, Back — цвет фона. Использовать переменные из colorama нужно также, как и коды изменения стиля. Но плюс использования библиотеки в том, что Fore.RED более читаем, чем \033[0;31m
Если в colorama.init() указать параметр autoreset=True, то стиль будет автоматически сбрасываться (в конец каждого print будут добавлены сбрасывающие стили последовательности), поэтому вам не придётся об этом каждый раз вспоминать.
А что не так с Windows?
Просто так синтаксис, описанный в начале статьи, не работает в командной строке Windows. Поддержка цветов появлялась постепенно, причём в странном варианте. В начале программы надо сделать системный вызов, активирующий отрисовку цветов. А в более старых версиях необходимо заменить все ANSI последовательности на системные вызовы.
Но colorama.init() сделает всё за вас в большинстве версий Windows. Однако если вы используете другую операционную систему, то функцию init() вызывать в начале программы не обязательно. Также некоторые IDE на Windows (например, PyCharm) тоже поддерживают цвета без каких-либо махинаций.
А еще Windows не поддерживает многие модификаторы, такие как жирный текст. Подробнее можно почитать на странице Colorama
Termcolor
Ещё одна библиотека для вывода цветного текста с более удачным, на мой взлгяд, синтаксисом.
from termcolor import colored, cprint

text = colored('Hello, Habr!', 'red', attrs=['blink'])
print(text)
cprint('Hello, Habr!', 'green', 'on_red')
Кстати, проблему с Windows всё ещё можно починить с помощью colorama.init()
Выводы
Стандартные 8 цветов позволяют разнообразить вывод в консоль и расставить акценты. 256 цветов намного расширяют возможности, хотя и поддерживаются не всеми консолями. Windows, к сожалению, не поддерживает многие основные модификаторы, например, курсив. Также есть некоторые цвета, которые не прописаны в стандартах, но могут поддерживаться вашей операционной системой. Если вы хотите больше цветов, то вы можете поискать их в Гугле.
Пока что не любой терминал поддерживает 24-битные цвета и все модификаторы, но мы вряд ли увидим сильные изменения в этой сфере. Так что пока нам остаётся выбирать самые красивые варианты из тех, что доступны в любимом терминале.
Источники
- Картинки с синтаксисом из статьи
- Генератор из статьи на Хабре
- ANSI escape code
Облачные серверы от Маклауд быстрые и безопасные.
Зарегистрируйтесь по ссылке выше или кликнув на баннер и получите 10% скидку на первый месяц аренды сервера любой конфигурации!

Если эта публикация вас вдохновила и вы хотите поддержать автора — не стесняйтесь нажать на кнопку
I have configured ZSH as integrated terminal on my VS Code instance on Windows. Like this:
"terminal.integrated.shell.windows": "C:\\Cygwin\\bin\\zsh.exe",
"terminal.integrated.shellArgs.windows": [
    "-lic",
    "cd $OLDPWD; exec zsh"
]
This is working, but colors are not that great. It seems that only 8 are supported.
Here’s ZSH running on Mintty (it also comes from Cygwin, no extra setup):
And here’s VS Code integrated terminal configured as mentioned above:

I have run set TERM=xterm on VS Conde before running the spectrum_ls command (which prints all the colors). I’ve also tried set TERM=xterm-256colors but it didn’t work either.
Am I missing something?
CommandBox has support for 256 colors in the console, but this is limited by the terminal in use. For instance, SSHing into a Linux server with PutTTY only supports 8 colors. Windows cmd only supports 16 colors. Most Mac terminals seem to support 256 colors by default.
For Windows users, we recommend using an add-on terminal like ConEMU which has good 256 color support out of the box. To find out how many colors your terminal supports, you can run this command:
This will show you at the top how many colors are supported. It will also output a sample of each of the 256 colors. Terminals that support less than 256 colors will «round» down and show the next closest color automatically. Some darker colors might turn to black. Note, some advanced terminals allow the user to choose color themes which will also change the default colors. CommandBox has no control over how colors show up for you.
The names and numbers of each color are unique and important if you want to do any Task Runners, custom commands that make use of these colors. Modules like Bullet Train also allow you to customize their colors. You can specify a color by its name like LightGoldenrod5 or its number (221).
In a Task Runner or custom command, the print helper would look like this:
print.lightGoldenrod5Line( 'This is pretty' );
print.color221( 'This is the same color as above' );
Here’s an example of customizing your Bullet Train module to use fancy colors. (Color 21 is Blue1)
config set modules.commandbox-bullet-train.packageBG=lightGoldenrod5
config set modules.commandbox-bullet-train.packageText=color21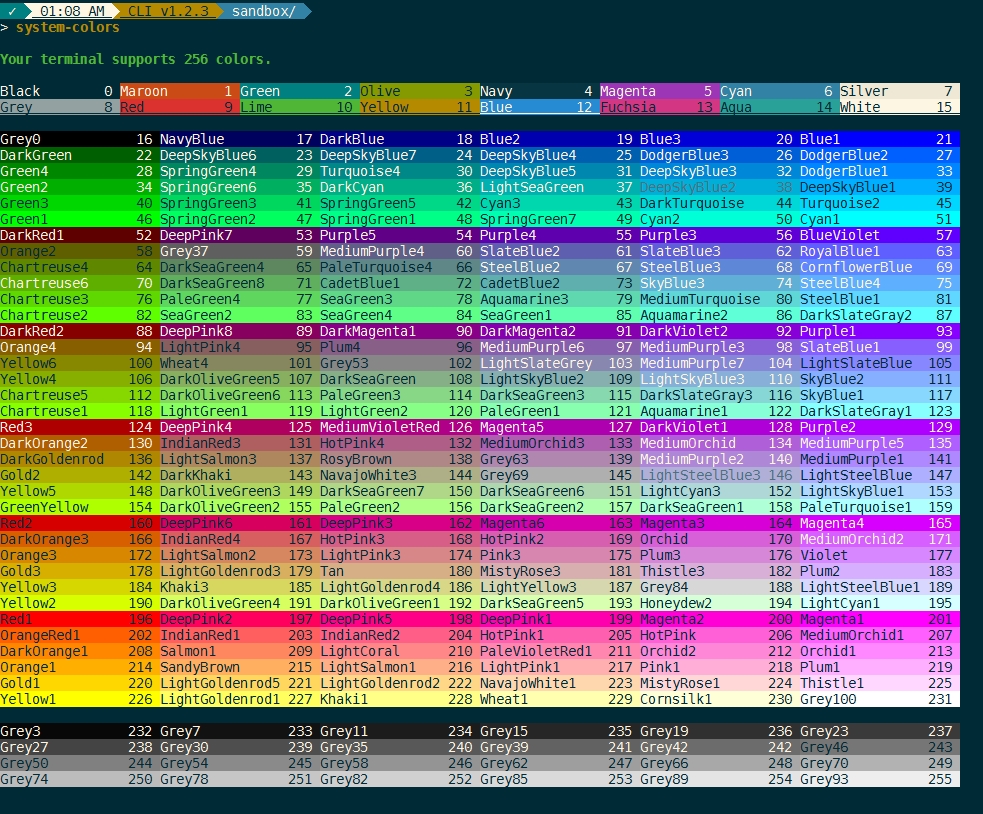
📖 tl;dr: Most terminal emulators lie about which color space they support. That’s why most detection libraries hard code color support when a certain combination of platforms and terminal emulator is used.
If you’ve been writing command line tools for other developers to use, there will come a time where the clarity of the output can be enhanced through colors. What appears to be simple on the surface gets a bit messy as soon as you dive into the details on how colors are supported in various terminal emulators. Funnily, much of this complexity is due to historical reasons which have been kept alive to this date.
Humble beginnings
In the early days of computing there were no terminal colors. Everything was rendered in either black or white. Demand grew for more complex rendering in the terminal and that’s how ANSI escape codes were born. They represent a special set of character sequences that control cursor location, color, background color, font styling, and other options.
// This will print the string "foobar" in green to the terminal
console.log("\u001b[32mfoobar\u001b[39m");
…which looks like this in the terminal:
There is a catch though and that is that only a total of 16 colors are supported. Nearly half of them are lighter shades of existing colors, so the true perceived amount of colors feels even more limited. Despite those limitations, they are usually enough for most apps.
One cool aspect about this color palette is that pretty much every terminal emulator allows you to change the color values. This opens up the door for theming and styling the terminal to your likings. You can see a good overview of the default palette of various terminal emulators on Wikipedia.
The full list of supported colors is:
- black
- white
- gray + light gray
- red + light red
- green + light green
- yellow + light yellow
- blue + light blue
- magenta + light magenta
- cyan + light cyan
All these colors can be used as foreground colors or as background colors. This is how they all render in my terminal.

Supporting all the colors
Over time computers advanced, and so did the richness of colors that developers wanted to use in their terminals. This led to the addition of an enhanced 8-bit color space which supports a whopping 256 colors. Suddenly, there wasn’t only green and dark green anymore. You could now display shades of green!
But why stop there? Fast forward a couple of years and with the introduction of graphic cards, demand for even more colors grew. It became common for applications to render 16 or 24-bits of colors. It didn’t take long for terminal emulators to follow suit. They jumped right to 24-bit colors which is often referred to as «true color» support. I’ll spare you a screenshot since that would be too big for this post. Let me just say that the jump from 256 colors to 16.7 million colors is pretty big.
In summary, we ended up with 4 different color spaces:
- black & white
- Ansi, 16 colors
- Ansi 256 colors
- 24-bit True Color
Detecting color support
This is the bit where it gets messy, because every terminal emulator does it slightly differently. There is no standardized way to detect which color space is supported. It’s not just terminal emulators either, because today’s developers expect the CI logs to be colored too. Most environments straight up don’t tell you what kind of color space they support.
The most common way to detect color support is by checking the TERM and COLORTERM environment variables. CI systems can be detected by checking for the existence of the CI environment variable. Combine that with the knowledge about which operating system the program is running on, and we have a decent enough way to detect colors.
If COLORTERM is 24bit or truecolor, then you know for certain that 24-bit True Colors are supported. Detecting ANSI 256 is usually done by checking if $TERM ends with 256 or 256color. If True Colors are supported than ANSI 256 support is a given. Same is true for the basic ANSI escape codes. Again, this detection logic is neither perfect nor elegant, but it works pretty reliable in practice. The Windows Terminal on the other hand doesn’t give you anything. Both environment variables are not set there. Therfore everyone simply assumes that the terminal supports full 24-bit colors, which is the case since Windows 10 revision 14931.
| Name | OS | ANSI | ANSI 256 | True Color | $TERM | $COLORTERM | $CI |
|---|---|---|---|---|---|---|---|
| Terminal.app | macOS | ✅ | ✅ | — | xterm-256color |
— | — |
| iTerm | macOS | ✅ | ✅ | ✅ | xterm-256color |
truecolor |
— |
| Windows Terminal | Windows | ✅ | ✅ | ✅ | — | — | — |
| PowerShell | Windows | ✅ | ✅ | ✅ | — | — | — |
| GitHub Actions | Linux (Ubuntu) | ✅ | ✅ | ✅ | dumb |
— | true |
The crazy bit is that the only common terminal emulator that I came across that didn’t support True Colors at the time of this writing was macOS’s built in Terminal.app. It only supports up to ANSI 256.
CI systems are the real boss battle here, because they often advertise themselves as dumb terminals with no support for colors. Since developers expect the logs to contain colors, there is no other way than to ignore both TERM and COLORTERM variables. Instead color support is inferred by virtue of detecting that the code runs inside the CI.
Color conversions
The missing piece when it comes to colors is converting one color space to another. When a developer uses the notation for True Colors to print something to the terminal, we should at least be able to show some colors.
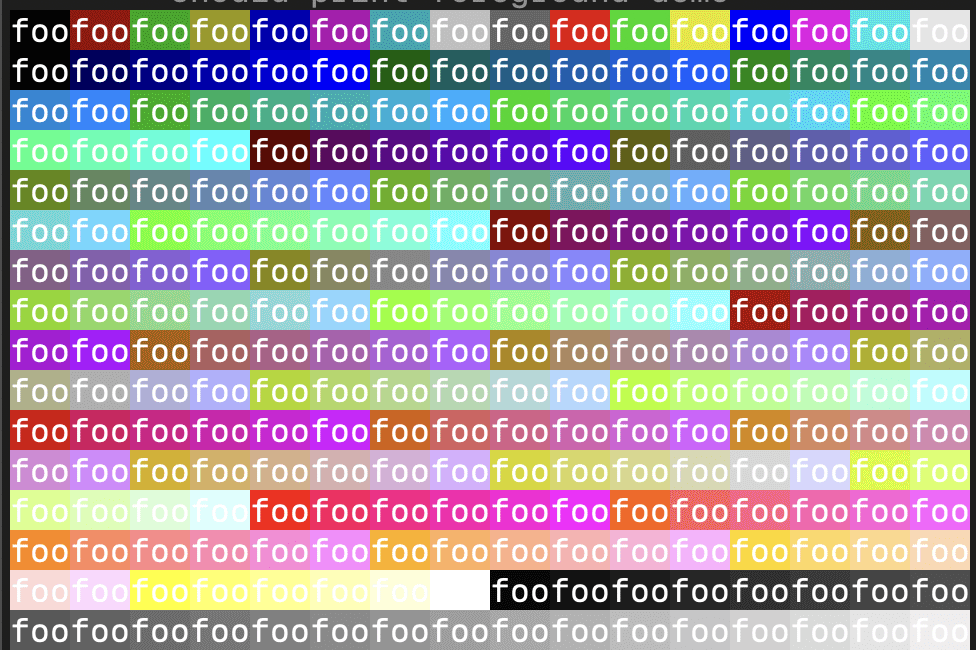
Here is what it looks like if you try to render True Colors in a terminal emulator that doesn’t support them.

And here is the same colors converted down to the more limited ANSI 256 color space.

Sure, the colors are slightly different, but it’s better than nothing. It’s a «good enough» compromise that keeps the original intentions intact. As far as I know this is only needed for macOS’s Terminal.app, which unfortunately is the one I happen to use the most. For some reason I haven’t switched to another emulator so far.
Can we do better?
Despite all those advancements, it feels a little weird to have to be aware of ANSI escape codes as a developer. Most developers just want to set the text color or background color after all. You know browsers allow you to style console.log messages via plain CSS. What if we leveraged the same thing on the server? That’s exactly what deno does. They got it right. They allow you to use the same API to print colors on the server.
console.log(
	"%cThis text is lime green %cand %cthis text has a red background",
	"color: #86efac",
	"",
	"background-color: red; color: white"
);
Rendered in Chrome’s browser console:

The same code executed on the server with deno:

Conclusion
Sometimes it’s all about getting the details right. For me colors have always been a huge part in making CLI output more readable. They can introduce an additional visual hierarchy that’s not possible with mere character shapes. Fixing color detection support for some projects was a fun little investigation. Luckily, most of the complexity is already solved by existing libraries in the ecosystem, so that you don’t have to work this out yourself.