
Если при попытке изменить, открыть или удалить папку или файл в Windows вы получаете сообщения о том, что вам отказано в доступе, «Нет доступа к папке», «Запросите разрешение на изменение этой папки» и аналогичные, то вам следует изменить владельца папки или файла, о чем и поговорим.
Есть несколько способов стать владельцем папки или файла, основные среди которых — использование командной строки и дополнительные настройки безопасности ОС. Есть также и сторонние программы, позволяющие изменить владельца папки в два клика, на одного из представителей которых тоже посмотрим. Все описанное ниже подходит для Windows 11, Windows 10 и предыдущих версиях системы.
Использование команды takeown для изменения владельца объекта
Для того, чтобы стать владельцем того или иного элемента с использованием способов ниже, вы должны иметь права администратора на компьютере. Кроме этого, не следует изменять владельца для всего системного диска — это может повлечь нестабильную работу Windows. Если вы хотите стать владельцем папки для того, чтобы удалить ее, а иначе она не удаляется, потребуется также предоставить необходимые права соответствующему пользователю (простого назначения владельца может быть недостаточно).
Изменение владельца папки или файла возможно с помощью командной строки. Имеются две команды, первая из них — takeown. Для ее использования, запустите командную строку от имени Администратора, в Windows 11 и Windows 10 это можно сделать через поиск в панели задач с последующим выбором пункта «Запуск от имени администратора». В командной строке, в зависимости от того, владельцем какого объекта вам нужно стать, введите одну из команд:
- takeown /F «полный путь к файлу» — стать владельцем указанного файла. Чтобы сделать всех администраторов компьютера владельцами, используйте параметр /A после пути к файлу в команде.
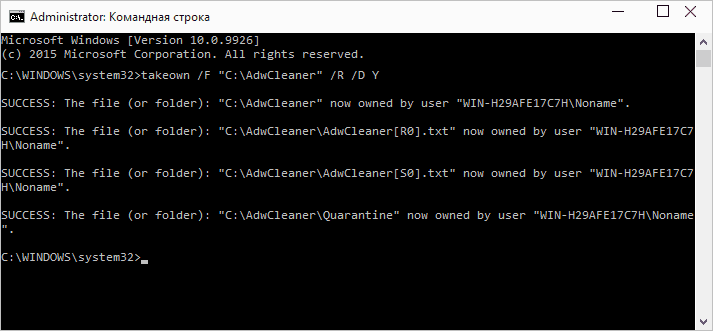
- takeown /F «путь к папке или диску» /R /D Y — стать владельцем папки или диска. Путь к диску указывается в виде D: (без слэша), путь к папке — C:\Folder (также без слэша).
При выполнении данных команд вы получите сообщение о том, что вы успешно стали владельцем конкретного файла или отдельных файлов в указанной вами папке или на диске (см. скриншот).
Как было отмечено ранее, простое изменение владельца объекта, не обязательно означает, что вы сможете удалить, переименовать или иным образом изменить его. Для этого также нужно предоставить необходимые права пользователю, о чём в следующих двух частях инструкции.
Команда icacls
Еще одна команда, которая позволяет получить доступ к папке или файлам (изменить их владельца) и получить необходимые права — icacls, использовать которую следует так же, в командной строке, запущенной от имени администратора.
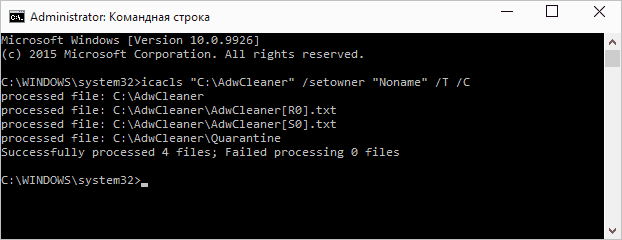
Для установки владельца используйте команду в следующем виде (пример на скриншоте):
icacls "путь к файлу или папке" /setowner "Имя_пользователя" /T /C
Пути указываются аналогично предыдущему способу.
Команды из первой и второй части можно сочетать. Например, следующие две команды сделают вас владельцем папки и предоставят полные права доступа к ней для группы Администраторы:
takeown /F D:\ПУТЬ /R /A
icacls D:\ПУТЬ /T /Inheritance:e /grant Администраторы:F
И общий пример для того, чтобы предоставить полный доступ пользователю к какой-либо папке или файлу с помощью ICACLS:
ICACLS "ПУТЬ_К_ПАПКЕ" /grant:r "имя_пользователя":(OI)(CI)F
Получение доступа с помощью настроек безопасности
Ещё один способ — использовать лишь мышь и интерфейс Windows, не обращаясь к командной строке.
- Кликните правой кнопкой мыши по файлу или папке, доступ к которому нужно получить (стать владельцем), в контекстном меню выберите пункт «Свойства».
- На вкладке «Безопасность» нажмите кнопку «Дополнительно».
- Напротив пункта «Владелец» нажмите «Изменить».

- В открывшемся окне нажмите кнопку «Дополнительно», а в следующем — кнопку «Поиск».

- Выберите в списке пользователя (или группу пользователей), которого нужно сделать владельцем элемента. Нажмите Ок, затем — снова Ок.
- Если вы изменяете владельца папки или диска, а не отдельного файла, отметьте также пункт «Заменить владельца подконтейнеров и объектов».

- Нажмите Ок.
- Вернитесь на вкладку «Безопасность» в свойствах папки или файла, нажмите кнопку «Изменить» под списком пользователей и групп и предоставьте необходимый уровень доступа нужным пользователям или их группам (которых можно добавить в список аналогично тому как мы делали на 4-м шаге), например — полный доступ.


На этом вы стали владельцем указанного объекта Windows, а также получили права на доступ к нему. Сообщения о том, что нет доступа к папке или файлу вас не должны больше потревожить.
Другие способы стать владельцем папок и файлов
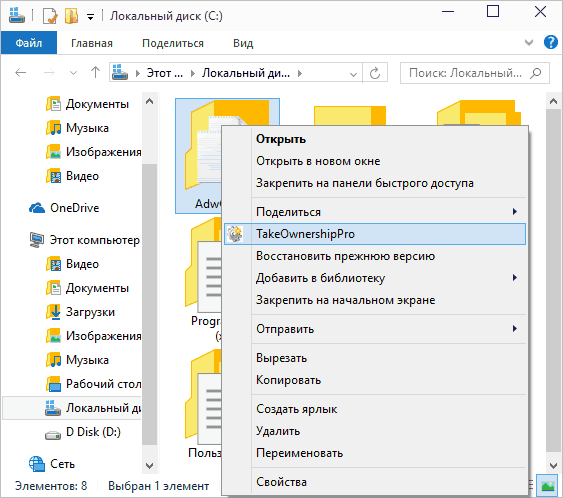
Есть и другие способы решить проблему «отказано в доступе» и быстро стать владельцем, например, с помощью сторонних программ, встраивающих пункт «Стать владельцем» в контекстное меню проводника. Одна из таких программ — TakeOwnershipPro, бесплатная и, насколько я могу судить, без чего-то потенциально нежелательного. Аналогичный пункт в контекстное меню можно добавить и путем редактирования реестра Windows. Есть и другие похожие утилиты, подробнее: Как добавить пункт Стать владельцем в контекстное меню папок и файлов Windows.
Однако, с учетом того, что подобная задача возникает сравнительно редко, я не рекомендую устанавливать стороннее ПО или вносить изменения в систему: на мой взгляд, лучше изменить владельца элемента одним из способов «вручную».
The `takeown` command in CMD is used to take ownership of a file or folder, allowing you to gain access rights that may have been previously restricted.
Here’s an example of how to use the command:
takeown /F "C:\path\to\your\folder_or_file" /R /D Y
What is `takeown`?
The `takeown` command is a powerful utility in the Windows Command Prompt that enables users to take ownership of files and directories. This is particularly important when access is denied due to insufficient permissions or when files are locked by other users or processes. Understanding ownership versus permissions is crucial; ownership allows a user to gain full control over a file or folder, while permissions dictate what actions can be performed (such as read, write, or execute).
You might find yourself needing to use `takeown` in various scenarios, such as managing files that belong to other users or recovering access to important data after an upgrade.
Mastering Cmd Timeout: Your Quick Guide to Precision
Syntax of the `takeown` Command
The general syntax for the `takeown` command is straightforward. It follows this format:
takeown /f <FileOrDirectory> [/a] [/r] [/u <UserName>]
- /f: Specifies the file or directory to take ownership of.
- /a: Grants ownership to the administrators group instead of the current user.
- /r: Recursively takes ownership of all files and subdirectories within a specified directory.
- /u: Specifies a particular username for ownership.
Understanding these parameters will allow you to effectively utilize the `takeown` command to meet your needs.
Mastering Cmd Task Manager: A Quick Guide
Basic Usage of `takeown`
The most common use of `takeown` is to take ownership of a specific file or directory. For example, if you want to take ownership of a single file, you would use the command:
takeown /f "C:\path\to\file.txt"
After executing this command, you will see a message confirming the successful ownership transfer. This command is effective in regaining access to files that may otherwise be blocked due to permission issues.
Mastering Cmd Telnet Port: A Quick Guide
Advanced Options for `takeown`
Taking Ownership Recursively
When you want to take ownership of not just a file, but all its contents—this includes subfolders and files—you can use the `/r` flag. This is particularly useful in managing directories. Here’s how you can do it:
takeown /f "C:\path\to\folder" /r
This command allows you to gain access to every file and folder within the specified directory, ensuring that nothing is left untouched.
Forcing Ownership of Files with Errors
Sometimes, files may present errors when attempting ownership changes. In such scenarios, the `/a` flag can be very useful. Using this option allows you to add ownership for the administrators group, which can bypass restrictions that may block the current user:
takeown /f "C:\path\to\problematicfile.txt" /a
This command comes in handy when trying to access files that are locked or require administrative rights for changes.
Setting Ownership for Specific Users
If you need to transfer ownership to a specific user rather than yourself or the administrators group, the `/u` flag lets you specify the user directly. Here’s how it can be executed:
takeown /f "C:\path\to\file.txt" /u "Domain\User"
This command is ideal for network environments where files need to be reassigned to different users.
Cmd Auto: Quick Tips for Effective Command Line Usage
Common Scenarios for Using `takeown`
Recovering Access to Locked Files
One of the most common scenarios for utilizing the `takeown` command is when you encounter locked files that are vital for your work. For example, if you are unable to access a file that was owned by a former employee, running:
takeown /f "C:\path\to\lockedfile.txt" /r
This command can help you regain control, freeing your workflow from disruptions.
Permission Issues in Windows Upgrades
After a Windows upgrade, many users experience permission-related issues, particularly with legacy files. If you suddenly find yourself unable to modify or delete files that were previously accessible, the `takeown` command can swiftly rectify this. Simply target the problematic directory or files and take ownership, allowing you to restore your access.
Mastering Cmd Administrateur for Quick Command Access
Best Practices When Using `takeown`
- Backup Important Data: Always ensure that you have backups of your important files before using `takeown`, especially if you’re dealing with critical system files.
- Use with Caution: Be mindful of transferring ownership of key system files as this can have unexpected consequences, such as system instability.
By following these best practices, you can minimize risks while effectively managing file ownership.
Mastering Cmd Open: Quick Tips and Tricks
Troubleshooting Common Issues with `takeown`
Error Messages
When using `takeown`, you may encounter various error messages. Here are a few common ones and their resolutions:
- «Access Denied» Error: This can occur if you don’t have administrative privileges. Ensure you run the CMD as an Administrator.
- «The file does not exist» Error: Double-check the file path for accuracy. Mistyped paths are a frequent cause of this error.
Permissions Not Updated After Use
If ownership is successfully taken but permissions don’t change, consider the following steps:
- Verify User Permissions: After taking ownership, make sure to edit the ACL (Access Control List) to fully establish your intended access rights. This can be done through the GUI or additional commands like `icacls`.
- Reboot: Sometimes changes may not take effect until the system has been rebooted.
Mastering Cmd Powershell: A Quick Start Guide
Conclusion
The `takeown` command is a vital tool within CMD for managing file and folder access in Windows environments. By understanding its syntax, options, and common use cases, you equip yourself with the knowledge to effectively navigate ownership issues.
With practice, the `takeown` command can become an essential part of your file management toolkit, helping you maintain control over your data and streamline your workflow.

Explore Fun Cmd Games for Quick Command Mastery
Additional Resources
For further learning, consult the official Microsoft documentation on the `takeown` command. Engaging with community forums can also provide valuable insights and troubleshooting assistance to enhance your CMD expertise.

Master Cmd Tasklist: Your Guide to Process Management
Frequently Asked Questions
What to do if `takeown` doesn’t work?
If the command fails, ensure that CMD is run with administrative privileges. Check for typos in your command and confirm the file path exists.
Can `takeown` be used on system files?
Yes, while `takeown` can be executed on system files, proceed with caution as this may affect system stability.
Is `takeown` reversible?
Taking ownership with `takeown` is not directly reversible. However, you can use other commands like `icacls` to change ownership back, but this requires prior knowledge of the original owner’s permissions or existing ACL settings.
Windows operating systems are designed with robust security features to protect your data, and this sometimes results in frustrating scenarios where you need to take ownership of a file or folder to gain full control.
Thankfully, Windows provides a handy command-line tool called Takeown.exe that allows you to do just that. In this blog post, we’ll explore what Takeown.exe is, how it works, and how you can use it to take ownership of files and folders on your Windows system.
Related. Learn how to change a file or folder ownership using Get-Acl and Set-Acl.
Why Would You Need to Use Takeown.exe?
There are several scenarios in which you might need to use Takeown.exe:
- Access Denied Issues: When you’re denied access to a file or folder due to insufficient permissions, even though you’re an administrator on the computer.
- File Recovery: To recover files from an old user profile or a system backup.
- System Tweaking: For advanced users who want to modify system files or folders for customization or troubleshooting purposes.
Takeown.exe Options and Parameters
Takeown.exe has several options and parameters that allow you to customize its behavior according to your needs. Understanding these options is crucial for using the tool effectively. Here are the key options and parameters:
- /S <system>:
- The remote system to connect to, such as another client machine or a server.
- /F <filename or directory>:
- Specifies the file or folder path you want to take ownership of.
- Example for a file:
takeown /f "C:\path\to\file.ext"
- Example for a folder (including subdirectories):
takeown /f "C:\path\to\folder" /r /d y
- /R:
- Makes the Takeown.exe command apply recursively to all files and subfolders within the specified folder. This is useful when you want to take ownership of an entire directory tree.
- Example:
takeown /f "C:\path\to\folder" /r /d y
- /D {Y|N}:
- Specifies the default answer for all prompts. When set to y, it assumes “Yes” as the answer to all confirmation prompts, making the process more automated.
- Example:
takeown /f "C:\path\to\folder" /r /d y
- /A:
- Allows administrators to take ownership of a file or folder even if they are not listed as the current owner. This option is handy for system administrators who need to manage network or shared drive permissions.
- /U [domain\]username:
- Specifies the username or user account for which ownership will be taken. By default, it uses the currently logged-in user account.
- Example:
takeown /f "C:\path\to\file.ext" /u "username"
- /P <password>:
- Specifies the password for the user context used in /U.
- /SKIPSL:
- Skip symbolic links. To be used with /R.
- /?:
- Displays information about the available options and usage of the Takeown.exe command.
How to Use Takeown.exe (Examples)
Using Takeown.exe is relatively straightforward. Here are some usage examples.
Take Ownership of a File or Folder as the Current User
Here are the steps to take ownership of a file or folder:
- Open Command Prompt as Administrator:
To use Takeown.exe, you need administrative privileges. Right-click on the Start menu, and select “Command Prompt (Admin)” or “Windows Terminal (Admin)” if you’re using Windows 10 or later. - Navigate to the File or Folder Location:
Use the cd command to navigate to the directory where the file or folder you want to take ownership of is located. - Run the Takeown.exe Command:
To take ownership of a file, use the following command:takeown /f "C:\path\to\file.ext"

- To take ownership of a folder and its contents, use this command:
takeown /f "C:\path\to\folder" /r /d y
- /f specifies the file or folder path.
- /r makes the command recursive, allowing it to apply to all files and subfolders within the specified folder.
- /d y assumes “Yes” as the answer to all prompts (useful for batch operations).

- Verify Ownership:
You can verify if ownership has been successfully transferred by running the dir /q command:dir "C:\path\to\folder" /q

You can also use the ICACLS command.


Assign Ownership of a File or Folder to the Local Administrator Group
To assign the ownership of a file or folder to the local administrators, use the /A parameter.
Assign ownership of one file to the local administrator group.
takeown /f "C:\path\to\file.ext" /A

Assign ownership of a folder and all its contents to the local administrator group.
takeown /f "C:\path\to\folder" /A /r /d y

Take Ownership of a File or Folder on a Remote System
You can also use Takeown.exe to take ownership of a file or folder (and its contents) on a remote system, provided you have sufficient privileges.
For example, this command takes ownership of the file C:\demo\computers.txt on the remote system DC1.
takeown.exe /f C:\demo\computers.txt /s DC1

When All Else Fails, Use Takeown.exe with PsExec
Sometimes, despite your best efforts, you just can’t take ownership of a folder or file, even as the local administrator account. When Takeown.exe fails with “INFO: Access is denied”, don’t lose hope.
In this situation, you try to run Takedown.exe using the local “NT AUTHORITY\SYSTEM” account with PsExec.
- Download the PSTools archive and extract it to a directory on the local drive. In this example, it is extracted to “C:\pstools”.
- Open the command prompt as an administrator and navigate to the PSTools directory:
cd c:\tools\pstools
- Start an instance of cmd.exe as the System account by running this command:
PsExec.exe -ids cmd.exe

- Now, you can run Takeown.exe in the new instance of the command prompt:


Conclusion
Takeown.exe is a valuable tool in your Windows administration arsenal when encountering file or folder permission issues. By understanding how to use it properly, you can regain control over your files and folders, troubleshoot permission-related errors, and manage your system more effectively.
Use it responsibly and be cautious when working with critical system files.
Cyril Kardashevsky
I enjoy technology and developing websites. Since 2012 I’m running a few of my own websites, and share useful content on gadgets, PC administration and website promotion.
Taking ownership of files in Windows is necessary to edit or delete system or program files that you have no access to by default. There are multiple ways to achieve that goal, like doing everything manually through the Properties menu, applying a registry tweak or, as described here, executing a command in the Command Prompt. Note that taking ownership will not let you edit every system file. Windows has set precautions so that you don’t edit any of the most important files which may be helpful in some cases but can be really, really annoying in other.
To start off, you need an elevated command prompt which is simply a command prompt opened as administrator. In the current Windows versions, you can open that by right-clicking the bottom left corner of the screen and selecting Command Prompt (Admin). In Windows 7 and previous, search the main menu for cmd, right-click it and select Open as administrator.
You need two commands now: one to actually take ownership of the file or folder and one to grant yourself access rights. These are the two commands you will want to use:
For folders, use:
takeown /f folder_name /r /d y
icacls folder_name /grant username_or_usergroup:F /t /q
For files, use:
takeown /f file_name /d y
icacls file_name /grant username_or_usergroup:F /q
The commands basically only differ in a few switches that make the folder procession run recursively. If you want to edit only one folder instead of the whole recursive lot, remove the /r and /t switches from the commands. For more info on the commands, simply enter takeown /? or icacls /? into the command prompt.
If I wanted to take control of my Program Files folder, I’d need to enter the following:
takeown /f "C:\Program Files" /r /d y
icacls "C:\Program Files" /grant christian:F /t /q
В Windows можно изменить владельца файла или папки через графический интерфейс Проводника Windows (откройте свойства файла -> Безопасность –> Advanced -> Owner –> Change) или с помощью встроенной консольной утилиты takeown.exe. В этой статье мы покажем, как изменить владельца файла в командной строке с помощью команды takeown.
Чтобы изменить владельца файла вы должны быть его владельцем или обладать правами администратора.

Обратите внимание, что с помощью команды takeown вы сможете назначить владельцем только текущего пользователя или локальную группу администраторов. Команда не позволяет указать в качестве владельца каталога или файла произвольного пользователя или группу.
Утилита takeown.exe по умолчанию находится в каталоге C:\Windows\System32, поэтому для ее использования не нужно указывать полный путь к ней. Команда takeown имеет следующий синтаксис:
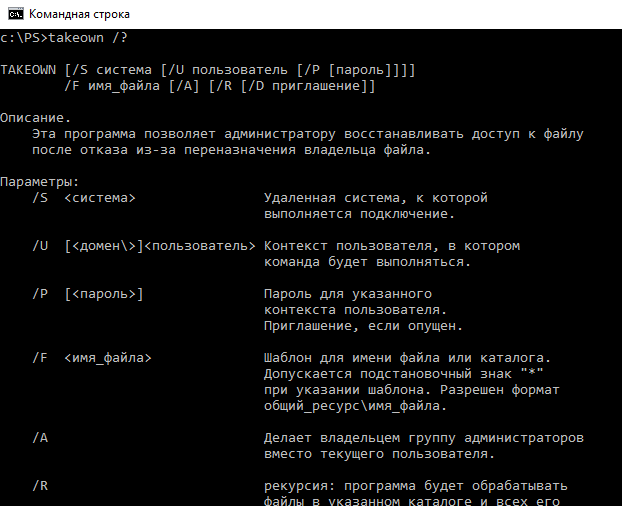
takeown /F <file_name> [/S <имя удаленного компьютер>] [/U <Domain\DomainUserName>] [/P <Пароль_пользователя>] [/A] [/R [/D приглашение]]
Рассмотрим основные параметры команды takeown:
- /F <имя_файла> — здесь нужно указать полный путь к файлу или каталогу, владельца которого нужно изменить. Можно использовать символ подстановки *.
- /S <ИмяУдаленногоКомпьютера> — вы можете указать IP адрес или имя удаленного компьютера, на котором нужно выполнить команду takeown. По умолчания команда выполняется на текущем компьютере.
- /U <Domain\DomainUserName> и [/P <UserPassword> — используется для указание учетных данных пользователя, под которым нужно выполнить команду takeown.
- /A – назначить владельцем не текущего пользователя (из-под которого запущена команда), а локальную группу администраторов. Если параметр не указан владельцем файла назначается текущий пользователь, под которым выполняется команда takeown.
- /R – указывает, что нужно рекурсивно изменить владельцев всех вложенных файлов и папок в указанном каталоге.
- /D {Y | N} – если у текущего пользователя нет прав доступа на просмотр содержимого каталога (list files), нужно ли изменять владельца данных файлов. Y – изменить владельца, N – пропустить файлы.
Полный синтаксис и помощью по команде можно получить так:
takeown /?
Рассмотрим несколько примеров использования командой takeown.
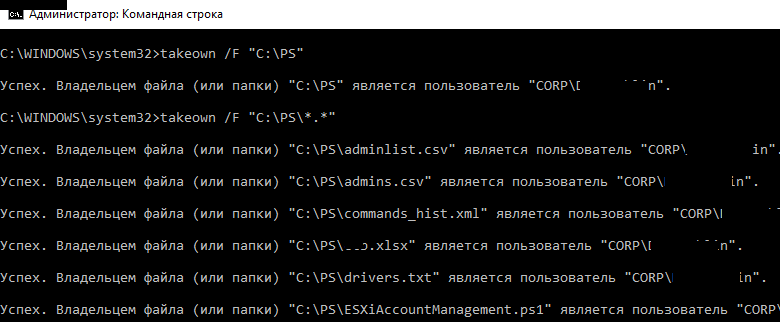
Назначить себя владельцем каталога C:\PS:
takeown /F "C:\PS"
Чтобы изменить владельца всех файлов в каталоге, используйте команду:
takeown /F "C:\PS\*.*"
Если запущена непривелигированная командная строка, или у текущего пользователя нет прав на каталог, появится ошибка
Ошибка. Текущий вошедший пользователь не имеет привилегий владельца на файл (или папку) «C:\PS».
После того, как вы назначали себя владельцем, вы сможете получить доступ к папке. Если к этой папке получают доступ другие пользователи, нужно проверить и изменить доступ с помощью утилиты icacls или проводника Windows.
Назначить себя владельцем файла testfile.txt на удаленном компьютере msk-sal-15-21.vmblog.ru:
takeown /F "C:\testfile.txt" /S msk-sal-15-21.vmblog.ru
При выполнении данных команд вы получите сообщение о том, что вы успешно стали владельцем конкретного файла или отдельных файлов в указанной вами папке.
Назначить владельцем всех тестовых файлов в каталоге C:\SharedFolder группу администраторы можно так:
takeown /F C:\SharedFolder\*.txt /A
Чтобы назначить группу администратором владельцем всех вложенных файлов и каталогов и пропустить каталоги, к которым у пользователя нет доступа:
takeown /F C:\PS\ /A /R /D Y
Назначить текущего пользователя владельцев всех файлов с расширением *.docx в общей сетевой папке Public на сервер msk-fs1:
takeown /S msk-fs1 /F Public\*.docx
Совет. Не стоит без осознанной необходимости переназначать владельца для корневых системных папок (c:\Windows, c:\Users\, c:\Program Files и т.д.) или для всего системного раздела – вы можете повредить систему.