
Ошибка 0xc00000e9 «Возникла неожиданная ошибка ввода-вывода» (иногда с указанием файла, например: \Boot\BCD\ или «An unexpected I/O error has occurred» — достаточно распространенная проблема, возникающая при загрузке Windows 10 (здесь она появляется на синем экране «Восстановление»), 8.1 или Windows 7, а в некоторых случаях и при чистой установке системы с флешки или компакт диска.
В этой инструкции подробно о том, чем может быть вызвана неожиданная ошибка ввода-вывода 0xc00000e9 и как её исправить в зависимости от причин возникновения. Если ошибка с этим кодом сообщает о том, что «не удалось загрузить операционную систему, так как файл системного реестра отсутствует или содержит ошибки», используйте методы из этой статьи, лучше — точки восстановления при их наличии: Восстановление реестра Windows 10.
Возникла неожиданная ошибка ввода-вывода 0xc00000e9 — как исправить
Наиболее частой причиной появления ошибки 0xc00000e9 во время загрузки или установки Windows является проблема с работой SATA-устройств или ошибки/неисправности жесткого диска. Чаще всего речь идет о системном жестком диске, но это не всегда так: например, неисправность второго физического диска или DVD-привода также может приводить к такому же результату.

В зависимости от того, при каких условиях возникает «Неожиданная ошибка ввода-вывода» или что предшествовало её появлению, возможны следующие подходы к решению:
- Если ошибка возникает однократно после завершения работы, а при повторном включении не появляется, а на компьютере или ноутбуке установлена Windows 10 или 8.1, попробуйте отключить быстрый запуск, см. Быстрый запуск Windows 10 (тот же метод подойдет и для 8-ки).
- Попробуйте отключить все накопители, кроме системного диска (включая привод DVD, флешки, карты памяти), а если внутри ПК или ноутбука проводились какие-либо работы (например, после чистки от пыли, установки нового оборудования или просто в тех случаях, когда корпус ПК всегда открыт) — перепроверить подключение системного жесткого диска или SSD (при SATA-подключении — как со стороны самого диска, так и со стороны материнской платы, при возможности также следует попробовать использовать другой кабель и разъем SATA на материнской плате).
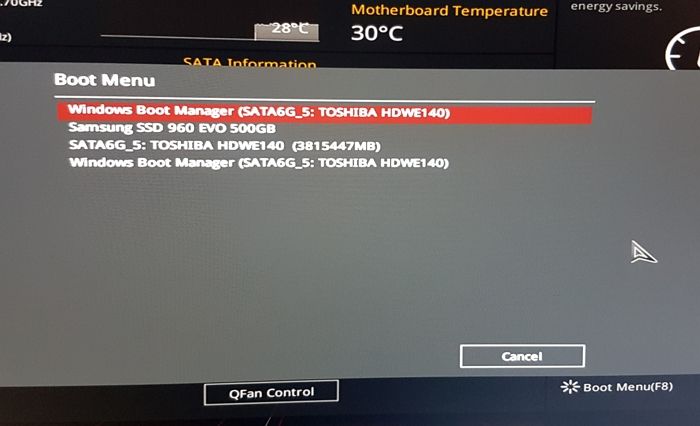
- На экране с ошибкой вам будет предложено нажать F8 для того, чтобы открыть параметры загрузки. Нажмите F8 (или Fn+F8) и проверьте, загружается ли компьютер в безопасном режиме. Если загрузка прошла успешно, откройте свойства «Диска C» и выполните проверку на вкладке «Сервис».
- Если безопасный режим не запускается, можно попробовать загрузиться с загрузочной флешки с Windows, нажать клавиши Shift+F10 (или Shift+Fn+F10 на некоторых ноутбуках) и использовать командную строку для проверки жесткого диска на ошибки с помощью chkdsk (учитывайте, что при загрузке диск может иметь букву, отличающуюся от C, используйте Diskpart, чтобы определить текущую букву системного раздела диска, также в некоторых случаях может быть необходимым выполнить проверку скрытых разделов). Также вы можете использовать утилиты проверки жестких дисков с какого-либо LiveCD.
- Попробуйте использовать загрузочную флешку с вашей версией Windows для восстановления загрузчика системы, см.: Восстановление загрузчика Windows 10, Восстановление загрузчика Windows 7.
- Перепроверьте параметры БИОС, в частности, режим работы SATA (обычно — AHCI) и режим загрузки (ошибка может быть вызвана переключением из режима UEFI в Legacy или наоборот, когда система на диске установлена в ином режиме).
- По сообщению в комментариях, иногда помогает сброс модуля TPM в БИОС компьютера или ноутбука. Важно: при включенном шифровании Bitlocker и отсутствии ключей восстановления это может сделать недоступными данные на диске.
Обычно, что-то из перечисленного помогает в решении проблемы, однако, если в вашем случае этого не произошло, возможно, имеет смысл попробовать переустановить Windows на компьютере.
Также учитывайте тот факт, что ошибка может быть и следствием аппаратных проблем с жестким диском, особенное если вы роняли ноутбук, жесткий диск в последнее время часто издавал странные звуки или вам регулярно приходилось экстренно выключать компьютер (из розетки или кнопкой питания) во время работы.
В случае, если описанные сценарии появления ошибки 0xc00000e9 — это не то, что происходит в вашем конкретном случае, опишите, как, в какой системе и при каких условиях проблема проявилась у вас, а я постараюсь подсказать возможное решение.
| Workable Solutions | Step-by-step Troubleshooting |
|---|---|
| Boot Into Safe Mode | Restart Windows by long-pressing the Shift key on the keyboard and clicking the…Full steps |
| Perform a Startup Repair | Choose Restart from the power icon while holding the SHIFT key…Full steps |
| Scan the PC | It is simple and can take several minutes or longer to scan your PC for viruses…Full steps |
| Other Workable Methods | Change the Boot Order > Update the Volume Boot Code > Re-install Windows 10…Full steps |
Error Code 0xc00000e9: What Does It Mean
Windows error code 0xc00000e9 is a typical Windows Boot Manager error that can occur during the boot process and denotes either a hardware failure or a corrupted system file. It displays shortly after the PC turns on but before the Windows login screen: An unexpected I/O error has occurred. Error code: 0xc00000e9.
The Windows boot procedure is constantly involved with error code 0xc0000e9. When the system cannot access the drive or disk, which prevents it from reading or copying data, I/O (input/output) issues happen. Error 0xc0000e9, therefore, has a wide range of potential causes, such as:
- Damaged system files or a lack of specific files or drivers.
- The motherboard’s hard drive connector is defective or broken.
- A sudden break in communication between a computer and a removable storage device. For instance, if you attempt to install Windows and your PC unexpectedly loses contact with the installation disk.
- Faulty registry files.
- Defective installation media; a damaged hard drive or its controller. For instance, the disk itself may be faulty or specific files may be missing, corrupt, or damaged.
- Incorrect Windows 10 installation ISO.
- Malware attack.
How to Fix Windows 10 Error Code 0xc00000e9
Want to know how to fix the Windows 10 error code 0xc00000e9 on your PC? Check out these six methods given below.
- Boot Into Safe Mode and Scan Windows for Errors
- Perform a Windows Startup Repair
- Scan the PC for Malware or Other Issues
- Change the Boot Order to Fix Error 0xc00000e9
- Update the Volume Boot Code to Use BOOTMGR
- Re-install Windows 10 to Fix Error 0xc00000e9
Before explaining these methods, let us check out the video below on how to fix error code 0xc00000e9 in Windows 11 and 10.
- 0:17 Restart your PC
- 0:45 Access BIOS setting
- 2:19 Load optimize default
Now, let us explain the methods and their solutions mentioned above.
Method 1. Boot Into Safe Mode and Scan Windows for Errors
You can access Windows in safe mode when it does not boot normally. If it succeeds, you can try several troubleshooting procedures and scan Windows to check for errors. Safe Mode is also called the diagnostic startup mode.
How to start Windows in safe mode?
Restart Windows by long-pressing the Shift key on the keyboard and clicking the Restart button in the Power button in the lower-right corner.
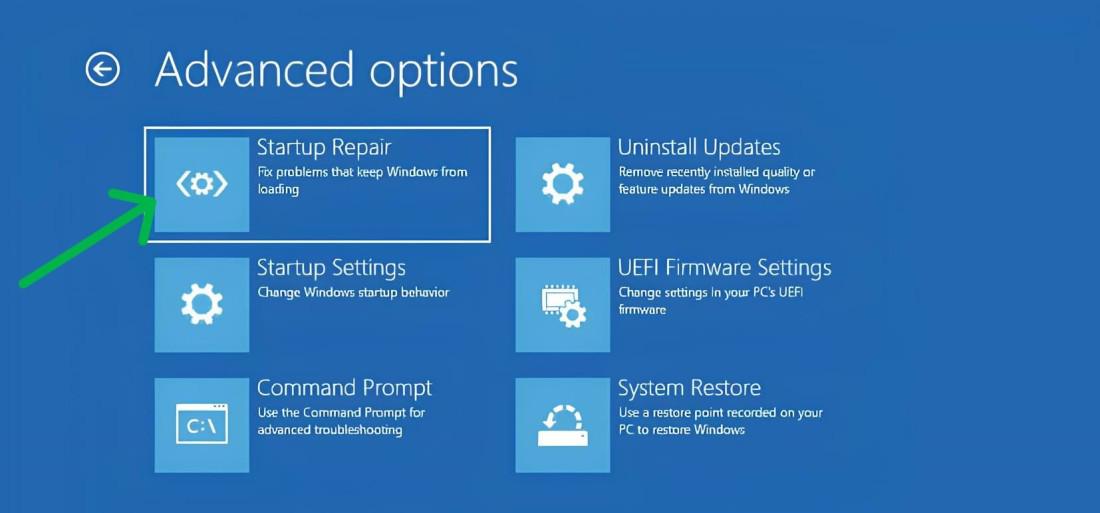
Once Windows boots up, you will get an Advanced Recovery Screen. Here click on the following option one after the other to boot into Safe Mode.
Troubleshoot> Advanced Options> Startup Settings> Restart on the following screen.
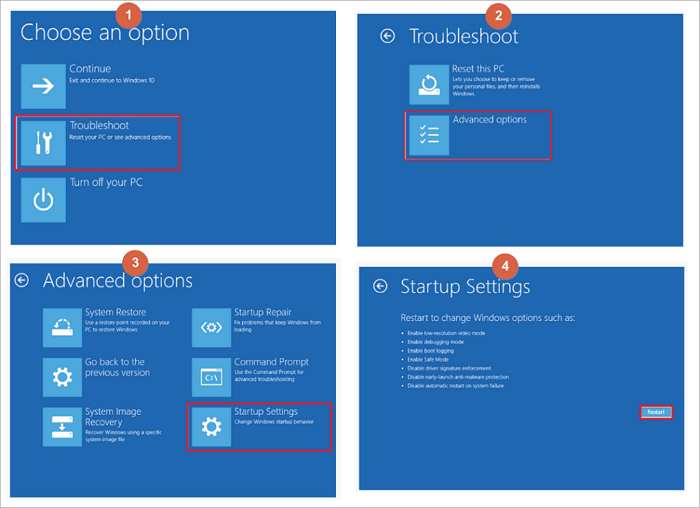
After your PC restarts, you’ll see a list of options. Select 4 or press F4 to start your PC in Safe Mode. Or if you’ll need to use the internet, select 5 or press F5 for Safe Mode with Networking.
Once Windows boots into Safe Mode, you can use the built-in Windows Error Checking tool and the SFC scannow command. It will check the hard drive and system files for issues that can cause boot issues.
Let us see how to go about it:
Step 1: On your Windows PC, right-click on the Windows logo on the bottom left corner of your screen and choose Windows Terminal (Admin).
Step 2: Press Yes on the User Account Control pop-up window.
Step 3: Type sfc /scannow and press Enter to begin scanning.
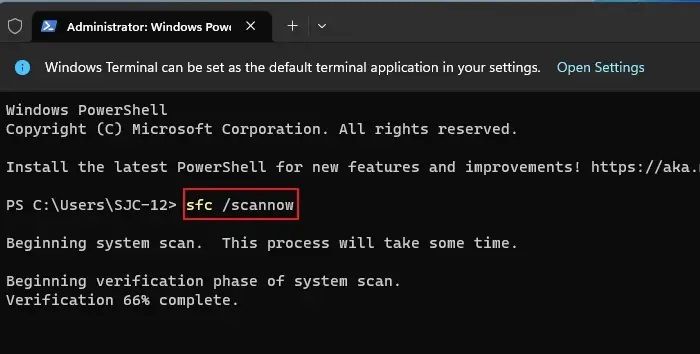
Every protected operating system file on your PC will now be checked for integrity by System File Checker. It can take some time to complete. If errors are discovered and fixed, you will get a message. You can restart your PC after that.
Method 2. Perform a Windows Startup Repair
I will explain how to perform a Windows Startup Repair in this method that may eliminate the error code. This is how you go about it:
If Windows won’t let you log in, use a Windows disk or a prepared USB device with the Windows automated repair tools. This problem might occasionally appear due to missing or corrupt system files, registry errors, or other issues that can be resolved with a startup repair.
Startup Repair is available from the Advanced Startup Options menu.
Step 1: Choose Restart from the power icon while holding the SHIFT key.
Step 2: On the Choose an option screen, click on Troubleshoot > Advanced Options
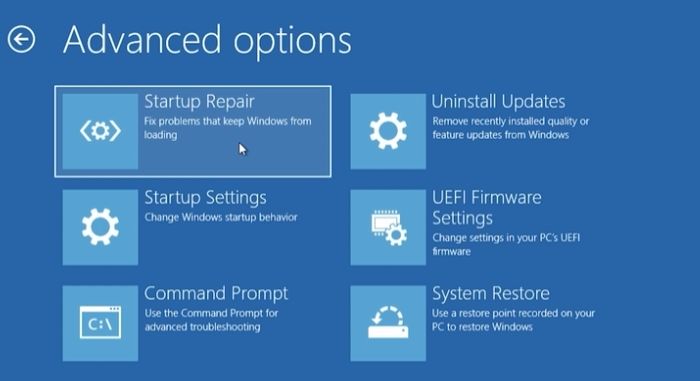
Step 3: Click on Startup Repair to begin the Windows Startup Repair.
During the process, you will need to provide your account details and other related things to help the troubleshooter fix the problem.
Method 3. Scan the PC for Malware or Other Issues
Use a bootable antivirus program if a virus stops Windows from starting. Download an antivirus program for Windows on a different PC, then copy it to a bootable drive. A bootable rescue tool that scans a system from a Windows Terminal is typically included in virus tools.
It is simple and can take several minutes or longer to scan your PC for viruses and other spyware properly. The length of the scan will increase with the number of files you have and the speed of your PC.
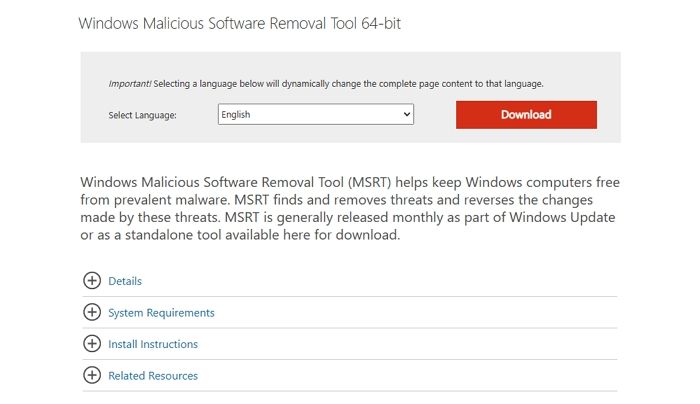
Run the Microsoft Windows Malicious Software Removal Program after downloading it. Depending on whether you are using a 32-bit or 64-bit version of Windows, there are two versions to choose from: (Check out which one your PC has) MSRT 32-bit or MSRT-64bit.
Microsoft’s free malware removal program may not find everything, but it will search for particular, prevalent malware, which is a decent place to start. Use Windows Update to update the tool if you already have it so that it can scan for the most recent threats.
Method 4. Change the Boot Order to Fix Error 0xc00000e9
If you added a new hard disk, plugged in an external drive, or attached a USB device, the boot order might have been altered. The system BIOS upgrade may also cause it. Verify that the hard disk that Windows is installed on is listed at the top of the boot sequence by accessing the PC’s BIOS or UEFI settings.
To change the BIOS boot order, follow the procedures given below. The order in which devices boot will change if the boot sequence is altered.
Step 1: As your PC turns on or restarts, watch for a notification mentioning a key (typically Del or F2) that must be pressed to enter the BIOS setup program. As soon as you see the message, press this key.
Note: The details of changing the boot order options vary from PC to PC because every BIOS setup program is unique. The menu choice or configuration setting may be identified by Boot Options, Boot, Boot Order, etc. A broad menu item like Advanced Options, Advanced BIOS Features, or Additional Options may contain the option.
Step 2: Find the option to change the boot order using the directions for accessing your BIOS tool. The modifications are made in the Boot menu of the BIOS.
The order in which the devices are listed determines the boot order or the order in which your PC will look for operating system information. The integrated hard disk that is in the PC is often what BIOS refers to as a hard drive and will attempt to boot from first from the order on your screen.
Select the right hard disk or SSD on which your Windows is installed, and press the Enter key.
Step 5: Save your BIOS settings before your option becomes effective. To accomplish that, navigate to the Exit or Save and Exit menu using the guidance provided by your BIOS utility.
Step 6: Verify your changes and then close BIOS. You should choose Yes if you get a confirmation message.
Any modifications to the boot sequence and any other BIOS settings you may have made are now saved, and your PC will restart and follow the new boot order.
Method 5. Update the Volume Boot Code to Use BOOTMGR
If a boot loader other than the Windows default BOOTMGR is used, the volume boot code may get corrupted or linked to it. This issue should be resolved by updating the volume boot code. To boot to Command Prompt and perform the required command, follow these steps:
Step 1: Go to Advanced Startup Options.
Step 2: Choose the Command Prompt.
Step 3: Type the following command and press Enter:
bootsect /nt60 SYS
This will change the volume boot code on the partition used to boot Windows to BOOTMGR, compatible with Windows operating systems.
Step 4: Remove the Windows flash drive from its USB port or the Windows disk from your optical drive before closing the Command Prompt window.
Step 5: Choose either Continue or Restart from the list of options. Windows should now launch usually.
Note: After attempting to start Windows normally once more, if you get any errors or this does not work, try the command bootsect /nt60 ALL.
The ALL option updates the boot code on volumes that can be used as Windows boot volumes, excluding any dynamic volumes not connected with an underlying disk partition.
The only catch is that if you dual boot your machine, you could unintentionally create a problem with any previous operating systems you boot to that is similar but the opposite.
Method 6. Re-install Windows 10 to Fix Error 0xc00000e9
All system modifications are wiped out when Windows is reinstalled. As a result, corrupted or missing system files are recovered and put back in working order. A clean install of Windows is achieved during the Windows setup process by removing the existing Windows installation (assuming there is one) before installing a new operating system or reinstalling the old one. Here is how to go about it:
Step 1: Navigate to the Windows Downloads page and click the Download Now button under Windows Installation Assistant.
Step 2: Launch the executable file you downloaded for Windows 10 Installation Assistance.
Step 3: Click Accept and Install on the terms of the agreement window.
Note: Before continuing, you might be asked about using the PC Health Check app. Installing that will allow you to determine whether your PC qualifies for the upgrade.
Step 4: The download of Windows will begin instantly. Allow the installation time to finish.
Step 5: After downloading, your PC will restart to install Windows 10 Or, you may choose Restart now to start the installation immediately. Windows 10 will be set up and installed automatically.
How to Recover Windows 10 Data After Fixing Error 0xc00000e9
Windows users may lose data after fixing error code 0xc00000e9. So, I recommend EaseUS Data Recovery Wizard, where you can recover Windows 10 data that you lost after fixing the error code 0xc00000e9.
So, what are the highlights of using the EaseUS Data Recovery Wizard tool?
- It can recover deleted files, photos, videos, music files, documents, and other files with simple clicks.
- This software supports file recovery from a hard drive, SSD, USB flash drive, and pen drive.
- Recovery of files from a corrupted Windows operating system is possible through this tool. To boot your PC and retrieve list data, EaseUS offers a WinPE boot device.
- Attacks from viruses can make your PC malfunction, which is very frustrating. Your data can be quickly and securely recovered using this tool.
- This data recovery software makes restoring a partition’s data simple, even if it has been completely lost or the system cannot recognize it.
So these are the features of EaseUS Data Recovery Wizard, and you can easily download them from the official website.
Note: To guarantee a high data recovery chance, install EaseUS data recovery software on another disk instead of the original disk where you lost files.
Step 1. Launch EaseUS Data Recovery Wizard on your Windows 11, Windows 10, Windows 8, or Windows 7 computer. Select the disk partition or storage location where you lost data and click «Search for Lost Data».

Step 2. This recovery software will start scanning the disk to find all lost and deleted files. When the scan process completes, click «Filter» > «Type» to specify lost file types. If you remember the file name, you can also search in the search box, which is the fastest way to find the target file.

Step 3. Preview and restore lost Windows files. You can double-click to preview the scanned files. Then, select the target data and click the «Recover» button to save them to another safe spot in the PC or Cloud drive.

Conclusion
So, do not panic if your system does not start when you encounter error 0xc00000e9. By following the above instructions, you can quickly fix the unexpected error without causing any harm to your Windows PC. Reinstall Windows if nothing else works, but be aware that this will erase all the data on your system drive. Replace your drive with another if the issue reappears. A bad or damaged HDD or SSD may bring on error 0xc00000e9.
So, if you lost any data while reinstalling Windows, you can always download and use EaseUS free data recovery software to recover your lost files. So, that’s it! I hope this article helped you!
An Unexpected I/O Error Has Occurred (0xc00000e9) FAQs
Do you have more questions about the unexpected error code 0xc00000e9 showing up on your Windows PC? Check out the frequently asked questions and their answers given below:
1. What Is Problem Status 0xc000009e?
A typical Windows Boot Manager issue, Windows error code 0xc00000e9, indicates a hardware failure or a corrupt system file detected during the boot process. Before the Windows login screen, it appears immediately after the PC turns on and looks like this: An unexpected I/O error has occurred.
2. How to do Windows Startup Repair?
This is how you perform Windows Startup Repair: Click the Windows Start icon and the power button icon. Press and hold down the Shift key and then click Restart. On the blue screen, select Troubleshoot. Next, go to Advanced Options > Startup Repair. After the startup repair process is complete, reboot the computer.
3. How to repair Windows 10 without a boot?
To repair Windows 10: Launch the Windows Advanced Startup Options menu. Go to Troubleshoot > Advanced options > Startup Repair. Wait a few minutes, and Windows will fix the startup problem without boot.
4. How to fix MBR in Windows 10 without a disk?
Restart your PC, and after each time the Windows logo appears during boot, force a hard shutdown. You should enter the Windows Recovery Environment (WRE) to perform a system restore after doing this three times. Choose «Automatic Repair» from the Advanced settings menu if that does not work. If all else fails, choose Command Prompt and execute the following commands:
bootrec /fixmbr bootrec /fixboot bootrec /rebuildbcd sfc /scannow
If you find it helpful, share this post to help more people.
The Windows error 0xc00000e9 is a common boot error that occurs when your system is unable to communicate with your hard drive, often due to hardware failures, connection issues, or corrupted system files. This error typically appears during startup, preventing Windows from booting correctly. Fortunately, there are several troubleshooting steps you can follow to fix Windows error 0xc00000e9 and get your system running again.
In this guide, we’ll explore the causes of this error and the steps you can take to resolve it.
Table of Content
- How does the error 0xc00000e9 come?
- Method 1: Check Your Hardware Compatibility
- Method 2: Perform a Windows Startup Repair
- Method 3: Update System I/O Drivers
- Method 4: Run SFC and DISM
- Method 5: Run a CHKDSK Scan
- Method 6: Rebuild MBR
- Method 7: Scan for Malware
How does the error 0xc00000e9 come?
Here, we’ll discuss about the internal process of Windows Error 0xc00000e9 and how to fix this problem by following some methods.
- Hardware Failure: Both software and hardware failure will possibly lead to such an error especially when the drive or some other device fails.
- I/O Error: The system may encounter an I/O error if it cannot access a drive or disk, this causes the data transfer and copying processes to fail.
- Corrupt System Files: Corrupted system files and Windows Registry reader problems can be classified as one of the main causes of that error.
- Faulty Device Drivers: The error can be caused by various factors, such as obsolete or corrupted components of the device drivers, particularly the ones that handle the input/output ports and storage.
- BIOS/Firmware Issues: If UEFI, BIOS, or CMOS settings are inadequately set up, the error may be initially displayed during the boot or later.
Method 1: Check Your Hardware Compatibility
Incompatibilities of your hardware with Windows may raise Error 0xc00000e9. Compatibility is the most vital of factors to consider in the initial stage.
- Verify the compatibility of your hardware components with your operating system.
- Ensure every hardware component is plugged in correctly and is not faulty.
- Run each hardware part of the equipment to check for any sign of failure.
Method 2: Perform a Windows Startup Repair
Windows sometimes fails to start properly. That could happen because of little glitches or file issues. But you can fix it with a Startup Repair. This tool fixes boot problems automatically. And it won’t delete your files or apps.
Step 1: Press the power button and hold it for about 10 seconds to power off your PC.
Step 2: Continue repeating the same thing of powering off two more times.
Step 3: When your PC is switching to the Windows Recovery Environment (WinRE), wait for it.
Step 4: On the “Choose an option” page, press «Troubleshoot» > «Advanced options» > «Startup Repair«.
Step 5: Let the startup repair tool scan and fix your PC.
Step 6: Restart your PC to verify if the problem is resolved.
Method 3: Update System I/O Drivers
Outdated or old software compatibility drivers may cause Error 0xc00000e9. The issue will be resolved if the outdated ones are updated.
Step 1: Press Win + X and select «Device Manager.»
Step 2: Expand the categories related to system I/O devices (e.g., Disk drives, IDE ATA/ATAPI controllers).
Step 3: Right-click on each device and select «Update driver.»
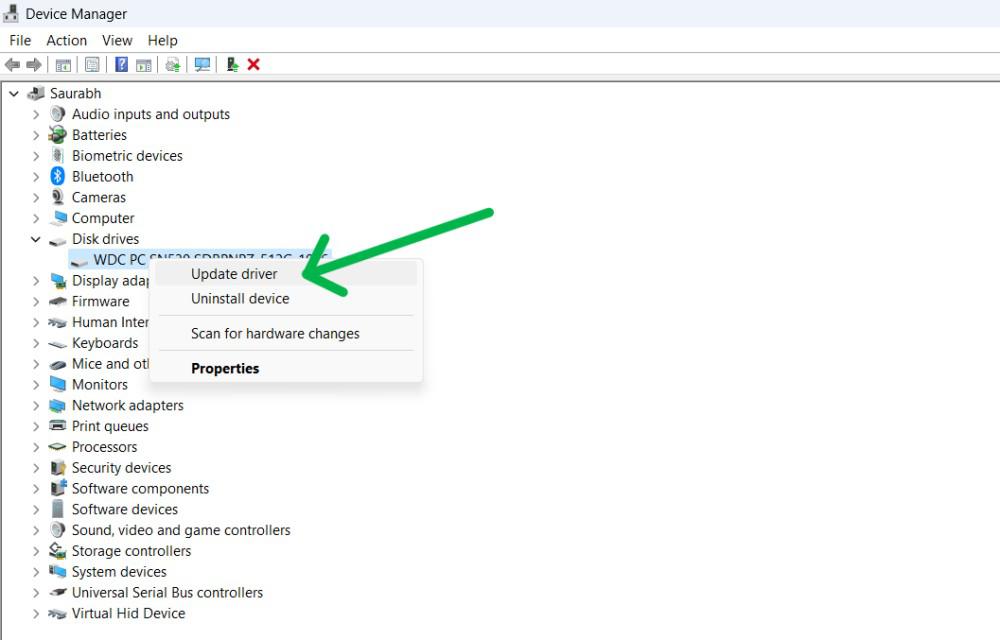
Step 4: Choose «Search automatically for updated driver software» and follow the on-screen instructions.
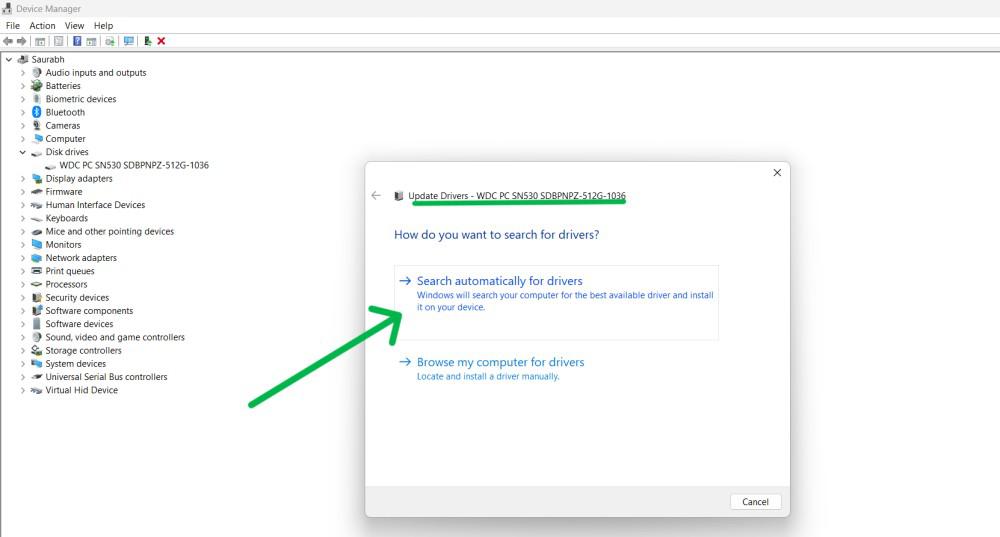
Step 5: Repeat this process for all relevant devices.
Step 6: After updating the drivers, restart your computer to apply the changes.
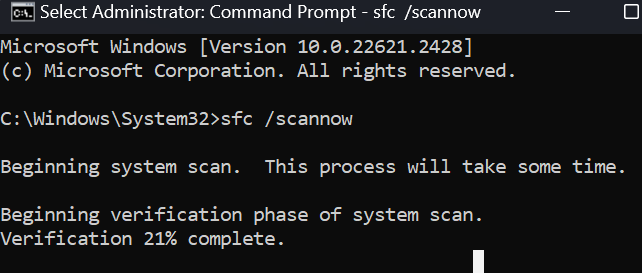
Method 4: Run SFC and DISM
The System File Checker analyzes system files. If any are corrupted or damaged, it will attempt to fix them. The Deployment Image Servicing and Management utility does something similar. Running these programs may solve the Windows Error 0xc00000e9.
Step 1: Click Start, search for Command Prompt, right-click, and select Run as Administrator.
Step 2: Type sfc /scannow, press Enter, then restart after the scan completes.
Step 3: If the error persists, open the command prompt as an administrator again and run the following command:
DISM /Online /Cleanup-Image /CheckHealth
DISM /Online /Cleanup-Image /ScanHealth
DISM /Online /Cleanup-Image /RestoreHealth
And press enter.
Step 4: Restart your computer.
Method 5: Run a CHKDSK Scan
The check disk tool (CHKDSK) scans drives and file systems. CHKDSK detects errors, repairs issues like bad sectors and other startup problems. This tool fixes your hard disk file system integrity. It is crucial for resolving disk-related issues impacting system boot.
Step 1: Press Windows Key + S then on the search bar type «CMD» then run as administrator.
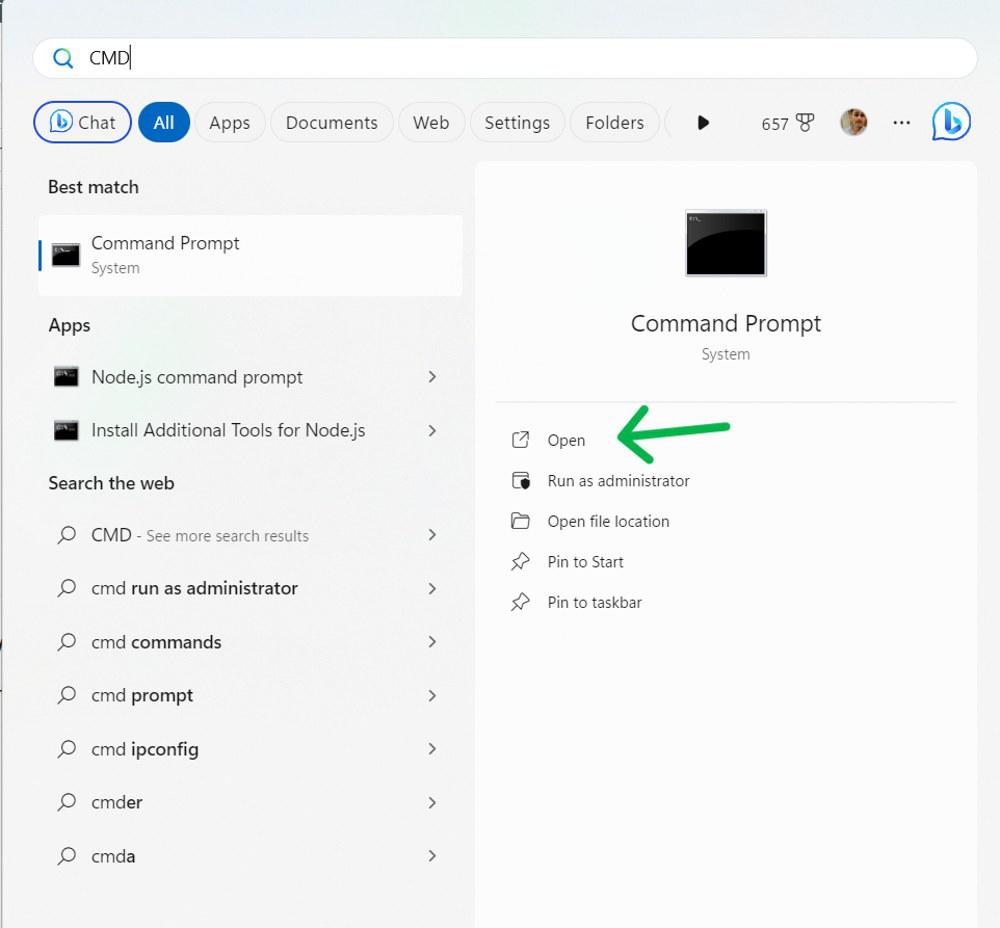
Step 2: In the CMD window, Type the following command and hit Enter.
chkdsk c: /f /r
Method 6: Rebuild MBR
The Master Boot Record (MBR) allows Windows to start up properly. If these files become corrupted, your computer won’t boot correctly. Reconstructing these critical components is key when troubleshooting boot errors.
Step 1: Download and install this software to Rebuild MBR
You can download the software from this link:
https://www.diskpart.com/ss/download/pa/PAssist_Std.exe
Step 2: Open the AOMEI Partition Assistant
Step 3: Right-click on «Disk 0» then select «Rebuild MBR«
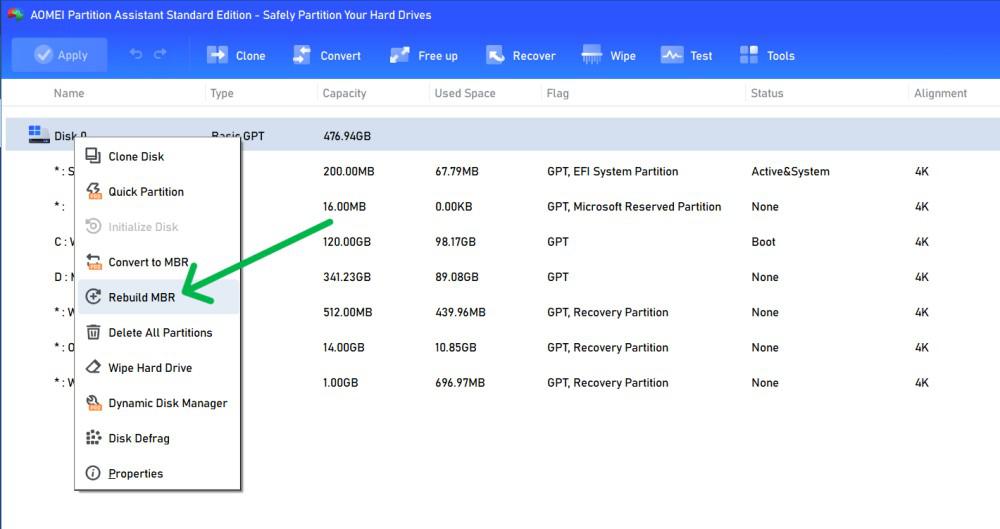
Step 4: Select the type of MBR for Window 11 in the pop-up window
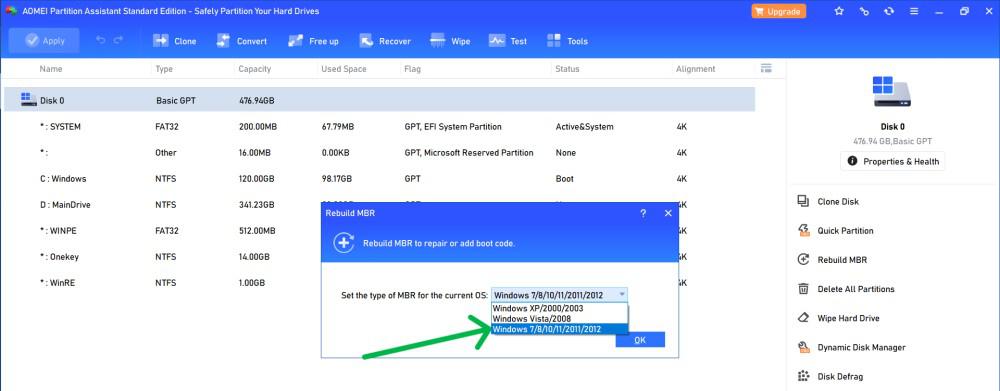
Step 5: Click OK then proceed.
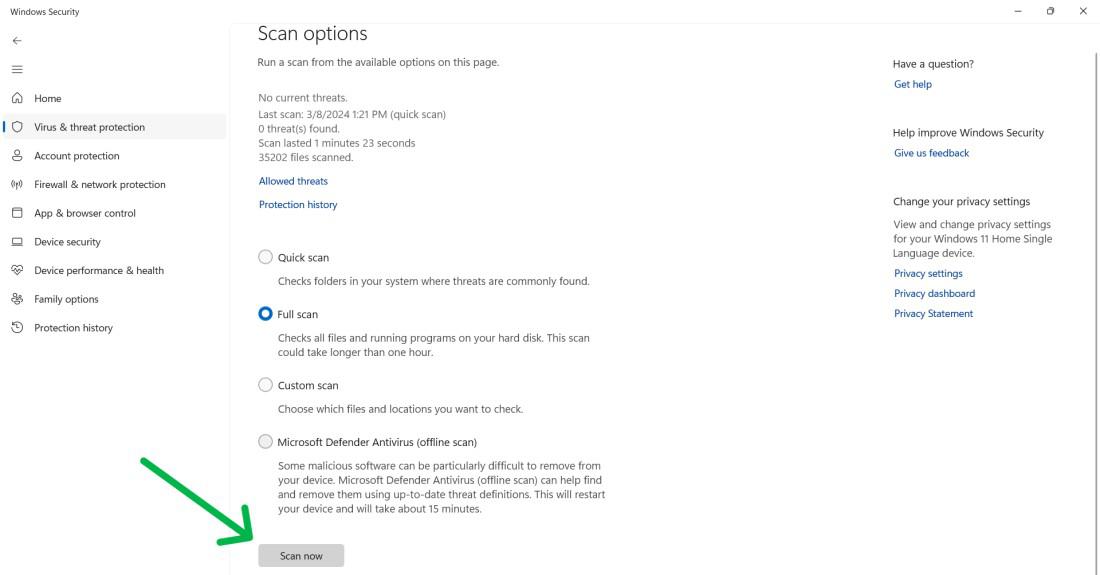
Method 7: Scan for Malware
Malware infections interrupt normal system tasks. They causes many errors, such as boot errors. So running malware scans is important.
Step 1: Press Windows Key + S to open the search bar on the search bar type «Windows Security» and then open it.
Step 2: In Windows Security, On the left side pane click on «Virus & Treat Protection» then on the bottom click on «Scan Options«
Step 3: From the list select «Full Scan» then click on the «Scan Now» button.
Conclusion
By following the troubleshooting steps outlined in this guide, you can effectively fix Windows error 0xc00000e9 and restore your system to proper functionality. Whether the issue stems from a hardware malfunction, corrupted system files, or an improperly connected hard drive, addressing these potential causes will help you resolve the boot error and prevent it from occurring again in the future.
Also Read
- How To Fix Windows Update Error 0x80248007?
- How to Fix Windows Error Code 0x800700E1: Virus Detected
- How to Fix Boot Error “No Bootable Device” in Windows?
Error code 0xc00000e9 is a critical Windows boot issue that can leave users frustrated and unable to access their systems. This comprehensive guide will walk you through understanding, diagnosing, and resolving this error, ensuring you can get your computer up and running again.
What is Error Code 0xc00000e9?

Error 0xc00000e9 is a Windows Boot Manager error that typically indicates a hardware failure or corrupted system file. It’s associated with an unexpected input/output (I/O) error, preventing the system from accessing a drive or disk during the boot process. This error can occur shortly after turning on your computer, halting the boot sequence before reaching the Windows login screen.
The impact of this error is significant:
- It prevents the system from booting properly
- It can lead to data loss if not addressed promptly
- It causes disruptions in productivity and access to important files
Understanding and resolving this error quickly is crucial to minimize potential data loss and system downtime. In some cases, this error might be accompanied by the message “Your PC needs to be repaired,” which indicates a serious boot issue. Learn more about this related error.
Common Causes of Error 0xc00000e9
Several factors can trigger the 0xc00000e9 error:
- Hardware Failures: Malfunctioning external devices or damaged I/O ports can disrupt the boot process. This includes issues with hard drives, SSDs, or connection cables.
- Corrupted System Files: Problems within the Windows Registry or critical system files can lead to boot errors. This corruption can occur due to improper shutdowns, failed updates, or software conflicts.
- Improper Removal of Storage Devices: Disconnecting external drives without properly ejecting them can cause data corruption and subsequent boot issues.
- Incorrect BIOS or UEFI Configurations: Misconfigured BIOS settings, particularly those related to boot order or drive recognition, can trigger this error. In some cases, your computer might get stuck on the boot menu, especially on Lenovo devices. Check this guide if you’re experiencing a similar issue.
- Malware Infections: Certain types of malware, especially boot sector viruses, can interfere with the normal boot process and cause errors like 0xc00000e9.
Diagnosing Error 0xc00000e9
Before attempting to fix the error, it’s important to diagnose the root cause:
- Check Hardware Connections:
- Ensure all cables, especially those connecting the hard drive to the motherboard, are securely attached.
- Inspect cables for any visible damage and replace if necessary.
- Use Diagnostic Tools:
- Run CHKDSK to scan for hard drive errors and bad sectors.
- Use System File Checker (SFC) to identify and repair corrupted system files.
- Inspect BIOS Settings:
- Access your computer’s BIOS/UEFI setup.
- Verify that the boot order is correct and all hardware components are properly recognized.
- Test External Devices:
- Disconnect all external devices and attempt to boot the system.
- Reconnect devices one by one to identify any problematic hardware.
- Run Malware Scans:
- Use a bootable antivirus tool to perform a comprehensive scan of your system.
Solutions to Fix Error 0xc00000e9
Once you’ve diagnosed the issue, try these solutions to resolve the error:
1. Update Drivers
Outdated or corrupted drivers can lead to I/O issues. To update drivers:

- Boot into Safe Mode if possible.
- Open Device Manager (right-click Start > Device Manager).
- Expand categories for disk drives and storage controllers.
- Right-click each device and select “Update driver.”
- Choose to search automatically for updated driver software.
2. Run Check Disk Scan (CHKDSK)
CHKDSK can identify and repair disk errors:
- Boot from a Windows installation media.
- Open Command Prompt from the recovery options.
- Type
chkdsk C: /f /rand press Enter (replace C: with your system drive letter if different). - Allow the scan to complete, which may take some time.
3. Perform Startup Repair
Windows’ built-in Startup Repair tool can fix many boot-related issues:

- Boot from Windows installation media.
- Choose “Repair your computer” instead of “Install now.”
- Navigate to Troubleshoot > Advanced options > Startup Repair.
- Follow the on-screen instructions to complete the repair process.
If you’re experiencing issues with Windows 7 getting stuck on the welcome screen, this guide might be helpful.
4. Repair Windows Without CD
If you don’t have a Windows installation CD, you can still attempt to repair your system. Learn how to repair Windows 10 without a CD.
5. Reinstall Windows (Last Resort)
If other methods fail, a clean Windows installation may be necessary:
- Back up all important data before proceeding.
- Boot from Windows installation media.
- Choose “Custom: Install Windows only” during the installation process.
- Follow the prompts to complete the installation.
6. Replace Faulty Hardware
If hardware issues are identified:
- Replace any damaged cables, particularly SATA or power cables.
- If the hard drive is failing, replace it with a new one.
- Ensure all components are properly seated in their connections.
Preventive Measures
To avoid encountering error 0xc00000e9 in the future:
- Regular Maintenance:
- Perform routine system checks and updates.
- Use Windows Update to keep your system current.
- Proper Device Handling:
- Always use the “Safely Remove Hardware” option before disconnecting external devices.
- Back Up Data Regularly:
- Use Windows Backup or third-party software to create regular backups of your important files.
- Monitor Hardware Health:
- Use diagnostic tools to check the health of your hard drives and other components periodically.
- Keep Software Updated:
- Ensure your operating system and all installed software are up-to-date to reduce vulnerabilities.
- Address Other System Issues:
- Be proactive in addressing other system issues, such as screen tearing, which might indicate underlying hardware or software problems. Here’s a guide on fixing screen tearing.
Conclusion
Error 0xc00000e9 can be a frustrating obstacle, but with the right approach, it’s often resolvable. By understanding its causes, carefully diagnosing the issue, and applying the appropriate fixes, you can overcome this error and prevent its recurrence. Remember, regular maintenance and proactive measures are key to maintaining a stable and reliable computing environment.
If you’ve tried these solutions and still encounter issues, it may be time to consult with a professional technician. They can provide more in-depth diagnostics and repairs, especially if hardware failures are suspected.
FAQs about Error 0xc00000e9
Q: What should I do if I encounter error 0x8007042B during the repair process? A: Error 0x8007042B is often related to Windows Update issues. Check this guide for solutions if you encounter this error while trying to fix 0xc00000e9.
Q: Can error 0xc00000e9 cause permanent data loss? A: While the error itself doesn’t typically cause data loss, attempting to fix it improperly might. Always back up your data before attempting repairs.
Q: How long does it take to fix error 0xc00000e9? A: The time can vary from a few minutes to several hours, depending on the cause and the solution required.
Q: Is it safe to update BIOS to fix this error? A: Updating BIOS can be helpful but should be done cautiously. Follow manufacturer instructions carefully to avoid bricking your motherboard.
Q: Can using a different power supply resolve the 0xc00000e9 error? A: In some cases, yes. If the error is caused by insufficient power to your components, a more powerful or stable PSU could help.
Q: How often should I run diagnostic tools to prevent this error? A: Running basic diagnostics monthly and more comprehensive checks quarterly can help catch potential issues before they lead to errors like 0xc00000e9.
In this guide, we will discuss why boot error 0xc00000e9 occurs, the reasons behind it, and how to solve it on Windows 11 or 10 PCs. Hardware failure and corrupt or missing system files are a few reasons that may trigger this issue in the first place.
In addition to this, damaged input/output ports, and a faulty external device attached to your device may also prevent you from booting into your computer. Since this is a boot-related issue, your device may fail to display the login screen. Whatever is causing this issue on your computer, you may solve it simply by applying the workarounds discussed in this article.
- Restart PC
- Disconnect Peripheral devices
- Boot into the Safe Mode
- Fix Driver Issues
- Scan for Malicious codes or malware
- Use the SFC Utility Program
- Run CHKDSK
- Initiate Startup Repair

What causes Boot Error 0xc00000e9?
A boot error may occur due to one or more of the reasons outlined below. Have a look at the most probable causes and work to fix that particular reason.
- Damaged I/O Ports
- Malfunctioning peripheral devices
- Corrupted system files, registry entries
- Wrong Boot Sequence
- Improperly set Master Boot Record
To solve boot error 0xc00000e9 on Windows, go through the solutions discussed below and see if any help to fix it on your computer –
1] Restart PC
If you are not able to get past the login screen, restart your PC by pressing and holding down the power button until your PC turns off. Turn it back On and check if the problem is resolved. Doing this alone solves numerous issues that otherwise seem complex and unsolvable.
- Save all work going on your computer.
- Keep Pressing Alt + F4 till you get the following pop-up window –

- Use the drop-down menu to select Restart and hit OK.
In case the error continues to occur even after rebooting your PC, try the below set of solutions –
2] Disconnect Peripheral devices
The error 0xc00000e9 may also occur because of corrupted external devices attached to your computer. So, if you are using any peripheral devices like an external hard disk, printer, or other USB devices, disconnect them and restart your PC. When your computer reloads, check if the boot issue still occurs or has been resolved for good.
Note: In case it does solve the problem you are struggling with, connect the removed devices one after another. Proceeding this way you may locate the faulty or buggy device.
3] Boot into the Safe Mode
This may occur when you can’t boot into your Windows normally. If that’s the case, try booting into the Safe Mode first and then only apply the below workarounds.
In case you are able to log into your computer normally, there’s no need to enter the Clean boot state.
Note: When you enter the Safe mode, it disables all third-party apps or services. Since there is no interference from third-party sources or applications, you may find if the boot issue is occurring because of the system failure or simply due to the apps that are running on your computer.
4] Fix Driver Issues
Boot errors may also occur when there is some issue with the drivers running on your computer.
Windows 10: Settings > Update & Securtiy > Windows update > Check for updates
Windows 11: Settings > Windows update > Check for updates
After you hit the “Check for updates” button, the system will look for any available patches online. In case it does find any pending update, the same gets automatically resolved.
5] Scan for Malicious codes or malware
If you have visited some sites that contain infectious files, this may also trigger boot error code 0xc00000e9 on Windows 11/10. To solve this, you should use Windows Defender to find and repair malicious codes or malware.
6] Use the SFC Utility Program
The boot error 0xc00000e9 may also occur if your device contains any corrupted or missing system files. You may fix or repair these files using the System File Checker.
Here’s how the SFC Scan works –
- Launch Command Prompt having admin rights.
- Type “
sfc /scannow” near the blinking cursor and hit Enter.

- Let this code run till this reaches 100%.
- After this is over, restart your PC.
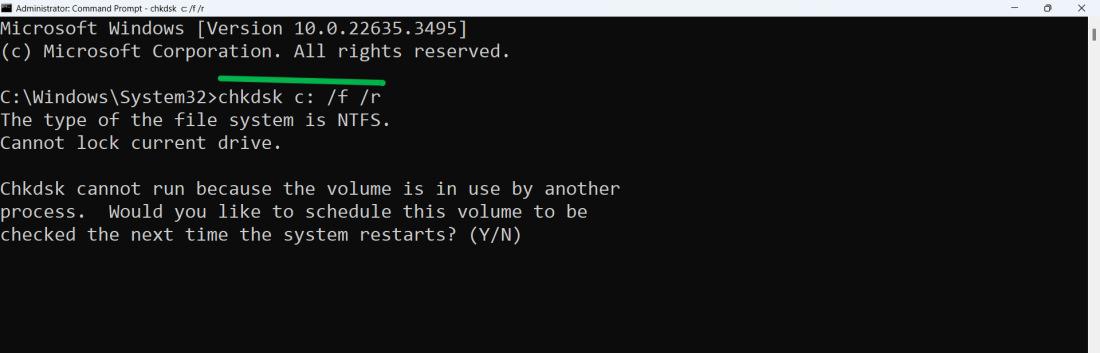
7] Run CHKDSK
Hardware problems may also cause such boot issues including error code 0xc00000e9 on your computer. So, if none of the above fixes are able to solve this problem, check if this is occurring because of “hardware being corrupt”. Here’s how this process goes –
- Press Win + R to launch the Run dialog.
- Type “CMD” and press the Ctrl + Shift + Enter keys together.
- This will invoke Command Prompt as an administrator.
- When the UAC window prompts, hit Yes.
- Type the following and hit the Enter key again.
chkdsk C: /f /r /x

Here C: denotes the root drive, and f implies fixing the issue. Similarly, r is there to identify the problem and X instructs the concerned volume to scan.
- The hard drive scanning won’t start immediately as the volume is currently in use. Type “Y” and hit Enter to start the scanning process automatically when your device reboots.
- If you do find your hard drive corrupted, replace it with some new ones.
8] Initiate Startup Repair
When you are not able to log into your Windows no matter how many times you try, you may perform a Startup repair on your PC. Doing so will automatically look for corrupt system files, and registry errors, and repair them.
- Hit and hold the Power button till your device shuts down.
- When your device turns off completely, hit the power button.
- Restart your PC 2-3 times following this way.
- Your device will boot into the Advanced options automatically.
- Click Troubleshoot > Advanced options.
- Hit over the first option i.e. Startup Repair.

- Let the system take care of the remaining steps.
9] Repair Boot Order/MBR
If none of the above solutions resolve the boot error 0xc00000e9 on your PC, go and check the current boot sequence. A boot order may change automatically in case you have updated your system BIOS or installed a new hard drive.
To fix it then, you should boot into the Computer’s BIOS and see if the default boot is set to the hard drive containing Windows OS. In short, make the attached HDD/SSD the primary boot device, and the problem resolves automatically. Just don’t forget to restart your computer after you change the boot sequence.
Similar to changing the boot order, you should try repairing the Master Boot Record (MBR). This is important as it contains all the data essential to boot up your device.
Perform a Clean Installation of Windows if you are still struggling with boot issues on your computer. If you do have any restore points saved on your device, you may try to revert your PC back to that stable point.