
Файл PSHED.DLL считается разновидностью DLL-файла. DLL-файлы, такие как PSHED.DLL, по сути являются справочником, хранящим информацию и инструкции для исполняемых файлов (EXE-файлов), например 3DViewer.ResourceResolver.exe. Данные файлы были созданы для того, чтобы различные программы (например, Windows) имели общий доступ к файлу PSHED.DLL для более эффективного распределения памяти, что в свою очередь способствует повышению быстродействия компьютера.
К сожалению, то, что делает файлы DLL настолько удобными и эффективными, также делает их крайне уязвимыми к различного рода проблемам. Если что-то происходит с общим файлом DLL, то он либо пропадает, либо каким-то образом повреждается, вследствие чего может возникать сообщение об ошибке выполнения. Термин «выполнение» говорит сам за себя; имеется в виду, что данные ошибки возникают в момент, когда происходит попытка загрузки файла PSHED.DLL — либо при запуске приложения Windows, либо, в некоторых случаях, во время его работы. К числу наиболее распространенных ошибок PSHED.DLL относятся:
- Нарушение прав доступа по адресу — PSHED.DLL.
- Не удается найти PSHED.DLL.
- Не удается найти C:\Windows\System32\PSHED.DLL.
- Не удается зарегистрировать PSHED.DLL.
- Не удается запустить Windows. Отсутствует требуемый компонент: PSHED.DLL. Повторите установку Windows.
- Не удалось загрузить PSHED.DLL.
- Не удалось запустить приложение, потому что не найден PSHED.DLL.
- Файл PSHED.DLL отсутствует или поврежден.
- Не удалось запустить это приложение, потому что не найден PSHED.DLL. Попробуйте переустановить программу, чтобы устранить эту проблему.
Файл PSHED.DLL может отсутствовать из-за случайного удаления, быть удаленным другой программой как общий файл (общий с Windows) или быть удаленным в результате заражения вредоносным программным обеспечением. Кроме того, повреждение файла PSHED.DLL может быть вызвано отключением питания при загрузке Windows, сбоем системы при загрузке PSHED.DLL, наличием плохих секторов на запоминающем устройстве (обычно это основной жесткий диск) или, как нередко бывает, заражением вредоносным программным обеспечением. Таким образом, крайне важно, чтобы антивирус постоянно поддерживался в актуальном состоянии и регулярно проводил сканирование системы.
Pshed.dll is a Dynamic Link Library (DLL) file used to manage hardware error messages. This file acts as a Microsoft driver or service that helps prevent system crashes by handling hardware-related error messages and reporting them back to the operating system, which in turn takes appropriate actions to stabilize the system.
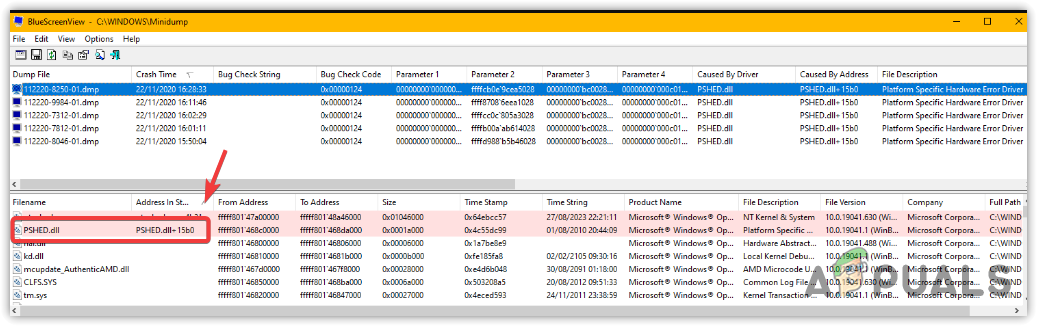
When pshed.dll is mentioned in error messages such as BSOD (Blue Screen of Death) or minidump files, it indicates that there is a hardware issue that pshed.dll has detected. However, this does not mean that pshed.dll is the cause of the problem. Contrary to what many users believe, pshed.dll is not the source of these issues. Instead, we should investigate hardware components to determine the underlying cause.
WHEA_UNCORRECTABLE_ERROR is a common error code associated with pshed.dll BSODs, pointing to a critical hardware malfunction. While the error typically suggests hardware issues, it can also arise from outdated or corrupted system drivers and BIOS firmware.
Factors such as overheating, power supply issues, faulty memory, or other hardware failures can trigger pshed.dll errors.
BSOD errors involving pshed.dll may also point to problems with other critical system files like ntoskrnl.exe and hal.dll, which play essential roles in system operations and hardware communication.
With an understanding of the function of the pshed.dll file, we can now explore the solutions to these issues.
Boot into Safe Mode (if required)
If you cannot boot Windows normally, you need to boot into Safe Mode first to follow the methods listed in this guide. Safe Mode allows users to boot Windows without drivers or third-party services. This helps troubleshoot the errors caused by drivers and even hardware failures.
- To boot Windows into safe mode, shut down your computer completely.
- Then, press the Power button to boot Windows.
- As soon as you see the Windows logo, press the Power button again to shut down your computer.
- Repeat this step three times to trigger the automatic repair system.
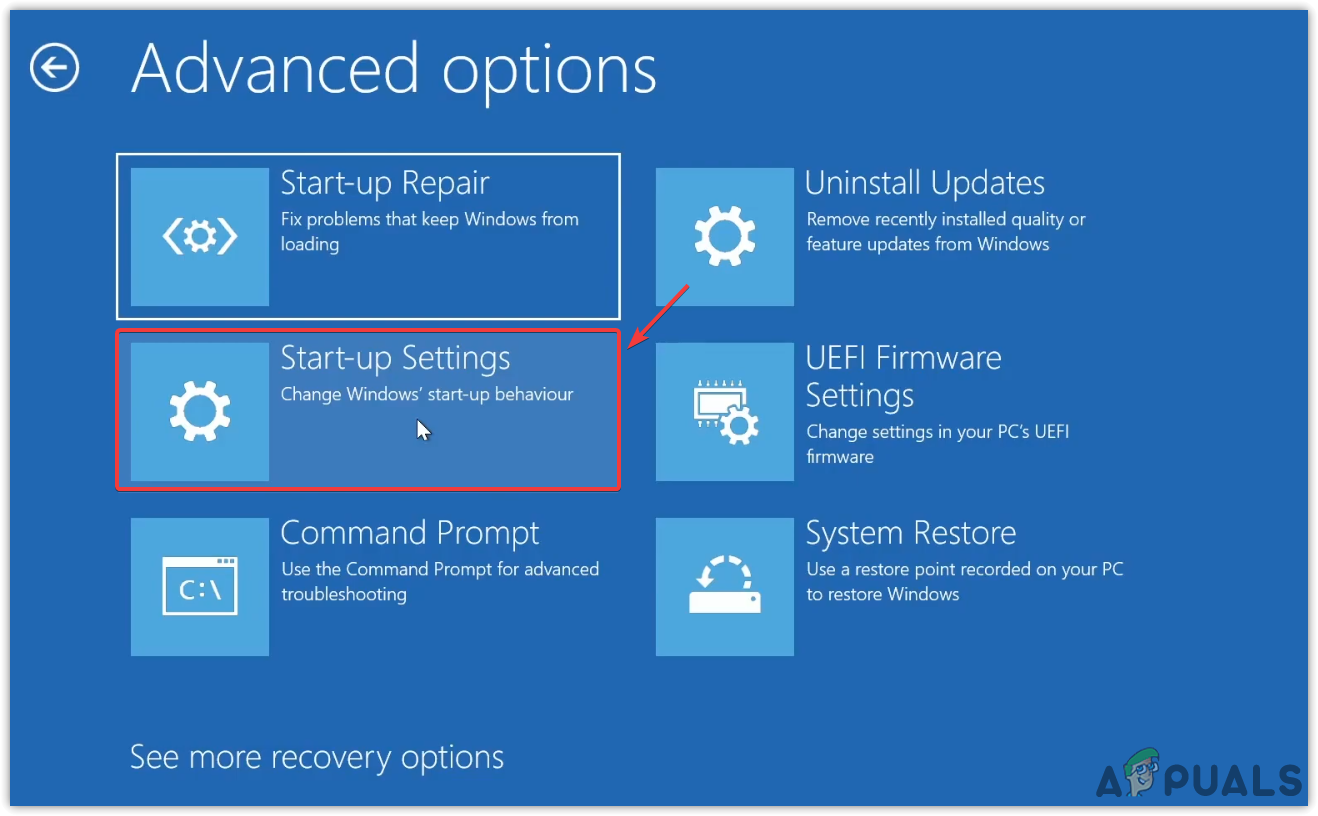
- Select Advanced Options > Troubleshoot > Startup Settings. This will reboot your system and show you the options to enable Safe Mode. Simply press F4 to enable safe mode.

- Once done, proceed to follow the below methods.
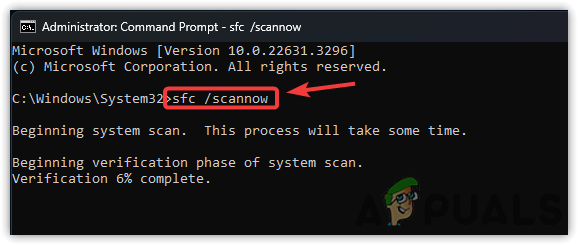
1. Run SFC Scannow and DISM Command
Windows-specific DLL files can be restored by running the SFC scannow command. SFC (System File Checker) is a command line utility that is especially used to restore protected system files, including DLL files. If any of the essential system files become corrupted, it could cause a BSOD error.
With that, also run the CHKDSK command, which will help fix the errors found on a hard drive.
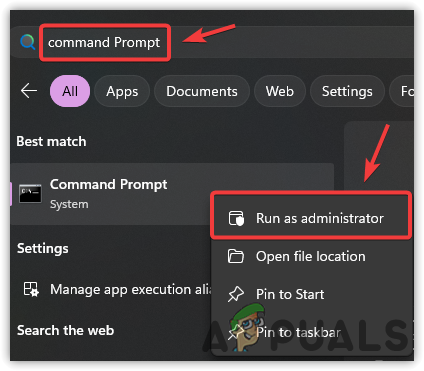
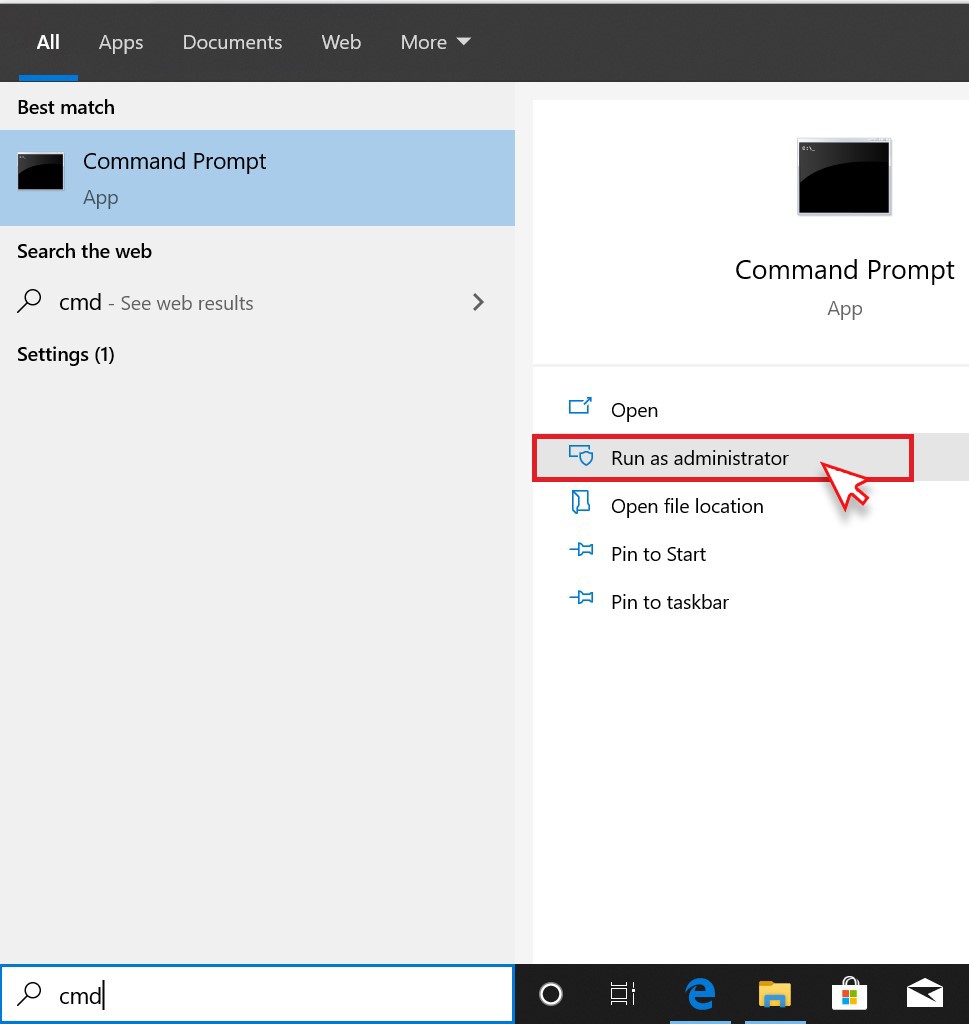
- Press the Win key and type Command Prompt in the Windows search bar.
- Right-click on it and select Run as administrator.

- Once it is opened, type sfc /scannow and wait for the command to be executed.
- Once done, enter the chkdsk command and hit Enter.

- Once done, you can restart your PC to see if the problem is resolved.
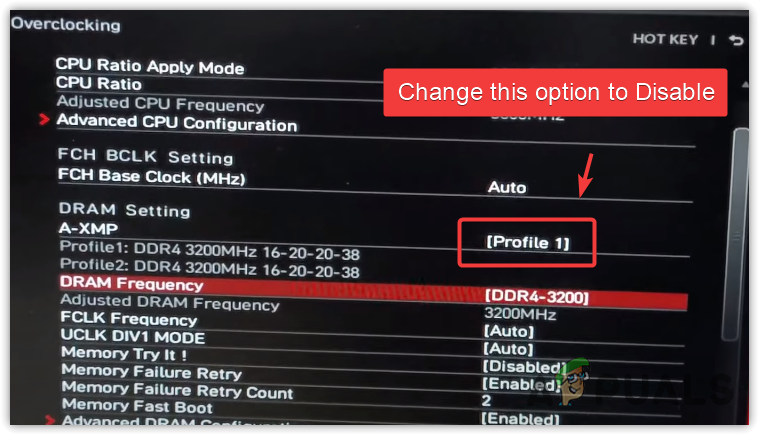
2. Disable XMP or any other overclocking
If you have overclocked any hardware components, such as RAM or the processor, it is advisable to enter your motherboard’s BIOS settings to reset these settings, particularly by turning off the XMP profile.
XMP, or Extreme Memory Profiles, allows users to overclock RAM for maximum performance. Enabling XMP means the RAM operates at the intended clock speed, which can enhance performance during memory-intensive tasks like gaming and editing.
Despite XMP being a relatively safe overclocking method, it can still lead to issues, including crashes. Therefore, if you have an XMP profile enabled, be sure to disable it temporarily.
- Completely power off your PC.
- Power it back on.
- Upon seeing the manufacturer’s logo on your screen, start pressing F2, F12, delete, or the corresponding key to access the BIOS settings. (Refer to our detailed BIOS key guide if you are stuck.)
- In the BIOS settings, navigate to the Overclock settings and select the XMP option.
- Choose Disable to turn off the XMP profile.

- After disabling XMP, reboot your computer and check if the issue has been resolved
3. Test your RAM
A hardware problem with your RAM could be causing BSOD errors. Testing your RAM is especially recommended if you have recently built your PC or are frequently facing BSOD errors.
For an effective diagnosis, use two RAM sticks so you can test your PC with one stick at a time. If the same problem occurs with both sticks individually, it is likely the issue lies elsewhere. If you have only one RAM stick, you can test your RAM with either the built-in Windows Memory Diagnostic utility or a third-party utility such as MemTest86.
4. Update the motherboard BIOS
If the problem persists, ensure that you have updated to the latest chipset drivers available from your motherboard manufacturer. It is also crucial to have the latest BIOS update installed. If the issue remains unresolved after these steps, consider taking your PC to a repair shop for further diagnosis.
If you suspect a hardware issue, you could also try to reinstall Windows or reset it without losing any data.
In the event that you have a restore point created before encountering this issue, a system restore utility can be used to revert your Windows to a previous state.
Hamza Mohammad Anwar
Hamza Mohammad Anwar is an intermediate JavaScript web developer with a focus on developing high-performance applications using MERN technologies. His skill set includes expertise in ReactJS, MongoDB, Express NodeJS, and other related technologies. Hamza is also a Google IT Certified professional, which highlights his competence in IT support. As an avid problem-solver, he recreates errors on his computer to troubleshoot and find solutions to various technical issues.
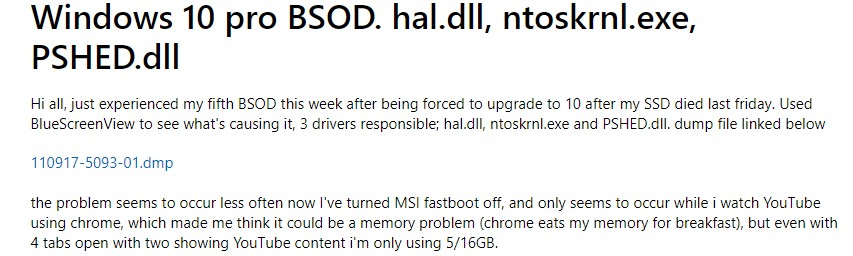
PSHED.Dll (Dynamic Link Library) is one of the most common BSOD (Blue Screen of Death) errors. It can occur right after turning on your system or while you’re in the middle of an important task. A few users also encountered this problem while watching YouTube videos on Chrome.
The PSHED.Dll Windows 10 error may appear with different stop codes and error messages, such as:
- PSHED.Dll Ntoskrnl.exe BSOD
- Hal.dll ntoskrnl.exe PSHED.Dll BSOD
- 0x124 PSHED.Dll
- PSHED.Dll WHEA Uncorrectable Error,
- PSHED.Dll has been deleted or is corrupted
What Causes PSHED.Dll Error?
This blue screen error may occur for multiple reasons, including an incompatible or faulty device driver, missing or corrupted system files, outdated BIOS, defective hard drive, memory issues, etc. Read on to find some effective DIY troubleshooting methods to fix the PSHED. Dll BSOD Windows 10 error.
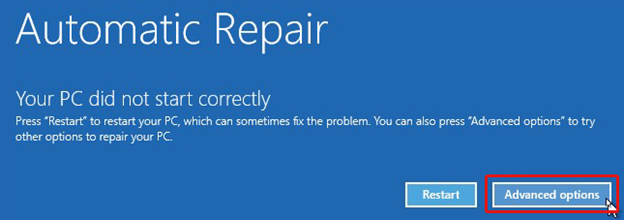
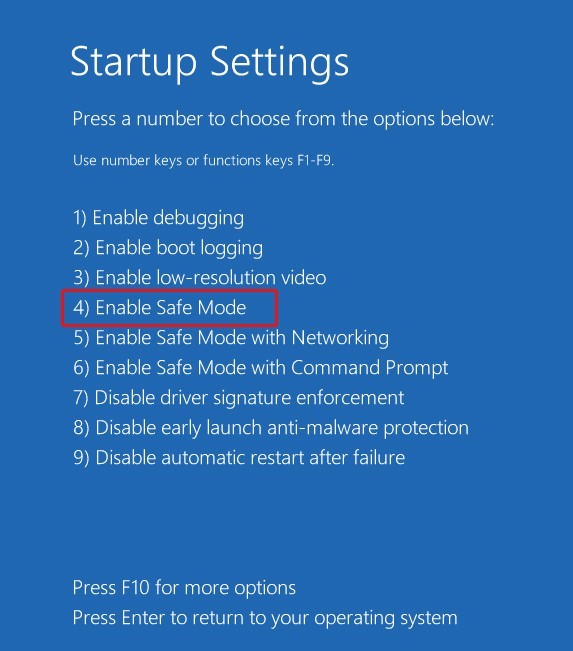
As some Windows users reported that they tried factory resetting their PC, but the BSOD error kept coming up , we’d suggest you boot your system in safe mode to prevent interruptions while fixing the error.
To boot into Safe Mode, follow the given steps:
- Reboot your Windows 10 system. The moment you start to see the Windows logo on screen, turn off your system again.
- Repeat this step thrice. After that, you should reach the Automatic Repair environment.
- There, click ‘Advanced options’ to proceed.
- Next, click Troubleshoot on the ‘Choose an option’ screen.
- On the next screen, click ‘Advanced options’ on Troubleshoot screen.

- Afterward, you need to select Startup Settings from the available options.
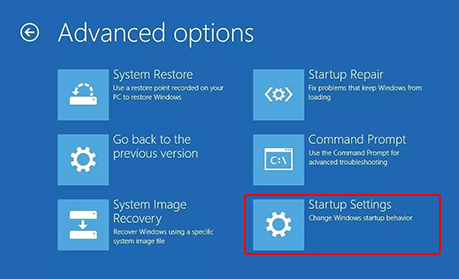
- On the next prompt, click Restart. The system will reboot and give you multiple options. Press F4 to enable Safe Boot.
How to fix the PSHED.Dll BSOD Error on Windows 10?
Now that you’ve booted successfully into safe mode, you can start performing the troubleshooting methods given below.
- Update device driver
- Run an SFC Scan
- Run CHKDSK Command
- Run Windows Memory Diagnostic Tool
- Update BIOS
- Perform System Restore
- Reset Windows 10 PC
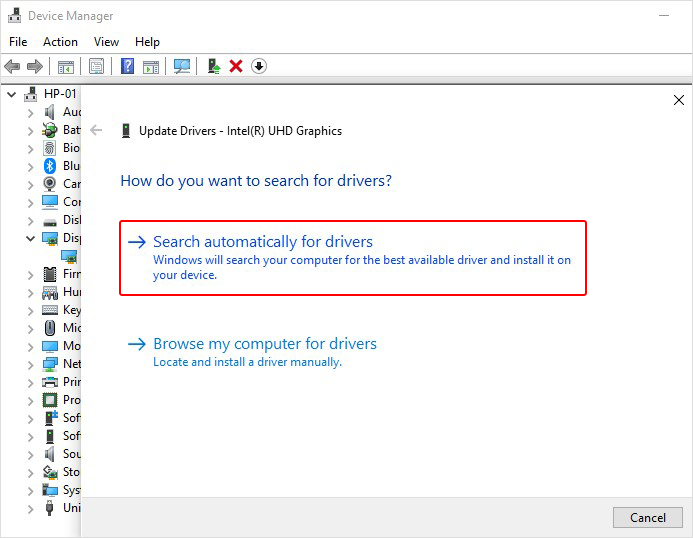
Method 1: Update Device Drivers
- Open Device Manager and then go to the Device category for which you want to update the driver.
- Expand the device category, right-click on the driver, and click Update driver.
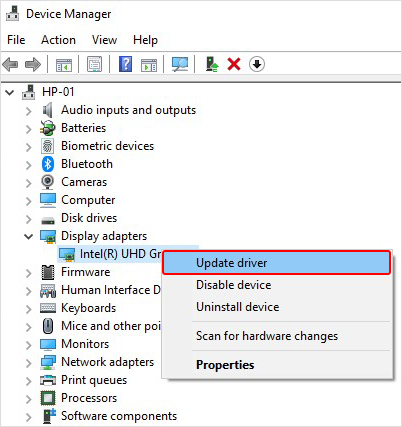
- Click Search automatically for drivers, and Windows 10 will start looking for the latest driver software available.
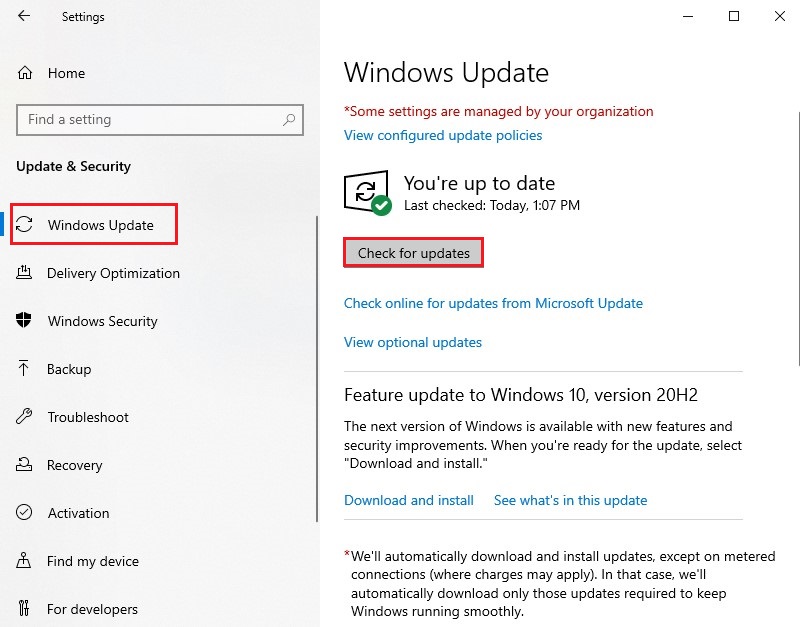
- Suppose you don’t find any latest driver. In that case, you can uninstall the buggy one and reinstall the compatible one either by visiting the device manufacturer’s website or by installing Windows Update. To do so, follow System Settings > Update & Security > Windows Update > Check for updates.
- After installing the Windows update, the latest and compatible device drivers will be downloaded automatically.
Method 2: Run an SFC Scan
- Open Command Prompt and click ‘Run as administrator.’
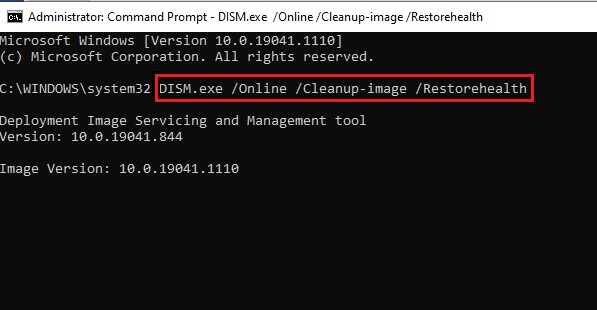
- In the command prompt window, type DISM.exe /Online /Cleanup-image /Restorehealthand hit Enter.
- Wait for a while till the system shows files that need to be fixed.
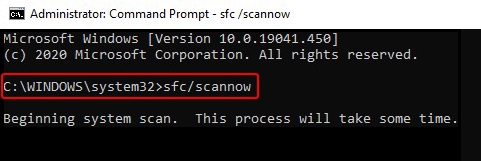
- Next, type SFC/Scannow and press Enter.
- Let the process end, and once done, close the window and reboot your system to check if the error is gone.
Method 3: Run CHKDSK Command
When you run the CHKDSK command, it scans and marks the bad sectors on the hard drive. But it prevents Windows from reading and store data from these bad sectors, which may cause you to lose your essential data. So, before performing this method, take a backup of your system (if possible).
- Run Command Prompt as an administrator and type CHKDSK /f/r/d: and press Enter.
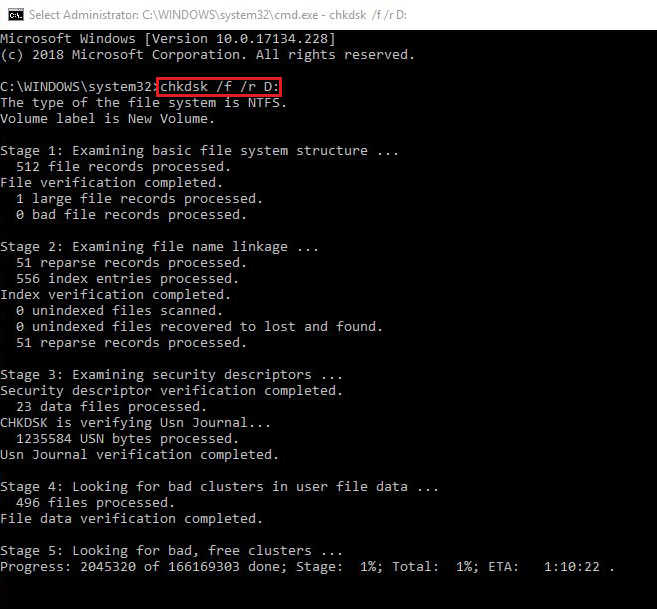
- It will take some time. Once done, close the window and restart your system to check if the PSHED.DLL is gone now.
If you don’t have any backup, you can restore data using powerful data recovery software, such as Stellar Data Recovery Professional. It is a robust and efficient DIY data retrieval software, which can retrieve all types of data, including files, folders, audio files, videos, photos, and more. It supports recovery from Windows systems and storage media drives, such as HDDs, SSDs, USB drives, etc.
Method 4: Run Windows Memory Diagnostic tool
- Type memory diagnostic in Windows Search Box to open Windows Memory Diagnostic tool.
- In the next window, select Restart now and check for problems (recommended).
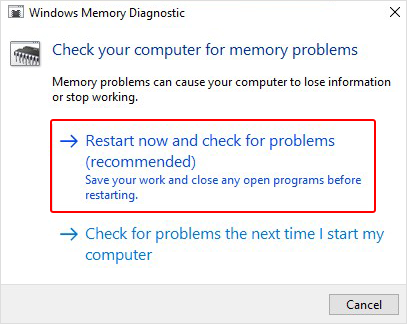
- The system will restart. The moment system will reboot, and a test will start checking up any problems with your RAM.
- Once the test is done, you’ll see the test results. If there is any further instruction given on the screen, follow them and fix the problem.
Method 5: Update from BIOS
- Restart your Windows 10 and enter the Automatic Repair environment using the steps to boot into safe mode.
- Once you reach the Automatic Repair environment, follow Advanced options > Troubleshoot.
- Next, click Advanced options > UEFI Firmware Settings

- Next, click Restart. The system will reboot and should now boot to BIOS.
- Now, note down the make and model of your motherboard. (You can find it in the motherboard’ user manual.)
- Open the System Information app to identify the BIOS current version. For this, type System Information in the search box, and after that, click System Summary. You’ll be able to see the BIOS version on display.
- Next, visit the motherboard’s manufacturer’s site, search for your system model, and then look for BIOS updates from the list of available downloads.
- Now, run the BIOS update. Once done, reboot your PC; the error should be solved.
Method 6: Perform System Restore
System Restore brings the system to default configuration or chosen restore point, due to which you may lose some of your programs, apps, system files, etc. So, either take a backup of your system data or use robust data recovery software.
After recovering the data, you can start performing system restore. Follow the given steps:
- Go to the Windows Search box and type Create a restore point.
- Afterward, navigate to the System Protection tab, and click System Restore.
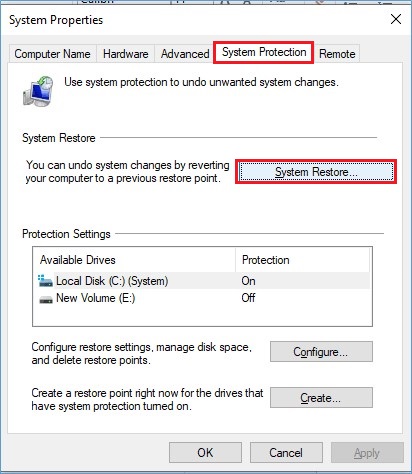
- Click Next > Next to proceed. Now, select a restore point from the available ones and click Scan for affected programs.
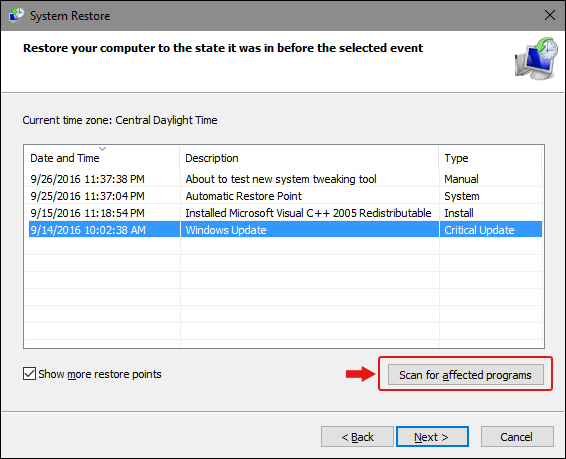
- The process will start looking for the programs and applications, etc., that will be affected.
- After this, click Finish and close the window.
- Now, reboot your Windows 10 and check if the PSHED.Dll BSOD error is fixed.
Method 7: Reset your Windows 10
If none of the above-discussed methods work for you, you’re left with nothing else but resetting your PC. Here, we’re not talking about factory reset, but resetting the system by removing all those programs, apps, files, or anything that may cause problems with your system.
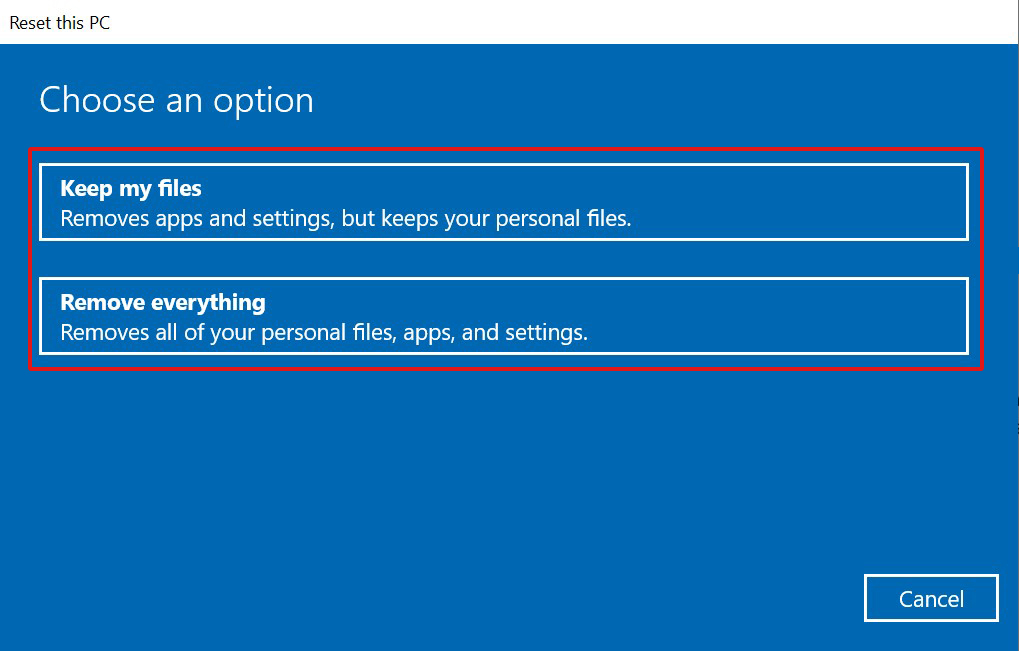
- Open System Settings and follow Update & Security > Recovery > Reset this PC > Get started.
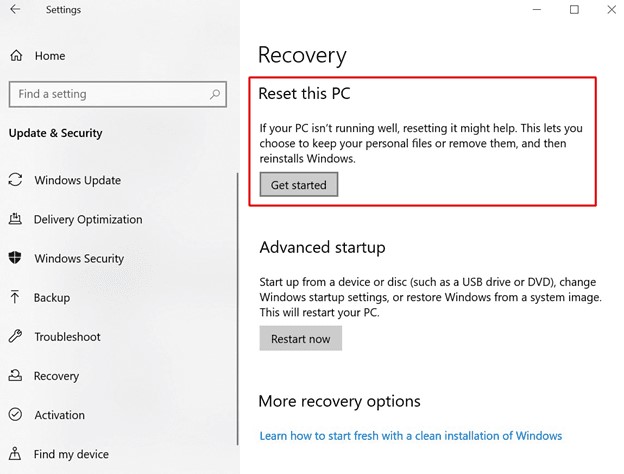
- Next, you’ll get to see two options – Keep my files and Remove everything.
- If you want to save your data, choose ‘Keep my files’ and proceed with the instructions given on screen.
- If the data is unimportant or you’ve already backed up your data, choose ‘Remove everything’. (It is recommended for the process to work).
- Afterward, click ‘Just remove your files’ and click Next.
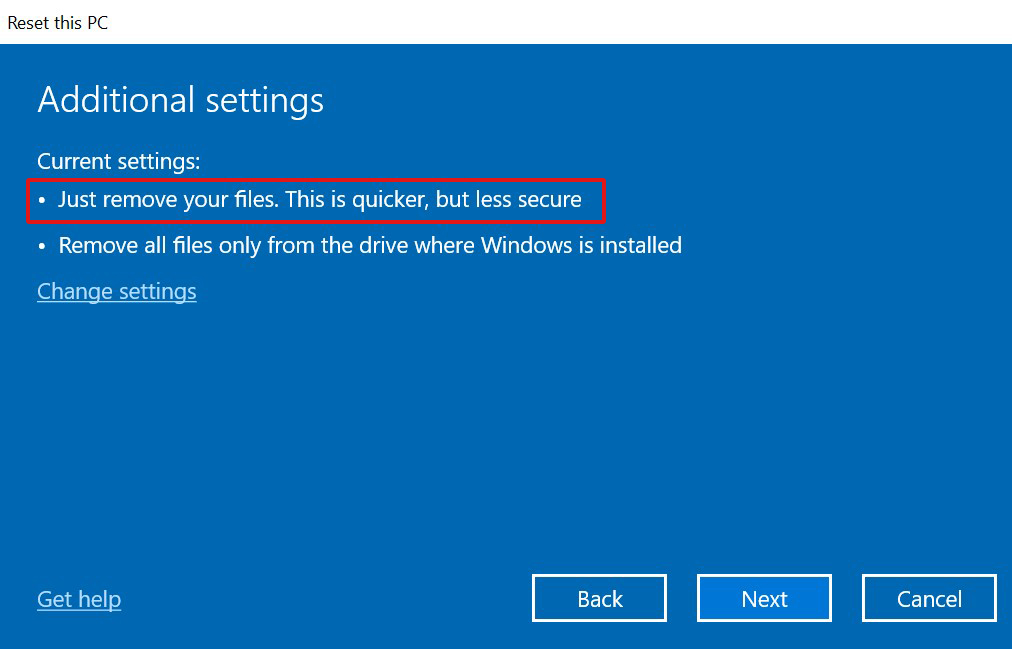
- Next, a warning message will appear on the screen. Click Next > Reset.
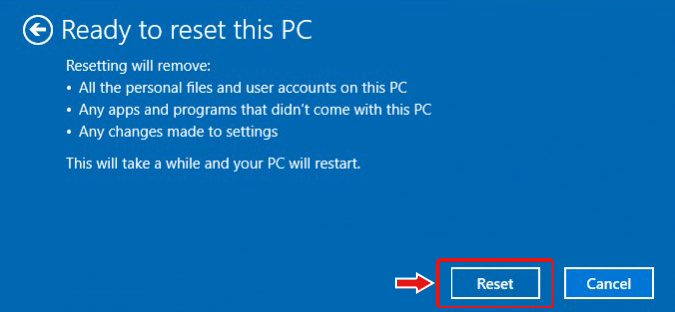
- If prompted with a confirming message, click Continue to initiate the process.
- After this, your Windows 10 will be as fresh as new, and hopefully, the error will be gone forever.
PSHED.DLL error on Windows 10 can occur due to multiple reasons, as discussed in this blog. However, the methods shared above may feasibly help you troubleshoot this blue screen error. Remember, some of these methods, such as running the CHKDSK command, performing a system restore, or resetting your system, may cause data loss. Hence, take back up of your system data before attempting them (if possible). Else, restore your essential data using professional data recovery software, such as Stellar Data Recovery Professional. It supports data recovery from unbootable, crashed, or even BSOD-affected Windows systems.
Was this article helpful?
YES0
NO
I will teach you how to fix the Pshed.dll BSOD error in Windows
Pshed.dll, short for Platform System Hardware ErrorDetection, is a DLL (Dynamic Link Library) file essential for the proper functioning and stability of the Windows operating system. This component plays a vital role as a hardware watchdog, monitoring and managing error messages related to physical components such as RAM, hard drive, CPU, and other peripheral devices.
Pshed.dll: A crucial component for detecting hardware errors in Windows
Pshed. dll, short for Platform System Hardware Error Detection , is a DLL (Dynamic Link Library) file essential for the proper functioning and stability of the Windows operating system. This component plays a critical role as a hardware watchdog, monitoring and managing error messages related to physical components such as RAM, hard drive, CPU, and other peripheral devices.
Key Functions of Pshed.dll
The main functions of Pshed. dll include:
System hardware monitoring: Pshed. dll performs continuous monitoring of the system’s hardware status, looking for any signs of errors or malfunctions.
Hardware error detection: If a hardware error is detected, Pshed. dll records the error information and sends it to the operating system.
Error message management: Pshed. dll is responsible for displaying the appropriate error messages to the user, informing them about the problem detected and possible solutions.
Error recovery assistance: Pshed. dll can help the operating system recover from hardware errors by starting repair processes or restarting the system if necessary.
Impact of Pshed.dll Failures
Failures or errors in Pshed. dll can manifest themselves in various ways, including:
-
Blue Screen of Death (BSOD): One of the most common symptoms of problems with Pshed. dll is the appearance of the dreaded BSOD, indicating a serious system error.
-
System freezes: The system may freeze or crash unexpectedly, preventing normal use.
-
Unexpected restarts: The computer may restart without warning, interrupting work or activities in progress.
-
Hardware-related error messages: You may see specific error messages that mention hardware components such as RAM, hard drive, or CPU.
Solutions for problems related to Pshed.dll
If you are experiencing issues related to Pshed. dll, there are some steps you can take to fix them:
Updating hardware drivers: Make sure you have the latest drivers installed for all hardware components on your system. Outdated or corrupt drivers can cause problems with Pshed. dll.
Running System File Checker (SFC): This Windows tool can scan and repair corrupted system files, including Pshed. dll.
Checking Hard Drive: A damaged hard drive can cause hardware errors affecting Pshed. dll. Run the Windows Disk Check Tool to detect and repair hard drive problems.
Reinstalling Windows: If the above measures do not work, the only solution may be to reinstall the Windows operating system. This will reinstall all system files, including Pshed. dll.
Preventing Problems with Pshed.dll
To prevent problems with Pshed. dll, it is advisable to follow these practices:
Keep your system up to date: Install all available Windows updates and hardware drivers to ensure proper system operation.
Perform malware and virus scans: Malware and viruses can damage system files, including Pshed. dll. Run regular scans with a trusted antivirus and antispyware.
Caring for system hardware: Avoid bumps, drops, or exposure to extreme temperatures that could damage hardware components.
Take regular backups: It is crucial to back up your data regularly so that you can recover it in case of a serious system error.
Pshed. dll is a fundamental component for the stability and proper functioning of the Windows operating system. If you experience problems related to this file, follow the recommendations mentioned to fix them and prevent their recurrence. It is important to note that some of the solutions mentioned may require advanced technical knowledge. If you are unsure how to proceed, it is recommended to consult with a qualified computer technician.
Other Articles
Readers help support Windows Report. We may get a commission if you buy through our links.
Read our disclosure page to find out how can you help Windows Report sustain the editorial team. Read more
Pshed.dll is a Dynamic Link Library system file that’s sometimes referenced in different Blue Screen of Death issues.
The dump files for those BSOD error messages specify that they’re caused by a Pshed.dll driver. There are various ways you can fix Pshed.dll BSOD errors and today we’ll show you the best methods to use.
What causes Pshed.dll BSOD?
There are a few reasons for the pshed.dll error on Windows 10. Below are the common ones:
- Outdated drivers: The Pshed.dll WHEA Uncorrectable Error is one of the frustrating BSoD issues that can be caused by outdated drivers. Your only way around this is to update your drivers.
- Corrupt system files: Faulty system files are one of the biggest causes of this Blue Screen of Death error. You need to repair and restore these files to get past this Pshed.dll NTOSKRNL.exe BSoD.
- Faulty memory: When your PC memory is faulty, it can also lead to this issue. You can confirm this by running the Memory Diagnostic tool.
How can I fix Pshed.dll blue screen errors?
Before proceeding to the fixes in this guide:
- Try to update your BIOS and see if it solves this issue.
If it does not work, you can explore the solutions below.
1. Repair system files
- Press the Windows key + S, type cmd, and select Run as administrator under Command Prompt.

- Type the command below and press Enter:
sfc /scannow
- Wait for the command to finish, copy and paste the command below, and hit Enter:
DISM.exe /Online /Cleanup-image /Restorehealth


SFC and DISM scans are the two repair tools for fixing system files. They should be able to fix the Pshed.dll issue. Here’s what to do if sfc /scannow isn’t working.
Also, some third-party Windows 10 repair utilities can fix a wide range of BSOD errors. Those system repair packages include scanning options for hardware, security, and stability issues.
After scanning your system, rest assured that you can fix these problems with just a click of a button.
2. Update system drivers
- Press the Windows key + X and choose Device Manager.
- Click the arrow next to the option to update driver for, right-click the driver there, and choose Update driver.

- Now select Search automatically for drivers and follow the instructions on the screen.
- Repeat these steps for all outdated drivers.


Pshed.dll BSOD errors, and others, can be caused by outdated drivers, so be sure to update them. Updating drivers manually is a tedious task, and this is why it’s better to use a dedicated tool.
⇒ Get Outbyte Driver Updater
3. Stop overclocking
- Press the Windows key + I to open the Settings app and click Update & Security.

- Select Recovery in the left pane and click the Restart now button under Advanced startup.
- When your PC restarts, choose Troubleshoot > Advanced options.

- Then, select UEFI Firmware Settings and the Restart option.
- When your PC restarts within UEFI or BIOS settings, you’ll need to locate and open the Overclocking section.
- Disable all overclocking settings from there.


NOTE
You should also uninstall any third-party overclocking software installed.
4. Run Windows Memory Diagnostic check
- Press the Windows key + R, type mdsched.exe, and click OK.
- Select Restart now and check for problems (recommended).

- Wait for the diagnosis to complete and follow any given recommendation.

If Windows Memory Diagnostic detected issues, you might need to replace your PC’s RAM module to resolve the Pshed.dll issue.
- ERROR_OPLOCK_SWITCHED_TO_NEW_HANDLE [BSoD Fix]
- How to Fix the ERROR_OPLOCK_HANDLE_CLOSED?
5. Perform system restore
- Press the Windows key + R, type rstrui.exe, and hit Enter.
- Tick the Choose a different restore point button and click Next.

- Choose a later restore point before you started getting the Pshed.dll error and click Next.
- Finally, click the Finish button to confirm the action.


In a case where you can’t get past the Pshed.dll issue, you might need to restore your PC to a later time to make it work.
The above resolutions could feasibly fix the majority of Pshed.dll Windows 10 BSOD errors for most users. Nevertheless, those who still need more potential fixes should check out the best BSOD repair software.
Did you find a different solution for this problem? Do not hesitate to let us know in the comments section below.
Matthew Adams
Windows Hardware Expert
Matthew is a freelancer who has produced a variety of articles on various topics related to technology. His main focus is the Windows OS and all the things surrounding it.
He is passionate about the tech world, always staying up-to-date with the latest and greatest. With an analytical view, he likes problem-solving, focusing on errors and their causes.
In his free time, he likes to read and write about history and tries to always develop new skills.