
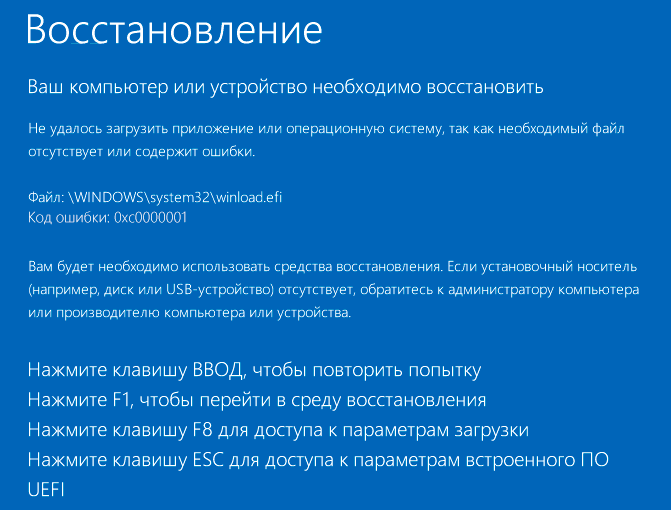
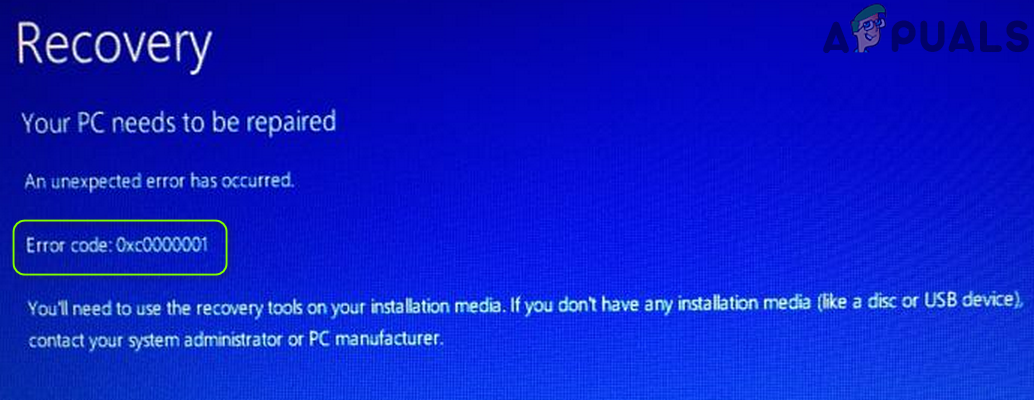
При включении компьютера или ноутбука вы можете столкнуться с ошибкой «Вашему ПК не удалось правильно загрузиться» или «Ваш компьютер необходимо восстановить» с кодом 0xc0000001, иногда — с указанием на файл Windows\System32\winload.efi, чаще — без указания каких-либо проблемных файлов, также возможен текст «Требуемое устройство не подключено или недоступно» или текст на английском языке: «Your PC couldn’t start properly», даже в русскоязычной версии Windows 11/10.
В этой инструкции подробно о том, как исправить ошибку 0xc0000001 при загрузке Windows 10 или 11 в различных ситуациях, чем она может быть вызвана и дополнительная информация, которая может оказаться полезной для решения проблемы.
Причины и способы исправления ошибки 0xc0000001
Среди основных причин ошибки 0xc0000001 — отсутствие необходимых для загрузки системных файлов (или невозможность доступа к ним, например, вследствие повреждения файловой системы на диске) и проблемы с оборудованием, либо его настройками.
Прежде чем приступать к предлагаемым далее методам решения проблемы, обратите внимание на следующие простые способы исправить ошибку, которые часто могут сработать:
- Если проблема появляется при первом включении компьютера или ноутбука после завершения работы, но исчезает при последующем, попробуйте отключить быстрый запуск Windows 10 (аналогично отключается и быстрый запуск Windows 11).
- Если на вашем компьютере несколько жестких дисков или SSD, а ошибка появилась после отключения одного из них, причиной ошибки может быть то, что на отключенном диске также находились необходимые системные файлы (даже если сама Windows 10 расположена на оставшемся диске). Здесь может пригодиться инструкция: Как перенести загрузчик Windows на другой диск.
- Если в БИОС в качестве первого устройства загрузки у вас выбран HDD или SSD, но также присутствует пункт Windows Boot Manager, попробуйте выбрать его вместо физического накопителя.
- В случае появления ошибки после обновления БИОС/UEFI или сброса его настроек, проверьте, не включён ли контроллер VMD в настройках (обычно в разделах System Agent Configuration — VMD Setup Menu, Storage Configuration — VMD Configuration или аналогичных), попробуйте его отключить (установить в Disabled), сохранить настройки и перезагрузить компьютер.
Если предыдущие пункты не подходят к вашей ситуации, приступаем к исправлению ошибки «Вашему ПК не удалось правильно загрузиться» или «Ваш компьютер необходимо восстановить» с кодом 0xc0000001.
Вход в среду восстановления Windows 11/10
Почти для любого из далее описанных методов нам потребуется войти в среду восстановления Windows. Как правило, при ошибке 0xc0000001 не удается использовать нажатие клавиши F8 для открытия параметров загрузки или (если предлагается) F1 для прямого входа в среду восстановления. Поэтому придётся использовать следующий метод:
- Создайте где-то на другом компьютере или ноутбуке загрузочную флешку или диск с Windows 10 (как создать: Загрузочная флешка Windows 10, Загрузочная флешка Windows 11) и загрузитесь с неё.
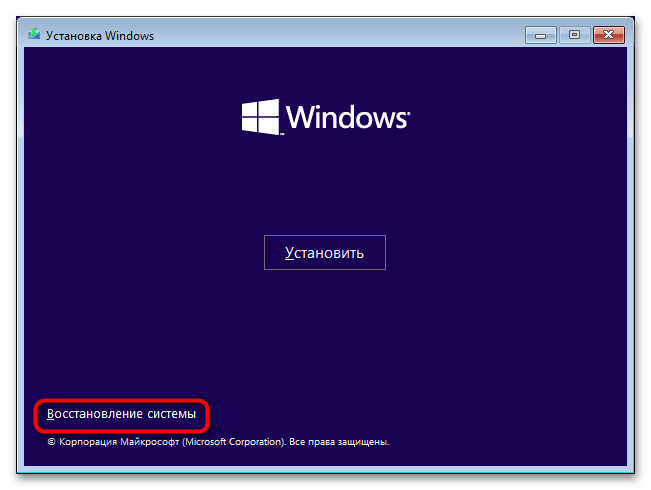
- Вам будет предложено нажать любую клавишу для загрузки с флешки, а после этого запустится программа установки Windows.
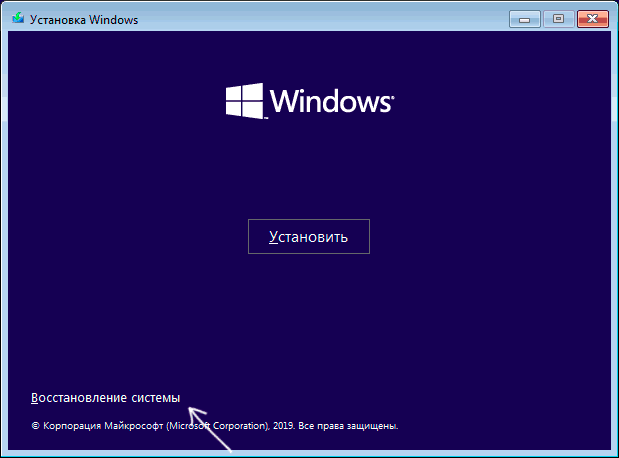
- Наша задача — нажать «Далее» на экране выбора языка, а на следующем экране нажать по пункту «Восстановление системы» внизу слева.

В результате будет загружена среда восстановления, здесь мы можем попробовать:
- Автоматическое восстановление при загрузке.
- Проверку файловой системы HDD или SSD на ошибки.
- Восстановление системных файлов Windows.
- Использовать точки восстановления.
- Попробовать перезаписать загрузчик.
А если ни один из указанных пунктов не сработает, попробовать проверить, помогут ли решить проблему действия с оборудованием компьютера или ноутбука.
Автоматическое восстановление при загрузке
Этот способ редко оказывается работоспособным при рассматриваемой ситуации, но его следует попробовать в первую очередь, так как это не займет много времени, не требует особенных навыков и иногда всё-таки срабатывает:
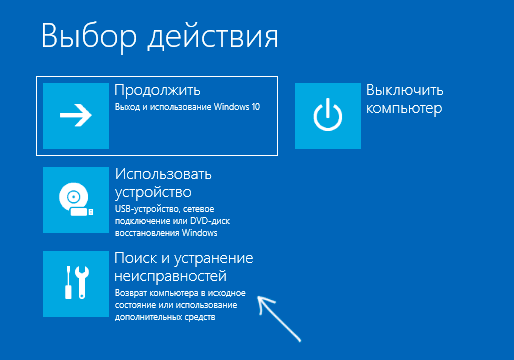
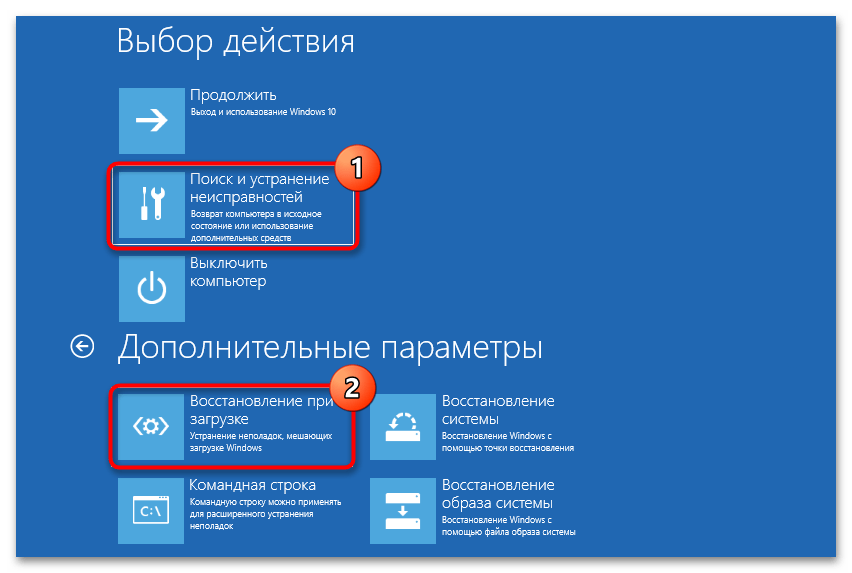
- В среде восстановления перейдите в «Поиск и устранение неисправностей».

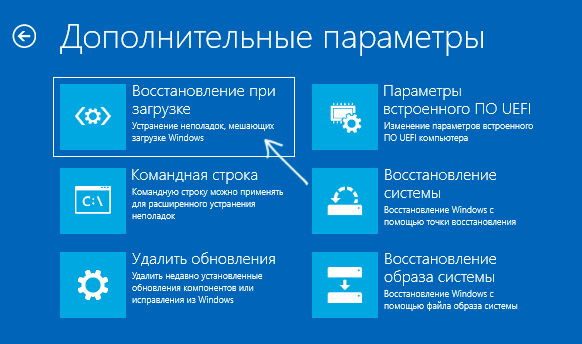
- Нажмите «Восстановление при загрузке» и выберите ОС Windows 10 или Windows 11.

- Дождитесь завершения автоматической диагностики и исправления ошибок.
- Даже если вы увидите сообщение о том, что «Восстановление при загрузке не удалось восстановить компьютер», все равно попробуйте перезагрузить компьютер уже не с флешки, а выбрав Windows Boot Manager (при наличии) или системный диск в качестве первого устройства загрузки в БИОС/UEFI.
Проверка файловой системы системного диска HDD или SSD на ошибки
Иногда причиной ошибки 0xc0000001 являются ошибки файловой системы на диске и я не рекомендую пропускать этот шаг, хотя бы потому, что при таких ошибках следующий способ исправления ошибки также может оказаться безрезультатным:
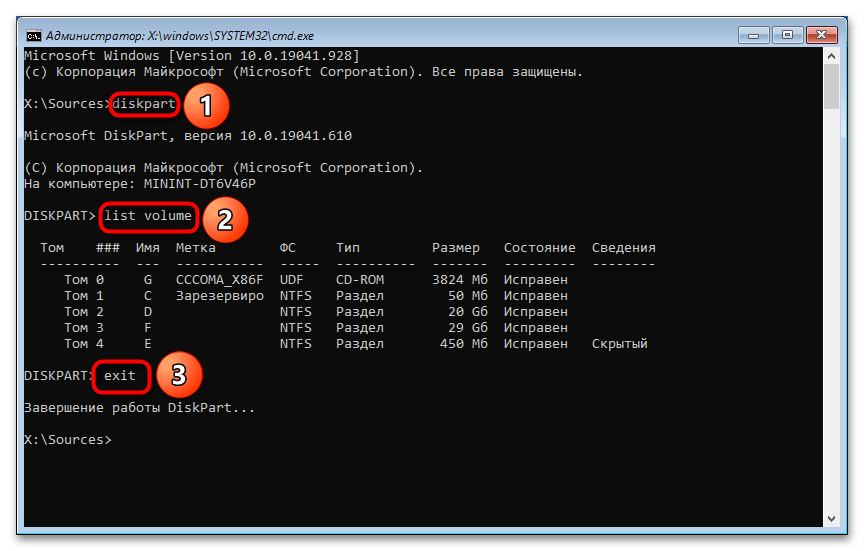
- В среде восстановления в разделе «Поиск и устранение неисправностей» выберите «Командная строка» для запуска командной строки. Или просто нажмите клавиши Shift+F10 (иногда на ноутбуках — Shift+Fn+F10) прямо в программе установки Windows 11/10, чтобы запустить командную строку.
- Введите по порядку команды (переключение языка ввода будет выполняться сочетанием клавиш Alt+Shift):
diskpart
list volume
exit
- В результате выполнения второй команды вы увидите список разделов диска, проверьте букву диска, на котором расположена Windows 11 или 10 — иногда в среде восстановления она отличается от стандартной C:, в этом случае в следующей команде используйте актуальную букву раздела диска.

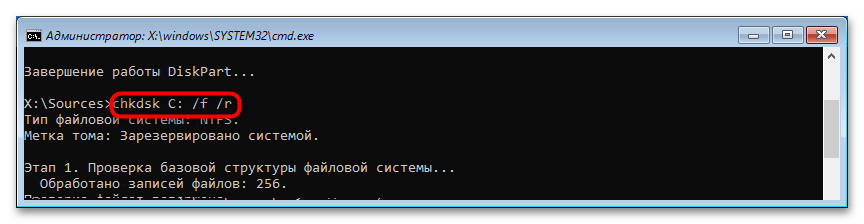
- Введите команду
chkdsk C: /f
для запуска проверки файловой системы системного раздела диска на ошибки.

После проверки, если chkdsk сообщит об исправлении ошибок, попробуйте перезагрузить компьютер в обычном режиме.
Восстановление системных файлов Windows 10
Если причиной ошибки оказалось повреждение системных файлов Windows, например, удаление Windows\System32\winload.efi, с помощью тех же шагов, что были описаны выше, перейдите в командную строку, после чего используйте команду (с правильной буквой системного диска):
sfc /SCANNOW /OFFBOOTDIR=C:\ /OFFWINDIR=C:\Windows
Внимательно вводите все пробелы (например, перед offwindir) и учитывайте, что после начала сканирования системы у вас может появиться ощущение что процесс завис. Это не так — наберитесь терпения и дождитесь завершения операции.
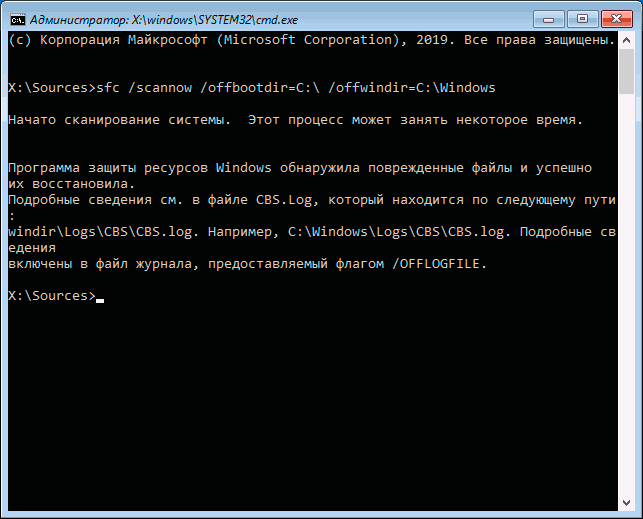
Если в результате вы увидите сообщение о том, что программа защиты ресурсов Windows обнаружила поврежденные файлы и успешно их восстановила — пробуем загрузить компьютер или ноутбук в обычном режиме, уже не с флешки — возможно, запуск пройдёт успешно.
В случае, когда предыдущие подходы не помогают, попробуйте:
- Использовать точки восстановления системы при их наличии. В среде восстановления — Поиск и устранение неисправностей — Восстановление системы. Есть и другие методы воспользоваться точками восстановления.
- Вручную восстановить загрузчик Windows 10 или Windows 11.
Возможные аппаратные причины ошибки 0xc0000001 при загрузке компьютера или ноутбука
Среди возможных причин проблем с загрузкой с кодом ошибки 0xc0000001 могут быть и аппаратные проблемы. Среди распространенных вариантов:
- Проблемы с оперативной памятью. Можно попробовать отключить любой разгон памяти (если включался), а также оставить только один модуль RAM и проверить, исчезнет ли ошибка. Если нет — попробовать поставить вместо него другой и повторить проверку.
- Проблемы со шлейфами подключения дисков: можно попробовать поменять кабели SATA, убедиться что они плотно подключены как со стороны накопителя, так и со стороны материнской платы.
- Проблемы с питанием, а точнее его недостатком. Учитывайте, что выходящий из строя блок питания может продолжать работать, но быть не в состоянии обеспечить необходимую мощность. При наличии возможности можно попробовать отключить необязательные потребители (например, дискретную видеокарту, оставив только интегрированное видео).
- По некоторым отзывам иногда причиной оказываются Ethernet и Wi-Fi адаптеры и срабатывает их физическое отключение или отключение в БИОС (при наличии там соответствующих опций).
Если один из способов помог вам исправить ошибку 0xc0000001, поделитесь в комментариях, какой именно: такая статистика может быть полезной для других пользователей.
The Winload.EFI error (0xc0000001) causes your computer to halt during startup, displaying a blue screen with a message that your PC needs to be repaired. This error generally means that the Windows Boot Manager (BOOTMGR) is unable to locate the necessary boot files, particularly the Winload.EFI file, which is essential for starting the operating system.
The most common cause of this issue is a corrupted or missing boot file, often due to improper shutdowns, disk errors, or changes in the system’s boot configuration. Additionally, issues with UEFI firmware or damaged system files can also trigger this error.
On a Windows 8/8.1/10 system, the error usually appears in the following forms:
Your PC needs to be repaired. The application or operating system couldn’t be loaded because a required file is missing or contains errors. File: \windows\system32\winload.efi Error code: 0xc000***
or:
Your PC needs to be repaired. An unexpected error has occurred. Error code: 0xc0000001. You’ll need to use the recovery tools on your installation media. If you don’t have any installation media, contact your system administrator or PC manufacturer.
How to Boot into BIOS to Change Boot Order
You must know how to boot and change the boot order since this will be needed to perform the solutions below. Restart your computer. Enter your computer’s BIOS (or UEFI) settings as soon as it starts up. The key that you need to press to enter these settings depends on the manufacturer of your computer’s motherboard and can be anything from Esc, Delete, or F2 to F8, F10, or F12, with F2 being the most common. This information is displayed on the POST screen and in the manual supplied with your system. A quick Google search asking “how to enter BIOS” followed by your model number will also list the results.
Method 1: Disable Secure Boot
If you have a UEFI-based computer instead of the old traditional BIOS, the issue can be caused by a certain setting in UEFI called Secure Boot. It can stop your system from accessing the winload.efi file, causing this error to appear. Windows 8 and later versions have this feature enabled by default.
To disable Secure Boot, boot to BIOS or UEFI. The UEFI setup user interface differs by model. Generally, look for Secure Boot, which can be found in its own separate section, or under the Security tab, the Boot tab, or the Authentication tab, depending on your system model. Consult your system model’s manual to know exactly where it is. Once you find the Secure Boot option in a tab, disable it or turn it off.

Save the UEFI settings and exit. Now boot up your system normally. If you still get the same error, move on to the next solution.
Method 2: Repair Boot Record
Restoring the Boot Record fixes the Winload.EFI error by correcting corrupted or missing boot configurations, enabling the system to locate necessary boot files. This process rewrites the Master Boot Record (MBR), Boot Configuration Data (BCD), and related structures that control startup, re-establishing the pathways the Windows Boot Manager uses to load the operating system, effectively resolving the 0xc0000001 error.
Windows 7 Users
In order to continue, you will need to start Windows in repair mode. For that, (see steps here).
Once you boot to start-up repair and see the “System Recovery Options,” choose Command Prompt. Once the command prompt’s black window appears, type the following commands and press Enter after each line.
bootrec /fixboot

bootrec /scanos

bootrec /fixmbr

bootrec /rebuildbcd
After the commands have executed successfully, restart your system and check if the issue is still there.
If the issue is still there, then repeat the above procedure and execute the commands 3 times each. Now check if the issue is resolved. If not, move on to the next solution.
Windows 8/8.1/10
To start Windows 8/8.1 and 10 in Repair Mode, see steps here.
In the advanced options, click Command Prompt.
Once the command prompt’s black window appears, type the following commands and press Enter after each line.
bootrec /fixboot

bootrec /scanos

bootrec /fixmbr

bootrec /rebuildbcd
After the commands have executed successfully, restart your system and check if the issue is still there.
If the issue persists, then repeat the above procedure and execute the commands 3 times each. Now check if the issue is resolved. If not, move on to the next solution.
Method 3: Perform a Startup Repair
You may get the error code 0XC0000001 if the startup items of your system are corrupt. In this context, performing a startup repair of the system may solve the problem. But before that, make sure the system’s boot order in the BIOS settings is properly configured (the Windows drive is first in the boot order).
- Power off your system (if it is powered on) and then power it back on.
- When the Windows logo appears (with spinning dots), press and hold the power button to forcibly shut down the system.
- Repeat the process thrice and at the third time, your system may boot into the Recovery Environment. If so, select Troubleshoot.
- Now open Advanced Options and select Startup Repair
- Once Startup Repair has completed its course, check if the system is clear of the error code 0XC0000001.
- If the issue persists, create a Windows 10 bootable USB and boot system through that USB device (if you cannot boot by using the USB, then try different USB ports on the system and also make sure Secure Boot is disabled in the system’s BIOS).
- Now select Repair Your Computer and open Troubleshoot.
- Then select Advanced Options and open Startup Repair.
- Now follow the prompts on the screen, and once the Startup Repair has completed its course, reboot your PC to check if the 0XC0000001 issue is resolved.
Method 4: Uninstall the Buggy Update
Microsoft has a very long history of releasing buggy updates, and the issue at hand can also be a result of the same. In this case, removing the buggy update (either Quality or Feature Update) may solve the problem.
- Boot your system into the Recovery Environment as discussed in solution 1 and open Troubleshoot.
- Now select Advanced Options and open Uninstall Updates.
- Then either select Uninstall Latest Quality Update or Uninstall Latest Feature Update.
- Now let the uninstallation complete, and then reboot your PC to check if the system is clear of the BSOD error.
Method 5: Perform a CHKDSK Scan
Running a CHKDSK scan can pinpoint and repair disk errors that might be causing the Winload.EFI error. Over time, bad sectors, file system corruption, or other disk-related issues can damage essential boot files, leading to the 0xc0000001 error.
CHKDSK (Check Disk) examines the integrity of your hard drive, detects these issues, and attempts to fix them.
- Boot your system in the Recovery Environment or (preferably) use Repair Your Computer by booting your system through a Windows 10 bootable USB (as discussed in solution 1) and open Troubleshoot.
- Now select Advanced Options and open Command Prompt.
- Then execute the following to find the drive letter of the system drive (the drive letter may not be the same as shown in Windows):
Diskpart
- Now list down the partitions by executing the following:
list vol
- Now check for the drive letter (e.g., E drive) of the OS drive (most probably, having Boot in the Info column, or otherwise use Dir in the Command Prompt to check the contents of the partition) and then close the Diskpart by executing the following:
Exit
- Then navigate to the system’s drive (in the Command Prompt) by entering the drive letter followed by a colon (e.g., if the system drive is C, then enter C: and hit Enter).
- Now run the Chkdsk scan by executing the following (where C is the system drive):
chkdsk C: /r
- Then wait till the Chkdsk scan is completed and, once done, boot into Windows and check if the BSOD error code 0XC0000001 is resolved.
If the above process is too technical for you, then attach the problematic system’s hard drive to another PC and perform the Chkdsk scan there to check if the BSOD issue is resolved.
Method 6: Use the BCDBoot Utility
Using the BCDBoot utility re-establishes the link between system files and the Windows Boot Manager, resolving the Winload.EFI error. It copies essential boot files to the system partition and creates a new Boot Configuration Data (BCD) store, ensuring the Windows Boot Manager can load these files correctly.
This is particularly useful when the existing BCD is corrupted or missing, allowing you to rebuild the boot environment and fix the 0xc0000001 error.
- Type diskpart and press Enter.
- Type list volume and press Enter.
- Under the label row, find the label System Reserved and note its corresponding Volume number.
- Now type select Volume=N and press Enter, where N is the Volume number you noted earlier.
- Now type assign letter=w and press Enter.
- Type exit and press Enter.
- Type bcdboot c:\Windows /s w: /f uefi and press Enter.
Now restart your system and check if the issue is resolved. If not, proceed to Method 4.
Method 7: Disable Anti-Malware Protection
- Power on your system, then forcefully shut it down when you see the Windows logo. Repeat the process a few times until you get the Recovery screen.
- Click See advanced repair options.
- Then click on Troubleshoot > Advanced Options.
- Click Startup settings in Advanced Options.
- In the startup settings screen, click on Restart.
- The Startup Settings menu will appear after the restart.
- Now press 8 on your keyboard. Your Windows will launch with anti-malware disabled only for this session.
Solution 8: Perform a System Restore
The error code 0XC0000001 could be a result of a recent (unwanted) change to the system, and restoring the system to an earlier point in time when it was operating fine may solve the problem.
- Boot your system into the Recovery Environment (as discussed in solution 1) and open Troubleshoot.
- Now open Advanced Options and select System Restore.
- Then follow the prompts to restore the system to an earlier point in time. When the process is complete, reboot your PC to check if the system is clear of the 0XC0000001 error.
You can also use the following in the Command Prompt to perform the System Restore (where C is the system drive, which you can find by following the steps mentioned in the Chkdsk solution):
rstrui.exe /OFFLINE:C:\Windows
Method 9: Rename the Corrupt Registry Files and Copy the Backup Registry Files
You may encounter the 0XC0000001 error if some of the essential files (especially those related to the system’s registry) are corrupt. In this scenario, renaming the corrupt files and placing the original OS files (from the registry backup folder) may solve the problem.
- Launch the Command Prompt in the Recovery Environment (as discussed in solution 3) and execute the following (where C is the system drive) one by one (make sure to press the Enter key afterward):
Ren C:\windows\system32\config\SAM SAM.BAK

Ren  C:\windows\system32\config\SYSTEM SYSTEM.BAK

Ren  C:\windows\system32\config\SECURITY SECURITY.BAK

Ren  C:\windows\system32\config\DEFAULT DEFAULT.BAK

Ren  C:\windows\system32\config\SOFTWARE SOFTWARE.BAK

Copy  C:\Windows\System32\config\RegBack\SAM C:\windows\system32\config

Copy  C:\Windows\System32\config\RegBack\SYSTEM C:\windows\system32\config

Copy  C:\Windows\System32\config\RegBack\SECURITY C:\windows\system32\config

Copy  C:\Windows\System32\config\RegBack\DEFAULT C:\windows\system32\config

Copy  C:\Windows\System32\config\RegBack\SOFTWARE C:\windows\system32\config
- Once the above commands are executed, reboot your PC into Windows and check if the BSOD issue is resolved.
Method 10: Perform System Operations in Command Prompt
There are different cmdlets (like Bootrec, SFC, DISM, etc.) in the Command Prompt that can be used to solve the current BSOD issue.
Perform the SFC and DISM Scans
- Execute the following in the Recovery Environment’s Command Prompt (where D is the system drive):
sfc /scannow /offbootdir=d:\ /offwindir=d:\windows
- Once the scan is complete, type Exit in the Command Prompt and boot your system into Windows to check if the system is clear of the BSOD issue.
- If the issue persists, then check if performing a DISM scan to repair Windows (preferably, after attaching your system’s hard disk to another PC) solves the problem.
Disable Hibernation
If the issue started to occur after hibernating the system, then disabling hibernation may solve the problem.
- Launch the Command Prompt in the Recovery Environment and navigate to the system partition (as discussed in solution 3).
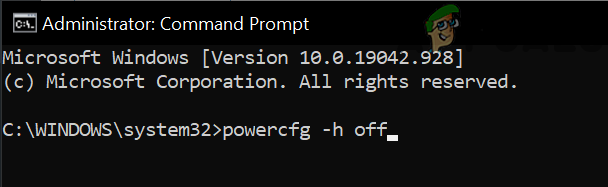
- Now execute the following cmdlet to disable hibernation:
powercfg -h off

Disable Hibernation in the Command Prompt - Then reboot your PC and check if the system is clear of the BSOD issue.
Rename the EFI Folder
- Launch the Command Prompt in the Recovery Environment and navigate to the system drive.
- Now execute the following:
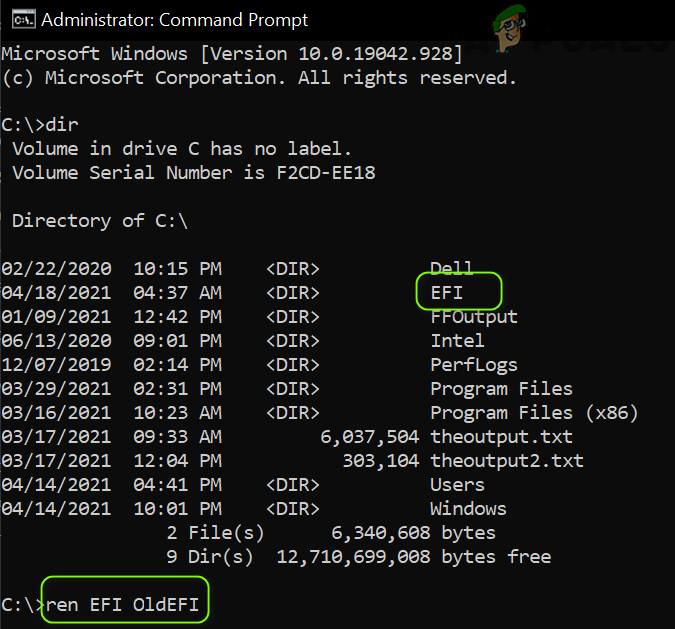
dir
- Then check if the EFI directory is shown. If so, then rename it by executing the following:
ren EFI oldEFI

Rename the EFI Folder in the System Drive - Now reboot your PC and check if the system is clear of the 0XC0000001 issue.
- If the issue persists, then check if deleting the EFI folder by executing the following in the Command Prompt in the Recovery Environment (make sure you are executing the command in the system drive):
rd /s C:\oldEFI
If the issue persists, then you may have to perform a clean installation of Windows either on a different partition/disk or after completely repartitioning the problematic drive. If you cannot back up the system drive data in any other way, then it will be better to use the Custom Install option (the system drive data will be in the Windows.old folder) when performing the clean installation of Windows.
,
If your Windows 10/11 PC does not start and goes to the recovery screen with error code 0xc0000001 «Your PC Couldn’t start properly», continue reading below to fix the problem.
The BSOD error 0xc0000001, usually appears after a Windows Update or a BIOS update. In other cases the problem appears after an improper computer shutdown or because of a damaged disk.

In this tutorial you ‘ll find instructions to resolve the Error 0xc0000001: Your PC Couldn’t start properly, in Windows 11, 10 or 8 OS.
How to FIX: Your PC Couldn’t start properly with Error code 0xc0000001, on Windows 10/8/7 OS.
Suggestion (Important): Before you continue to the methods below…
- Enter BIOS SETUP.
- Locate the SATA Configuration setting. (Commonly named as «SATA Mode» or «SATA Controller Mode» or «SATA Operation» or «Configure SATA as«).
- If the SATA Mode is set to RAID then change it to AHCI. If the SATA Mode is set to AHCI then change it to IDE.
- Save Changes and Exit BIOS Settings.
- Try to boot in Windows. If Windows doesn’t start, then revert the SATA setting back to what it was and proceed to apply the methods below.
Notes:
1. If you receive the 0xc0000001, on a system that you have used software mirroring for fault tolerance, then break the mirror first, with the DISKPART tool in Recovery Environment. Detailed instructions to do that can be found in Method-2 in this tutorial.
2. Requirement: In order to resolve the 0xc0000001 Boot error, you need to start your computer from a Windows USB installation/recovery media. If you don’t own a Windows Installation Media, then you can create one (corresponding to your Windows Edition and Version) directly from Microsoft.
- How to create a Windows 10 USB boot media.
- How to create a Windows 11 USB boot media.
Method 1. Fix Error 0xc0000001 with Startup Repair
1. Power on your PC and boot from a Windows 10 installation/recovery media.
2. At the Windows Setup screen choose Repair > Troubleshoot > Advanced Options > Startup Repair.

3. Click on Windows 10 and when the repair is completed, remove try to boot to Windows normally.

Method 2. Fix Boot Configuration Data using BOOTREC tool.*
* Note: This method usually works on Windows 7 & 8 systems.
1. Power on your PC and boot from a Windows 10 installation/recovery media.
2. At the Windows Setup screen press SHIFT + F10 to access command prompt, or choose Next –> Repair your computer –> Troubleshoot –> Advanced Options –> Command Prompt.

3. In command prompt type the following commands in order:
- bootrec /fixmbr
- bootrec /fixboot
* Note: If after executing the above command you receive that «Access is denied» give this command «bootsect /nt60 sys» and continue below.
- bootrec /scanos *
* Note: If after executing the «bootrec /scanos» command you receive that «Total identified Windows installations = 0» then give the following commands, before you continue to next step:
-
- bcdedit /export C:\bcdbackup
- C:
- cd boot
- attrib bcd -s -h –r
- ren C:\boot\bcd bcd.old
4. Rebuild Boot Configuration Data:
- bootrec /rebuildbcd
5. Press «A» to Add installation to boot list and press Enter.

6. Close all windows and restart your computer. If Windows still fails to boot, then try Method 2.
Method 3. Repair Boot Configuration Data using BCDBOOT tool.
* Note: This method usually works on Windows 10/11 systems.
1. Power on your PC and boot from a Windows 10 installation/recovery media.
2. At the Windows Setup screen press SHIFT + F10 to access command prompt, or choose Next –> Repair your computer –> Troubleshoot –> Advanced Options –> Command Prompt.
3. In command prompt type the following commands in order:
- diskpart
- select disk 0
- list partition
4. Note the size in Megabytes of System Partition. *
* e.g. As you can see at the screenshot below, the partition size of System partition is 99 MB.

5. Find out the volume number of the system partition * and the drive letter of OS drive,** by typing this command:
- list volume
* At the previous step we found that the system partition is 99 MB. So, from the screenshot below, we understand that the System partition is the «Volume 2«.
** The OS Drive, is the drive where the Windows installed. Commonly this is the «Volume 0», the largest volume on the list. At this example the OS drive is located at «C» drive letter.

6. Select the System partition and assign a drive letter to it. Then exit DISKPART:
- select volume 2 *
- assign letter=Z
- exit
* Note: Change the Volume number according your case.

7. Finally, in command prompt give this command:
- bcdboot C:\windows /s Z: /f ALL
* Note: Replace the letter «C«, according the drive letter of the OS volume at your case.

8. Close all windows, remove the Windows Recovery media and try to boot in Windows normally. If Windows doesn’t boot, then follow the same steps, but at the end, type this command:
- bcdboot C:\windows /s Z: /f UEFI

Additional help: If you cannot fix the problem using the above methods, read this article: How to Repair Windows 10/11 without losing files.
That’s it! Which method worked for you?
Let me know if this guide has helped you by leaving your comment about your experience. Please like and share this guide to help others.
If this article was useful for you, please consider supporting us by making a donation. Even $1 can a make a huge difference for us in our effort to continue to help others while keeping this site free:
- Author
- Recent Posts
Konstantinos is the founder and administrator of Wintips.org. Since 1995 he works and provides IT support as a computer and network expert to individuals and large companies. He is specialized in solving problems related to Windows or other Microsoft products (Windows Server, Office, Microsoft 365, etc.).
Have you ever encountered such an error that you cannot boot into your Windows system and received an error code of 0xc0000001? If you have, how do you fix the problem? Or, are you looking for solutions for such an issue? Anyhow, it is worth to read this article and learn something useful for you.
Messages Including Error Code 0xc0000001 Windows 10
This is a common Windows 10 error code that usually occurs on startup. It may appear in the following forms:
Error Message 1
In Windows Boot Manager, an error says that “Windows failed to start. A recent hardware or software change might be the cause” while giving the error status: 0xc0000001 and error info: A required device isn’t connected or can’t be accessed.
Error Message 2
In new operating systems, you may get an error message in the Windows Recovery Environment. It shows that your PC couldn’t start properly and a required device isn’t connected or can’t be accessed while giving the error code: 0xc0000001.
Error Message 3
Or, you may get this warning after the loading of the system: “Security Accounts Manager initialization failed because of the following error: A device attached to the system is not functioning. Error Status: 0xc0000001.”

The error message may vary in different situations. Yet, no matter what error message it is, the error code is always “0xc0000001”.
Tip: Besides the problem in the above, there are many other errors you may encounter while using Windows or its programs, such as the “Your virus & threat protection is managed by your organization” error of Windows Defender.
Causes of Error Code 0xc0000001
This startup issue may be caused by one or more of the below reasons. Or, it may be caused by other uncommon reasons.
#1 Damaged System Files
Due to virus attacks, hard disk write errors, power outages, etc., the boot-related system files may get damaged or the majority of system files will be corrupted. Once the system files are corrupted or damaged, it may cause problems like the error 0xc0000001 in error message 1 in the above.
#2 Damaged SAM File
Security Accounts Manager file contains the user credential information that is crucial in Windows booting procedure. If the SAM file is damaged or gone, sure the boot process can’t complete and you can’t boot into your computer. An error message similar to error message 3 will appear to you.
#3 Damaged RAM
If the random-access memory storage is destroyed due to some causes like mentioned in the above content, still, you won’t start your machine successfully and will be given the issue code 0xc0000001 like in error message 2 above.
According to the causes above, you can choose the related solution below to fix your problem. If you can’t figure out the cause of your error or your case is an uncommon one, then, you can try the following fixes one by one until you get your issue solved.
Tip: Don’t forget to reboot your computer every solution you have tried to see whether you can succeed or not. If you can, it means that your problem is fixed. If not, just move to the next solution.
Solution 1. Use sfc /scannow to Check System Files
If your problem is caused by damaged system files, you should make use of the Windows built-in System File Checker function to deal with your issue.
1. Connect an installation disk to your computer and boot from it.
2. Select your language, time and keyboard input, etc. and choose Repair your computer and go on.
3. Navigate to Troubleshoot > Advanced options > Command Prompt.
4. In the CMD, input sfc /scannow and press Enter key.
5. Wait until the task finishes.

Solution 2. Copy SAM File from Repair Folder
If you get the 0xc0000001 error due to a damaged SAM file. Then, you can handle the error by copying the integrated SAM file from the Repair Folder.
1. Boot from the installation disk.
2. Go to Repair your computer > Troubleshoot > Advanced Options > Command Prompt.
3. In the CMD, type copy C:\Windows\Repair\Sam C:\Windows\System32\Config and press Enter.
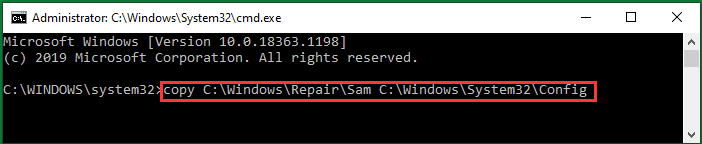
4. If it asks you whether you want to overwrite the original file or not, just input Y (yes).
Note: This operation will remove all credentials (username and password) that your current system has. And it will revert to the original username added when you install Windows.
Solution 3. Check RAM
If your issue is caused by the damaged RAM, you should check it for solutions. Check the newly added RAM modules. Replace the new RAM modules to see whether you can log into your system or not. If yes, it most likely is the new RAM module that causes you the error. If not, keep checking for other RAM modules.
If your situation is none of the above three, you may try the following methods.
Solution 4. Run chkdsk
If the file system of your system disk is damaged, you can also receive the error 0xc0000001. To fix it, just follow the below steps.
1. Boot from your installation disk.
2. Move to Repair your computer > Troubleshoot > Advanced Options > Command Prompt.
3. Type chkdsk c: /f and press Enter.
4. Wait until it completes.
Solution 5. Run Windows Startup Repair
Or, you can rely on the startup repair feature of the system itself to fix your problem.
1. Still, you need to boot from your installation disc.
2. Then, navigate to Repair your computer > Troubleshoot > Advanced Options > Startup Repair.

3. It will start diagnosing your computer. Wait until it finishes.
Besides, there are still some other ways to solve the Windows error 0xc0000001, like reset your PC, check system disk integrity, uninstall suspicious programs, remove problematic files, and so on. No matter which method you take, hope you can solve your problem ASAP.
BTW, it is necessary to take action to avoid such errors. For example, make full use of the built-in Windows Defender to protect your computer and keep it safe and sound. Moreover, it is wise to back up your crucial data regularly to avoid losing data during such errors.
Featured Photo: Bloomberg / Getty Images
Все способы:
- Вариант 1: Восстановление при загрузке
- Вариант 2: Проверка и восстановление файловой системы
- Вариант 3: Восстановление системных файлов
- Вариант 4: Проверка оперативной памяти
- Вариант 5: Откат к точке восстановления
- Вопросы и ответы: 0
Причин, по которым при загрузке Windows 10 пользовать может столкнуться с ошибкой 0xc0000001, существует достаточно много, но основной из них является отсутствие доступа к загрузочным файлам, либо отсутствие самих файлов. Также ошибка может появиться вследствие повреждения оборудования, например жесткого диска. Соответственно, существует несколько основных решений проблемы.
Вариант 1: Восстановление при загрузке
Назвать эффективным данный способ можно лишь с натяжкой, тем не менее, начинать рекомендуется с него, как с наиболее простого.
- Загрузите компьютер с установочной флешки/диска и когда на экране появится окошко мастера-установщика, нажмите в нём «Далее», а затем «Восстановление системы».
Читайте также: Настраиваем BIOS для загрузки с флешки
- В окне среды WinPE выберите «Поиск и устранение неисправностей» → «Восстановление при загрузке».
- Укажите целевую операционную систему.
- Дождитесь завершения процедуры восстановления загрузочных файлов и попробуйте загрузиться в обычном режиме, даже если получили сообщение о неудаче.

Вариант 2: Проверка и восстановление файловой системы
Если ошибка 0xc0000001 была вызвана повреждением файловой системы или наличием на жестком диске bad-блоков, устранить неполадку поможет следующая процедура. Во всяком случае, ее выполнение будет весьма желательным, так как в случае наличия ошибок или багов на диске все остальные решения могут оказаться безрезультативными.
- Загрузившись в среду восстановления, как было показано в Варианте 1, выберите «Поиск и устранение неисправностей» → «Командная строка».
- Выполните в консоли последовательно эти три команды:
diskpart

list volume

exit - Обратите внимание на присвоенные разделам буквы (столбец «Имя») — они вам нужны для формирования команды проверки файловой системы. Тут нужно определить тот диск, на который установлена операционная система. Проще всего это сделать, опираясь на столбец «Размер». Например, команда проверки раздела с буквой С будет выглядеть так:
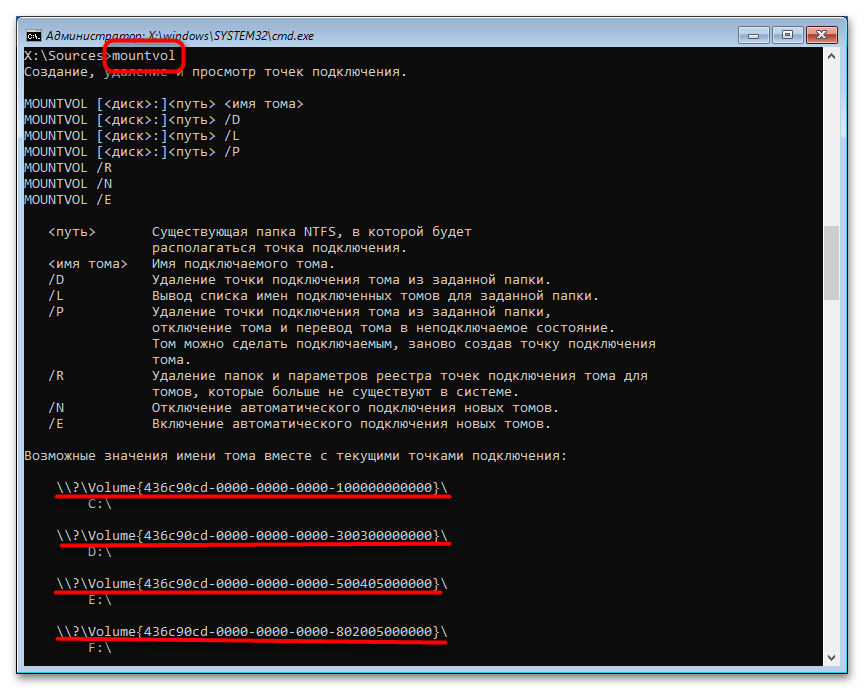
chkdsk C: /f /r - Если буква диска не отображается, вместо указанных команд утилиты «Diskpart» используйте команду
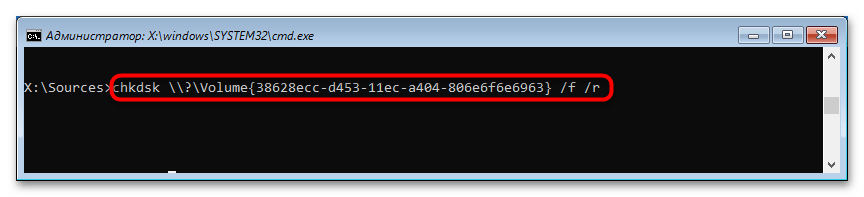
mountvol, выводящую идентификаторы разделов. - Получив ID, сформируйте и выполните команду следующего вида, заменив ID в фигурных скобках 32-значным значением идентификатора тома.
chkdsk //?/volume{ID} /f /r

Вариант 3: Восстановление системных файлов
Так как ошибка 0xc0000001 может быть вызвана повреждением ключевых системных файлов, необходимо просканировать Windows на предмет таких повреждений. Как и в предыдущем случае, проверка выполняется из-под загрузочного диска.
- Загрузившись в среду восстановления, откройте «Командную строку», с помощью команд
diskpart,list volumeиexitопределите буквы загрузочного и системного тома. - Запустите процедуру проверки следующей командой, передав параметру offbootdir букву загрузочного тома, а параметру offwindir — путь к папке Windows, расположенной на основном системном разделе.
sfc /scannow /offbootdir=C:\ /offwindir=D:\windows

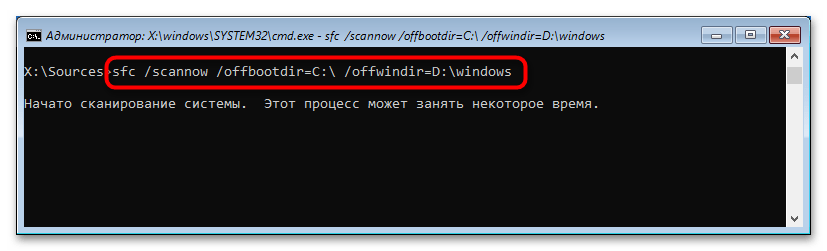
Процедура займет некоторое время, дождитесь ее завершения.
Вариант 4: Проверка оперативной памяти
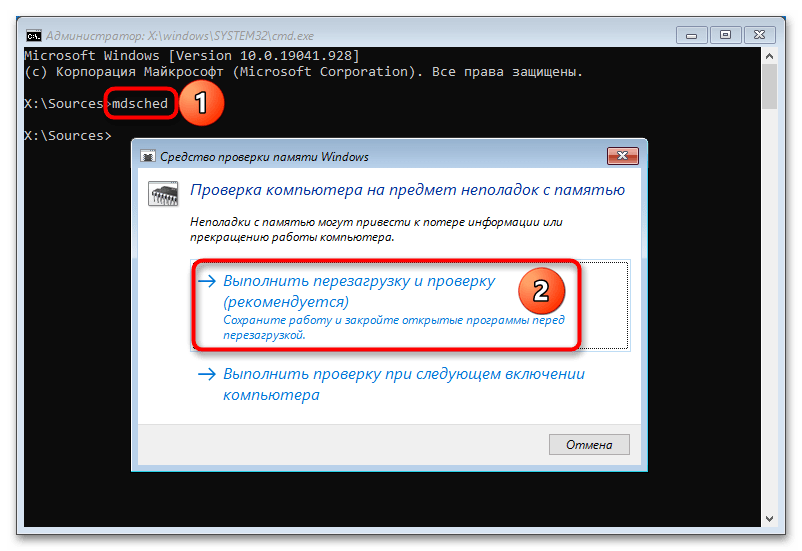
Ошибка загрузки с кодом 0xc0000001 также может быть вызвана различными неполадками в работе оперативной памяти. Чтобы проверить RAM на предмет ошибок и повреждений, выполните в «Командной строке» команду mdsched. Команда может быть выполнена как в работающей системе, так и в среде восстановления. Если в ходе теста будут обнаружены ошибки, возможно, память придется заменить. Выявляется поврежденный модуль RAM методом исключения (попытки загрузить Windows с одной, потом со второй планкой по отдельности).
Вариант 5: Откат к точке восстановления
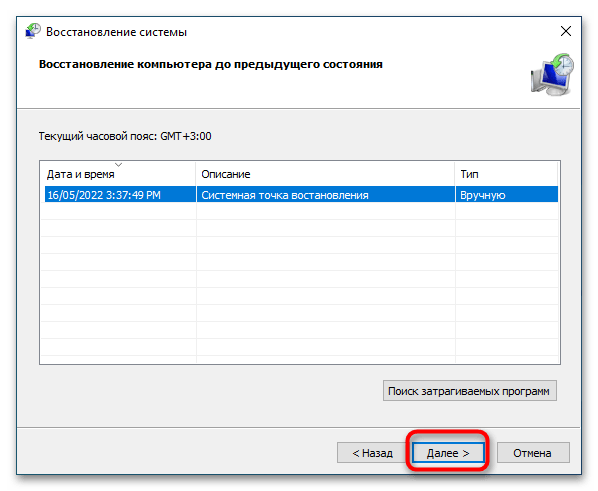
Универсальное решение, однако воспользоваться им вы сможете только в том случае, если на компьютере была включена функция защиты системы и на диске уже имеется точка восстановления.
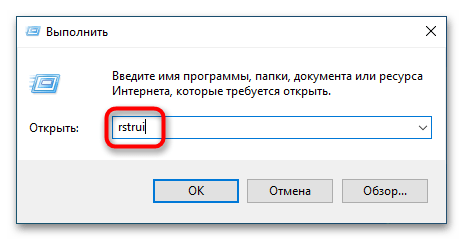
- Загрузитесь в среду восстановления, как показывалось в Варианте 1, и на этот раз вызовите «Командную строку», в которой выполните команду
rstrui. В случае удачной загрузки Windows выполните ее из «PowerShell», окошка «Выполнить» или даже из адресной строки «Проводника». - Проследуйте указанием мастера, выбрав в его окне ближайшую по времени точку восстановления.
В крайнем случае вы можете попробовать полностью переустановить Windows либо восстановить ее из полной резервной копии, если таковая имеется.
Наша группа в TelegramПолезные советы и помощь