
In this post I want to summarize an overview from Microsoft about local accounts in windows.
Local Accounts
https://docs.microsoft.com/en-us/windows/security/identity-protection/access-control/local-accounts
Local user accounts are stored locally on the server. These accounts can be assigned rights and permissions on a particular server, but on that server only. Local user accounts are security principals that are used to secure and manage access to the resources on a standalone or member server for services or users.
- Default local user accounts
- Administrator account
- Guest account
- HelpAssistant account (installed with a Remote Assistance session)
- DefaultAccount
- How Windows uses the DefaultAccount
- How the DefaultAccount gets created on domain controllers
- Recommendations for managing the Default Account (DSMA)
- SYSTEM
- NETWORK SERVICE
- LOCAL SERVICE
- Enforce local account restrictions for remote access
- WDAGUtilityAccount local account
Default local user accounts
The default local user accounts are built-in accounts that are created automatically when you install Windows.
After Windows is installed, the default local user accounts cannot be removed or deleted. In addition, default local user accounts do not provide access to network resources.
Default local user accounts are used to manage access to the local server’s resources based on the rights and permissions that are assigned to the account. The default local user accounts, and the local user accounts that you create, are located in the Users folder. The Users folder is located in the Local Users and Groups folder in the local Computer Management Microsoft Management Console (MMC). Computer Management is a collection of administrative tools that you can use to manage a single local or remote computer. For more information, see How to manage local accounts later in this topic.
Default local user accounts are described in the following sections.
Administrator account
The default local Administrator account is a user account for the system administrator. Every computer has an Administrator account (SID S-1-5-domain-500, display name Administrator). The Administrator account is the first account that is created during the Windows installation.
The Administrator account has full control of the files, directories, services, and other resources on the local computer. The Administrator account can create other local users, assign user rights, and assign permissions. The Administrator account can take control of local resources at any time simply by changing the user rights and permissions.
The default Administrator account cannot be deleted or locked out, but it can be renamed or disabled.
In Windows 10 and Windows Server 2016, Windows setup disables the built-in Administrator account and creates another local account that is a member of the Administrators group. Members of the Administrators groups can run apps with elevated permissions without using the Run as Administrator option. Fast User Switching is more secure than using Runas or different-user elevation.
- Get SID of a local user
wmic useraccount where name=’administrator’ get sid - Get SID for current logged in user
wmic useraccount where name=’%username%’ get sid - Get SID for current logged in domain user
whoami /user - Get SID for the local administrator of the computer
wmic useraccount where (name=’administrator’ and domain=’%computername%’) get name,sid - Get SID for the domain administrator
wmic useraccount where (name=’administrator’ and domain=’%userdomain%’) get name,sid - Find username from a SID
wmic useraccount where sid=’S-1-5-21-2593857963-3184534624-523876939-500′ get name
Account group membership
By default, the Administrator account is installed as a member of the Administrators group on the server. It is a best practice to limit the number of users in the Administrators group because members of the Administrators group on a local server have Full Control permissions on that computer.
The Administrator account cannot be deleted or removed from the Administrators group, but it can be renamed.
Security considerations
Because the Administrator account is known to exist on many versions of the Windows operating system, it is a best practice to disable the Administrator account when possible to make it more difficult for malicious users to gain access to the server or client computer.
You can rename the Administrator account. However, a renamed Administrator account continues to use the same automatically assigned security identifier (SID), which can be discovered by malicious users. For more information about how to rename or disable a user account, see Disable or activate a local user account and Rename a local user account.
As a security best practice, use your local (non-Administrator) account to sign in and then use Run as administrator to accomplish tasks that require a higher level of rights than a standard user account. Do not use the Administrator account to sign in to your computer unless it is entirely necessary. For more information, see Run a program with administrative credentials.
In comparison, on the Windows client operating system, a user with a local user account that has Administrator rights is considered the system administrator of the client computer. The first local user account that is created during installation is placed in the local Administrators group. However, when multiple users run as local administrators, the IT staff has no control over these users or their client computers.
In this case, Group Policy can be used to enable secure settings that can control the use of the local Administrators group automatically on every server or client computer. For more information about Group Policy, see Group Policy Overview.
Note Blank passwords are not allowed in the versions designated in the Applies To list at the beginning of this topic.
Important Even when the Administrator account has been disabled, it can still be used to gain access to a computer by using safe mode. In the Recovery Console or in safe mode, the Administrator account is automatically enabled. When normal operations are resumed, it is disabled.
Guest account
The Guest account is disabled by default on installation. The Guest account lets occasional or one-time users, who do not have an account on the computer, temporarily sign in to the local server or client computer with limited user rights. By default, the Guest account has a blank password. Because the Guest account can provide anonymous access, it is a security risk. For this reason, it is a best practice to leave the Guest account disabled, unless its use is entirely necessary.
Account group membership
By default, the Guest account is the only member of the default Guests group (SID S-1-5-32-546), which lets a user sign in to a server. On occasion, an administrator who is a member of the Administrators group can set up a user with a Guest account on one or more computers.
Security considerations
When enabling the Guest account, only grant limited rights and permissions. For security reasons, the Guest account should not be used over the network and made accessible to other computers.
In addition, the guest user in the Guest account should not be able to view the event logs. After the Guest account is enabled, it is a best practice to monitor the Guest account frequently to ensure that other users cannot use services and other resources, such as resources that were unintentionally left available by a previous user.
HelpAssistant account (installed with a Remote Assistance session)
The HelpAssistant account is a default local account that is enabled when a Remote Assistance session is run. This account is automatically disabled when no Remote Assistance requests are pending.
HelpAssistant is the primary account that is used to establish a Remote Assistance session. The Remote Assistance session is used to connect to another computer running the Windows operating system, and it is initiated by invitation. For solicited remote assistance, a user sends an invitation from their computer, through e-mail or as a file, to a person who can provide assistance. After the user’s invitation for a Remote Assistance session is accepted, the default HelpAssistant account is automatically created to give the person who provides assistance limited access to the computer. The HelpAssistant account is managed by the Remote Desktop Help Session Manager service.
DefaultAccount
The DefaultAccount, also known as the Default System Managed Account (DSMA), is a built-in account introduced in Windows 10 version 1607 and Windows Server 2016. The DSMA is a well-known user account type. It is a user neutral account that can be used to run processes that are either multi-user aware or user-agnostic. The DSMA is disabled by default on the desktop SKUs (full windows SKUs) and WS 2016 with the Desktop.
The DSMA has a well-known RID of 503. The security identifier (SID) of the DSMA will thus have a well-known SID in the following format: S-1-5-21-<ComputerIdentifier>-503
The DSMA is a member of the well-known group System Managed Accounts Group, which has a well-known SID of S-1-5-32-581.
The DSMA alias can be granted access to resources during offline staging even before the account itself has been created. The account and the group are created during first boot of the machine within the Security Accounts Manager (SAM).
How Windows uses the DefaultAccount
From a permission perspective, the DefaultAccount is a standard user account. The DefaultAccount is needed to run multi-user-manifested-apps (MUMA apps). MUMA apps run all the time and react to users signing in and signing out of the devices. Unlike Windows Desktop where apps run in context of the user and get terminated when the user signs off, MUMA apps run by using the DSMA.
MUMA apps are functional in shared session SKUs such as Xbox. For example, Xbox shell is a MUMA app. Today, Xbox automatically signs in as Guest account and all apps run in this context. All the apps are multi-user-aware and respond to events fired by user manager. The apps run as the Guest account.
Similarly, Phone auto logs in as a “DefApps” account which is akin to the standard user account in Windows but with a few extra privileges. Brokers, some services and apps run as this account.
In the converged user model, the multi-user-aware apps and multi-user-aware brokers will need to run in a context different from that of the users. For this purpose, the system creates DSMA.
How the DefaultAccount gets created on domain controllers
If the domain was created with domain controllers that run Windows Server 2016, the DefaultAccount will exist on all domain controllers in the domain. If the domain was created with domain controllers that run an earlier version of Windows Server, the DefaultAccount will be created after the PDC Emulator role is transferred to a domain controller that runs Windows Server 2016. The DefaultAccount will then be replicated to all other domain controllers in the domain.
Recommendations for managing the Default Account (DSMA)
Microsoft does not recommend changing the default configuration, where the account is disabled. There is no security risk with having the account in the disabled state. Changing the default configuration could hinder future scenarios that rely on this account.
Default local system accounts
SYSTEM
The SYSTEM account is used by the operating system and by services that run under Windows. There are many services and processes in the Windows operating system that need the capability to sign in internally, such as during a Windows installation. The SYSTEM account was designed for that purpose, and Windows manages the SYSTEM account’s user rights. It is an internal account that does not show up in User Manager, and it cannot be added to any groups.
On the other hand, the SYSTEM account does appear on an NTFS file system volume in File Manager in the Permissions portion of the Security menu. By default, the SYSTEM account is granted Full Control permissions to all files on an NTFS volume. Here the SYSTEM account has the same functional rights and permissions as the Administrator account.
Note To grant the account Administrators group file permissions does not implicitly give permission to the SYSTEM account. The SYSTEM account’s permissions can be removed from a file, but we do not recommend removing them.
NETWORK SERVICE
The NETWORK SERVICE account is a predefined local account used by the service control manager (SCM). A service that runs in the context of the NETWORK SERVICE account presents the computer’s credentials to remote servers.
This account is not recognized by the security subsystem, so you cannot specify its name in a call to the LookupAccountName function. It has minimum privileges on the local computer and acts as the computer on the network.
This account can be specified in a call to the CreateService and ChangeServiceConfig functions. Note that this account does not have a password, so any password information that you provide in this call is ignored. While the security subsystem localizes this account name, the SCM does not support localized names. Therefore, you will receive a localized name for this account from the LookupAccountSid function, but the name of the account must be NT AUTHORITYNetworkService when you call CreateService or ChangeServiceConfig, regardless of the locale, or unexpected results can occur.
A service that runs in the context of the NetworkService account presents the computer’s credentials to remote servers. By default, the remote token contains SIDs for the Everyone and Authenticated Users groups. The user SID is created from the SECURITY_NETWORK_SERVICE_RID value.
The NetworkService account has its own subkey under the HKEY_USERS registry key. Therefore, the HKEY_CURRENT_USER registry key is associated with the NetworkService account.
The NetworkService account has the following privileges:
- SE_ASSIGNPRIMARYTOKEN_NAME (disabled)
- SE_AUDIT_NAME (disabled)
- SE_CHANGE_NOTIFY_NAME (enabled)
- SE_CREATE_GLOBAL_NAME (enabled)
- SE_IMPERSONATE_NAME (enabled)
- SE_INCREASE_QUOTA_NAME (disabled)
- SE_SHUTDOWN_NAME (disabled)
- SE_UNDOCK_NAME (disabled)
- Any privileges assigned to users and authenticated users
For more information, see Service Security and Access Rights.
LOCAL SERVICE
The LOCAL SERVICE account is a predefined local account used by the service control manager. It has minimum privileges on the local computer and presents anonymous credentials on the network. For more information, see LocalService Account.
Enforce local account restrictions for remote access
https://docs.microsoft.com/en-us/windows/security/identity-protection/access-control/local-accounts#enforce-local-account-restrictions-for-remote-access
The User Account Control (UAC) is a security feature in Windows that has been in use in Windows Server 2008 and in Windows Vista, and the operating systems to which the Applies To list refers. UAC enables you to stay in control of your computer by informing you when a program makes a change that requires administrator-level permission. UAC works by adjusting the permission level of your user account. By default, UAC is set to notify you when applications try to make changes to your computer, but you can change how often UAC notifies you.
UAC makes it possible for an account with administrative rights to be treated as a standard user non-administrator account until full rights, also called elevation, is requested and approved. For example, UAC lets an administrator enter credentials during a non-administrator’s user session to perform occasional administrative tasks without having to switch users, sign out, or use the Run as command.
In addition, UAC can require administrators to specifically approve applications that make system-wide changes before those applications are granted permission to run, even in the administrator’s user session.
For example, a default feature of UAC is shown when a local account signs in from a remote computer by using Network logon (for example, by using NET.EXE USE). In this instance, it is issued a standard user token with no administrative rights, but without the ability to request or receive elevation. Consequently, local accounts that sign in by using Network logon cannot access administrative shares such as C$, or ADMIN$, or perform any remote administration.
For more information about UAC, see User Account Control.
WDAGUtilityAccount local account
https://docs.microsoft.com/en-us/windows/security/threat-protection/microsoft-defender-application-guard/faq-md-app-guard#what-is-the-wdagutilityaccount-local-account
This account is part of Windows Defender Application Guard beginning with Windows 10 version 1709 (Fall Creators Update). This account remains disabled until Application Guard is enabled on your device. This item is integrated to the OS and is not considered as a threat/virus/malware.
https://www.thewindowsclub.com/what-is-wdagutilityaccount
Just as with any other operating system, you need a user account to use a Windows computer or device. This is one of those concepts that a lot of us take for granted, and we believe we know what it is and what it does. But do you know everything there is to know? This guide includes a detailed definition of the user account, the username, and their attributes. You will also learn how to list all the user accounts that exist on any system with Windows and how to see which users are signed in at the same time.
What is a user account in Windows?
A user account is a collection of settings used by Windows and other operating systems for understanding your preferences and for controlling the files and folders you access, the tasks you are allowed to perform, the devices and resources you are allowed to use, and so on.
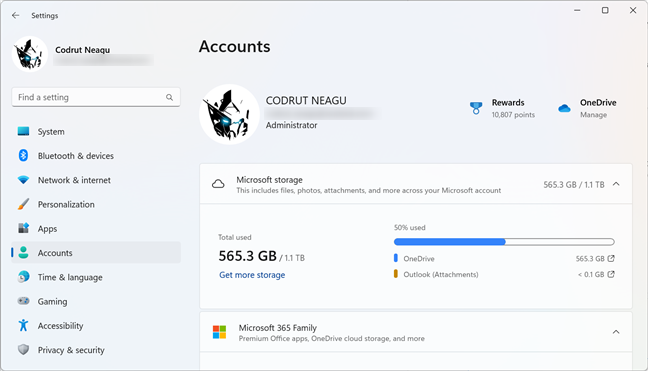
A user account in Windows 11
User accounts are the only way of authenticating and receiving authorization to use your Windows device. Without logging in with a user account, you cannot use Windows. User accounts are also used to separate the people who use the same computer or device and ensure they don’t mess with each other’s files, settings, or applications. When multiple people use the same computer, user accounts keep everyone’s files, settings, and applications private.
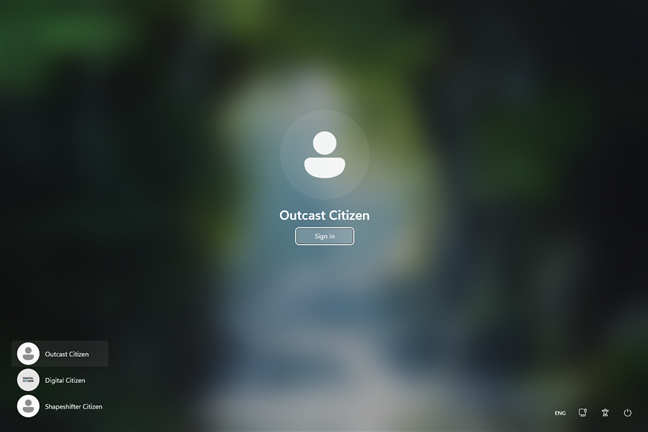
Multiple user accounts on a Windows PC
For example, on a Windows computer used by the whole family, you might have a user account for each parent, a user account for each child, and a user account for guests that come to visit and may need to use the computer temporarily.
What is the connection between a Microsoft account and a user account?
In older versions of Windows, like Windows 7 and the ones before, we only had local user accounts. These user accounts had a name unique only to the computer or the business network where they existed.
However, in Windows 11 and Windows 10, we also have Microsoft accounts. These accounts have an e-mail address that is registered with Microsoft, and they can be used across Microsoft devices, websites, and services.
For example, with the same user account that is also a Microsoft account, you can sign into your Windows 10 or Windows 11 computer, Xbox Series X console, Microsoft 365 subscription, Skype, OneDrive, Microsoft Edge, Bing, and so on. This isn’t possible with local user accounts.
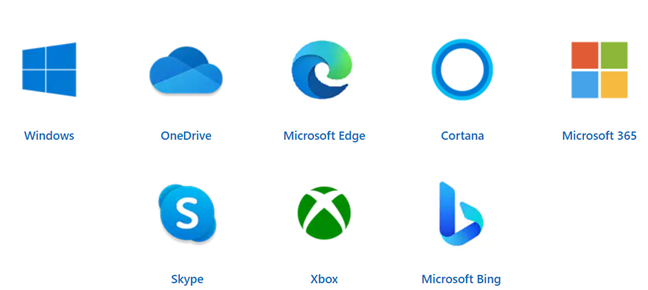
Devices, websites, and services available with a Microsoft account
TIP: If you want to learn more about the different types of accounts, and which is a good fit for you, read: Local account vs. Microsoft account: Which one should I use?.
Furthermore, if you’re using a Home or Pro edition of Windows 10 or Windows 11, Microsoft accounts are mandatory during installation. What does that mean? Well, you simply cannot install Windows on your computer unless you provide a Microsoft account. However, once you’ve installed the operating system, you can create additional user accounts that are local, not tied to a Microsoft account.
What are the attributes of a user account in Windows?
Every user account has the following characteristics:
- A username or account name
- A unique identifier
- A password
- A user account picture
- A user type
- A user group

The settings page of a user account in Windows 11
Now let’s take a look at all these user accounts properties:
What is the username in Windows?
The username is the display name of a user account. Microsoft also calls it the account name. You can set the username to anything you wish.
Changing the username of a Microsoft account means changing your first name and last name, and that will affect all the PCs and devices on which you’re signed in using that account. Also, you should know that this is only possible online on your Microsoft account webpage.
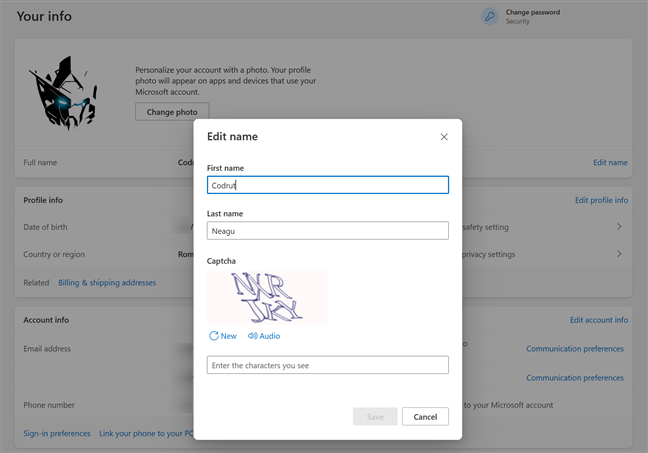
Changing the name of a Microsoft account
On the other hand, changing the username of a local account applies only to the Windows computer you’re currently using. That’s because local accounts are offline and are not synced to any of your other devices.
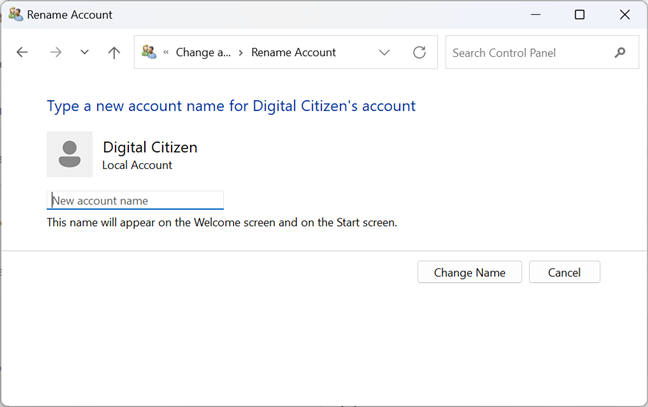
Changing the name of a local account
Also, for local accounts, it’s worth noting that Windows usernames can’t have more than twenty characters, including spaces.
What is the SID of a user account in Windows?
For each user account, Windows also generates a unique Security Identifier (SID) that’s not displayed in the user interface but is used internally for storing your settings. The SID has a unique value, of variable length, that looks like this:
S-1-5-21-4023099299-329329835-1027168274-1001
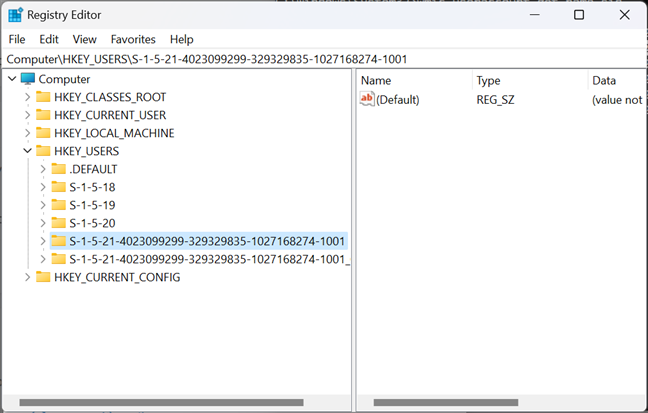
The SID of a user account
While display names may not be unique, the hidden SID is always unique. Each time a user account logs on, Windows retrieves the SID for that user from its database of user accounts. Then, it uses the SID to identify the user in all subsequent interactions. If you want to read more about this concept, Microsoft offers some technical documentation: Security Identifiers.
What is the password for a user account?
If you are using computers, e-mail services, and smartphones, the concept of passwords shouldn’t be foreign to you. A password is the most basic way of securing an account and ensuring that only its owner can access it. On a computer with Windows, each user should have a unique password that is not known by other users.
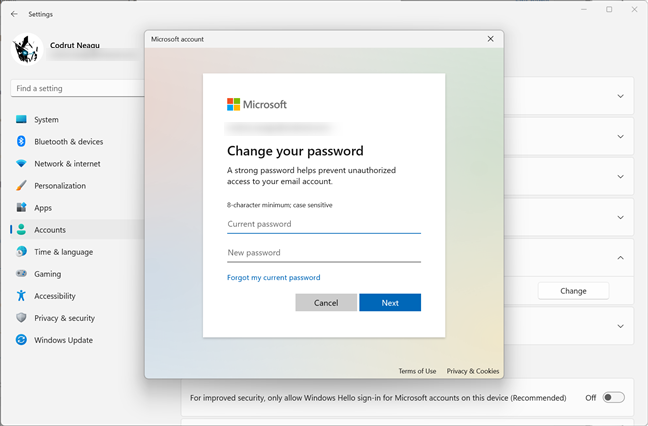
Changing the password of a Microsoft account
TIP: Here’s how to change the password of your Microsoft account when you need to.
Every user account has a password. However, this password may be blank if you use local user accounts. Windows 11 and Windows 10 have also introduced other options for signing in, such as with a PIN or using facial recognition (Windows Hello). While these new methods don’t replace the traditional password, they complement it and make the authentication process more secure.
What is the user type in Windows?
Every user account has a type assigned to it, and depending on its permissions and restrictions, there are certain tasks you can or can’t do:
- Administrator – user accounts with complete control over the operating system, apps, and settings.
- Standard – this is a limited type of user account that can only use existing software and cannot install applications of any kind. Also, these user accounts cannot modify system settings that affect other users.
- Guest – a limited type of user account with no password, meant only for temporary access to the PC and only for running existing applications. This user account type cannot modify any system settings. However, although still present deep down in the OS settings, Guest accounts no longer function in Windows 10 and Windows 11.
A local standard user account in Windows 11
If you want to learn how to change the user account type in Windows, we’ve covered all the steps in these tutorials: 6 ways to change an account to Administrator and back in Windows 10 and How to change the Administrator account on Windows 11.
What is a user group in Windows?
A user group is a collection of multiple user accounts that share common security rights in Windows. A user account is a member of at least one user group, while user groups can have any number of members, including none. A user account that is part of a group inherits all its permissions and restrictions.
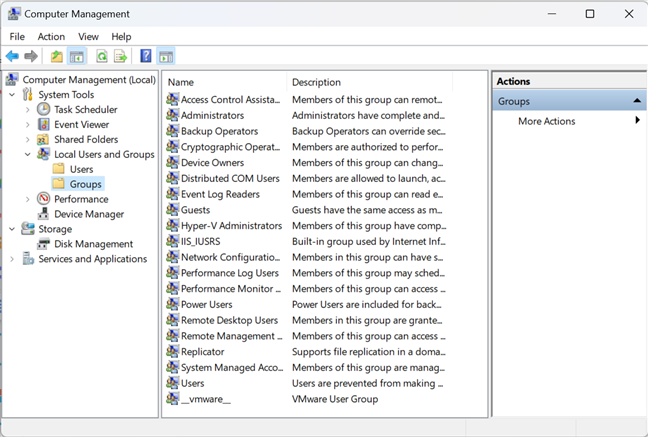
List of user groups on a Windows computer
If you want to understand better user groups, why Windows uses them, and how, read this guide: What is a Windows user group, and what does it do?.
Who can create accounts in Windows?
Besides yourself, the owner of your Windows computer, there are many other parties that can create user accounts. Here are a couple of user account examples:
- Windows, for instance, creates several user accounts when you install it or use certain features. For example, Windows 11 creates the following user accounts: Administrator, DefaultAccount, Guest, and WDAGUtilityAccount. All of them are built-in accounts created by Windows for administration purposes and are disabled by default, meaning that you can’t use them yourself. They’re part of the operating system and are needed by it to operate properly.
- Administrators can create any number of user accounts. These can be either administrator accounts or standard accounts.
- Third-party software and services can create hidden user accounts that are used to run different services. The most common example is virtualization software like VMware Player: It creates a user account named ___VMware_Conv_SA___, which is used to run VMware Converter standalone server jobs.
How to find all the user accounts in Windows
There are many methods for displaying user accounts on your Windows device. If you have a Pro or superior edition of Windows 11 or Windows 10, you can use the Computer Management tool. Complete step-by-step instructions are shared in this guide: How to manage local users and groups in Windows with lusrmgr.msc.
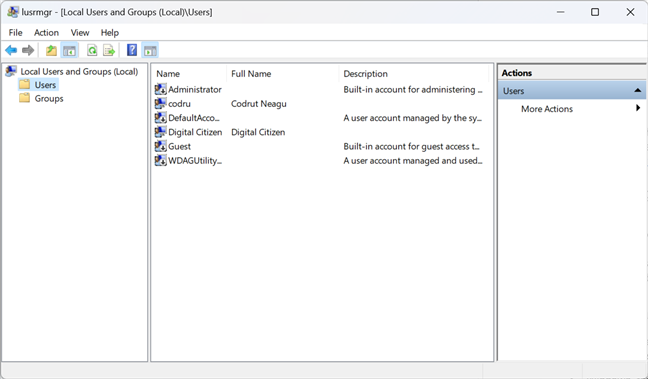
List of user accounts shown by Computer Management (lusrmgr)
If you have another edition of Windows, or if you prefer using the command line, follow the instructions shared in this guide: How to list all the users on a Windows computer (7 ways).
How do you know which user accounts are signed in?
The Task Manager is a handy tool for seeing which user accounts are signed in to your Windows PC or device and what apps they are running. Press CTRL + Shift + Esc to start the Task Manager. If it is displayed in its compact view, press More details and then go to the Users tab. There, you can see the list of user accounts signed into your Windows device and their status.
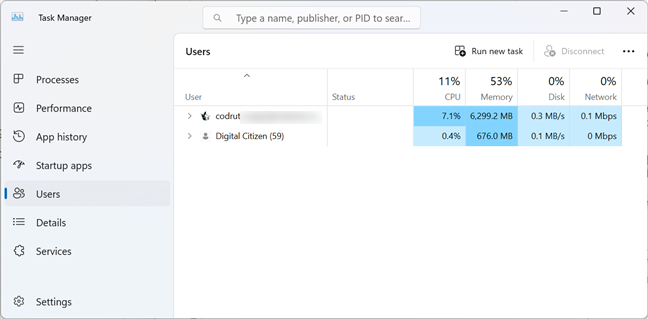
List of user accounts on a Windows 11 PC
If you’d like to learn how to use the Task Manager to keep track of who is signed in, read this guide: How to manage signed-in user accounts with the Task Manager in Windows.
Do you have other questions about Windows user accounts?
Now you know everything there is to know about user accounts, usernames, and so on. You also know about the different types of accounts that you can use in Windows and how they differ from one another. If any questions were left unanswered, let me know using the comments below. I’ll do my best to help and improve this guide.
Все способы:
- Управляем учетными записями в Windows 10
- Способ 1: Меню Параметры
- Способ 2: Панель управления
- Способ 3: Локальная политика безопасности
- Способ 4: Вкладка «Безопасность» в свойствах файлов, папок и дисков
- Вопросы и ответы: 8
Как правило, часто за одним компьютером работает несколько пользователей по очереди. Разработчики операционных систем специально для таких случаев добавляют возможность создания разных учетных записей с индивидуальными настройками и правами доступа. Администратору предоставляются все полномочия для управления такими профилями, включая их удаление или полную блокировку на определенный период времени. Осуществляется такое взаимодействие через специальные меню в Windows. Именно о них мы и хотим поговорить далее.
Управляем учетными записями в Windows 10
В рамках этой статьи мы предлагаем изучить несколько меню и оснасток, встроенных в Windows 10, чтобы понять, как именно производится управление профилями через такие средства. Ознакомившись с последующими инструкциями, вы поймете, где можно отыскать нужный для изменения параметр и как именно производится необходимое редактирование. После этого уже можно будет приступить к непосредственной реализации требуемых действий, например, к созданию новой учетной записи или изменению прав доступа.
Способ 1: Меню Параметры
В первую очередь остановимся на одном из разделов в меню «Параметры». Сейчас там находятся еще не все опции, которые позволяли бы взаимодействовать с учетными записями, поскольку разработчики постепенно переносят все пункты из Панели управления. Однако имеющихся там функций будет достаточно, чтобы справиться с некоторыми задачами. Давайте вкратце пробежимся по каждому из них.
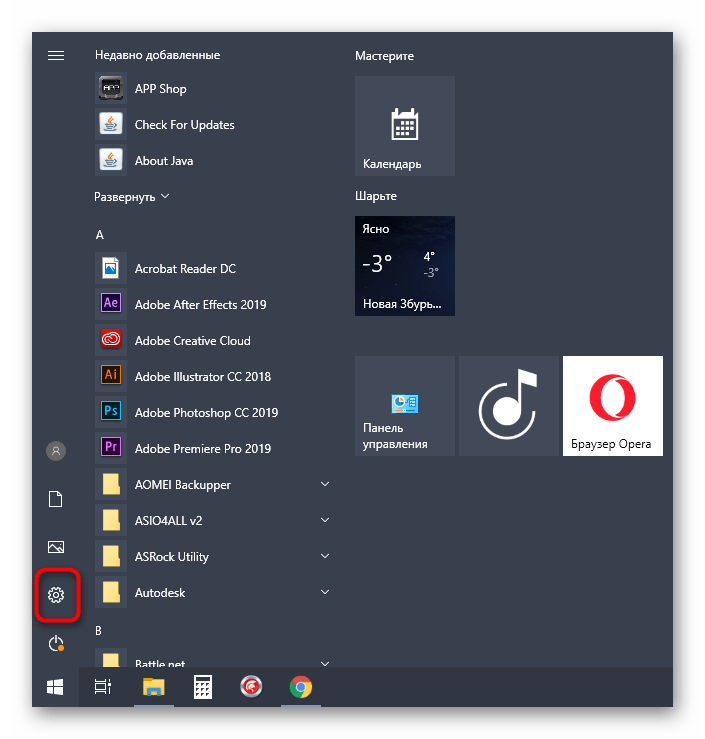
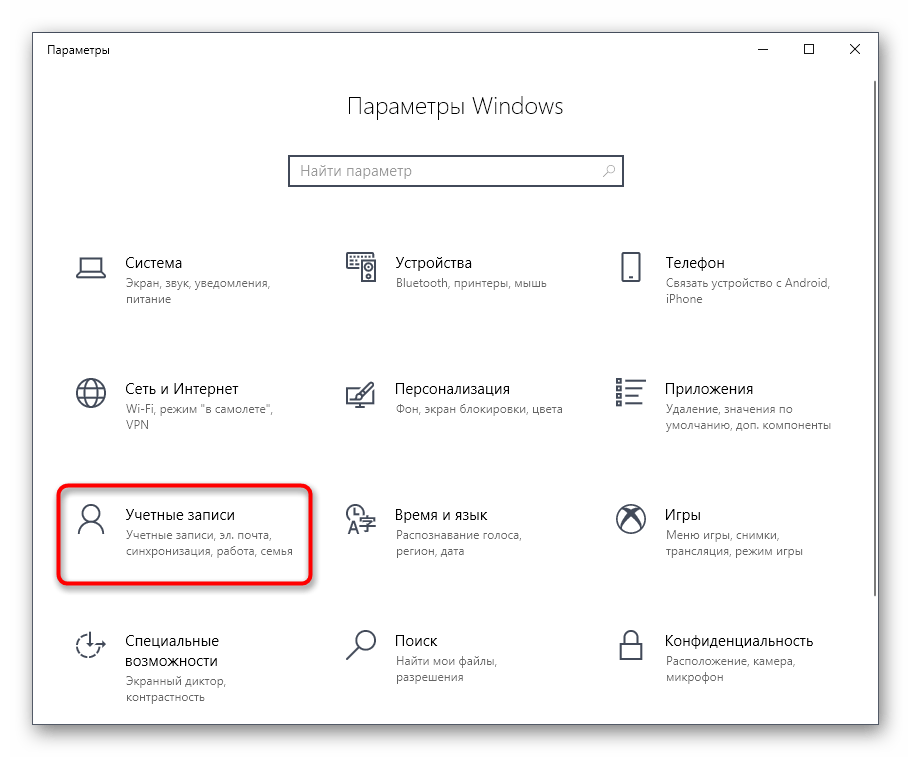
- Для начала откройте «Пуск» и перейдите в меню «Параметры», кликнув по соответствующему значку в виде шестеренки.
- Здесь вас интересует раздел «Учетные записи».
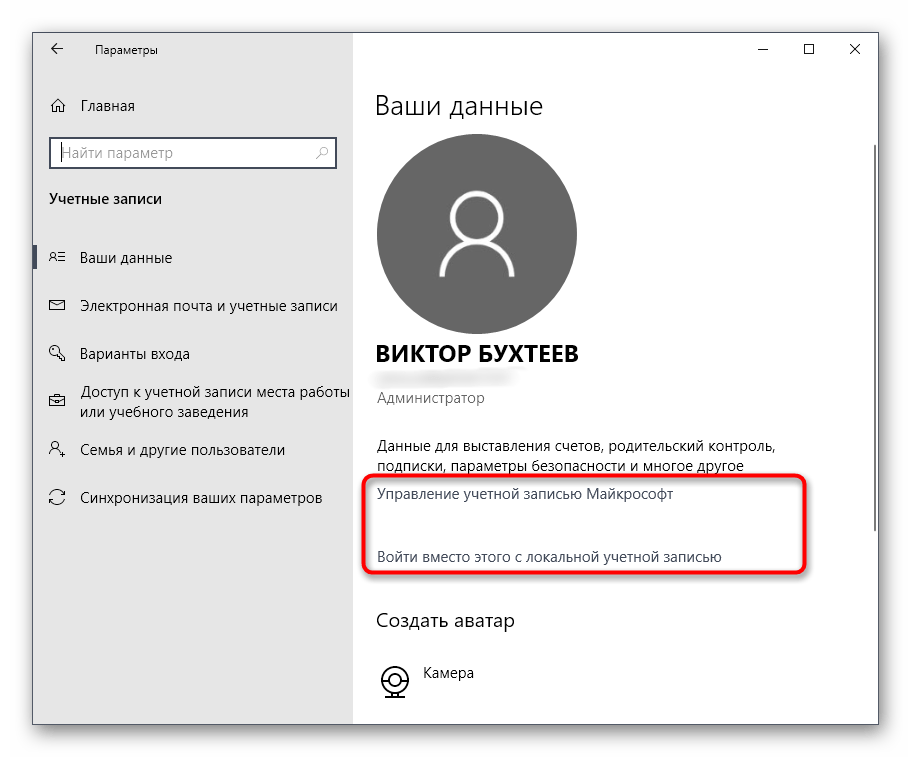
- В первой категории левой панели «Ваши данные» осуществляется редактирование текущего профиля. Например, можно перейти к настройке учетной записи Майкрософт через браузер. Там редактируется имя профиля, год рождения, устанавливается фото и изменяется пароль. Дополнительно в этой категории есть надпись «Войти вместо этого с локальной учетной записью». Она позволяет переключиться на привычный профиль администратора, который не связан с аккаунтом Microsoft.
- Ниже присутствует опция создания аватара. Это можно сделать прямо с веб-камеры или через Проводник выбрать уже имеющееся изображение нужного формата.
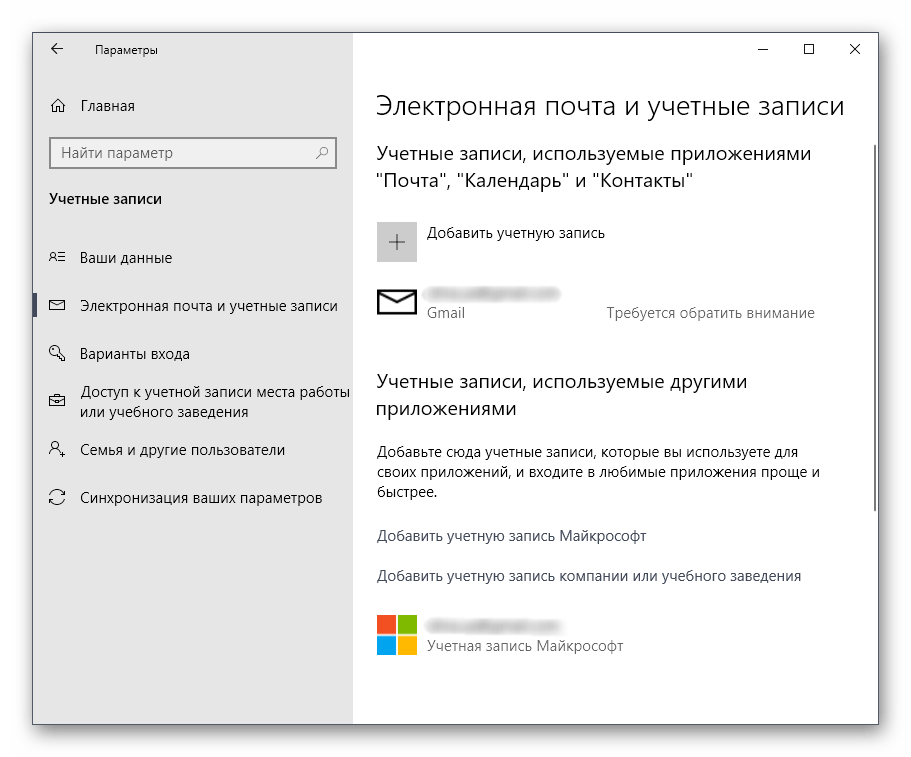
- Вторая категория под названием «Электронная почта и учетные записи» тоже относится к текущему профилю Windows. Именно отсюда осуществляется добавление аккаунтов Microsoft, которые связаны со стандартными приложениями и сторонними программами.
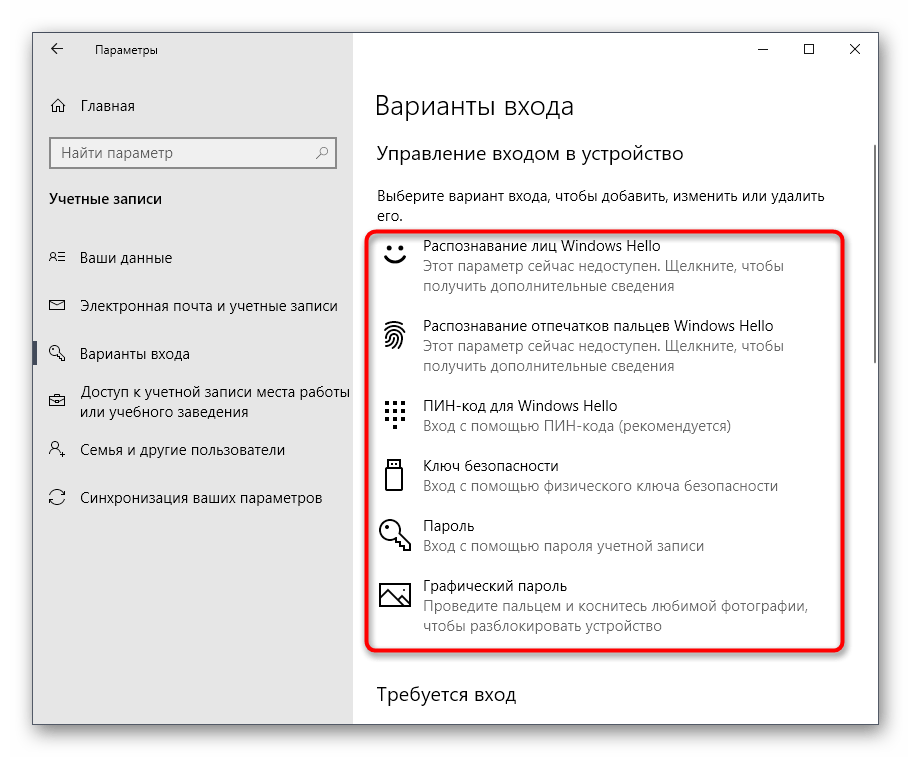
- Далее идет категория «Варианты входа». В ней вы самостоятельно выбираете принцип авторизации учетной записи при запуске операционной системы. На данный момент существует огромное количество разнообразных вариантов для всех типов устройств. В этом же окне находятся детальные описания каждого варианта, поэтому мы предоставим выбор оптимального средства вам.
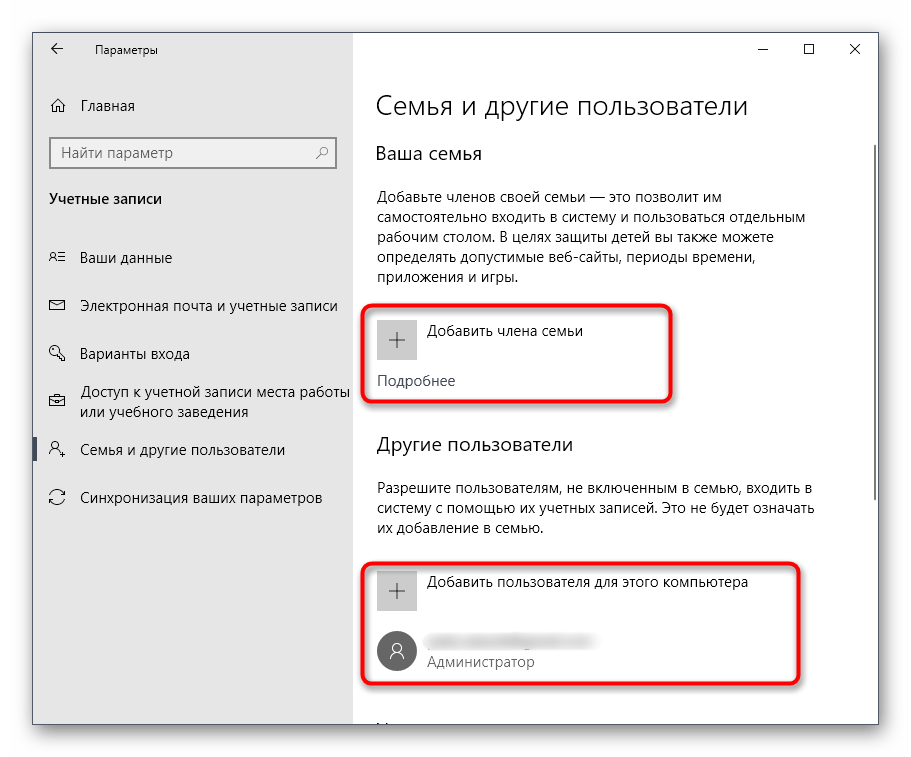
- Ключевой раздел этого меню — «Семья и другие пользователи». Именно отсюда выполняется управление другими учетными записями, например, создание, изменение названия, установка ограничений или изменение типа профиля. Добавить можно как уже существующий аккаунт Microsoft, так и создать локальный аккаунт.
Как видно, это меню по большей части рассчитано на изменение личной учетной записи, хотя в случае с аккаунтом Microsoft все равно произойдет перенаправление на страницу в браузере. Скорее всего, при выходе следующих обновлений содержимое данного раздела поменяется и в нем будет больше опций, перенесенных из Панели управления.
Способ 2: Панель управления
Только что мы упоминали Панель управления как средство, из которого все пункты переносятся в «Параметры» с новой реализацией. Однако пока что это коснулось далеко не всех настроек, включая опции, отвечающие за управления учетными записями, поэтому давайте остановимся на этом меню более детально.
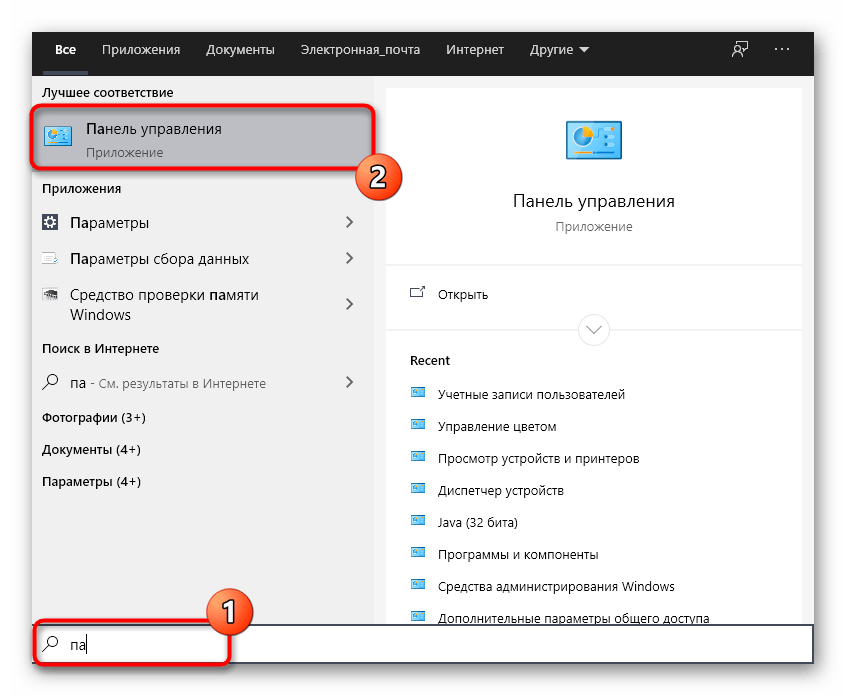
- Откройте «Пуск», через поиск отыщите приложение «Панель управления» и перейдите в него.
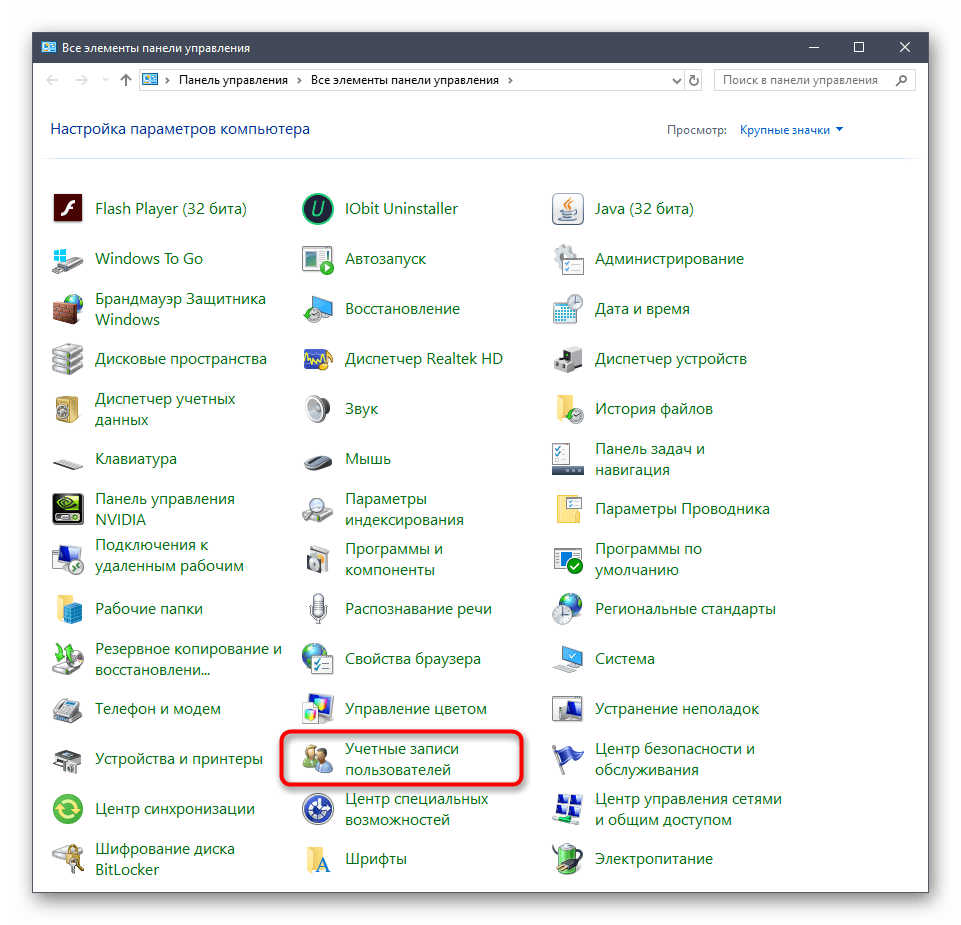
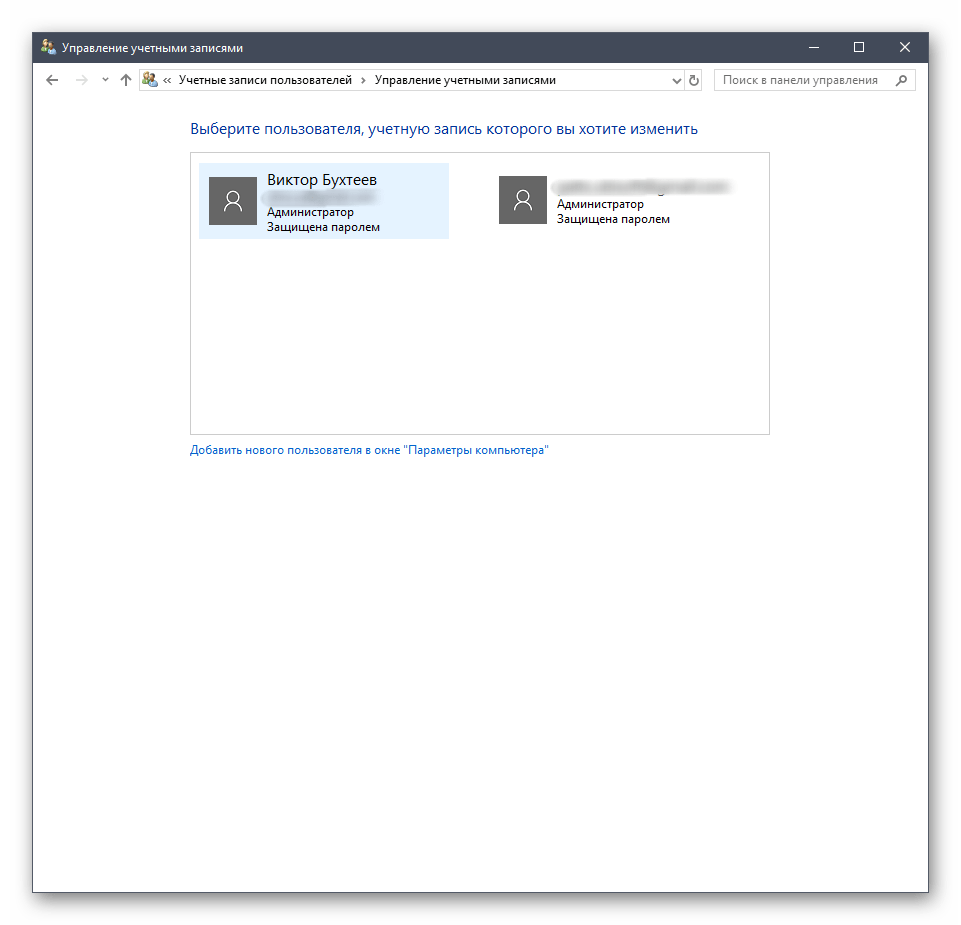
- Среди списка всех разделов отыщите «Учетные записи пользователей».
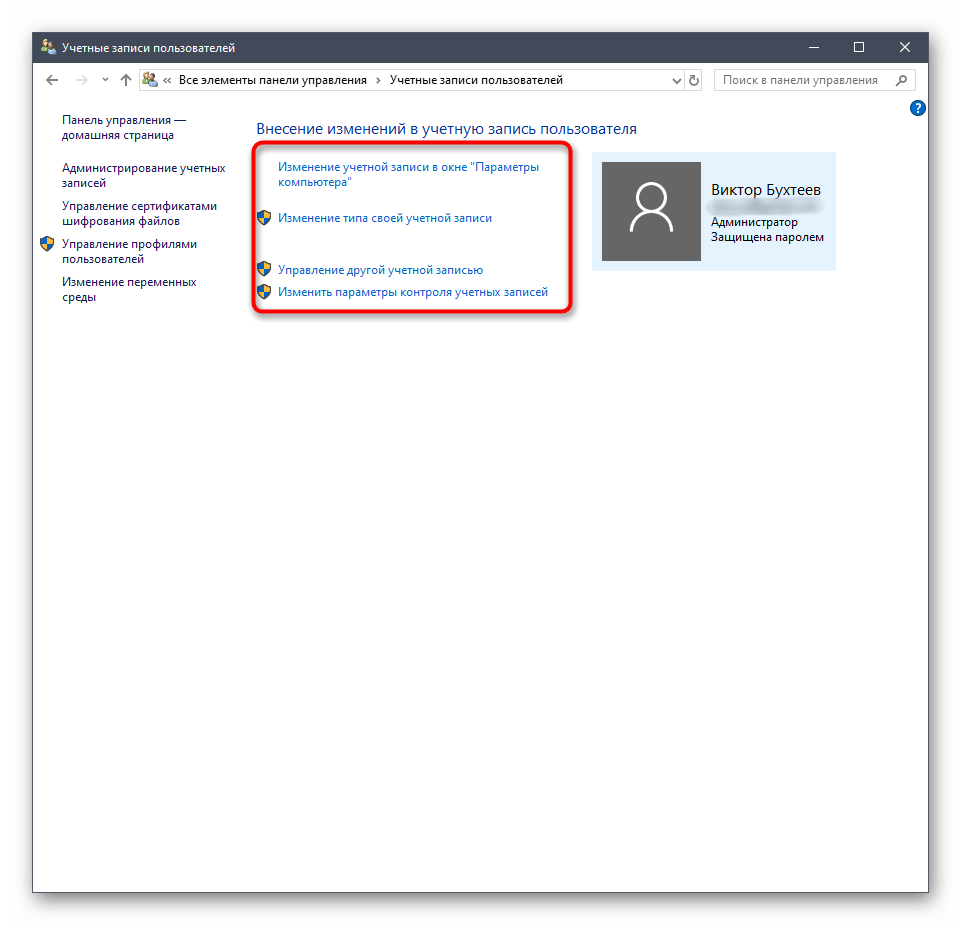
- В главном меню вы можете перейти для изменения текущей учетной записи в меню Параметры, о котором уже шла речь ранее, изменить тип своего профиля, перейти к управлению другим пользователем или изменить особенности контроля учетных записей.
- При переходе к изменению других профилей откроется отдельное меню, где производится выбор.
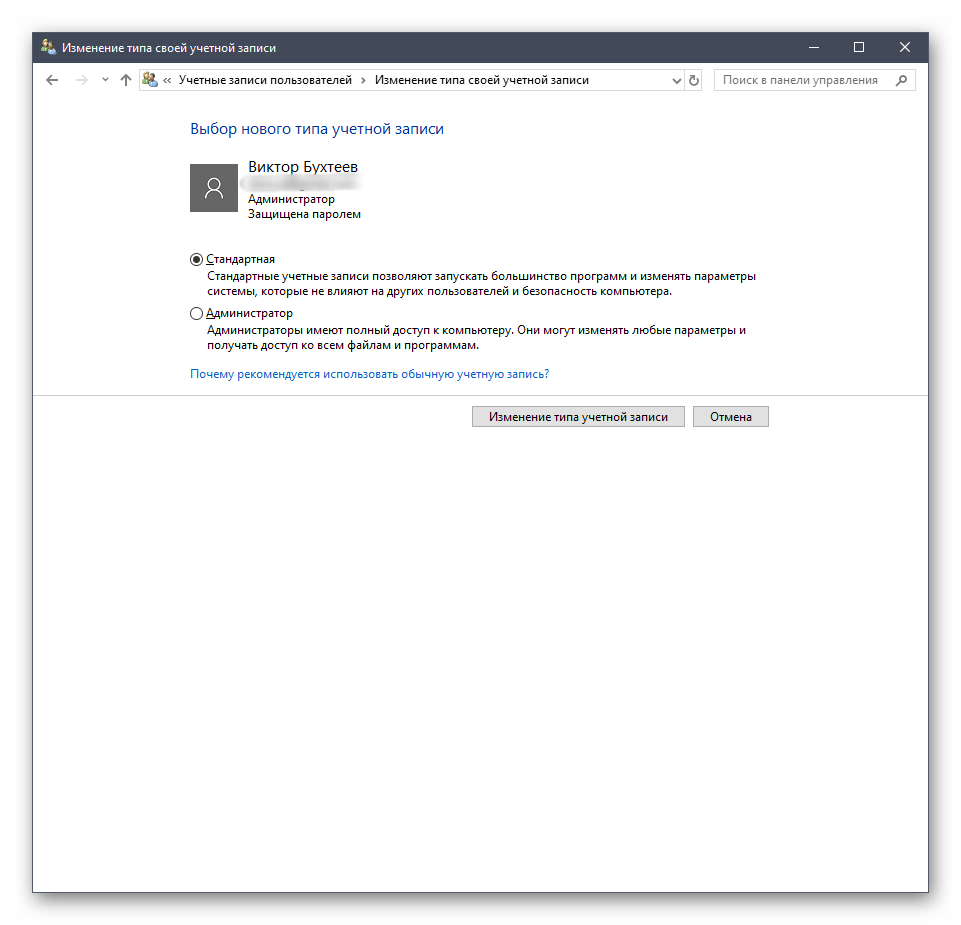
- Теперь вы можете сменить тип профиля, например, на администратора, или задать новое имя.
Более детально обо всех этих процессах рассказывалось в других статьях на нашем сайте. О них мы еще поговорим после рассмотрения всех сегодняшних методов, а пока переходим к следующему меню, в котором можно управлять учетными записями.
Способ 3: Локальная политика безопасности
В каждой сборке Windows 10 имеется оснастка под названием Локальная политика безопасности. В ней осуществляются различные действия, связанные с обеспечением надежности системы, включая настройки для существующих профилей. Благодаря этой оснастке можно установить ограничения на пароли или заблокировать один из профилей. Выполняется это следующим образом:
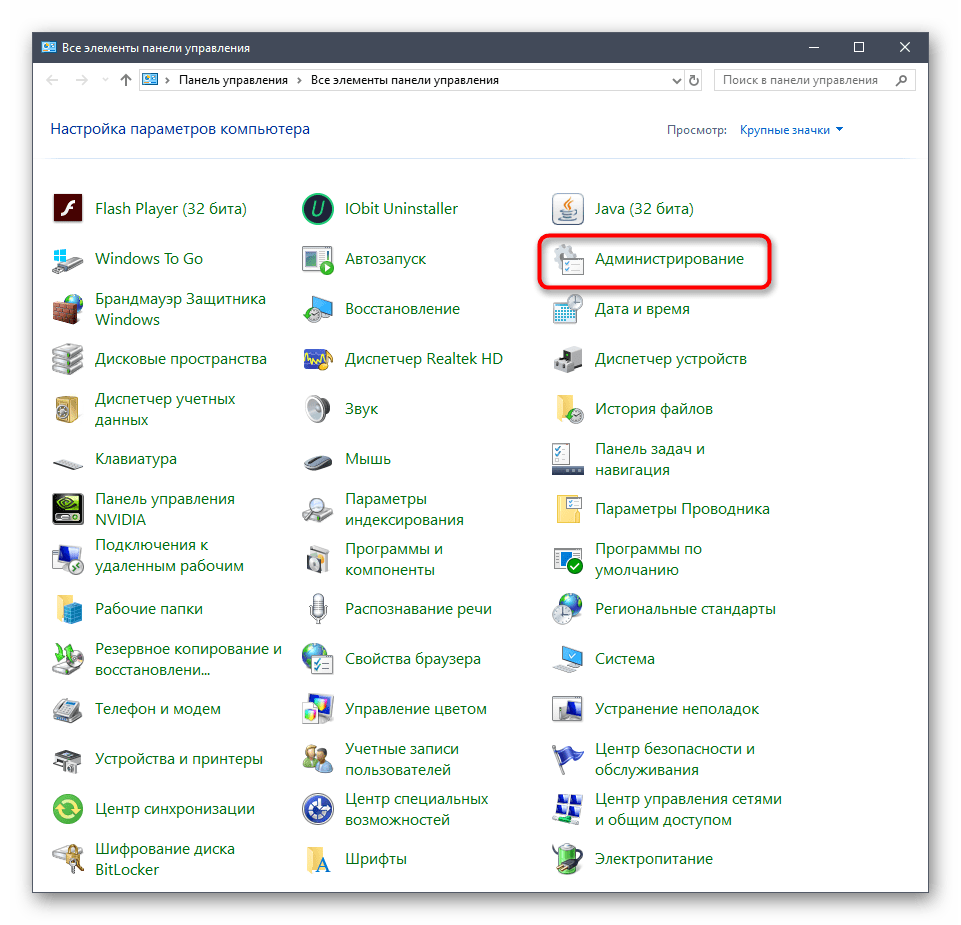
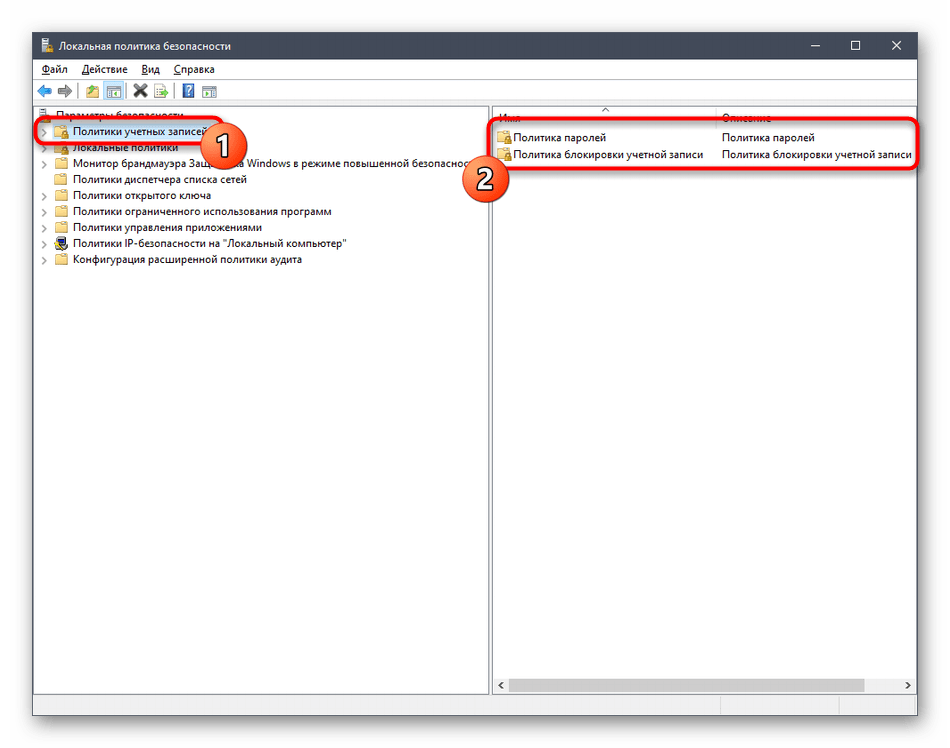
- В меню «Панель управления» перейдите в раздел «Администрирование».
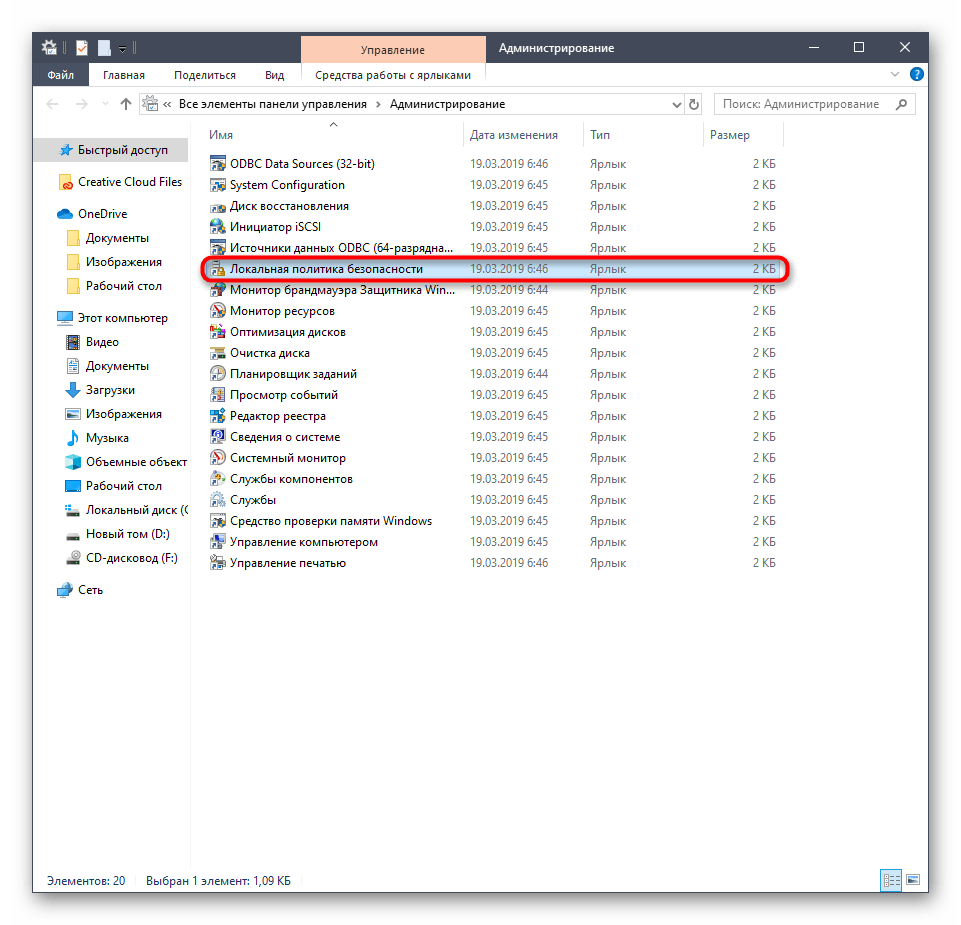
- Здесь вас интересует пункт «Локальная политика безопасности».
- Разверните каталог «Политики учетных записей». В нем вы видите две папки: «Политика паролей» и «Политика блокировки учетной записи». Эти названия уже говорят сами за себя, поэтому не будем останавливаться на каждой из них.
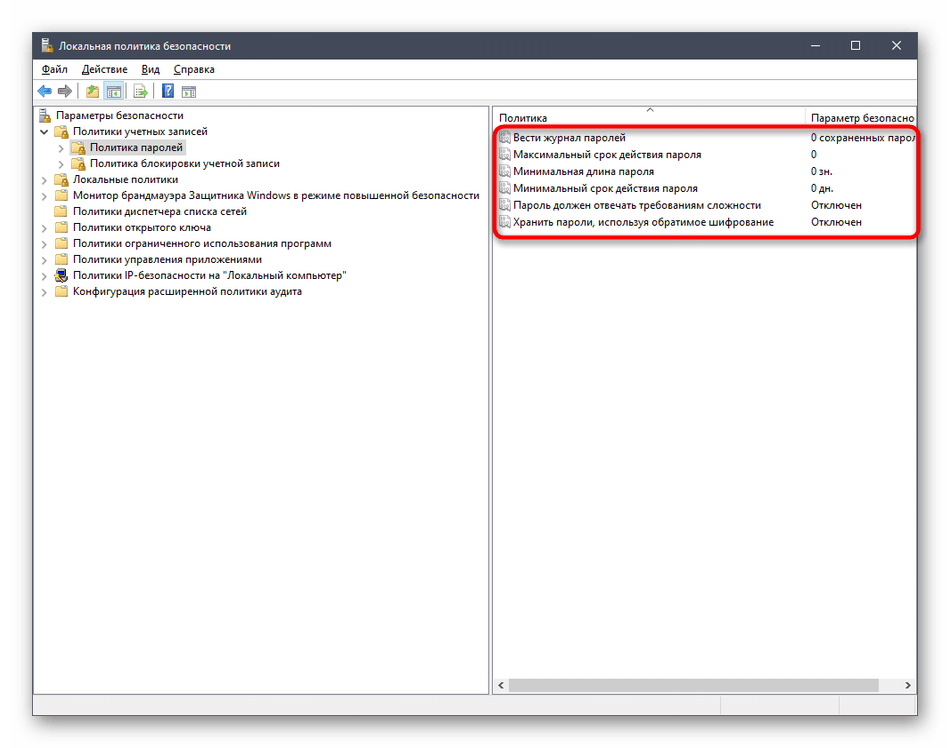
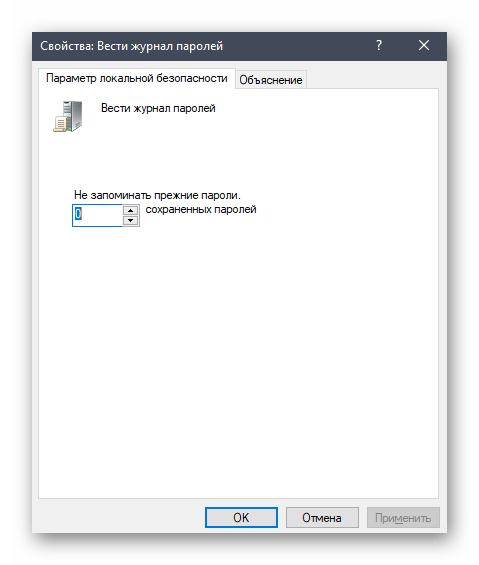
- При открытии такой директории появляется список доступных политик. Их названия как раз и означают опции или действия, осуществляемые через данные параметры. Возьмем за пример «Вести журнал паролей». Как видно, по умолчанию этот параметр не сохраняет вообще никакие пароли. Для редактирования значения нужно дважды кликнуть по строке, чтобы открыть свойства.
- Здесь можете указать, какое количество паролей должно в операционной системе. То же самое происходит и с другими политиками. Например, можно задать срок действия пароля или изменить минимальную длину в символах.
- Дополнительно обратите внимание на каталог «Параметры безопасности». Здесь имеется отдельный раздел «Контроль учетных записей». Он отвечает за предоставление прав доступа для учетных записей без прав администратора. Более детальные описания имеются в окнах свойств данных политик.
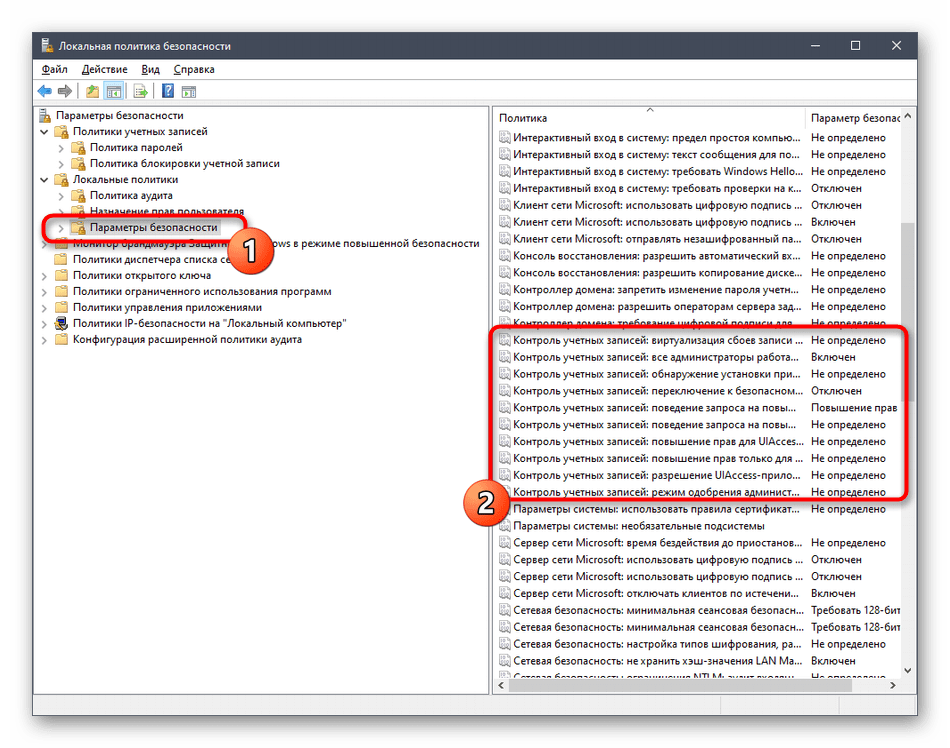
Учитывайте, что подобные изменения в Локальной политике безопасности может производить только администратор. К тому же не стоит изменять значения случайных параметров, не изучив их значения, поскольку это может привести к необратимым последствиям.
Способ 4: Вкладка «Безопасность» в свойствах файлов, папок и дисков
Отдельного внимания заслуживает настройка доступа для определенных файлов, папок и дисков, которая осуществляется через меню «Свойства». Там имеется вкладка «Безопасность». Через нее администратор может решить, какие именно действия с указанным объектом разрешить выполнять одному юзеру или целой группе. На примере это выглядит так:
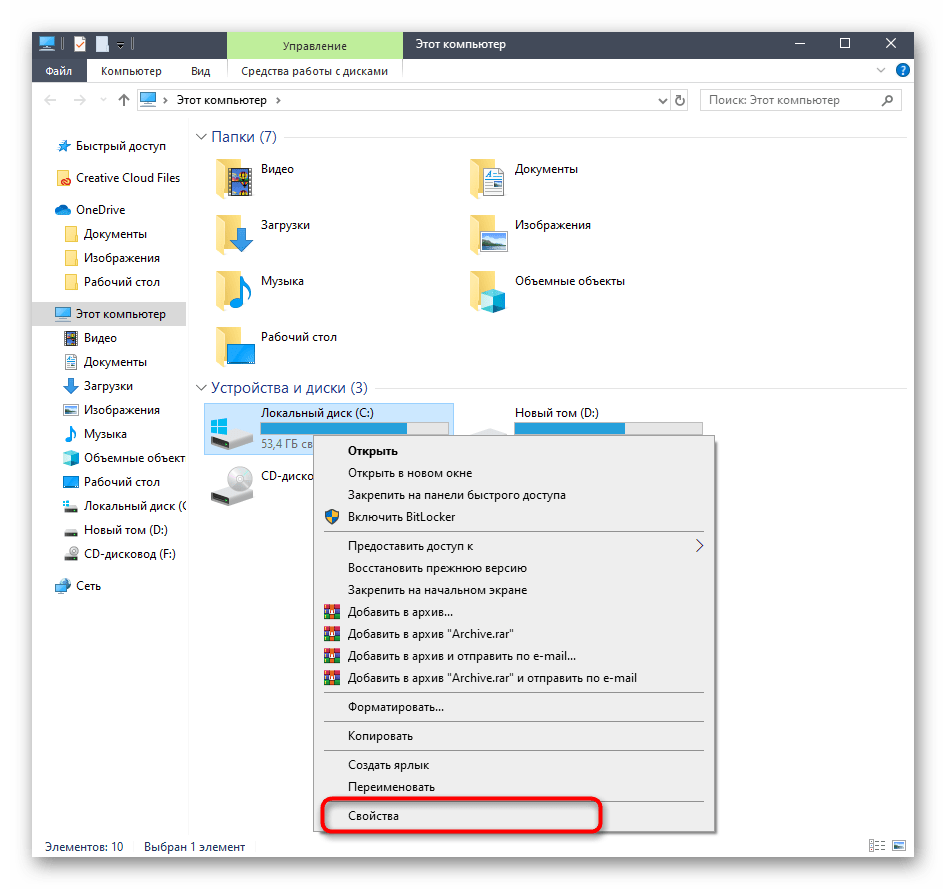
- Щелкните по необходимому объекту правой кнопкой мыши и выберите «Свойства». Учитывайте, что все изменения для папок применяются автоматически и для всех хранящихся там файлов, что касается и логических разделов.
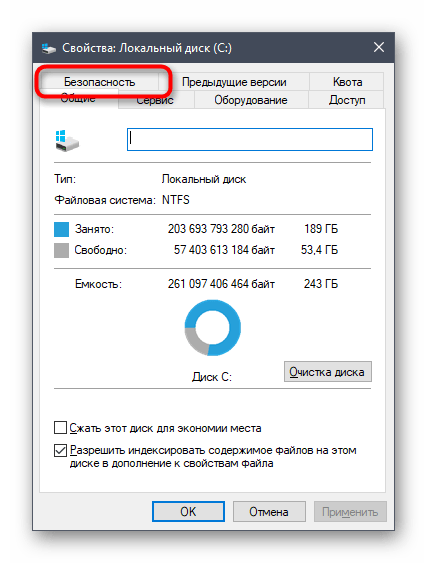
- В появившемся меню вас интересует вкладка «Безопасность».
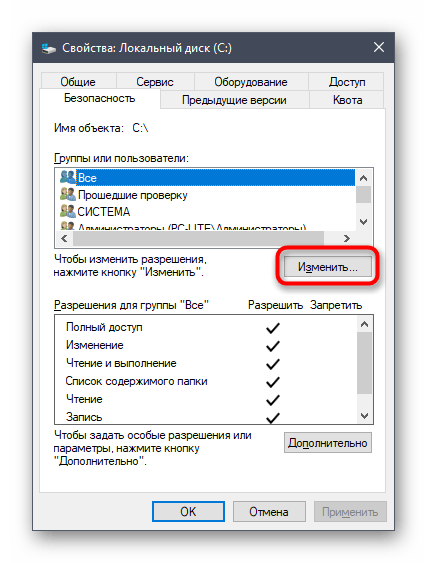
- Нажмите на кнопку «Изменить», которая находится под блоком «Группы или пользователи».
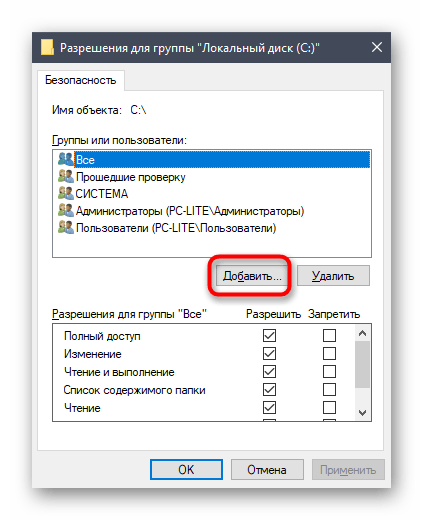
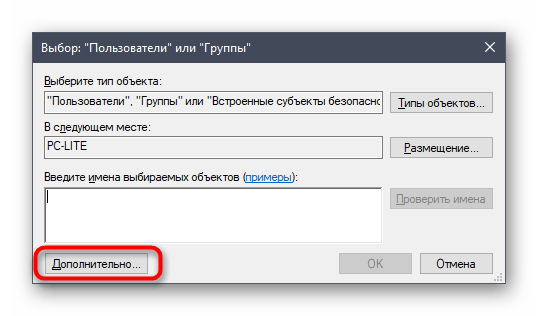
- Вы можете редактировать уже добавленные учетные записи, устанавливая разрешения либо запреты, или нажать на «Добавить», чтобы перейти к выбору профиля.
- Введите имена объектов в специально отведенное поле, а затем проверьте их. В качестве альтернативы можно использовать встроенную опцию поиска. Она открывается через «Дополнительно».
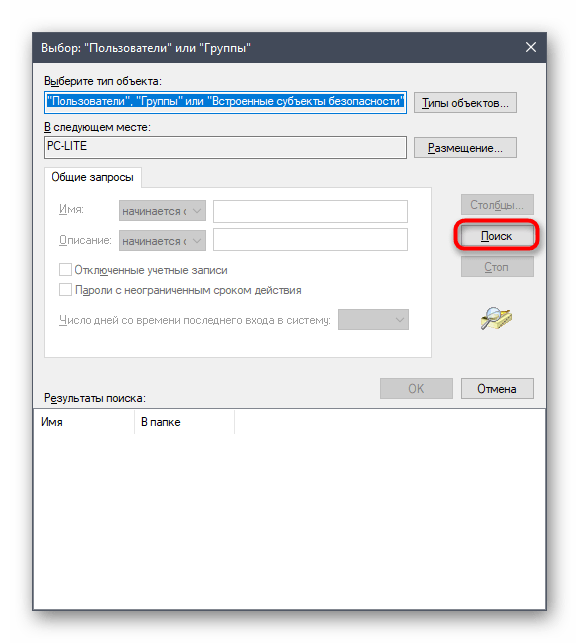
- Щелкните по кнопке «Поиск» и подождите несколько секунд.
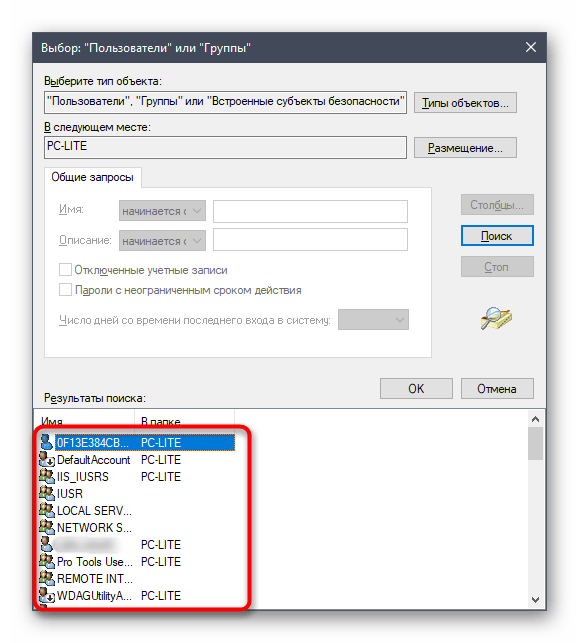
- Выберите необходимый профиль или группу из отобразившихся результатов, чтобы потом установить для этого объекта правила доступа к директории или файлу.
В конце давайте затронем тему взаимодействия с учетными записями при помощи рассмотренных выше инструментов. Существует огромное количество задач, которые возникают перед обычными юзерами и администраторами. Их решение просто не уместится в рамках одного материала, поэтому мы предлагаем ознакомиться с отдельными инструкциями на нашем сайте, воспользовавшись указанными далее ссылками. Просто прочтите заголовки и выберите подходящую для себя статью. Там вы найдете все необходимые руководства, позволяющие справиться с поставленной целью разными методами.
Читайте также:
Изменение имени учетной записи администратора в Windows 10
Управление правами учетной записи в Windows 10
Переключение между учетными записями пользователей в Windows 10
Создание новых локальных пользователей в Windows 10
Меняем имя папки пользователя в Windows 10
Отключение UAC в Windows 10
Сбрасываем пароль для учетной записи «Администратор» в Windows 10
Удаление администратора в Windows 10
Вы были ознакомлены с принципами управления учетными записями в Windows 10, а также получили необходимые руководства по решению самых частых задач, связанных с профилями. Осталось только перейти к соответствующему материалу, чтобы изучить и реализовать инструкции.
Наша группа в TelegramПолезные советы и помощь
Last Updated :
10 Sep, 2024
Managing user accounts and profiles is a critical task for system administrators in a Windows environment. Traditionally, these tasks were handled through the GUI tools handed by Windows, similar to the Control Panel, Active Directory Users and Computers, or the Computer Management press. still, with the rise of automation and scripting, PowerShell has become an important tool for managing user accounts and profiles efficiently. PowerShell provides a comprehensive set of cmdlets that allow administrators to automate repetitious tasks, streamline user account operations, and handle complex surroundings with ease.
Table of Content
- Understanding PowerShell for user management
- Creating and Managing user Accounts
- Managing user profiles
- Automation and Advanced Management
Understanding PowerShell for user management
PowerShell is a task automation frame developed by Microsoft that includes a command-line shell and an associated scripting language. It integrates deeply with Windows and provides access to system-position functions that allow administrators to manage various system configurations, including user accounts and biographies.
When managing user accounts, PowerShell allows administrators to produce, modify, and remove user accounts both on original systems and within Active Directory surroundings. This can be particularly useful for large-scale management tasks that involve multiple users and machines, where homemade operations through the GUI would be time-consuming.
Creating and Managing user Accounts
One of the most common tasks administrators need to perform is creating and managing user accounts. PowerShell makes this process straightforward with cmdlets like New- LocalUser for creating new users on original machines and New- ADUser for managing users in Active Directory.
For case, to produce a new original user, the following PowerShell command can be used
New- LocalUser- Name" JohnDoe" Description" New user Account" NoPassword
This command creates a new original user account named» JohnDoe» without assigning a word. Also, for Active Directory surroundings, the New- ADUser cmdlet can be used to produce sphere user accounts with specific parcels, similar to name, organizational unit, and group enrollments.
Once the user accounts are created, PowerShell also allows administrators to modify these accounts. For case, if you need to modernize a user’s word, you can use the Set- LocalUser or Set- ADUser cmdlet
Set- LocalUser- Name" JohnDoe" word( ConvertTo- SecureString" NewPassword123" AsPlainText- Force)
This command updates the word for the» JohnDoe» account securely.
Managing user profiles
In addition to managing user accounts, PowerShell is also precious for handling user biographies, which store particular settings, lines, and preferences for druggies. user profiles are especially important in surroundings with participated or roving biographies, as they ensure users have a harmonious experience anyhow of which machine they log in to.
PowerShell provides the Remove-point cmdlet to cancel user biographies, which can be useful for drawing up old or unused profiles on a system
Remove- point- Path" C usersJohnDoe" Recurse
This command removes the profile brochure associated with the» JohnDoe» user, drawing up the system.
In enterprise surroundings where roving profiles are used, PowerShell can also manage the synchronization of profiles across different machines. Cmdlets like Get- WmiObject can be employed to gather information about profiles on remote systems and automate profile management tasks.
Automation and Advanced Management
One of the crucial benefits of using PowerShell for managing user accounts and profiles is the capability to automate repetitious tasks. For illustration, if you need to produce multiple user accounts in bulk, a script can be written to circle through a CSV train and produce users grounded on predefined parameters. This automation significantly reduces the eventuality of mortal error and improves effectiveness.
Also, PowerShell integrates with Active Directory, allowing administrators to manage users across the entire sphere efficiently. The Active Directory module in PowerShell provides a rich set of cmdlets to handle user account creation, group enrollments, word operation, and more.
Conclusion
PowerShell is a necessary tool for managing Windows user accounts and biographies, offering inflexibility, effectiveness, and automation capabilities that traditional GUI tools can not match. Whether you are working in an original environment or managing a complex Active Directory sphere, PowerShell streamlines user management tasks, allowing administrators to handle their liabilities with less ease. By using cmdlets like New- LocalUser, Set- ADUser, and Remove- point, administrators can ensure user accounts and profiles are managed effectively, reducing the time and trouble needed for routine tasks.
Windows — многопользовательская система, что означает, что в ней могут относительно независимо работать несколько пользователей. Помимо пользовательских учетных записей, создаваемых при установке и после, в системе предусмотрено несколько скрытых системных учетных записей. При необходимости вы можете получить список и тех и других.
В этой простой инструкции подробно о способах посмотреть список пользователей Windows 11 или Windows 10, большинство из которых подойдёт и для предыдущих версий системы. Если вам требуется получить список пользователей без входа в систему, обратите внимание на последний раздел этого материала.
Windows PowerShell или Терминал Windows
Если по той или иной причине вам потребовалось получить список всех пользователей Windows 11, Windows 10 или одной из предыдущих версий системы — сделать это можно как в графическом интерфейсе, так и средствами командной стройки или PowerShell.
Я рекомендую начать с PowerShell, так как он позволяет быстро получить максимум информации об учетных записях пользователей:
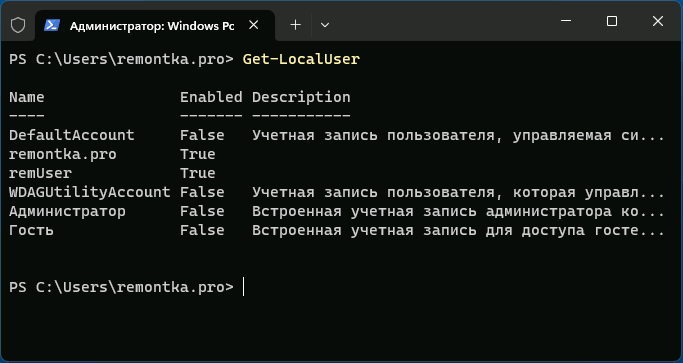
- Запустите Windows PowerShell или Терминал Windows от имени администратора, для этого можно нажать правой кнопкой мыши по кнопке «Пуск» и выбрать нужный пункт контекстного меню.
- Введите команду
Get-LocalUser
и нажмите Enter.
- В результате вы получите полный список учетных записей пользователей, а также информацию, включена ли учетная запись в столбце «Enabled».

Обратите внимание, некоторые учетные записи могут вызвать вопросы, ответы на них можно найти в статьях:
- Как включить скрытую системную учетную запись Администратор в Windows 11 (подойдет и для Windows 10)
- Для чего нужна учетная запись WDAGUtilityAccount в Windows 11/10
Командная строка
Список пользователей Windows можно получить с помощью командной строки:
- Запустите командную строку (права администратора не обязательны).
- Введите команду
net user
и нажмите Enter, чтобы получить список всех пользователей.

- Ещё одни вариант команды:
wmic useraccount get name


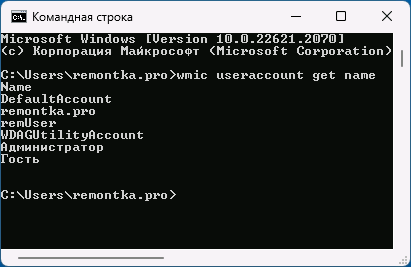
Оба варианта отобразят как активных, так и отключенных (скрытых) пользователей, но без информации, о том, что это за учетная запись и включена ли она. Второй вариант команды допускает следующую модификацию:
wmic useraccount get name,status
для просмотра информации о статусе учетных записей (для включенных — Ok, для отключенных — Degraded).
Параметры Windows 11 и Windows 10
«Основной», но не идеальный метод просмотра списка пользователей в графическом интерфейсе — приложение «Параметры»:
- Откройте «Параметры».
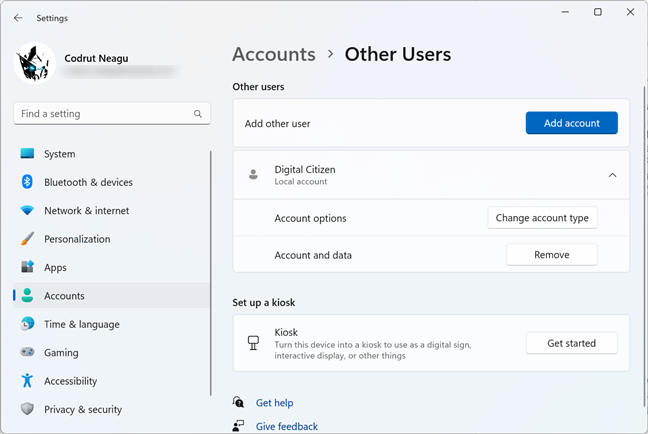
- В Windows 11 откройте раздел «Учетные записи» — «Другие пользователи» для того, чтобы посмотреть список пользователей, помимо текущего (и без отключенных и системных учетных записей).

- Если вы используете семейную группу (например, для родительского контроля Windows), пользователи, добавленные в семью, будут показаны не в «Другие пользователи», а в «Учетные записи» — «Семья».

- В Windows 10 откройте «Параметры» — «Учетные записи» — «Семья и другие пользователи». На открывшемся экране будут показаны пользователи компьютера (за исключением текущего), а также члены семейной группы при их наличии.


Как в Windows 11, так и в Windows 10 в «Параметрах» вы не увидите отключенные учетные записи.
Локальные пользователи и группы
Ещё один вариант просмотра пользователей в графическом интерфейсе — оснастка «Локальные пользователи и группы».
- Нажмите клавиши Win+R на клавиатуре, либо нажмите правой кнопкой мыши по кнопке «Пуск» и выберите пункт «Выполнить». Введите lusrmgr.msc в диалоговое окно «Выполнить» и нажмите Enter.
- В открывшемся окне «Пользователи» вы сможете посмотреть список пользователей текущей системы, их статус (если рядом со значком отображается стрелка — пользователь отключен).

- Дважды нажав по учетной записи пользователя, можно изменить её параметры (например, включить или отключить пользователя) и посмотреть описание.


Некоторые дополнительные детали, которые могут пригодиться в части получения списка пользователей:
- Если при использовании способов получения списка пользователей в командной строке или PowerShell вам требуется вывести список в файл, просто добавьте «> путь_к_файлу» через пробел после команды, например:
wmic useraccount get name,status > spisok.txt
Учитывайте, что путь (папка) в которую сохраняется файл должен существовать, а если для сохранения файла в указанном расположении требуются права администратора, консоль следует запускать с соответствующими правами.
- При необходимости получить список пользователей без входа в систему в случае, если он невозможен, либо если система не запускается, вы можете использовать утилиты с WinPE, те же самые, которые описаны в последней части инструкции про сброс пароля Windows 11 (подойдет и для других версий системы).
Если у вас остаются вопросы, касающиеся просмотра списка пользователей Windows, вы можете задать их в комментариях ниже, описав ситуацию и задачу в деталях.