
Applies ToWindows 11 Windows 10
Support for Windows 10 will end in October 2025
After October 14, 2025, Microsoft will no longer provide free software updates from Windows Update, technical assistance, or security fixes for Windows 10. Your PC will still work, but we recommend moving to Windows 11.
Learn more
With System Restore you can revert your PC’s state to a previous point in time. This can be particularly useful when troubleshooting issues caused by recent changes, such as software installations, driver updates, or system settings modifications. By using System Restore, you can undo these changes without affecting your personal files, providing a safe way to resolve problems without losing important data.
System Restore works by utilizing restore points, which are snapshots of the system’s configuration and settings at a specific moment. These restore points can be created automatically by the system during significant events, like software installations or updates, or manually before making major changes. To learn more, see System Protection.
When a restore point is selected, System Restore reverts the system files, registry settings, and installed programs to the state they were in at the time the restore point was created. This helps maintain system stability and can be a valuable tool for recovering from unexpected issues.
Recover your PC from a system restore point
You can apply a restore point when you are signed in to Windows or from the Windows Recovery Environment (Windows RE).
Select the option that best suits your needs:
-
To open System Restore, you can use one of the following methods:
-
From the Control Panel, select Recovery > Open System Restore
-
Use the keyboard shortcut +R, type rstrui.exe and press Enter
-
-
In the Restore system files and settings box, select Next
-
Select the restore point that you want to use in the list of results. If you don’t see the restore point that you want to use, select the Show more restore points check box to see more restore points
-
Optionally, select Scan for affected programs
-
Once you find the proper restore point, select Next > Finish
-
After the restore point is applied, Windows restarts automatically
Note: If you’ve encrypted your device, you’ll need your BitLocker key to complete this task. If you don’t know your BitLocker key, see Find your BitLocker recovery key.
-
Access the Windows Recovery Environment
-
Once in Windows RE, select Troubleshoot > Advanced options > System Restore
-
Select the restore point that you want to use in the list of results. If you don’t see the restore point that you want to use, select the Show more restore points check box to see more restore points
-
Optionally, select Scan for affected programs
-
Once you find the proper restore point, select Next > Finish
-
After the restore point is applied, select Restart
Need more help?
Want more options?
Explore subscription benefits, browse training courses, learn how to secure your device, and more.
System Restore creates restore points for your Windows software. If you’ve made changes to your Windows 11 PC that you regret but don’t know how to change, Microsoft’s System Restore feature is your friend.
In this article, we’ll explain how to use the System Restore function on your Windows 11 PC to undo changes or fix software-related issues.

What Is System Restore?
System Restore is a Microsoft Windows tool that’s designed to back up and restore your PC’s software. System Restore saves the details of your system files and registry as Restore Points so that, when needed, it can help repair Windows 11 and return a system to a working state without you having to reinstall the operating system.
You can use it to restore your system back to its last functional point, uninstall the latest windows update, remove malware, or revert your settings back to before you made unwanted system changes.
All the apps, drivers, and updates installed on the system since the system point was created will be deleted. Fortunately, the System Restore process has no impact on your personal files such as documents or photos.
In Windows 10, the System Restore setting is a part of the Advanced System Settings in the Control Panel. Microsoft has made this setting more accessible in Windows 11 by integrating it within the Settings app.
The System Restore feature is not enabled by default so you’ll need to turn it on to start creating restore points. The process is relatively simple.
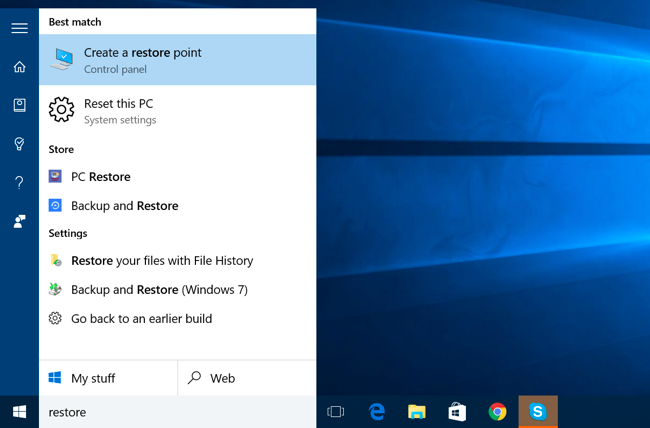
- In the Windows 11 taskbar, select the search bar and type create a restore point then select the top option.

- Select which system drive of your Hard Drive you want to create a System Restore Point for and press the Configure button.

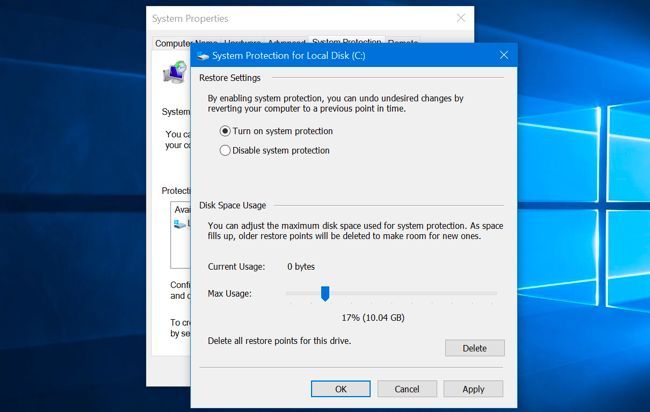
- Choose the Turn on system protection option to enable System Restore. Use the Max Usage slider to allocate the maximum disk space you want to use for storing the System Restore Points.

- Select Apply. Your system will now start making System Restore Points.
How to Create a System Restore Point for Your Windows 11 System
After enabling System Restore, a new restore point will automatically be created every week or whenever you install a system update or application. It’s also a good idea to manually create System Restore points before making any changes to your system preferences or registry.
Here’s how to create a System Restore Point manually in Windows 11:
- In the Windows 11 taskbar, select the search bar and type create a restore point. Press Open to open the System Properties window.

- Select the Create button.

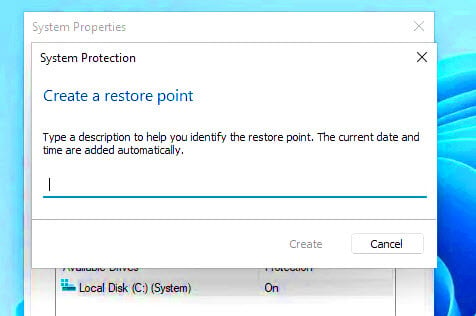
- Name the restore point, and choose Create.

- Wait for the system to finish the process, then select Close in the dialog box. A new system restore point has now been created.

How to Use System Restore
You can use restore points to revert your Windows PC to an earlier stage and fix any bugs you may be experiencing.
To do so:
- In the Windows 11 start menu, select the search bar and type create a restore point. Press Open.
- Select the System Restore button.

- If you are happy with the recommended restore point, select Recommended restore, otherwise select Choose a Different Restore Point. Choose Next.

- If you chose to pick another restore point, select the restore point you want to use. In the System Restore window, you can now select Scan for affected programs to see the changes made to the system before the restore point was created.
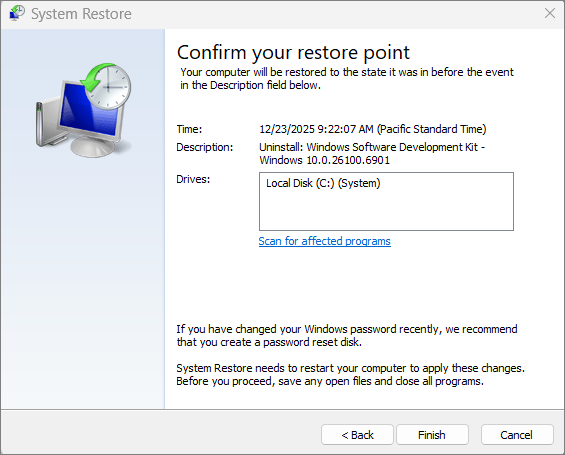
- Confirm the restore point you want to revert your system to. Select Finish to start the restoration process.

Your PC will now start to apply changes and will restart at least once. This may take a while depending on various factors including the size of the restore point and the age of the PC’s hardware. Do not turn off your computer or use it while the restoration is in progress — just sit back and let it do its thing.
After the restoration process is complete, a window will appear to let you know that you have successfully restored your PC.
Keep in mind that your settings may be different depending on what changes were made since the restore point. Your important and personal files should remain untouched.
If the issues you were experiencing are still present after the restore you may need to restore to an older system restore point or factory reset Windows.
Note: You can also create a Windows 11 recovery USB drive in advance to repair your PC in the case that it won’t turn on.
How to Use System Restore When Your Computer Won’t Boot
If the bugs you are trying to resolve are preventing you from logging into your PC, there are still ways to commence the System Restore process in the Advanced startup options.
- Start your computer. When you see the Windows logo hold down the power button until it reboots.
- Continue to force reboot your PC until the Automatic Repair screen appears.
- Select Advanced options.

- Select Troubleshoot.

- Choose Advanced options.

- Select System Restore.

- If asked, enter the Administrator password then choose Continue.
- Select Next if you are happy with the recommended restore point or select Choose a Different Restore Point if you would like to choose a different one.

- Press Next. If you chose to pick another restore point, select the restore point you want to use then select Next.
- Confirm the restore point you want to revert your system to. Choose Finish to start the system restoration process.

Do not turn your PC off or try to use it while the restoration process takes place. This may take a few hours.
Backup, Backup, Backup
The System Restore Function is a fantastic recovery tool that allows users to revert their buggy computers to a functional system state. After reading this article, hopefully, you can use your system restore points to avoid bugs and keep your Windows PC running smoothly.
Related Posts
- How to Fix a “This file does not have an app associated with it” Error on Windows
- How to Add OneDrive to Windows File Explorer
- How to Fix an Update Error 0x800705b4 on Windows
- How to Resolve “A JavaScript error occured in the main process” Error on Windows
- How to Fix the Network Discovery Is Turned Off Error on Windows
System Restore is a very useful and important tool in Windows 11 and Windows 10. It helps you fix errors, remove malware (still have to be used along with an antivirus program), and more by restoring your computer to a previous state. In this guide, we’ll show you how to turn on System Restore and make restore points by yourself.
Note: Turning on System Restore now will start saving restore points from now onward. If you do a system restore later, it will go back to the latest saved point. Making a restore point after something bad happens won’t undo the bad event. If there’s no restore point, your best choice is to reset Windows 11/10 to factory settings.
Enable System Restore in Windows 11/10
System Restore usually turns on by itself in Windows 11/10. But sometimes, it might be off, and you might not know why. So, it’s good to check if it’s on and turn it on if it’s not. This protects you from future problems.
- Go to the Start menu.
- Look for System and open it. (In Windows 11, search for “Advanced system settings” in Start and skip the next step.)
- Click Advanced system settings on the left.
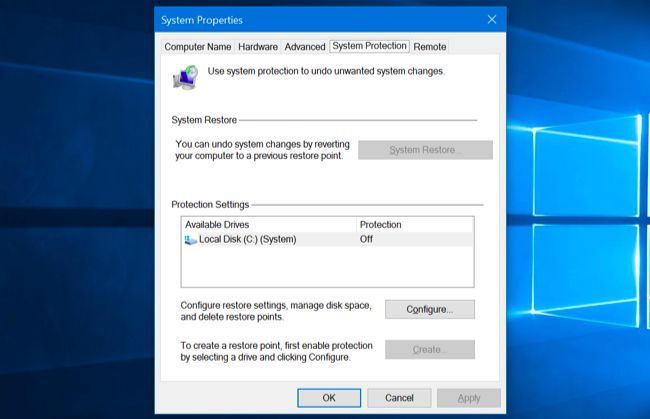
- Go to the System Protection tab.
- If there are no restore points, the System Restore button won’t work.
- Pick your main drive, usually C:.
- Click Configure.

- Choose Turn on system protection.

- Set how much space to use for System Restore. More space means more restore points.
- Hit Apply, then OK.
When System Restore is on, it makes its first restore point right away. It will make more over time. If it runs out of space, it will delete older ones.
Create system restore point manually
To make a restore point yourself, do the steps above until step 7. But instead of clicking Configure, click Create. Name the restore point whatever you like and click Create to save the current state of your system.
Additional tip: If you’re running out of space, deleting old restore points can free up space. But, this means you might not be able to go back if needed. Only delete them if you think you won’t need them. Even if you delete them, as long as System Restore is on, it will make new ones.
To go back to an earlier time on Windows 11/10, read: How to system restore Windows 11/10.
How can System Restore help?
System Restore is great for keeping your Windows computer safe. It’s good for:
- Going back if updates or new software mess up your system.
- Getting rid of malware by going back to a clean state (in most cases, you will still need to run a full scan with a proper anti-malware program).
- Fixing settings that make your computer act weird.
- Maybe getting back a file you deleted by accident.
- Fixing problems without wasting too much time.
Common scenarios for using the feature
The below are some scenarios where System Restore comes in handy:
- If new software or drivers cause problems, go back to a previous state to fix it.
- If your computer keeps crashing or freezing, going back might fix it too.
- If a Windows update doesn’t work right, use System Restore and try again.
- If malware gets on your computer, you can revert some damages by going back to before it happened.
What System Restore cannot do
While System Restore sometimes sounds like a superhero for your computer, there are some things it can’t fix:
- It doesn’t back up your personal files, so if you lose them, System Restore won’t bring them back.
- It can’t help with hardware issues. If something’s wrong with your computer’s hardware, System Restore won’t fix it, obviously.
- It won’t remove every virus or malware. Some nasty bugs can hide from System Restore, so you might still need to clean those out another way, usually by using a reputable security software.
- If your computer is really messed up, sometimes System Restore might not work. It’s good, but it’s not magic.
But know that, System Restore isn’t the same as keeping backups of your files. Always back up your important stuff to avoid losing it if something bad happens.
Testing if System Restore is working properly
It’s one thing to get System Restore all set up, but how can you be sure it’s really doing its job? Giving it a quick test can set your mind at ease. Here’s a straightforward way to see if System Restore is on point:
- First up, set up a new restore point and call it “Test Restore Point.” Just follow the steps we’ve already covered in this guide.
- Then, tweak something small on your computer that you’ll notice—like changing your desktop wallpaper or dropping a fake file on your desktop.
- After that, roll back time with System Restore to “Test Restore Point.” It should reverse that little tweak you made, such as switching your wallpaper back or making that fake file vanish.
- If everything reverts back to the way it was before, you’re golden! System Restore is working along just fine. If things don’t go back to normal, you might want to double-check your settings.
This quick test doesn’t eat up much time, but it can really save you from a huge hassle later by making sure System Restore is all set and ready to bail you out when you’re in trouble.
With Windows 10, Microsoft seems to have disabled System Restore by default — at least on some PCs. System Restore has been around since Windows ME, creating snapshots of system files you can restore if a problem occurs.
Windows 10 still does contain System Restore, so you can re-enable it if you feel more comfortable with System Restore as a safety net. Windows 10 also offers other system-recovery features, helping lessen the need for System Restore.
Why Did Microsoft Disable System Restore?
Microsoft hasn’t really explained why it’s not enabling System Restore by default. However, we do have some idea. System Restore can use quite a bit of disk space when it creates those snapshots, and Microsoft is trying to get Windows 10’s disk space requirements down. Microsoft wants Windows 10 to run on devices with as little as 16 GB of internal storage — all the better to compete with Chromebooks and cheap Android tablets.
System Restore is also less necessary thanks to other features in Windows 10 that can quickly get your Windows system back to a fresh state without a full reinstallation of Windows. Windows 10’s PC reset feature that will give you a fresh Windows system without necessarily wiping your files is one big help here.
How to Re-Enable System Restore
You can re-enable System Restore from the Control Panel. It will use some system storage space for its snapshots, so you probably won’t want to do this on inexpensive laptops and tablets with only a small amount of storage space. If you have a big hard drive in your PC, however, it won’t be a big deal.
Bear in mind that it’s disabled by default, so it hasn’t been creating snapshots. If you’re experiencing a system problem, re-enabling System Restore won’t help because you won’t have any old snapshots to restore. When you re-enable it, it will create a new snapshot — of your current system in its damaged state, if it’s damaged. If you want to enable and rely on System Restore, this must be done preemptively, before you have a problem.
This option is only available in the Control Panel, not the new Settings app. The quickest way to access System Restore settings will be to open the Start menu or Start screen, type «Restore» to search for it, and click the «Create a restore point» shortcut. You can also open the Control Panel, navigate to «System», and click the «System Protection» link in the sidebar.
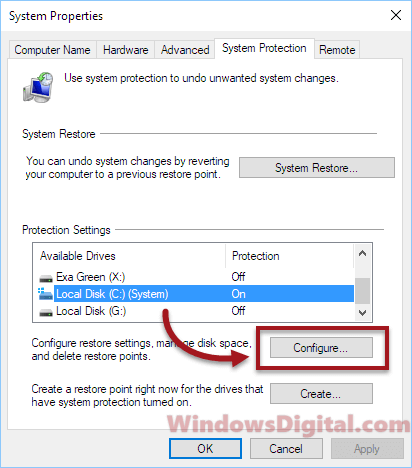
Open this window and you’ll see that system protection is «Off» for your Windows 10 system drive and the other drives in your computer. Select your system drive and click the «Configure» button if you want to enable it.
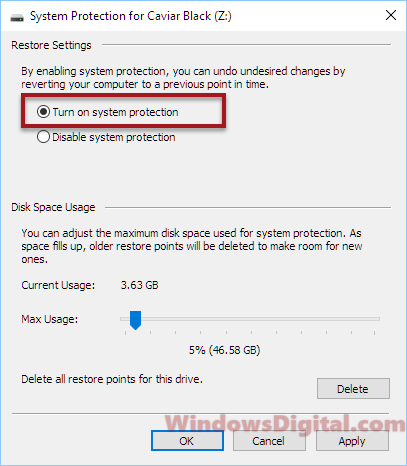
Click the «Turn on system protection» option and choose how much disk space you want to reserve for your restore points. The less space you provide, the fewer restore points System Restore will be able to kepe at once. Click «OK» and System Restore will be enabled.
To use System Restore in the future, just go back to the same «System Protection» panel you used above. Click the «System Restore» button — now no longer grayed out, assuming you enabled System Restore — and you can use System Restore to go back to a previous restore point. Check out our full guide to System Restore for more information on how to use it.
If Windows isn’t normally bootable, you can also boot into Safe Mode and run System Restore, or launch System Restore from the «advanced startup options» recovery environment.
Other Ways to Fix System Problems
If you wanted to use System Restore to fix a problem but found out it’s been disabled all along, you’ll have to fix whatever system problem you’re encountering in another way.
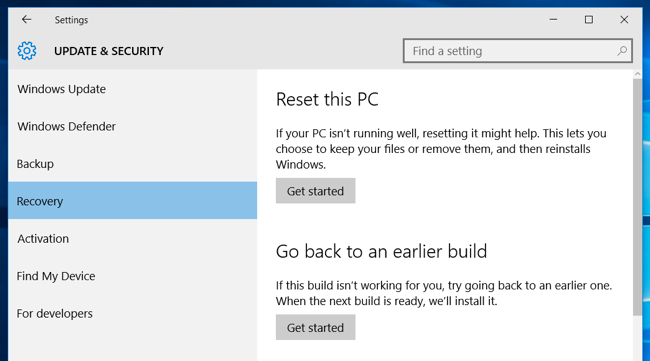
If the problem was caused by a recent update, you can look at uninstalling that Windows Update or reverting to a previous «build» of Windows 10. This should fix problems that might occur due to Windows Update and issues with your specific hardware and software.
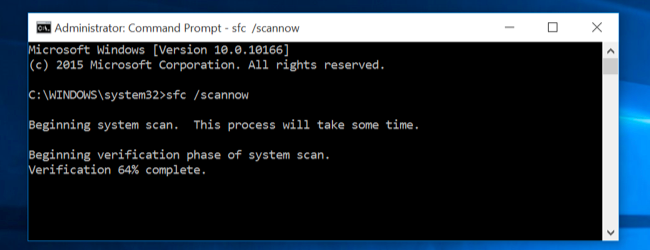
If your system files are corrupted, you can try using the SFC — system file check — command to scan your system files for problems and automatically repair them.
If you installed a program or hardware driver and the problem started after that, you can visit the Control Panel and uninstall that program or hardware driver.
If Windows isn’t booting properly so you can’t do any of this, you can boot into Safe Mode. You can also visit the «advanced startup options» screen — these will automatically appear if Windows 10 can’t boot normally — and use the options there.
There are many other ways to troubleshoot and fix a Windows 10 system. However, the one surefire solution will be to use the «Reset this PC» tool in the Settings app. This will wipe your Windows 10 system and restore it to factory-default settings. You’ll have to reinstall your software and reconfigure Windows afterwards. However, your personal files will be kept and won’t be erased. Whatever system problem you’re having, this will restore all your Windows 10 system files to their default state.
System Restore has always been a bit of a shotgun approach, just rolling back an entire system rather than fixing whatever that individual problem was. It used a bit of disk space, too.
Having it disabled by default is certainly a loss that makes tech support harder to perform. It used to be enabled by default and was a quick thing to try whenever a Windows PC isn’t working properly. Now, you just might have to use the «reset» feature instead.
(Image credit: Mauro Huculak)
If you’ve ever had a Windows 10 setup suddenly acting up after a driver update, app installation, or Registry tweak gone wrong, you’re not alone. These changes can sometimes cause system issues, which may not always be easy to reverse. That’s where System Restore comes in.
This built-in recovery feature has been designed to create snapshots of your system, known as restore points, capturing the current state of your computer at a specific time. When enabled, the operating system can automatically create a restore point before major events like updates or program installations. If something goes wrong, you can roll your system back to that earlier state, without losing personal files like documents, pictures, or videos.
However, System Restore is turned off by default, which means it won’t create restore points until you manually enable it. A lot of users overlook this important step, often realizing too late when they actually need it.
From my experience helping users recover their systems, enabling System Restore is one of the first things I recommend after setting up a new device. It’s not a substitute for a full system backup, but it’s a fast, effective way to undo harmful changes and avoid having to reinstall the operating system.
In this how-to guide, I’ll outline the steps to set up System Restore and the steps to recover from problems that may be affecting your computer’s normal operation.
Recent updates
These instructions has been updated to ensure accuracy and reflect changes to the process in the operating system.
How to enable System Restore on Windows 10
To enable System Restore on Windows 10, use these steps:
- Open Start.
- Search for Create a restore point and click the top result to open the System Properties page.
- Select the primary «System» drive under the «Protection Settings» section.
- Click the Configure button.
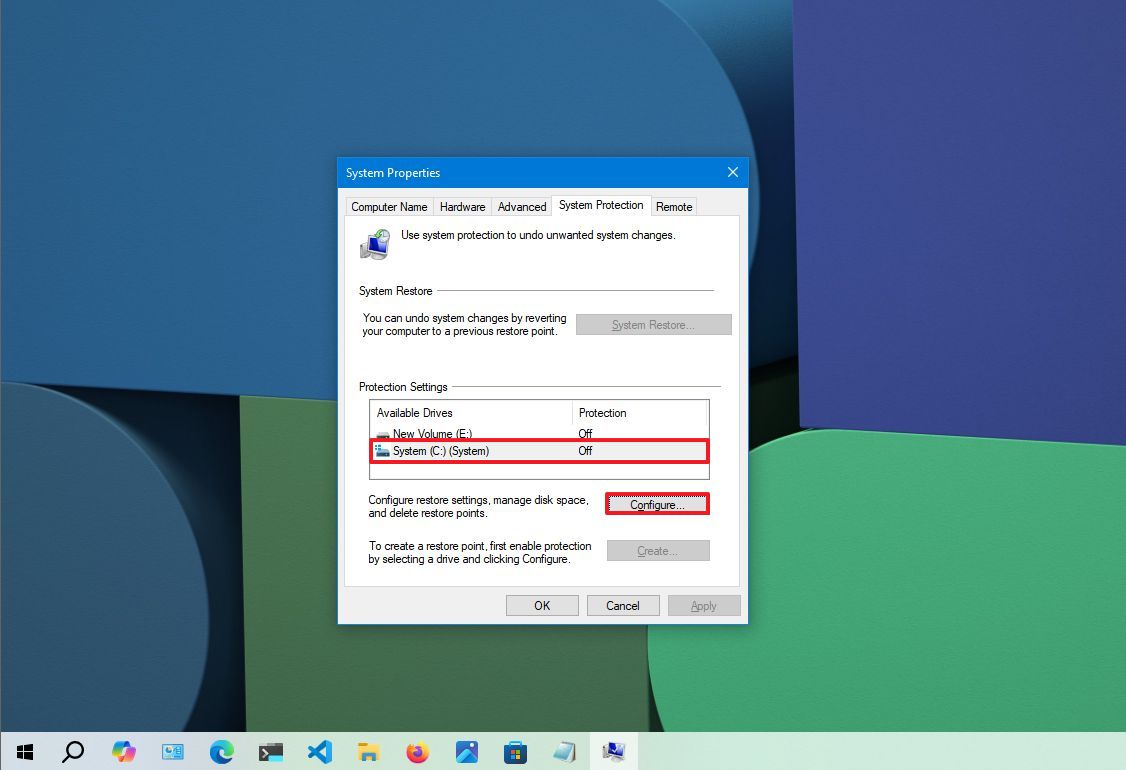
- Select the «Turn on system protection» option.
- Quick tip: Windows 10 can automatically manage space. However, under the «Disk Space Usage» section, you can use the slider to specify the storage for recovery. You will also find a «Delete» button, which you can use to remove all restore points. This can come in handy if you want to free up space or start over with the recovery feature.

- Click the Apply button.
- Click the OK button.
Once you complete the steps, the system automatically creates restore points when applying a new update or specific system changes.
All the latest news, reviews, and guides for Windows and Xbox diehards.
System Restore doesn’t automatically enable protection for all drives. If you have other drives connected to your computer, you must enable the feature manually on each device.
How to create a System Restore point on Windows 10
Once System Restore is enabled, it will automatically create a checkpoint when it detects system changes. However, if you plan to make configurations manually, you always want to create a restore point manually.
To create a restore point on Windows 10 manually, use these steps:
- Open Start.
- Search for Create a restore point, and click the top result to open the System Properties page.
- Click the Create button under the «Protection Settings» section.
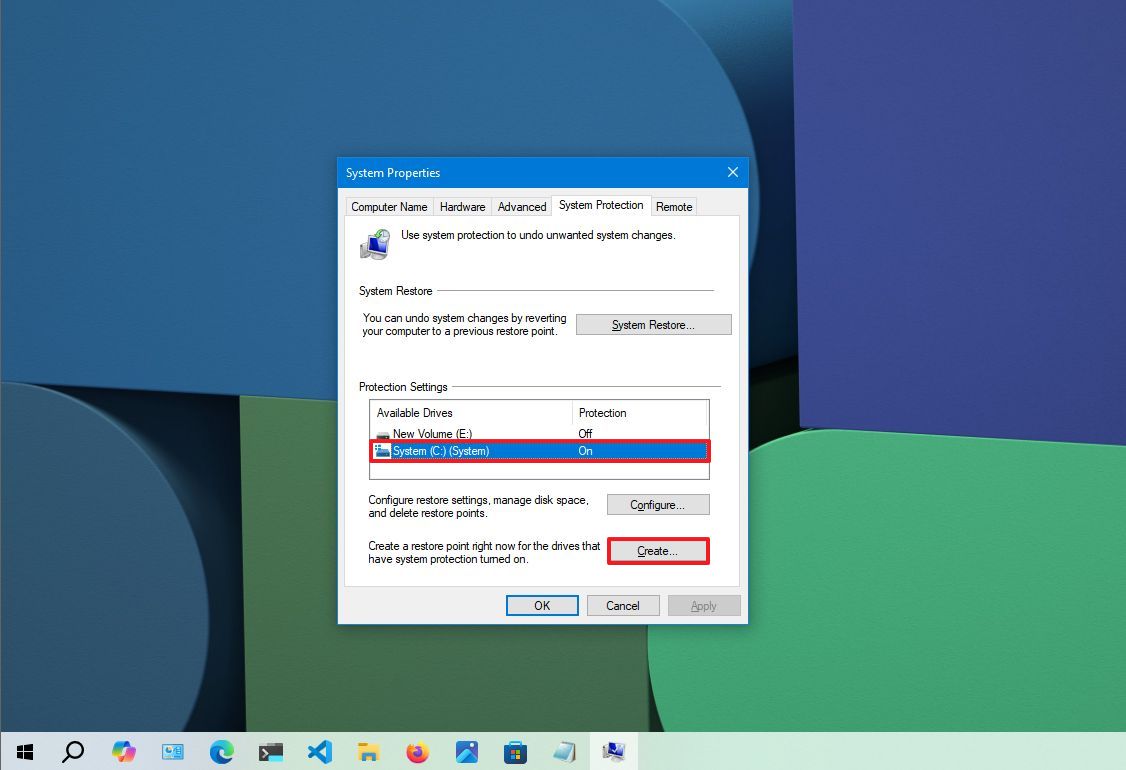
- Confirm a descriptive name for the restore point, for example, Before modifying the Registry settings.
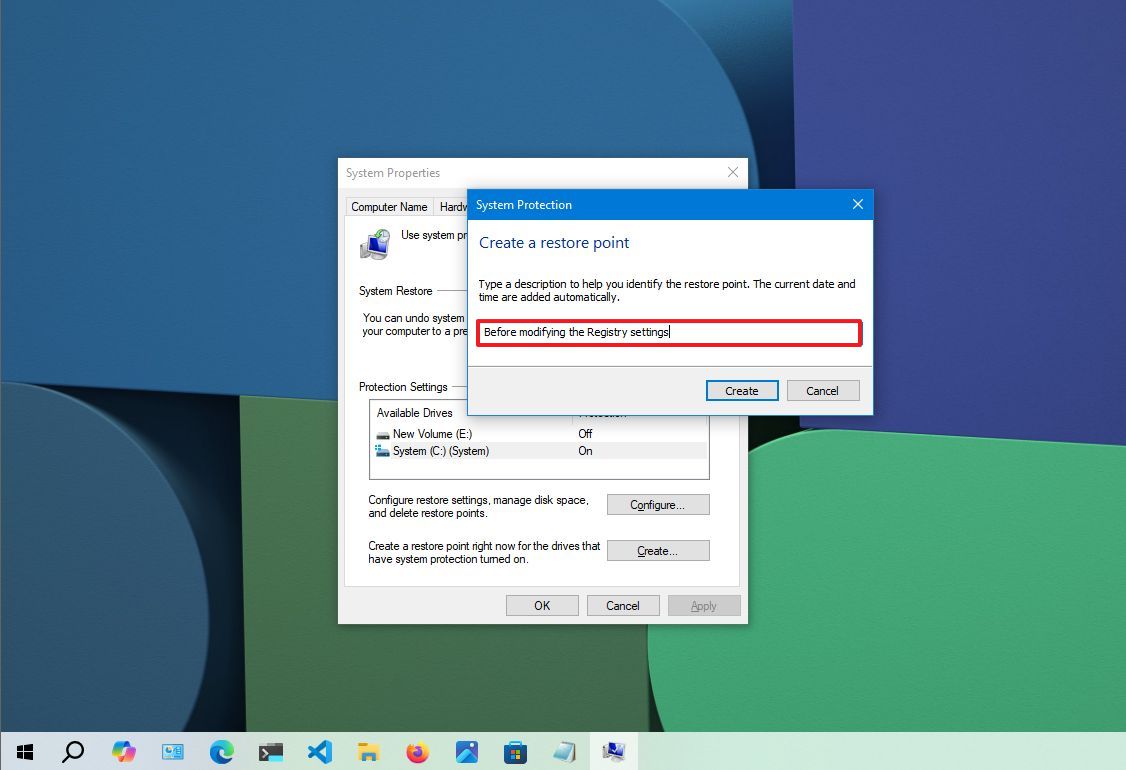
- Click the Create button.
- Click the Close button.
- Click the OK button.
- Click the Close button.
After you complete the steps, you should be able to undo system changes in the event that something happens while installing a new driver, program, or applying changes to the Registry.
How to recover using System Restore on Windows 10
If an error or an unknown problem occurs after installing or modifying system settings, you can use the recovery feature to apply a restore point to undo the changes and fix the issue. If the computer no longer boots correctly, you can complete this task from the desktop environment or the advanced startup settings.
Undo system changes from desktop
When you have access to the Windows 10 desktop, you can revert changes using these steps:
- Open Start.
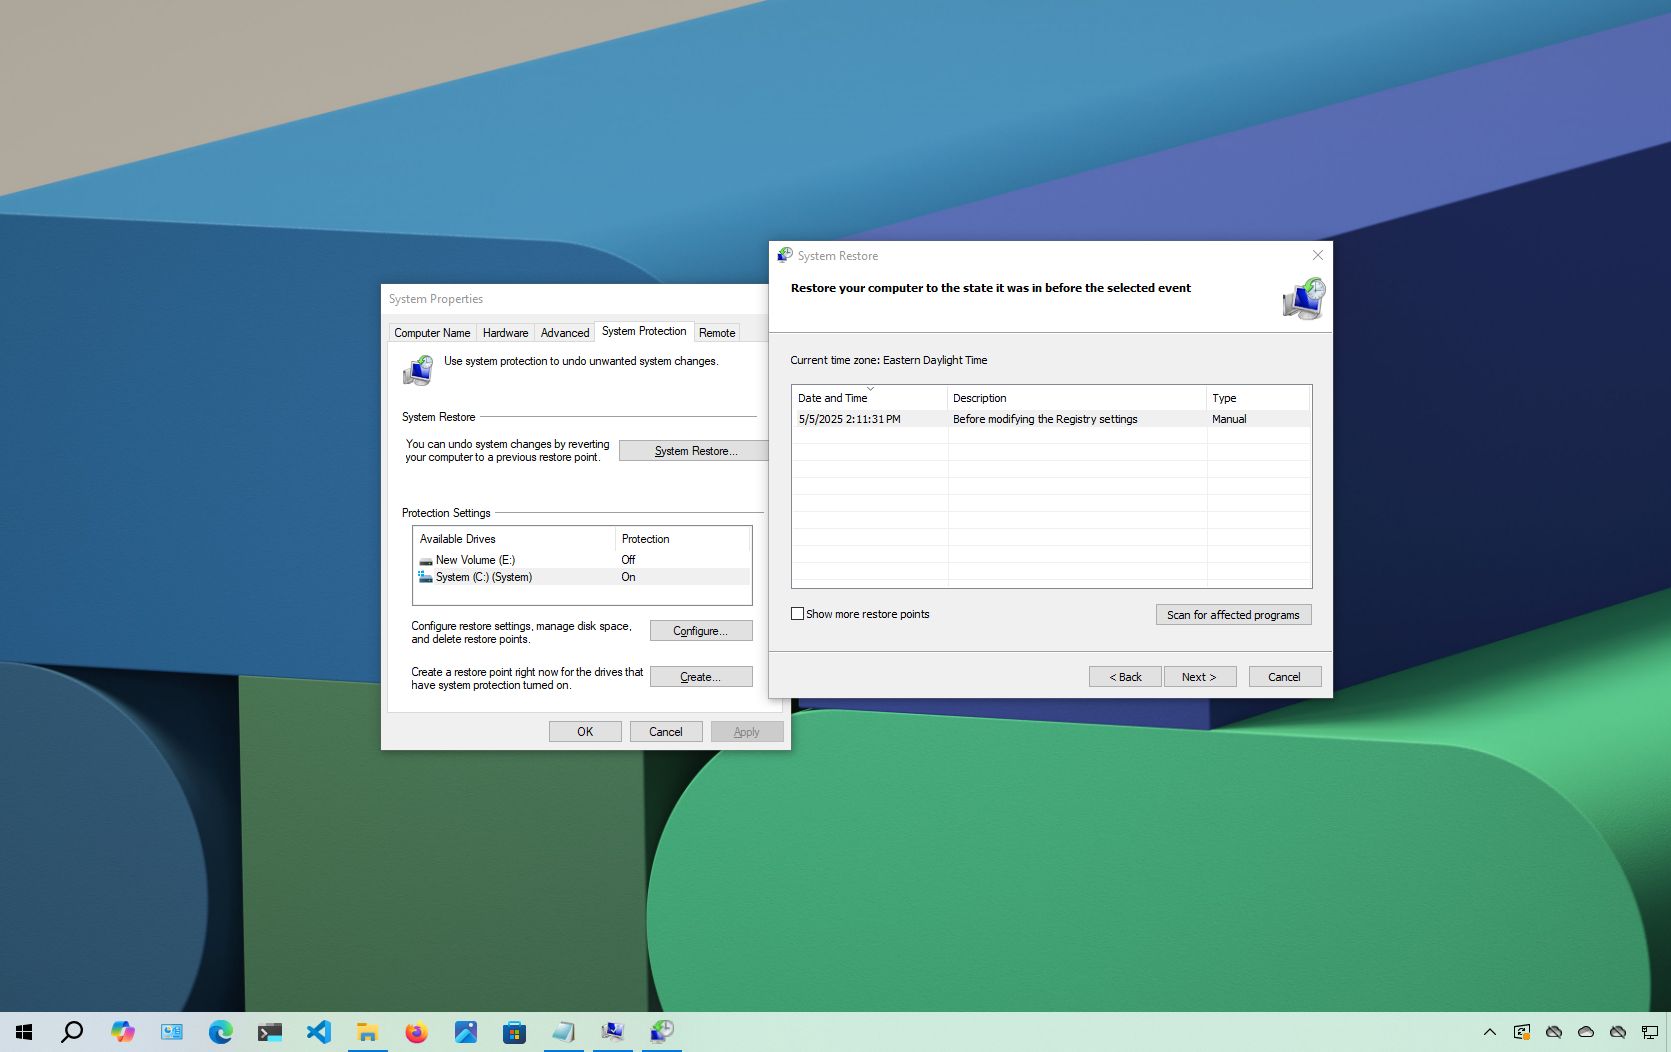
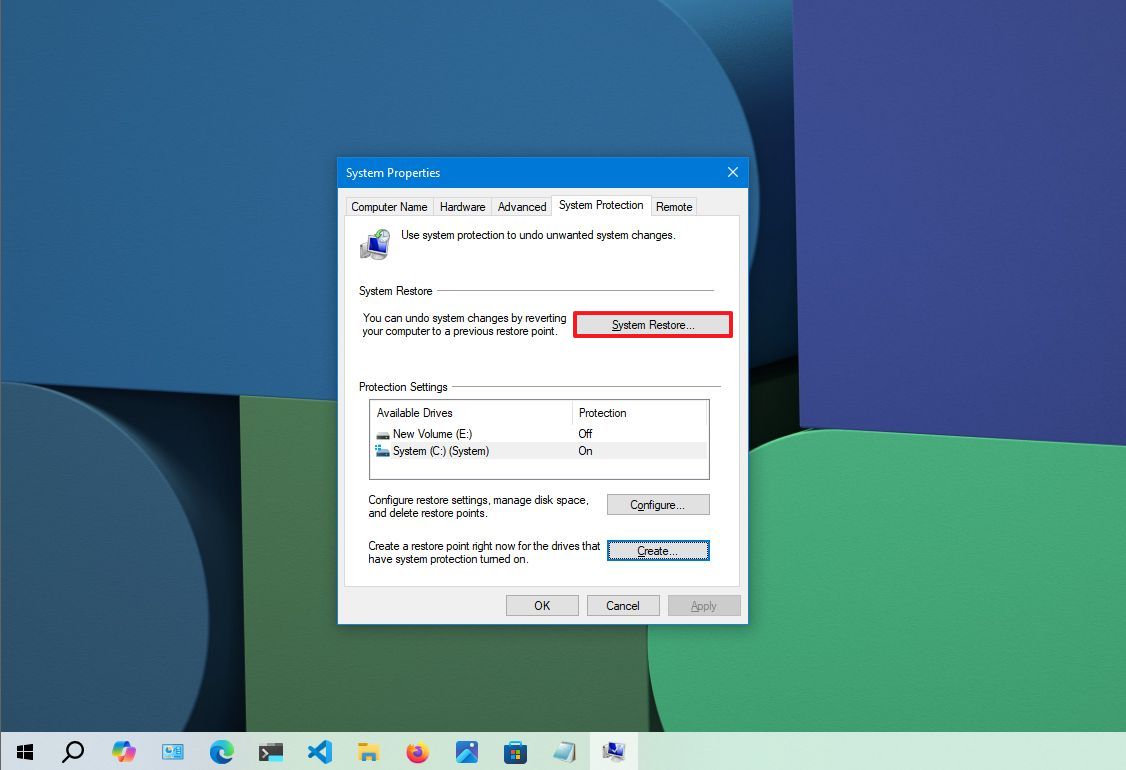
- Search for Create a restore point, and click the top result to open the System Properties page.
- Click the System Restore button.
- Quick note: If the option is greyed out, no restore points are available.
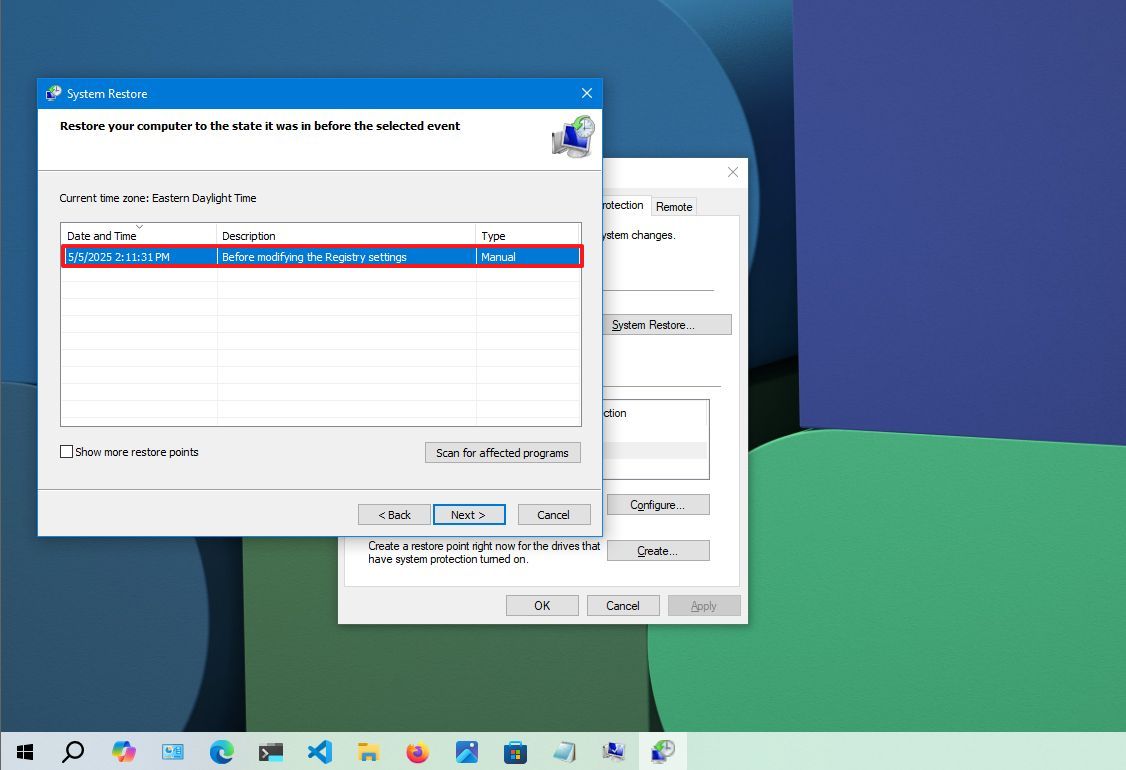
- Click the Next button.
- Select the restore point to undo changes and fix problems on Windows 10.
- Click the «Scan for affected programs» button to confirm the apps that will be removed because they were added after creating the original restore point.
- Click the Close button.
- Click the Next button.
- Click the Finish button.
Once you complete the steps, System Restore will restore the computer to the previous working state. If one or more apps were affected, remember to reinstall after the process finishes.
Undo system changes from Advanced startup
Alternatively, you can use the Advanced startup settings to access the System Restore feature to recover the system if the computer doesn’t start correctly.
Access Advanced startup
To use System Restore through the Advanced Startup environment, use these steps:
- Start the computer.
- As soon as the Windows logo appears, press the power button to interrupt the boot sequence.

- Repeat steps 1 and 2 two more times. (Or until the device boots into the recovery experience.)
After you complete the steps, you can use the steps below to revert system changes with System Restore.
If you cannot access the recovery environment with these instructions, you can start the device with a Windows 10 installation media, and while in the «Windows Setup» experience, click the «Next» button, click the «Repair your computer» button from the bottom-left corner, and then continue with the steps below.
Undo changes with System Restore
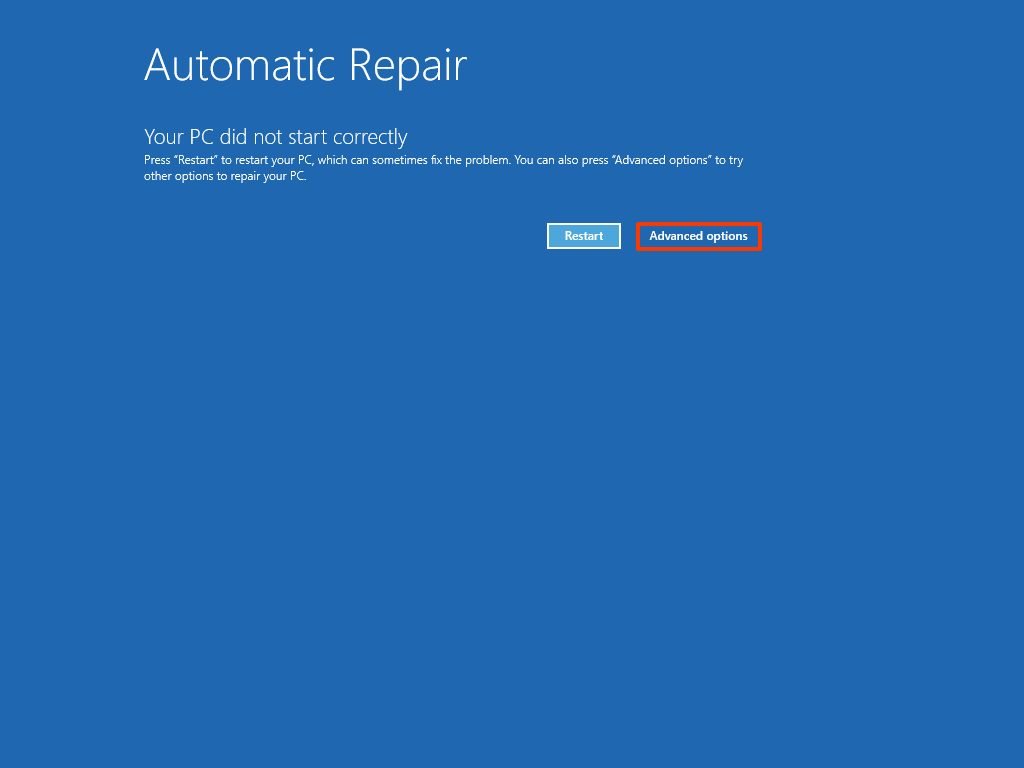
To undo system changes on Windows 10 through the Advanced Startup environment, use these steps:
- Click the Advanced options button.
- Click on Troubleshoot.
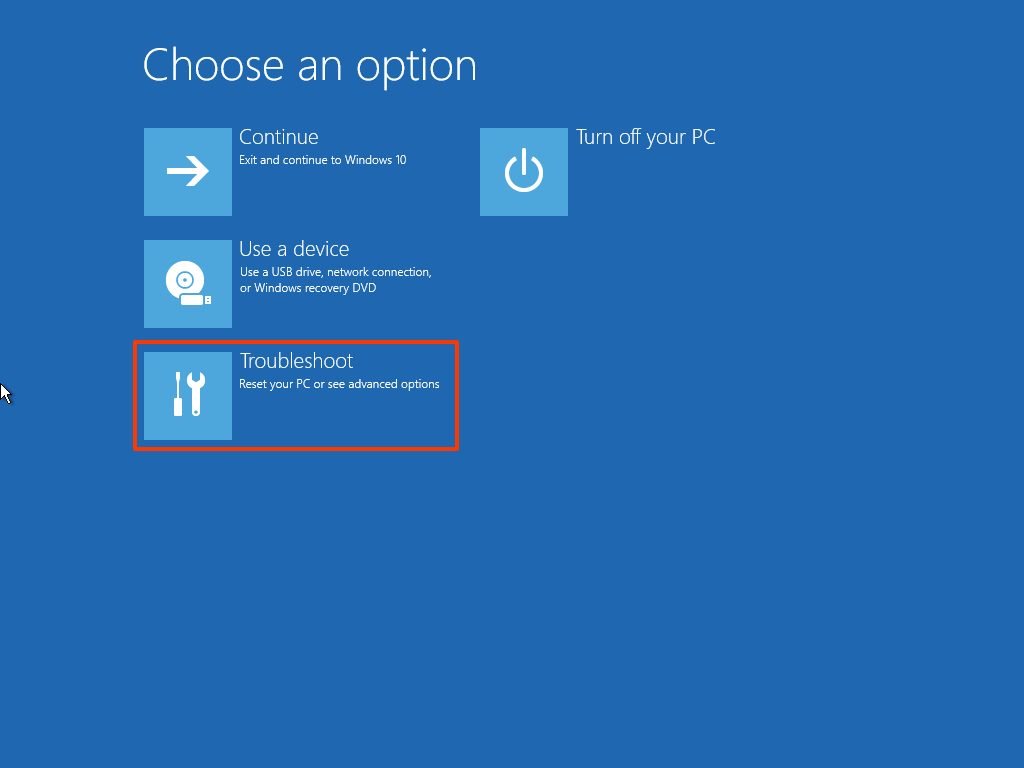
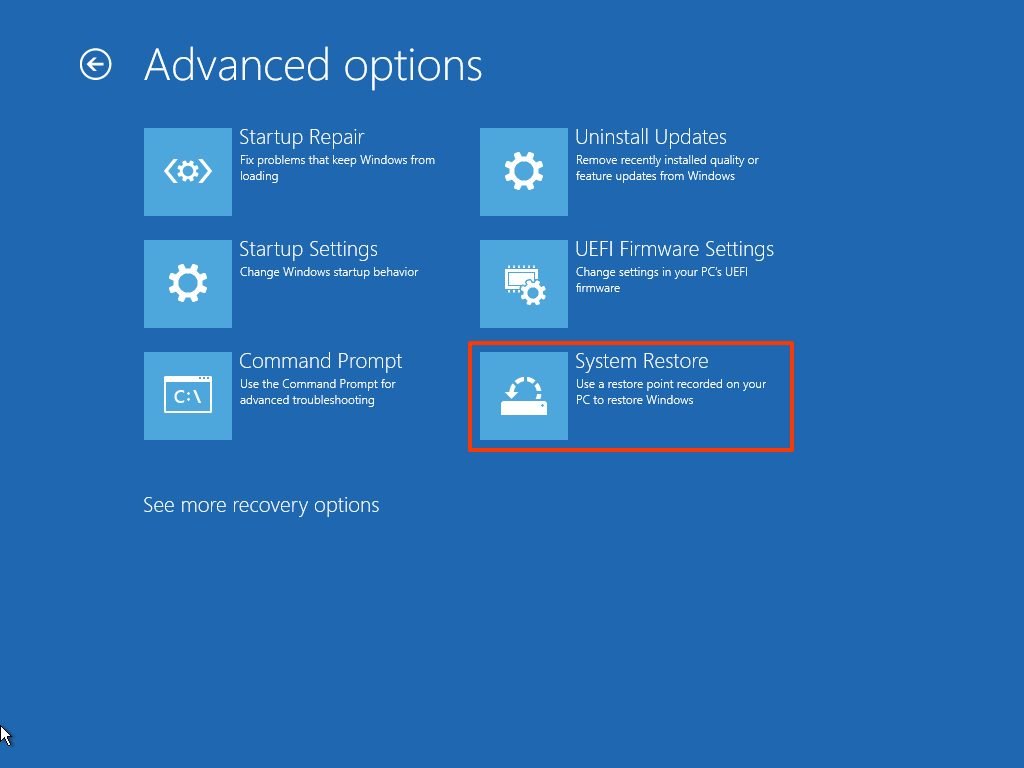
- Click on Advanced options.
- Click on System Restore.
- Select the Windows 10 account.
- Confirm the account password.
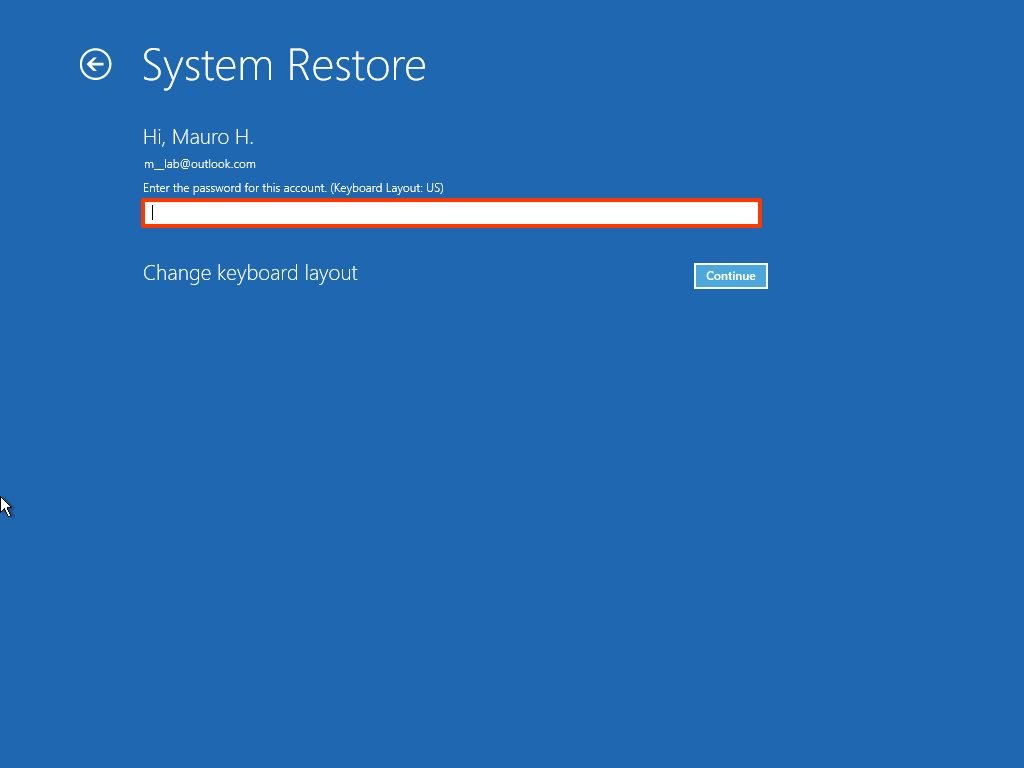
- Click the Continue button.
- Click the Next button.
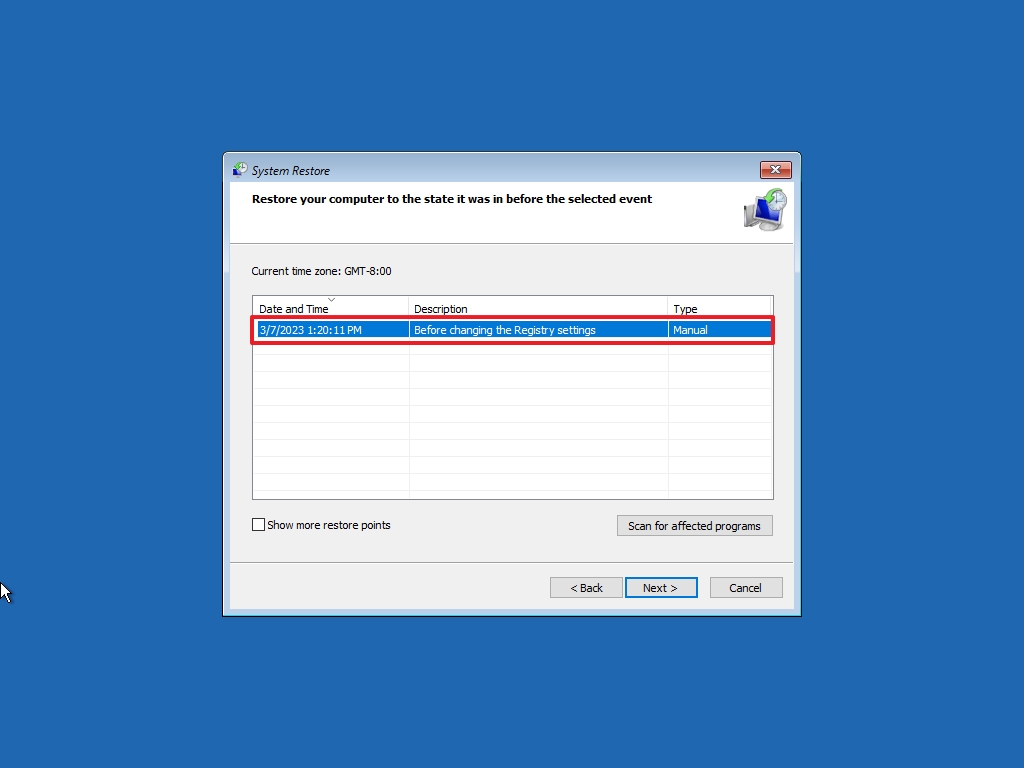
- Select the restore point to fix the problem with your device.
- Click the «Scan for affected programs» button to confirm the apps that will be removed because they were added after creating the restore point.
- Click the Close button.
- Click the Next button.
- Click the Finish button.

Once you complete the steps, the restore point will apply to undo system changes that may be causing problems, including those preventing the computer from starting correctly.
System Restore is only a feature that recovers a device from configuration problems quickly. It is not a feature to replace a backup solution or an option to reset the computer to the factory default settings.
More resources
For more helpful articles, coverage, and answers to common questions about Windows 10 and Windows 11, visit the following resources:
- Windows 11 on Windows Central — All you need to know
- Windows 10 on Windows Central — All you need to know
Mauro Huculak has been a Windows How-To Expert contributor for WindowsCentral.com for nearly a decade and has over 15 years of experience writing comprehensive guides. He also has an IT background and has achieved different professional certifications from Microsoft, Cisco, VMware, and CompTIA. He has been recognized as a Microsoft MVP for many years.