
С 15.06.2022 г. IE 11 не поддерживается
IE11 станет недоступным с 14.02.2023. Сайты, созданные для IE, можно перезапустить в режиме IE в Microsoft Edge.

Важно! Если выбрать язык ниже, содержимое страницы динамически отобразится на выбранном языке.
-
Date Published:
26.07.2019
File Name:
w2k3sp1_1830_ru_wsrm.iso
С помощью диспетчера системных ресурсов Windows (Windows System Resource Manager, WSRM) администраторы ИТ могут распределять оборудование между процессами или пользователями службы терминалов. Диспетчер WSRM управляет доступом каждого процесса к системным ресурсам, чтобы несколько приложений могли одновременно работать на одной системе более эффективно, не мешая друг другу.
WSRM включает распределение ресурсов, в том числе ресурсов процессора и памяти, между несколькими приложениями или пользователями службы терминалов, в зависимости от их приоритетов. С помощью WSRM вы можете внедрять сложные эксплуатационные процессы, соответствующие производственным требованиям, увеличить прибыль от инвестиций в ИТ и управлять изменяющейся рабочей нагрузкой.
-
Поддерживаемые операционные системы
Windows Server 2003
Диспетчер WSRM был обновлен и доступен для использования со следующими версиями ОС Windows Server 2003:
- Windows Server 2003 Enterprise Edition
- Windows Server 2003 Datacenter Edition
- Windows Server 2003 Enterprise x64 Edition
- Windows Server 2003 Datacenter x64 Edition
- Windows Server 2003 Enterprise для систем на базе процессоров Itanium
- Windows Server 2003 Datacenter для систем на базе процессоров Itanium
Примечание. Только клиент администрирования WSRM может быть установлен на ОС Windows Server 2003 Standard Edition, Windows Server 2003 Standard x64 Edition, Windows Server 2003 Web Edition, Windows XP Professional или Windows XP Professional x64 Edition.
-
Если установлена пробная версия Windows Server 2003, то можно загрузить диспетчер WSRM по ссылке на этой странице. Следует иметь в виду, что загружаемый файл представлен в формате образа диска, ISO, и его следует записать на компакт-диск перед установкой.
Любой пользователь ОС Windows Server 2003 Enterprise Edition или Datacenter Edition, Windows Server 2003 Enterprise x64 Edition или Datacenter x64 Edition также может загрузить и записать на компакт-диск диспетчер WSRM.
Примечания.
- Диспетчер WSRM включен в состав компакт-диска с каждой лицензионной копией ОС Windows Server 2003 Enterprise Edition и Datacenter Edition, а также ОС Windows Server 2003 Enterprise x64 Edition и Datacenter x64 Edition, и на него распространяются условия лицензий на эти продукты.
- Клиент администрирования WSRM может быть установлен на все версии ОС Windows выше Windows 2000 Server с пакетом обновления 3 (SP3), за исключением следующих:
- Windows XP Home Edition
- Windows Server 2003 для систем на базе процессоров Itanium (без пакетов обновления)
- Диспетчер WSRM может быть установлен и запущен только на поддерживаемых операционных системах.
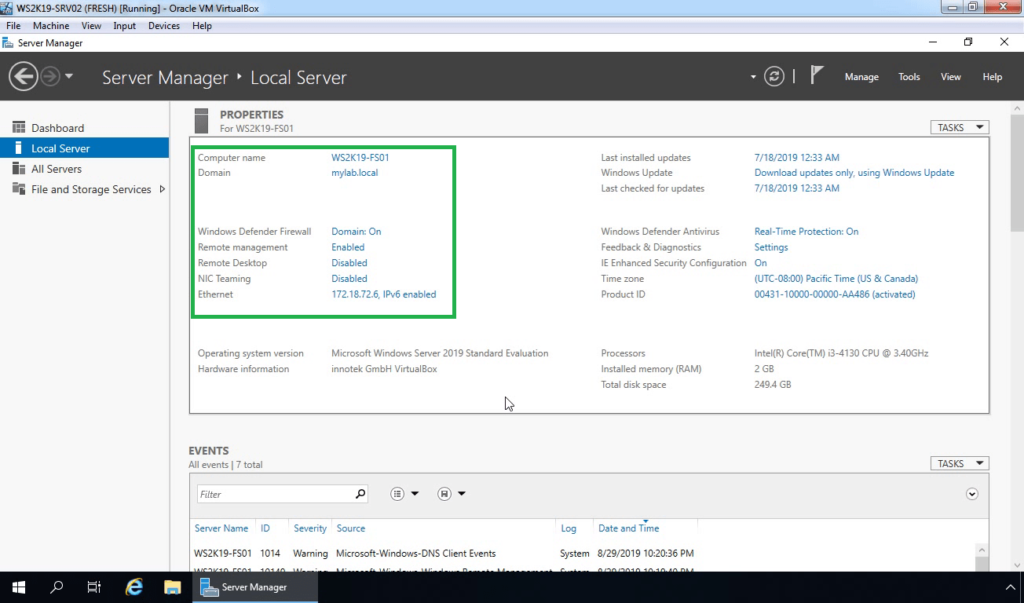
The File Server Role, which has been in our lives since Windows Server 2008, continues with Windows Server 2019. It is used for assigning sharing quotas to our users in our environments, preventing unnecessary content from being copied to these areas or adding only allowed content, receiving reports, seeing the event log in case of violations here, receiving e-mail related to the situations.
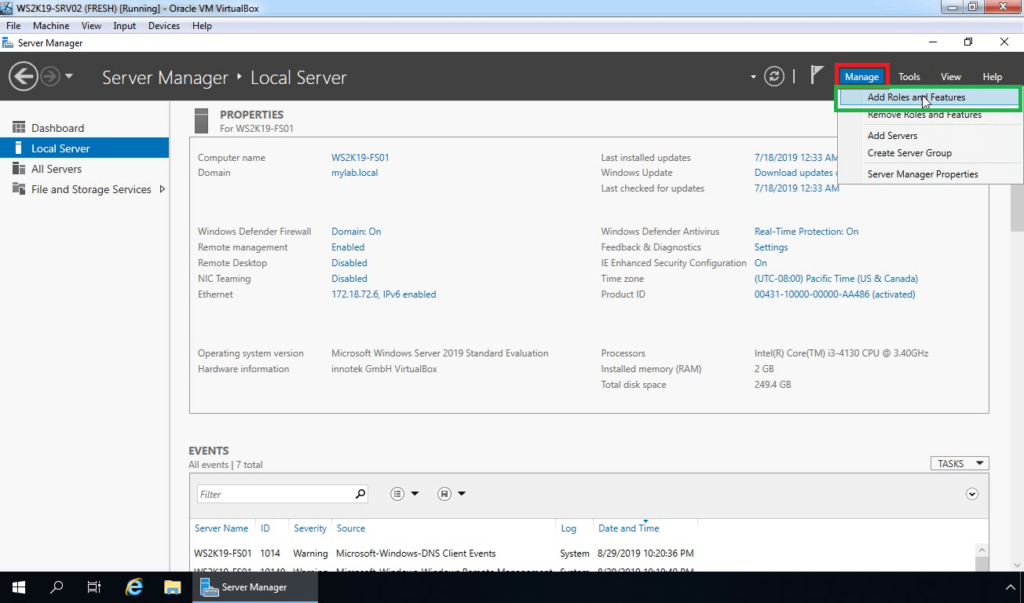
We can start the steps to add roles by using one of the Manage menu on Server Manager or the area shown by the picture below.
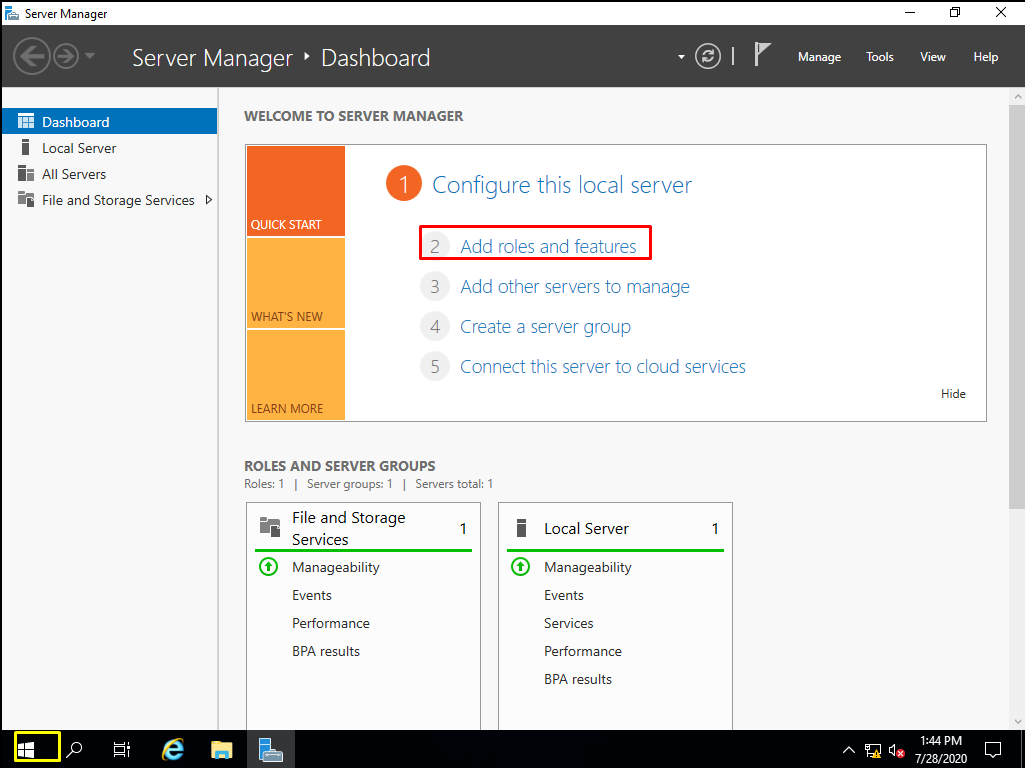
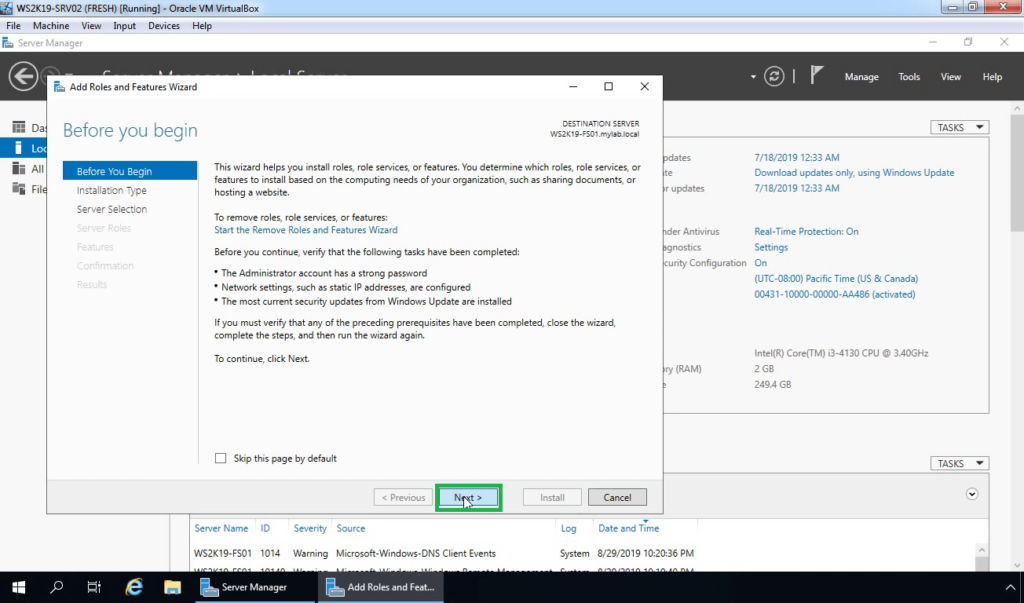
On the screen that opens, information is given on what we can do with the wizard. With the “Next” button, we can proceed to our next screen.

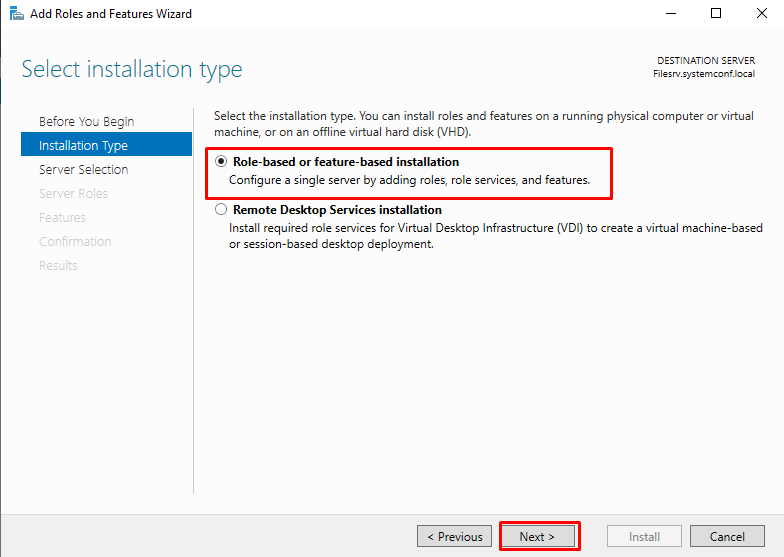
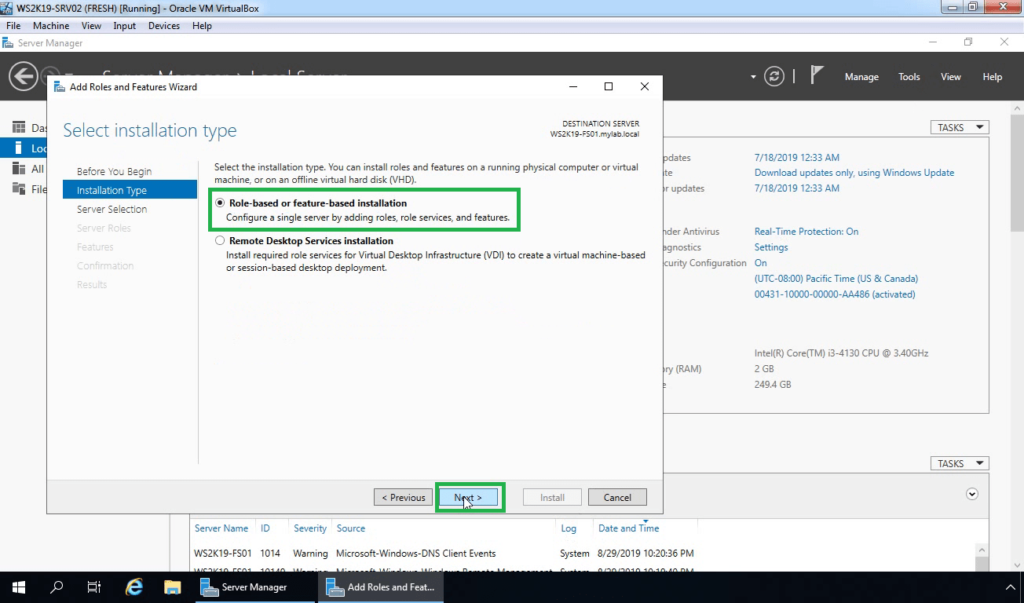
There are two options on our screen that opens. The first one is;
Role-based or feature-based installation: Allows to add and install on role and feature basis. According to the version we have in Windows Server 2016, we can add and remove the roles and features we need.
Remote Desktop Services installation: In the old days called Terminal Service and now we can make RDS (Remote Desktop Services) remote desktop configuration fast and as standard here.
For this reason, we will proceed with the Next button by choosing Role-based or feature-based installation since we will not do RDS installation and configuration.
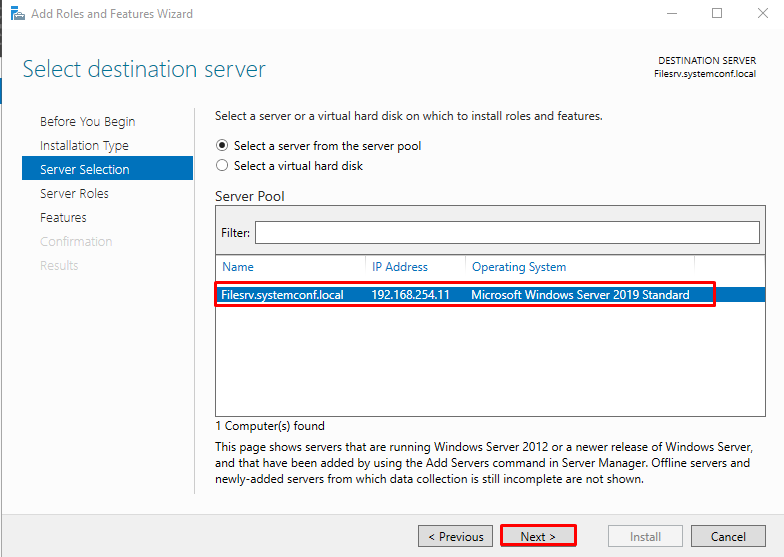
By creating a server cluster with Windows Server 2008 and 2012, it was able to add and remove Roles and Features on this cluster collectively and over a different server. Of course, this process can be done directly on Windows Server 2012, while we had to add some features to Windows Server 2008. Since we have a single server in our environment and we will install the Resources Manager feature of the File Server role on this server, we proceed with the “Next” button by selecting our server whose Name, IP address and version information are provided.
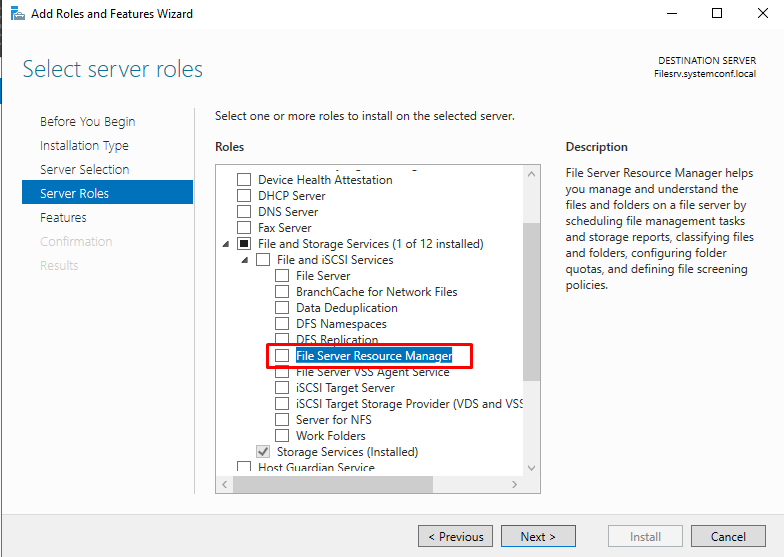
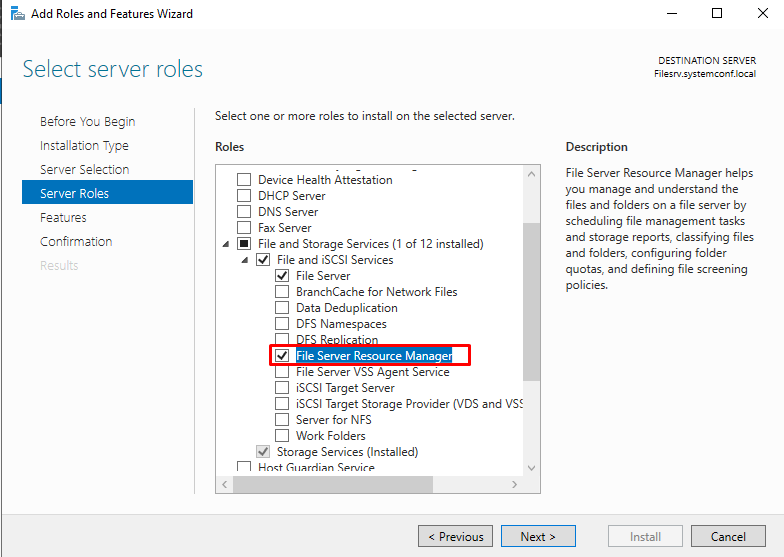
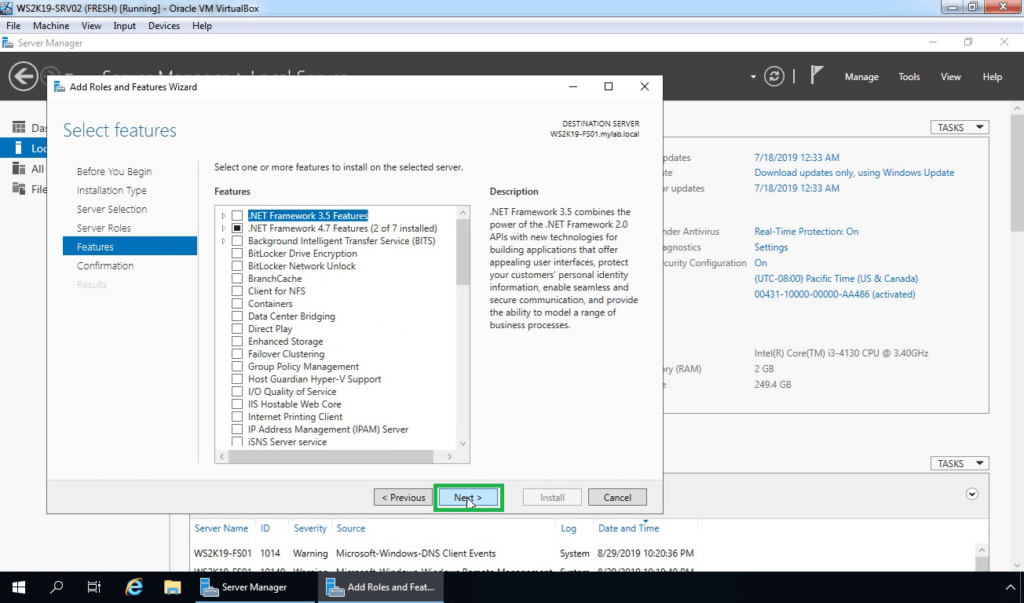
We select and expand the File and Storage Services role for the feature that we will install from the screen we see.

We select the File Server Resource Manager feature.
After selecting this feature, the screen of the components required to install this feature is displayed. Since we want it to be installed automatically on these components, we click on the Add Features button.

After our selections are completed, we proceed to the next screen with the “Next” button.
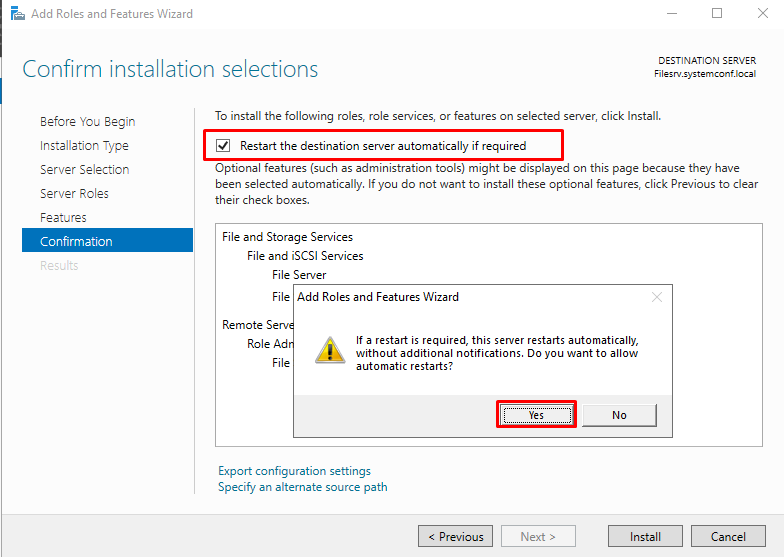
By selecting “Restart the destination server automatically if required”, we can ensure that this process happens automatically if a reboot is required after installing the roles. Let’s click the YES button on the problem screen that comes to our mix and let us state that we give consent to start again.
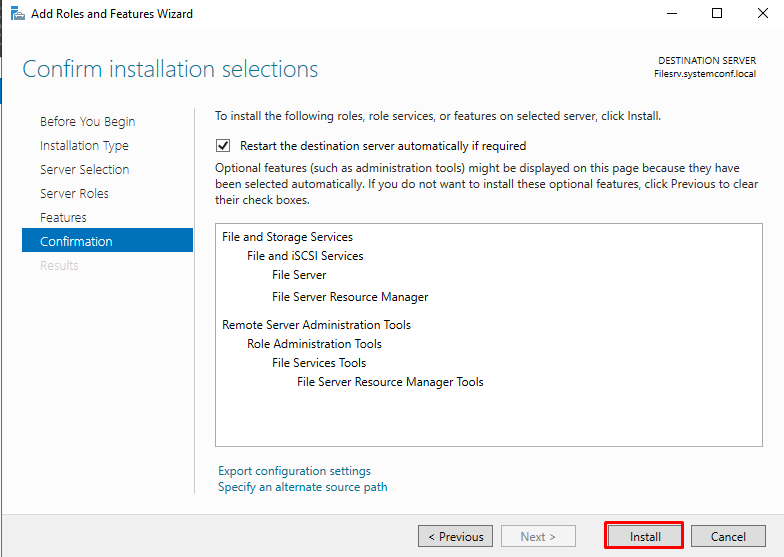
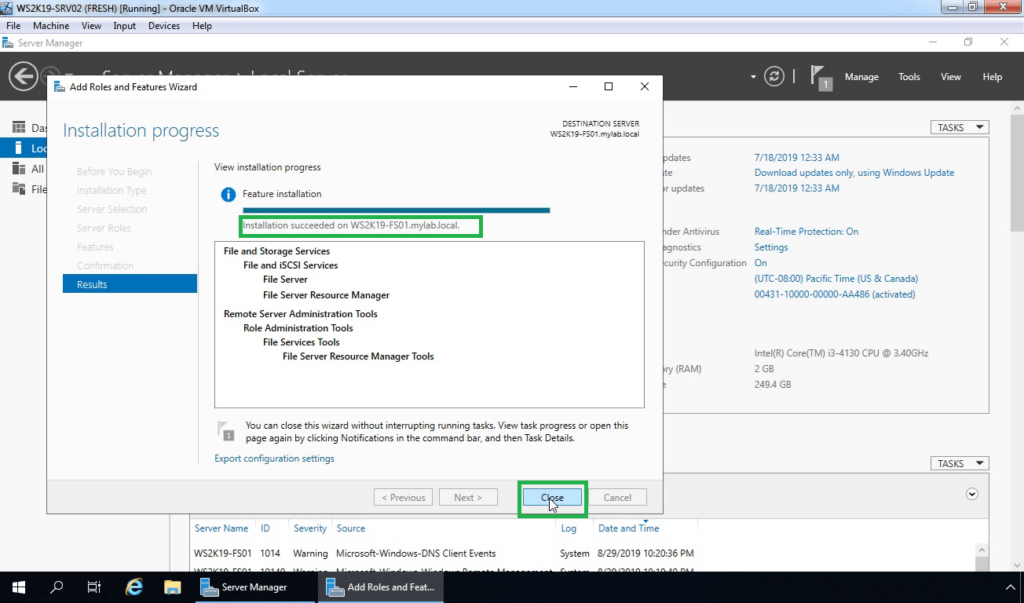
On this screen, we can start our installation process by clicking our Install button.
File Server Installation has started and continues.
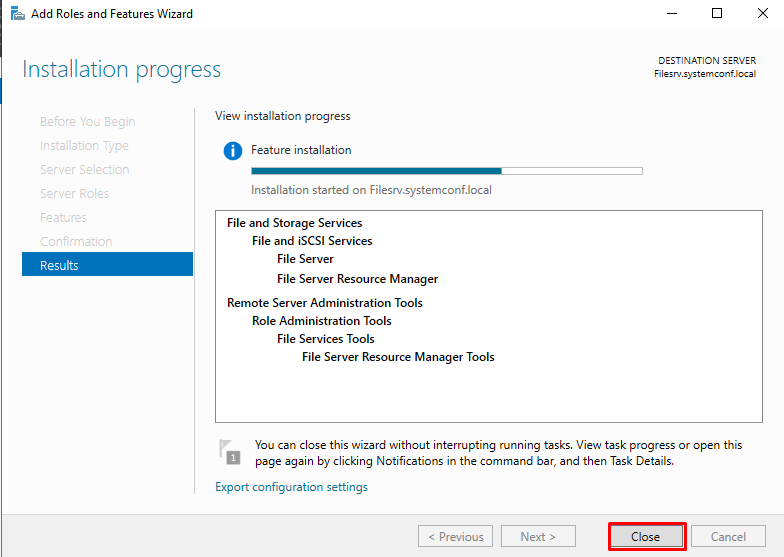
Role feature setup is complete. We can close our screen with the “Close” button.
A shortcut of our File Server Resource Manager feature has occurred on the start menu. We can open our console by clicking here.
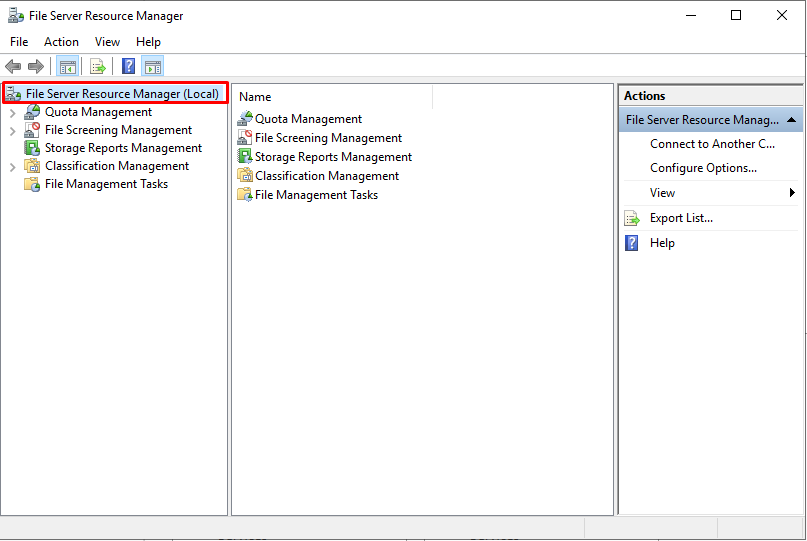
Our console is opened. A screen that is simple to use and manage welcomes us.
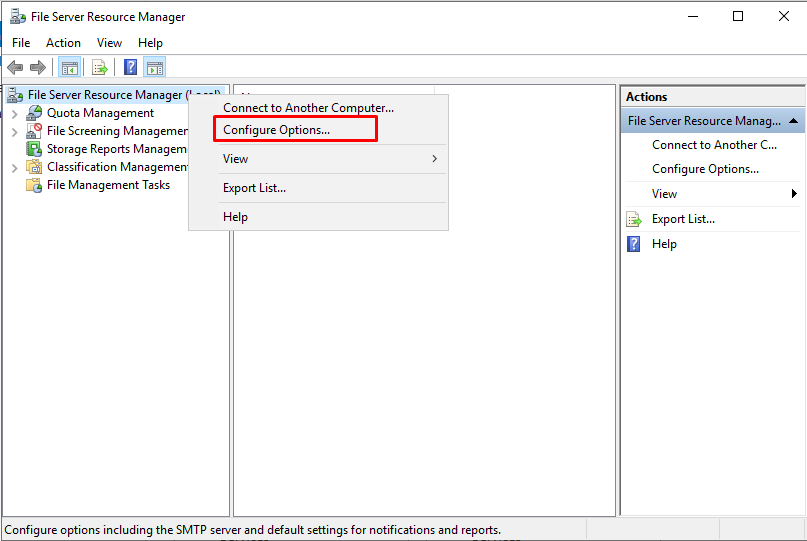
First, let’s right-click on the console main menu and click on “Configure Options…” to configure our main settings.
We just need to make a few settings on our screen in general. One of them will be notifications by mail when there is a violation or report situation. Therefore, first of all, let us enter an SMTP server information in our environment or outside in the Email Notifications section. Then we can enter the address information that will send and receive mail.
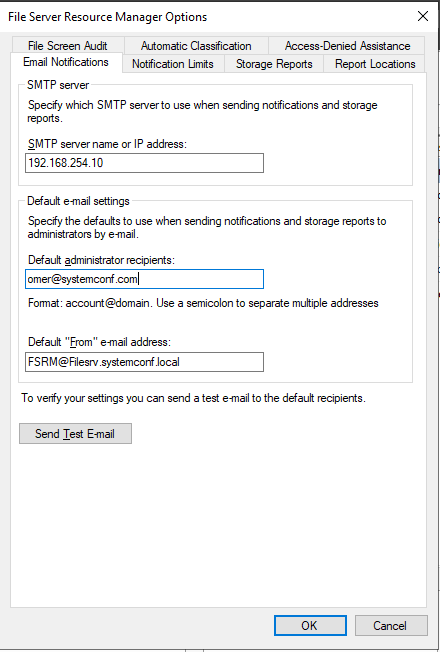
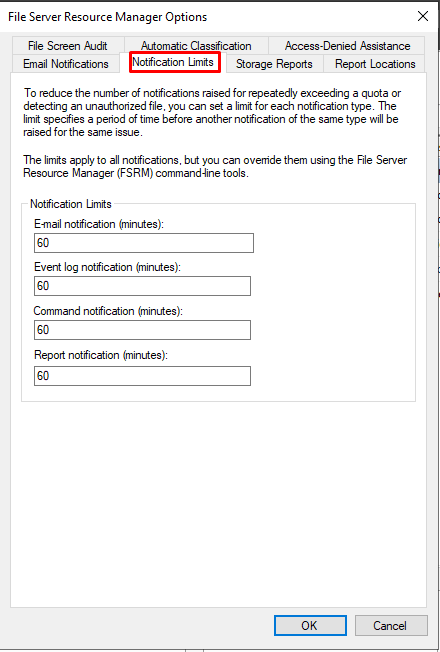
In the Notifications Limits section, we can edit the values or leave them as is.
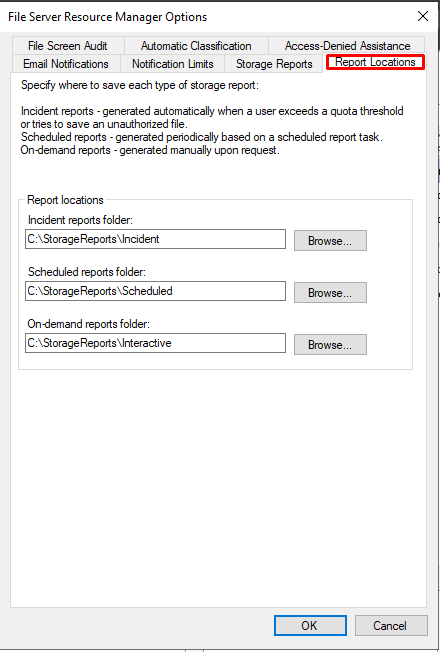
In the Reports Locations section, we can change the area where the reports are stored or leave them as is.
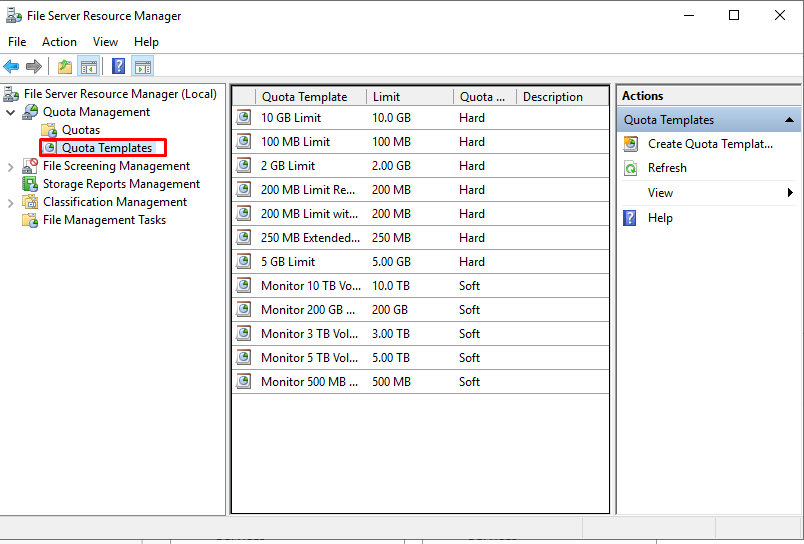
Finally, let’s start our settings after general settings. When we first look at the QUOTA Templates section, we can see ready templates prepared in MB, GB and TB.
In this post, you will be learning about How to Install and Configure File Screening using File Server Resource Manager (FSRM) on Windows Server 2019.
Why File Screening?
File screening management is a feature that allows you to control the type of files that users can save and send notifications when users try to save a blocked file.
Test lab setup:
- WS2K19-DC01: Domain Controller and DNS.
- WS2K19-FS01: File Server.
- WS10-CLI01: Windows 10 Client Machine.
Install FSRM role on the file server:
1. Open Server Manager Console.
2. On Server Manager dashboard, click on Manage and select Add Roles and Features.
3. On the Before you begin page, click Next.
4. Select Role-based or feature-based installation and then click Next.
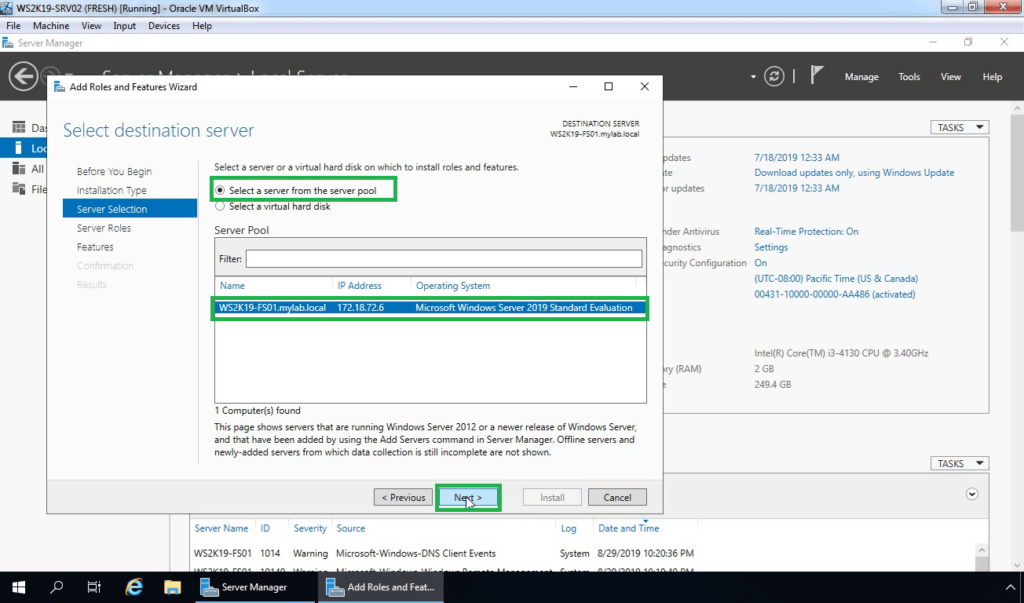
5. Select a server from the server pool to install FSRM to, and then click Next.
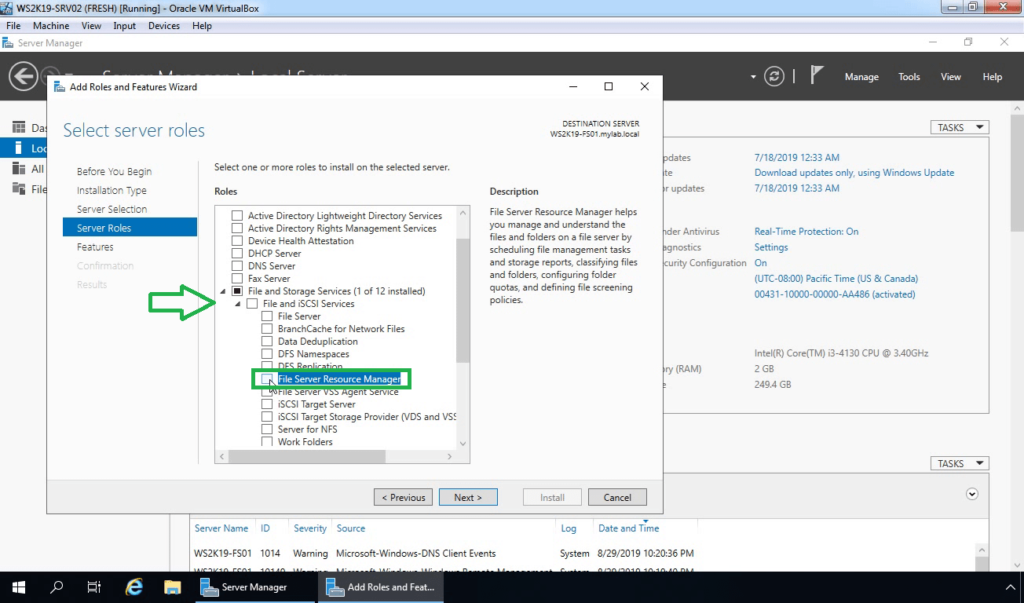
6. Expand File and Storage Services and expand the File and iSCSI Services. Select File Server Resource Manager.
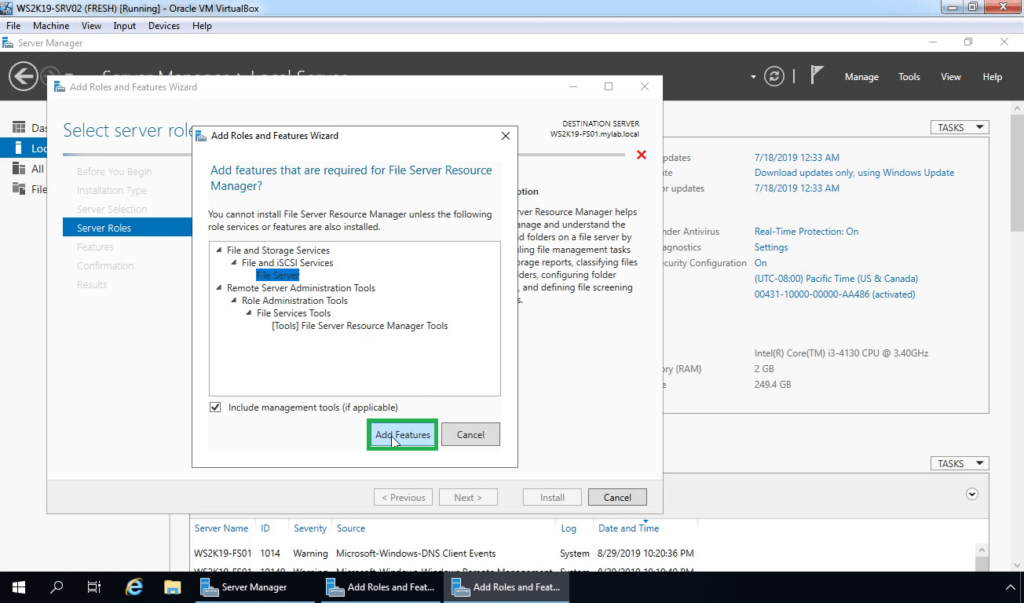
7. A new window will pop up, click on Add Features to include required features and management tools.
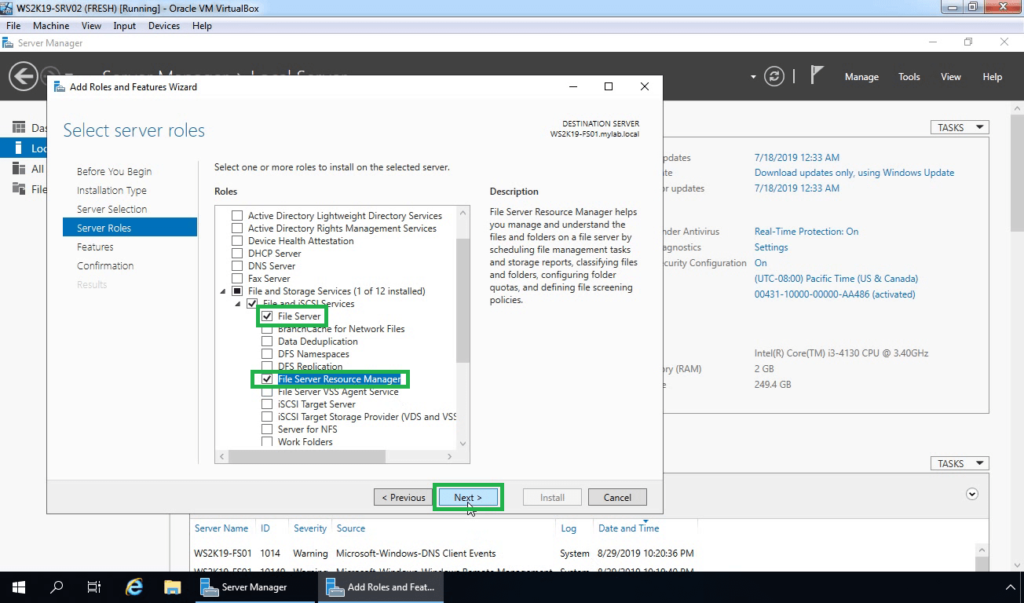
8. Make sure that File Server and File Server Resource Manager server role are selected. Click on Next.
9. On select features page, click Next.
10. Click on Install to start the installation process.

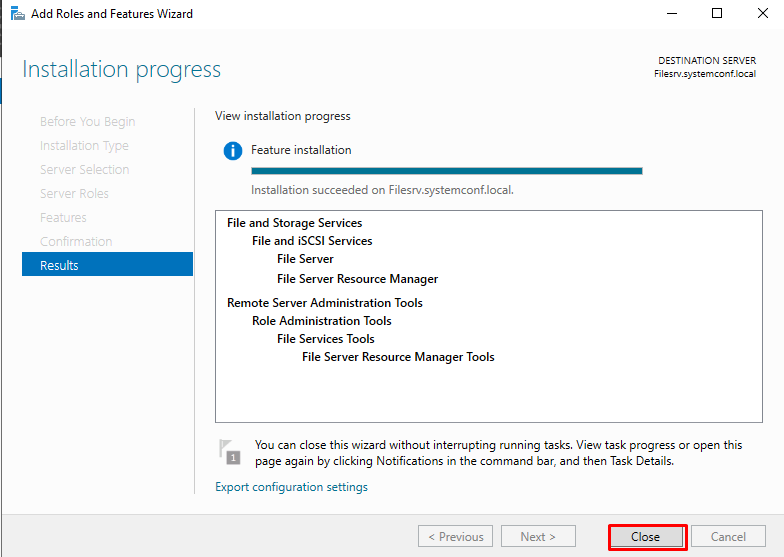
11. When the installation is complete, click the Close button.
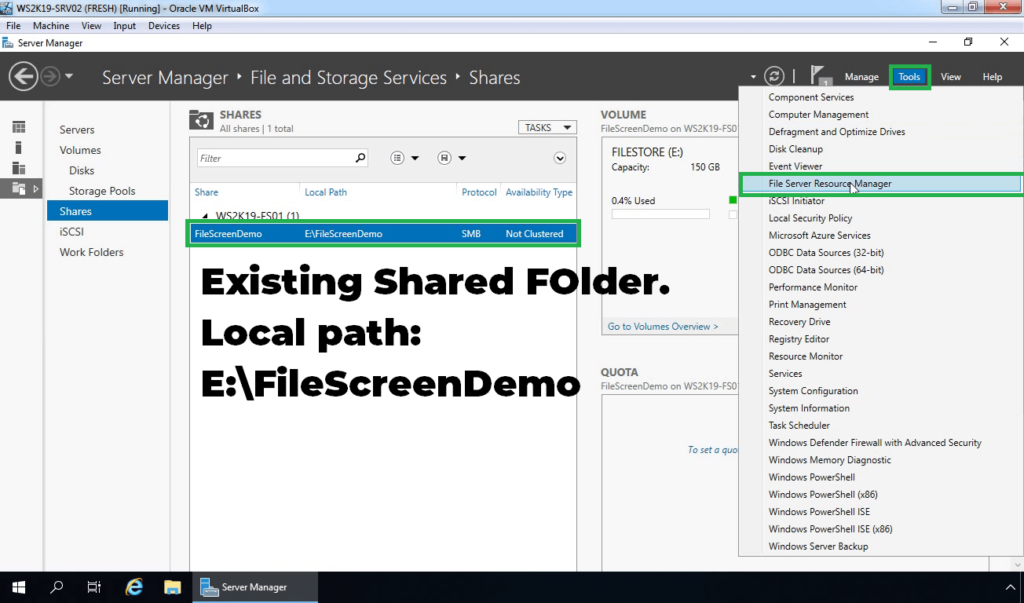
Note: Already I have created one shared folder on our file server for the testing purpose. We will apply File Screening on that shared folder.
Create a File Screen Template:
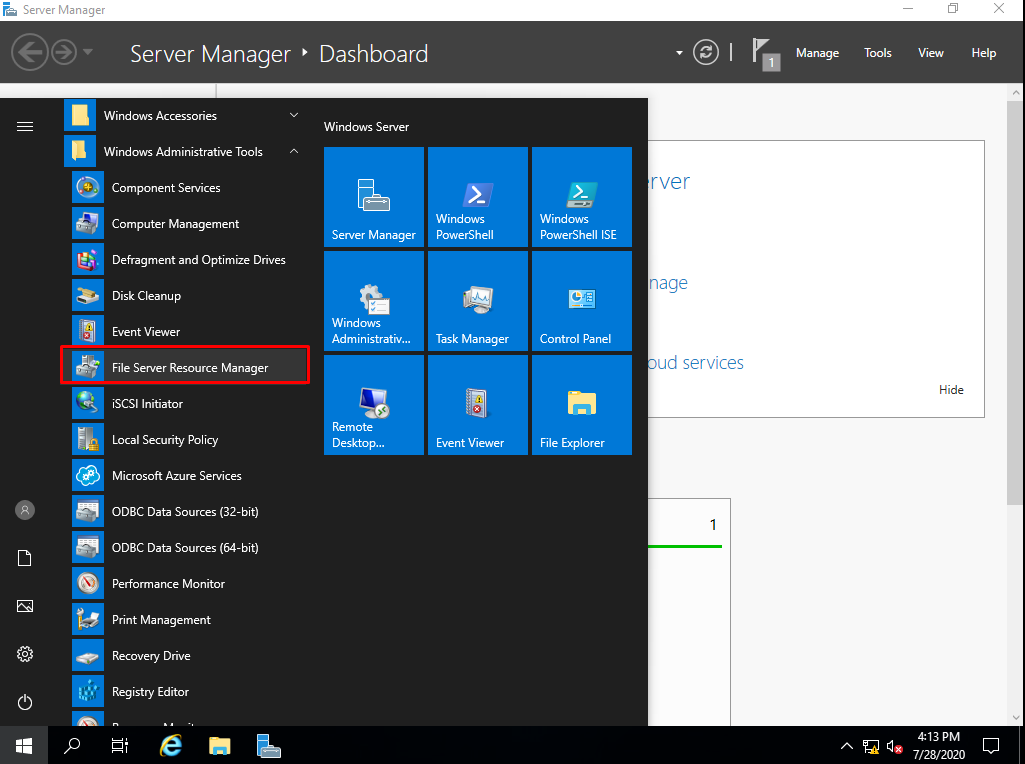
12. Click on Tools and select the File Server Resource Manager.
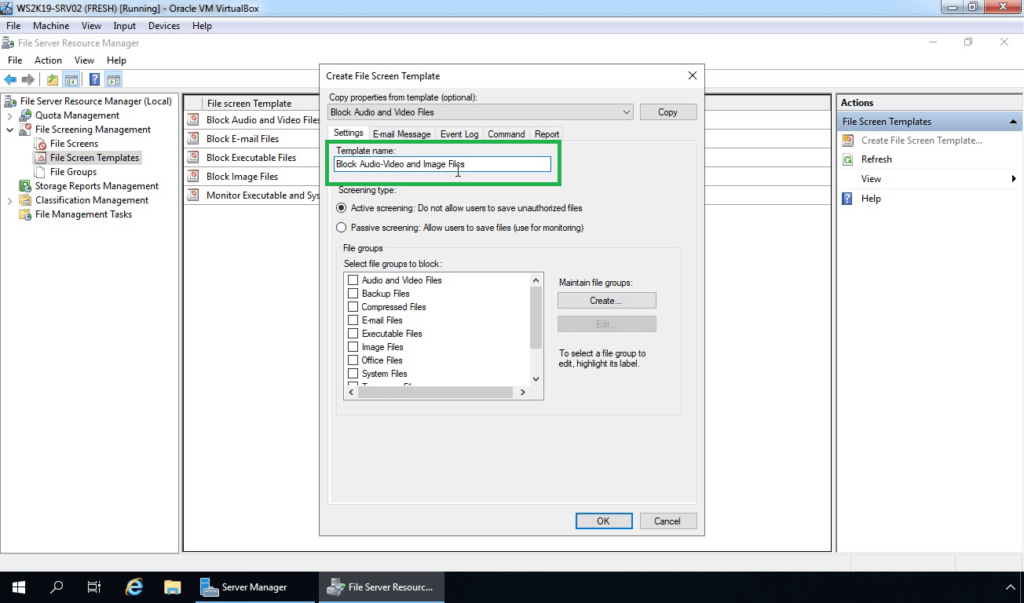
13. On File Server Resource Manager console, expand File Screen Management. Right-click File Screen Template and select Create File Screen Template.
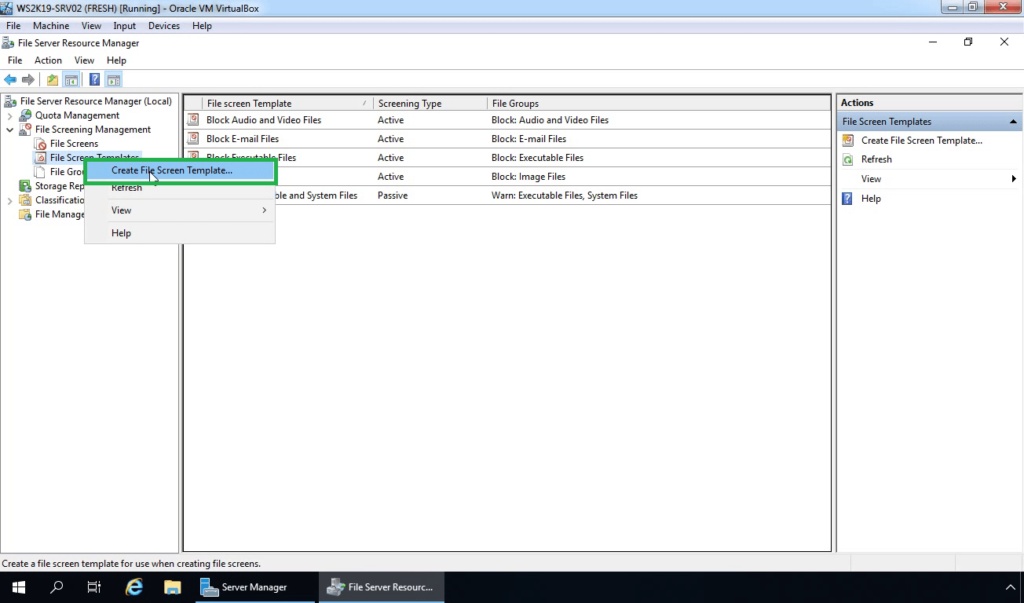
14. In the Template name text box, type a name for a new file screen template.
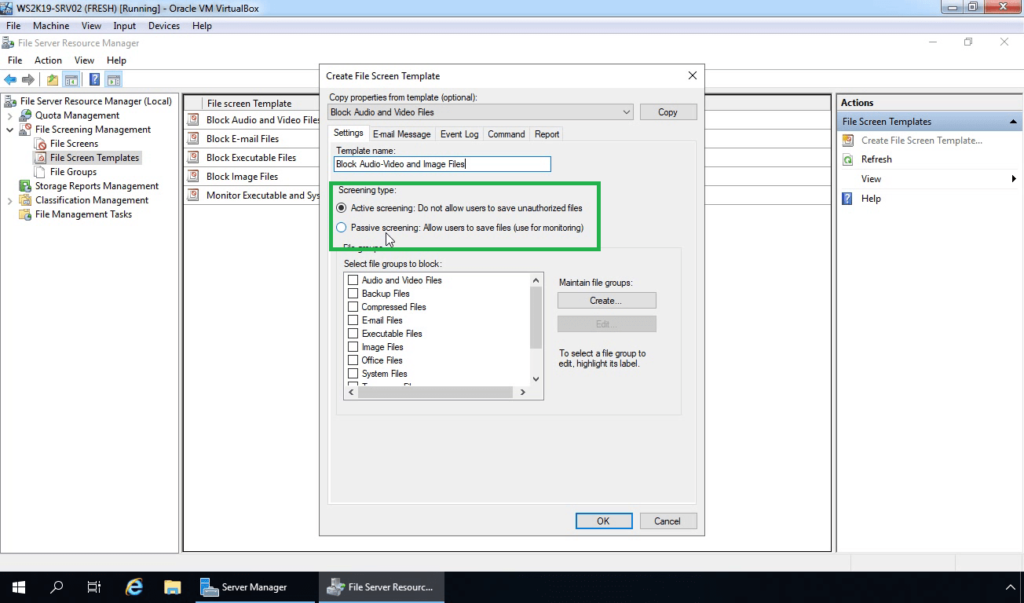
15. Under Screening type, click the Active screening or Passive screening option.
- Active screening prevents users from saving files that are members of blocked file groups and generates notifications when users try to save unauthorized files.
- Passive screening sends configured notifications, but it does not prevent users from saving files.
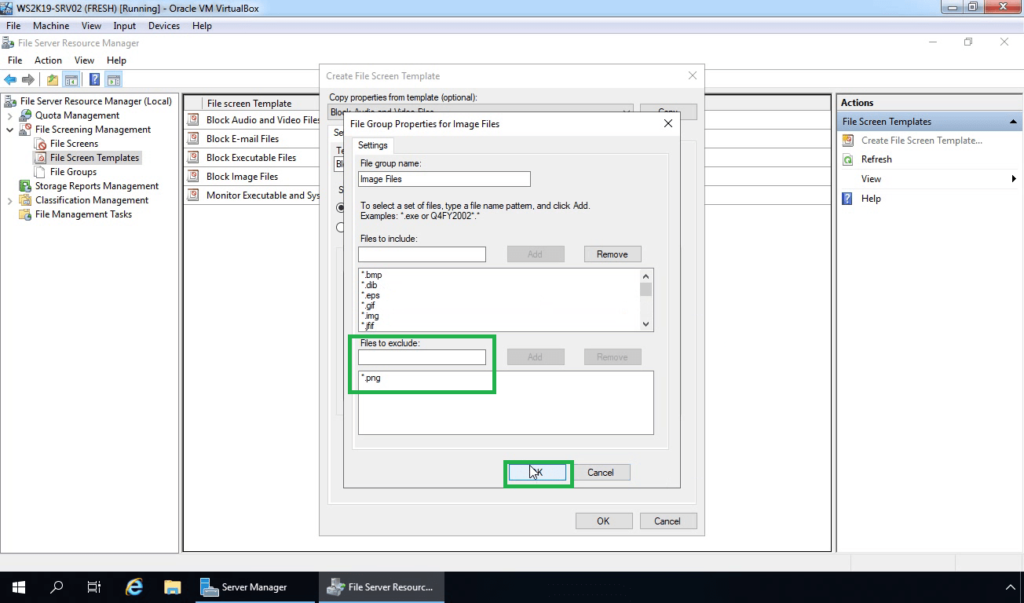
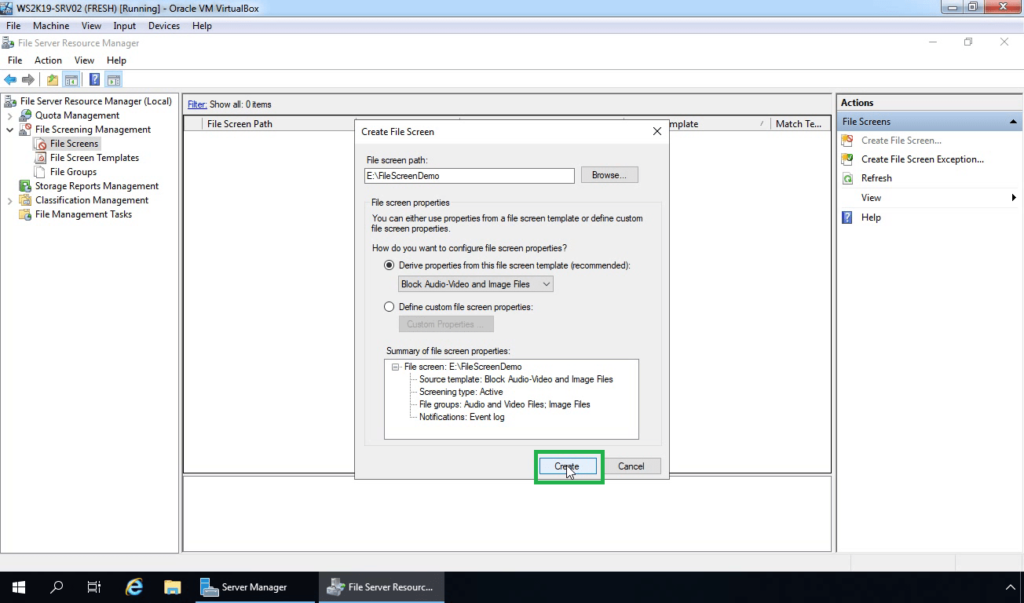
16. Select Audio and Video Files. Select Image Files and click on the edit button. We want to exclude .png file, so users can save only .png files.
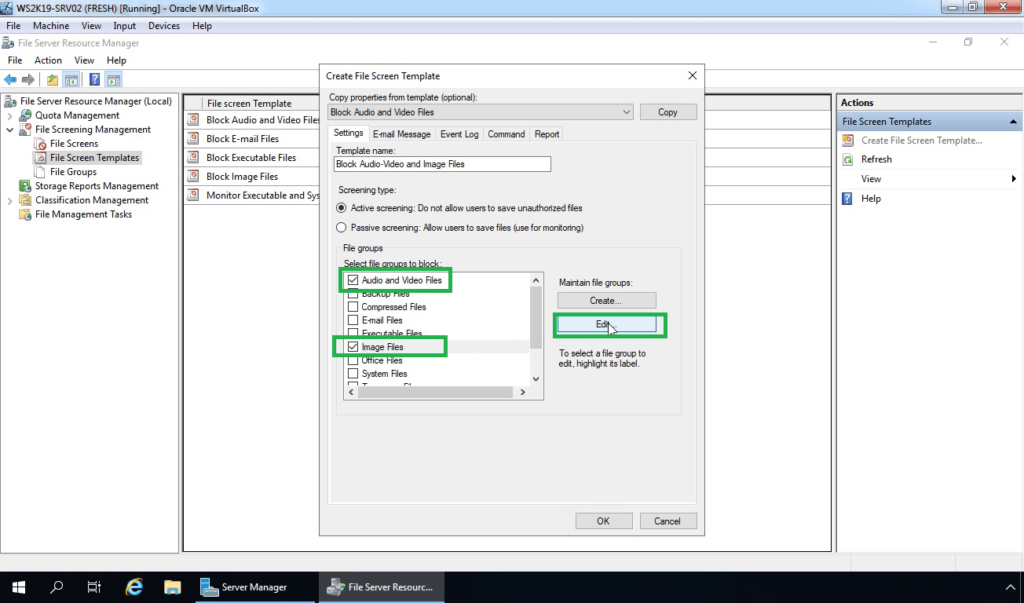
17. Under Files to exclude, type *.png and click on Add button. Once you are ready, Click OK.
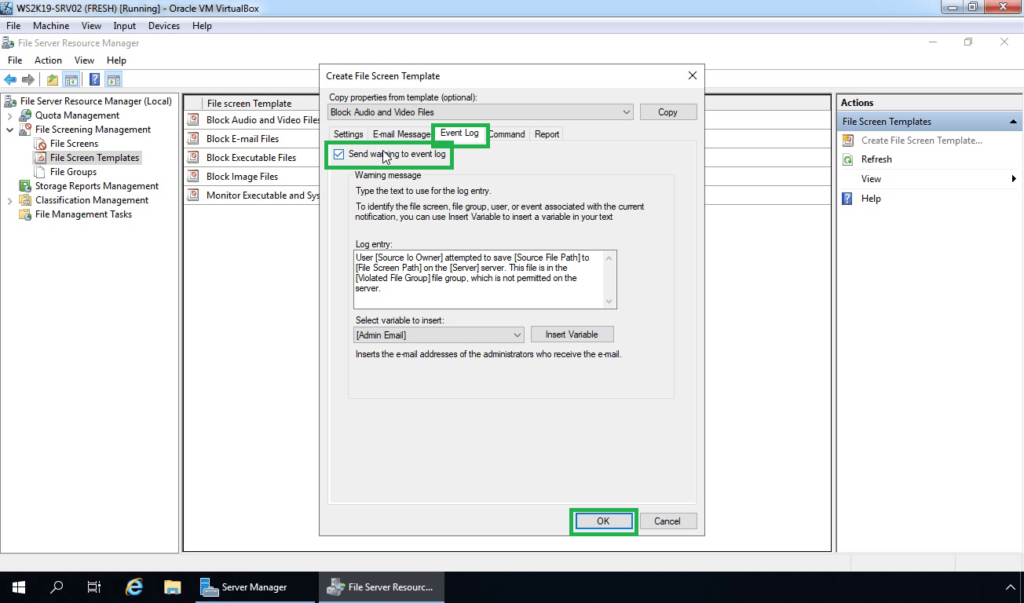
18. Click on Event Log tab, select the Send warning to event log checkbox. Click OK.
Creating File Screen in Windows Server 2019:
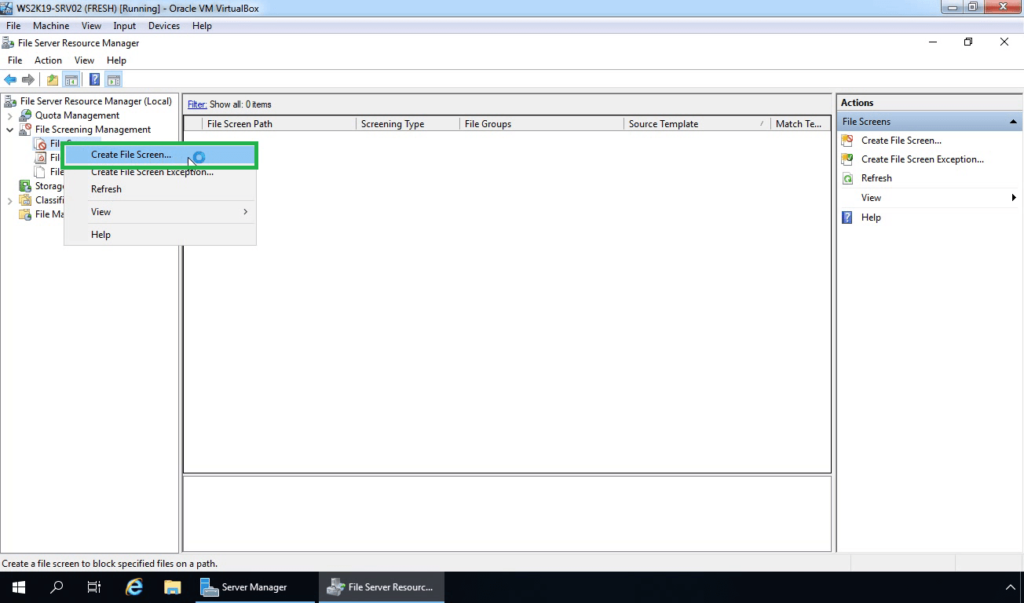
19. Right-click on File Screen and select Create File Screen.
20. Browse the path of the shared folder.
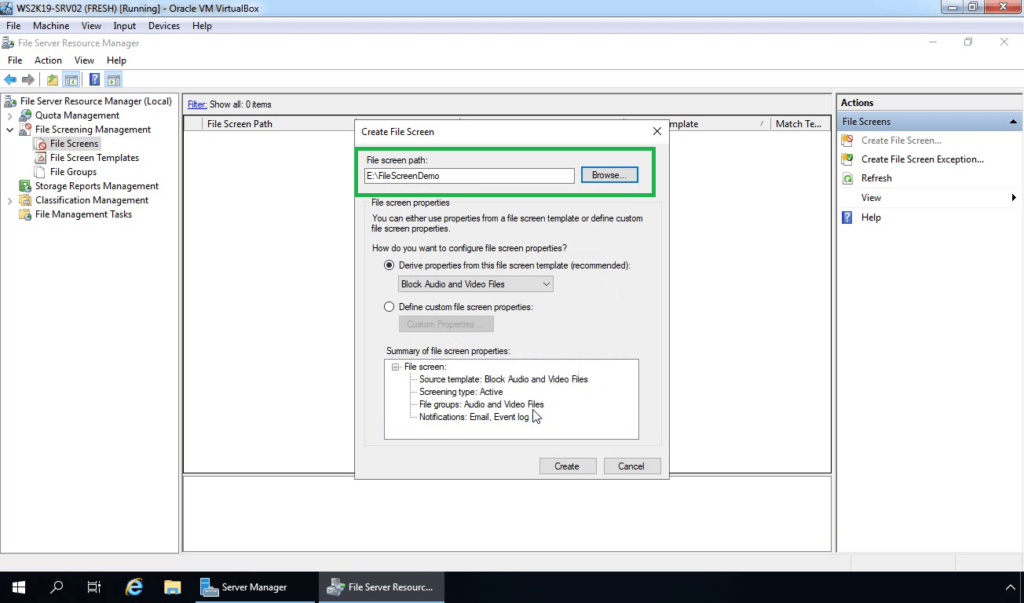
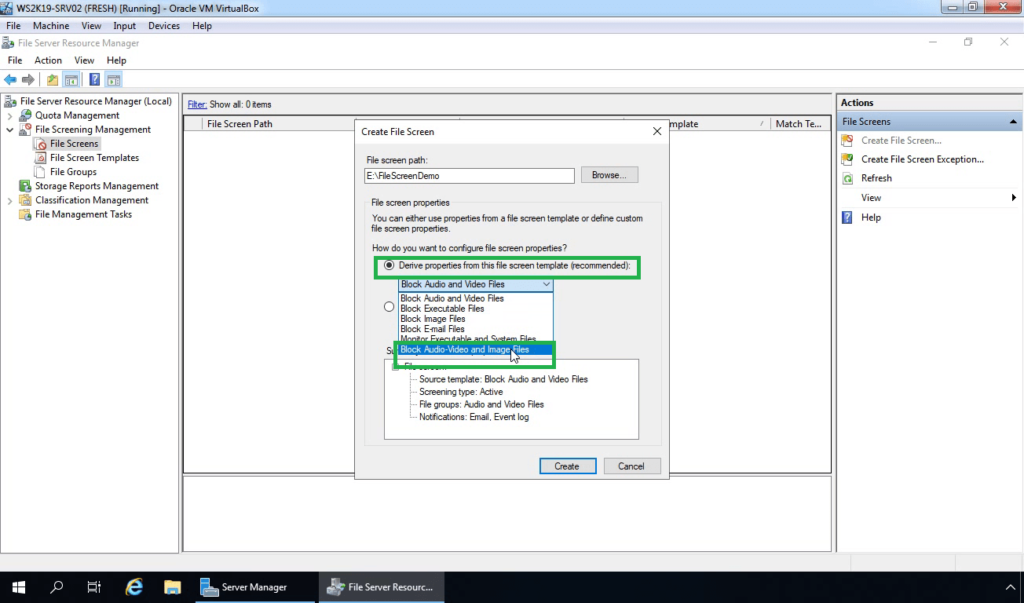
21. Choose the option, Derive properties from this file screen template (recommended). Select the File Screen Template which we have created earlier.
22. Click on Create.
How to test File Screening:
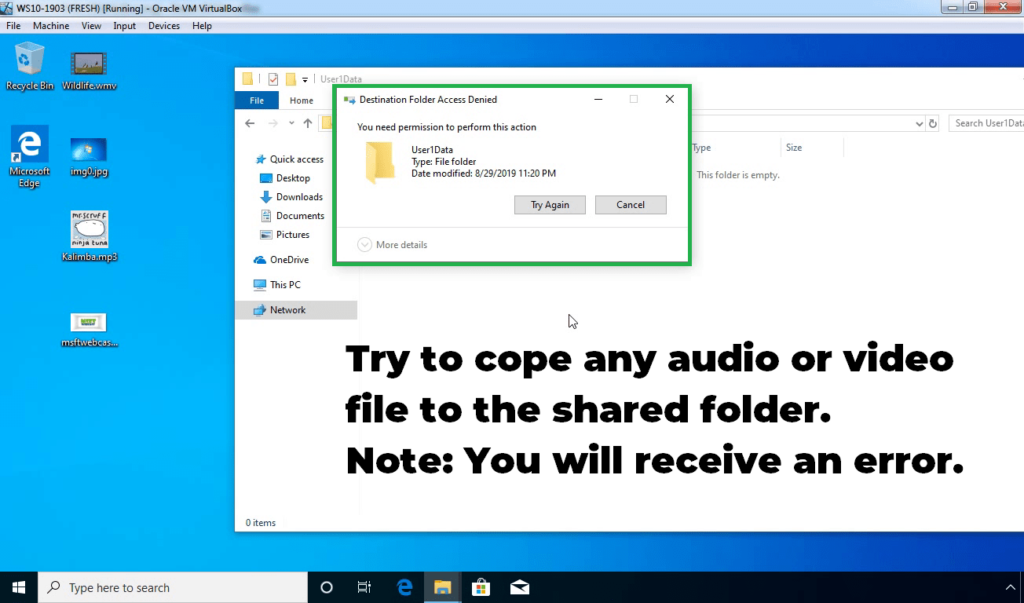
23. On Windows 10 client machine, access the shared folder. Try to copy any audio or video file to the folder for testing purposes.
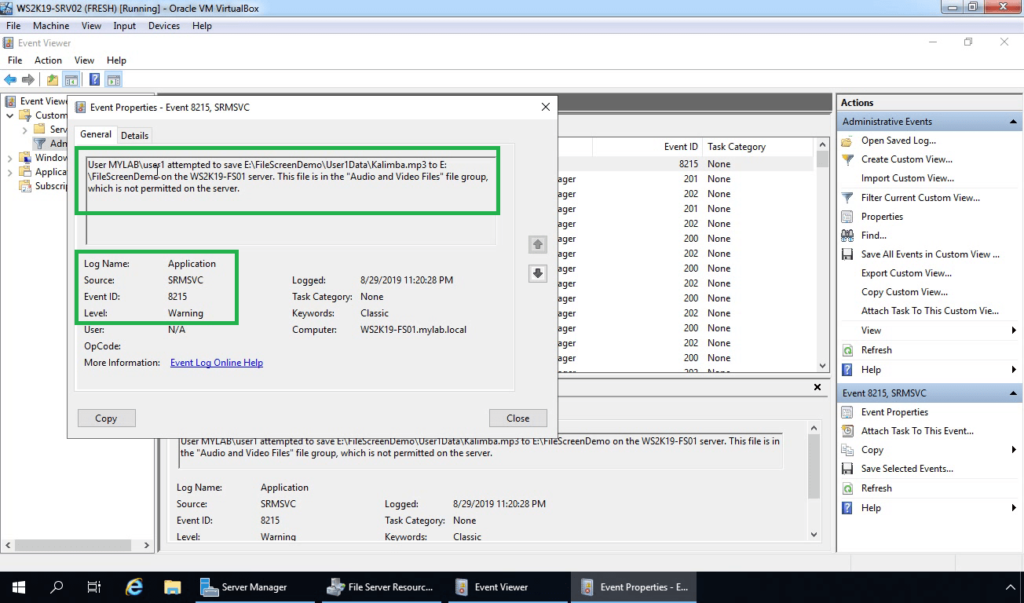
24. On a File server, open event viewer. Look for the event ID 8215.
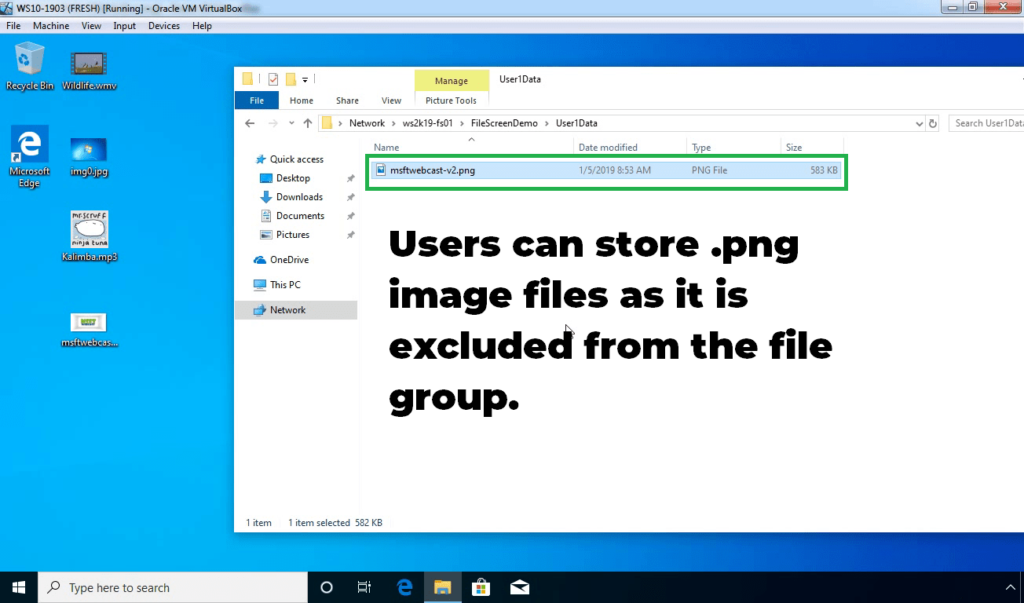
25. If a user tries to save any .png image file then it is allowed as we have added the exclusion entry for .png file.
In this post, we have learned the steps to configure File Screening using file server resource manager in Windows Server 2019.
Hope this will be helpful. Thank you for reading.
Related Articles:
- Install and Configure DFS Namespace on Windows Server 2019
- How to configure DFS Replication in Windows Server 2019
- Configure Disk Quota with File Server Resource Manager (FSRM)
Post Views: 3,939
From Wikipedia, the free encyclopedia
Windows System Resource Manager (WSRM)
| Developer(s) | Microsoft |
|---|---|
| Written in | C++ |
| Operating system | Windows Server |
| Successor | Hyper-V |
| Website | docs |
Windows System Resource Manager (WSRM) is a component of Windows Server operating systems that enables the allocation of resources, including CPU and memory resources, among multiple applications based on business priorities. An administrator sets targets for the amount of hardware resources that running applications or users are allowed to consume. It can allocate resources among multiple applications on a server according to defined policies.
This can be helpful in a corporate environment when, for example, a well-behaved app has to co-exist with an application that has a memory leak. Without protection such as afforded by WSRM, the app runs more slowly and eventually crashes, because the misbehaving app eventually causes problems that affect every app that shares its memory space. With WSRM, an app can be limited to an isolated subset of hardware resources. As a result of this, the bad effects caused by the memory leak is limited to that subset.
WSRM is deprecated starting with Windows Server 2012. Microsoft recommends the use of Hyper-V as an alternative that provides similar functionality.[1]
- List of Microsoft Windows components
- Process Lasso
- ^ «Features Removed or Deprecated in Windows Server 2012». TechNet. Microsoft. Retrieved 30 April 2014.
- Mueller, John Paul (2011). Windows Server 2008 All-In-One Desk Reference For Dummies. Wiley. ISBN 978-1118051979.
- Minasi, Mark; Gibson, Darril; Finn, Aidan; Henry, Wendy; Hynes, Byron (2010). Mastering Microsoft Windows Server 2008 R2. Wiley. ISBN 978-0470619759.
- Sosinsky, Barrie (2008). Microsoft Windows Server 2008 Implementation and Administration. Wiley. ISBN 978-0470174593.
- Windows System Resource Manager Overview | Microsoft Docs
- Download Windows System Resource Manager from Official Microsoft Download Center
Настраиваем квоты файловой системы в Windows Server из консоли диспетчера ресурсов файлового сервера FSRM
Организации могут ограничить рост объема данных, назначая квоты на своих файловых серверах. Настроить квоты файловой системы в Windows Server можно из консоли диспетчера ресурсов файлового сервера File Server Resource Manager (FSRM).
Хотя поставщики хранилищ каждый год наращивают емкость жестких дисков, а такие технологии редуцирования данных, как дедупликация, помогут уменьшить место в хранилище, занимаемое набором данных, компаниям по-прежнему важно эффективно использовать хранилища данных. Ведь с хранением, резервным копированием и защитой данных непосредственно связаны затраты. Один из способов, с помощью которых компании могут ограничить рост данных, предусматривает назначение квот файловой системы на серверах. Windows Server располагает таким встроенным инструментом, как диспетчер ресурсов файлового сервера File Server Resource Manager (https://docs.microsoft.com/en-us/windows-server/storage/fsrm/fsrm-overview), предназначенный именно для этого.
Чтобы создать квоту, откройте диспетчер ресурсов файлового сервера, выбрав его из списка инструментов диспетчера серверов. После того как консоль откроется, разверните контейнер Quota Management («Управление квотами»).
На экране 1 показаны два вложенных контейнера в контейнере Quota Management. Один из них называется Quotas («Квоты»), а другой — Quota Templates («Шаблоны квот»).

|
| Экран 1. Создание квот и управление ими из консоли диспетчера ресурсов файлового сервера |
Квоты основаны на шаблонах квот. Шаблон квоты определяет предельный размер и действия, которые совершаются при достижении предела. С другой стороны, квоты применяют шаблон квоты к конкретному пути. Учитывая это, рассмотрим анатомию шаблона квот.
Если взглянуть на экран 2, можно увидеть несколько шаблонов квот, существующих по умолчанию. Эти шаблоны квот можно использовать в изначальном виде или изменить в соответствии со своими нуждами. Конечно, возможно и создание дополнительных шаблонов квот.
|
|
| Экран 2. Существует несколько встроенных шаблонов квот |
Обратите внимание на несколько особенностей этого экрана. Во-первых, квоты определяются как жесткая или мягкая квота. Жесткие квоты применяются принудительно, а мягкие используются в основном для тестирования или в информационных целях.
Во-вторых, один из шаблонов квот определен как имеющий предел 200 Мбайт с расширением 50 Мбайт. В сущности, это шаблон для 200 Мбайт жесткой квоты. Однако, после того как квота исчерпана, шаблон квоты может инструктировать Windows предпринять какие-либо действия, например отправить сообщение по электронной почте или выполнить команду. Шаблон использует такую команду для автоматического расширения квоты. Это происходит следующим образом.
Если щелкнуть по шаблону квоты правой кнопкой мыши и выбрать команду Edit Template Properties («Изменить свойства шаблона») из контекстного меню, откроется окно, представленное на экране 3. Обратите внимание, что шаблон квоты не только задает предельный размер, но и определяет действия, предпринимаемые в том случае, если пользователь приближается к пределу квоты. Предупреждающее сообщение по электронной почте отправляется, когда использовано 85% пространства. Второе предупреждение отправляется пользователю, когда израсходовано 95% пространства. Кроме того, в журнал событий вносится соответствующая запись. Когда лимит квоты окончательно исчерпан, отправляется еще одно сообщение по электронной почте и вносится запись в журнал событий. Однако на этот раз, помимо прочего, выполняется команда. Все эти действия настраиваемые.
|
|
| Экран 3. Вид шаблона квоты |
Если выбрать вариант Warning 100% («Предупреждение 100%») и нажать кнопку Edit («Изменить»), то откроется диалоговое окно, показанное на экране 4. В этом диалоговом окне можно управлять действиями, выполняемыми после достижения предела. Здесь показан текст электронного сообщения, которое будет отправлено. Однако, взглянув на вкладку Command («Команда»), можно увидеть, что этот шаблон квоты настроен на автоматическое увеличение квоты путем применения другого шаблона квоты (экран 5).
|
|
| Экран 4. Настройка электронного сообщения, отправляемого при достижении предела квоты |
|
|
| Экран 5. Вкладка Command настраивается для выполнения команды расширения при достижении предела квоты |
Как отмечалось выше, шаблоны квот просто определяют поведение операционной системы. С другой стороны, квоты привязывают шаблон квоты к пути к файлу. Можно создать квоту, щелкнув правой кнопкой мыши на контейнере Quotas и выбрав команду Create Quota («Создать квоту») из контекстного меню. Как показано на экране 6, в открывающемся в результате диалоговом окне Create Quotas («Создание квот») содержится приглашение ввести путь к квоте и выбрать шаблон квоты.
|
|
| Экран 6. Квоты применяют шаблон квоты в соответствии с путем к файлу |
После того как в диалоговом окне Create Quotas введены все необходимые файлы, можно воспользоваться разделом сводки внизу, чтобы проверить параметры квоты, прежде чем нажать кнопку Create («Создать»).