
Command Prompt in Windows offers a range of commands to gather detailed information about your system’s hardware, software, and overall health. These CMD commands provide quick access to system details, making it easier to diagnose issues, check specifications, and retrieve essential information.
In this blog, we’ll walk you through essential CMD commands that reveal everything from your operating system version to network details and hardware configurations. Perfect for beginners and pros alike, these tools will empower you to take control of your system like never before.
CMD Commands to Gather Information Of A System
CMD Commands to Gather Information Of A System
This article uses WMIC commands. Wmic is a tool used in the command prompt to get system information. The full form of WMIC is the Windows Management Interface command. The list of Commands for gathering information is mentioned below.
1. Serial Number
The command is used to get the computer’s serial number. This is very helpful to get the serial number of our bios. We will get our serial number instead of O.E.M.
wmic bios get serialnumber
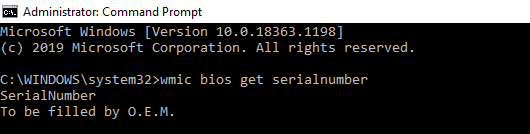
wmic bios get serialnumber command
2. Mac Address
The command is used to get Mac Address is given below but there other be other ways also by which we can get our Mac Address.
wmic nic get macaddress :: Method 1
getmac :: Method

getmac
3. CPU
This command helps to gather all information about a CPU i.e. name, device id, number of cores, max clock speed, status. This can also help us in figuring out our CPU specs.
wmic cpu
We can also send attributes to get the particular details of a CPU in a better view. You may use a particular attribute to get particular details of CP.
wmic cpu get caption, name, deviceid, numberofcores, maxclockspeed, status

get cpu command
4. RAM
There are many times when we need to know the RAM size of a machine. The following command helps us to get the total size of the ram in the number of bits. We can convert the size from bits to bytes if we want to know by dividing the size by 8.
Given_Ram_Size (in bits) / 8 = New_Ram_Size (int bytes)
wmic computersystem get totalphysicalmemory
totalphysicalmemory command
5. Partition Details
In many cases, we need to know the size of the disc as well as the partition of our/someone’s disk. Here is the command to get the details of the partition of the disc. Here also, like in CPU, we can get the particular detail of the disc, like getting the name or size or type or getting everything in one shot.
The size given here is also in terms of bits. We can convert it into byte by dividing the given size by 8.
Given_Ram_Size (in bits) / 8 = New_Ram_Size (int bytes)
wmic partition get name,size,type
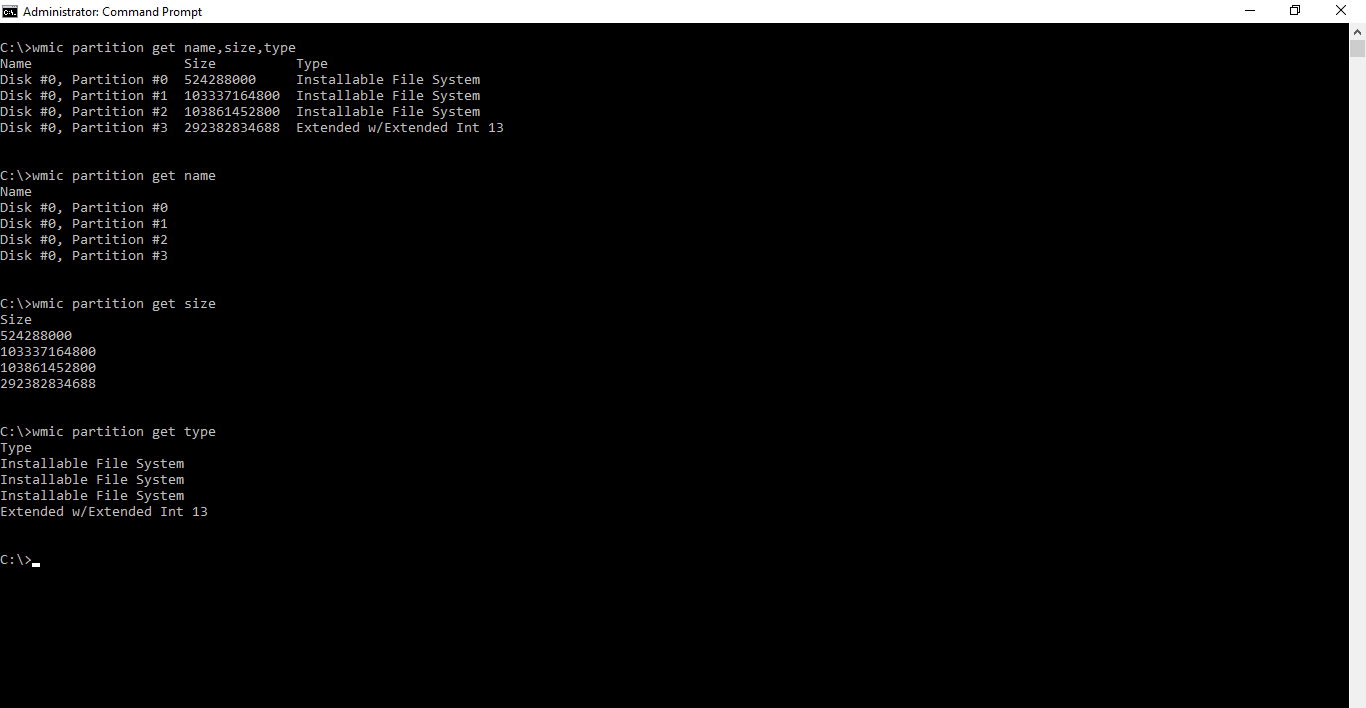
wmic partition get name,size,type
Process
These are the commands which can help us to get the list of all processes running on our computer, and we can also close them by using these commands. These commands are very useful to get to know what tasks are running on someone’s machine. It gives us a list of processes that are running in our background.
wmic process list
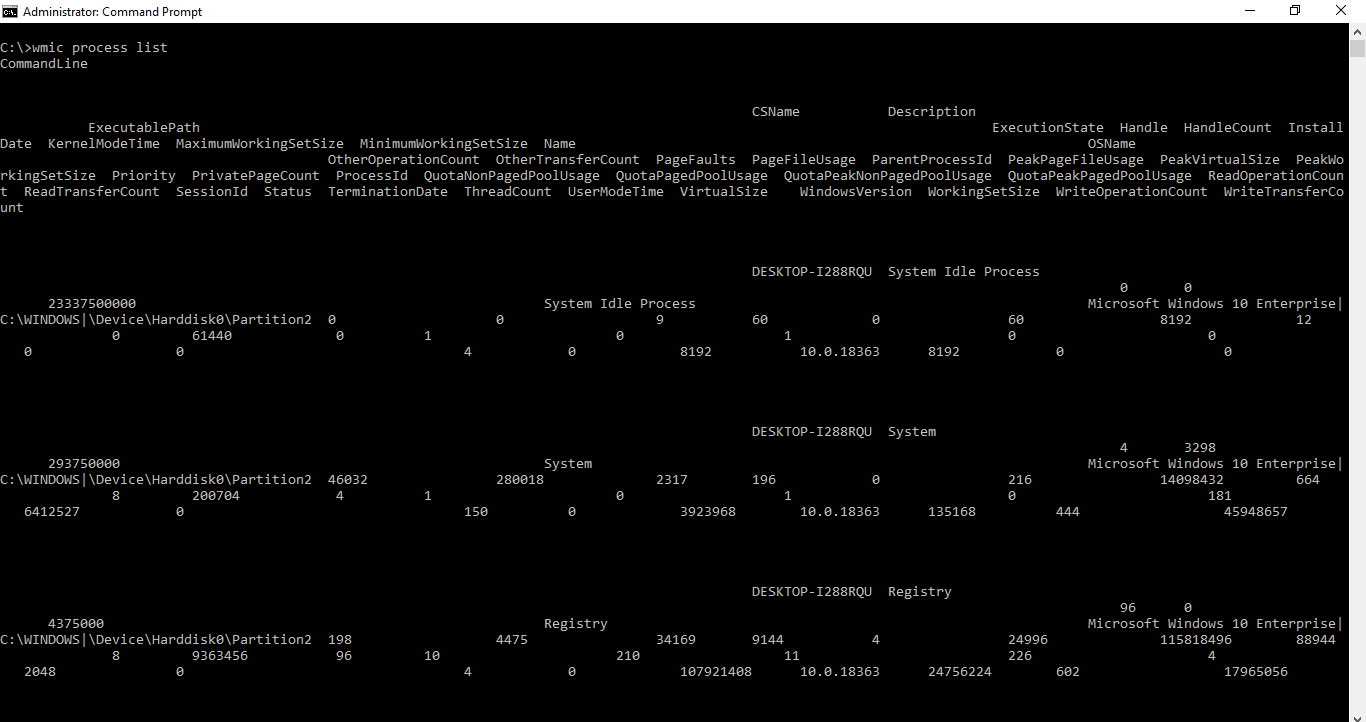
wmic process list command
We can terminate these tasks by using the command:
wmic process where name="name_of_file" call terminate
Note: Put the name of the ‘.exe file’ in place of “name_of_file”
Example:
Let’s say, we want to terminate the calculator. So, open a calculator in the system and terminate the process by using the following steps:
1. After opening the calculator, execute the following command.
wmic process list

calculator.exe
2. Now, execute the following command and it will terminate the ‘Calculator.exe’ process.
wmic process where name="Calculator.exe" call terminate
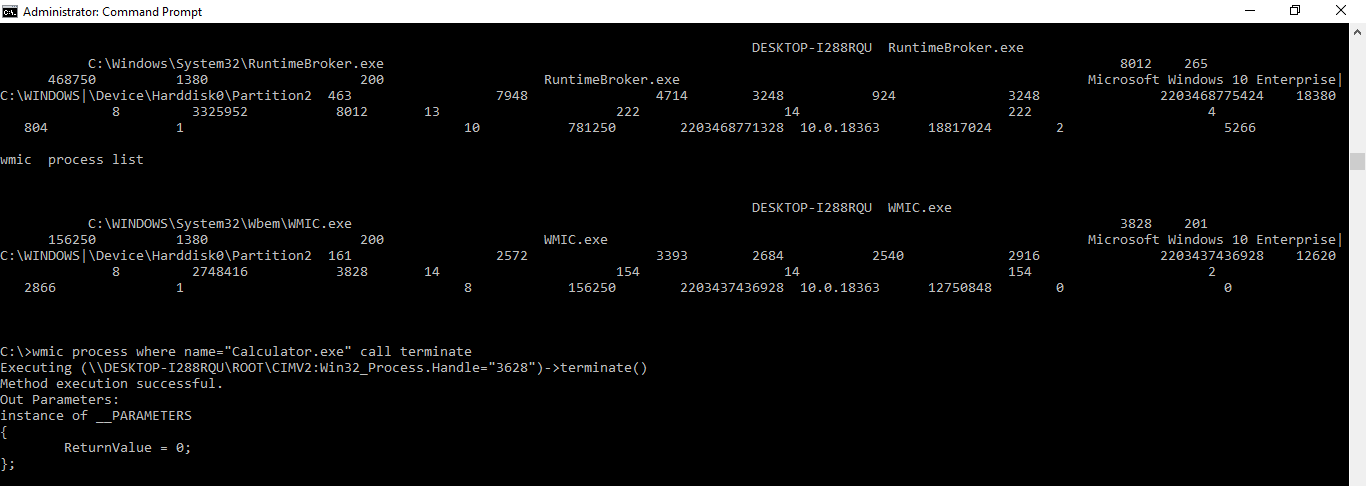
terminate calculator using cmd
Product
This command gives/returns us the list of all products/software installed on a computer that is developed by a well-known developer and is recognized by the windows[Microsoft].
wmic product
::OR
wmic product get name,version
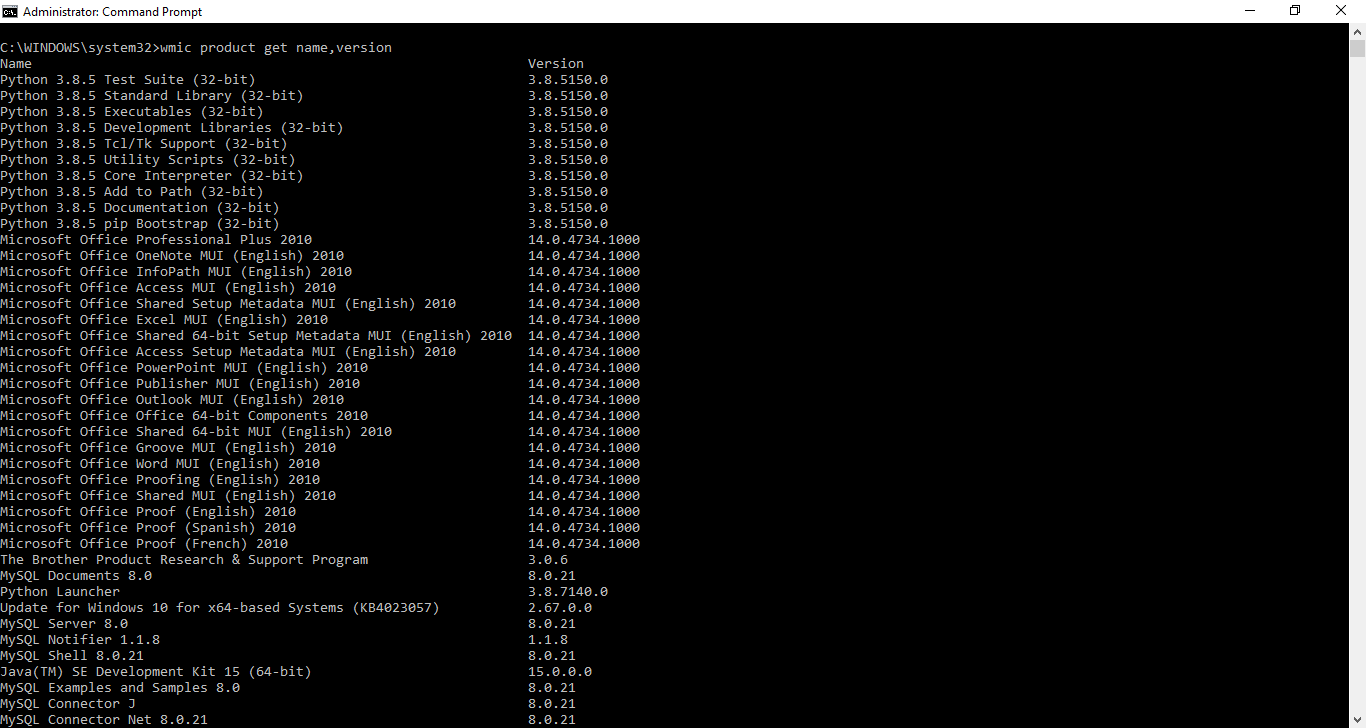
wmic product get name, version
Basic Volume Details
This command gives us the details of a particular volume of the disc. This also gives us the serial number of the volume of that disc.
vol volume_letter:
Note: Replace volume_letter with the letter of the volume you wish to use.
6. Window’s Version
This command gives us the window’s version. This helps us figure out that if the updates are installed in our system or what is our window’s version. The command pop up a new window about windows where we can see our Windows version.
winver
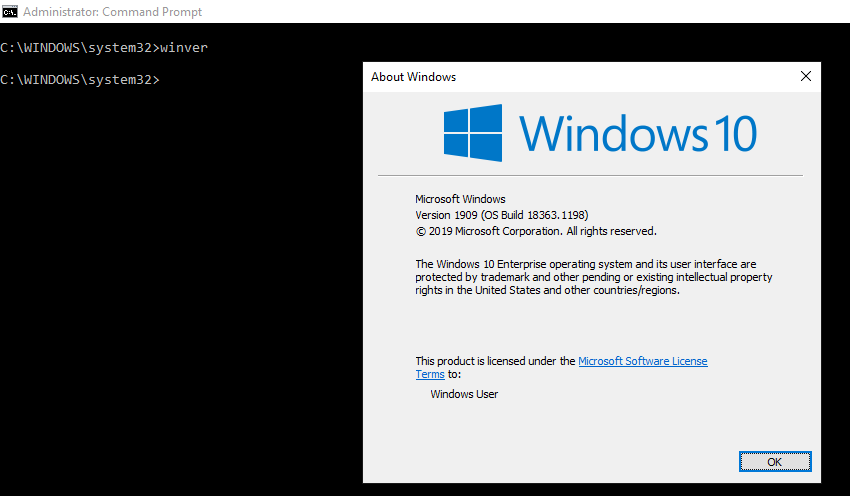
winver command
7. Check Disk
This command gives us a list of all large files and files which are harmful. This can also help us to figure out which file is taking more space and we can also delete those files to clean some memory in the disc.
chkdsk
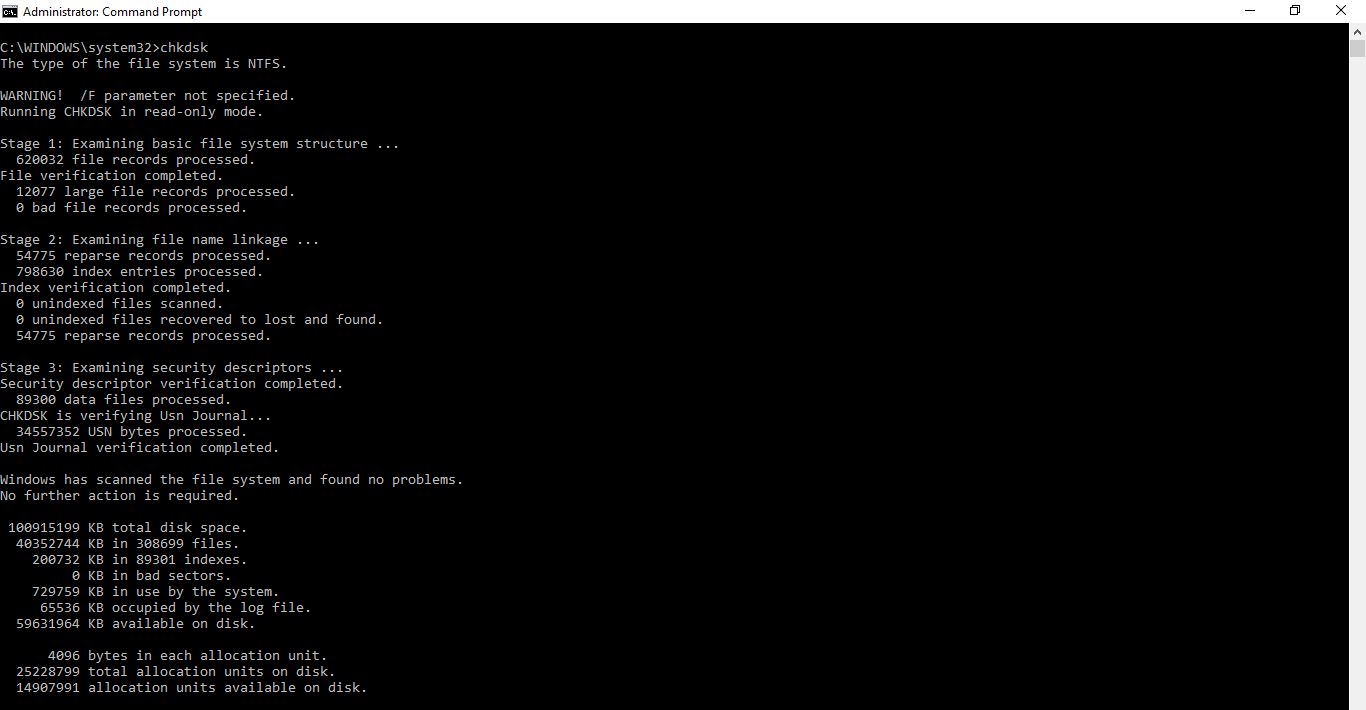
chkdsk
System Information
This command gives us all the basic information about our computer such as:
- Host Name
- OS Name
- OS Version
- OS Manufacturer
- OS Configuration
- Os Build Type
- Registered Owner
- Product ID
- Original Install Date
- Bios Version
- Processor
- Input Locale
- Time Zone
- & many more
systeminfo
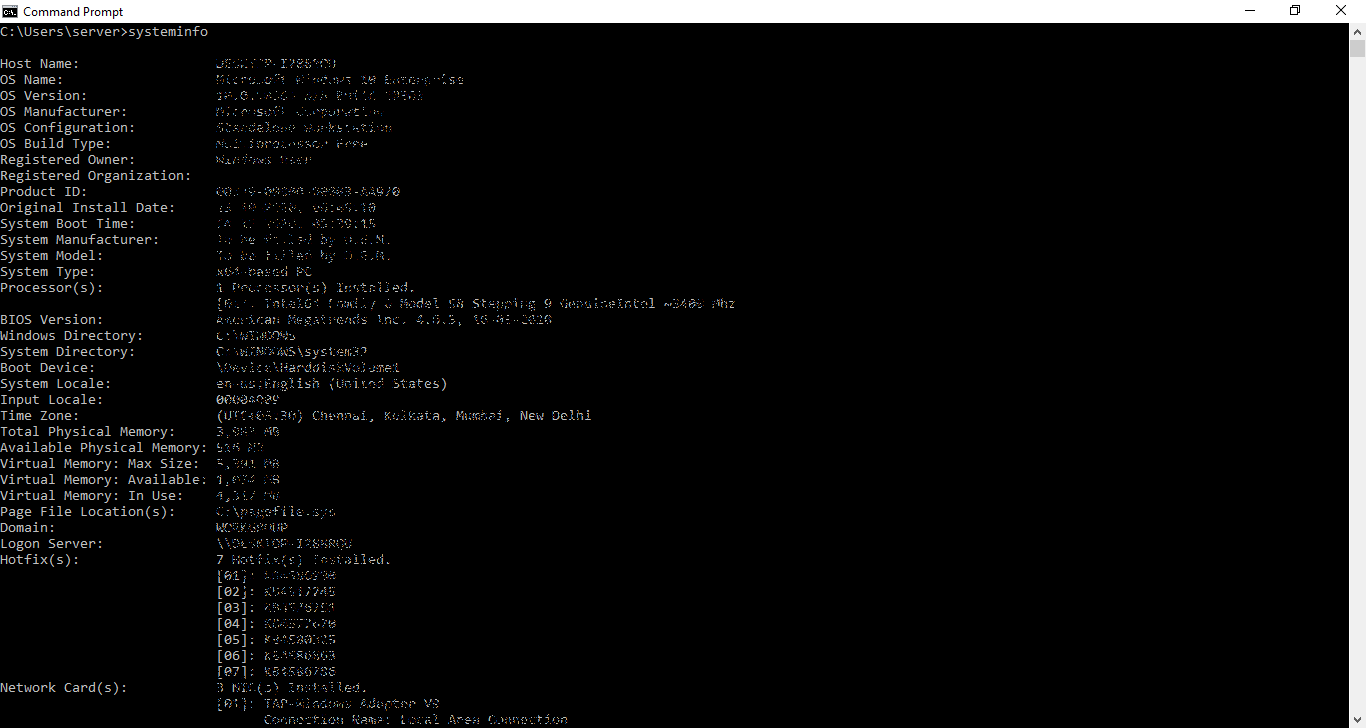
system info
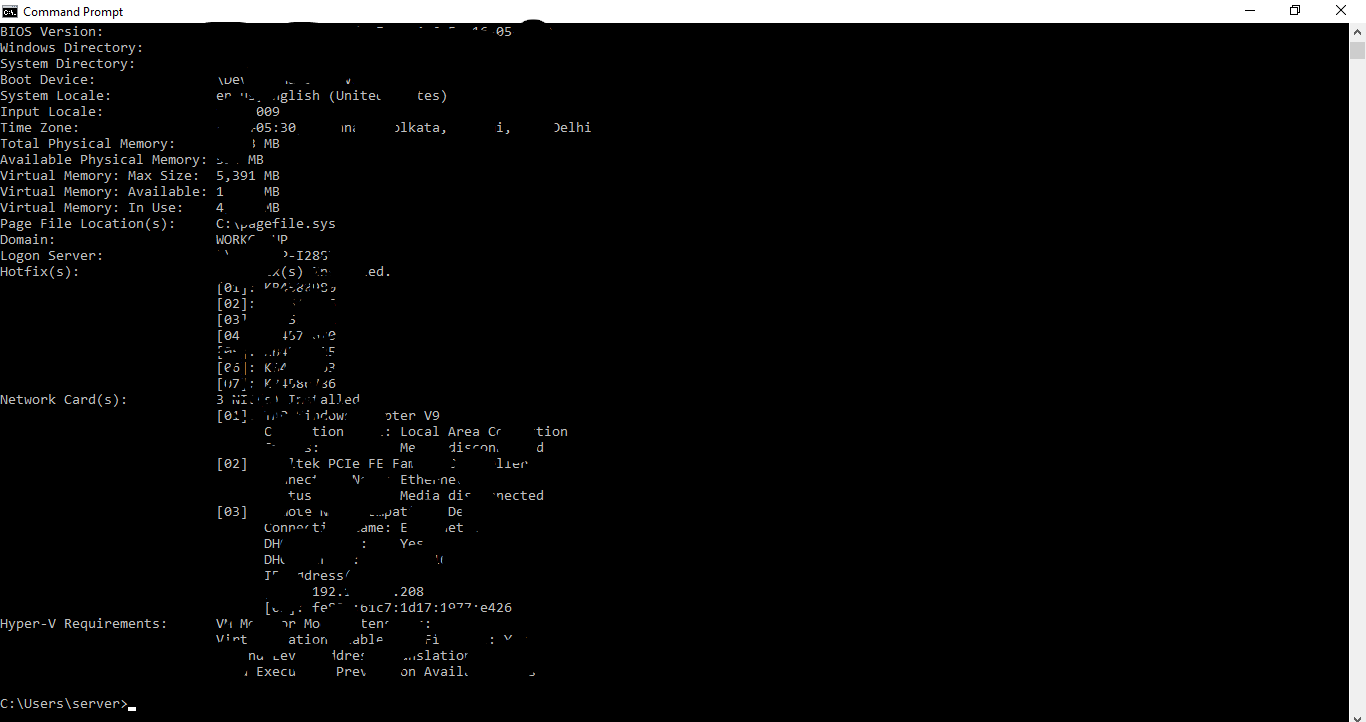
system info
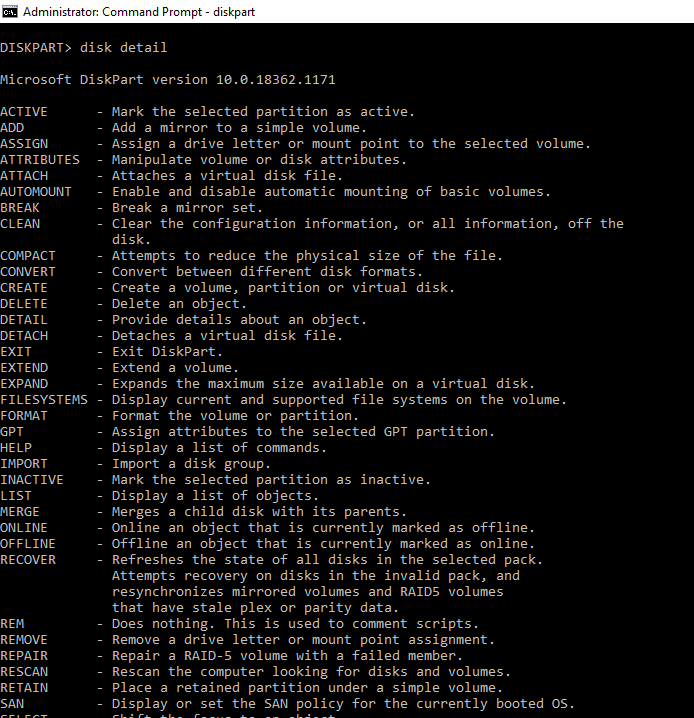
Disk Details
This command gives us whole details of our hard disk where we can select volume get whole details of that volume.
    diskpart
::'disk part' will get us to an infinite loop.
    list disk
::'list disk' will give us the status and the size of the hard disk partition
    select disk_name
::Enter our disk name instead of 'disk_name' and our disk will be selected
    detail disk
::This will give us option which we can use to manipulate our disk
    exit
::This will finally help us to exit the infinite loop

diskpart command
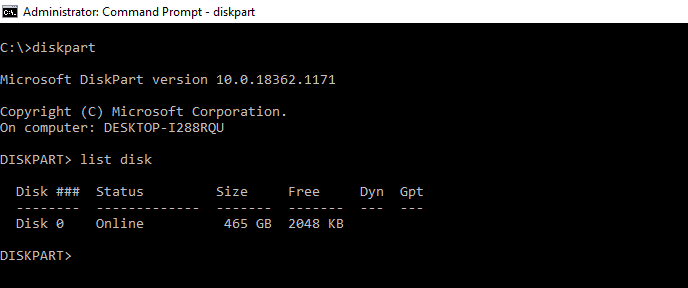
list disk
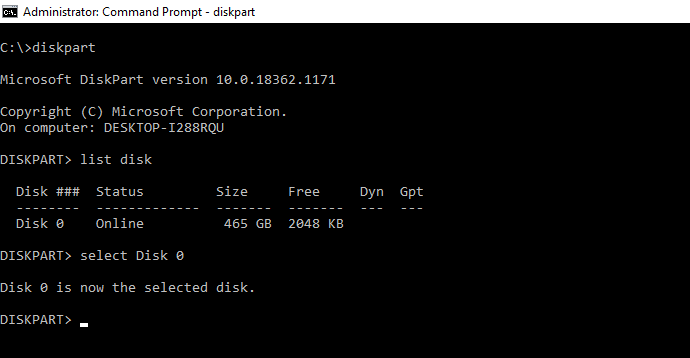
select disk_name
disk detail
exiting disk
Mastering these CMD commands for system information allows you to efficiently gather and analyze crucial details about your Windows system. Whether you need hardware specifics, software details, or a system health check, these commands provide valuable insights to help you manage and optimize your system effectively.
CMD Commands to Gather Information Of A System
Conclusion
Using CMD commands to gather system information is a quick and efficient way to obtain a comprehensive overview of your system’s specs and status. From checking hardware details to monitoring system performance, the Command Prompt offers a wide range of tools at your disposal. By mastering these Windows CMD system info commands, you’ll be better equipped to manage your system and troubleshoot any issues that arise.
The `cmd systeminfo` command displays detailed information about a computer’s hardware and operating system configurations, making it a useful tool for gathering system specifications.
systeminfo
What is `systeminfo`?
The `systeminfo` command is a powerful tool embedded in the Windows operating system, designed to provide a wealth of information about the current state of your computer. When executed, it collects and displays detailed data regarding your system’s hardware and software configuration, making it an essential resource for system diagnostics and troubleshooting.
Master Cmd System32: Your Quick Guide to Efficiency
How to Access the Command Prompt
To utilize the `systeminfo` command, you’ll first need to access the Command Prompt. Here are three easy methods:
Method 1: Using the Search Bar
- Click on the Start button or press the Windows key.
- Type cmd or Command Prompt in the search bar.
- Select Command Prompt from the search results.
Method 2: Using the Run Dialog
- Press Windows + R to open the Run dialog.
- Type cmd and press Enter.
Method 3: Through File Explorer
- Open File Explorer.
- Navigate to `C:\Windows\System32`.
- Double-click on cmd.exe.
Once in the Command Prompt, you will see a black console window where you can input commands.
Mastering Cmd System Repair: A Quick Guide
Using the `systeminfo` Command
Basic Syntax
The basic structure of the `systeminfo` command is quite straightforward. Simply type the following command in your Command Prompt:
systeminfo
Once you hit Enter, the command will execute and begin gathering data from your system.
Expected Output
The output from `systeminfo` is organized into a list of fields, each providing specific information regarding various aspects of your system configuration. Some of the details include:
- Host Name: The name assigned to your computer.
- OS Name: The specific version of the operating system installed.
- OS Architecture: Indicates whether the OS is 32-bit or 64-bit.
- System Manufacturer and Model: Provides the brand and structure of your hardware.
- BIOS Version: Indicates the current version of the BIOS.
- Physical and Available Memory: Displays the total RAM and how much of it is currently available for use.
Exploring Cmd System Variables: A Quick Guide
Understanding the Output
Key Sections in the Output
Host Name
The host name is the identifier of your computer within a network. It is crucial for both local and remote connections.
OS Name
This section gives you the complete name of the operating system. For example, «Microsoft Windows 10 Pro». It helps you confirm if your system runs the version you think it is.
OS Architecture
Knowing whether you’re running a 32-bit or 64-bit version of Windows affects application compatibility and overall system performance. 64-bit versions can handle more RAM and perform better with modern applications.
System Manufacturer and Model
This part highlights who manufactured your computer and its specific model. This is particularly useful for finding the right drivers or support.
BIOS Version
The BIOS version can be vital when troubleshooting hardware issues or updating your BIOS. It shows the firmware version controlling the hardware of your system.
Total Physical Memory
This section indicates how much memory is installed in your computer. Understanding your system’s memory can directly correlate with performance and multitasking capabilities.
Available Physical Memory
This number indicates how much memory is currently free. Managing available memory is crucial for maintaining optimal system performance.
Cmd System Check: A Quick Guide to Run Diagnostics
Advanced Usage of `systeminfo`
Filtering Output
Sometimes you might only want specific details from the `systeminfo` command. You can use `findstr` to filter the output accordingly. For example:
systeminfo | findstr /C:"OS Name" /C:"System Manufacturer"
This command will display only the operating system name and the system manufacturer, making it easier to view pertinent information without wading through the entire output.
Redirecting Output to a File
If you need to save the information for later reference or reporting, redirect the output to a file. You can achieve this with the following command:
systeminfo > systeminfo.txt
This command creates a text file called `systeminfo.txt` in the current directory with all the information from the `systeminfo` command.
Scheduling Regular Checks
You can automate the `systeminfo` command to run at regular intervals using the Task Scheduler in Windows. This could be useful for routine audits of system performance. Create a script with the `systeminfo` command, and then set it up to run daily or weekly.

Mastering Cmd Terminal: Quick Tips for Every User
Troubleshooting Common Issues
Command Not Found Errors
If you encounter a «command not found» error, it could be due to various reasons. First, ensure you are typing the command correctly. If that doesn’t solve the issue, check your system’s PATH environment variable, as it might not include the necessary directories to execute the command.
Limited Command Output
If you notice that the output from `systeminfo` is limited or truncated, this could be related to permissions. Make sure you are running the Command Prompt as an administrator to access all available details.

Mastering Cmd Testing: Quick Tips for Efficiency
Conclusion
The `systeminfo` command is an invaluable tool for anyone in IT or casual Windows users looking to better understand their system. Utilizing `systeminfo` can help you diagnose issues, understand system specs, and optimize performance effortlessly. By incorporating this command into your routine, you can gain insights that enhance your computing experience.
Master Cmd SSH Windows: A Quick Guide to Connectivity
Additional Resources
For further exploration of the `systeminfo` command, consider reviewing the official Microsoft documentation, which offers in-depth technical details and variations of this command for more advanced users.

Mastering Cmd Administrateur for Quick Command Access
Call to Action
Now that you’re equipped with knowledge about the `cmd systeminfo` command, it’s time to put it into practice! Explore your system’s specifications and equip yourself with essential tools for diagnostics. Don’t forget to subscribe to our blog for more CMD command tutorials and tips to enhance your command line skills!
Sometimes you may need immediate information on your computer, its hardware, software, or internet connectivity settings. For that, Microsoft includes a built-in utility called “System Information,” or “MSInfo32” in the Windows operating system.
These tools have been included in the Windows OS since Windows 98, and every Microsoft OS released after that. It performs a fresh scan of your system search time the tool is run and fetches fresh information.
In this post, we are going to discuss what information can be obtained using the System Information tool, and how you can use it to generate readable reports.
Table of Contents
SystemInfo.exe VS. MSInfo32
Before we proceed any further, we would like to discuss what SystemInfo is and how is it different from MSInfo32.exe.
MSInfo32, or MSInfo32.exe is a utility in the Windows OS that opens in a separate window that displays “System Information” in the title bar. Therefore, it is also referred to as the System Information utility.

Whereas SystemInfo.exe is a command-line tool that displays a small part of the same information displayed in the MSInfo32 utility.

Having said that, both fetch system information for you to obtain, and both can be used to generate system information reports in plain text and HTML. Not only that, but you can also obtain information on remote devices on your network.
What Information does System Information Give
The list of information the MSInfo32 tool gives is lengthy. Therefore, the list below only highlights the major components on which the MSInfo32.exe tool reports:
- Operating system version, build, and other details
- Details of the hardware inside the computer (CPU, RAM, ROM, CD-ROM, motherboard, graphic and network card, etc.)
- BIOS/UEFI details
- Other system details (Page file, locale, virtualization status, etc.)
- Codec details (Both audio and video)
- Details on sound and display devices (and their drivers)
- Attached peripheral details
- Network adapter, protocol, and socket details
- Details of partitions on the disk
- Details of configured printers and their drivers
- Details of all drivers
- List and details of environmental variables
- Running and halted tasks and processes
- List and details of Windows services
- Windows error reports
Many of these item details are fetched when you attempt to open the respective category inside the MSInfo32 utility. However, Microsoft warns that you should always run this tool as an administrator because certain information needs elevated privileges to obtain accurate information.
Furthermore, MSInfo32 cannot be run in Safe Mode.
Let us now discuss how to run these tools and how to generate reports.
How to Run and Use MSInfo32.exe
You can open the System Information utility in multiple ways in both Windows 10 and 11. The methods shared below to open this utility are with elevated privileges, making sure that the cache is updated and accurate information is displayed.
Open System Information from Command Line
One way to open the System Information window is from the command line. All you need to do is type in the following in either the Run Command box, Command Prompt, or Windows PowerShell.
Note: Make sure to run Command Prompt or PowerShell with administrative privileges. If you are using the Run Command box, then press CTRL + Shift + Enter to execute the cmdlet with elevated rights.
msinfo32.exeOpen System Information from Search
Alternatively, you can also open the System Information utility by searching for it either in the Start Menu or from the search box in the taskbar. Here is how:
-
Search for either “system information” or “msinfo32” in the search area.
-
You will then see the System Information app. Click Run as administrator under it.

Run System Information as admin

The utility will now open with administrative privileges. Once it opens, you can navigate the different categories from the left pane and view the desired information in the right pane.
Now let us show you how to generate reports using the System Information utility.
Generate System Information Report
There are 2 ways you can generate a report using the System Information tool – one is from within the tool itself, and the other is through the command line.
Moreover, you can generate reports in both plain text and HTML. The reports contain information that is already viewable inside the System Information window. However, you may need a report to print or carry it onto another computer.
From MSInfo32 Tool
To generate a report in plain text (.txt) file, follow these steps:
-
Open the System Information utility by typing in msinfo32 in the Run Command box.
Open System Information -
Within the tool, click File from the top menu and then click Export.

Export report -
Now set a location and a name for the text file to save it, and then click Save.
Save text file -
You will now see a small window generating a report. This can take a few seconds to complete.
Generating report When the process is complete, you will be able to view the complete system report in a text file on the saved location.


Now if you want to generate an HTML (.nfo) report, then follow these steps:
-
Open the System Information utility by typing in msinfo32 in the Run Command box.
-
Within the tool, click File from the top menu and then click Save.
Save report -
Now set a location and a name for the text file to save it, and then click Save.
Save HTML file -
You will now see a small window generating a report. This can take a few seconds to complete.
Generating report When the process is complete, you will be able to view the complete system report in a .NFO file, which is an HTML file used for system reports.


You can also connect the System Information utility to another computer on the network to generate a report of that particular computer. The process to generate reports and view the information will be the same. However, you must first make a connection to the remote PC. To do that, perform these steps:
-
From inside the System Information tool, click View from the top menu and then click Remote Computer.
Make a remote connection -
The Remote Computer window will now open. Select the “Remote Computer on the Network” dialog box, then enter the name of the remote PC. When done, click Ok.
Connect to a remote computer -
The tool will now attempt to connect to the remote computer over the network. You will be asked to provide credentials to the remote computer, and when you do, the connection will be established.
Once done, you will now be able to view the remote computer’s details inside System Information, and even generate reports.


From Command Line
You can also use the “msinfo32.exe” cmdlet in either Command Prompt or PowerShell to generate these reports. Before we show you how, let us discuss the syntax and the switches used with this cmdlet.
msinfo32 /ReportType Path| Switch/Variable | Values | Details |
| ReportType | nfo or report |
SWITCH – Specifies if you want to generate an HTML report or a text report |
| Path | C:\Path\FileName.txt | VARIABLE – Complete path to where you want to save the file; includes the file extension |
Note that if you do not include the correct file extension, you will receive an “Access is denied” error.
Moreover, if you used the /nfo switch, then the file extension must be .nfo. If you used the /report switch, then the extension must be .txt. Here is our example:

Note that running this cmdlet also opens a progress window. Once the process is complete, the window will close automatically and you will be able to see the generated report.
You can also generate a report using the command line of another remote computer on your network. For that, you must use this syntax:
msinfo32 /ReportType Path /Computer ComputerName| Switch/Variable | Values | Details |
| Computer | Computer | SWITCH – Used when connecting to a remote computer on the network |
| ComputerName | ItechticsServer or 192.168.10.222 | VARIABLE – Specifies the target computer’s name or IP address |
Using this syntax, you can generate a report of a remote PC. This can be very useful for system administrators when working inside a domain.
Up till this point, we have covered all the basics of the “System Information” or “MSInfo32.exe” utility. Let us now discuss the “systeminfo.exe” tool.
How to Run and Use SystemInfo.exe
As we mentioned earlier, the “systeminfo” is a command-line tool and does not have a Graphical User Interface (GUI) to interact with. It displays only a portion of the information you can see inside the System Information tool.
Moreover, you cannot generate a report with the SystemInfo utility. However, you can connect remotely with another PC on the same network and obtain details of it as well.
Run SystemInfo.exe
You can run the “systeminfo.exe” cmdlet in either Command Prompt of Windows PowerShell, but not in the Run Command box. This is because the cmdlet then fetches the system’s information and displays it inside the command line – which it cannot do in a Run Command box.
To view the details of your computer using this tool, simply run the following in the command line tool:
systeminfo.exe
As you can see in the image above, some details regarding the operating system, BIOS, and physical hardware are displayed using the SystemInfo.exe tool. It also displays network and virtualization details, but no more than that.
Get Remote Computer Details using SystemInfo.exe
If you want to obtain the details of a remote computer on your network, that can also be done using the SystemInfo tool inside the command line. Here is the syntax of the complete command and below you’ll find a table explaining the different switches and variables:
Systeminfo /s ComputerName /u DomainName\UserName /p Password /fo TypeOfFormat /nh| Switch/Variable | Values | Details |
| /s | /s | SWITCH – Specifies the name or IP address of remote PC |
| /u | /u | SWITCH – Specifies the authenticating username on the remote PC |
| /p | /p | SWITCH – Specifies the password for the username to authenticate on the remote PC |
| /fo | /fo | SWITCH – Specifies the output format of the data |
| /nh | /nh | SWITCH – Suppresses column headers in the output. Valid when the /fo parameter is set to TABLE or CSV. |
| ComputerName | ItechticsServer Or 192.168.10.222 |
VARIABLE – Name or IP address of remote PC |
| DomainName | Contoso | VARIABLE – Name of your network domain |
| UserName | ItechticsAdmin | VARIABLE – User account name of remote PC to authenticate |
| Password | xxxxxx | VARIABLE – Password for the user account of the remote PC to authenticate |
| TypeOfFormat | TABLE Or LIST Or CSV |
VARIABLE – Specify the format of the output data |
This cmdlet will simply fetch the details of the remote PC and display them inside the command line tool.

Closing Thoughts
To sum up, both the System Information (MSInfo32) tool and the SystemInfo.exe tool are alike – since they both provide details on your computer. However, unlike MSInfo32, SystemInfo.exe cannot generate and save reports and only works in the command line.
Both of these tools are excellent for system and network administrators so they can obtain the details of both local and remote computers in a jiffy, without having to get up from their seats!
You can easily view information about your computer using Windows graphical tools like Task Manager or System Information. However, some users prefer terminal environments like the Command Prompt or PowerShell for almost everything. If you’re curious about how to get system info in CMD (Command Prompt) or want to learn how to view and manage running processes from Windows’ CMD, keep reading. I’ll show you how to do all of these things:
NOTE: The information in this tutorial applies to Windows 10 and Windows 11, and the commands work both in Command Prompt and PowerShell.
1. How to get system information in CMD with the Systeminfo command
Windows has a built-in command to check the system configuration called systeminfo. Running this command displays a long list of information about your computer. Open Command Prompt or PowerShell, and run the command as-is:
systeminfo
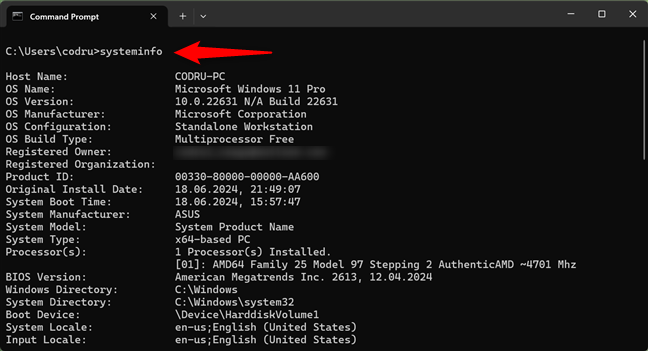
Systeminfo is the command that lets you check PC specs
Do you see what’s happening? The systeminfo command reveals details about your operating system, computer hardware, and software components. You’ll see details such as the version of the operating system version on your computer, RAM status, and processor model, as well as network information like the IP and MAC addresses.
TIP: If you’d like to find out even more information about the systeminfo command, Microsoft offers excellent documentation for it: Microsoft Learn Systeminfo.
2. How to see the list of running processes using the Tasklist command
To view the list of currently running processes in Command Prompt or PowerShell, run the command:
tasklist
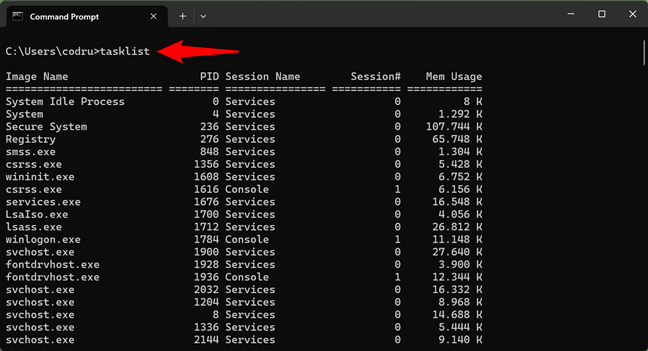
Tasklist lets you view running processes in Windows’ CMD
The command lists the processes running on your computer. In addition to their names, the list includes details like the processes’ PIDs (Process identifiers) and the memory they use.
TIP: For more information on how the tasklist command works and what parameters it accepts, check the Microsoft Learn Tasklist documentation.
3. How to stop a process using the Taskkill command
To kill or stop a running process from Command Prompt or PowerShell, use the taskkill command. For example, to stop OneDrive, whose process is called OneDrive.exe, run the command:
taskkill /f /im OneDrive.exe
The /f parameter forcefully terminates the process, and the /im parameter identifies and stops a process by its name.

How to stop a process from CMD
There are times when you need to open a program multiple times. Every new window and sometimes the tabs of a specific program (for example, Microsoft Edge) creates a separate process called instance with a unique PID (Process identifier).
To stop a single instance, specify its PID (Process identifier). For example, there are a couple of instances of Microsoft Edge open on my computer. The process’s name is msedge.exe, but I only want to close one of its running instances (tabs, windows).
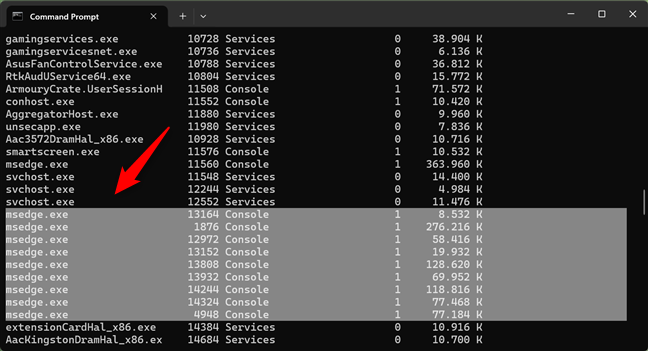
Multiple instances of a process have unique process identifiers
If I want to kill the process with the 12820 PID, I must run the command:
taskkill /PID 12820
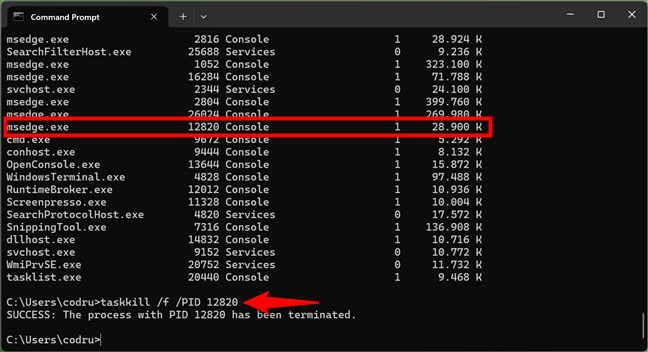
Killing a process in CMD using its PID
Another useful parameter for the taskkill command is /t, which terminates a specified process and any child processes it started.
Take the same example: the Microsoft Edge process. To kill all instances of Microsoft Edge, run the command:
taskkill /t /im msedge.exe
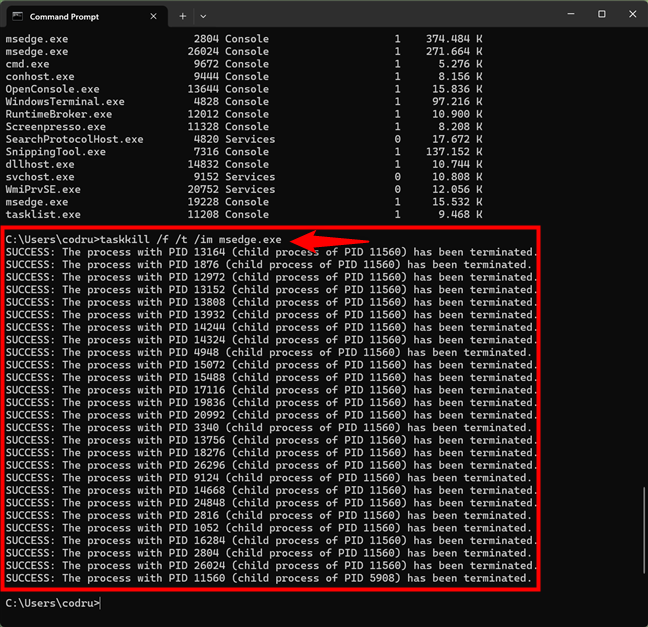
Kill all the instances of an app from CMD
TIP: If you’d like to discover all the ins and outs of the taskkill command, including advanced uses for it, read its documentation: Microsoft Learn Taskkill.
Warning! Misusing these kill commands can result in data loss in running processes. Always proceed carefully and make sure you’ve backed up your data.
Do you use CMD to get system info and manage running processes?
You know now how to use commands to view system information and manage processes. Do you like having this level of control over your computer? Comment below and share your experiences with CMD and PowerShell. Also, if you have any favorite commands, don’t hesitate to share them with some background information on how you’re using them. They’ll surely be helpful to other people reading this article.
В этой статье вы узнаете, как получить полную информацию о конфигурации компьютера через командную строку – мощный инструмент, который часто недооценивают обычные пользователи. Представьте ситуацию: ваш системный администратор попросил предоставить технические характеристики ПК для диагностики проблемы, а доступ к графическому интерфейсу ограничен или отсутствует вовсе. Или более сложный случай – система работает нестабильно, и нужно быстро определить, соответствует ли текущее “железо” минимальным требованиям установленного программного обеспечения. С помощью командной строки вы сможете получить детальную информацию буквально за несколько минут, что особенно ценно при работе с удаленными серверами или в условиях ограниченного времени.
Основные методы получения информации о конфигурации
Для эффективного анализа конфигурации компьютера через командную строку существует несколько базовых подходов, каждый из которых имеет свою специфику применения. Первый метод основан на использовании встроенных системных утилит Windows, таких как systeminfo, dxdiag и tasklist. Эти инструменты позволяют получить комплексную информацию о системе, начиная от данных о процессоре и оперативной памяти, заканчивая сетевыми настройками и установленными драйверами. Важно отметить, что некоторые команды требуют прав администратора для корректного выполнения, поэтому перед началом работы рекомендуется запустить командную строку от имени администратора.
Второй подход предполагает использование специализированныых команд PowerShell, которые предоставляют более гибкие возможности для анализа конфигурации. Например, команда Get-WmiObject позволяет получать детальную информацию о различных компонентах системы через WMI-запросы. Это особенно полезно при необходимости автоматизации процесса сбора информации или создания отчетов. Третий метод включает использование сторонних утилит, которые могут быть вызваны через командную строку и предоставляют расширенные возможности по сравнению со стандартными средствами.
- Системные утилиты Windows (systeminfo, dxdiag)
- Команды PowerShell (Get-WmiObject)
- Сторонние инструменты командной строки
При выборе метода важно учитывать конкретные задачи и условия работы. Например, если требуется быстрый обзор основных характеристик системы, достаточно будет использовать команду systeminfo. Для более детального анализа лучше обратиться к PowerShell или специализированным утилитам. Рассмотрим практический пример: при диагностике производительности сервера необходимо было определить точную модель процессора, объем оперативной памяти и версию BIOS. Использование команды systeminfo позволило получить всю необходимую информацию всего за одну минуту, что значительно ускорило процесс диагностики.
Подробный разбор команды systeminfo
Команда systeminfo представляет собой универсальный инструмент для получения информации о конфигурации компьютера через командную строку. При ее выполнении формируется подробный отчет, содержащий свыше 50 параметров системы. Основные группы данных включают информацию о версии операционной системы, состоянии безопасности, аппаратной конфигурации и сетевых настройках. Например, в разделе OS Name указывается точное название операционной системы, включая номер сборки, а в разделе System Manufacturer можно найти данные о производителе компьютера.
| Параметр | Описание | Пример значения |
|---|---|---|
| OS Name | Название операционной системы | Microsoft Windows 10 Pro |
| System Manufacturer | Производитель оборудования | LENOVO |
| Processor(s) | Информация о процессоре | Intel(R) Core(TM) i7-1065G7 CPU @ 1.30GHz |
| Total Physical Memory | Объем оперативной памяти | 16,288 MB |
Важным преимуществом команды systeminfo является возможность фильтрации выводимой информации с помощью дополнительных параметров. Например, команда systeminfo /fo csv позволяет получить данные в формате CSV, удобном для последующего анализа в табличных редакторах. Также доступна возможность сохранения результатов в текстовый файл с помощью символа перенаправления вывода >. Это особенно полезно при необходимости документирования текущей конфигурации системы или сравнения параметров до и после модернизации оборудования.
Рассмотрим реальный кейс: при подготовке отчета о состоянии парка офисной техники потребовалось получить информацию о всех компьютерах в сети. Использование команды systeminfo в сочетании с возможностью удаленного подключения позволило автоматизировать процесс сбора данных и сформировать единый документ с характеристиками всех рабочих станций. При этом время выполнения задачи сократилось более чем в три раза по сравнению с ручным способом сбора информации.
Анализ аппаратных компонентов через командную строку
Глубокий анализ аппаратных компонентов компьютера через командную строку требует применения специализированных команд и инструментов. Команда wmic (Windows Management Instrumentation Command-line) открывает доступ к широкому спектру информации об оборудовании. Например, команда wmic cpu get name,NumberOfCores,NumberOfLogicalProcessors предоставляет детальные данные о процессоре, включая его модель, количество физических ядер и логических процессоров. Аналогичным образом, команда wmic memorychip get capacity, speed позволяет узнать объем и частоту каждой установленной планки оперативной памяти.
Видеоподсистему можно исследовать с помощью команды dxdiag /whql:off, которая формирует подробный отчет о видеокарте, включая информацию о производителе, модели, объеме видеопамяти и поддерживаемых технологиях. Важно отметить, что эта команда может занять несколько минут на выполнение, так как она собирает данные о всех установленных графических адаптерах. Для получения информации о жестких дисках и разделах используется команда wmic diskdrive get model,size,interfaceType, которая показывает модель накопителя, его объем и тип интерфейса подключения.
- wmic cpu – информация о процессоре
- wmic memorychip – данные об оперативной памяти
- dxdiag /whql:off – характеристики видеокарты
- wmic diskdrive – параметры жестких дисков
Рассмотрим практический пример использования этих команд. При диагностике производительности рабочей станции дизайнера возникла необходимость проверить соответствие текущей конфигурации системным требованиям нового графического пакета. Команда wmic cpu показала, что процессор имеет только четыре физических ядра вместо рекомендованных шести, а команда wmic memorychip выявила недостаточный объем оперативной памяти – 16 ГБ вместо требуемых 32 ГБ. Информация о видеокарте, полученная через dxdiag, подтвердила, что установленная модель соответствует минимальным требованиям, но не оптимальна для работы с новым программным обеспечением.
Экспертное мнение: Сергей Михайлов, системный администратор с 15-летним опытом
По словам Сергея Михайлова, сертифицированного специалиста Microsoft Certified Systems Engineer (MCSE) с обширным опытом администрирования корпоративных сетей, использование командной строки для анализа конфигурации компьютера особенно актуально в условиях ограниченного времени и ресурсов. “За годы работы я столкнулся с множеством ситуаций, когда графический интерфейс был недоступен или работал нестабильно, а информация о системе требовалась срочно. В таких случаях командная строка становится настоящим спасением,” – делится эксперт.
Сергей рекомендует всегда иметь под рукой набор готовых скриптов для быстрого получения информации о ключевых компонентах системы. “Я создал универсальный bat-файл, который за одну команду собирает все необходимые данные о процессоре, памяти, дисках и сетевых настройках. Это особенно полезно при работе с удаленными серверами или при массовом аудите парка оборудования,” – объясняет специалист. По его словам, такой подход позволяет сэкономить до 40% времени на рутинных операциях по сбору информации.
В своей практике Сергей часто сталкивается с ситуациями, когда пользователи пытаются самостоятельно определить конфигурацию системы, но сталкиваются с трудностями при интерпретации полученных данных. “Многие забывают, что числовые значения часто представлены в неочевидных единицах измерения. Например, размер оперативной памяти в выводе команды wmic memorychip указан в килобайтах, что может ввести в заблуждение неопытных пользователей,” – предостерегает эксперт. Он советует всегда внимательно изучать описание каждого параметра и при необходимости использовать справочные материалы.
Часто задаваемые вопросы и проблемные ситуации
- Как быть, если команда systeminfo выполняется слишком долго? Действительно, на некоторых системах выполнение этой команды может занимать до 5 минут. Чтобы ускорить процесс, используйте параметр /fo list для получения только базовой информации. Альтернативно, можно применить команду wmic computersystem get *, которая работает быстрее, но предоставляет менее подробные данные.
- Что делать, если некоторые команды не работают? Прежде всего, убедитесь, что командная строка запущена от имени администратора. Если проблема остается, проверьте состояние службы Windows Management Instrumentation (WMI) – она должна быть запущена. В крайнем случае, попробуйте восстановить системные файлы с помощью команды sfc /scannow.
- Как получить информацию о температуре компонентов? Стандартные средства Windows не предоставляют эту информацию через командную строку. Для мониторинга температуры понадобится установка сторонних утилит, таких как Open Hardware Monitor, которые имеют собственные CLI-интерфейсы.
- Можно ли получить историю изменений конфигурации? Да, это возможно через журнал событий Windows. Используйте команду wevtutil qe System /f:text /c:10 /q:”*[System[(EventID=10000)]]”, которая покажет последние изменения в аппаратной конфигурации.
- Как экспортировать результаты в удобный формат? Для сохранения результатов в файл используйте символ >. Например, systeminfo > config.txt сохранит отчет в текстовый файл. Для CSV-формата применяйте параметр /fo csv. Можно также использовать PowerShell для преобразования данных в JSON или XML.
Рассмотрим реальный случай: при попытке получить информацию о конфигурации старого сервера команда systeminfo выдавала ошибку доступа к некоторым параметрам. Проблема была решена путем перезапуска службы WMI и очистки ее репозитория с помощью команды winmgmt /resetrepository. После этого все команды начали работать корректно.
Сравнительный анализ методов получения информации о конфигурации
| Метод | Преимущества | Недостатки | Скорость выполнения | Уровень детализации |
|---|---|---|---|---|
| systeminfo | Полная информация, встроенная команда | Медленное выполнение, большой объем данных | Высокая (до 5 минут) | Максимальная |
| wmic | Гибкость запросов, быстрое выполнение | Требует знания синтаксиса | Средняя (10-30 секунд) | Средняя |
| PowerShell | Мощные возможности фильтрации | Сложность освоения | Низкая (5-15 секунд) | Высокая |
| Сторонние утилиты | Расширенные функции | Требуется установка | Зависит от утилиты | Максимальная |
Практический опыт показывает, что наиболее эффективным является комбинированный подход. Например, для быстрого получения базовой информации можно использовать wmic, а для детального анализа – PowerShell или специализированные утилиты. Важно помнить, что выбор метода зависит от конкретных задач и условий работы. Так, при массовом аудите парка оборудования предпочтительнее использовать скрипты PowerShell, тогда как для одноразового анализа достаточно стандартных команд.
Рассмотрим кейс из практики: при подготовке тендерной документации потребовалось получить информацию о конфигурации нескольких десятков компьютеров. Было решено создать универсальный PowerShell-скрипт, который автоматически собирал данные о процессоре, памяти, дисках и сетевых настройках, сохраняя результаты в структурированный CSV-файл. Это позволило сократить время выполнения задачи с нескольких дней до нескольких часов, а также минимизировать риск человеческой ошибки при ручном вводе данных.
Практические рекомендации и чек-лист для анализа конфигурации
Для максимально эффективного использования командной строки при анализе конфигурации компьютера следует придерживаться следующих рекомендаций:
- Всегда запускайте командную строку от имени администратора
- Создайте текстовый файл с часто используемыми командами для быстрого доступа
- Используйте символ > для сохранения результатов в файл
- Проверяйте единицы измерения при анализе числовых значений
- Регулярно обновляйте список известных вам команд и параметров
- Тестируйте новые команды на тестовой системе перед использованием в продакшене
Важным аспектом является правильная интерпретация полученных данных. Например, значение Total Physical Memory в выводе команды systeminfo указывается в килобайтах, что может привести к ошибкам при расчетах. Также стоит учитывать, что некоторые параметры могут быть недоступны или отображаться некорректно на старых системах или при использовании виртуальных машин. Рекомендуется всегда проверять полученные данные несколькими различными методами для исключения ошибок.
Для системных администраторов полезно создать универсальный скрипт, который автоматически собирает всю необходимую информацию о конфигурации компьютера через командную строку и формирует структурированный отчет. Такой скрипт должен включать проверку основных компонентов системы, сетевых настроек и состояния безопасности. При этом важно предусмотреть обработку возможных ошибок и создание лог-файла выполнения.
Заключение и дальнейшие шаги
Анализ конфигурации компьютера через командную строку представляет собой мощный инструмент, который позволяет быстро и точно получить необходимую информацию о системе. Мы рассмотрели различные методы получения данных, начиная от базовых команд systeminfo и wmic до продвинутых возможностей PowerShell и специализированных утилит. Каждый из этих подходов имеет свои преимущества и особенности применения, что делает их взаимодополняющими в реальной практике.
Для успешного использования командной строки при анализе конфигурации рекомендуется:
- Создать персональную библиотеку часто используемых команд
- Регулярно практиковаться в написании и отладке скриптов
- Освоить базовые принципы работы с PowerShell
- Научиться правильно интерпретировать получаемые данные
- Автоматизировать рутинные задачи с помощью скриптов
Если вы только начинаете осваивать работу с командной строкой, начните с простых команд и постепенно переходите к более сложным задачам. Практический опыт показывает, что регулярное использование командной строки для анализа конфигурации компьютера не только экономит время, но и помогает глубже понять работу операционной системы. Создайте свой первый скрипт уже сегодня – начните с простой задачи сбора базовой информации о системе и постепенно расширяйте его функциональность по мере освоения новых команд и техник.