In today’s digital age, data loss can happen unexpectedly due to various reasons including hardware failures, malware attacks, or accidental deletions. Creating a system image is a crucial step to ensure you can rapidly restore your computer to its previous state. Windows offers a built-in solution for this purpose called the Windows System Image Tool. In this comprehensive guide, we’ll dive into the key aspects of this tool, explain how it works and how to effectively use it. Let’s get started.
Introduction: What is a Windows System Image?
A system image is essentially an exact copy of the entire state of your system at a specific point in time. It includes all your files, applications, settings, and the operating system. Creating a system image allows you to restore your system to a fully functional state in case you encounter any issues. The Windows System Image Tool simplifies this process by providing an easy-to-use interface and robust functionality.
Why Create a System Image?
There are several compelling reasons to create a system image:
- Data Protection: Safeguard your important files and documents from accidental deletions or corruption.
- Disaster Recovery: Quickly recover from hardware failures and software malfunctions without losing data or spending hours reinstalling software.
- System Migration: Move your entire system to a new machine seamlessly.
How Does the Windows System Image Tool Work?
The Windows System Image Tool captures the entire state of your system and packages it into a single file or a set of files. This «image» can then be stored on an external hard drive, a network location, or even DVDs. When needed, you can use the image to restore your computer to the exact state it was in when the image was created.
Getting Started: Creating a System Image
To create a system image using the Windows System Image Tool, follow these steps:
Step 1: Open the System Image Tool
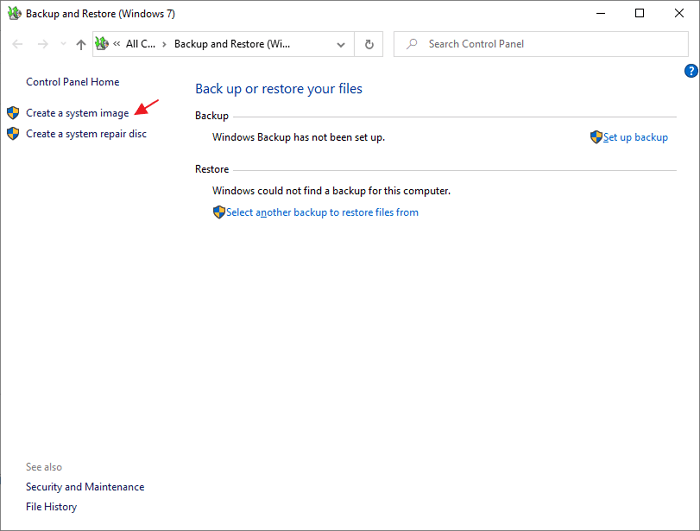
Navigate to “Control Panel” and select “Backup and Restore (Windows 7)”. Click on “Create a system image” from the left sidebar.
Step 2: Choose a Destination
You’ll be prompted to select a destination for your system image. You can save it on an external hard drive, network location, or DVDs.
Step 3: Select Drives to Include
By default, the tool will include all the drives required to run Windows. However, you can add additional drives if needed.
Step 4: Review and Start Backup
Review your settings and click “Start backup” to create the system image. This process might take some time depending on the size of your drives.
Restoring from a System Image
Restoring your computer using a system image is a relatively straightforward process, but it’s crucial to follow the steps carefully.
Step 1: Boot from Recovery Media
If your computer is inoperable, you’ll need to boot from a Windows recovery drive or installation media. Insert the media, restart your computer, and boot from the media.
Step 2: Choose System Image Recovery
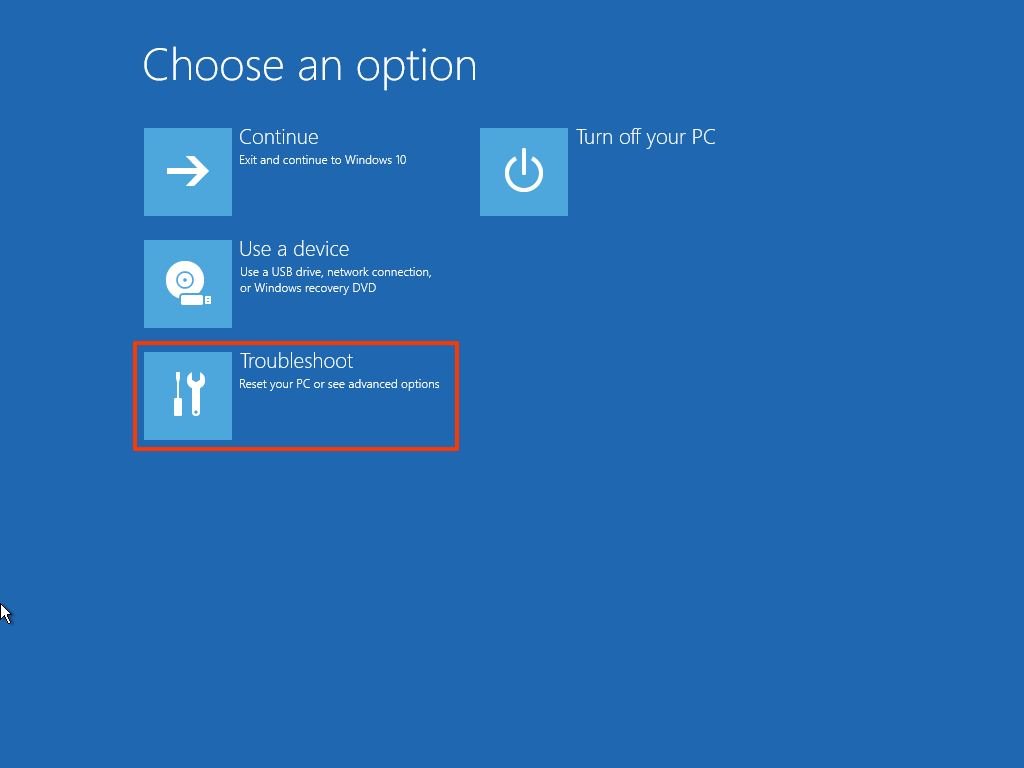
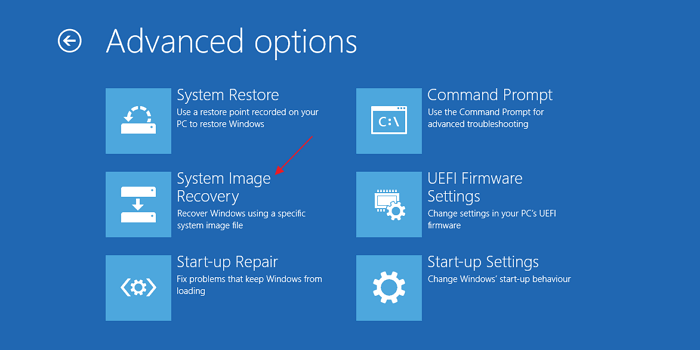
From the setup screen, select “Repair your computer” and choose “Troubleshoot”, then “System Image Recovery”.
Step 3: Select the System Image
The tool will automatically detect available system images. Choose the one you want to restore and follow the prompts to start the restoration process.
Advanced Tips and Best Practices
Here are some advanced tips and best practices to get the most out of the Windows System Image Tool:
Automate System Image Backups
Automate your system image creation by setting up scheduled backups. This ensures you always have an up-to-date image without manual intervention.
Store Multiple Versions
Keep multiple versions of your system images to allow for more flexible recovery options. You might need to restore an older image if recent changes caused issues.
Use Network Locations
If you have a large network, consider storing your system images on a network location. This approach ensures easy access and centralized management of backups.
Regularly Test Restorations
Regularly test the restoration process to ensure your system images are functional. A non-working backup is as good as no backup at all.
Common Issues and Troubleshooting
Here are some common issues you might face while using the Windows System Image Tool and how to address them:
Insufficient Storage Space
If you encounter an insufficient storage space error, ensure the destination drive has enough free space. You might need to delete old backups or use a larger storage device.
Network Location Issues
If you’re saving to a network location and face connectivity issues, check network permissions and ensure you have the necessary access rights.
Image Corruption
If you cannot restore from a system image due to corruption, use the built-in Windows error-checking tool or consider third-party software to repair the image.
Conclusion
The Windows System Image Tool is a robust, easy-to-use solution for ensuring your data and system integrity. By following the steps and best practices outlined in this guide, you can efficiently create and manage system images, providing you with peace of mind and a reliable disaster recovery option.
Don’t wait for a data disaster to strike. Take action today by creating a system image and safeguarding your digital life.
We hope you found this guide helpful! For more content on Windows tools and best practices, visit our blog and subscribe to our newsletter.
Share your thoughts and experiences with us using the hashtags: #WindowsSystemImage, #DataRecovery, and #BackupAndRestore.
For further reading:
- Comprehensive Guide to Windows Backup Solutions
- How to Recover Deleted Files Using Windows Tools
Stay tuned for more! #TechTips #WindowsTips #DataProtection
(Image credit: Mauro Huculak)
When planning a recovery strategy for your Windows 10 device, creating a full system backup should be your top priority. It is the most reliable method to safeguard your system against potential threats, including hardware failures, software glitches, upgrade issues, and malware attacks that could corrupt your files or compromise the operating system.
Failing to back up your system regularly puts your most valuable data (documents, irreplaceable photos, and custom configurations) at serious risk. Many users only realize the importance of a backup after it’s too late.
Fortunately, Windows 10 offers several options to help you protect your data. You can use third-party software to create a complete system image, manually copy files to an external drive, or sync your data to a cloud storage service like OneDrive. However, if you prefer to avoid third-party solutions or manual steps, Windows 10 still includes a built-in System Image Backup tool, part of the legacy features, which lets you create a full backup with minimal effort.
A system image is essentially a full snapshot of your entire system. It includes everything (Windows installation files, settings, applications, and all your personal files). This method is especially effective when recovering from severe issues such as hard drive failure or when rolling back to a previous version of Windows 10 after a problematic update.
Using a full backup ensures peace of mind and quick recovery, making it an essential step for data protection and system reliability.
In this how-to guide, I’ll outline the steps for creating a full backup with all your custom settings, apps, files, and installation using the system image tool.
Recent updates
These instructions has been updated to ensure accuracy and reflect changes to the process in the operating system.
How to create a backup with system image tool on Windows 10
The system image tool allows you to create a full backup to an external drive or network-shared folder. However, it is best to use removable storage, which you can disconnect and store in a different physical location.
All the latest news, reviews, and guides for Windows and Xbox diehards.
Quick note: The System Image Backup tool for Windows 10 is no longer a maintained feature, but you can still use it for the foreseeable future. The instructions outlined in this guide are meant to create a temporary full backup while the feature is still available. You can also read this guide with alternative ways to back up your computer.
To create a full backup of Windows 10 with the system image tool, use these steps:
- Open Settings.
- Click on Update & Security.
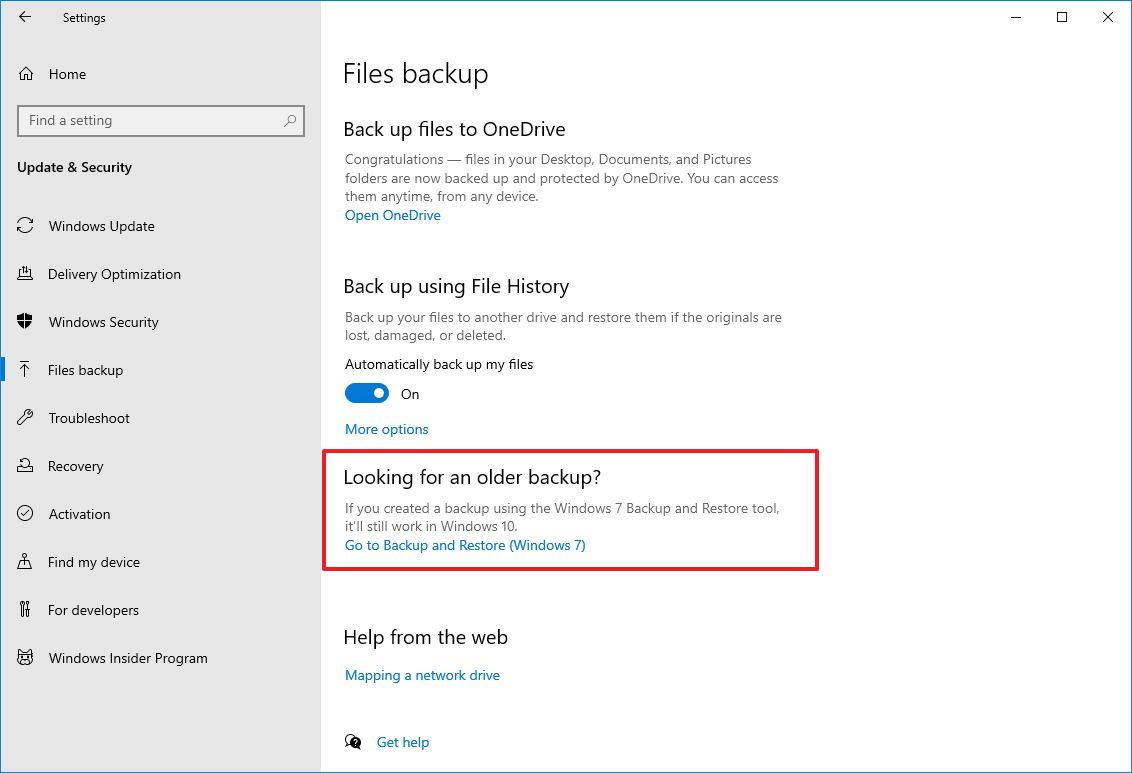
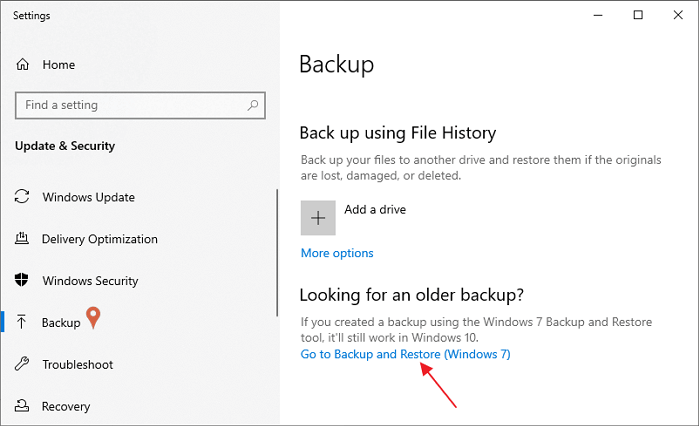
- Click on File backup.
- Click the «Go to Backup and Restore (Windows 7)» option under the «Looking for an older backup?» section.
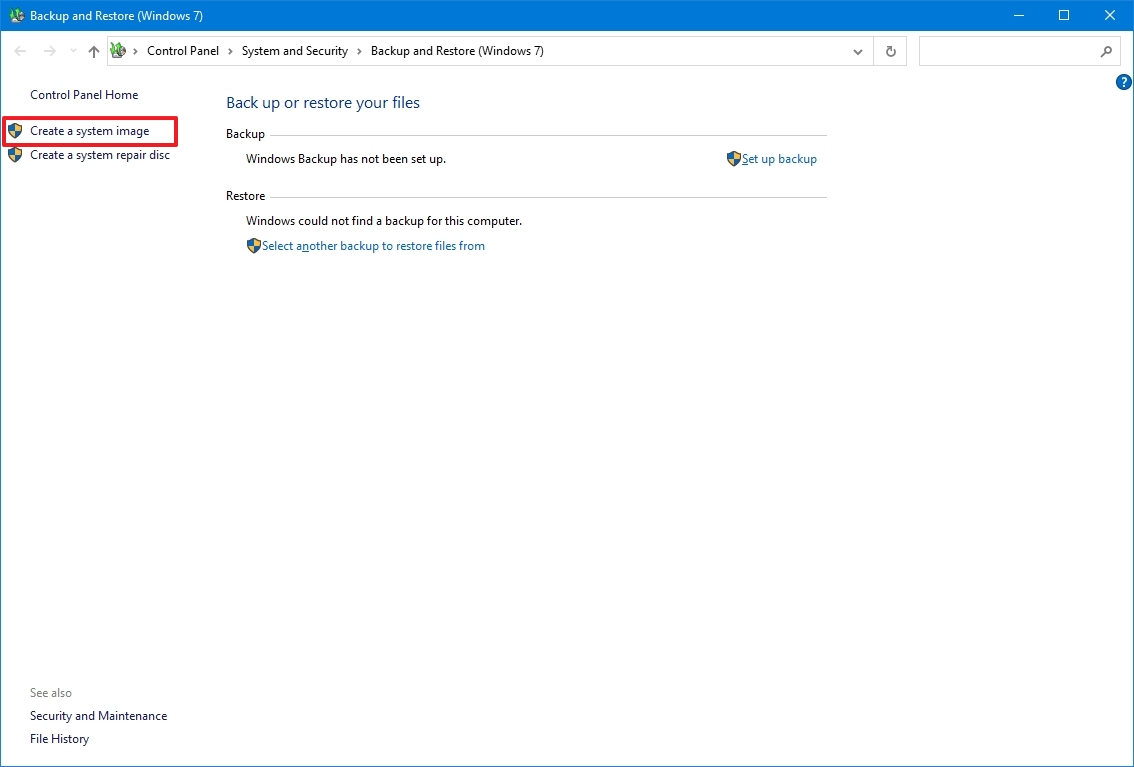
- Click the «Create a system image» option from the left pane.
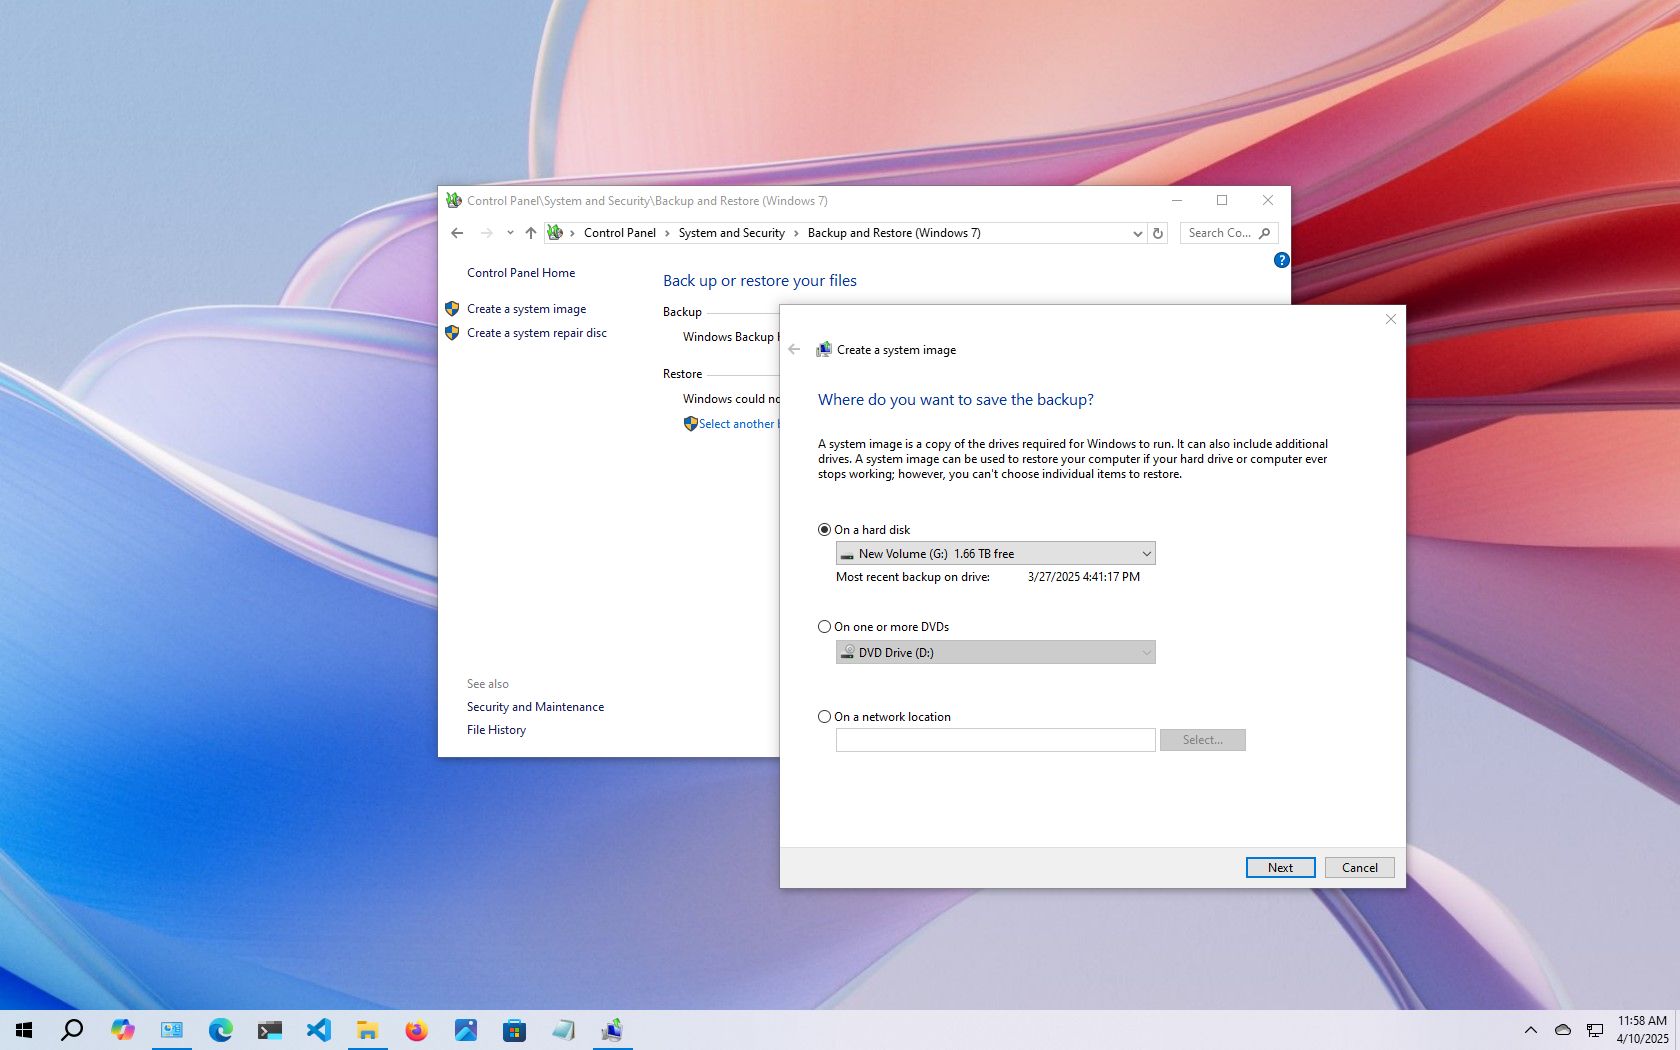
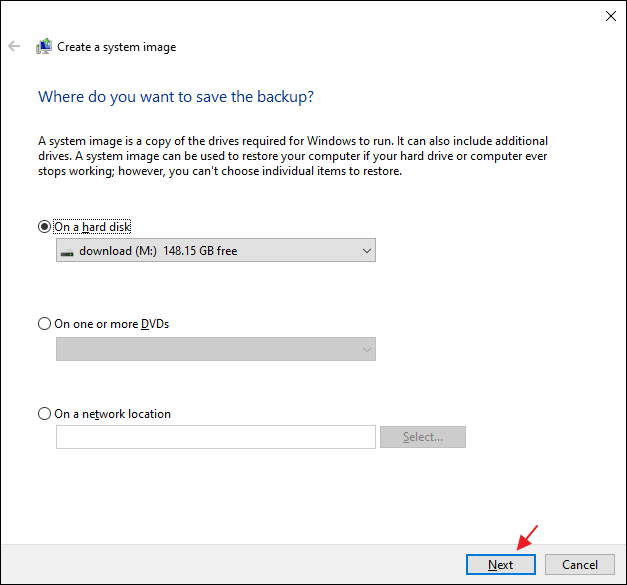
- Select the «On a hard disk» option.
- Use the «On a hard disk» drop-down menu and select the location to export the Windows 10 full backup.
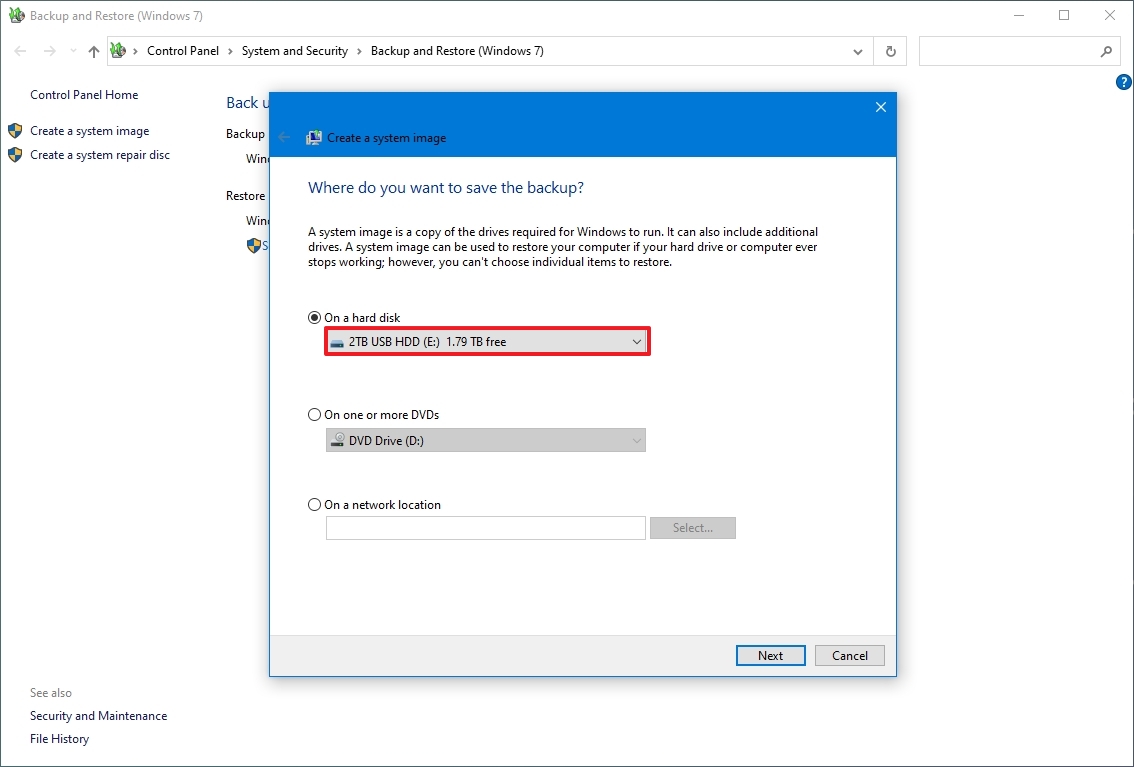
- Click the Next button.
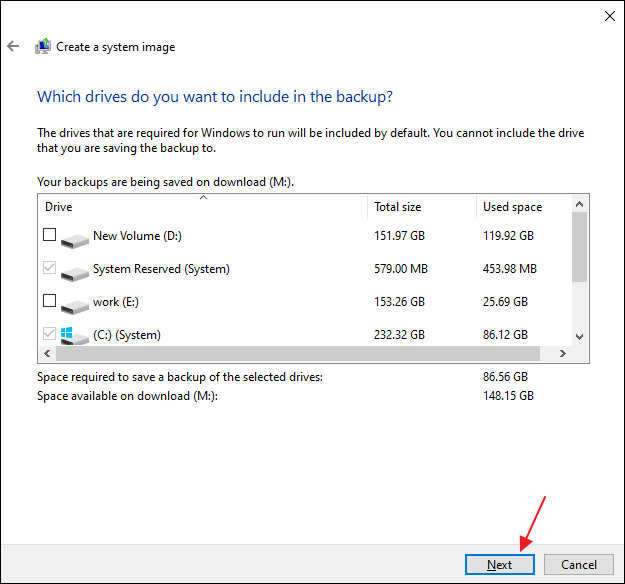
- (Optional) Select any additional hard drives to include them in the backup.
- Click the Next button.
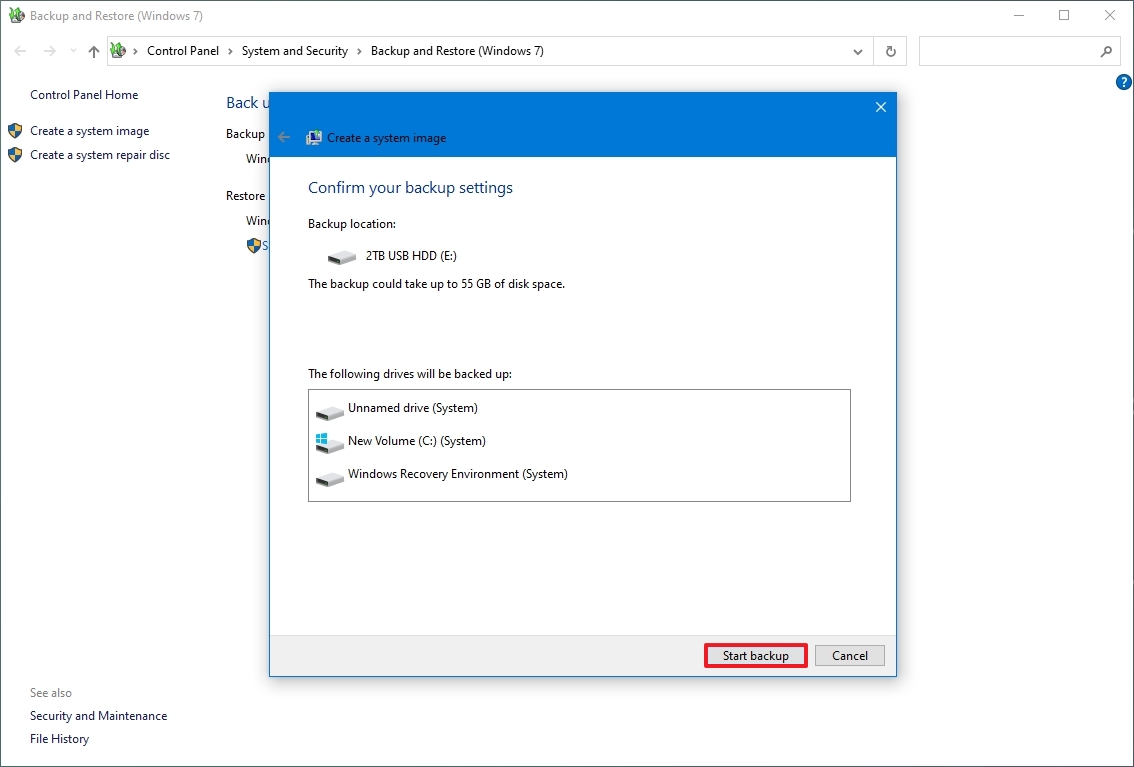
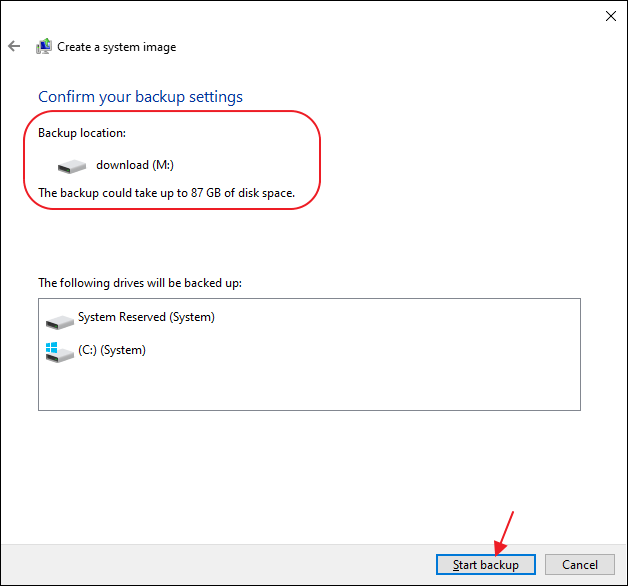
- Click the Start backup button.
- Click the No button.
- Quick note: You’ll also receive a prompt to create a system repair disc, but because most devices no longer include an optical drive, you can skip it. If you must restore the machine, you can use a USB installation media to access the recovery environment.
- Click the Close button.
Once you complete the steps, the tool will create an image of the entire system, including everything on the primary hard drive and other drives you may have selected.
While the backup is in progress, you can continue working on the device since it uses the «Shadow Copy» feature to backup files even if files are open and apps are running.
After the process, you can disconnect and store the external drive safely. If you have valuable data, you may consider keeping the backup in a different physical location.
How to restore a backup with system image tool on Windows 10
If you need to replace the hard drive or hardware failure occurs, you can use one of the backups to recover the device and files.
To restore a backup on Windows 10, use these steps:
- Connect the drive with the full backup to the device.
- Connect the Windows 10 USB bootable drive to the computer.
- Start the computer.
- On the USB bootable drive startup prompt, press any key to continue.
- Quick tip: If the device does not start in the Windows Setup wizard, you will need to access the Basic Input/Output System (BIOS) or Unified Extensible Firmware Interface (UEFI) to change the boot order settings. You can use this guide to access the BIOS/UEFI, but the steps are usually different per manufacturer and device model. It is recommended that you check your manufacturer’s support website for more specific details.
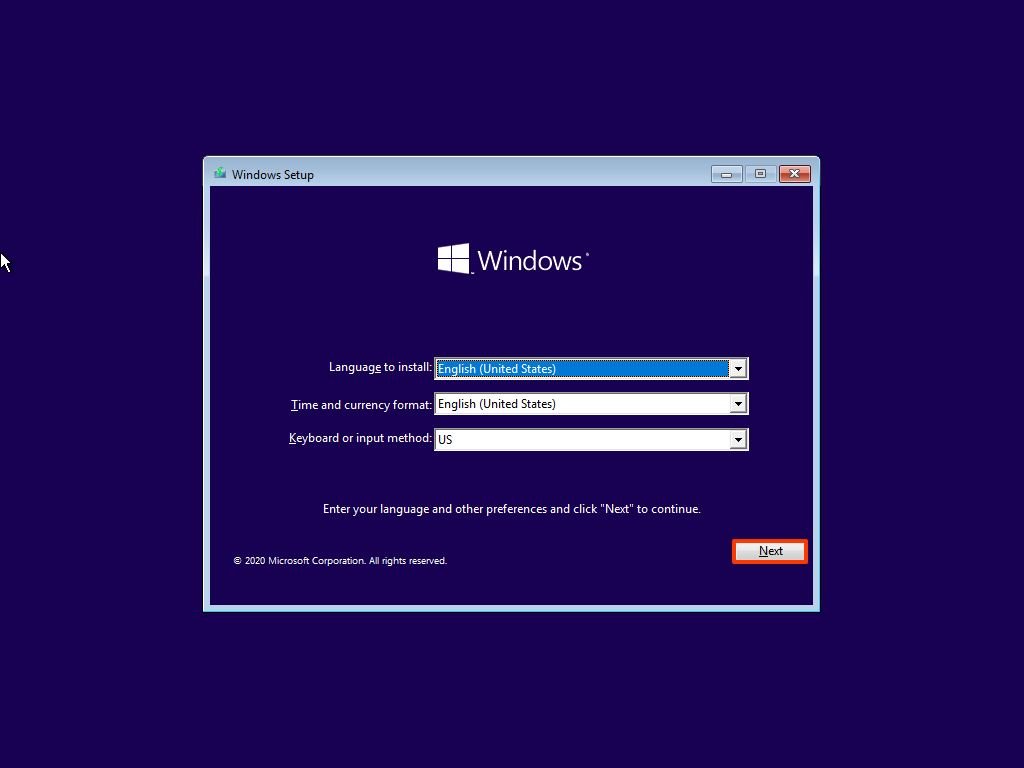
- On the «Windows Setup» page, click the Next button.
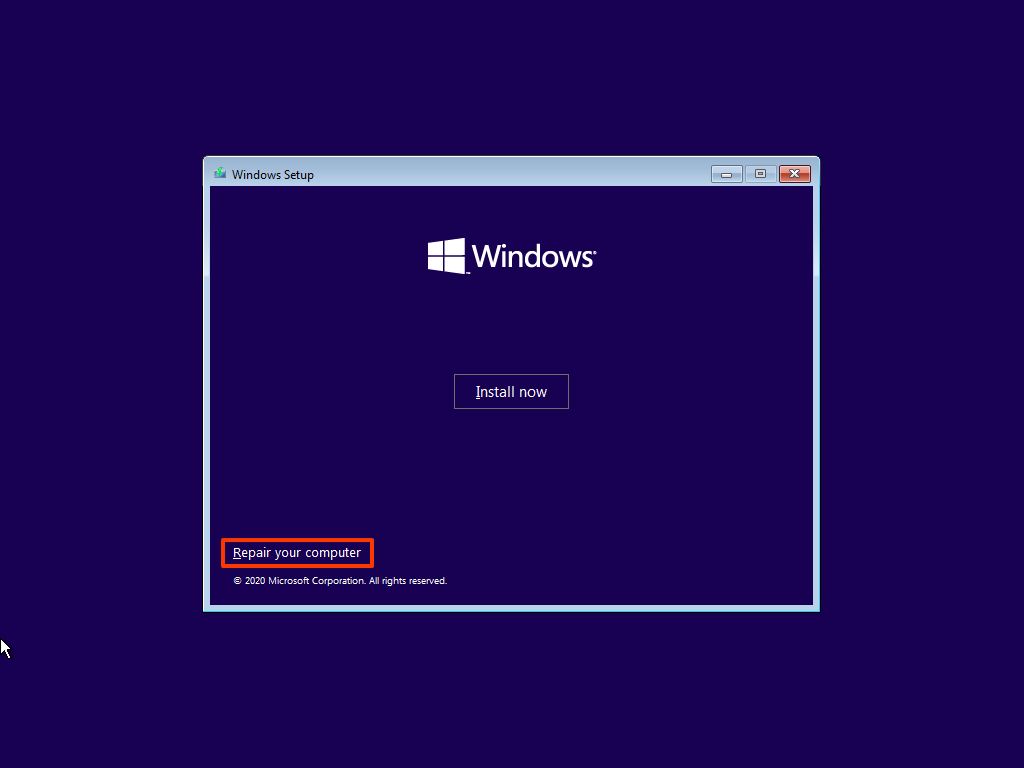
- Click the «Repair your computer» option from the bottom-left corner of the screen.
- Click the Troubleshoot option.
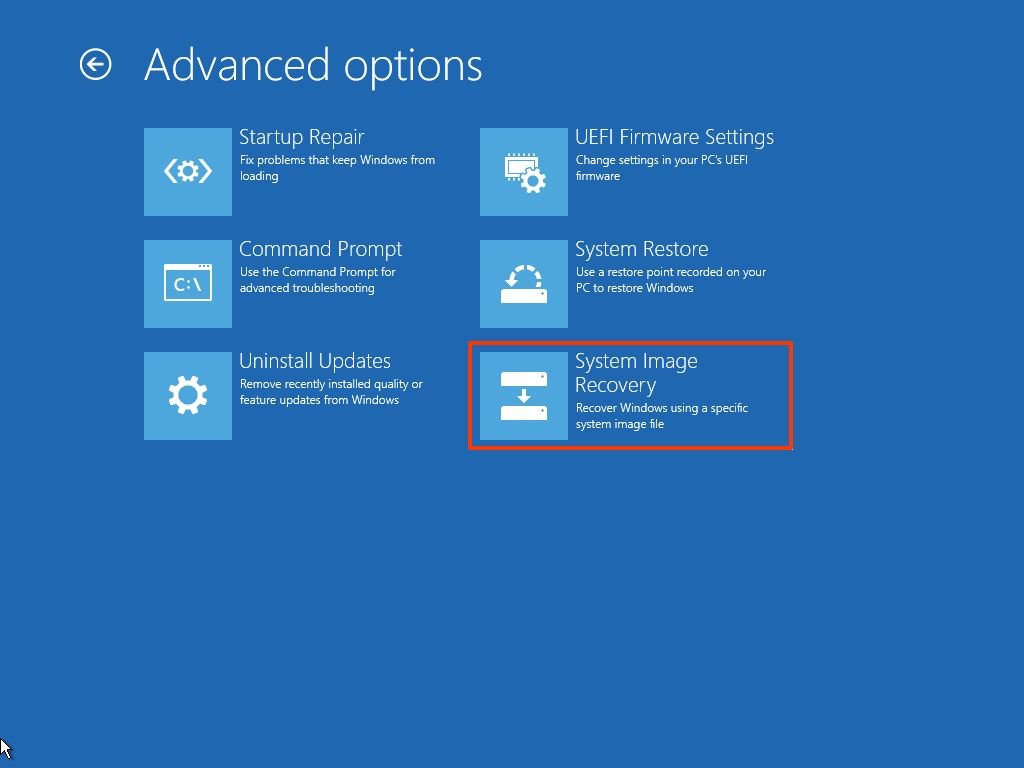
- Click the «System Image Recovery» option.
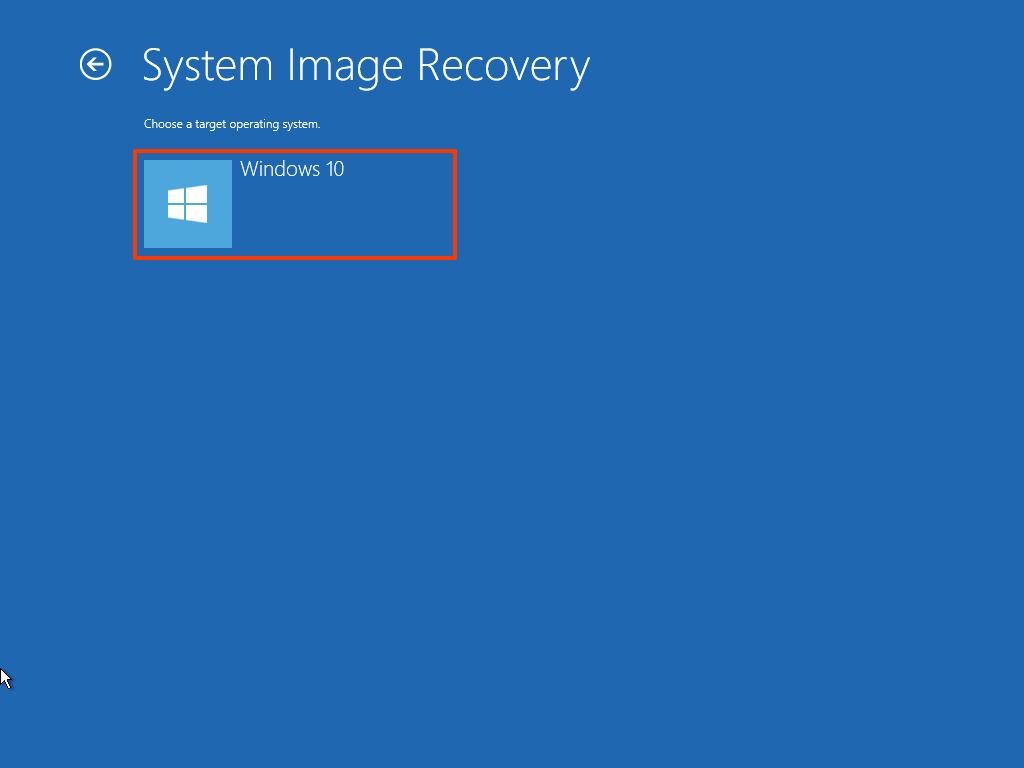
- Select the Windows 10 option as the target operating system.
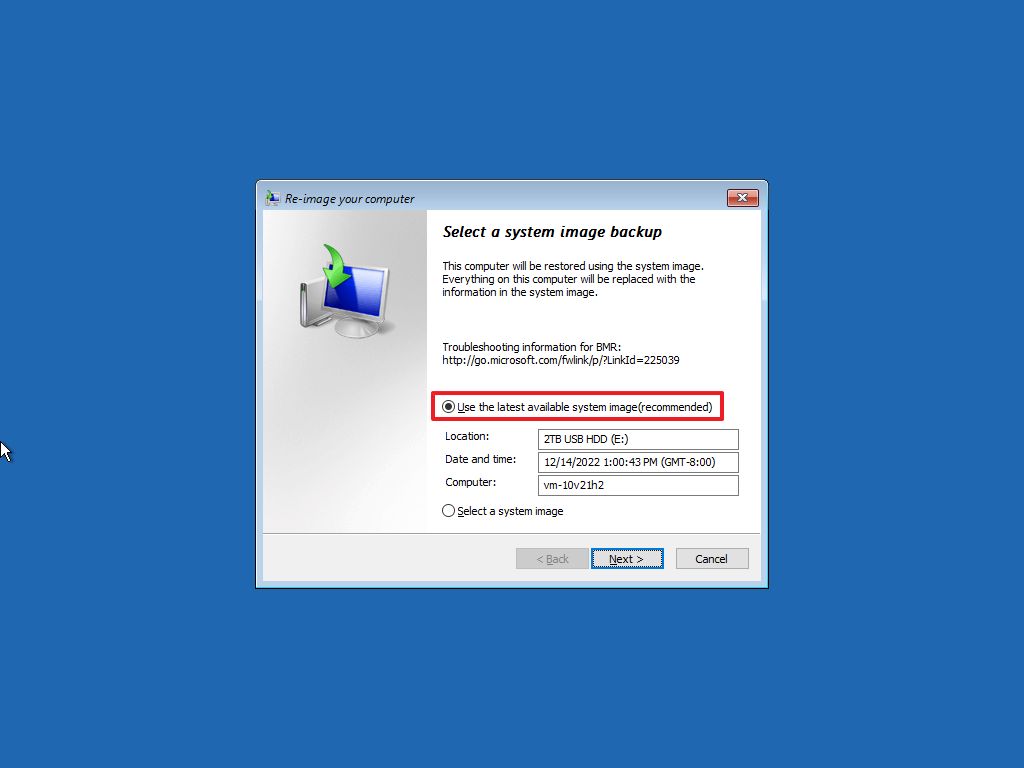
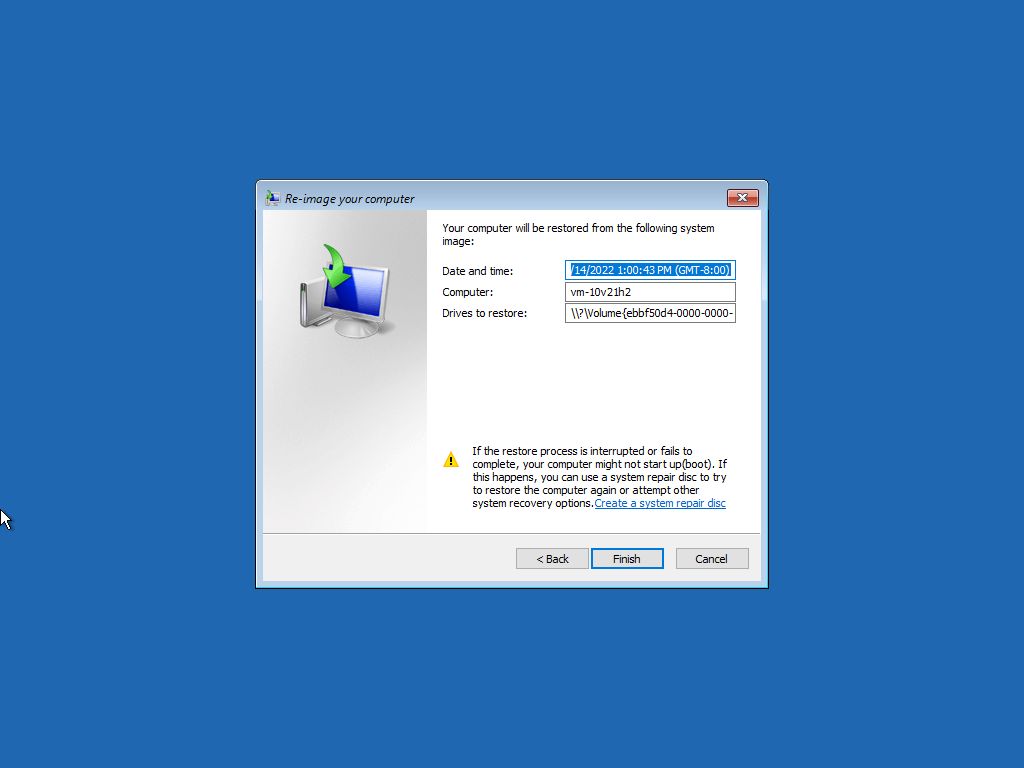
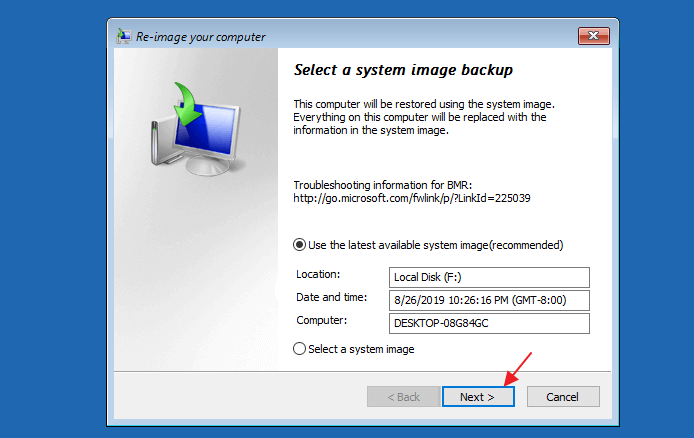
- Select the «Use the latest available system image» option on the «Re-image your computer» page.
- Quick tip: You can use the «Select a system image» option if you have multiple backups and you are trying to restore an older version of the system and files.
- Click the Next button.
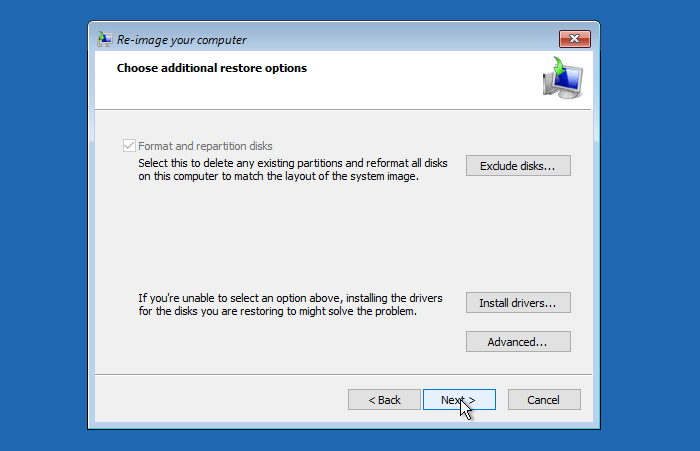
- (Optional) Carefully select the «Format and repartition disks» option before restoring the backup (if you are restoring the backup on a new drive).
- Quick tip: If you choose this option, use the Exclude disks option to prevent formatting secondary drives that may contain data.
- (Optional) Check the «Only restore system drivers» option (if the backup contains a copy of multiple drives and you only want to restore the operating system).
- Click the Next button.
- Click the Finish button.
- Click the Yes button.
After you complete the steps, the recovery process will start on the computer. The time to finish the restoration will depend on the amount of data and the hardware configuration.
Best practices restoring a backup
When restoring a system image on Windows 10, never interrupt the process. Doing so can corrupt the backup, rendering the system unbootable and potentially causing data loss. To ensure a smooth recovery, always connect a laptop to a power source or a desktop computer to an uninterruptible power supply (UPS). Power interruptions during restoration can lead to irreversible errors.
Once the restoration completes, it’s essential to check for missing updates. Go to Settings > Update & Security > Windows Update, and click the «Check for Updates» button to install any pending patches, including critical security updates that may have been released after the backup was created.
Although Windows 10 offers various backup methods, the System Image Backup tool still has its place (especially in specific scenarios). For instance, it’s an ideal solution when:
- You don’t have another recovery method available.
- You’re preparing for a major Windows 10 upgrade.
- You’re planning to replace the system hard drive.
- You need to transfer your current installation and files quickly without reinstalling everything.
It’s also a good idea to periodically create a backup of your computer in case the unexpected happens, as it offers a reliable fallback in case of unexpected issues such as hardware failure, ransomware, malware attacks, or system corruption.
However, it’s important to understand the limitations of the System Image Backup tool. It is designed to restore the entire system (operating system, apps, settings, and files) exactly as they were at the time of the backup. It does not support restoring individual files or settings.
To keep your files continuously protected and up to date, complement system images with other solutions like OneDrive or File History. Also, be proactive since only the data captured in the most recent full backup can be recovered. Any changes or files added after that point will be lost during restoration.
If you combine full system backups with ongoing file backups, you can build a reliable recovery plan that keeps your data and system safe against virtually any threat.
Lastly, it’s important to note that the end of support for Windows 10 will occur on October 14, 2025, and after this date, Microsoft will no longer release security or maintenance updates and will not provide any kind of support.
You can use these instructions to prepare your device and upgrade from Windows 10 to 11.
More resources
For more helpful articles, coverage, and answers to common questions about Windows 10, visit the following resources:
- Windows 11 on Windows Central — All you need to know
- Windows 10 on Windows Central — All you need to know
Mauro Huculak has been a Windows How-To Expert contributor for WindowsCentral.com for nearly a decade and has over 15 years of experience writing comprehensive guides. He also has an IT background and has achieved different professional certifications from Microsoft, Cisco, VMware, and CompTIA. He has been recognized as a Microsoft MVP for many years.

Are you running out of storage space on your Windows 10 computer? Or maybe you just got a shiny new SSD and want to transfer your operating system for faster performance? Well, you’re in luck! In this blog post, we’ll show you the step-by-step process of transferring Windows to another drive. Whether it’s an HDD or SSD, we’ve got you covered. So grab your cables and get ready to unleash your computer’s full potential with our easy-to-follow guide. Let’s dive in!
Prepare a New Hard Drive – HDD/SSD
Before you embark on the exciting journey of transferring Windows to another drive, it’s crucial to prepare a new hard drive – whether it’s an HDD or SSD. This ensures that your computer can detect it correctly and guarantees a smooth migration process.

Here are two essential steps to follow:
Step 1: Get Your New Drive Ready
Start by acquiring a new HDD/SSD and grabbing a trusty SATA cable. Remember, the space on the new drive must be larger than the used space on your current system C drive.
Step 2: Connect and Initialize
Connect the newly acquired SSD/HDD to your PC using both SATA and power cables. Once connected, head over to Disk Management, where you’ll locate and right-click on the new disk. From there, select “Initialize Disk” and make sure to set it as either GPT or MBR (matching your source OS disk).
Keep in mind: If there are existing partitions or data on the destination disk, take precautions by backing up everything beforehand. Only then should you proceed with deleting all partitions for a seamless transfer experience.
The duration of the entire process can vary depending on various factors such as the size of your original system disk and the speed of your computer. Generally, it may take anywhere between 30 minutes to an hour and a half. So grab a cup of coffee and get comfortable while we work our magic!
It’s important to note that this method is specifically designed for OS migration on Windows 10 from a small disk to a larger SSD or HDD. If you’re looking to switch from one type of storage device to another (e.g., HDD to SSD), this guide will come in handy.

One crucial limitation to keep in mind is that the new disk must be bigger than your original system disk space. This ensures that all your files, applications, and settings are seamlessly transferred without any issues.
For experienced Windows users who love tinkering with their systems, running the Windows System Image Tool for the Windows 10 migration operation might seem like second nature. It provides greater control over the transfer process, allowing you to preserve everything just as it was before.
So if you’re up for some tech wizardry and want to get more storage drive with ease, let’s jump right into creating a system image!
Create Windows 10 System Image to An External Hard Drive
You can utilize the Windows System Image Tool to transfer your Windows 10 operating system to a new HDD or SSD. The first step in this process is to connect an empty external hard drive to your PC. Ensure that the external drive has sufficient space to accommodate the system image.
Next, type “Control Panel” in the search box and open it. From there, click on “Backup and Restore (Windows 7)” option. This will lead you to the backup settings page, where you can create a system image.
Once on the backup settings page, click “Create a system image.” Here, you’ll have the opportunity to select the connected external USB drive as the destination for saving your Windows 10 system image. After selecting it, click “Next” to proceed.
By default, both the System and System Reserved partitions will be selected. These are crucial components of your operating system that need to be included in the system image. Simply click “Next” when prompted.
With all the necessary selections made thus far, it’s time to start creating your current system image by clicking on “Start backup.” This will initiate a process where Windows creates an exact copy of your entire operating system onto the USB drive.
Remember not to conclude or summarize yet! There’s more information coming up about restoring and moving this newly created Windows 10 system image onto another disk! Stay tuned!
Create Windows Media Creation Tool
Creating a Windows Media Creation Tool is essential in transferring your Windows 10 system to another HDD or SSD.

Here’s how you can do it:
Step 1: Connect an empty USB flash drive (minimum 8GB) to your PC. This will serve as the installation media for the new system.
Step 2: Download the Windows 10 installation media and run it as an administrator on your computer. This ensures that you have the necessary permissions to create the installation media.
Step 3: On the “What do you want to do?” interface, select “Create installation media for another PC” and click “Next“. This option allows you to create a bootable USB drive with all the necessary files for installing Windows 10 on another computer.
Step 4: Choose the language, edition, and architecture (64-bit or 32-bit) for your Windows 10 installation. Make sure to select the appropriate options based on your requirements.
Step 5: Select the USB flash drive that you connected in Step 1 as the destination for creating your installation media. This will ensure that all the required files are copied onto this drive and can be used later when transferring your system image.
By following these steps, you will be able to create a Windows Media Creation Tool that contains all the necessary files for installing Windows 10 on another computer. This tool will come in handy during the restoration process of transferring your system image to a new disk.
Restore and Move Windows 10 System Image to Another New Disk
To transfer your Windows 10 system image to a new disk, you need to connect both the Windows 10 installation media and the Windows image backup disk to your PC. Once connected, reboot your computer and access the BIOS settings by pressing F1/F2/Del key. In the BIOS settings, set the installation media as the boot drive.
After setting up the boot drive, restart your PC from the Windows Installation Media. On the “Install Now” window, click on “Repair your computer.” This will take you to advanced options where you can select “Troubleshoot” and then choose “System Image Recovery.”
Next, check “Select a system image” which will bring up your Windows 10 system image disk. Choose it and click on “Next” to proceed with the restoration process.

In this step, you have the option to exclude disks that are not required for restoring your system image onto a new HDD/SSD. To do this, click on “Exclude disks…” and confirm by clicking “OK.” This will ensure that only the new disk is used for restoration.
Click on “Next” to initiate the restoration process. Wait patiently until it completes. Once finished restoring Windows 10 onto your new disk, your computer will automatically restart and boot up with all data intact.
By following these steps carefully, you can successfully restore and move your Windows 10 system image onto another HDD/SSD without any hassle or loss of data.
Remember always be cautious while performing such operations as they involve critical changes in software configurations!
FAQs on How to transfer Windows to another drive
Can you transfer Windows to another hard drive?
Yes, you can transfer Windows to another hard drive. There are a few different ways to do this, but the most common methods are:
- Using the Windows 10 media creation tool: This is the simplest method, but it requires you to have a blank USB drive or DVD. The Windows 10 media creation tool is available for download from the Microsoft website.
- Using a third-party disk cloning software: There are many third-party disk cloning software programs available, such as EaseUS Partition Master, Macrium Reflect, and Clonezilla. These programs allow you to create an exact copy of your existing Windows drive, which you can then transfer to the new drive.
How do I move Windows to a new SSD?
To move Windows to a new SSD, you can use the same method as you would for any other hard drive. However, there are a few things to keep in mind when moving Windows to an SSD. First, make sure that the SSD is large enough to accommodate your Windows installation. Second, you may need to update your BIOS or UEFI settings to make sure that the SSD is bootable.
Can I transfer Windows from HDD to SSD?
Yes, you can transfer Windows from an HDD to an SSD. The process is the same as moving Windows to any other hard drive. However, you may want to consider using a cloning tool to make sure that the transfer is successful. Cloning tools will copy your entire hard drive, including the operating system, drivers, and installed applications. This can be a good option if you want to avoid having to reinstall all of your software after the transfer.
How do I move Windows from C to D drive?
To move Windows from C to D drive, you can use the following steps:
- Create a system image of your C drive.
- Create a new partition on your D drive that is the same size as your C drive.
- Restore the system image to the new partition on your D drive.
- Boot from the new partition on your D drive.
Once you have completed these steps, Windows will be moved from your C drive to your D drive.
Microsoft Windows System Image Manager (SIM) is a tool in the Windows Assessment and Deployment Kit that IT professionals can use to create and manage unattended setup answer files for Windows before installing the operating system.
In addition, IT teams can use Windows SIM to validate answer file settings against a Windows image file and view the configurable component settings in a Windows image. Many admins also use Windows SIM to create a distribution share containing all the portable folders with Setup files and to add packages like third-party drivers and applications to answer files.
A tool in the Windows Assessment and Deployment Kit (ADK), Windows SIM provides a graphical user interface (GUI) to help system admins create unattended Windows Setup answer files for installing the Windows OS.
An answer file is an extensible markup language (XML)-based file that houses Windows Setup information, including how to partition disks and which product key to use. These files, and the information contained within them, are needed to configure and customize the default Windows installation.
IT teams can create answer files with Windows SIM using information from a Windows image file and a catalog file. They can then use the files to automate Windows Setup and modify the settings of a Windows image, such as the default language.
Windows SIM also displays all the configurable component settings within a Windows image. It allows IT professionals to add third-party applications, device drivers, language packs and more to the answer files.
«Unattended» setup in answer files means the OS setup and configuration are automated in the file. After adding the required component settings to an unattended answer file, IT can view the available settings for each component. They can also customize the settings to satisfy a user’s or the organization’s needs. For example, IT can customize the language settings, the partitions to create during installation and more.
Here are some of the most common scenarios for using Windows SIM:
- Create catalog files and new answer files for a Windows image;
- Add components, packages or other updates to existing answer files;
- Validate answer file component settings against the settings in a Windows image;
- Add device drivers (in-box and out-of-box) during Windows Setup;
- Add applications or drivers to be installed during Windows Setup using a distribution share;
- Add applications, scripts and other binary files by using a data image;
- Make offline updates (including software updates, device drivers and language packs) to a Windows image;
- Create small, portable configuration sets to be called explicitly in an answer file for installations that cannot access a larger distribution share;
- Import packages that are not part of a Windows image file to a distribution share.
How Windows SIM works
Two types of files are needed for Windows SIM to create answer files (Unattend.xml). These are the Windows image (.wim) files and catalog (.clg) files. Windows SIM uses these files to display the available components and packages. These elements can be added to an answer file. The components section contains the component settings to be applied during Windows Setup.
The configuration settings are organized into configuration passes. One example of a configuration pass is offline servicing, which is when the installation process applies the packages (software updates, drivers and language packs) in an answer file to the Windows image. Teams can add the components by right-clicking on the one they want in the catalog file and moving it to the answer file. The packages section contains Windows features and the information needed to distribute software updates, service packs and language packs.
Once the answer file is created, it configures and customizes the default Windows installation during Windows Setup. The .wim and .clg files also contain configurable settings that IT personnel can modify after a component or package has been added to an answer file.
How to use Windows System Image Manager
To use Windows SIM to create unattended answer files, first IT personnel must have the required permissions to access the install.wim file for the OS being installed. This access is needed to create, validate, and manage the answer file and provide the correct options for customizing the default Windows installation.
During Windows Setup, the Windows SIM answer file applies the chosen settings to the Windows installation. Windows SIM does not modify the Windows image or the settings in a Windows image file.
The first step in using an answer file with Windows SIM is to create a catalog file. When creating this file, Windows SIM queries the Windows image for a list of all the settings and states in that image.
The catalog file is a binary file containing a writable version of the install.wim file located in the Windows installation media Sources folder; the administrator uses the installation media to install the OS. The catalog file contains and displays all the configurable settings in a Windows image and information about the settings’ status. Microsoft recommends using the 32-bit version of Windows SIM to create catalog files.
Once the catalog file is set, IT teams create an answer file by clicking on File in Windows SIM, and then clicking on New Answer File. Once the answer file is in place, they can add components, properties and other resources to it, or customize different aspects of Windows using the answer file and Windows SIM. They can also add properties to the answer file that automate parts of the installation process such as automatically accepting the Windows End-User License Agreement.
IT can include other resources such as third-party drivers, scripts or applications from a distribution share, which is an optional storage folder. IT can also pick smaller, more portable sections of a distribution share, known as a configuration set, which contains files the answer file explicitly calls for. These files are saved in a specific folder that IT chooses. The paths to the files automatically update to that folder.
In addition, IT can import any packages — which contain instructions for adding or removing applications — that are not part of the Windows image to the distribution share. IT can then take the packages from the distribution share and apply them to the answer file.
To add even more resources, such as binary files, administrators can use a data image. First, open the Windows Deployment Image Servicing and Management command-line tool to create a folder with the resources. During this process, specify where the data image goes in the Windows image with the DataImage setting. It’s also possible to indicate where to send binary files using the $OEM$ folder. Finally, pick which disk — or disks — to install the OS on. Windows SIM allows IT to change the Windows image while offline, including altering software, device drivers, language packs and more.
Windows SIM user interface and panes
The Windows SIM GUI is divided into five sections, which Microsoft calls «panes.» IT teams can use these multi-purpose panes to create unattended answer files, and then add components and packages to the respective configuration passes in an answer file. IT personnel can also use the panes to open Windows image files.
Each of the five panes in Windows SIM has a specific name. One is the Distribution Share pane. IT teams can use this pane to view the currently open distribution share folder in the tree. They can also create and explore new distribution folders by right-clicking in the pane, or add items from a distribution file to an answer file by right-clicking that item.
The second pane in Windows SIM is the Answer File pane. This section displays information on Windows Setup configuration passes, including the settings to apply in each pass and which packages Windows Setup will install. IT personnel can also create, open and change answer files from this pane.
The Windows Image pane shows a tree view of the currently open Windows image. IT teams can view everything within the image, including its components and packages from this pane. They can then use this information to determine which components and packages need to be added to an answer file in the Answer File pane.
The Properties pane displays all the settings and properties for a particular package or component. IT can use this pane to change component settings and package Windows feature selections.
Finally, the Messages pane shows information about issues and where they are happening. It contains three tabs — XML, Validation and Configuration Set. Clicking on any of these tabs allows IT staff to see the issue location, as well as the type and description of the issue message. While all three tabs can contain messages, IT can only see messages in the Configuration Set tab if a configuration set has already been created.
IT should carefully plan the process for migrating to Windows 11 and ensure they have the right tools and products to support it. Explore Windows 11 migration tools for desktop administrators.
This was last updated in April 2025
Continue Reading About What is Microsoft Windows System Image Manager (SIM)?
- How to create a custom Windows 11 ISO file
- How to perform a Windows 11 ISO file install
- How to repair Windows 11 with an ISO file
- Learn to automate with PowerShell and Task Scheduler
- 7 steps to fix a black screen in Windows 11
Dig Deeper on Desktop management
-

What is Microsoft Windows Assessment and Deployment Kit (Windows ADK)?
By: Rahul Awati
-
How to create a custom ISO for Windows 10
By: Kari Finn
-
Microsoft Windows File Explorer
By: Paul Kirvan
-
What are the best file managers for Mac devices?
By: Robert Sheldon


A system image recovery can be a lifesaver when your computer crashes or you need to rescue an ailing Windows operating system. But what is a system image recovery, and how do you perform one? This complete guide will tell you everything you need to know.
What Is a System Image Recovery?
A system image recovery is the process of restoring your computer from a system image. A system image is a complete copy of your PC, including the operating system, applications, settings, and all your files. If you’re having trouble starting Windows, or if your PC has been damaged by malware or a hardware failure, you can use a system image to restore your PC to an earlier state when you created the system image.
System image recovery is different from resetting your PC or reinstalling Windows. When you reset your PC, it will remove all of your files, settings, and apps — essentially returning your PC to its factory default state. When you reinstall Windows, it will keep your files and settings, but any apps that came with your PC or that you installed from the Microsoft Store will be removed.
LEARN MORE
Still befuddled by the system image recovery and reset/reinstall Windows? Here’s a full guide on system image recovery vs. system restore.
[Important to Know] What Are Other System Recovery Options in Windows?
In addition, you may have heard other similar terms to system image recovery, for example, a recovery USB drive, a system repair disc, and a system restore point. Do you know what each term means? Here we’ll try to use simple words and a comparison table to help you understand.
Option 1. A Recovery USB Drive
A system image recovery requires a separate drive that contains the backup image. The drive can be an external hard drive, a USB flash drive, or a network location. Therefore, a recovery USB drive is a bootable drive that contains a system backup image in it, with which you can reinstall Windows or troubleshoot common Windows problems by booting into Windows Advanced startup options.
Option 2. System Repair Disc
A system repair disc is a bootable CD/DVD disc that contains the Windows Recovery Environment. It can be used to access system recovery options, troubleshoot and fix errors in Windows, and restore your system to a previous state.
You can create a system repair disc in Windows 7 and use it to recover your system. In Windows 8/10/11, you don’t need to create a system repair disc because you can access the recovery options directly from the Advanced Startup Options menu. Or, through a recovery USB drive.
How to Restore System Image Without Repair Disc
If you are worried about whether you can restore system image without repair disc, it is possible. In this post, we will see a professional backup tool, EaseUS Todo Backup to create a system image on an external device and use it to restore it on your device.
Option 3. System Restore Point
A system restore point is a snapshot of your system’s state at a certain point in time. It can be used to revert your system to a previous state if something goes wrong.
You can create system restore points manually or set Windows to create them automatically on a schedule. To perform a system image recovery, you’ll need to use the backup image file that was created at the same time as the system restore point.
| Comparison | Storage Device | What Does It Contain | How to Use It |
|---|---|---|---|
| System Image Recovery | Local drive, network, NAS, cloud | Many system restore points | Restore the operating system and data from it |
| Windows Recovery USB Drive | A USB flash drive, external hard drive | The Windows recovery environment | Boot from it to reinstall the operating system or fix errors on the current PC |
| System Repair Disc | CD/DVD disc | The Windows recovery environment | Boot from it to reinstall the operating system or fix errors on both the current and new PCs |
| System Restore Point | Local drive, network, NAS, cloud | A snapshot of your system state | Use the System Restore feature |
To sum up, if you want a hassle-free system image recovery on a computer, the best combination is to regularly create a system image backup of a working system state on a recovery USB drive or a system repair disc.
Another important note for you: System image recovery will overwrite your system drive, which means you will lose all the files that were created after the system image was created. So if you have any important files on your system drive, make sure to back them up before you proceed with system image recovery.
LEARN MORE
Still feel hesitant? Find answers to «Will system recovery delete my files?» in the linked article.
Walkthrough: How to Perform System Image Recovery
[Image: A flow chart to complete the system image recovery]
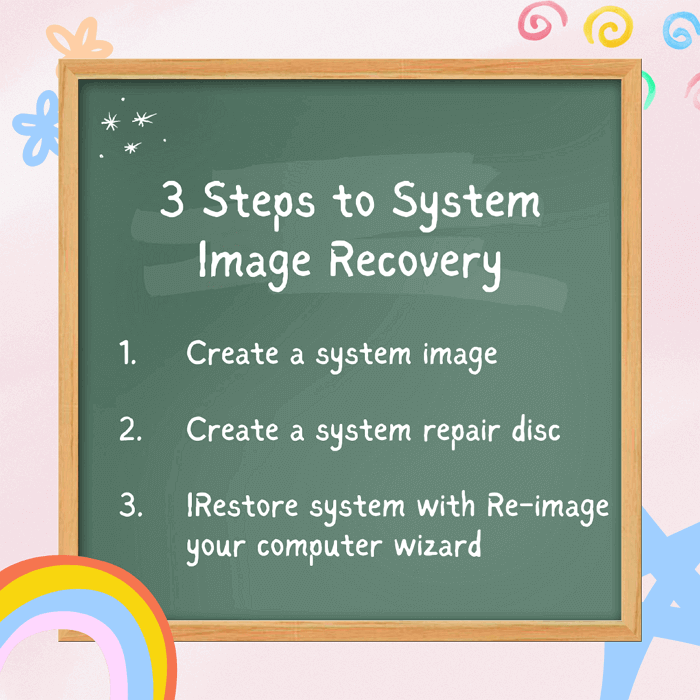
Now that you know what system image recovery is, it’s time to learn how to do it. According to the flow chart to complete a system image recovery on your PC, there are four steps you must go through, and we must ensure each step is done accurately.
🚩You may be interested: Surface Recovery Image: How to Download & Create & Use
☟Set Up Backup
As we mentioned above, the system image is created from an earlier system state backup. Therefore, the first step is to create a system image backup of your computer using a system image recovery tool. Microsoft Windows has already had a default option called Windows Backup and Restore (Windows 7) within the operating system. Since it’s free and handy, it’s worth giving it a try.
- Notice:
- There are two default backup and recovery programs in Microsoft Windows. One is called File History, and the other is the older backup option called Windows Backup and Restore (Windows 7), which is firstly introduced in Windows 7 but still works perfectly in Windows 10 and 11. Windows 10 File History backs up only individual files/folders associated with user accounts, while the older solution supports backing up an entire operating system, which happens to be the native system image recovery tool we’ll put in use as tutorial material.
Here we take Windows 10 as an example. If you’re using another Windows system, don’t worry, the steps are very similar. Just follow along.
Step 1. To access the default Windows system image recovery tool in Windows 10, choose one of the paths to follow:
- Open Settings (Windows + I keys) > Update & Settings > Backup > Go to Backup and Restore (Windows 7).
- Open Control Panel (Press Windows key + R then type: control then hit Enter) > Backup and Restore (Windows 7).

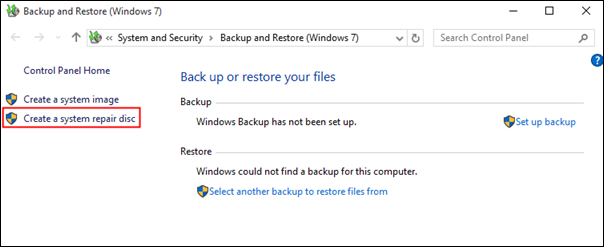
Step 2. If you didn’t create any backups before, the Backup status should be «Windows Backup has not been set up». You can directly click the «Set up backup» link to start the first backup creation. Or, you can click on «Create a system image» from the left sidebar as instructed here, which will guide you to select a storage location in the first place.
Step 3. There are three backup locations for you to choose from: On a hard disk, On DVDs, and on a network location. Select any one of them that you have at hand. Click Next after selecting the backup destination.
Tip: Which backup location works the best for me?
- Choose a local hard disk/external drive: When you demand a very high frequency of backup of the changed operating system, files or applications. (Note: To create a system image of a drive, it must be formatted to use the NTFS file system. If you save the system image on a hard drive or USB flash drive, it must be formatted to use the NTFS file system.)
- Choose DVDs: If you’re backing up system images for the first time or don’t have an external hard drive, you can use DVDs. Just make sure you have enough blank DVDs on hand because a system image can be very large, and one DVD can hold only 4.7GB of data.
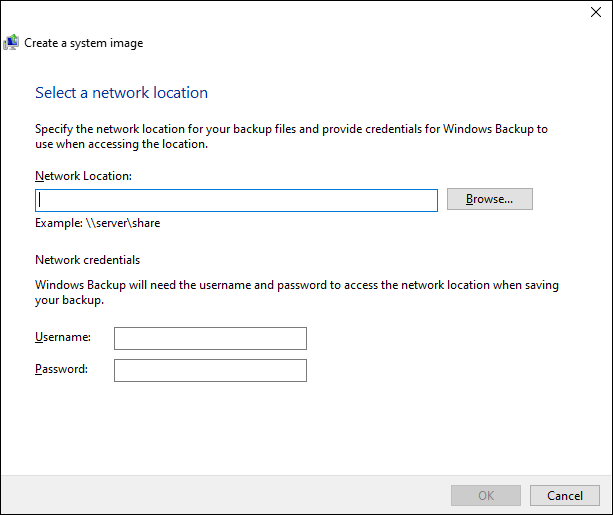
- Choose a network drive: If you’re doing system backups of working computers in a company, and there is network drive available to you, you can try to save the primary backup images on network. To be able to use network drive as a backup location for the first time, you need to enter the network location in the format of «\\server\share and the username and password.
Here I chose a local drive to keep the system image, as an example.
Step 4. Since you’re doing a backup of the operating system, the drives that are required for Windows to run will be included by default. As you can see from the screenshot, my system C drive and a system reserved drive is chosen by default and marked as grey (unchangeable).
Pay attention to the important notes here: (1) You cannot include the drive that you’re saving the backup to; (2) You can add additional drives in the backup as well, like drive D or E to backup an entire computer; (3) The system image file can be large (as you can see my system drive takes up 90GB space) and therefore it’s suggested that you back up system image to an external hard drive with enough storage space. You can find 1TB or 2TB external hard drives on best buy for under $100.
Click Next to continue.
Step 5. Review the backup settings and click Start backup to start system image creation immediately or schedule a system backup in the future. You can also click Change schedule to modify the system image backup interval according to your needs.
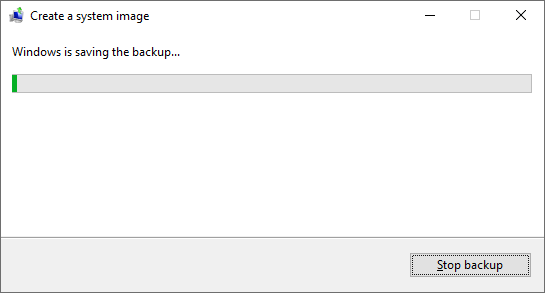
Step 6. Now Windows is saving the backup according to your setup. Wait patiently until this process is complete.
How to Keep Different Versions of System Images
You can keep several versions of system images. On internal and external hard drives, older system images will be deleted when the drive runs out of space. To help conserve disk space, delete older system images.
If you’re saving your system images in a network location, you can only keep the most current system image for each computer. System images are saved in the format of drive\WindowsImageBackup\computer name\. If you already have a system image for a computer and are creating a new one for the same computer, the new system image will overwrite the old one.
If you want to keep the old system image, you can copy it to a different location before creating the new system image by following these steps.
- Navigate to the location of the system image.
- Copy the WindowsImageBackup folder to a new location.
LEARN MORE
Do you know that 67% of people choose to create a system image on a USB flash drive? Check the article for reasons and benefits.
☝Create a System Repair Disc (for Bootable Recovery)
After the backup task is completed, Windows will guide you to create a system repair disc to use if your computer ever permanently shuts down and couldn’t turn on anymore. And you mustn’t skip this step, it’s quite important and necessary.
Technically, to perform a system image recovery, the essential requirement is a system image. However, when you save a system image backup on a local disk, external drive or a network drive, it’s no problem to access it when your computer can turn on as usual. What if the system crashed and you lost access to the image? In fact, in over 80% of the cases, it’s because your PC ran into a problem and cannot boot, you need to revert the system back to a working state.
A system repair disc, originally introduced for Windows 7 but still accessible in later Windows versions, can be used to boot your computer when the system abnormally shuts down. It can help you troubleshoot and repair serious problems that might prevent Windows from starting correctly. You should create a system repair disc and keep it handy in case your computer doesn’t start correctly and restore it to a working state by performing a system image recovery via such a bootable disc.
(Windows 8.1/10/11 users can create a Window recovery USB drive instead of a system repair disc)
To create a system repair disc in Windows 7/8.1/10/11:
Step 1. Go to Start > Control Panel > Backup and Restore.
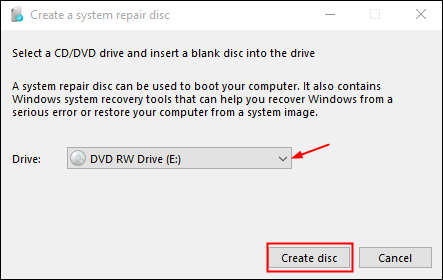
Step 2. On the left side, click Create a system repair disc. If a User Account Control message appears, click Yes to continue.
Step 3. Choose the CD or DVD drive where you want to create the system repair disc, and then click Create disc.
Step 4. The system will now burn a system repair disc for you, wait until the process is completed.
Step 5. When the system repair disk is created successfully, click Close to finish.
Now you can keep this system repair disc in a safe place, it can be very helpful when system image recovery is required.
☝ Restore PC from a System Image
Now we arrive at the critical procedure to finally recover Windows from a system image. We need to restore an operating system for many reasons. The system could be crashed by a virus or system file damage, it could also simply be because you installed too many unnecessary programs and bloatware that make the system run slow. No matter what the reasons are, as long as you have a system image backup created in advance (and we strongly suggest you should), a system image recovery is always an option.
We’ll show you how to perform system image recovery in Windows 11/10/8.1/7 step by step. The interface may look a little bit different if you’re using an older Windows version, but the procedures are actually quite similar.
(Note that system image recovery will restore everything you backed up to an earlier state. It’s not for some individual file recovery. Use data recovery software to recover deleted files instead.)
Step 1. Launch system image recovery on your PC. The entrance can be different according to your current computer’s state.
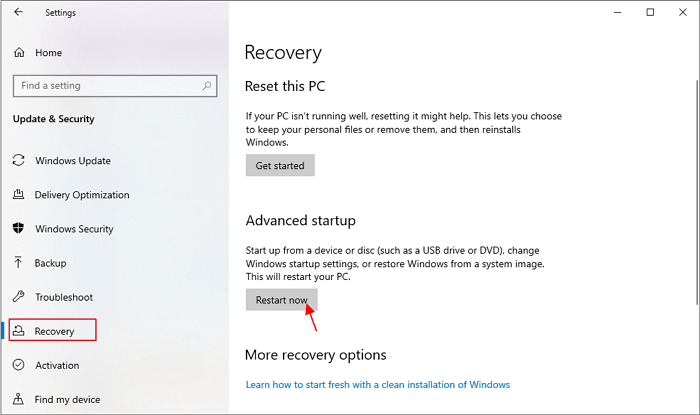
- Case 1: Your computer can still turn on.
Go to Settings > Update and Security > Recovery. Under Advanced startup, click «Restart now».
- Case 2: Your computer failed to boot and you need to use a system repair disc.
Insert the system repair disc into your CD/DVD drive, then restart your computer. Connect your external hard drive containing the system image backup.
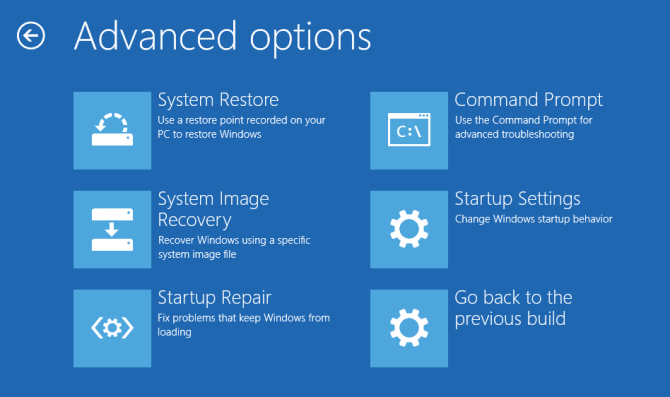
Step 2. Both operations will bring you to the «Choose an option» screen. Follow the path to select Troubleshoot > Advanced options > System Image Recovery.
Step 3. System image recovery will now scan all system images on all available drives and display them in a list. Select the most recent system image and click «Next».
Step 4. Confirm the operation. You’ll be warned that system image recovery will delete everything on your hard drive and replace it with the selected system image backup. Click «Finish» to continue.
Step 5. The system image recovery process will now start, and you’ll see the Re-image Your Computer Wizard window appears. First, select a system image version to restore. Windows recommends using the latest available system image by default, as the below image shows. Click Next to continue.
Step 6. Next, you need to choose additional restore points.
- Format and repartition disks: If you’re restoring to a new hard disk, it’s better to enable this option.
- Exclude disks: If you have multiple hard drives and don’t want to restore system image backup to all of them, select the drives that you want to exclude from the restore operation.
- Advanced settings: Configure additional options for system image recovery. You can also change where Windows will search for the system image backup files. If your system image is stored on a network location, select that option.
Step 7. On the next screen, you’ll need to confirm the operation. Windows will warn you that system image recovery will delete everything on your hard drive and replace it with the selected system image backup. Click Finish to continue.
Step 8. The system image recovery process will now start, and you’ll see the progress bar appear on the screen. Depending on the size of your system image and the speed of your hard drive, this process can take a while to complete.
After system image recovery, Windows will restart automatically and boot up from the system image you just restored. You can then check if the problem has been fixed and your computer runs as usual. If system image recovery doesn’t work as expected or you can’t boot into Windows, try other methods in this guide.
Problem: Failed to Perform a System Image Recovery on My PC
If you see error messages or system image recovery failed to work, it’s likely that the system image backup is corrupted, or something goes wrong with your backup disk. For example, in Windows 8.1 or 10, you may encounter an error message like «The system image restore failed. The System cannot find the file specified (0x80070002). It’s an error telling that the backup image is prematurely dismounted during the restore process.
To be able to recover the system from such an error, follow the below steps.
Step 1. When booting into the Choose an option screen, this time click Troubleshoot > Advanced options > Command Prompt.
Step 2. Now the Command Prompt window opens. Now we’ll use the DISKPART command lines to locate the volume where the OS was installed. When you perform system image recovery and meet the error 0x80070002, the system drive will be recognized as RAW. What we’re going to fix is to convert RAW to NTFS. Type: diskpart > list volume > select volume x > format fs=NTFS quick > exit.
Step 3. Back to Choose an option, click Troubleshoot > Advanced options > System Image Recovery. Follow the guidance of the Re-image Your Computer Wizard to complete the restore from the backup that you saved.
Other problems that would cause a system image recovery failure can be «Windows cannot find a system image on this computer», or «system image restore failed because of EFI or BIOS errors.» Errors akin to the examples here are usually because when you restore a system image to a computer that has different firmware.
LEARN MORE
Due to reasons that the configuration settings and necessary drivers on another computer are usually different from your current PC, to be able to restore a system image to a different computer with dissimilar hardware, you must use the right tools and follow the right restore procedures.
[Highly Recommend] Third-party Windows System Image Recovery Tool
Now you got the whole procedure of creating a system backup image, and the detailed instruction on how to restore a PC from a system image. In addition, how to use a system repair disc to recover an unbootable computer. To some degree, the default Windows system image recovery tool is user-friendly for most computer users, and it can be a basic backup plan for individuals. As for advanced use, for example, to encrypt a system image, compress a system image into small size to save disk space, or set up an automatic backup frequency, it’s far competent enough.
Alternatively, EaseUS Todo Backup is a a more complete and professional system backup and recovery solution than the inbuilt tool for all editions of Windows 10/8.1/8/7, such as Home, Professional, Enterprise, and so on. It’s exclusively designed for Windows users who’re looking for a simple, fast and worry-free system protection plan.
Unlike the built-in system image backup tool in Windows, EaseUS Todo Backup can create a system image and store it on an external hard drive, USB flash drive, network share or cloud. It also supports scheduled system image backup so that you can set up an automatic system image backup plan to protect your PC.

In general, below are reasons why more and more users choose third-party system backup and recovery software over the default Windows system restore program. Check the key points one by one.
- Less chance of failing to create a system backup or perform a recovery
- Much simpler and more intelligent in doing backups, and the recovery speed is faster.
- Supports system backup to external hard drives, USB flash drives, network locations, NAS and cloud storage. Enable users to create one more copy of backups in different locations at the same time.
- Allows you to schedule system image backups daily, weekly, monthly, or upon an event.
- Doing an incremental and differential backup to greatly improve the recovery speed and disk space usage.
- Advanced backup options to let you compress, encrypt, merge and split backup images for flexible system management.
- Integrated with the hot feature of cloning hard drive, which is very useful when you want to upgrade your system disk to a larger one.
- Creating a bootable rescue media is much easier than creating a system repair disc in Windows.
- Allows to create and restore a system image to another computer without booting problems.
- 24X7 tech support via live chat, email, and phone calls. Remote assistance is available.
Now, let’s see how to create a system image backup and recover your system with EaseUS Todo Backup.
Backup System Image:
Step 1. Launch EaseUS Todo Backup on your computer, and click Create Backup on the home screen and then hit the big question mark to select backup contents.

Step 2. To back up your Windows operating system, click «OS» to begin the backup task.

Step 3. Your Windows operating system information and all system related files and partitions will be automatically selected so you don’t need to do any manual selection at this step. Next, you’ll need to choose a location to save the system image backup by clicking the illustrated area.

Step 4. The backup location can be another local drive on your computer, an external hard drive, network, cloud or NAS. Generally, we recommend you use an external physical drive or cloud to preserve the system backup files.

Step 5. Customiztion settings like enabling an automatic backup schedule in daily, weekly, monthly, or upon an event, and making a differential and incremental backup are available in the Options button if you’re interested. Click «Backup Now«, and the Windows system backup process will begin. The completed backup task will display on the left side in a card style.

Restore a System Image:
* To perform system recovery on a none-bootable machine, try to boot the computer through the EaseUS Todo Backup emergency disk.
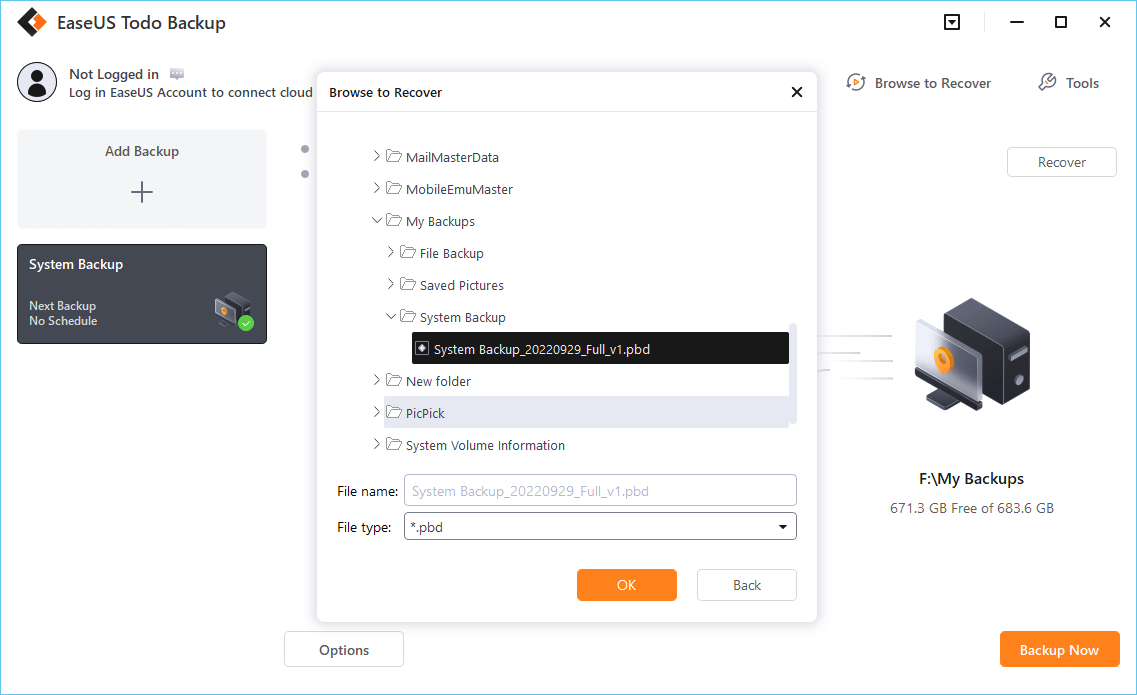
Step 1. Launch EaseUS Todo Backup, click «Browse to Recover«.

Step 2. Guide to your backup destination, choose the system backup file you need. (The backup file created by EaseUS Todo Backup is a pbd file.)
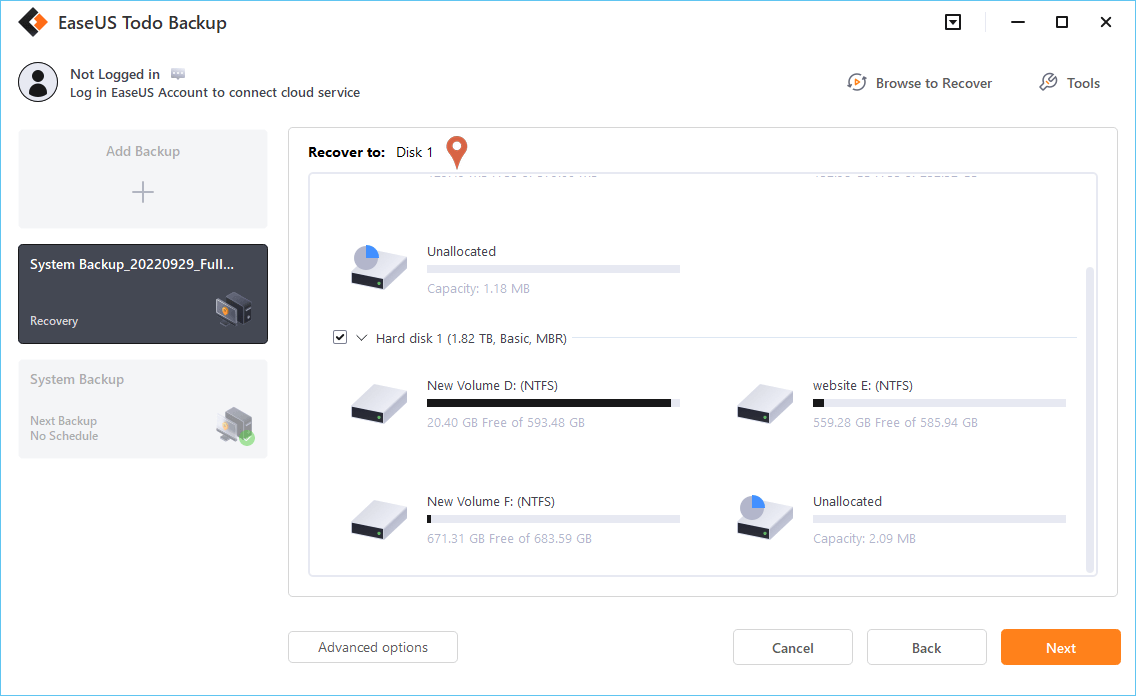
Step 3. Choose the recovery disk. Make sure that the partition style of the source disk and the recovery disk are the same.
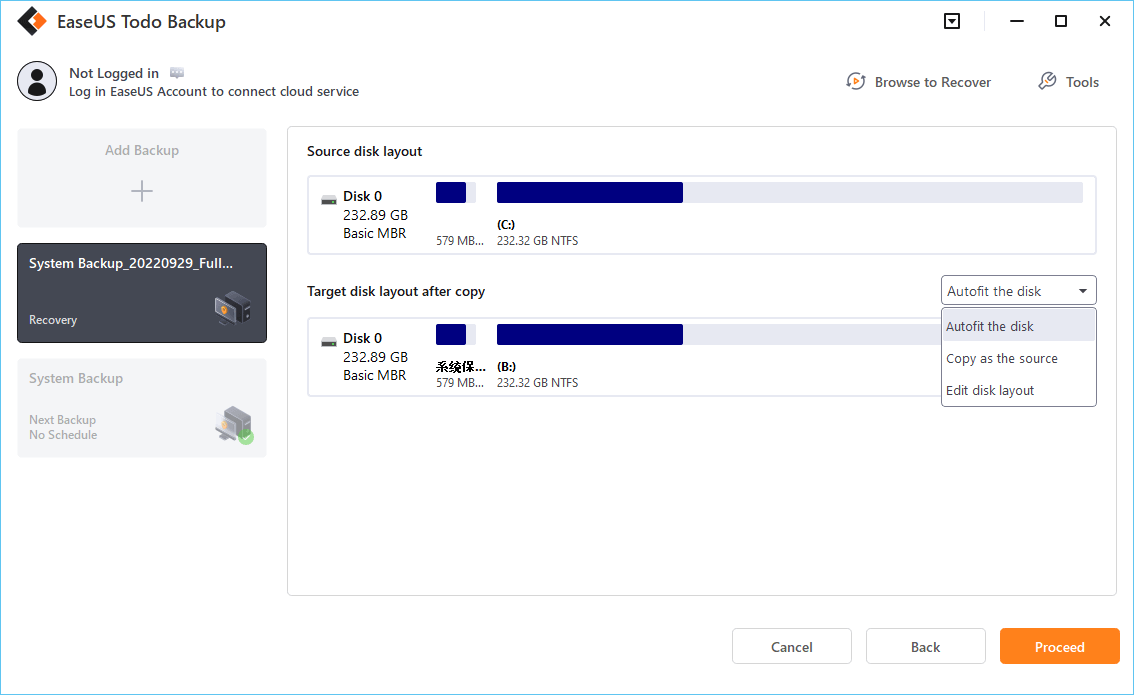
Step 4. You can customize the disk layout according to your needs. Then click «Proceed» to start system backup recovery.
LEARN MORE
Besides EaseUS Todo Backup, check the list of top 5 best Windows backup software that enables you to create a useful system image and perform a system image recovery on both your current PC and new PC.
Key Takeaways for a Successful System Image Recovery
- A system image is a complete copy of your computer’s system drive, which contains your operating system and all of your installed programs and settings.
- The goal of system image recovery is to restore your computer from a system image backup in case of system failure or data loss.
- To perform system image recovery, you must create a system image in advance.
- There are two ways to create a system image backup: using the built-in system image backup tool in Windows or using third-party system backup software.
- Before you start system image recovery, check if your computer can normally start or cannot. If it’s unbootable, try to boot it through the system repair disc you created and then select the system image to recover.
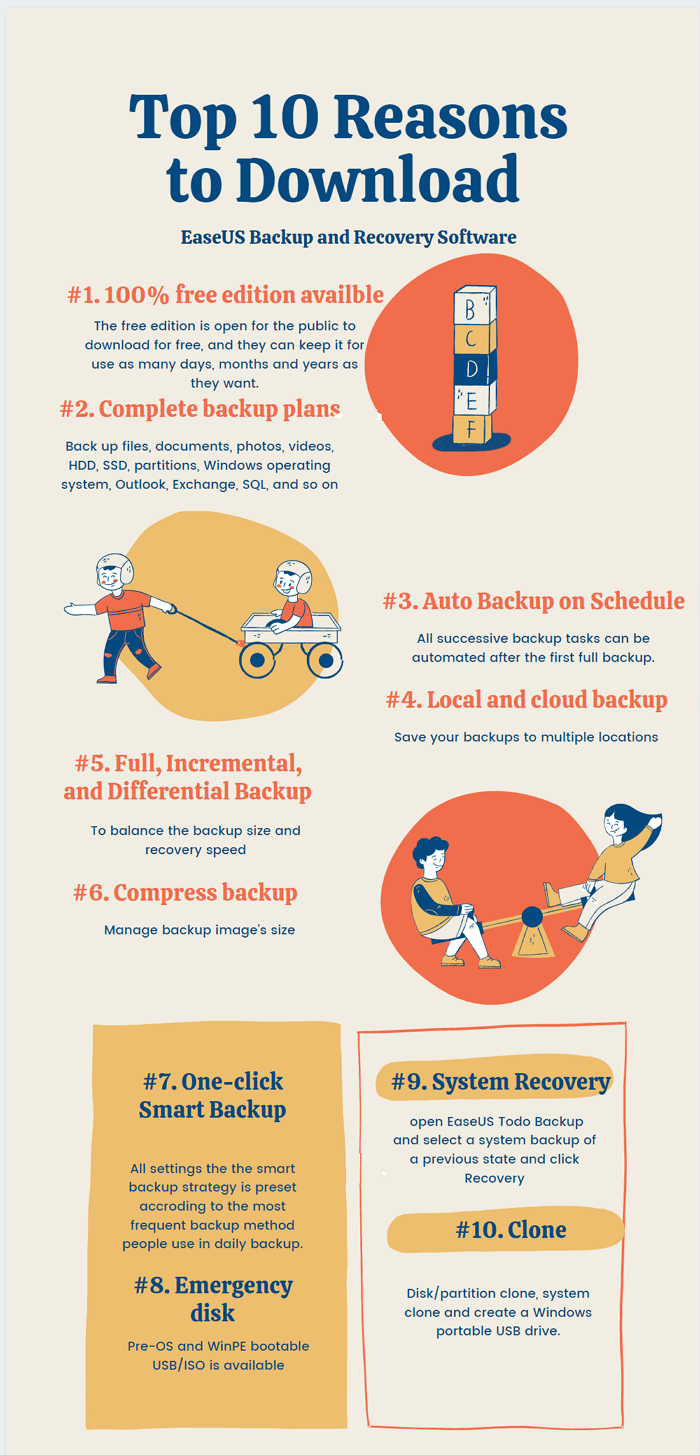
- If system image recovery doesn’t work as expected or you can’t boot into Windows, try EaseUS Todo Backup in this guide. Here are the top 10 reasons to download EaseUS backup and recovery software.