
В этой инструкции пошагово описаны 5 способов сделать резервную копию Windows 10 как встроенными средствами, так и с помощью бесплатных программ сторонних разработчиков. Плюс о том, как в дальнейшем, при возникновении проблем использовать резервную копию для восстановления Windows 10. См. также: Резервная копия драйверов Windows 10
Резервная копия в данном случае — полный образ Windows 10 со всеми установленными в данный момент времени программами, пользователями, настройками и прочим (т.е. это не Точки восстановления Windows 10, содержащие в себе лишь информацию об изменениях системных файлов). Таким образом, при использовании резервной копии для восстановления компьютера или ноутбука, вы получаете то состояние ОС и программ, которое было на момент создания копии.
Как сделать резервную копию Windows 10 встроенными средствами ОС
Для чего это нужно? — прежде всего для быстрого возврата системы к заранее сохраненному состоянию при необходимости. Восстановление из резервной копии занимает куда меньше времени, чем переустановка Windows 10 и настройка системы и устройств. Кроме этого, это проще для начинающего пользователя. Создавать такие образы системы рекомендуется сразу после чистой установки и первоначальной настройки (установки драйверов устройств) — так копия занимает меньше места, быстрее создается и применяется при необходимости. Также может заинтересовать: хранение резервных копий файлов с помощью истории файлов Windows 10.
Windows 10 включает в себя несколько возможностей для создания резервных копий системы. Самый простой для понимания и использования, при этом полностью работоспособный способ — создание образа системы с помощью функций резервного копирования и восстановления панели управления.
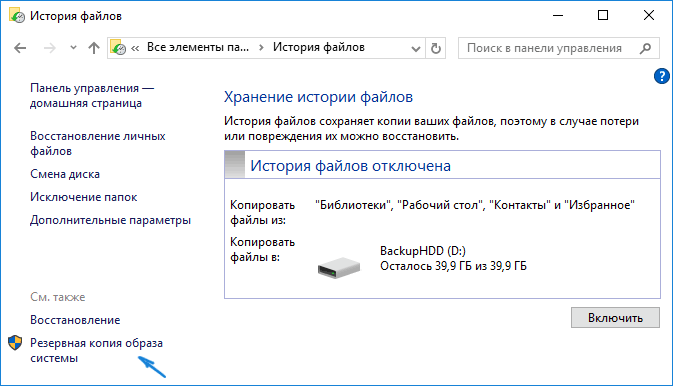
Чтобы найти эти функции, вы можете зайти в Панель управления Windows 10 (Начните набирать «Панель управления» в поле поиска на панели задач. После открытия панели управления в поле просмотр вверху справа установите «Значки») — История файлов, а затем в левом нижнем углу выберите «Резервная копия образа системы».
Следующие шаги достаточно простые:
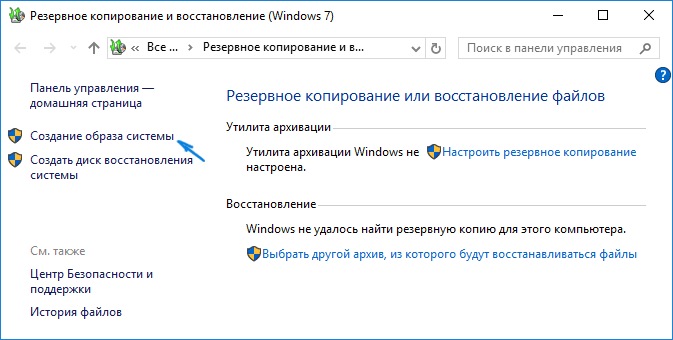
- В открывшемся окне слева нажмите «Создание образа системы».

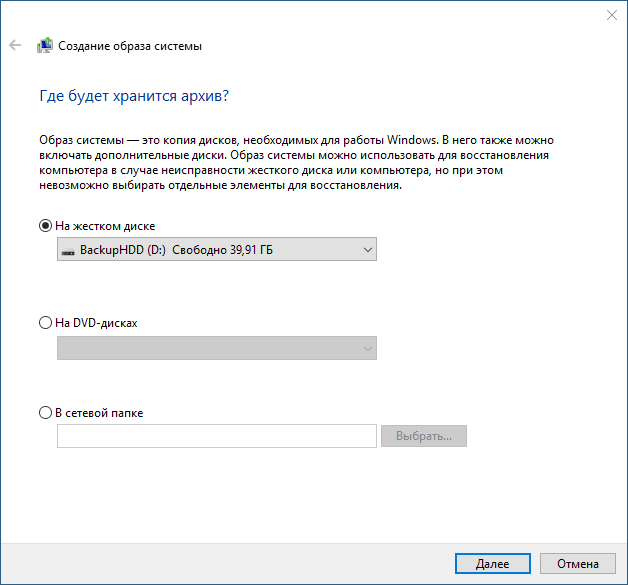
- Укажите, где вы хотите сохранить образ системы. Это должен быть либо отдельный жесткий диск (внешний, отдельный физический HDD на компьютере), либо DVD диски, либо сетевая папка.

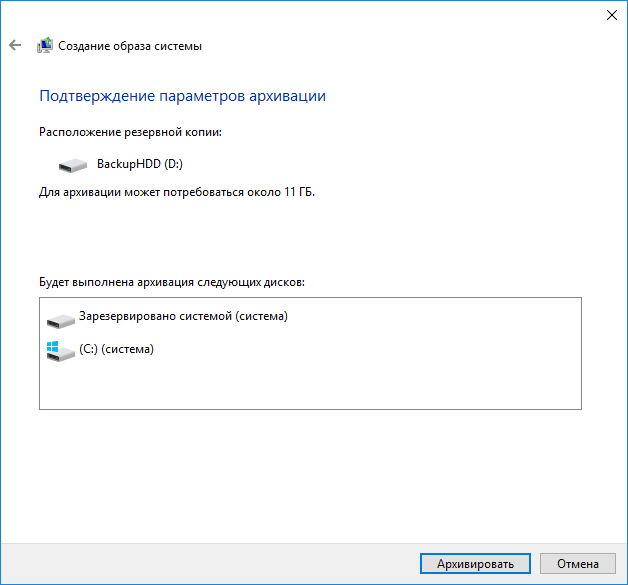
- Укажите, какие диски будут архивированы с резервную копию. По умолчанию всегда архивируются зарезервированный и системный раздел (диск C).
- Нажмите «Архивировать» и подождите завершения процедуры. На чистой системе она занимает не очень много времени, в пределах 20 минут.
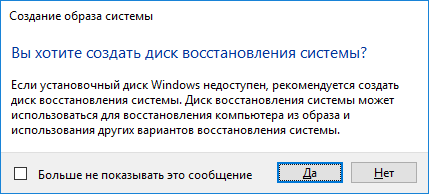
- По завершении, вам будет предложено создать диск восстановления системы. Если у вас нет флешки или диска с Windows 10, а также доступа к другим компьютерам с Windows 10, где вы можете быстро сделать его при необходимости, рекомендую создать такой диск. Он пригодится для того, чтобы в дальнейшем использовать созданную резервную копию системы.

Вот и всё. Теперь у вас имеется резервная копия Windows 10 для восстановления системы.
Восстановление Windows 10 из резервной копии
Восстановление происходит в среде восстановления Windows 10, попасть в которую можно как из рабочей установленной ОС (в данном случае потребуется быть администратором системы), так и с диска восстановления (заранее созданного средствами системы. см. Создание диска восстановления Windows 10) или загрузочной флешки (диска) с Windows 10. Опишу каждый вариант.
- Из рабочей ОС — зайдите в Пуск — Параметры. Выберите пункт «Обновление и безопасность» — «Восстановление и безопасность». Затем в разделе «Особые варианты загрузки» нажмите кнопку «Перезагрузить сейчас». Если такого раздела нет (что возможно), есть второй вариант: выйдите из системы и на экране блокировки нажмите по кнопке питания справа внизу. Затем, удерживая Shift, нажмите пункт «Перезагрузка».
- С установочного диска или флешки Windows 10 — загрузитесь с данного накопителя, например, с помощью Boot Menu. В следующем после выбора языка окне слева внизу нажмите «Восстановление системы».
- При загрузке компьютера или ноутбука с диска восстановления сразу открывается среда восстановления.
В среде восстановления по порядку выберите следующие пункты «Поиск и устранение неисправностей» — «Дополнительные параметры» — «Восстановление образа системы».

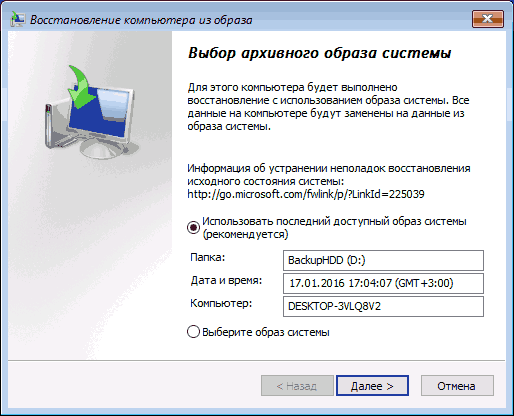
Если система найдет образ системы на подключенном жестком диске или DVD, она сразу предложит выполнить восстановление из него. Также можно указать образ системы вручную.
На втором этапе, в зависимости от конфигурации дисков и разделов, вам предложат или не предложат выбрать разделы на диске, которые будут перезаписаны данными из резервной копии Windows 10. При этом, если вы делали образ только диска C и с тех пор не меняли структуры разделов, беспокоиться о сохранности данных на D и других дисках не следует.
После подтверждения операции восстановления системы из образа, начнется сам процесс восстановления. По окончании, если все прошло успешно, поставьте в БИОС загрузку с жесткого диска компьютера (если меняли), и загрузитесь в Windows 10 в том состоянии, в котором она была сохранена в резервной копии. При необходимости, вы можете также восстановить отдельные файлы из резервной копии.
Создание образа Windows 10 с помощью DISM.exe
В вашей системе по умолчанию присутствует утилита командной строки DISM, позволяющая как создать образ Windows 10, так и выполнить восстановление из резервной копии. Также, как и в предыдущем случае, итогом нижеописанных шагов будет полная копия ОС и содержимого системного раздела в текущем состоянии.
Прежде всего, для того, чтобы сделать резервную копию с помощью DISM.exe, вам потребуется загрузиться в среде восстановления Windows 10 (как это сделать описано в предыдущем разделе, в описании процесса восстановления), но запустить не «Восстановление образа системы», а пункт «Командная строка».
В командной строке введите по порядку следующие команды (и выполните следующие действия):
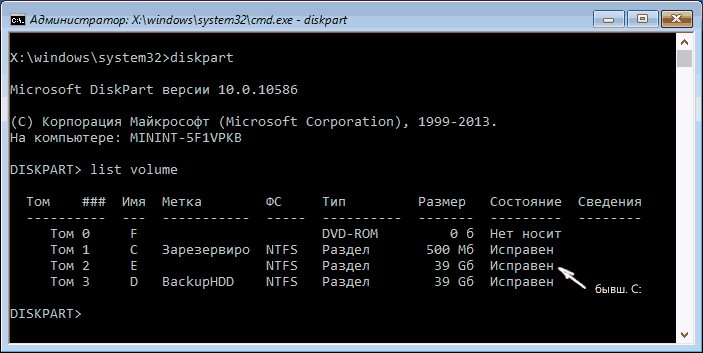
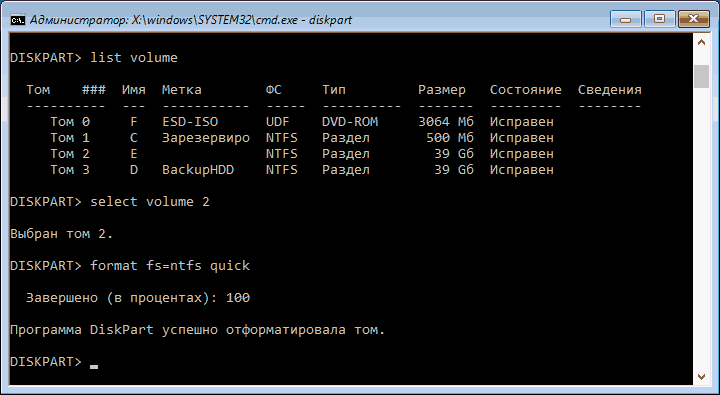
- diskpart
- list volume (в результате выполнения этой команды запомните букву системного диска, в среде восстановления она может быть не C, определить нужный диск вы можете по размеру или метке диска). Там же обратите внимание на букву диска, куда вы будете сохранять образ.

- exit
- dism /Capture-Image /ImageFile:D:\Win10Image.wim /CaptureDir:E:\ /Name:”Windows 10”

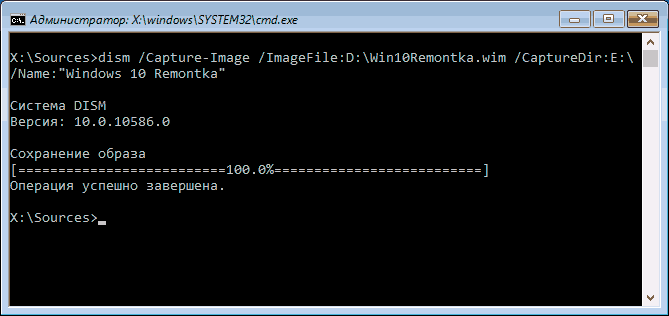
В вышеприведенной команде диск D: — тот, куда сохраняется резервная копия системы с именем Win10Image.wim, а сама система расположена на диске E. После запуска команды вам придется некоторое время подождать, пока резервная копия не будет готова, в результате вы увидите сообщение о том, что «Операция успешно завершена». Теперь вы можете выйти из среды восстановления и продолжить пользоваться ОС.
Восстановление из образа, созданного в DISM.exe
Использование созданной в DISM.exe резервной копии также происходит в среде восстановления Windows 10 (в командной строке). При этом, в зависимости от ситуации, когда вы столкнулись с необходимостью восстановить систему, действия могут немного отличаться. Во всех случаях системный раздел диска предварительно будет отформатирован (так что позаботьтесь о сохранности данных на нем).
Первый сценарий — если на жестком диске сохранилась структура разделов (есть диск С, раздел, зарезервированный системой и, возможно другие разделы). Выполните в командной строке следующие команды:
- diskpart
- list volume — после выполнения этой команды обратите внимание на буквы разделов, где хранится образ восстановления, раздела «зарезервировано» и его файловую систему (NTFS или FAT32), букву системного раздела.
- select volume N — в этой команде N — номер тома, соответствующего системному разделу.
- format fs=ntfs quick (раздел форматируется).

- Если есть основания полагать, что загрузчик Windows 10 поврежден, то также выполните команды под пунктами 6-8. Если вы просто хотите откатить ставшую плохо работать ОС из резервной копии, эти шаги можно пропустить.
- select volume M — где M это номер тома «зарезервировано».
- format fs=FS quick — где FS — текущая файловая система раздела (FAT32 или NTFS).
- assign letter=Z (присваиваем букву Z разделу, она потребуется в дальнейшем).
- exit
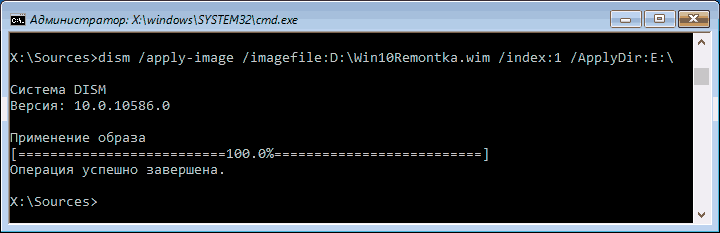
- dism /apply-image /imagefile:D:\Win10Image.wim /index:1 /ApplyDir:E:\ — в этой команде образ системы Win10Image.wim находится на разделе D, а системный раздел (куда мы восстанавливаем ОС)— E.

После завершения развертывания резервной копии на системном разделе диска при условии отсутствия повреждений и изменений загрузчика (см. пункт 5), можно просто выйти из среды восстановления и загрузиться в восстановленную ОС. Если же вы выполняли шаги с 6 по 8, то дополнительно выполните следующие команды:
- bcdboot E:\Windows /s Z: — здесь E — системный раздел, а Z — раздел «Зарезервировано».
- diskpart
- select volume M (номер тома зарезервировано, который мы узнавали ранее).
- remove letter=Z (удаляем букву зарезервированного раздела).
- exit
Выходим из среды восстановления и перезагружаем компьютер — Windows 10 должна загрузиться в ранее сохраненном состоянии. Есть и еще вариант: у вас нет раздела с загрузчиком на диске, в таком случае предварительно создайте его с помощью diskpart (размером около 300 Мб, в FAT32 для UEFI и GPT, в NTFS для MBR и BIOS).
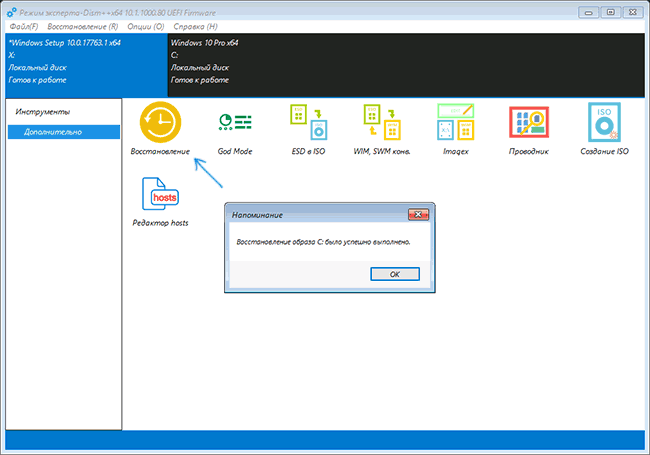
Использование Dism++ для создания резервной копии и восстановления из неё
Описанные выше действия по созданию резервной копии можно выполнить проще: с помощью графического интерфейса в бесплатной программе Dism++.
Шаги будут следующими:
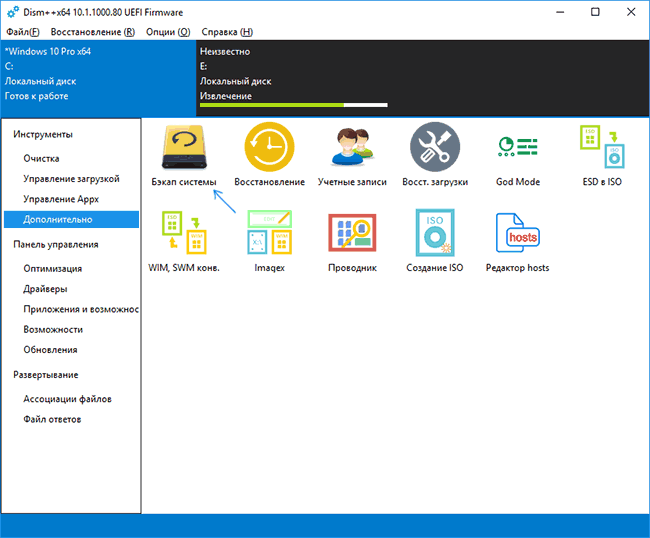
- В главном окне программы выберите Инструменты — Дополнительно — Бэкап системы.

- Укажите место сохранения образа. Другие параметры менять не обязательно.

- Дождитесь завершения сохранения образа системы (может занять продолжительный промежуток времени).
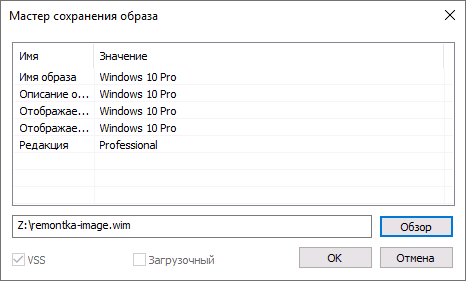
В итоге вы получите .wim образ вашей системы со всеми настройками, пользователями, установленными программами.
В дальнейшем восстановиться с него можно с помощью командной строки, как описывалось выше или всё также используя Dism++, однако для этого придется загрузить её с флешки (или в среде восстановления, в любом случае программа не должна находиться на том же диске, содержимое которого восстанавливается). Это можно сделать так:
- Создайте загрузочную флешку с Windows и на неё же скопируйте файл с образом системы и папку с Dism++.
- Загрузитесь с этой флешки и нажмите клавиши Shift+F10, откроется командная строка. В командной строке введите путь к файлу Dism++.
- При запуске Dism++ из среды восстановления будет запущен упрощенный вариант окна программы, где достаточно будет нажать «Восстановление» и указать путь к файлу образа системы.

- Учитывайте, что при восстановлении содержимое системного раздела будет удалено.
Подробнее о программе, её возможностях и где скачать: Настройка, очистка и восстановление Windows 10 в Dism++
Macrium Reflect Free
Про Macrium Reflect я уже писал в отдельной статье про перенос Windows 10 на SSD в Macium Reflect Free — отличная, бесплатная и сравнительно простая программа для резервного копирования, создания образов жестких дисков и подобных задач. Поддерживает создание инкрементальных и дифференциальных резервных копий, в том числе автоматически по расписанию.
Восстановиться из образа можно как с помощью самой программы, так и созданной в ней загрузочной флешки или диска, который создается в пункте меню «Other Tasks» — «Create Rescue Media». По умолчанию, накопитель создается на базе Windows 10, а файлы для него загружаются из Интернета (около 500 Мб, при этом загрузить данные предлагается при установке, а создать такой накопитель — при первом запуске).
В Macrium Reflect присутствует значительное количество настроек и опций, но для базового создания резервных копий Windows 10 начинающим пользователем вполне подходят настройки по умолчанию. Подробно об использовании Macrium Reflect и где скачать программу в отдельной инструкции Резервная копия Windows 10 в Macrium Reflect.
Aomei Backupper Standard
Еще один вариант создания бэкапов системы — простая бесплатная программа Aomei Backupper Standard. Ее использование, пожалуй, для многих пользователей окажется самым простым вариантом. Если вас интересует более сложный, но и более продвинутый бесплатный вариант, рекомендую ознакомиться с инструкцией: Резервные копии с помощью Veeam Agent For Microsoft Windows Free.
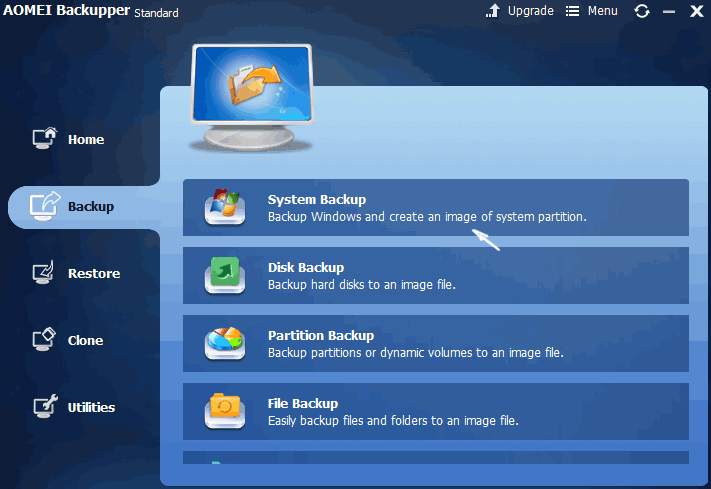
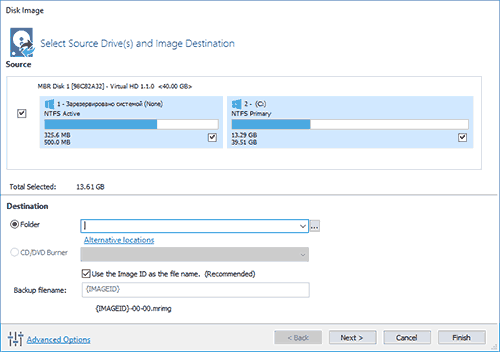
После запуска программы, перейдите на вкладку «Backup» и выберите, какого рода резервную копию вы хотите создать. В рамках этой инструкции это будет образ системы — System Backup (создается образ раздела с загрузчиком и образ системного раздела диска).
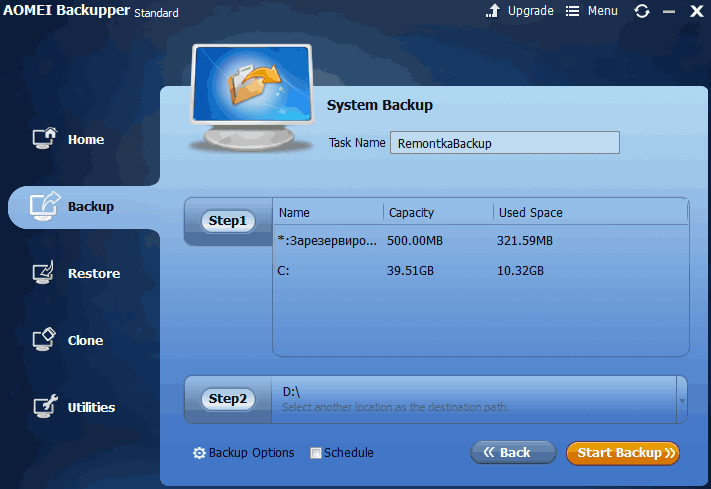
Укажите имя резервной копии, а также место сохранения образа (в пункте Step 2) — это может быть любая папка, диск или сетевое расположение. Также при желании вы можете установить опции в пункте «Backup Options», но для начинающего пользователя полностью подойдут настройки по умолчанию. Нажмите кнопку «Start Backup» и подождите, пока процедура создания образа системы не будет завершена.
Восстановить компьютер к сохраненному состоянию вы в дальнейшем можете прямо из интерфейса программы, но лучше предварительно создать загрузочный диск или флешку с Aomei Backupper, чтобы в случае проблем с запуском ОС можно было загрузиться с них и восстановить систему из имеющегося образа. Создание такого накопителя выполняется с помощью пункта программы «Utilities» — «Create Bootable Media» (при этом накопитель можно создать как на базе WinPE, так и Linux).
При загрузке с загрузочного USB или CD Aomei Backupper Standard, вы увидите обычное окно программы. На вкладке «Restore» в пункте «Path» укажите путь к сохраненной резервной копии (если расположения не определились автоматически), выберите ее в списке и нажмите «Next».
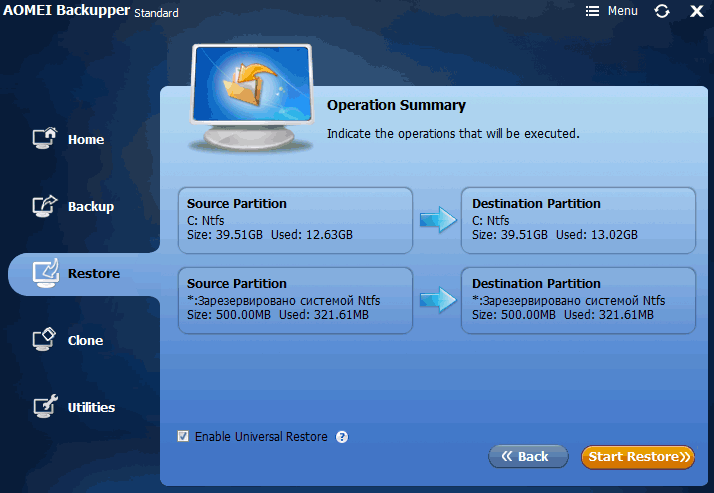
Убедитесь, что восстановление Windows 10 будет произведено в нужные расположения и нажмите кнопку «Start Restore» для начала применения резервной копии системы.
Скачать бесплатно Aomei Backupper Standard вы можете с официальной страницы https://www.ubackup.com/ (Фильтр SmartScreen в Microsoft Edge почему-то блокирует программу при загрузке. Virustotal.com не показывает обнаружения чего-то вредоносного.) Похожая программа от другого разработчика — EaseUS Todo Backup Free.
Это далеко не все способы создания образов и резервных копий системы. Есть множество программ, позволяющих сделать это, например, многим известные продукты Acronis. Есть инструменты командной строки, такие как imagex.exe (а вот recimg исчез в Windows 10), но думаю, в рамках этой статьи выше описано уже достаточно вариантов.
Кстати, не забывайте, что в Windows 10 присутствует «встроенный» образ восстановления, позволяющий автоматически выполнить переустановку системы (в Параметры — Обновление и безопасность — Восстановление или в среде восстановления), подробнее об этом и не только в статье Восстановление Windows 10.
В этой статье мы рассмотрим, как с помощью встроенных средств создать полную резервную копию образа системы Windows 10 на отдельном носителе (это может быть внешний диск, USB флешка или сетевая папка) и как правильно восстановить систему из этого образа. Резервная копия Windows включает в себя полный образ системы, системные и пользовательские разделы со всеми установленными программами, настройками и личными данными пользователя.
Содержание:
- Как создать полную резервную копию образа Windows 10?
- Управление резервными копиями Windows с помощью утилиты wbadmin
- Восстановление образа Windows 10 из резервной копии
В этой статье для резервного копирования образа Windows мы будем использовать классический инструмент System Image Backup. И хотя Microsoft перестала развивать его уже достаточно давно, он вполне пригоден для нашей задачи.
Как создать полную резервную копию образа Windows 10?
Для создания резервной копии образа Windows через System Image Backup можно воспользоваться консольной утилитой wbadmin.exe. Подключите к компьютеру внешний диск или USB флешку, на который будем сохранять образ.
Запустите консоль PowerShell с правами администратора.
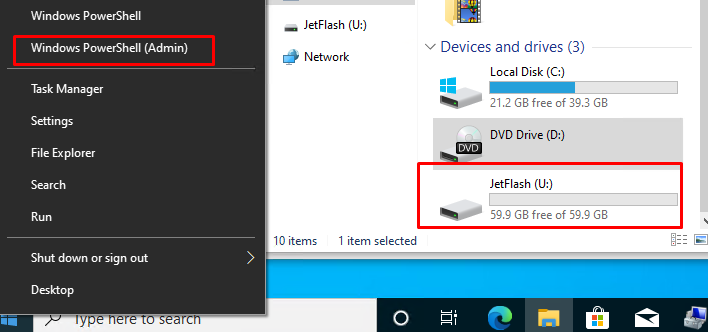
В нашем случае Windows 10 установлена на диск C:\, и мы будем сохранять образ системы на USB флешку U: (на флешке должно быть достаточно свободного места).
wbAdmin start backup -backupTarget:U: -include:C: -allCritical -quiet
Примечание. Для создания резервной копии образа Windows с помощью
Wbadmin.exe
ваша учетная запись должна состоять в локальных группах Backup Operators или Администраторы.
Если вам нужно включить в резервную копию не только системный раздел, на котором установлена Windows 10, но и другие разделы, используйте такую команду:
wbAdmin start backup -backupTarget:U: -include:C:,D:,F:,G: -allCritical -quiet
Если нужно сохранить образ системы в сетевую папку, необходимо указать UNC путь к ней (у вашей учетной записи должны быть права на запись в этот каталог):
wbAdmin start backup -backupTarget:\\homepc2\imagebackup -include:C: -allCritical –quiet
Вы можете указать учетную запись для доступа к SMB каталогу так:
wbAdmin start backup -backupTarget:\\homepc2\imagebackup -user:user1 -password:user1Password -include:C: -allCritical –quiet
Если вы хотите добавить в резервную копию определенные каталоги, укажите их так:
include:E:\docs
Создание резервной копии образа Windows займет некоторое время в зависимости от того, как много данных содержится на исходных дисках.
Для создания резервной копии образа используется механизм теневого копирования через службу Volume Shadow Copy (VSS). Это значит, что вы можете продолжать использовать Windows во время выполнения резервного копирования.
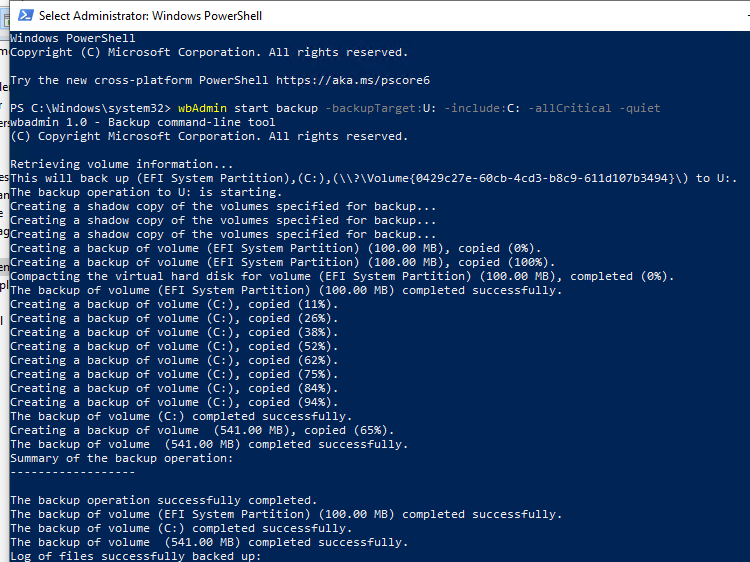
The backup operation successfully completed.
The backup of volume (EFI System Partition) (100.00 MB) completed successfully.
The backup of volume (C:) completed successfully.
The backup of volume (541.00 MB) completed successfully.
Как вы видите, в резервную копию образа был включен не только системный раздел, но и разделы EFI и System Reserved.
System Image Backup поддерживает как полное, так и инкрементальное резервное копирование (т.е. к первоначальному образу добавляются только изменившиеся блоки).
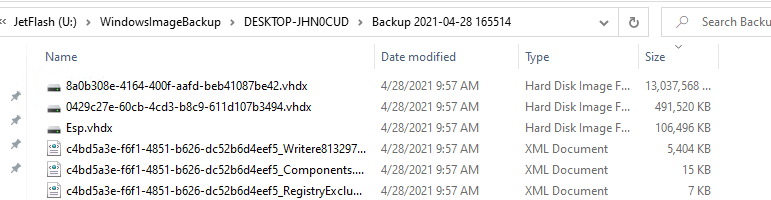
Проверьте, что на USB флешке появился каталог WindowsImageBackup, содержащий образ вашей Windows. Резервные копии разделов представляют собой vhdx файлы. При необходимости вы можете вручную смонтировать эти VHDX диски и получить доступ к их содержимому.
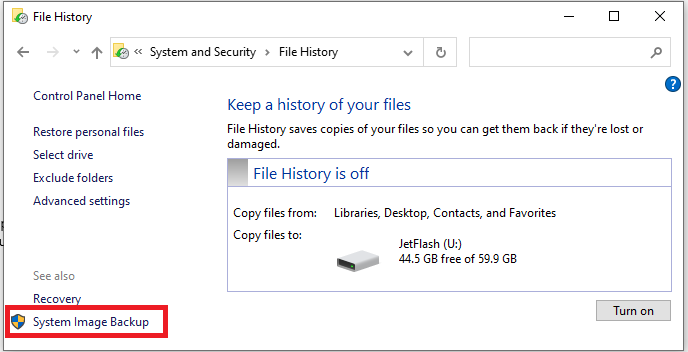
Вы можете создать резервной копии образа Windows 10 и из графического интерфейса Windows 10. Этот функционал доступен через панель управления (Control Panel\System and Security\File History). Нажмите на кнопку System Image Backup в нижнем левом углу.
Либо достаточно выполнить команду
Sdclt.exe
.
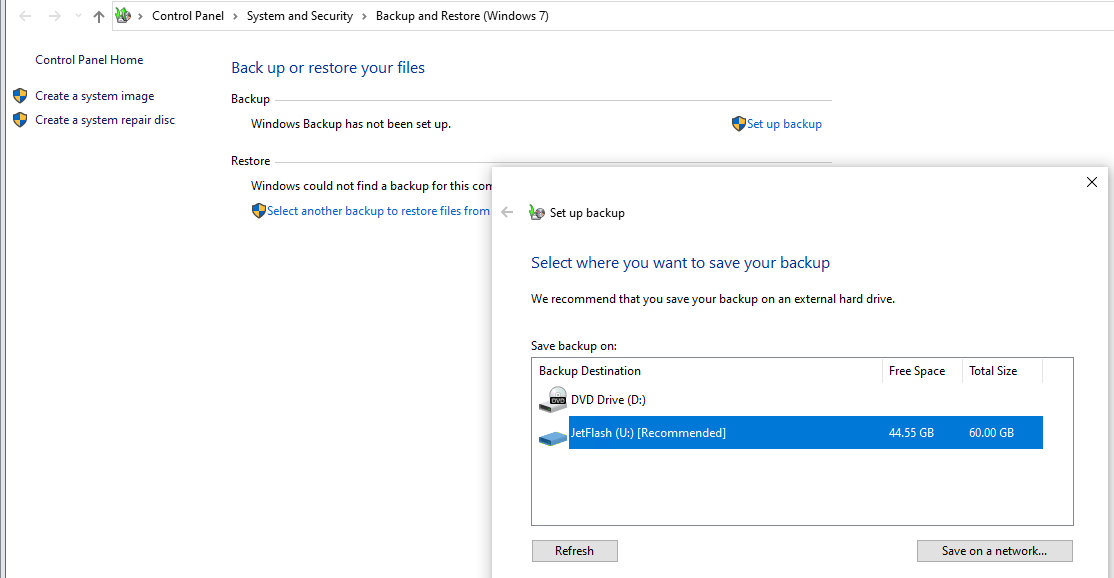
В следующем окне нажмите Setup backup и укажите диск, на который нужно сохранить резевную копию.
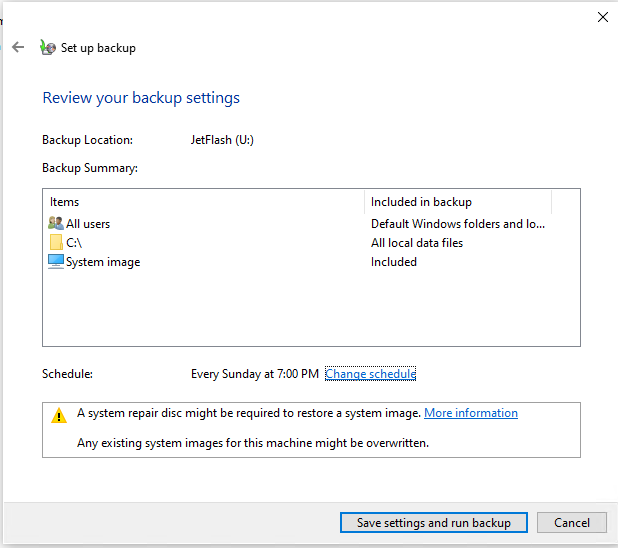
Выберите диски, которые нужно забэкапить. Убедитесь, что включена опция Include a system image of drives: EFI System Partition, C:, Windows Recovery Environment.

Далее можно настроить расписание автоматического резевного копирования. Чтобы начать бэкап, нажмите Save settings and run backup.
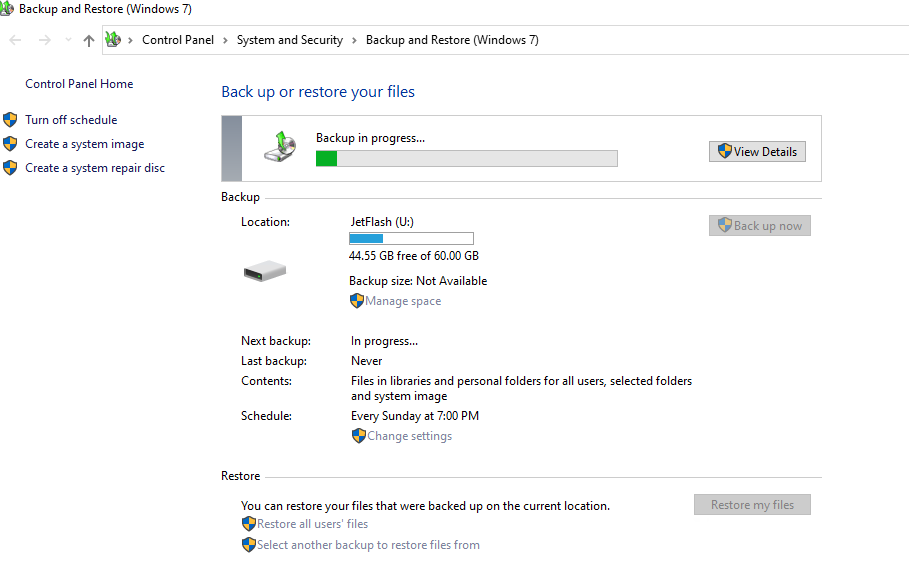
Статус резевного копирования указан в Панели Управления.
Управление резервными копиями Windows с помощью утилиты wbadmin
Рассмотрим несколько команд консольной утилиты wbadmin.exe для управления резервными копиями.
Вывести список зарегистрированных в системе резервных копий:
Wbadmin get versions
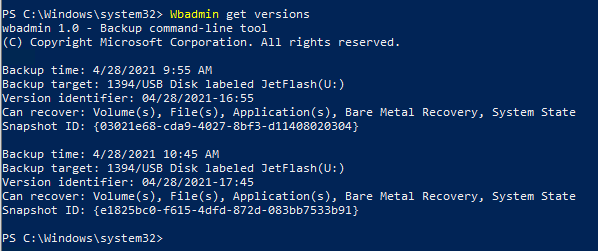
Backup time: 4/28/2021 9:55 AM
Backup target: 1394/USB Disk labeled JetFlash(U:)
Version identifier: 04/28/2021-16:55
Can recover: Volume(s), File(s), Application(s), Bare Metal Recovery, System State
Snapshot ID: {03021e68-cda9-4027-8bf3-d11408020304}
В данном случае у нас есть 2 резервных копии. Чтобы перечислить элементы, хранящиеся в определенной резервной копии, укажите ее Version identifier:
Wbadmin get items -version:04/28/2021-17:45

Чтобы удалить все резервные копии, кроме двух последних, выполните:
wbadmin delete backup -keepversions:2
Чтобы удалить только самую старую резервную копию образа:
Wbadmin delete backup –deleteOldest
Восстановление образа Windows 10 из резервной копии
Для восстановления Windows 10 из созданной ранее резервной копии образа, вам понадобится:
- Установочный образ Windows 10 DVD диске или USB флешке (как создать загрузочную USB флешку с Windows 10), диск восстановления системы, загрузочный образ восстановления MSDaRT или аналогичный LiveCD
- В настройках BIOS/UEFI измените порядок загрузки системы так, чтобы система загружалась cначала с загрузочного диска.
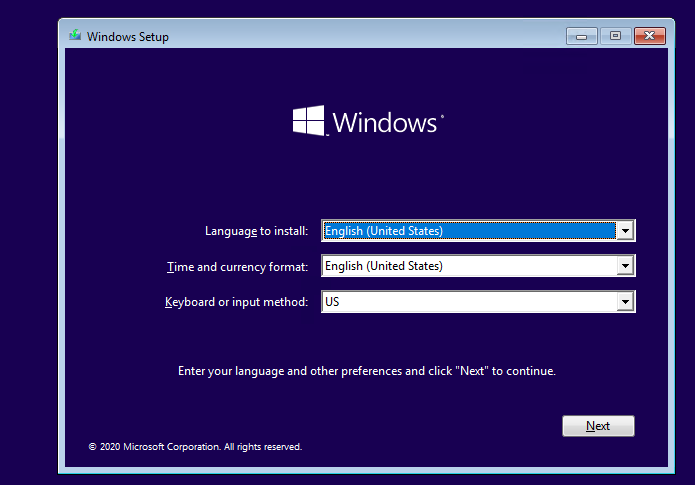
Загрузитесь с установочного/загрузочного диска. На первом экране Windows Setup нажмите Next.
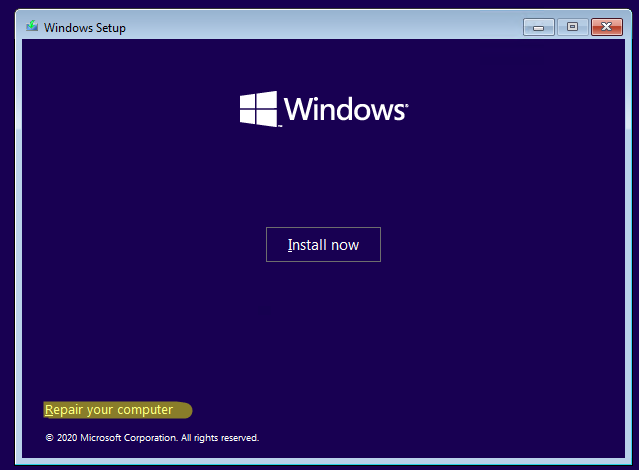
Нажмите на кнопку Repair your computer в левом нижнем углу.
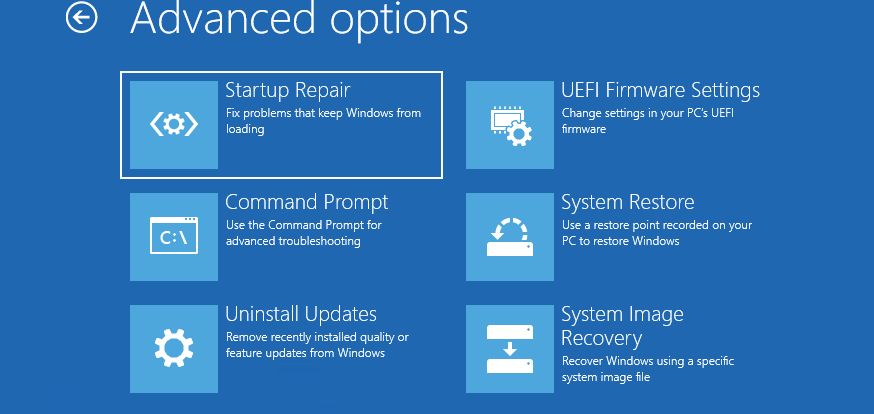
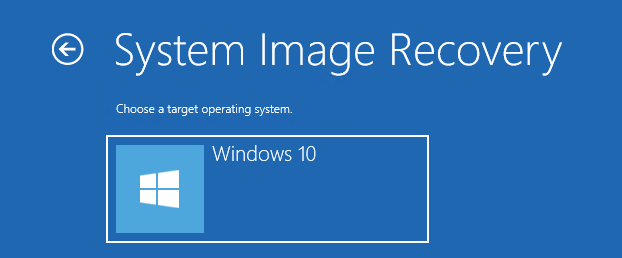
Затем перейдите в раздел Troubleshoot -> Advanced Options -> System Image Recovery.
В списке целевых ОС нужно выбрать Windows 10.
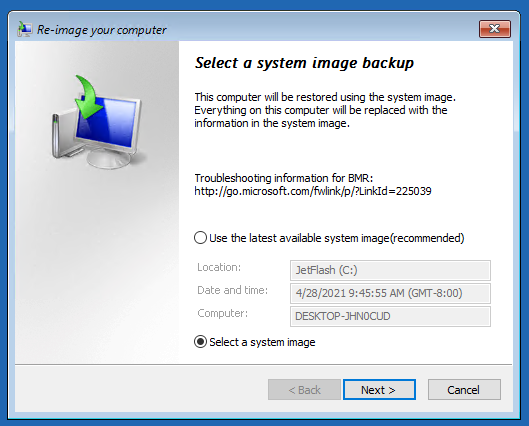
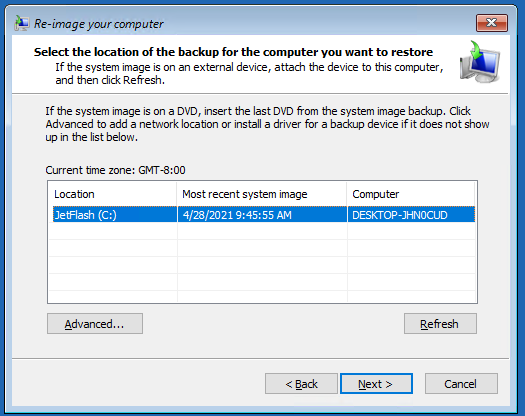
Мастер установки просканирует подключенные диски и обнаружит список ранее созданных резервных копий. Вы можете восстановить последний образ, либо выбрать более ранний.
Совет. Т.к. система загрузилась с загрузочного диска, буквы дисков могут не соответствовать буквам дисков в Windows.
Из списка доступных образов выберите образ, который нужно восстановить.
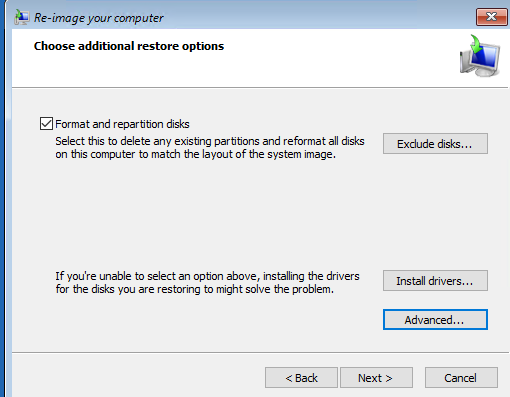
Отметьте опцию Format and repartition disks, если вы восстанавливаете образ на новый диск. В этом случае мастер восстановления удалит все имеющиеся разделы на диске и пересоздаст таблицу разделов в соответствии с разделами в образе.
Осталось подтвердить восстановление системы из образа.
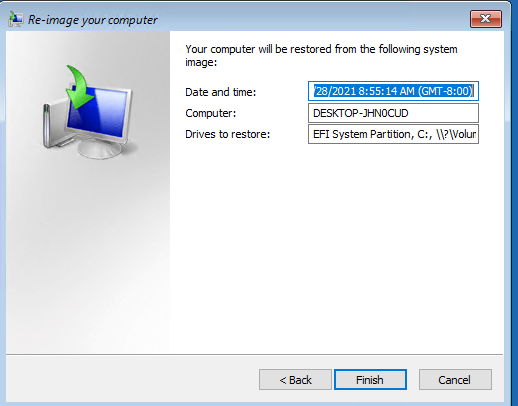
После завершения работы мастера восстановления, загрузитесь с жесткого диска (не забудьте поменять приоритет загрузочных устройств в BIOS) и убедитесь, что вы успешно восстановили Windows 10 из резервной копии образа, созданной ранее.
Если резервная копия образа хранится в сетевом каталоге, вам придется в WinPE сначала инициализировать и настроить сетевой адаптер. Нажмите сочетание клавиш Shift+F10 чтобы открыть командную строку.
Для инициализации сети выполните
startnet.cmd
или
wpeinit.exe
Текущие параметры сетевого адаптера можно получить так:
Ipconfig /all
Чтобы задать статический IP адрес и указать DNS сервера, используйте следующие команды:
netsh int ipv4 set addr "Ethernet" static 192.168.13.50 255.255.255.0 192.168.13.1 1
net start dnscache
netsh int ipv4 set dns "Ethernet" static 192.168.13.10 primary
Затем вернитесь в окно System Image Recovery и укажите путь к UNC каталогу.
Step-by-step guide for creating system image backups
Published
6 min read
How to Make System Image Backups on Windows 11
Every Windows user knows how critical it is to keep their system safe from data loss, crashes, or other unexpected issues. One of the most effective ways to safeguard your operating system, applications, and files is by creating a system image backup. This article will provide a comprehensive guide on how to create system image backups on Windows 11, enabling you to restore your system to a previous state when necessary.
What is a System Image Backup?
A system image backup is a complete snapshot of your current operating system, including installed applications, system settings, and all your data. Unlike standard file backups, which only copy individual files or directories, a system image captures the entire state of your computer at a specific point in time. This makes it invaluable for full system recovery—especially when dealing with severe issues like hardware failures, malware attacks, or corrupted files.
Why Create a System Image Backup?
Creating a system image backup has several advantages:
-
Complete Recovery: A system image ensures that you can restore your computer to its precisely captured state without having to reinstall the operating system and all your programs individually.
-
Time-Saving: Backing up the entire system saves time in case of recovery, as you’ll avoid the lengthy process of reinstalling.
-
Data Protection: Protects against data loss from hardware failures, accidental deletions, and corruption.
-
User Customization Preservation: Your personalized settings, installed programs, and other customizations will remain intact after restoration.
-
Quick Restoration: If your system fails, you can restore it quickly compared to searching for installation media and reinstalling everything manually.
Preparing for a System Image Backup
Before you start creating a system image backup, there are some preparatory steps you should follow:
-
Check Storage Capacity: Ensure that you have a sufficient amount of storage for your backup. You can store the backup on an external hard drive, a network drive, or on another partition of your disk. A typical system image might require as much as the total space used on your C: drive.
-
Gather Required Tools: You don’t need third-party software to create a system image in Windows 11, as the built-in tools are adequate. However, if you prefer using specialized backup software, be prepared with your preferred choice.
-
Close Applications: Before starting the backup process, make sure to close all running applications to ensure a smooth and error-free backup.
-
Ensure Power Supply: If you’re using a laptop, connect it to a power source to prevent any interruptions during the backup process.
Creating a System Image Backup Using Windows 11 Built-in Tools
Windows 11 retains a robust utility that enables you to create a system image easily. Follow the steps below to create a system image backup:
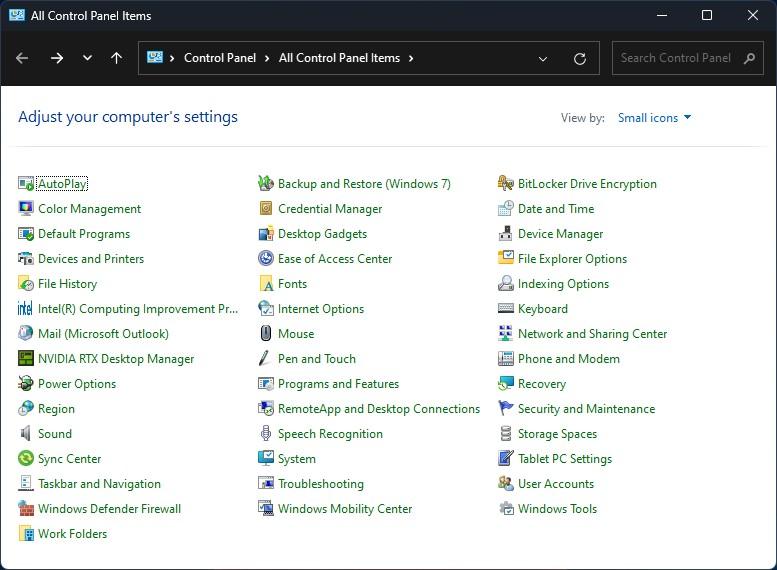
Step 1: Open Control Panel
- Click on the Start button or press the Windows key.
- Type «Control Panel» in the search bar and select the corresponding result.
Step 2: Navigate to Backup and Restore (Windows 7)
- Once you’re in the Control Panel, set the view to Large Icons or Small Icons (this can be changed in the «View by» dropdown at the top right).
- Locate and click on Backup and Restore (Windows 7). Although it’s labeled for Windows 7, it is fully functional on Windows 11.
Step 3: Create a System Image
- In the Backup and Restore window, look for the option that says Create a system image on the left sidebar and click on it.
- The system will begin checking for available backup locations.
Step 4: Choose Backup Location
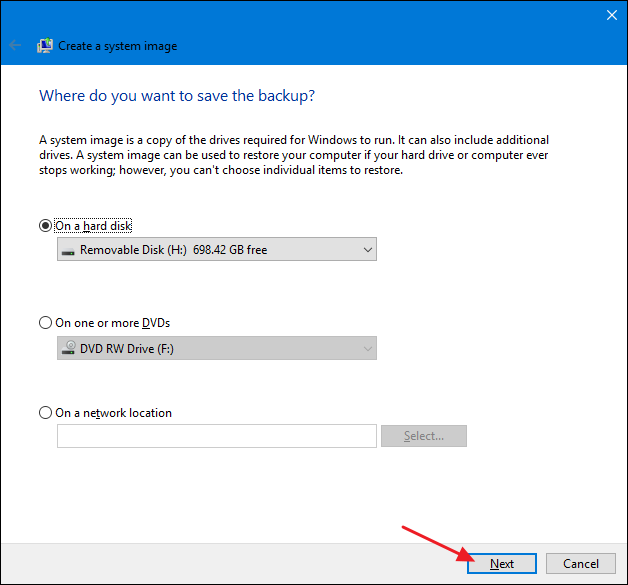
- When prompted, select where you want to store the system image:
- On a hard disk (choose this if you have an external HDD connected)
- On one or more DVDs
- On a network location (if available, provide the necessary credentials to access it)
- Click Next after selecting the desired location.
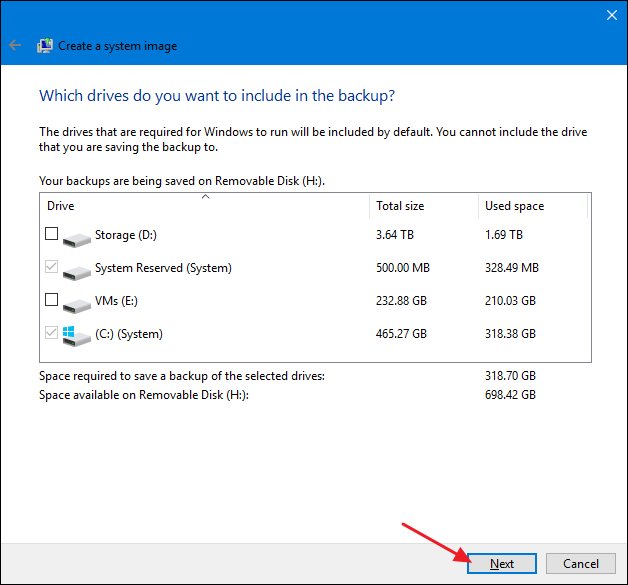
Step 5: Select Drives to Backup
- You will see a screen showing the drives included in the system image. By default, Windows will include the system drive (usually C: drive).
- If you wish to include additional drives, you can check the boxes next to them. However, note that only drives required for Windows to run should typically be included.
- Click Next to proceed.
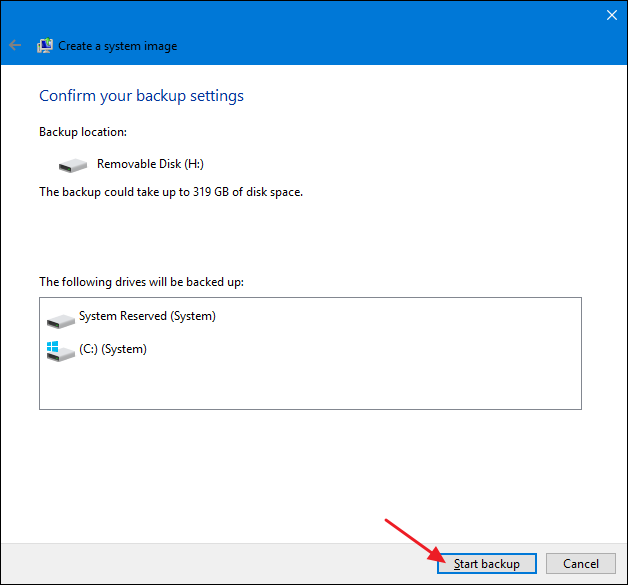
Step 6: Confirm and Start Backup
- Review your selections. If everything looks good, click on Start backup.
- The backup process will start, which might take some time depending on the size of your system and the speed of your storage device.
Step 7: Create a System Repair Disc (Optional)
After the backup finishes, Windows may prompt you to create a system repair disc. This disc can boot your computer in case your system fails and allows you to restore the image.
- If you have a CD/DVD drive and blank discs available, it’s a good idea to create this disc.
- Follow the prompts to create the disc or skip this step if you don’t need it.
Verifying the System Image Backup
Once the backup is created, it’s essential to verify that it was successful:
- Go back to the Backup and Restore (Windows 7) window.
- You should see your backup listed here.
- For a more thorough check, you can attempt to restore from it if you’re feeling confident (consider doing this in a test environment to avoid harming your primary system).
Restoring from a System Image Backup
If you ever face system failure or need to restore your system, the recovery process is straightforward:
Step 1: Boot from System Repair Disc or Recovery Drive
- If you’ve created a system repair disc or a recovery drive, insert it into your computer.
- Restart your computer.
- You may need to access the Boot Menu or change the boot order in your BIOS/UEFI settings to boot from the disc or USB drive.
Step 2: Access Advanced Options
- When prompted, select Repair your computer.
- Choose Troubleshoot, followed by Advanced options.
Step 3: Restore from a System Image Backup
- Click on System Image Recovery and select the operating system you want to recover.
- Follow the on-screen instructions to select the backup location.
- Select the system image you created earlier and follow the prompts to restore your system to the state captured in the backup.
Step 4: Complete the Restoration
- The system will begin restoring your computer, which could take some time.
- Once the process is complete, your system will reboot, and you should find it restored to its previous state.
Best Practices for Creating and Managing System Image Backups
-
Regular Backups: Schedule system image backups periodically (e.g., monthly or quarterly) to ensure that you always have a recent snapshot of your system.
-
Multiple Locations: Store backups in multiple locations to avoid losing them through hardware failure. Consider using both local and cloud storage solutions for redundancy.
-
Label Backups: Use clear labels or file naming conventions to identify each backup easily, including the date and version.
-
Test Recovery Process: Occasionally, practice the recovery process to ensure you’re familiar with it in a real-life scenario. Regular checks will help you understand how to restore your system quickly when necessary.
-
Clean Up Old Backups: Regularly review and delete old backups to free up storage space, but be cautious to maintain at least one or two copies of your most recent backups.
-
Monitor Storage Space: Keep an eye on the available space in your backup location, especially if you use limited capacity drives.
-
Document Change Logs: Maintain a log of changes made to your system, installations, or any other updates since the last backup. This log will help identify any changes made since your last image.
Conclusion
Creating a system image backup on Windows 11 is an essential practice for anyone who values their data and wants to protect their operating system. Understanding the process not only enhances your proficiency with Windows 11 but also provides peace of mind knowing that you can revert to a stable configuration in case of issues.
Always remember to keep your backups organized, regularly updated, and in secure locations, so you can recover your system quickly when the need arises. With these practices, you’ll be well-prepared to handle any unexpected challenges your computer may face.

There are many ways to backup Windows, and some of those ways are better at certain things than they are at others. For many users – including yours truly – the best kind of backup is an image backup. Such a backup includes a copy of the Windows boot/system drive, including its various partitions. This captures the OS, your settings, your applications and your data files all at once. An image backup is saved inside a single file called an image, and may be of type .IMG, .WIM (Windows Image format), VHD(X) for Hyper-V virtual machines, or .ESD (a compressed Windows image file format optimized for Internet download), among others.
What’s in a Boot/System Image?
Like the answer to any good question, a listing of image file contents or constituents starts with “It depends.” The image backup only needs to capture the contents of what is called the C: or boot/system drive by default in Windows 10 and 11.
But for maximum utility and restore flexibility, an image backup will ideally include all of the partitions on the drive being backed up. A map of a typical modern C: drive appears in Figure 1, shot from within the Disk Management tool (diskmgmt.msc).

These three partitions appear in the same order on most newer Windows 10 and all Windows 11 installations. The EFI partition is where the boot loader and other device and OS installation capability resides. It’s what a PC reads first when it’s booting up and getting ready to run an operating system (most likely, Windows from this layout). The C: Volume partition is where Windows runs, and where all the OS, application, and related settings, preferences, and so forth reside. The Recovery Partition offers an alternate set of boot and OS files that can be used to start up and repair a damaged system/boot (C:) drive, restore a backup, and much, much more.
Older Windows 10 installation used to put the Recovery File between the EFI and the C: partitions. But recent changes to the Windows installer allow it to adjust the size of the C: partition. It can make that partition a little smaller to accommodate a larger Recovery partition from one Windows version or upgrade to the next. That way, the disk layout stays unaltered, instead of getting littered with additional new Recovery partitions as sometimes used to happen on Windows 10. Figure 2 shows what this can look like from my 2017 vintage Windows 10 production PC:

What Is a “Whole-Drive” Image Good For?
Imaging the entire boot/system drive means the whole contents of that drive can be wiped out, and restored from a backup. A whole drive image can also be turned into a virtual disk, or even a virtual machine. The Recovery Partition (3rd from left on Figure 1, 1st from left on Figure 2) provides an alternate boot environment for Windows based on Microsoft’s Windows Pre-installation Environment (WinPE) runtime used for the Windows installer and for other purposes.
The Windows Recovery Environment (WinRE, as you might expect) is a specialized runtime environment that boots a slimmed-down version of Windows. It supports command-line access via Command Prompt, and can incorporate a variety of Windows applications and repair tools – such as boot repair utilities, disk or driver scanners, partition managers, data recovery tools, anti-virus programs, update and install/uninstall utilities, and a whole lot more – to run against a damaged or inoperable Windows installation.
Get Tom’s Hardware’s best news and in-depth reviews, straight to your inbox.
The most basic and important use for a whole-drive image is to replace a balky, damaged or non-working Windows installation (and its supporting boot/system disk infrastructure) in one simple, relatively speedy operation. But there’s a lot more one can do with such images, including:
- Performing repair and recovery operations on a broken or questionable Windows installation. This usually involves booting to alternate media, and running rescue and repair from there. Thus most good image backup utilities include some kind of “rescue media” or “bootable recovery” capability. You’ll boot your PC to the alternate media, and then perform rescue or restore operations on the primary but wonky version of Windows you want to fix (or replace). The same approach also works to support a so-called “clean install” of Windows which involves wiping the existing boot/system disk, repartitioning and reformatting, and then creating an entirely new (“clean”) Windows boot\system drive partition structure and contents.
- Mount an image as a virtual drive or even as a virtual machine (VM). Many good image backup utilities will let you mount an image backup in the form of one or more virtual drives (one for each disk partition in the image). This lets you open and navigate the contents of the backup as if it were another Windows drive, or run the image as just another Windows VM to explore, work on, or retrieve some or all of its contents.
- “Bare metal restore” means you can take an image backup and restore it onto a PC that has no OS currently installed. This is a way to take a formerly running installation from a PC that’s no longer usable or available, and get it running on a different PC. This can be a lifesaver when a downed or damaged PC can be used, but its image backup can still be installed and run on another machine.
Image Backup and Image Restore
Creating an image backup essentially means making a snapshot of each partition on the boot/system drive, then recording that snapshot in some heavily compressed (and possibly even encrypted) format on a storage device of some kind. Modern image backup tools are fast and efficient and can work with speedy external media.
Choosing the Right Backup Target
For maximum portability, it’s most sensible to use an external storage device for backups. Then, even if your PC becomes completely unusable, you can simply detach the external backup device and restore your chosen image to another PC. In fact, I strongly recommend using an NVMe SSD enclosure that is USB4 or Thunderbolt 4 capable of housing a PCIe x3 (or better) SSD of at least 512GB capacity as your backup device (see our list of best SSD enclosures).
Why do this? Because such a device is at least 100X faster than a flash drive, 40X faster than a hard disk, and between 20 and 30X faster than older SSDs (e.g. M.2 flash drives). I routinely create backups of my test Windows PCs in under 4 minutes on such devices; restoring such backups takes a little longer (5-6 minutes; uncompressed backup size 6-10 GB). Backing up even my storage-laden production PC, from which I make a daily 60-plus GB backup image that includes two data drives as well as my system/boot drive, takes less than 20 minutes to back up (5 minutes longer to restore, give or take).
Most capable image backup utilities (see next section) include file-by-file restore capabilities. Use these to restore accidentally deleted or damaged files. An image restore is something you’ll do when a drive has been damaged, corrupted, or when OS or application changes make it easier and less time-consuming to start afresh from your latest image backup rather than trying to fix what’s wrong. As a case in point, I tried a Windows filesystem experiment with changing ownership on certain protected OS files last month. After spending 15-20 minutes trying unsuccessfully to bind my self-inflicted wounds, I simply restored that morning’s backup and left that mess behind me.
To perform an image restore on the boot/system drive, you must boot to alternate media. From there, you’ll run a utility that finds your chosen backup image, then copies onto the target storage device of your choosing. Again: this completely wipes out the existing contents, and creates a new set of partitions on the target drive using the snapshots in the image backup for each partition that needs to be restored. Hopefully the reason for alternate media is clear: you can’t replace an OS and supporting infrastructure on a drive while using the OS and its services from that same drive. It just doesn’t work!
Choosing a Suitable Image Backup Solution
There are dozens of software packages that can perform Windows image backups on either Windows 10 or 11 currently available. Neither I – nor Microsoft, for that matter – recommends the old tool that persists in the Control Panel under the name “Backup and Restore (Windows 7)” as shown in Figure 3.
On the Microsoft.Answers pages, an October 22 post reads as follows: “Windows 7 Backup is only included in Windows 10 and 11 to transfer files over from Windows 7. It is way too old to work reliably for regular backup.” It’s much smarter and less risky to use a more modern backup/restore tool for Windows 10 or 11 instead. And indeed, when I tried to back up a Windows 10 system using this tool just now, it failed to create a successful backup, as shown in Figure 4 (it didn’t run to completion, or completed with skipped files, on a couple of Windows 11 laptops, either). It ran for upwards of 2.5 hours (157 minutes) before throwing this error message, too. For best results, please don’t use this tool. Try one of those mentioned in the next section instead.
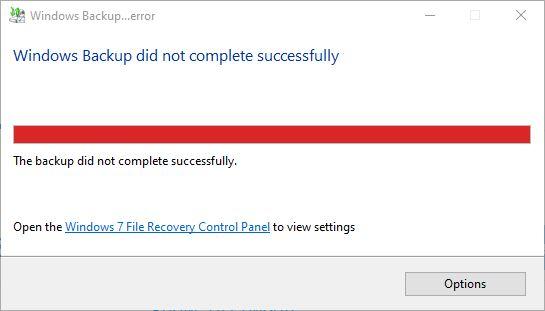
Table of Potential Candidates
The table below shows a list of leading Windows backup tools that regularly show up in “best of” lists across a wide range of sources. I’ll use that table to compare and contrast their capabilities and limitations across some important features already discussed. For a truly exhaustive list of such tools see the June 2023 Lifewire story “32 Best Free Backup Software Tools.”
Swipe to scroll horizontally
| · | EasUS Todo Backup |
| Free version available | Yes |
| Mount backup image as drive or VM | Yes (drive) VM (No) |
| Build rescue media | Yes |
| File&folder backup | Yes |
| Image backup | Yes |
| Free version link | https://www.easeus.com/backup-software/tb-free.html |
| · | AOMEI Backupper Standard |
| Free version available | Yes |
| Mount backup image as drive or VM | No |
| Build rescue media | Yes |
| File&folder backup | Yes |
| Image backup | Yes |
| Free version link | https://www.aomeitech.com/llyy/download/aomei-backupper.html |
| · | DriveImage XML |
| Free version available | Yes |
| Mount backup image as drive or VM | No |
| Build rescue media | No, but works with Standard WindowsPE |
| File&folder backup | Yes |
| Image backup | Yes |
| Free version link | https://www.runtime.org/driveimage-xml.htm |
| · | MiniTool ShadowMaker |
| Free version available | Yes |
| Mount backup image as drive or VM | Drive (Yes) VM (No) |
| Build rescue media | Yes |
| File&folder backup | Yes |
| Image backup | Yes |
| Free version link | https://www.minitool.com/backup/system-backup.html |
| · | Redo Rescue |
| Free version available | Yes |
| Mount backup image as drive or VM | No |
| Build rescue media | Yes |
| File&folder backup | Yes |
| Image backup | Yes |
| Free version link | http://redorescue.com/ |
| · | Macrium Reflect Free (Free version goes off-market on January 1, 2024) |
| Free version available | Yes |
| Mount backup image as drive or VM | Yes |
| Build rescue media | Yes |
| File&folder backup | Yes |
| Image backup | Yes |
| Free version link | https://www.macrium.com/reflectfree |
As a long-time user of Macrium Reflect, it is the package I use to back up my production systems daily, and both test and family member PCs weekly. I routinely see data rates upwards of 2 GBps when backing up to or restoring from USB 3.2 or Thunderbolt 4 NVMe SSD enclosures, and the source of the timing information earlier in this story. I have tried all of the aforementioned packages, and will be settling on one of the others (probably AOMEI Backupper or MiniTool ShadowMaker) after Reflect ceases support for its free version on the last day of 2023. In the past three years, Macrium Reflect restores have allowed me to recover from the following potential catastrophes with minimal disruption and loss of time and productivity:
- A botched experiment in taking ownership of files in the C:\Windows\System32 file hierarchy
- Failure of an older data drive (a 1TB Seagate 2.5” HDD purchased in 2011)
- Boot configuration data (BCD) damage or loss that rendered 3 systems unbootable
- Recovery of up to half-a-dozen Windows Insider Windows 10 and 11 preview installs that experienced driver difficulties during or immediately after installation
Access to a known good working image backup with proven tools, skills and knowledge to restore systems to working condition is a key capability that lets me stay comfortable as a Windows Insider MVP. I download, install, and experiment with Insider Previews across all channels (Canary, Dev, Beta and Release Preview) whenever they’re released. I’ve not yet encountered a situation from which I couldn’t recover, though I have had to resort to restoring a previous release image, then skipping one or more interim releases, to keep some of those test systems running.
One Last But Vital Backup/Restore Trick
If you restore any image backup to a PC, you will lose access to any new files or changed settings, preferences, registry tweaks, app or application installs, and so forth, that occurred after the backup was made. But image backup offers a possible band-aid to address this. If you’re going to restore an image backup to a still functioning system, you can capture an image backup of the current image before restoring your last backed up one.
Most image backup packages will let you mount an image as a virtual drive. That means when you restore the old image, you can mount the new one to copy (or document) changes that occurred after the old image was captured. That should prevent loss of data files (for me that means documents, spreadsheets, and so forth) at a minimum. As long as you can grab a file, create a registry snapshot (.reg file), or otherwise capture settings and preferences, you can get them from the soon-to-be abandoned installation back into the known good working image that will carry you forward. Don’t forget!
Ed Tittel is a long-time IT writer, researcher and consultant, and occasional contributor to Tom’s Hardware. A Windows Insider MVP since 2018, he likes to cover OS-related driver, troubleshooting, and security topics.
Quick Links
-
What Is a System Image Backup?
-
Step One: Open System Image Backup
-
Step Two: Create a System Image Backup
-
Step Three: Create a System Repair Disc
Summary
- Open the System Backup Image Tool. In Windows 10, head to Control Panel > Backup and Restore (Windows 7) > Create a System Image.
- Choose where you want to save the backup image.
- Select the drives to back up.
- Start the backup.
- Optionally, create a system repair disc that you can use to start your computer and restore a backup image.
The built-in backup utilities in Windows are pretty solid. You can even create a full backup image of your PC without a third-party utility. This tool is still included on Windows 10 and Windows 11.
What Is a System Image Backup?
A system image backup is essentially a complete snapshot of an entire hard drive. The advantage of a system image is that if a hard drive crashes, you can replace it, restore the image, and have your system right back to where it was when the image was captured. No need to reinstall Windows or your apps. On the other hand, normal backup tools, including online backup services like Backblaze or Windows’ built-in File History feature, essentially copy your files to another location.
The biggest disadvantage with system image backups—other than taking a bit longer—is that you can’t restore the backup to a different PC. You’re creating an image of your full Windows installation and, since Windows is set up specifically for your hardware, it just won’t work as-is in another PC. It would be like trying to plug your hard drive into another PC and expecting everything to load well. With that in mind, however, image backups can still be really handy.
Third-party apps like Macrium Reflect or Acronis True Image—at least, the paid versions—do offer some advanced features you won’t find in the Windows system image backup tool. For example, both support incremental backups, password-protected images, and the ability to browse backups for individual files. But free is free, and if you don’t need the extra features, the Windows tool offers a solid way to perform a full backup of your system.
Step One: Open System Image Backup
The System Image Backup tool is located in the Windows Control Panel, but it’s in a different place on different versions of Windows.
Open System Image Backup in Windows 10 and Windows 11
In Windows 10 and Windows 11, click the Start button, type «Control Panel» into the search bar, then press enter or click «Open.»
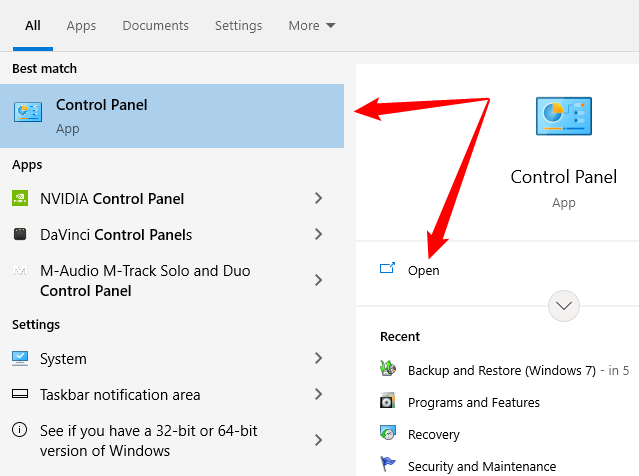
Make sure that your Control Panel view is set to «Large Icons» or «Small Icons,» and then click «Backup and Restore (Windows 7).»
You can also just search «Backup» in the search box at the top-right corner of the Control Panel window to find this shortcut.

In the «Backup and Restore (Windows 7)» window, click the «Create a system image» link.
Step Two: Create a System Image Backup
Once you’ve opened the system image tool, the steps for creating a system image are the same in Windows 7 all the way up to Windows 11.
When you first open the tool, it will scan your system for external drives. You can then decide where you want to save the image. It can be to an external drive, multiple DVD’s, or on a network location. Select where you want to save your backup and then click «Next.»
By default, the tool only backs up your system drive. You can include other drives if you want, but remember that this will add to the size of the final image. Typically, we like to create separate image backups for each drive.
At the confirmation screen, notice the amount of space the image may take. If anything doesn’t look right, you can still go back and make adjustments. If everything looks okay, click the «Start Backup» button.
You’ll see a progress meter as the tool creates the image.
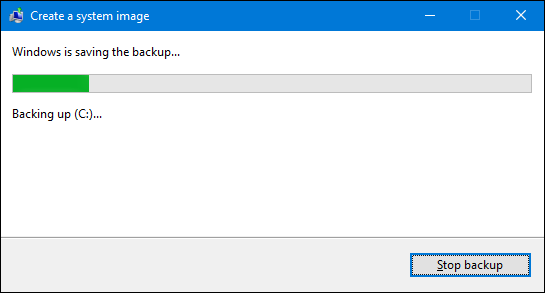
It can take a while. In this example, we’re backing up a drive with about 319 GB of data. It took about 2.5 hours when backed up to an external hard disk connected to our PC via USB. Your time will vary depending on your PC and the type of storage to which you’re backing up. Solid-state drives will naturally be much faster.
Step Three: Create a System Repair Disc
When the backup is complete, Windows gives you the option to create a system repair disc. You can use this disc to start your PC and restore from your image backup in the event you ever need to replace your hard drive and can’t start Windows. We highly recommend you go ahead and create the disc, then label and store it in a secure location.
Select the drive you want to use to create the disc and then click the «Create Disc» button.
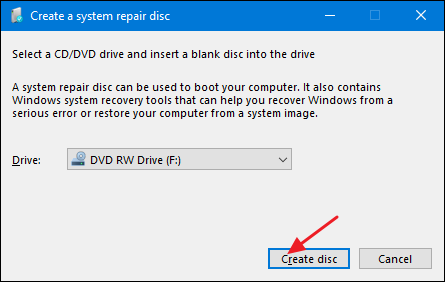
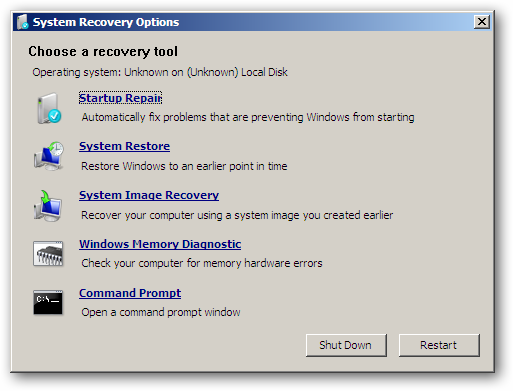
When it comes time to restore the image, you can start your PC from the recovery disc to get access to a number of recovery tools—including «System Image Recovery.»
Creating an image backup can take some time, so it’s best to do it when you won’t need your computer for a few hours—or even overnight. And should the need ever arise when you need to put that backup to use, restoring image backups in Windows isn’t very difficult.