
A «cmd system check» refers to using Command Prompt commands to diagnose and troubleshoot various system issues, ensuring that the operating system is running smoothly.
Here’s a code snippet for checking system file integrity:
sfc /scannow
What is CMD?
Command Prompt, commonly referred to as CMD, is a command-line interface (CLI) available on Windows operating systems. It allows users to execute commands to perform various tasks without the use of a graphical user interface (GUI). CMD can provide powerful capabilities, accessing functions that are sometimes buried deep within system menus. Using CMD for system checks can be particularly beneficial because it often offers faster and more direct feedback from the system.
Mastering Cmd System Repair: A Quick Guide
Getting Started with CMD
To access CMD, follow these simple steps:
-
Using the Run Dialog: Press `Windows + R` on your keyboard, type `cmd`, and hit Enter. This will launch the Command Prompt.
-
Search Bar: Click on the Start menu or press the `Windows` key, type `cmd` or `Command Prompt`, and select it from the search results.
-
Direct Access: Navigate to the `Windows System` folder within the Start Menu and find Command Prompt there.
Once you have CMD open, you are ready to begin executing commands for a system check.
Cmd Systeminfo: Your Quick Guide to System Details
Understanding System Checks
A system check refers to the process of diagnosing and resolving issues within the operating system. This includes scanning for file corruption, checking disk integrity, analyzing network configurations, and ensuring optimal performance. Regular system checks are essential for maintaining system health, improving performance, and preventing potential crashes or data loss.
Master Cmd System32: Your Quick Guide to Efficiency
Key CMD Commands for System Checks
Checking System Integrity
One of the most critical aspects of maintaining a healthy operating system is ensuring that its files are not corrupted. The System File Checker (SFC) is a built-in CMD utility designed for this purpose.
What It Does: SFC scans the system for corrupted or missing Windows system files and automatically repairs them.
To run the scan, enter the following command:
sfc /scannow
Explanation: This command initiates a full system scan. If any issues are found, SFC will attempt to repair these files, and it provides feedback on any actions taken. It’s advisable to run this command with administrative privileges to ensure comprehensive access to all system files.
Disk Check
Another fundamental tool for maintaining system integrity is CHKDSK (Check Disk). This command scans your hard drive for errors and can repair any found issues.
What It Does: Checks the file system and file system metadata of a volume for logical and physical errors.
To execute a disk check, use the following command:
chkdsk C: /f /r
Explanation:
- `C:` is the drive letter you wish to check.
- The `/f` parameter instructs CHKDSK to fix any errors it finds.
- The `/r` parameter locates bad sectors on the disk and recovers readable information.
Depending on the size of the drive and the number of issues, the disk check can take some time. It’s often best to schedule this command during off-hours.
Network Configuration Check
Understanding your network settings is crucial for troubleshooting connectivity issues. The IPCONFIG command displays the current network configuration of your machine.
What It Does: Provides details about the computer’s network interfaces, including IP address, subnet mask, and default gateway.
To view your network configuration, run the command:
ipconfig /all
Explanation: The output will display comprehensive information about all network adapters. This includes both active and inactive interfaces, enabling a clear overview of your current network setup, which is invaluable for troubleshooting network issues.
Running Disk Cleanup
DISM (Deployment Image Service and Management Tool) is another powerful tool that can help maintain the health of your Windows images and free up system space.
What It Does: Repairs Windows image files and removes unnecessary files, enhancing performance.
To initiate a cleanup, type the following command:
dism.exe /Online /Cleanup-image /Restorehealth
Explanation:
- `/Online` specifies that the action is performed on the running operating system.
- `/Cleanup-image` directs DISM to clean up the image.
- `/Restorehealth` assesses and repairs any corruption within the image.
This command can take some time depending on the state of your system.
Cmd Ram Check: Quick Guide to Monitor Memory Usage
Advanced CMD Commands for Detailed System Checks
Performance Monitoring
To gain insight into the processes currently running on your machine, the Tasklist command is invaluable.
What It Does: Lists all processes currently active on your computer.
Run it with:
tasklist
Explanation: This command will return a list of all running processes, which can help identify any that are consuming excessive resources or operating unexpectedly.
System Information Retrieval
For an overview of your system’s configuration and specifications, the Systeminfo command will present a comprehensive report.
What It Does: Displays detailed configuration settings and specifications, including the OS version, RAM, processor details, and installed patches.
To retrieve system information, type:
systeminfo
Explanation: The output will provide a wealth of information, making it easy to understand your system’s capabilities and configuration in one glance.
Exploring Cmd System Variables: A Quick Guide
Tips for Conducting System Checks
Maintaining best practices when conducting system checks can significantly enhance the effectiveness of your efforts. Here are some recommendations:
-
Regular Scheduling: Make it a routine to run system checks weekly or monthly to proactively identify issues before they become significant problems.
-
Understanding Output: Familiarize yourself with the output messages from CMD commands. Knowing what to look for can help you diagnose problems quicker.
-
Documentation: Keep a log of any checks performed, the results, and any actions taken. This habit will help track recurring issues and their resolutions.
Mastering Cmd Switches: Quick Guide to Command Power
Troubleshooting Common CMD Issues
Command Not Recognized
If you encounter a message indicating that a command is not recognized, it may be due to several reasons:
- Path Issues: Ensure that the command is correctly typed.
- Wrong Syntax: Double-check spelling and parameters used.
- Permissions: Some commands require administrative privileges. Use «Run as administrator» when opening CMD.
Slow Performance During Checks
If system checks run slowly, consider optimizing CMD usage by:
- Closing other applications to free up system resources.
- Running CMD as an administrator to expedite processes that require elevated permissions.
Mastering The Cmd Disk Check Command Effortlessly
Conclusion
Utilizing CMD for system checks not only provides a deeper understanding of your operating system but also enhances its performance and longevity. By regularly executing commands like SFC, CHKDSK, IPCONFIG, DISM, and others, users can proactively maintain their computers and address any emerging issues. Embrace the power of CMD and integrate these checks into your routine for a healthier computing experience.
Quick Cmd Virus Check: Simple Steps to Secure Your PC
Additional Resources
To learn more, consider exploring the following:
- Official Microsoft Docs on CMD for detailed syntax and options.
- Recommended tutorials and online communities focused on advanced CMD usage to expand your skills further.
Applies ToWindows 11 Windows 10
Средство проверки системных файлов — это служебная программа в Windows, которая проверяет наличие проблем с файлами на компьютере. Чтобы запустить ее, выполните следующие действия.
-
Убедитесь, что установлены последние обновления для Windows, а затем перезапустите компьютер. Дополнительные сведения см. в статье Обновление Windows.
-
В поле поиска на панели задач введите командную строку и щелкните правой кнопкой мыши или нажмите и удерживайте командную строку (классическое приложение) в списке результатов. Выберите Запуск от имени администратора, а затем —Да.
-
Введите DISM.exe /Online /Cleanup-image /Restorehealth (обратите внимание на пробел перед каждой косой чертой «/»), а затем нажмите ВВОД. (Примечание. Запуск и завершение этого шага может занять несколько минут.)
-
После того как появится сообщение «Операция успешно завершена», введите sfc /scannow (обратите внимание на пробел между «sfc» и «/») и нажмите клавишу ВВОД.
-
Когда появится сообщение «Проверка 100 % завершена», введите exit и нажмите клавишу ВВОД.
Дополнительные сведения о системной проверке файлов
Нужна дополнительная помощь?
Нужны дополнительные параметры?
Изучите преимущества подписки, просмотрите учебные курсы, узнайте, как защитить свое устройство и т. д.
Command Prompt in Windows offers a range of commands to gather detailed information about your system’s hardware, software, and overall health. These CMD commands provide quick access to system details, making it easier to diagnose issues, check specifications, and retrieve essential information.
In this blog, we’ll walk you through essential CMD commands that reveal everything from your operating system version to network details and hardware configurations. Perfect for beginners and pros alike, these tools will empower you to take control of your system like never before.
CMD Commands to Gather Information Of A System
CMD Commands to Gather Information Of A System
This article uses WMIC commands. Wmic is a tool used in the command prompt to get system information. The full form of WMIC is the Windows Management Interface command. The list of Commands for gathering information is mentioned below.
1. Serial Number
The command is used to get the computer’s serial number. This is very helpful to get the serial number of our bios. We will get our serial number instead of O.E.M.
wmic bios get serialnumber
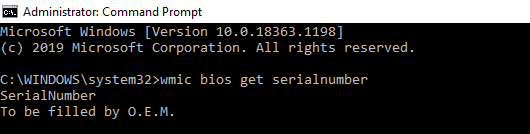
wmic bios get serialnumber command
2. Mac Address
The command is used to get Mac Address is given below but there other be other ways also by which we can get our Mac Address.
wmic nic get macaddress :: Method 1
getmac :: Method

getmac
3. CPU
This command helps to gather all information about a CPU i.e. name, device id, number of cores, max clock speed, status. This can also help us in figuring out our CPU specs.
wmic cpu
We can also send attributes to get the particular details of a CPU in a better view. You may use a particular attribute to get particular details of CP.
wmic cpu get caption, name, deviceid, numberofcores, maxclockspeed, status

get cpu command
4. RAM
There are many times when we need to know the RAM size of a machine. The following command helps us to get the total size of the ram in the number of bits. We can convert the size from bits to bytes if we want to know by dividing the size by 8.
Given_Ram_Size (in bits) / 8 = New_Ram_Size (int bytes)
wmic computersystem get totalphysicalmemory
totalphysicalmemory command
5. Partition Details
In many cases, we need to know the size of the disc as well as the partition of our/someone’s disk. Here is the command to get the details of the partition of the disc. Here also, like in CPU, we can get the particular detail of the disc, like getting the name or size or type or getting everything in one shot.
The size given here is also in terms of bits. We can convert it into byte by dividing the given size by 8.
Given_Ram_Size (in bits) / 8 = New_Ram_Size (int bytes)
wmic partition get name,size,type
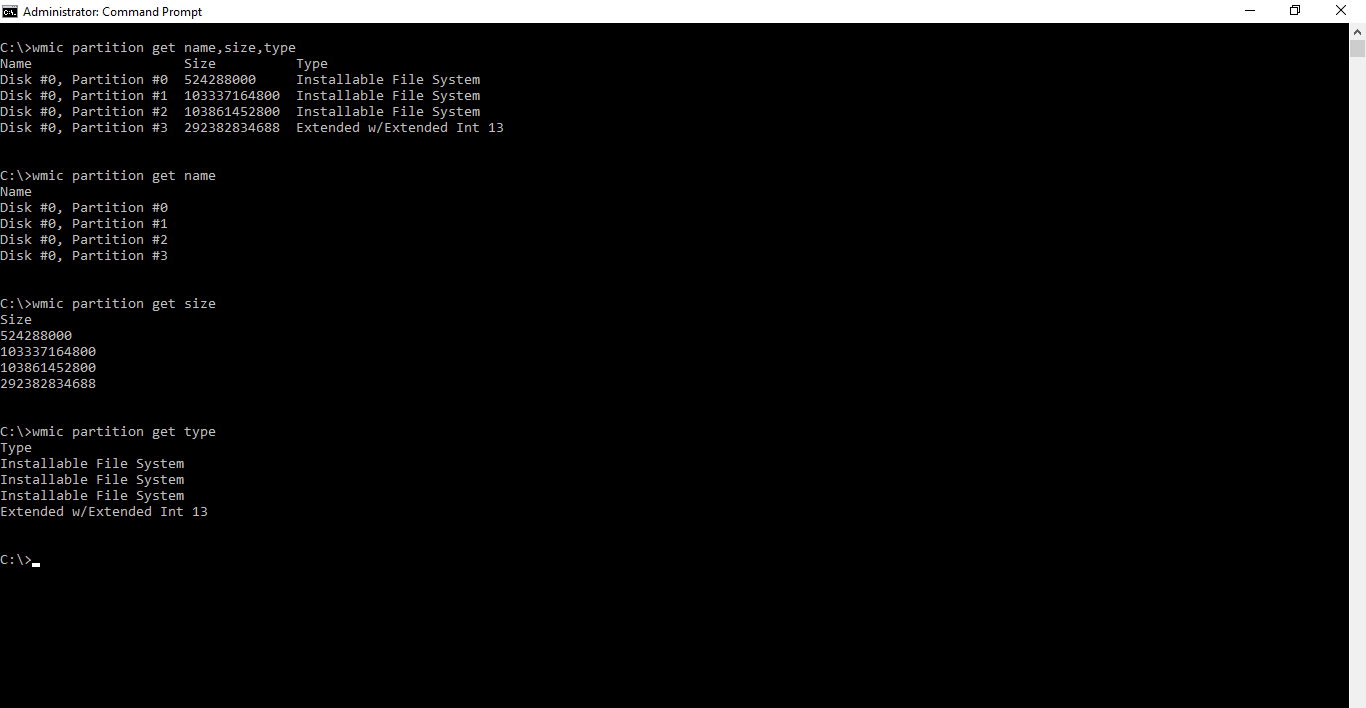
wmic partition get name,size,type
Process
These are the commands which can help us to get the list of all processes running on our computer, and we can also close them by using these commands. These commands are very useful to get to know what tasks are running on someone’s machine. It gives us a list of processes that are running in our background.
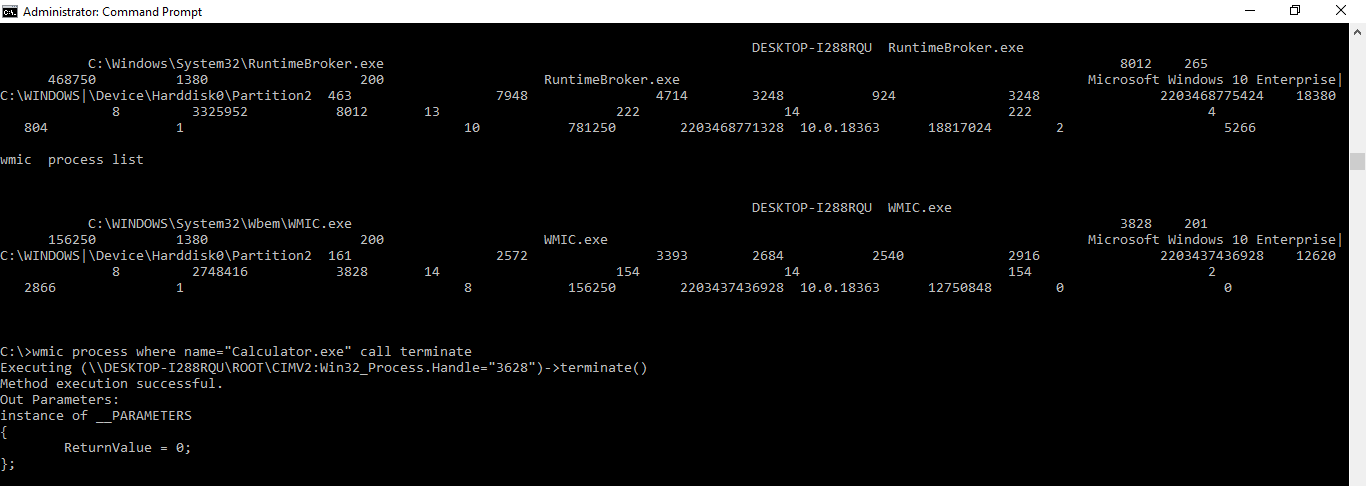
wmic process list
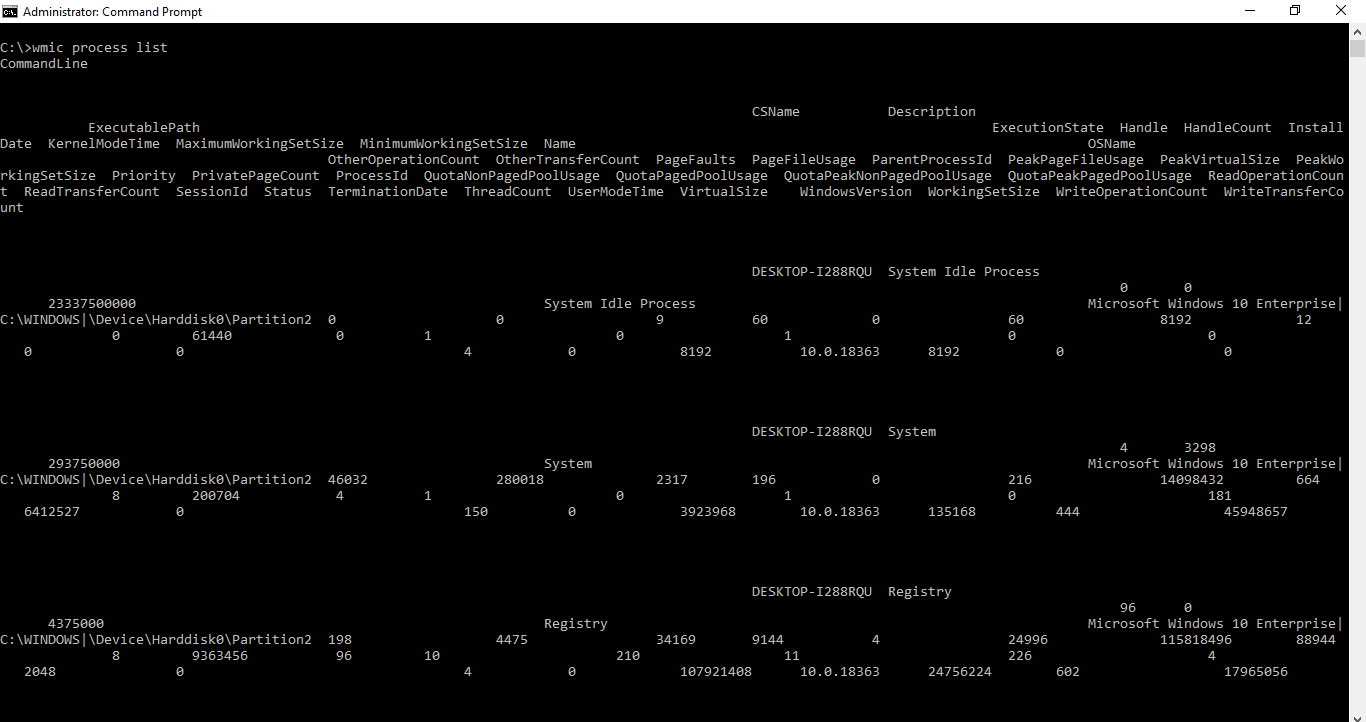
wmic process list command
We can terminate these tasks by using the command:
wmic process where name="name_of_file" call terminate
Note: Put the name of the ‘.exe file’ in place of “name_of_file”
Example:
Let’s say, we want to terminate the calculator. So, open a calculator in the system and terminate the process by using the following steps:
1. After opening the calculator, execute the following command.
wmic process list

calculator.exe
2. Now, execute the following command and it will terminate the ‘Calculator.exe’ process.
wmic process where name="Calculator.exe" call terminate
terminate calculator using cmd
Product
This command gives/returns us the list of all products/software installed on a computer that is developed by a well-known developer and is recognized by the windows[Microsoft].
wmic product
::OR
wmic product get name,version
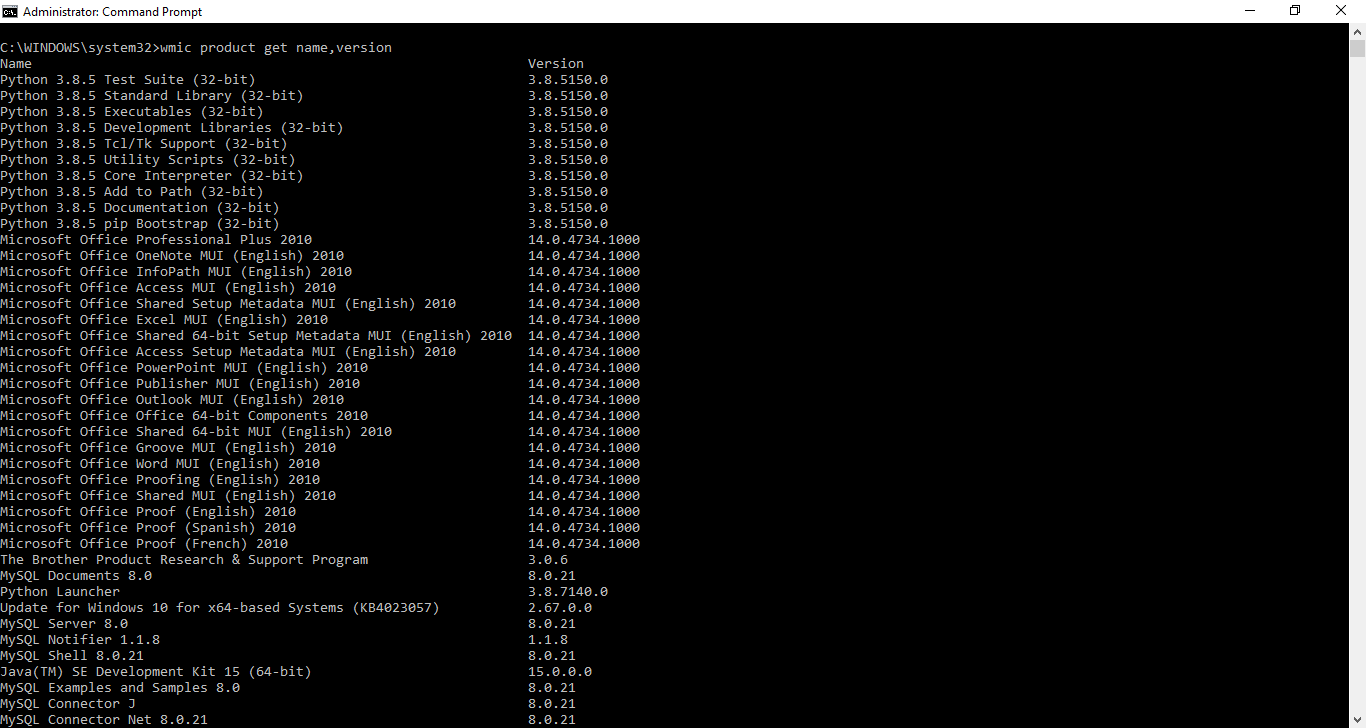
wmic product get name, version
Basic Volume Details
This command gives us the details of a particular volume of the disc. This also gives us the serial number of the volume of that disc.
vol volume_letter:
Note: Replace volume_letter with the letter of the volume you wish to use.
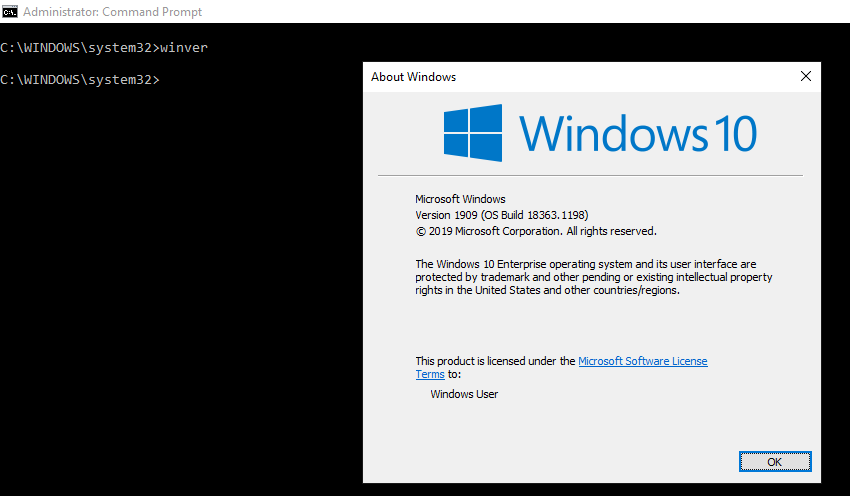
6. Window’s Version
This command gives us the window’s version. This helps us figure out that if the updates are installed in our system or what is our window’s version. The command pop up a new window about windows where we can see our Windows version.
winver
winver command
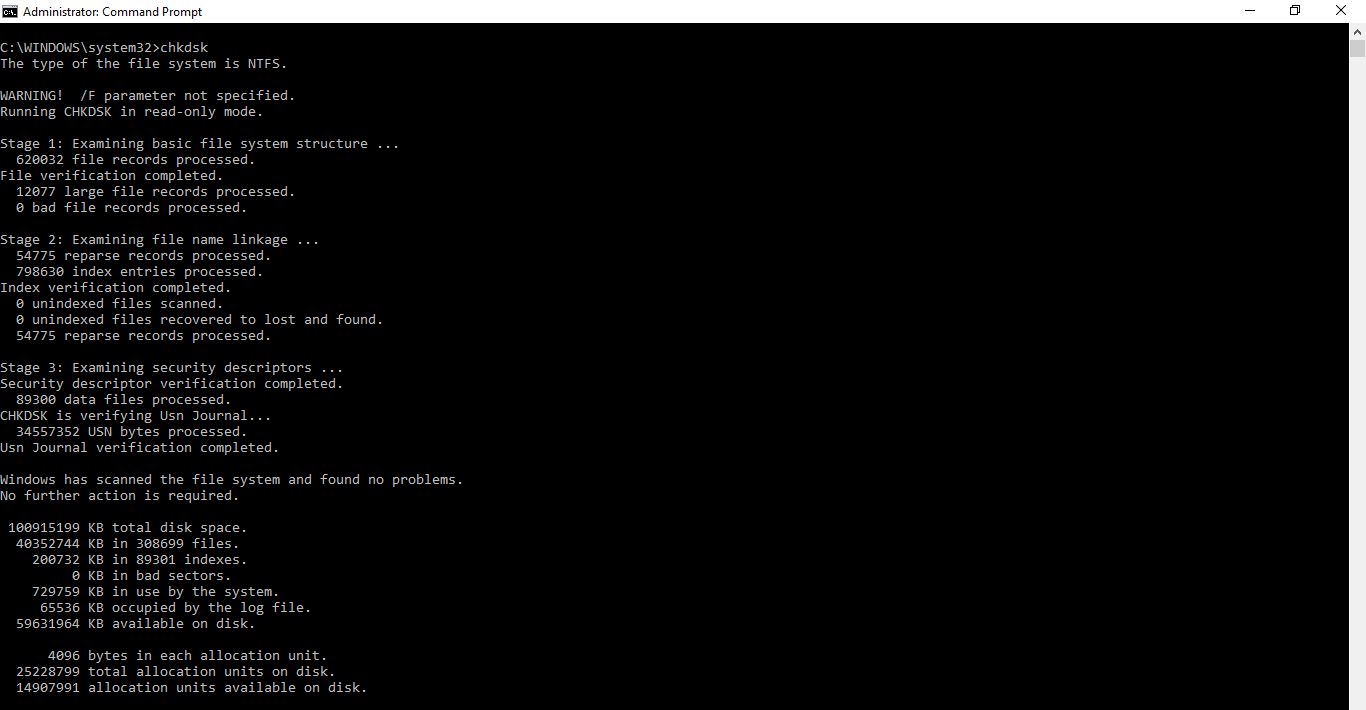
7. Check Disk
This command gives us a list of all large files and files which are harmful. This can also help us to figure out which file is taking more space and we can also delete those files to clean some memory in the disc.
chkdsk
chkdsk
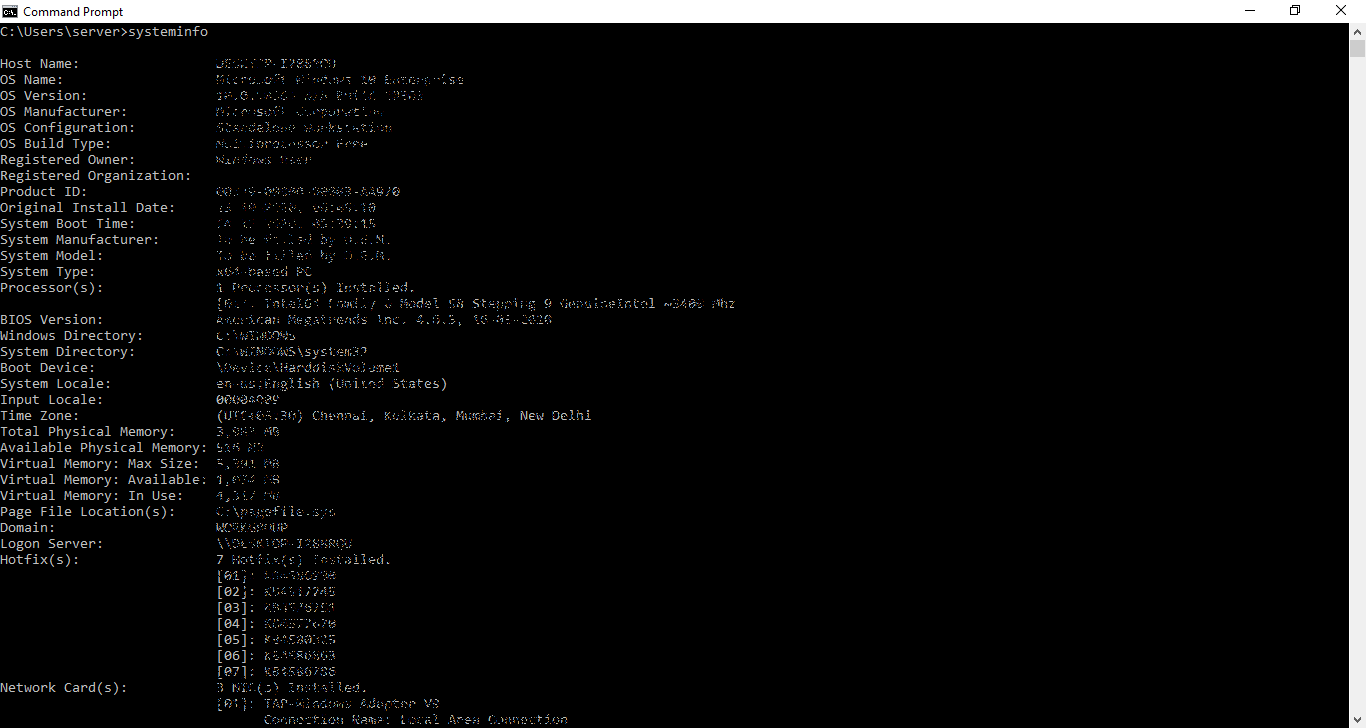
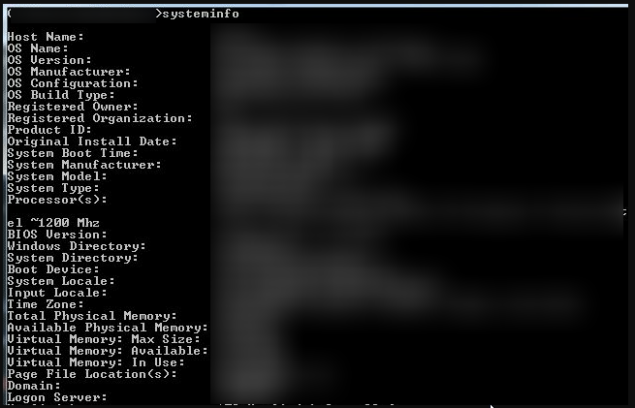
System Information
This command gives us all the basic information about our computer such as:
- Host Name
- OS Name
- OS Version
- OS Manufacturer
- OS Configuration
- Os Build Type
- Registered Owner
- Product ID
- Original Install Date
- Bios Version
- Processor
- Input Locale
- Time Zone
- & many more
systeminfo
system info
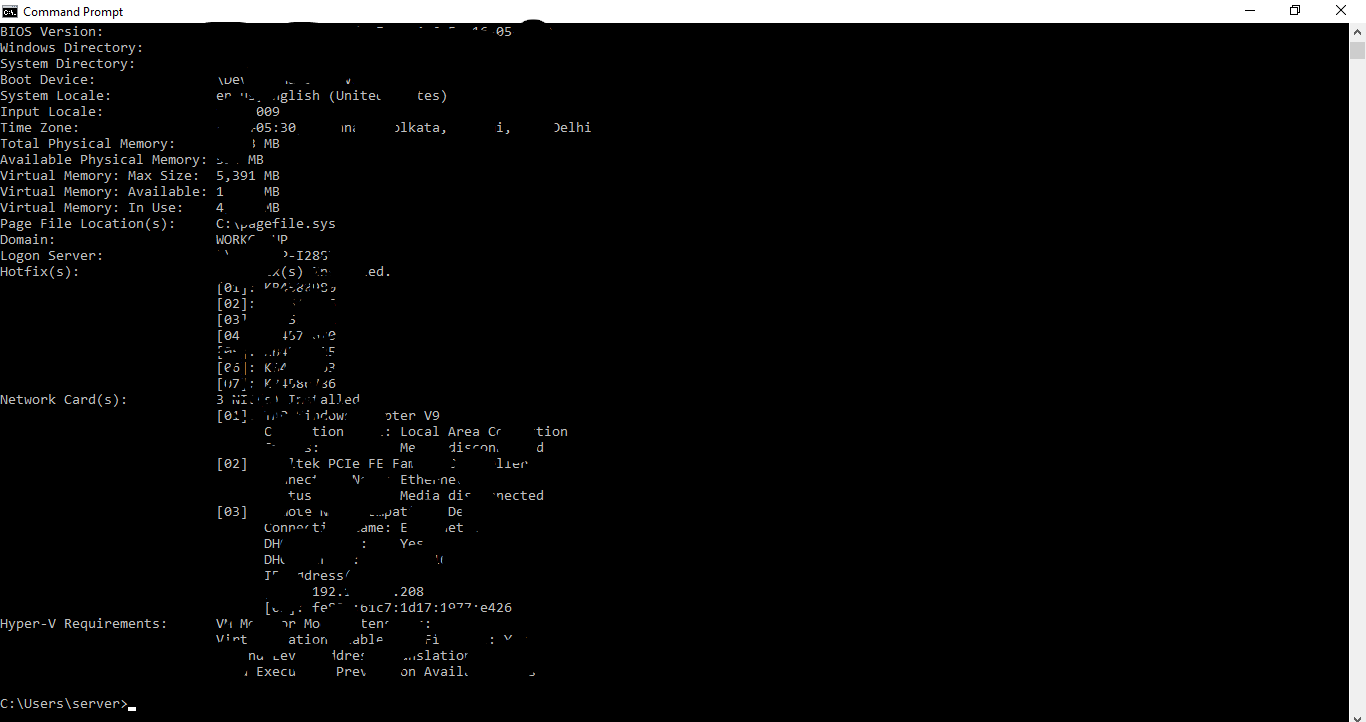
system info
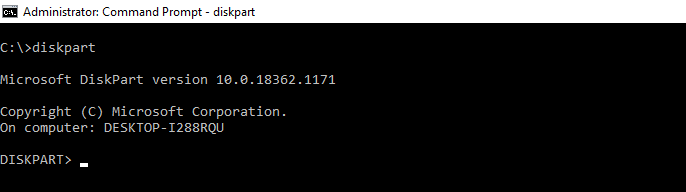
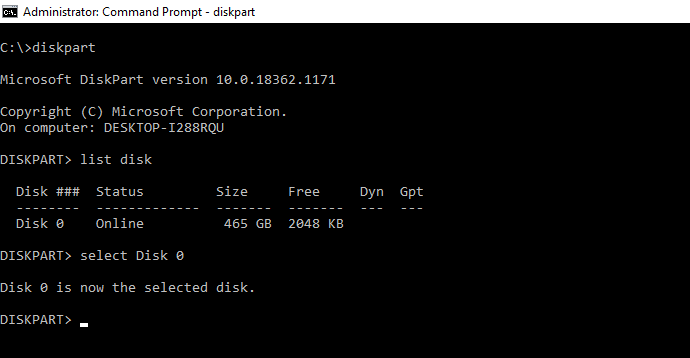
Disk Details
This command gives us whole details of our hard disk where we can select volume get whole details of that volume.
    diskpart
::'disk part' will get us to an infinite loop.
    list disk
::'list disk' will give us the status and the size of the hard disk partition
    select disk_name
::Enter our disk name instead of 'disk_name' and our disk will be selected
    detail disk
::This will give us option which we can use to manipulate our disk
    exit
::This will finally help us to exit the infinite loop
diskpart command
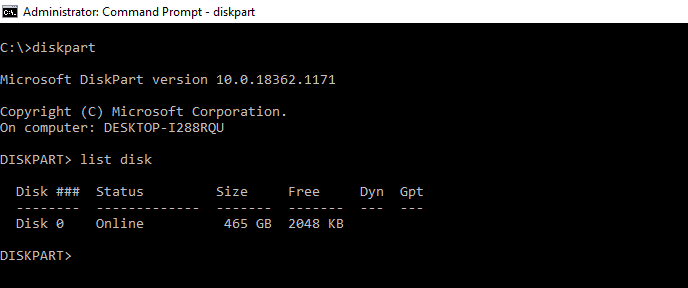
list disk
select disk_name
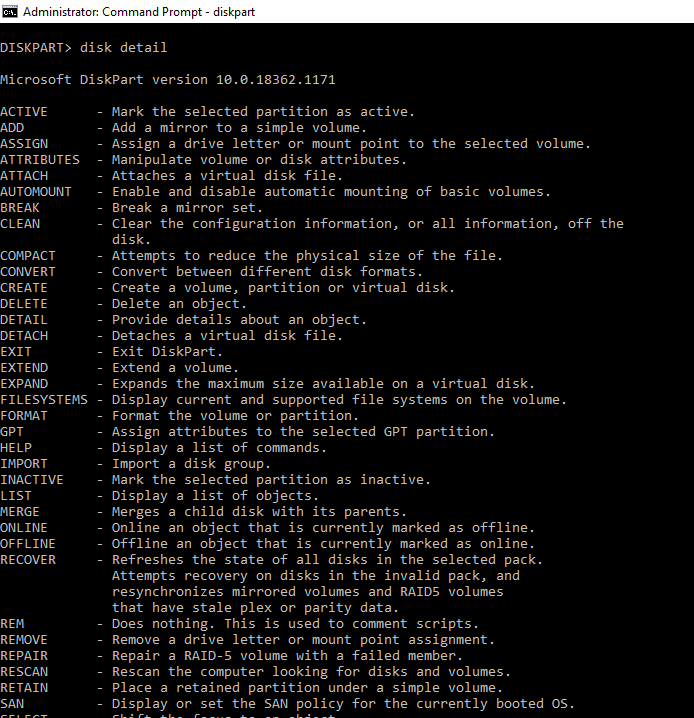
disk detail
exiting disk
Mastering these CMD commands for system information allows you to efficiently gather and analyze crucial details about your Windows system. Whether you need hardware specifics, software details, or a system health check, these commands provide valuable insights to help you manage and optimize your system effectively.
CMD Commands to Gather Information Of A System
Conclusion
Using CMD commands to gather system information is a quick and efficient way to obtain a comprehensive overview of your system’s specs and status. From checking hardware details to monitoring system performance, the Command Prompt offers a wide range of tools at your disposal. By mastering these Windows CMD system info commands, you’ll be better equipped to manage your system and troubleshoot any issues that arise.
In this article, we will explore the 8 best Windows CMD commands for system diagnostics.

Whether you’re dealing with system file corruption, disk errors, network problems, or general performance issues, these commands will be your go-to tools.
For anyone who uses Windows regularly, keeping your system running smoothly is critical. Whether you are a regular user or a seasoned IT professional, Windows has several powerful built-in tools for system diagnostics and troubleshooting. One of the most versatile tools is the Command Prompt (CMD), which provides access to a wide array of commands that can help you monitor system performance, diagnose problems, and even repair common issues.
Why Use CMD for System Diagnostics?
The Command Prompt is a text-based interface in Windows that allows users to interact with the operating system by typing commands. While Windows has many graphical tools for troubleshooting and diagnostics (like the Event Viewer or Performance Monitor), CMD is often more powerful and efficient for experienced users. It’s also helpful when graphical tools fail to load or when you need to perform deeper system-level diagnostics.
Not only does the Command Prompt offer faster and more direct access to system processes, but it also provides commands that can reveal hidden issues, allowing for more precise fixes. Plus, using CMD doesn’t require you to install any third-party software, making it a safe and effective option for system diagnostics.
1. sfc /scannow – The Essential System File Checker
One of the most well-known commands for diagnosing system problems in Windows is the System File Checker (SFC). The sfc /scannow command is crucial when dealing with system file corruption, which can lead to performance issues, crashes, and errors.
What Does sfc /scannow Do?
When you run the sfc /scannow command, Windows scans your system files for corruption or missing files and automatically repairs them by replacing the corrupted files with a cached copy.
This command is particularly useful when you’re facing unexplained system slowdowns, crashes, or boot failures, as corrupted files are often the root cause.
How to Run sfc /scannow:
- Open the Command Prompt as an administrator by right-clicking the Start button and selecting “Command Prompt (Admin).”
- Type
sfc /scannowand press Enter. - The scan will take some time, depending on the size of your hard drive and system performance.
Once complete, you’ll receive a message indicating whether or not issues were found, and if so, whether they were fixed. If the System File Checker fails to fix the issue, you may need to look into deeper solutions, like reinstalling Windows.
Why This Command Matters:
Corrupted system files can cause an array of issues, from slow performance to system crashes. The sfc /scannow command is an essential diagnostic tool to resolve these types of problems quickly.
2. chkdsk – Check Disk for Hardware and File System Errors
If you suspect that your hard drive is failing or has file system issues, the Check Disk (chkdsk) command is your go-to option. This command scans and repairs hard disk sectors, corrects file system errors, and prevents data loss.
What Does chkdsk Do?
When you run the chkdsk command, it checks the disk for errors such as bad sectors, lost clusters, and file system integrity. It can also attempt to repair these errors, making it an excellent tool for hard disk diagnostics.
This command is especially helpful if you’re experiencing symptoms like files not opening, unexplained system crashes, or the infamous blue screen of death (BSOD).
How to Run chkdsk:
- Open Command Prompt as an administrator.
- Type
chkdsk C: /f /r(replaceC:with the drive letter of the disk you want to check). - Press Enter.
The /f switch fixes errors on the disk, while /r locates bad sectors and recovers readable information.
Why This Command Matters:
Hard drive errors can cause severe problems, from data loss to system instability. Regularly running chkdsk can help identify problems early on and ensure that your files remain safe.
3. ipconfig – Network Diagnostics Made Easy
When you run into internet connectivity issues, one of the first things you should do is use the ipconfig command. This command displays all the network information on your computer, including IP addresses, subnet masks, and default gateways.
What Does ipconfig Do?
The ipconfig command is helpful for network diagnostics, providing a snapshot of your network configurations. It can display your current IP address, release or renew your IP address, and even flush the DNS cache to solve connection problems.
Common Usage of ipconfig:
ipconfig /all: Shows detailed information about all network adapters.ipconfig /flushdns: Clears the DNS cache, which can resolve internet connectivity issues caused by outdated or incorrect DNS entries.ipconfig /releaseandipconfig /renew: These two commands are used to reset your IP address, which can help resolve issues with DHCP servers.
Why This Command Matters:
Network problems are frustrating and often difficult to diagnose. The ipconfig command gives you immediate access to crucial network information, allowing you to resolve issues more efficiently.
4. netstat – Monitor Network Performance and Detect Issues
The netstat command (short for network statistics) allows you to view all open network connections and their associated ports. It is a valuable tool for monitoring network performance and identifying potential security threats, such as malware using unauthorized ports.
What Does netstat Do?
With netstat, you can see a detailed list of all incoming and outgoing connections on your computer. This includes the IP addresses of remote computers and the ports being used for communication. You can also check for TCP and UDP connections, as well as network traffic data.
How to Run netstat:
- Open Command Prompt.
- Type
netstat -ato view all open connections. - Use
netstat -anto view active connections numerically (IP and port numbers).
You can also use netstat -b to show the executable involved in creating each connection, which can help in diagnosing malicious software.
Why This Command Matters:
The netstat command is critical for network performance monitoring. It helps identify open ports, verify active connections, and spot unusual traffic that could indicate network problems or security breaches.
5. ping – Test Connectivity and Troubleshoot Network Problems
The ping command is a simple yet effective tool for testing the connectivity between your computer and a remote server or website. It sends small data packets to a specified IP address or domain name and measures the time it takes for the data to travel there and back.
What Does ping Do?
The ping command tests whether a particular host is reachable across a network. It also helps identify network latency or connection failures. If you’re having trouble loading websites or suspect a network problem, ping can quickly confirm whether the issue is with your connection.
How to Use ping:
- Open Command Prompt.
- Type
ping google.com(or any other website) to test the connection.
The command will send a series of packets to the server and display the round-trip time for each one. If the pings fail (time out), this indicates a network issue.
Why This Command Matters:
When network issues arise, ping is the first tool you should use to test basic connectivity. It’s fast, easy, and provides clear results that can help you isolate the problem.
6. tracert – Trace the Path of Data Across a Network
While ping tests connectivity, tracert (short for trace route) goes one step further by showing the path data takes between your computer and a destination server. This is useful for identifying where slowdowns or failures are occurring along the network route.
What Does tracert Do?
tracert displays the IP addresses of each hop along the way from your computer to the destination server, as well as the time it took for data to travel between each hop. This makes it easy to spot where delays or connection failures are happening.
How to Use tracert:
- Open Command Prompt.
- Type
tracert www.google.comto trace the path to Google’s servers (or replace it with any website or IP).
The command will show the route taken by packets and list each hop with its IP address and response time.
Why This Command Matters:
If your internet connection is slow or inconsistent, tracert can help you determine whether the problem lies with your ISP or somewhere else on the network. It’s an invaluable tool for diagnosing network latency and routing issues.
7. tasklist – View Running Processes in Windows
The tasklist command is a powerful way to see what processes are currently running on your system. It’s similar to Task Manager but provides more detailed information, including memory usage, process IDs (PIDs), and the executable name for each task.
What Does tasklist Do?
tasklist displays a list of all the programs and background processes running on your system. This can help you identify resource hogs or rogue processes that are using too much CPU or memory.
How to Use tasklist:
- Open Command Prompt.
- Type
tasklistto display all running processes.
For more detailed information, use switches like tasklist /v to display verbose information or tasklist /svc to see which services are associated with each process.
Why This Command Matters:
Knowing what processes are running on your system is key to maintaining system performance. If your computer is running slowly, tasklist can help you identify which processes are consuming the most resources.
8. wmic – Windows Management Instrumentation Command-Line Utility
The wmic command provides detailed information about your system, including CPU, disk, memory, and operating system details. It is a versatile command that can be used to query almost any aspect of your system.
What Does wmic Do?
With wmic, you can query the system’s hardware and software configuration. For example, you can check the status of your hard drive, view the system’s uptime, or get detailed information about the CPU.
How to Use wmic:
- Open Command Prompt.
- Type
wmicfollowed by your query, such as:wmic cpu get name(to retrieve CPU details)wmic diskdrive get status(to check disk health)
This command is extremely flexible and useful for system inventory and hardware diagnostics.
Best Windows CMD Commands for System Diagnostics
Using these 8 powerful CMD commands for system diagnostics can help you maintain your Windows system’s performance, identify issues early, and resolve problems efficiently. Whether you’re dealing with network problems, disk errors, or system file corruption, these commands will give you the tools you need to keep your system running smoothly.
Regularly running these diagnostic commands should become part of your system maintenance routine. By doing so, you’ll be able to prevent many common issues and keep your computer operating at peak performance. If you prefer graphical tools, combine these commands with utilities like Task Manager and Performance Monitor to gain deeper insights into your system’s health.
Microsoft Command Prompt Documentation: https://learn.microsoft.com/en-us/windows-server/administration/windows-commands/windows-commands
Visit Our Post Page: Blog Page
Windows System Info Command to Check Configuration
-
Aniruddha Chaudhari -
Updated:
May 18, 2024
In this post, we learn, how to get complete system information using system information command.
Sometimes it is necessary to know all the Operating System configurations like OS details, serial number, and product ID. This information can be very handy to validate your system and to repair your system.
What’s the command to check system configuration in Windows?
Windows System Info Command:
- Open the command prompt (press “Win+R”, write “cmd” and enter).
- Type Command in the command prompt:
systeminfo
Note: This command works on all the major Windows OS like Windows XP, Vista, Windows 7 and Windows 10.
How to know the details about the Operating System?
You can find the following details about the OS installed on your system.
- Host Name
- OS Name
- OS Version
- Manufacturer
- OS Configuration
- OS Build Type
How to find the Register Owner and Product ID information?
Use the below parameters to get more details about the owner and the product.
- Registered Owner
- Registered Organization
- Product ID
- Original Install Date
How to find the Manufacture and System model in Windows?
After running systeminfo command, you can find the below detail.
- System Boot-Time
- Manufacturer of the system
- System Model
- System Type
- Processor(s)
- BIOS Version
How to find the details related to the directory and file system?
- Windows Directory
- System Directory
- Boot Device
- System Locale
- Input Locale
- Time Zone
How to check the available memory in Windows using cmd command?
- Total Physical Memory
- Available Physical Memory
- Virtual Memory: Max Size
- Virtual Memory: Available and In Use
- Page File Location(s)
Some other details you can find related to the domain and server.
- Domain
- Logon Server
- Hotfix(s)
The systeminfo utility is provided by Microsoft for its various Windows operating systems.
For Linux, there are different Linux commands to get the system details.
It shows the complete list of installed operating systems and various other system-related parameters.
This tool shows all the installed operating system configurations on your local machine. It includes the hostname and OS info such as name, version, and manufacturer. It displays memory statistics such as physical memory (total/available), and virtual memory (total/available). Important file directories include the window directory path and the system directory path. It also includes some network card related information such as DHCP server, IP address, and MAC address.
How to save data in the text file using system information command?
You can save system information in the text file by providing a file path.
Use the following System information command to save system information in the file.
systeminfo f://info.txt
“f://info.txt” is a text file path, that saves all the system information.
Note: The file path should be the same local disk directory in which the command prompt is opened. Here I am using the “f” local disk directory.
Fetching complete information will help you to know the system statistics. It provides basic information to maintain and repair your computer.
You can easily share this system info file with others, the system admin, or the customer support center. Before sharing this file, you must be aware of whatever system information you are sharing.
I am a Python enthusiast who loves Linux and Vim. I hold a Master of Computer Science degree from NIT Trichy and have 10 years of experience in the IT industry, focusing on the Software Development Lifecycle from Requirements Gathering, Design, Development to Deployment. I have worked at IBM, Ericsson, and NetApp, and I share my knowledge on CSEstack.org.