
- Sync your PC’s clock automatically on startup.
- Choose from tools that support customizable sync intervals and reliable servers.
- Use Task Scheduler to run syncing tools at startup for seamless time updates.
How to Auto Sync Your PC Clock on Windows Startup
When your PC clock doesn’t sync automatically, you might face issues like wrong timestamps on files, emails, or even expired software trials. Here’s how to fix this issue by automatically syncing your clock when Windows starts.
Why It’s Important to Sync Your PC Clock
Having an accurate system time is critical for:
- File timestamps
- Properly syncing emails
- Preventing issues with software licenses
Without auto-sync, manual time adjustments can become a hassle, especially when using software that depends on an accurate system clock.
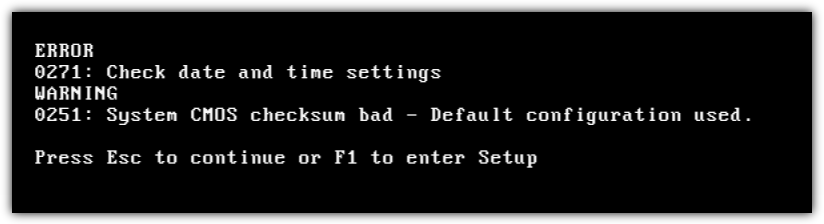
Changing the integrated battery on the motherboard will solve the problem and it’s quite easy to accomplish on desktop computers but can be much harder to do on laptops.
If you don’t want to or can’t take things apart, here are a few ways to automatically synchronize your PC clock on Windows startup. This way you don’t have to manually change the time settings each time you power up your computer.
Tools to update time and date automatically Windows 7 on startup
1. Time-Sync
Time-Sync is a free and simple to use Windows time correction tool that installs and runs itself as a Windows service. After install, the default configuration is to run at Windows startup and automatically perform a time synchronization when the service is started. You can verify sync status from the Protocol tab.
In the Settings tab, you can configure event logging and the update interval. The update interval contains selections as fast as every half a minute to once every day. If your computer is having battery problems and not maintaining the time, select “Synchronize every day” so that the program doesn’t unnecessarily perform time synchronizations.
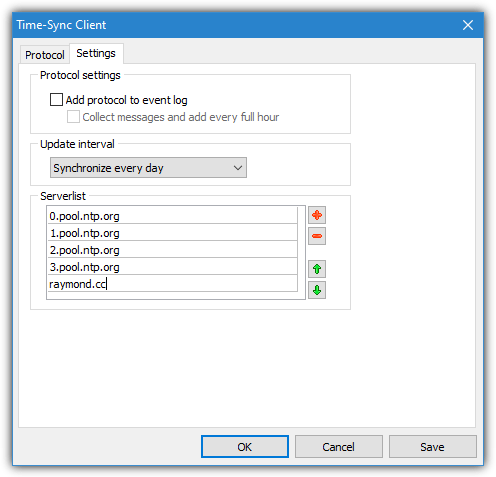
Time-Sync supports up to five time servers which can also be configured in the Settings tab. It uses the first server on the list and automatically attempts the next one if it fails. The default pool.ntp.org entries should be very reliable with over four thousand time servers worldwide. Make sure to install the default client version during install and not the server version. Otherwise, your computer will turn into its own time server!
Download Time-Sync
2. NetTime
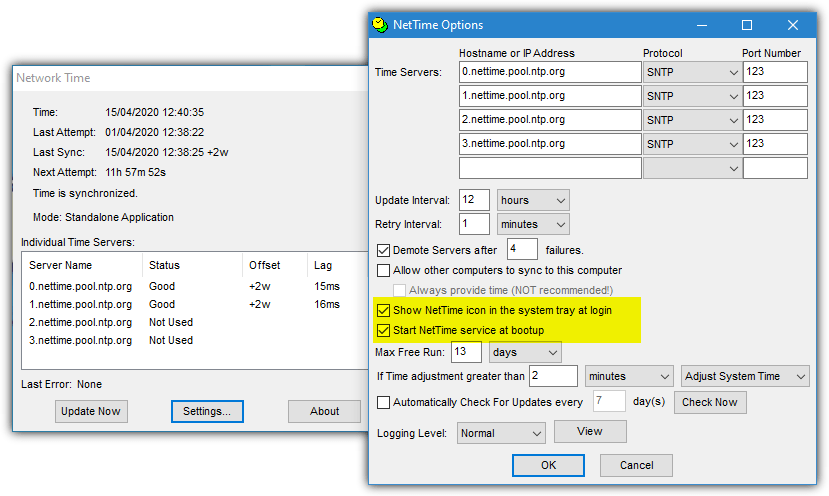
The last stable release of NetTime was back in 2012 although there is an alpha 3.20 build from 2017. Compatibility is fine though and it works on the latest Windows 10. NetTime can be used in two different ways; either syncing the time in the background using a Windows Service or launching the main program and letting it sync then sit in the system tray. The second option requires administrator privileges.
During install, NetTime defaults to running as a service which is recommended. Turn the option off to run the sync manually or from the main program. The default settings will query four pool.ntp.org servers although you can edit or add your own. It will keep trying every minute and update every 12 hours. If you want to let the service update the time in the background, uncheck “Show NetTime icon in the system tray at login”.
To run without the service, NetTime has to be permanently run as administrator (even if you are an admin). Go to the NetTime folder in Program Files (x86), right click on NetTime.exe > Properties > Compatibility > “Run this program as administrator”. In the Settings, leave “Show NetTime icon in the system tray at login” checked but uncheck “Start NetTime service at bootup”.
Download NetTime
3. Meinberg NTP
Like some of the previous tools, Meinberg NTP uses a Windows service for its time syncing. The program is based on source code from NTP.org who also list thousands of worldwide time servers. The newer versions of NTP support IPv6 and Windows XP or newer systems while there is another version from 2010 available for older PCs. NTP requires administrator privileges to install.
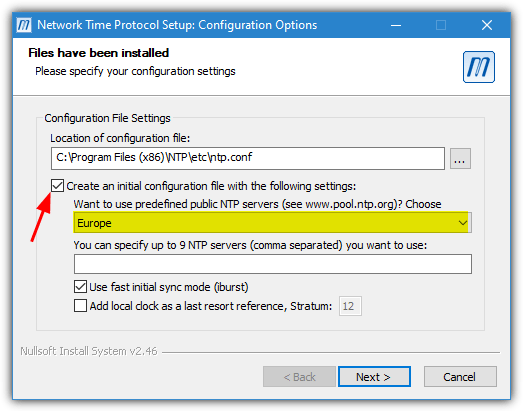
During the install process, you can leave the main settings at the defaults until the Configuration File Settings window appears. Check “Create an initial configuration file with the following settings” and then select a region or country from the pool.ntp.org drop down list. Click Next and then click No to not review the generated config file and at the next window leave everything alone. Click Next and Finish.
The Meinberg NTP service will set the time after the install is complete and on every boot. It is configured to keep checking for a network connection on startup in case there is a delay before your network adapter is initialized. If you want to sync the time during a session, the service will have to be restarted. You can do that from the Start Menu, the Program Files folder, the Services Control Panel applet or the command line.
Download Meinberg NTP
4. Dimension 4
Dimension 4 is one of the most well known time syncing tools for Windows. Sadly, the project appears to have been abandoned with no updates since 2013 and the website disappeared in early 2020. Although Dimension 4 has a huge list of time servers that it can cycle through, because of its age a number of them don’t work. As a result, you might get several sync failures before a success.
To help with this issue, bad time servers can be removed and you are also able to add your own. Dimension 4 can be told to use a specific server from the Advanced menu if you want it to use just one and not the rest of the list (as long as you’re sure it’s a reliable time server).
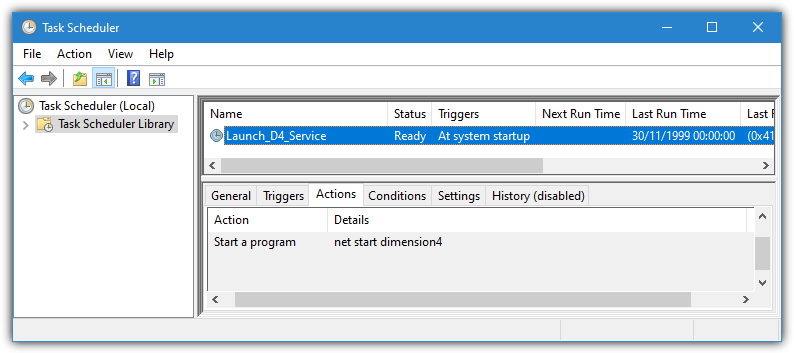
One problem is getting Dimension 4 to work on boot, usually for Windows 10 systems. It pops up a window asking for administrator privileges to start the service, even if you are already an administrator. A trick to get around that is to manually start the Dimension4 service on boot using a scheduled task. We have included a batch script to add a new scheduled task in the Zip archive, simply right click and run it as administrator.
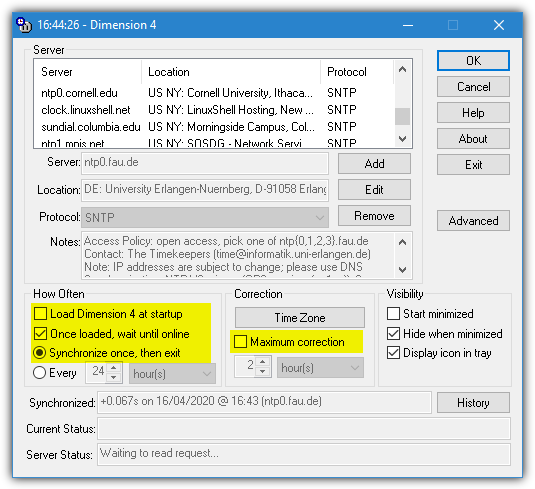
There are a few settings that you need to take note of in the main program window. Make sure “Once loaded, wait until online” and “Synchronize once, then exit” are checked. Uncheck “Maximum correction” or the time will only sync if it’s currently within the specified time range. If you are running Dimension 4 without using the scheduled task, “Load Dimension 4 at startup” can also be enabled.
Download Dimension 4 inc Scheduled Task Fix
5. Neutron
If you prefer a simpler tool that just syncs the time without too much fuss, check out Neutron. What makes Neutron stand out is the small file size (10KB), it’s portable, it automatically retries the next time server when the current one fails and has the ability to sync on startup. Importantly, Neutron can also exit after the time has been synced so nothing runs in the background. Neutron’s an old tool dating back to 2008 but it still works in Windows 10.
Download and extract the Zip, launch Neutron and click the arrows at the bottom right to open the options panel. Check the “Auto sync at program startup” and “Exit after time has been synced” boxes, then close Neutron. It will automatically sync the time and quit. Edit the Neutron.ini settings file to add your own custom time servers. There is a problem because Neutron is portable and doesn’t have the ability to start itself on boot. Help on how to do that is below.
Download Neutron
How to Run Neutron on Windows Startup
Neutron can automatically check the system time during boot by creating a scheduled task. In newer operating systems like Windows 10 and 8/8.1 placing a shortcut in the Startup folder or creating a registry Run key no longer works due to administrator privileges.
A scheduled task has some advantages such as bypassing UAC restrictions completely and optionally only launching after the system has connected to the network. That is useful if your network adapter takes several seconds to initialize.
Here’s how to do it:
a) Extract and set up the Neutron options
Extract and set up the Neutron options as explained above. Copy the Neutron folder to the root of your C: drive. The path should look like this:
C:\Neutron\Neutron.exe
b) Simplify the process with task scheduler
To try and simplify the process we’ve already created a scheduled task to be imported into your Task Scheduler. Download NeutronTime_Task.zip, extract it, right click and “Run as administrator”.
c) Type in the password
Type in the password for the current user account, if the account has no password just press Enter.
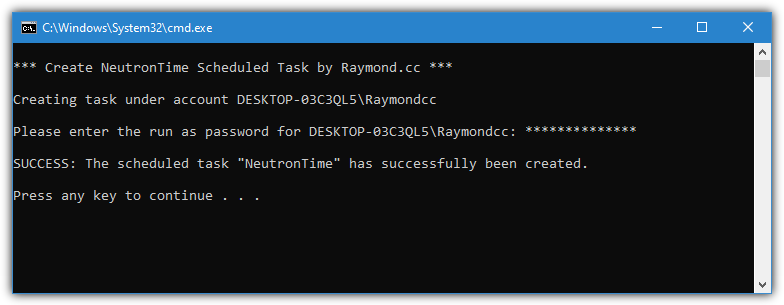
A new task will appear in Task Scheduler which runs whenever the system boots and/or the network is initialized. Neutron will start, sync the time and close after 5 seconds.
The batch script relies on the Neutron folder being in the root of C. If you want to change the location, open NeutronTime.xml with Notepad and change the path to Neutron.exe near the bottom. Then (re)run the batch file.
Note:
A small issue you might encounter with Neutron is the clock sync being out by one hour but all time zone settings are correct.
To fix this, click on the taskbar clock > Adjust Date/time > Change time zone (Windows 7 only), choose a different time zone from the drop-down (make sure it has a different + or – time), then change it back to your original time zone. This fixed the issue for us.
There is lots more information on synchronizing time servers and using third-party time servers on page 2.
6. Synchronize The Clock on Boot With Windows Time
As we’ve mentioned, Windows resyncs the time using a scheduled task once a week which isn’t very useful if you need to resync the clock every time the computer starts. The solution is starting the Windows Time Service on boot which will automatically synchronize the time. This can be done by creating a new scheduled task.
Windows 7 doesn’t have its own time service task to run on boot but Windows 10 already has one built in. Therefore, creating a new task for Windows 10 isn’t really necessary. However, if you are having time syncing issues in Windows 10 and wish to try this method, the steps will be the same.
Create The Windows Time Scheduled Task
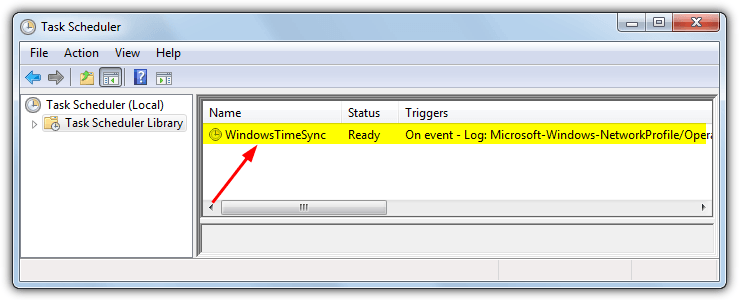
Like the Neutron tool, you can create a new scheduled task by importing one we’ve already made although in this case it’ll start the Windows Time Service, sync the time and then the service will stop again upon completion.
To do that, download WindowsTimeSync.zip and extract it. Run the Create_WindowsTimeSync_Task batch file making sure to right click and Run as administrator if you don’t have full privileges. A new task called WindowsTimeSync will appear in Task Scheduler which will run whenever you boot or manually enable the network adapter.
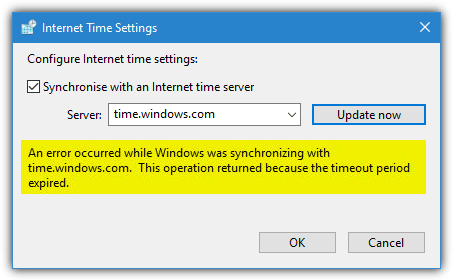
A drawback of using the Windows Time service is sometimes the Internet Time server fails to synchronize the clock. Third party tools we’ve mentioned in this article solve the problem by automatically attempting to sync with another server when the default fails but Windows Time will just fail if it cannot contact the default time server.
Windows Time Sync Errors and Required Checks
Although the sync on boot scheduled task might work smoothly, there are some system settings you might need to check for it to work correctly. There’s also a common error message you might need to rectify.
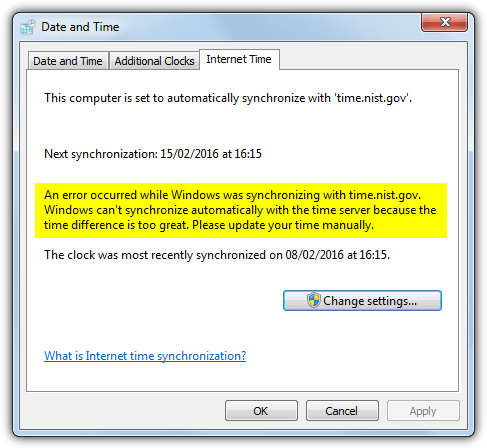
Fix The Time difference Is Too Great Error
If the clock is out by weeks, months or even years, when trying to sync the time in Windows 7 it could fail. An error might show saying “Windows can’t synchronize automatically with the time server because the time difference is too great. Please update your time manually”.
The error is caused by a hidden setting in Windows which only allows the clock to resync when the time difference is less than 15 hours. Increasing this to something bigger requires two settings to be edited in the registry called MaxPosPhaseCorrection and MaxNegPhaseCorrection. Their default hexadecimal values are d2f0 (15 hrs), changing to a larger number such as FFFFFFFF (35 years) lets the time sync work.
To make things as easy as possible and to avoid editing the registry yourself, download this ready made reg file and run it to make the changes in your registry.
Make Sure The Windows Time Service is Not Disabled
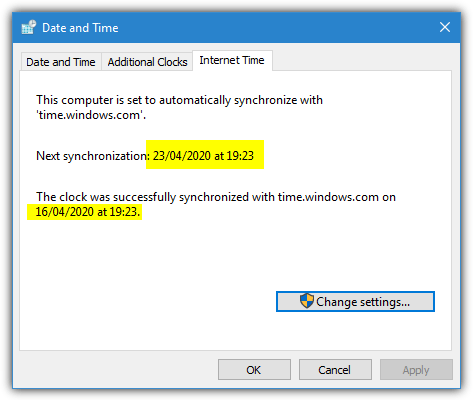
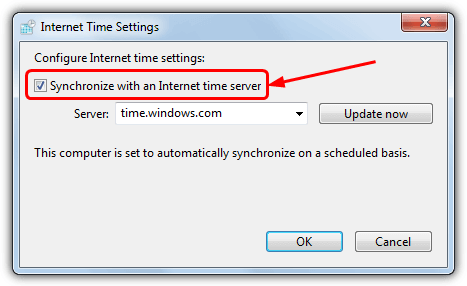
In order for the Internet Time task to work you have to make sure the service itself is not disabled, which it will be if Internet Time is not set to synchronize once a week. To make sure, go to Control Panel > Date and Time > Internet Time tab > Change settings and make sure “Synchronize with an internet time server” is checked. Click OK to confirm.
Make Sure Your Computer Has The Correct Time Zone
Besides syncing the clock to the right time and date, another important setting in Windows is to have the right time zone. If you live in Europe for example, and the time zone is set to the USA your clock could be out by as much as 10 hours. Making sure you have the correct time zone relative to your location will solve the problem.
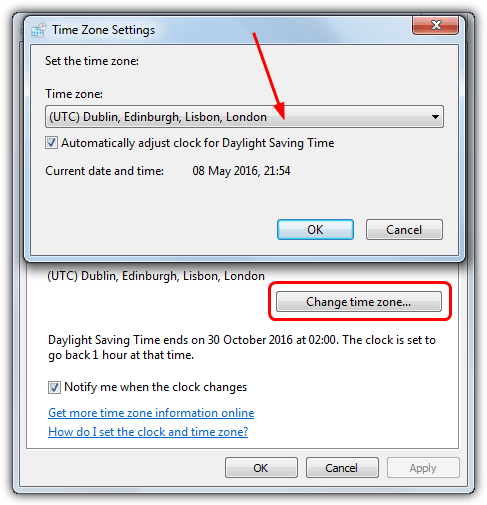
Right click on the clock in the tray and select Adjust date/time, Windows 7 users will need to additionally press the Change time zone button. Click on the drop down and find the right time zone for your area, also make sure the daylight saving time option is enabled if your country uses DST.
Using a More Reliable Time Server
As the Windows Time servers supplied by Microsoft are not 100% reliable, it’s possible to get server not responding or timeout errors. This is more likely if you live outside the United States as all the Windows time servers are US based. For a more reliable time server, it’s best to use one closer to where you live. This is recommended for all versions of Windows as they use the same time servers, including Windows 10.
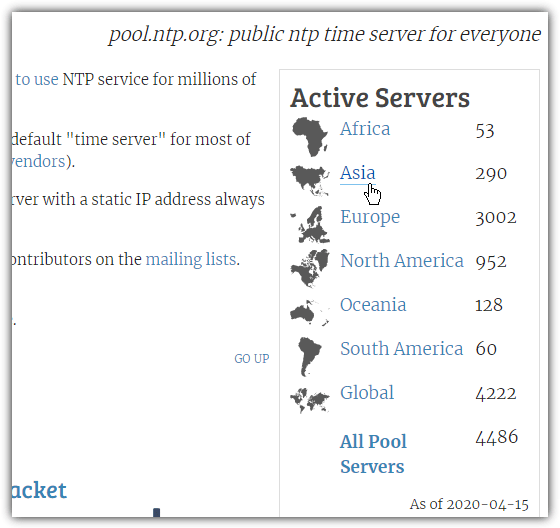
The NTP Pool project is a service with over four thousand time servers available worldwide. The generic global address of pool.ntp.org works for everybody and will try to sync with a server in your local area. However, it’s preferable to manually choose closer servers to you if possible.
a) Visit the NTP Pool Project
Visit the website and click on the link for your region on the right of the page in the active servers list.
b) Locate your country
Inside the region page, locate your country or the closest country to you and check how many servers there are in brackets.
If the server number is small (low single figures), try to choose the next closest country with a higher number. This is simply for fallback purposes and if one server fails, there are plenty of others available to try. Note down the server address (xx.pool.ntp.org).
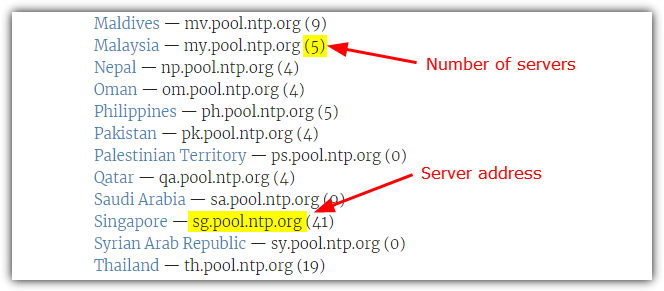
It’s also possible to use the regional time server listed at the top of the page next to the region name. For example, europe.pool.ntp.org, north-america.pool.ntp.org, or asia.pool.ntp.org.
c) Change the default time server
To change the default time server in Windows to an NTP Pool server go to Control Panel > Date and Time > Internet Time tab > Change settings. Ensure the Synchronize option is checked and enter the Pool server address into the box, then click OK.
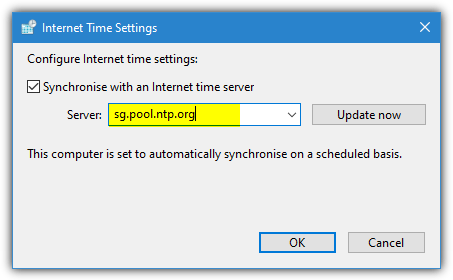
When Windows tries to sync the time according to the schedule or by pressing the Update now button, local NTP Pool servers will now be used to sync from instead, which should be faster and more reliable causing fewer errors from the Windows Time service.
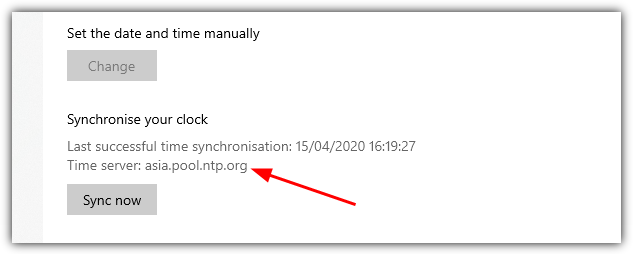
In the Data and Time Settings in Windows 10, the Time server will change to the time server you added in the Control Panel.
Conclusion
These six tools will ensure your PC’s clock stays accurate without manual effort. Whether you prefer a lightweight tool like Neutron or a more robust service like Meinberg NTP, there’s an option for every need. Make your system run smoothly with these automatic time-syncing solutions.
Update: The Windows time sync service is not working reliably. It was working fine on my system for a few months but stopped syncing time properly eventually even though it is still being started automatically. Feel free to give it a try nonetheless but know that this seems to be another one of Windows’ great unreliable mysteries…
Unlike most other operating systems, Windows 10 doesn’t sync the time with an internet service at startup by default. This can become an issue, if your mainboard’s built-in clock provides a wrong time or uses a different time zone.
If the mainboard’s battery responsible for storing time dies, it can become an even more annoying problem, because Windows will always start with an ever-growing time skew, which can eventually result in web browsing become a problem due to Windows considering websites’ SSL certificates not yet valid — effectively rendering browsing the majority of web pages impossible!
This can be worked around by starting Windows’ time sync service automatically at startup. Below you’ll find instructions on doing this with the graphical Services console and PowerShell.
Services console
- Press
Windows Key+rat the same time to open the Run dialogue - Type
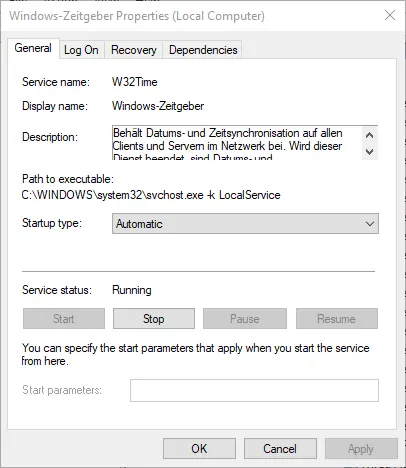
services.mscand hit Run — the Services window opens - In the list, scroll to Windows Time (in german: Windows-Zeitgeber) and right-click on it, click Properties in the context menu
- In the Properties window change Startup type to Automatic, click Start and click OK to save

PowerShell
- Start PowerShell as admin
- Run the following command:
Set-Service -Name W32Time -Status running -StartupType automatic
If PowerShell complains about not finding a service with the specified name, you can run the following command to get a list of all available services — Microsoft might have changed the time service’s name.
In this post, we’ll guide you through effective methods to ensure that your Windows clock loads correctly at startup, maintaining accurate system time and keeping your scheduled tasks on track.
To address this issue, here are some methods to load Windows clock at startup:
- Check Time Settings
- Update Windows
- Disable Unnecessary Startup Programs
- Check for Conflicting Software
- Reset Windows Time Service
However, as this is just an overview, we encourage you to continue reading the blog further to discover more effective methods along with their detailed steps to fix the error of Windows clock loading at startup.
How to Sync or Load Windows 11 clock at startup ?
Ensuring your Windows 11 clock loads correctly and stays synchronized is crucial for various system functions. Let’s explore the methods to sync Windows 11 time on startup:
Method 1: Automatic Time Synchronization (Recommended)
Firstly, Windows 11 is designed to automatically synchronize your system clock with an internet time server. Here’s how to ensure it’s enabled:
- Open Settings: To begin, press Windows key + I.
- Navigate to Time & language: Next, click on “Time & language” in the left-hand menu.
- Enable Automatic time adjustment: Then, ensure the “Set time automatically” toggle is on.
- Select Time zone: After that, verify that the correct time zone is selected.
- Finally, if automatic synchronization is enabled and you’re still facing issues, proceed to the next methods.
Method 2: Manual Time Synchronization
Alternatively, if automatic synchronization doesn’t work as expected, you can manually sync your clock:
- First, open Settings: Press Windows key + I.
- Then, navigate to Time & language: Click on “Time & language” in the left-hand menu.
- Lastly, sync now: Click on the “Sync now” button under “Date & time”.
Method 3: Using Command Prompt
For more advanced users, you can use Command Prompt to manually synchronize the clock:
- Open Command Prompt as administrator: To start, search for “Command Prompt” in the Start menu, right-click on it, and select “Run as administrator”.
- Run the following command: w32tm /resync
Method 4: Creating a Startup Task
To ensure the clock is always synchronized at startup, you can create a task in Task Scheduler to load Windows 11 clock at startup:
- Initially, open Task Scheduler: Search for “Task Scheduler” in the Start menu and open it.
- Next, create a new task: Click on “Create Task…” in the right-hand pane.
- In the General tab: Give the task a name (e.g., “Sync Time at Startup”) and select “Run with highest privileges”.
- Moving to the Triggers tab: Click “New…”, select “At log on”, and click “OK”.
- For the Actions tab: Click “New…”, set “Action” to “Start a program”, and enter “w32tm” in the “Program/script” field and “/resync” in the “Add arguments (optional)” field.
- Regarding the Conditions and Settings tabs: You can customize these settings as needed.
- Finally, finish: Click “Finish” to save the task.
Also Check: How do I turn off the display in Power Settings in Windows ?
Additional Tips
- Check for time zone conflicts: Ensure your BIOS/UEFI time is set correctly and matches the Windows time zone.
- Disable conflicting software: Some software might interfere with time synchronization. Temporarily disable any such programs.
- Update Windows: Keep your Windows operating system up-to-date with the latest updates.
By following these methods and troubleshooting tips, you should be able to effectively sync and load your Windows 11 clock at startup.
How to Sync or Load Windows 10 clock at startup ?
When your Windows 10 clock isn’t properly syncing at startup, it can lead to inaccurate time displays, affecting your daily schedule and system functions.
In this section, we’ll walk you through simple steps to ensure your clock syncs or loads correctly every time you start your computer, using Task Scheduler and other built-in tools.
Windows Time Service (w32time)
- To begin, press Windows key + R, type services.msc, and press Enter.
- Next, locate Windows Time in the list, right-click it, and select Properties.
- Then, check the service status and restart it if necessary. Click OK.
- Finally, restart your computer to apply the changes.
Internet Time Synchronization
- First, click on the system clock and select “Change date and time settings.”
- Next, go to the “Internet Time” tab.
- Then, ensure it’s set to “synchronize the time with time.windows.com.”
- Lastly, click “Change settings” and select “Synchronize with an Internet Time server.” Click OK.
Manual Synchronization (Windows 10)
- To start, open Settings (Win + I).
- Then, navigate to Time & Language > Date and time.
- Finally, on the right side, find “Synchronize your clock” and click it.
Windows 11 (Automatic Sync)
- First, open Windows Settings (Win + I) > Time & Language > Date & Time.
- Next, toggle “Set time automatically” and “Set time zone automatically” to turn them on.
- Additionally, for manual sync, click “Sync now” under Additional Settings.
You can also try the steps mentioned in first section (Load Windows 11 clock at startup) to Sync or Load Windows 10 clock at startup.
How to Sync or Load Windows 7 clock at startup ?
While Windows 7 might be an older operating system, the fundamentals of syncing the clock remain similar to newer versions. Here’s a breakdown of the steps:
Method 1: Automatic Time Synchronization
Firstly, this is the simplest method and usually the most reliable.
Access Date and Time Settings:
- First, click on the clock in the system tray.
- Then, select “Change date and time settings”.
Enable Internet Time:
- Start by going to the “Internet Time” tab.
- Then, click “Change settings”.
- After that, check the box “Synchronize with an Internet time server”.
- Next, choose a time server (time.nist.gov is a common option).
- Finally, click “Update now”.
Subsequently, your system will now attempt to synchronize with the selected time server.
Also Check: How to fix Windows 10 hardware random MAC address not working ?
Method 2: Manual Time Adjustment
If automatic synchronization isn’t working, you can manually adjust the time to load Windows clock at startup:
Access Date and Time Settings:
- First, click on the clock in the system tray.
- Then, select “Change date and time settings”.
Adjust Time:
- Next, go to the “Date and time” tab.
- Finally, manually set the correct date and time.
Method 3: Using Command Prompt (Advanced Users)
For more control or troubleshooting, you can use the command prompt:
Open Command Prompt as Administrator:
- Firstly, search for “Command Prompt” in the Start menu, right-click on it, and select “Run as administrator”.
Sync Time:
- Secondly, type the following command and press Enter: w32tm /resync
Method 4: Creating a Startup Task (If Necessary)
While not typically needed in Windows 7, you can create a startup task to force a time sync at boot if you encounter persistent issues:
Open Task Scheduler:
- First, search for “Task Scheduler” in the Start menu.
Create a New Task:
- Then, in the right-hand pane, click “Create Task”.
Task Properties:
- Next, in the “General” tab, give the task a name (e.g., “Sync Time at Startup”).
- Then, go to the “Triggers” tab, click “New”, select “At startup”, and click “OK”.
- Next, in the “Actions” tab, click “New”, set “Action” to “Start a program”, and enter “w32tm” in the “Program/script” field and “/resync” in the “Add arguments (optional)” field.
- Finally, click “Finish”.
Additional Tips
- Check BIOS/CMOS Time: Moreover, ensure the time set in your computer’s BIOS or CMOS matches the desired time.
- Disable Time-Related Software: Additionally, temporarily disable any software that might interfere with time settings.
Note: Creating a startup task can sometimes interfere with other system processes, so use it cautiously.
How to fix Windows 11 time wrong every boot ?
It’s frustrating when your Windows 11 time keeps resetting after every reboot. Let’s try to resolve this issue.
Potential Causes and Solutions:
Incorrect BIOS/UEFI Time
Check BIOS/UEFI Settings:
- To begin, reboot your computer and enter the BIOS/UEFI setup (usually by pressing a key like Del, F2, or F10 during boot).
- Then, look for a section related to date and time settings.
- Finally, ensure the correct date and time are set.
Replace CMOS Battery:
- Alternatively, if the time keeps resetting despite correct BIOS settings, a failing CMOS battery might be the culprit.
Windows Time Service Issues
Ensure Service is Running:
- First, press Win + R, type services.msc, and press Enter.
- Next, locate “Windows Time” service, double-click it, and ensure it’s set to “Automatic” and running.
Resync Time:
- To start, open Command Prompt as administrator.
- Then, type w32tm /resync and press Enter.
Conflicting Software
- Disable Time-Related Software: Simply temporarily disable any software that might interfere with time settings.
Corrupted System Files
Run System File Checker:
- Begin by opening Command Prompt as administrator.
- Next, type sfc /scannow and press Enter.
Windows Updates
- Check for Updates: Ensure your system is up-to-date.
Additional Tips
- Time Zone: Moreover, verify that the correct time zone is set in Windows settings.
- Internet Time Server: Additionally, ensure your system is synchronized with an internet time server.
- Clean Boot: Finally, perform a clean boot to isolate potential conflicts.
Also Check: How to uninstall Windows Subsystem for Android (WSA) on Windows 10 ?
Conclusion
Firstly, keeping your Windows clock synchronized at startup is essential for maintaining accurate time and ensuring your digital life runs smoothly. One way to achieve this is to load Windows clock at startup.
Moreover, whether you’re using Windows 11, 10, or even the older Windows 7, there are several effective methods to address clock-related issues.
Specifically, from enabling automatic synchronization to creating custom startup tasks, you now have the tools to keep your system time on track.
Remember, a properly functioning clock is more than just a convenience—it’s crucial for system processes, scheduled tasks, and maintaining consistent timestamps on your files and communications.
However, if you encounter persistent issues, don’t hesitate to dig deeper into your BIOS settings or consider hardware solutions like replacing the CMOS battery.
By implementing these solutions, you’ll ensure that your Windows clock loads correctly at startup, saving you time and frustration in the long run.
Source: [ answers microsoft, thewindowsclub, support.kaspersky, stack overflow ]
Frequently Asked Question’s (FAQ’s)
How to sync Windows time on startup ?
To sync Windows time on startup, ensure “Set time automatically” is enabled in Date & Time settings. For manual control, use Command Prompt with “w32tm /resync” command. For automatic syncing at every boot, create a Task Scheduler task to run “w32tm /resync” at startup.
How do I add a Clock to startup ?
Unfortunately, you cannot directly add the Clock app to the startup list. However, you can pin it to your Start menu for quick access. To do this, search for “Clock” in the Start menu, right-click on the app, and select “Pin to Start”. For Windows 11, consider adding a clock widget to your home screen for easy visibility.
How to update time and date automatically in Windows 10 on startup ?
Windows 10 automatically updates time and date when connected to the internet. Ensure “Set time automatically” is enabled in Date & Time settings. If manual adjustment is needed, use the “Sync now” button. For more control, use Command Prompt with “w32tm /resync” command.
There are some rare circumstances that you may want to re-sync your time on Windows startup. One of these can be a depleted CMOS battery on your laptop or desktop computer: This will cause the time to be at least “inaccurate”.
While Windows sync date and time in some interval, it doesn’t check the system date and time specifially on system startup. So you need to do it yourself by going Date and Time in Windows Settings, and clicking “Sync now”.
Of course if the problem is the CMOS battery, the proper solution is to replace it. But if you can’t do it for some reason, or you need a solution until you do, here it is.
PowerShell script to sync time at startup
This script isn’t developed by me, it’s by AI but it’s tested and I’ve added features to make it run (hopefully) without problems:
- The script waits for the internet connection for 15 minutes before failing.
- Tries alternative NTP server if main one fails.
- Writes last operation to a log file in same folder with script file.
- Checks if Windows Time service is available, and starts it if it is not.
When you run it with via Task Manager as admin, you can see if it’s working last lines in the mentioned Sync-Time.log.
Save this code as Sync-Time.ps1 (e.g. by creating empty file in Notepad).
# Define NTP servers to try
$NtpServers = @("time.windows.com", "pool.ntp.org", "time.google.com")
$MaxWaitMinutes = 15
$WaitInterval = 10  # Check every 10 seconds
$ServiceWaitSeconds = 30  # Time to wait for w32time service


# Determine the script directory and log file path
$ScriptDir = Split-Path -Parent $MyInvocation.MyCommand.Path
$LogFile = Join-Path $ScriptDir "Sync-Time.log"


# Function to write log
function Write-Log {
    param ($Message)
    $Timestamp = Get-Date -Format "yyyy-MM-dd HH:mm:ss"
    "$Timestamp - $Message" | Out-File -Append -FilePath $LogFile
}


# Ensure the Windows Time service is running
Write-Host "Checking Windows Time Service..."
Write-Log "Checking Windows Time Service..."
$Service = Get-Service -Name w32time -ErrorAction SilentlyContinue


if ($Service -eq $null) {
    Write-Host "Windows Time service is not installed! Exiting."
    Write-Log "Windows Time service is not installed! Exiting."
    Start-Sleep 2
    exit
}


if ($Service.Status -ne "Running") {
    Write-Host "Starting Windows Time Service..."
    Write-Log "Starting Windows Time Service..."
    Start-Service w32time
    Start-Sleep -Seconds $ServiceWaitSeconds  # Allow time for service to start
}


# Wait for internet connection
$StartTime = Get-Date
Write-Host "Waiting for internet connection..."
Write-Log "Waiting for internet connection..."
while (-not (Test-Connection -ComputerName "8.8.8.8" -Count 1 -Quiet)) {
    if ((New-TimeSpan -Start $StartTime).TotalMinutes -ge $MaxWaitMinutes) {
        Write-Host "Internet not available after $MaxWaitMinutes minutes. Exiting."
        Write-Log "Internet not available after $MaxWaitMinutes minutes. Exiting."
        Start-Sleep 2
        exit
    }
    Start-Sleep -Seconds $WaitInterval
}


Write-Host "Internet is available. Syncing time..."
Write-Log "Internet is available. Syncing time..."


# Try each NTP server
foreach ($Server in $NtpServers) {
    Write-Host "Trying NTP server: $Server"
    Write-Log "Trying NTP server: $Server"
    try {
        w32tm /config /manualpeerlist:$Server /syncfromflags:manual /update | Out-Null
        w32tm /resync /force | Out-Null  # Force sync
        Start-Sleep -Seconds 1
        $Status = w32tm /query /status
        Write-Host $Status  # Display sync status
        Write-Log "Final sync status:`n$Status"
        Write-Host "Time synchronized successfully with $Server"
        Write-Log "Time synchronized successfully with $Server`n$Status"
        Start-Sleep 2
        exit
    } catch {
        Write-Host "Failed to sync with $Server. Trying next..."
        Write-Log "Failed to sync with $Server. Trying next..."
    }
}


Write-Host "All NTP servers failed. Time sync unsuccessful."
Write-Log "All NTP servers failed. Time sync unsuccessful."
Start-Sleep 2
Now, open the Task Manager and create a task as follows:
- Click Create a Basic task
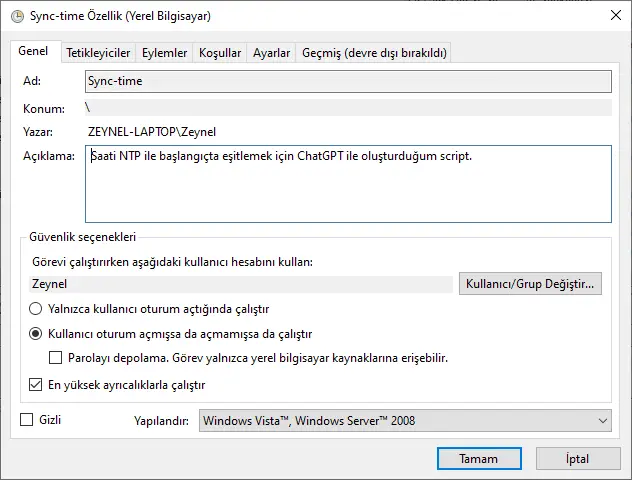
Under General:
- Name: Sync Time at Startup
- Run with highest privileges: ✅ (Check this)
- Configure for: Windows 10/11
Under Triggers:
- Click New…
- Choose «At startup»
- ✅ Check «Delay task for» → Set to 1 minute
- ✅ Check «Repeat task every» → Set to 30 minutes (Optional)
- Click OK
Under Actions:
- Click New…
- Program/script: powershell.exe
- Arguments (edit the directory to actual location you saved the script):
-ExecutionPolicy Bypass -File «C:\Scripts\Sync-Time.ps1»
- Click OK
Under Conditions:
- ✅ Uncheck «Start the task only if the computer is on AC power»
Under Settings:
- ✅ Check «If the task fails, restart every» → Set to 1 minute, up to 3 attempts
Click OK, enter your admin password if prompted.
That’s it. Now you can restart the computer to see if it works. After system restart, check the log file created in the same folder with the .ps1 file we created. If it’s working, the last line will look like:
2025-03-05 13:19:28 - Time synchronized successfully with time.windows.com
Leap Indicator: 0(no warning) Stratum: 4 (secondary reference - syncd by (S)NTP) Precision: -23 (119.209ns per tick) Root Delay: 0.3442501s Root Dispersion: 9.9794729s ReferenceId: 0x682895BD (source IP:   104.40.149.189) Last Successful Sync Time: 5.03.2025 13:19:27 Source: time.windows.com  Poll Interval: 10 (1024s)
Troubleshooting
If for some reason the script is failing, try these commands.
— Force Windows to use NTP sync consistently:
sc config w32time start=auto

w32tm /config /manualpeerlist:"pool.ntp.org,time.google.com,time.windows.com" /syncfromflags:manual /update

w32tm /resync
Conclusion
Enjoy your always up-to-date time. When you solve the problem, you can remove it from Task Manager or disable the task to remove unnecessary task at startup.
- How do I fix Windows sync time?
- How do I sync my clock automatically?
- How do I fix server time out of sync?
- Why does Windows 10 time sync keep failing?
- Why does my PC clock keep losing time?
- How do I make my computer automatically update the date and time?
- How do I set automatic date and time in Windows 10?
- How often does Windows time Sync?
- Why can’t I set time automatically Windows 10?
How do I fix Windows sync time?
First of all, go to Settings, select Time and language, and make sure Windows 10 is allowed to set the date and time settings automatically. After that, check if you can reach the time.nist.gov server and sync your date and time settings.
How do I sync my clock automatically?
Click the «Internet Time» tab and click «Change Settings.» Check the box that says «Synchronize with an internet time server» if you wish to automatically sync the clock, or uncheck it if you want to set the clock manually.
How do I fix server time out of sync?
Time discrepancy issues that result in the «Server’s time may be out of sync» error message are most commonly resolved by SSHing into the server hosting your Duo-protected application or service and using Network Time Protocol (NTP) to set the correct time.
Why does Windows 10 time sync keep failing?
Solution 1: Disable Firewall and Third-Party Antivirus
On the other hand, it can interfere with your clock or other programs. Then, you would receive various errors on the computer. The time synchronization failed error is one of them. If so, you should disable Firewall or the third-party antivirus installed on the PC.
Why does my PC clock keep losing time?
The most commonly reason that your computer loses the Time settings, is a damaged CMOS battery, especially if the date resets to a date like 1/1/2009 and with time 00.00. 00. To find out if the CMOS battery is off, enter BIOS setup and set the current Date, Time and Year.
How do I make my computer automatically update the date and time?
To program Windows to do that, just right-click on the time in the systems tray and go to Date and Time Properties and click on the Internet Time tab, placing a check in Automatically synchronize with an Internet time server (see screenshot at right).
How do I set automatic date and time in Windows 10?
In Date & time, you can choose to let Windows 10 set your time and time zone automatically, or you can set them manually. To set your time and time zone in Windows 10, go to Start > Settings > Time & language > Date & time.
How often does Windows time Sync?
This time sync happens every 7 days and with time.windows.com by default. You can also manually sync or update your time. To do that: Click on your system time > «Change date time settings» > «Internet Time» tab > «Change settings and click on Update now to sync.
Why can’t I set time automatically Windows 10?
From the Windows 11 WinX Menu, open Settings > Time & Language > Date & Time. Here you have to ensure that Set time automatically and Set time zone automatically are ‘On’. See if this works for you. If it does not help, change Set time automatically to ‘Off’ and then click on the Change button to set the time manually.