

So, you have used Linux inside Windows using WSL. Your goal is achieved. You learned Linux or completed your project and you don’t need WSL anymore.
It is only logical to get rid of unnecessary applications. This frees up disk space and keeps the system clean.
So, we end this WSL series by discussing the removal of WSL from Windows. Let’s see the steps.
Step 1: Uninstall all the Linux distributions
Before uninstalling WSL from your system, you should uninstall all the Linux distributions that you have installed using WSL. This can be done in two steps:
- Unregister the distribution
- Uninstall the application.
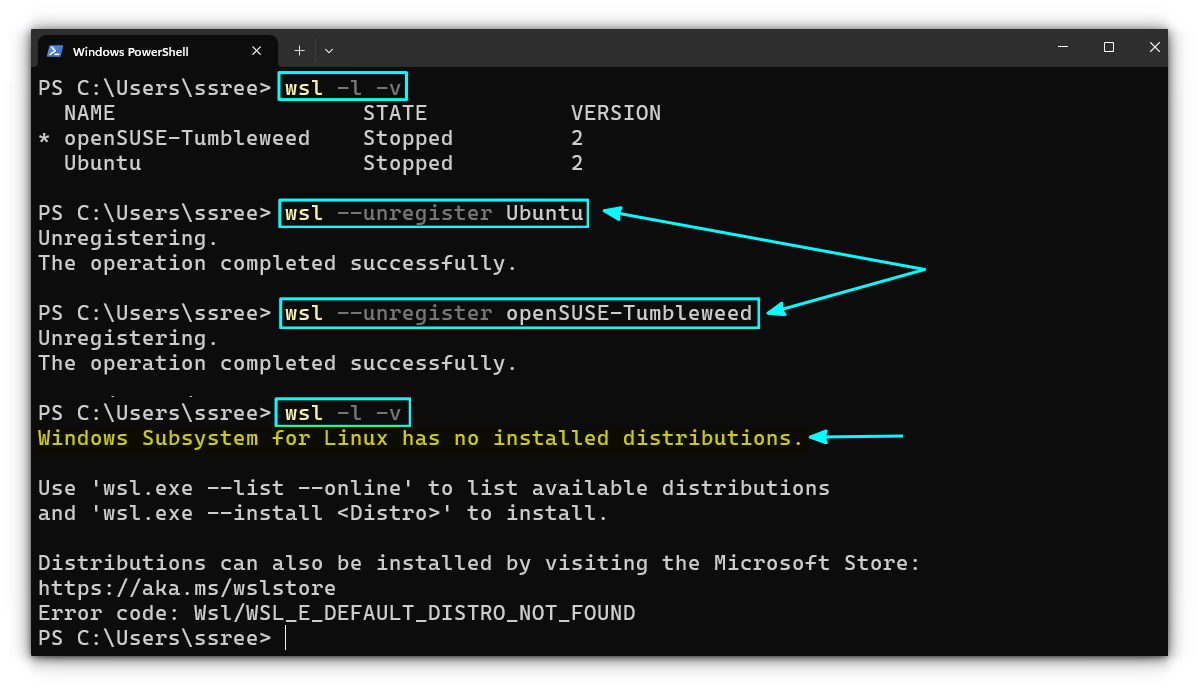
First, unregister a WSL distribution by using this command in Windows command line:
wsl --unregister <distribution_name>
🚧
Here, the distribution_name should be exactly the same as the name shown while listing the WSL distributions using wsl -l -v
Repeat the step for all the distributions you have installed.
Once all the distributions are unregistered, you can uninstall the apps, just like any other app on Windows.
📋
WSL distributions installed directly from the Microsoft Store will leave the app on your system once unregistered through the terminal. That’s why you need to uninstall them separately. Distributions installed from outside the store do not need to be uninstalled separately. This is the case for distributions that you have imported from an exported distribution tar file.
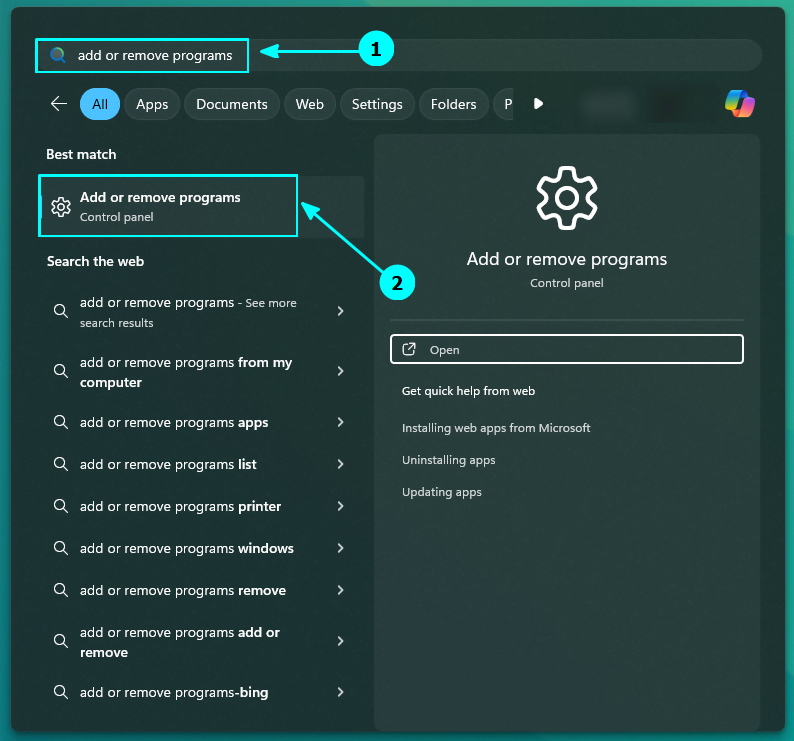
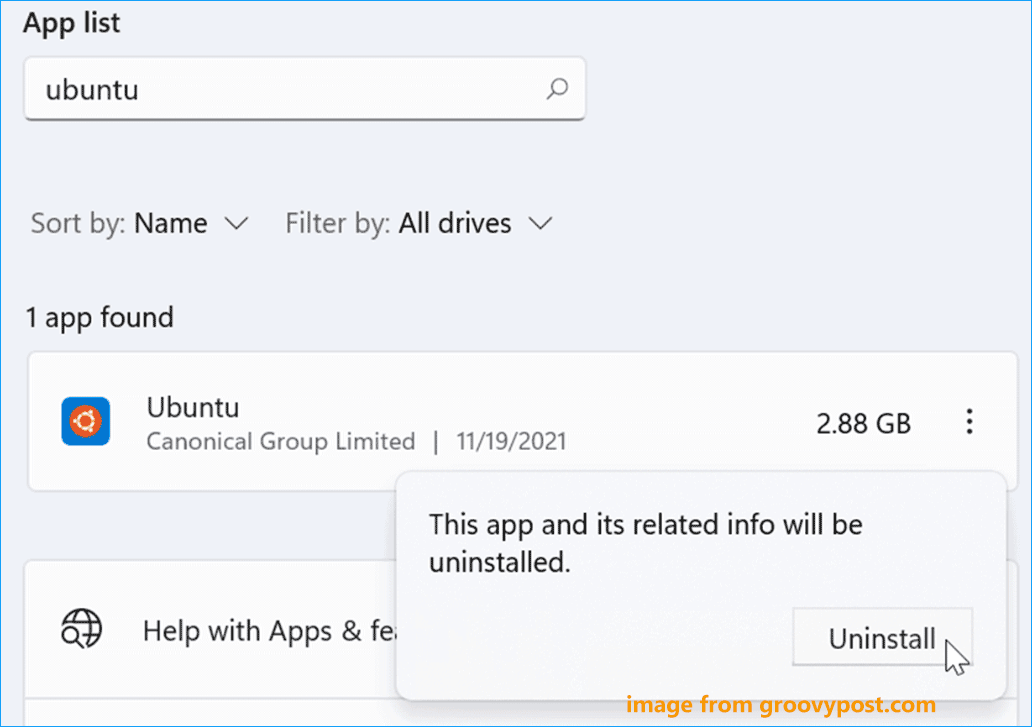
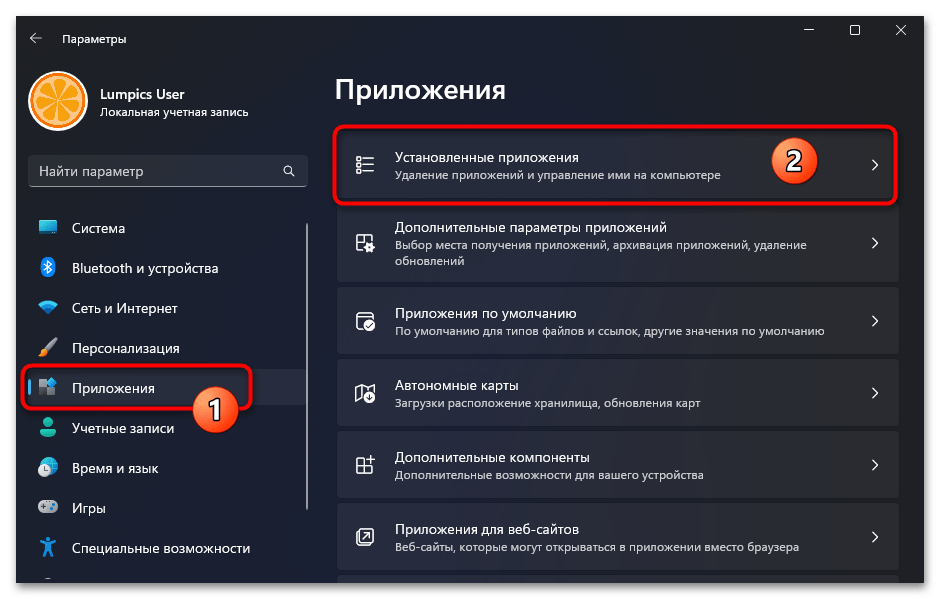
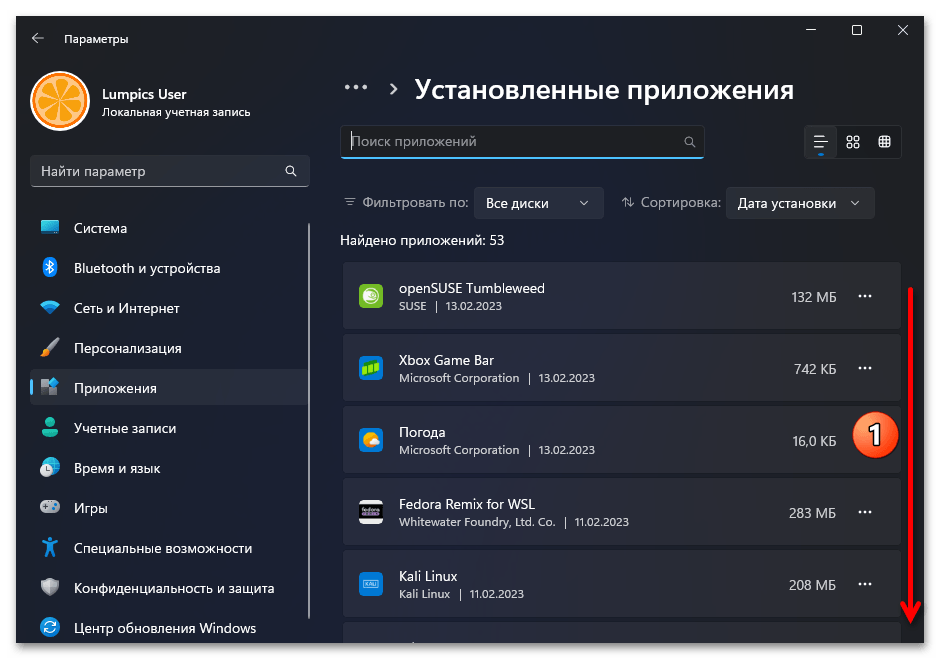
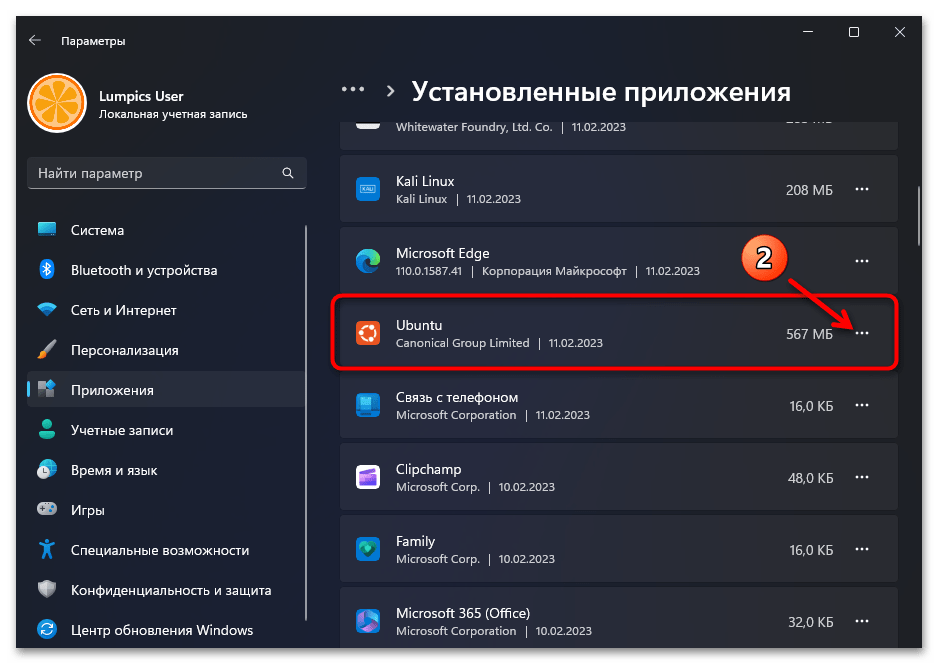
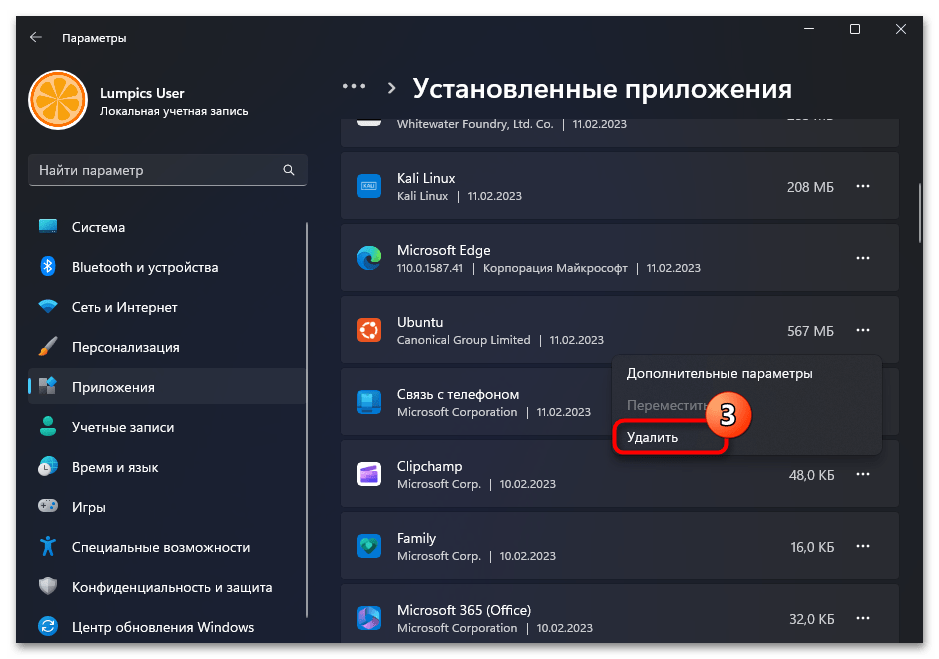
Search for the “Add or Remove Programs” in the start menu.
Inside this window, scroll down and go to the distribution name. Click on the three-dots button adjacent to it. You will see an “Uninstall” option. Use it.
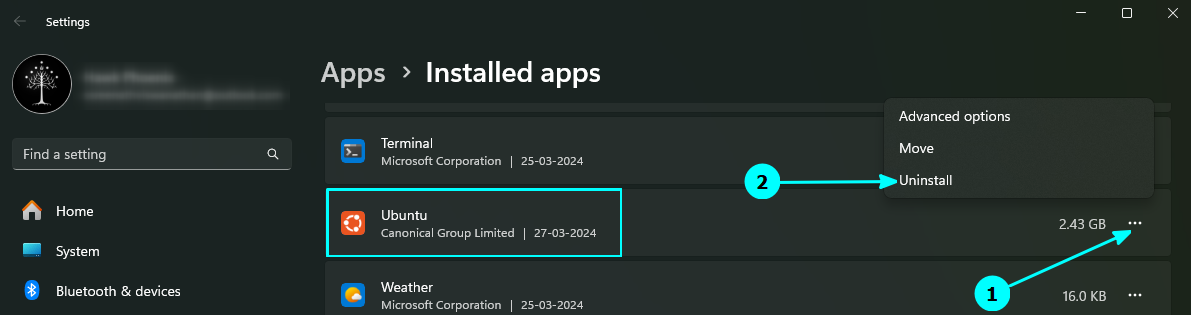
Repeat the steps for the rest of the distributions.
Step 2: Uninstall WSL from the system
Once you have removed all the installed WSL distributions, it’s time to uninstall the WSL app.
It can be done the same you installed it in the first place.
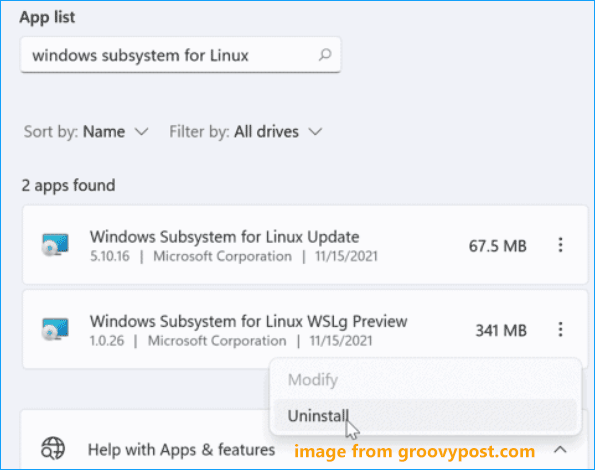
If you installed Windows Subsystem for Linux App from the Microsoft Store, you can uninstall the app from the Microsoft Store itself. Open the “Add or Remove programs” window. Inside that, remove components that are related to WSL, like the Windows Subsystem for Linux app, other updates and previews, etc. if installed.
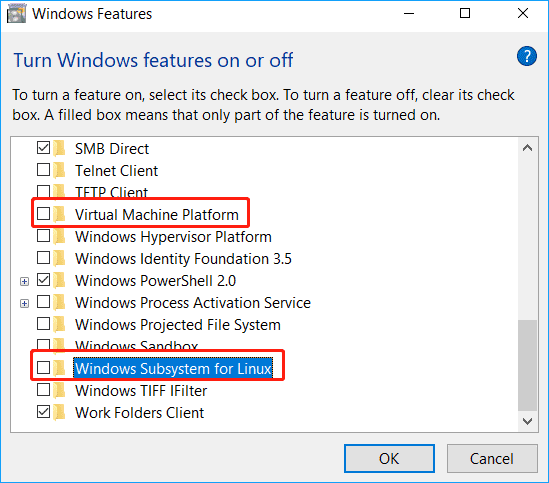
If you installed WSL as a Windows feature, you can turn off the respective feature.
Search for “features” in the Windows Start menu and open it.
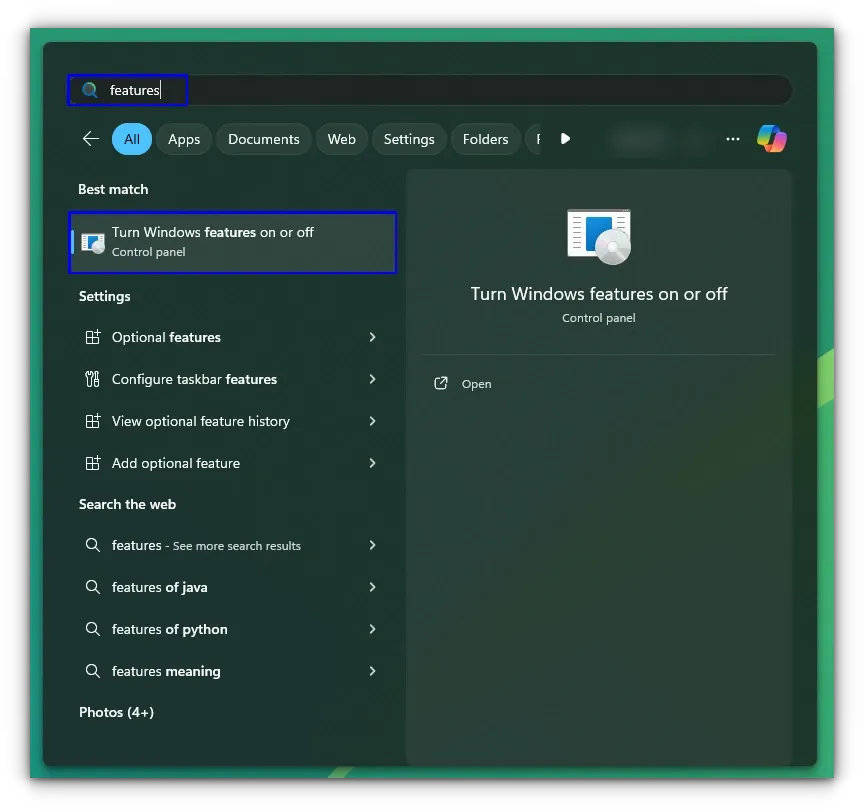
Inside the features window, turn off the «Windows Subsystem for Linux» feature by unchecking the box.
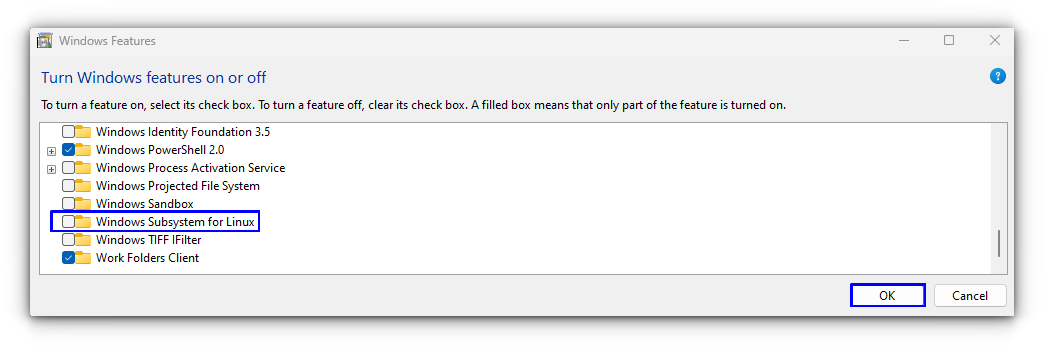
If you are not planning to use Virtual machine setups in the future, you may also turn off the Virtual Machine Platform feature. Although I’ll suggest keeping it. You never know when you are in the mood for a VM.
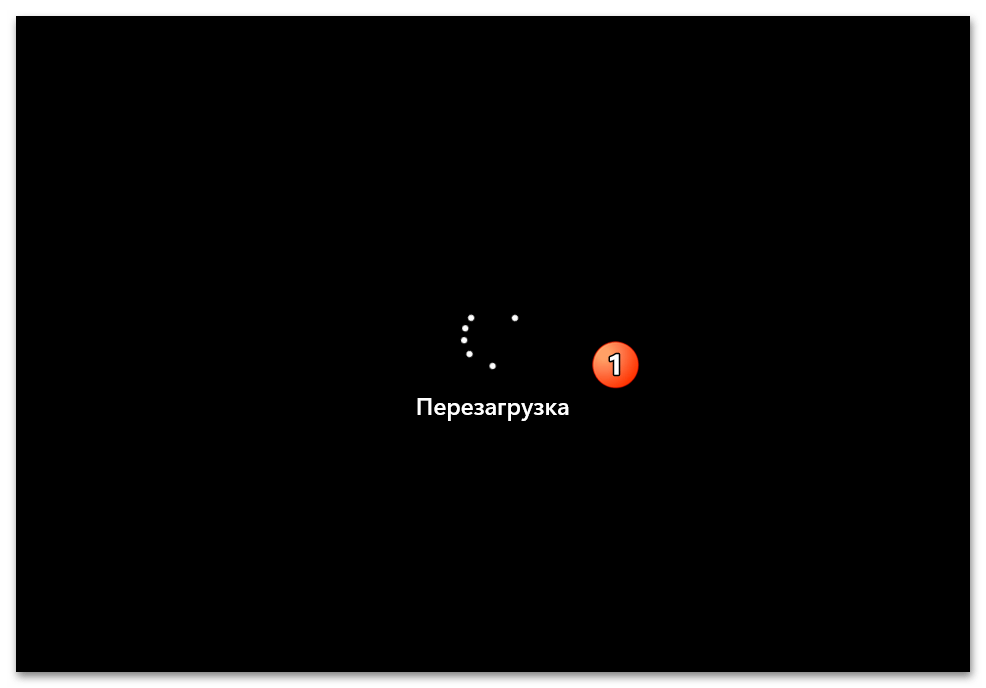
You should reboot your system when prompted. That’s it. You have successfully removed WSL from Windows.
I hope you found this WSL series helpful in your Linux journey.
About the author
Sreenath
Linux tinkerer by day, Lord of the Rings fanatic by night. When I’m not busy conquering the command line, you can find me kicking back and watching some football while quoting JRR Tolkien
-
Home
-
News
- How to Uninstall WSL on Windows 11 & Windows 10? See a Guide!
How to Uninstall WSL on Windows 11 & Windows 10? See a Guide!
By Vera | Follow |
Last Updated
If you need to uninstall Windows Subsystem for Linux, you can do this task on Windows 10/11. It is not simple as program uninstallation. Refer to this post from MiniTool and find the guide on how to uninstall WSL easily.
About WSL
Windows Subsystem for Linux, also known as WSL, is a feature in Windows operating system that is primarily designed for developers, especially web developers. WSL enables you to run a Linux system with Linux command-line tools and GUI apps on Windows 11/10. This won’t break anything important on your PC.
In the earlier time, Microsoft released the first version – Windows Subsystem for Linux (WSL) that supports a direct translation between Linux and Windows. While WSL2 uses a lightweight virtual machine to integrate it into your Windows workflow. Any Linux distribution can run on either the WSL 1 or WSL 2 architecture, which depends on their configuration.
To run a Linux system on Windows 10/11, you need to install WSL and here a related post is helpful – How to Install Windows Subsystem for Linux (WSL) on Windows 11.
When anything goes wrong or you no longer need to use this platform, you may want to uninstall WSL. Well then, can you uninstall WSL from your computer? It is possible and just follow the guide below now.
Tips:
Experience a faster system with MiniTool System Booster – your solution to effortless program uninstallation.
MiniTool System Booster TrialClick to Download100%Clean & Safe
How to Uninstall WSL on Windows 10/11
How to uninstall WSL on Windows 11/10? It is not easy to completely remove WSL from your PC since this isn’t similar to uninstalling a program. You need to do three steps – delete the Linux distro, uninstall other components and disable this platform. Do the operations about WSL uninstall Ubuntu in order:
Step 1: Uninstall Linux Distro
1. In Windows 11/10, press Win + I at the same time to open Settings.
2. Go to Apps > Apps & features.
3. Choose a Linux distribution like Ubuntu and click Uninstall (Windows 10). For Windows 11, click the three dots and click Uninstall. Then, click Uninstall again to confirm the operation.
Tips:
You can type the Linux distribution like Ubuntu into the text of App list to find your installation.
Step 2: Delete Windows Subsystem for Linux Components
After uninstalling the Linux distribution from Windows 11/10, other elements of the Windows Subsystem for Linux functionality should be also removed.
1. In the Settings window, go to App > Apps & features.
2. Choose Windows Subsystem for Linux WSLg Preview and click Uninstall > Uninstall. In Windows 11, you need to click three dots and click Uninstall.
3. Find Windows Subsystem for Linux Update and uninstall it.
Step 3: Disable Windows Subsystem for Linux
This is the last step you should do and see what you should do:
1. In Windows 11/10, click System > Optional features and click More Windows features under the Related settings section to open Windows Features.
Tips:
Alternatively, you can type windows features into the search box and click Turn Windows features on or off.
2. In the Windows Features interface, locate Virtual Machine Platform and Windows Subsystem for Linux, then uncheck the boxes of these two options.
3. Click OK to save the changes and restart your computer.
After the restart, you completely uninstall WSL on Windows 11/10. If you change your mind and want to run a Linux distribution like Ubuntu, you can still reinstall WSL on your computer.
About The Author
Position: Columnist
Vera is an editor of the MiniTool Team since 2016 who has more than 7 years’ writing experiences in the field of technical articles. Her articles mainly focus on disk & partition management, PC data recovery, video conversion, as well as PC backup & restore, helping users to solve some errors and issues when using their computers. In her spare times, she likes shopping, playing games and reading some articles.
Все способы:
- Удаление дистрибутивов Linux
- Шаг 1: Отмена установки дистрибутивов Linux в WSL
- Шаг 2: Деинсталляция приложений
- Удаление связанных с WSA компонентов Win 11
- Вариант 1: «Компоненты Windows»
- Вариант 2: Консоль
- Вопросы и ответы: 0
Удаление дистрибутивов Linux
Первым шагом на пути отказа от использования «Подсистемы Windows для Linux» в среде ОС от Microsoft, в том числе одиннадцатой версии, должна стать деинсталляция развёрнутых на ПК дистрибутивов UNIX-систем. Полное удаление любого адаптированного для функционирования через WSA дистрибутива Линукс выполняется в два этапа, и далее продемонстрировано, как это сделать относительно всех последних без исключения.
Шаг 1: Отмена установки дистрибутивов Linux в WSL
Сначала удаляем созданные Linux в подсистеме Windows 11 данные, созданную первой файловую систему, а также отменяем регистрацию всех Linux-дистрибутивов в WSL. Фактически всё это осуществляется путём запуска единственной консольной команды.
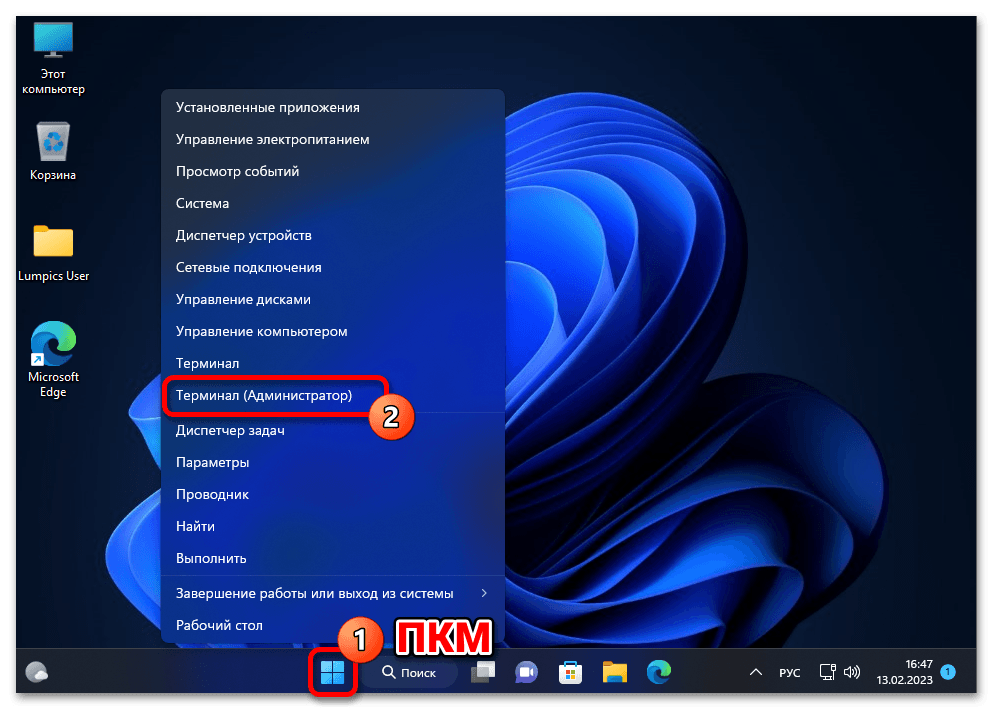
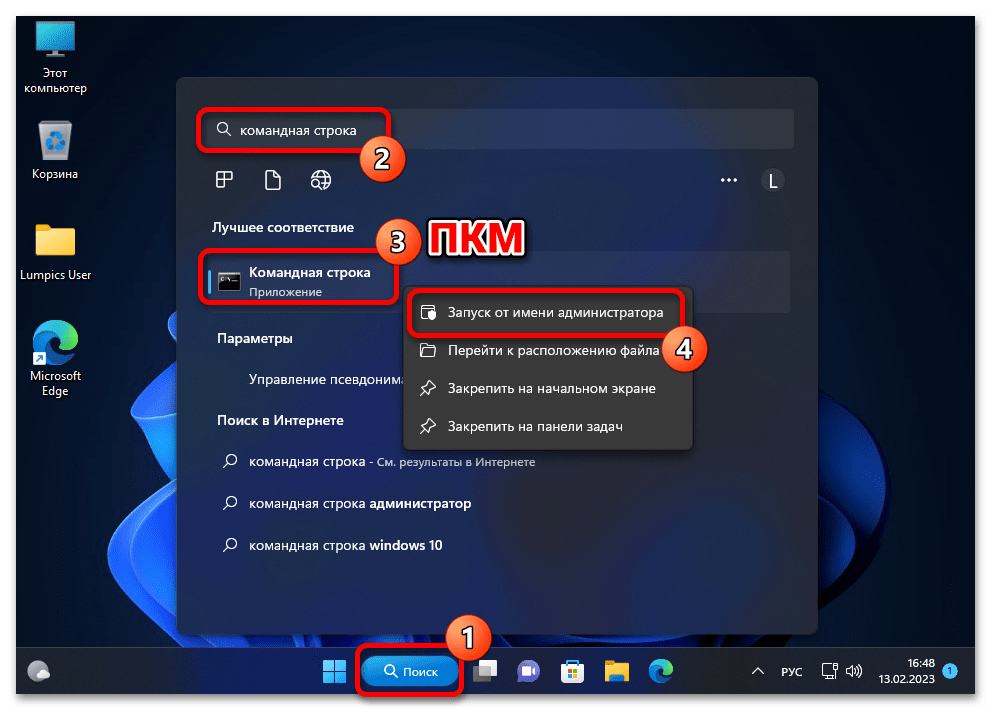
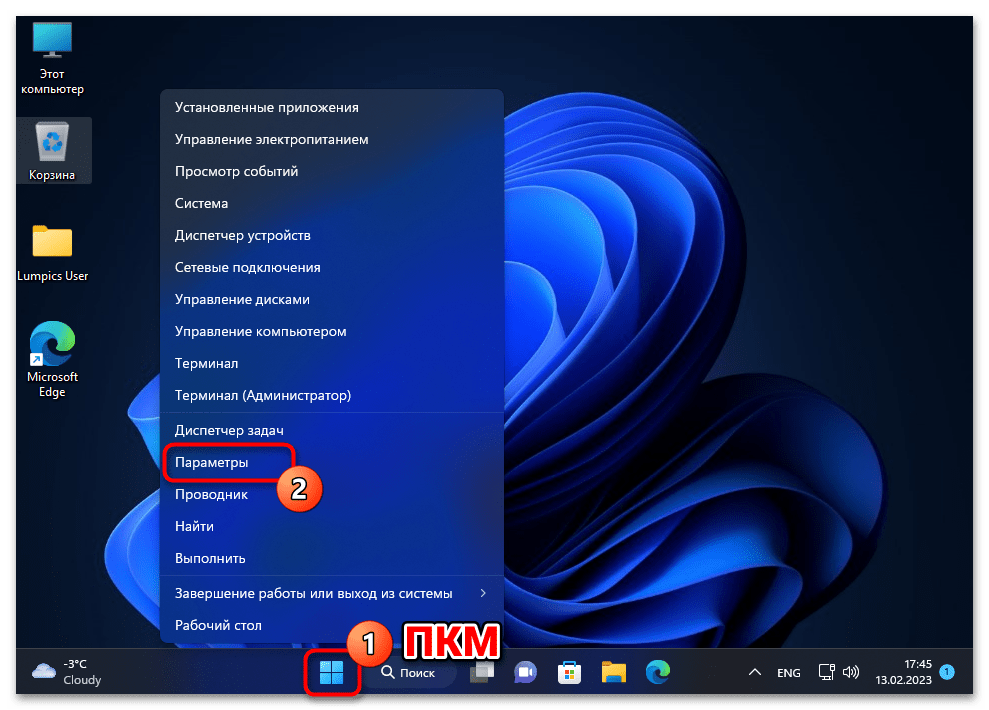
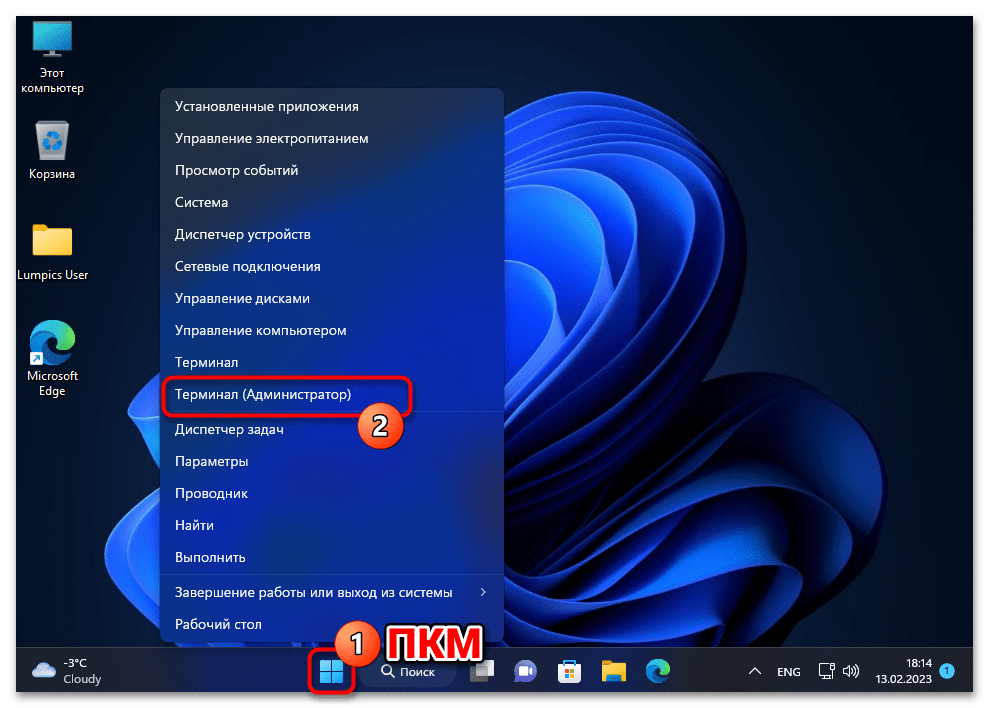
- Обязательно с повышенными привилегиями («от имени Администратора») открываем «Терминал» либо классическую «Командную строку» Windows 11. (Первое выполнимо, к примеру, из контекстного меню элемента «Пуск» на «Панели задач» операционки,

а второе проще всего реализовать средствами системного «Поиска».)

Читайте также:
Как открыть приложение «Терминал» в Windows 11
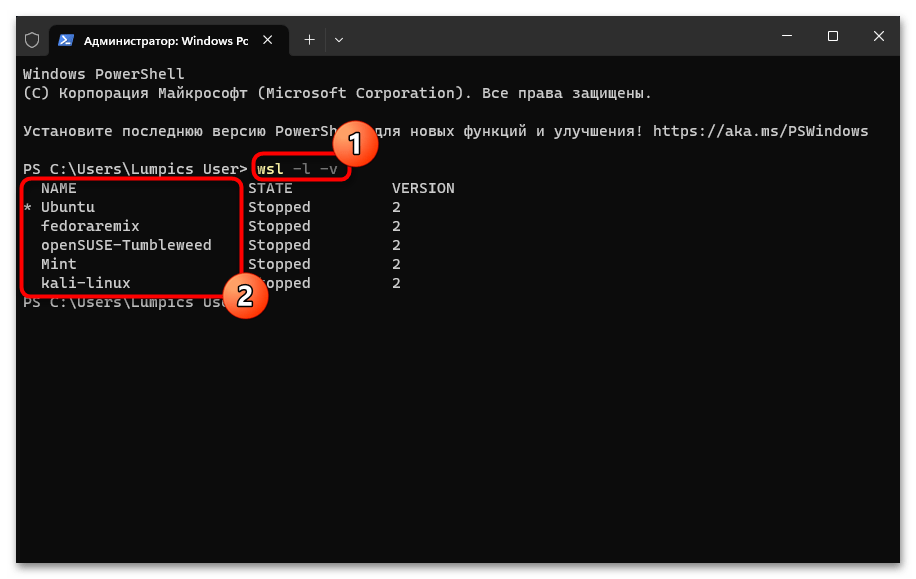
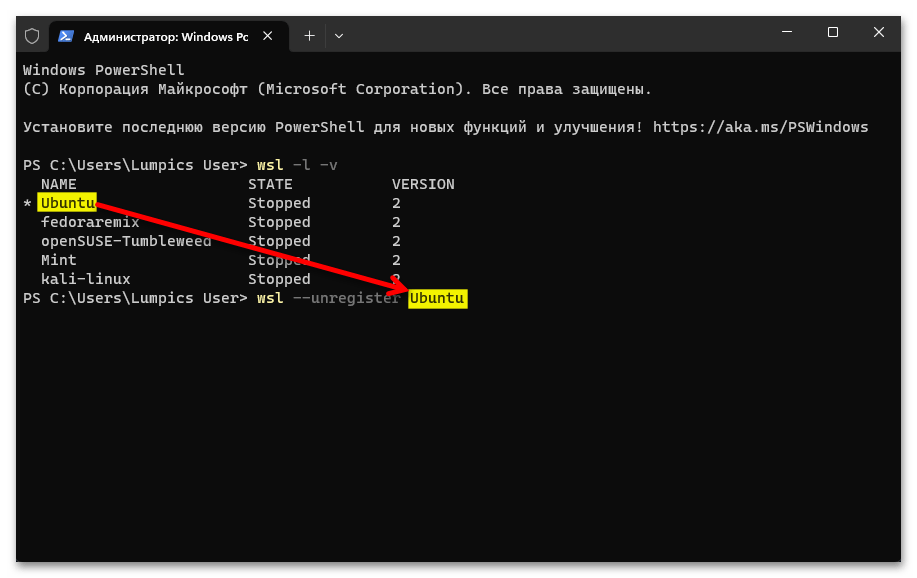
Запуск «Командной строки» от имени Администратора в Windows 11 - Сначала определяем, какие (и сколько) дистрибутивы Linux установлены в подсистеме WSL, а также выясняем их точные имена. С такой целью отправляем на выполнение команду:
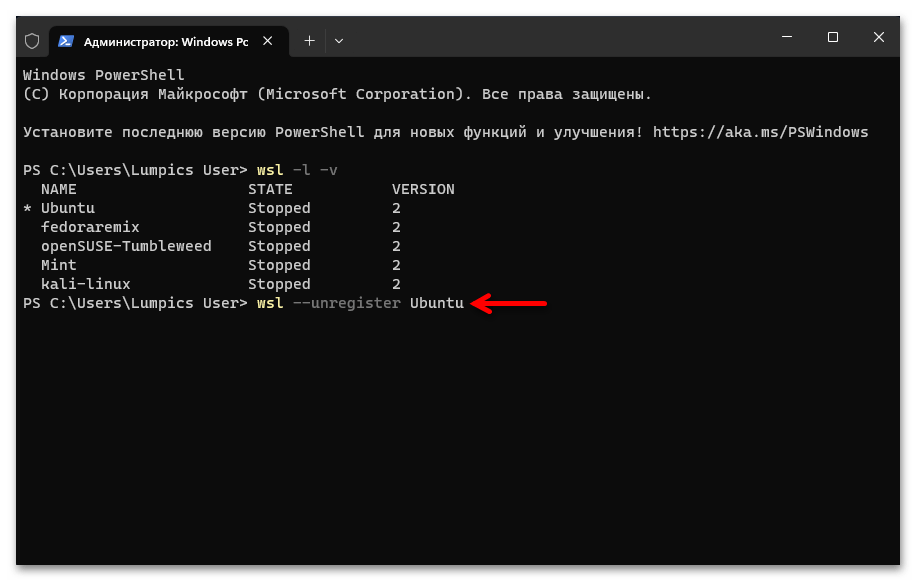
wsl -l -v - Чтобы деинсталлировать отдельный дистрибутив Linux из «Подсистемы Виндовс для Линукс», вводим в консоль следующее указание:
wsl --unregister ИМЯ_ДИСТРИБУТИВА
(
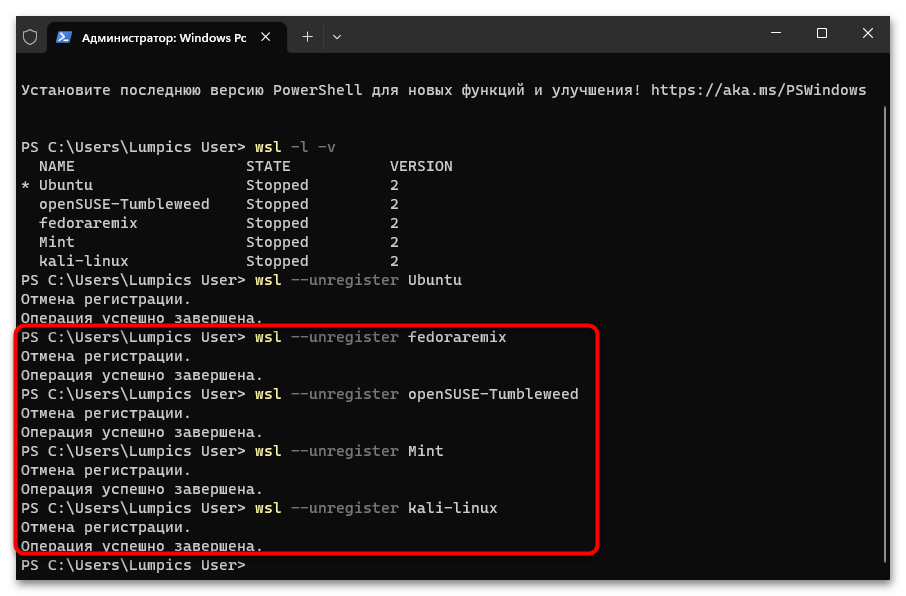
ИМЯ_ДИСТРИБУТИВАзаменяем на точное значение такового в полученном по результату выполнения предыдущего пункта этой инструкции перечня) - Нажав «Enter» на клавиатуре, отправляем введённую команду на выполнение, после чего дожидаемся завершения процедуры «Отмена регистрации» – в консоли появится оповещение «Операция успешно завершена».
- Повторяем процедуру отмены регистрации и удаления данных относительно всех других добавленных в подсистему дистрибутивов Линукс.
- Чтобы убедиться в том, что все дистрибутивы исключены из «Подсистемы Windows для Linux», по завершении выполнения вышеуказанного повторно запускаем команду
wsl -l -v.

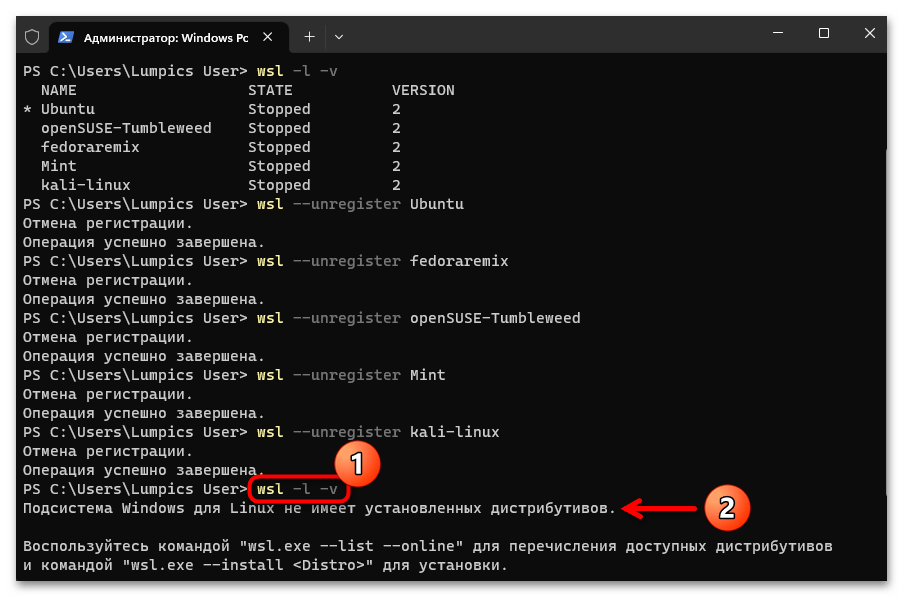
Рассмотренная выше операция очистит WSL непосредственно от данных Линукс-дистрибутивов, однако их инсталляционные пакеты останутся на компьютере (и будут доступны для развёртывания, к примеру, путём обычного открытия из «Главного меню» Windows 11), продолжат занимать место на диске, и в целом отображаться в интерфейсе ОС от Microsoft как установленные, поэтому не стоит игнорировать выполнение следующего пункта настоящих рекомендаций.
Шаг 2: Деинсталляция приложений
С целью полного избавления от следов всех ранее эксплуатируемых вариантов Линукс в Виндовс 11 необходимо деинсталлировать приложения дистрибутивов, через которые они и были интегрированы в «Подсистему Виндовс для Линукс». Это выполняется точно так же, как удаление любого полученного из Майкрософт Стор софта, а практически реализуется минимум двухвариантно.
Читайте также: Удаление встроенных и полученных из Microsoft Store приложений в Windows 11
Вариант 1: «Параметры»
- Открываем (к примеру, нажав «Win»+«X» или вызвав соответствующий пункт из меню дополнительных функций кнопки «Пуск» на «Панели задач») «Параметры» Windows 11.
- Из меню слева окна «Параметров» ОС переходим в раздел «Приложения», затем открываем «Установленные приложения».
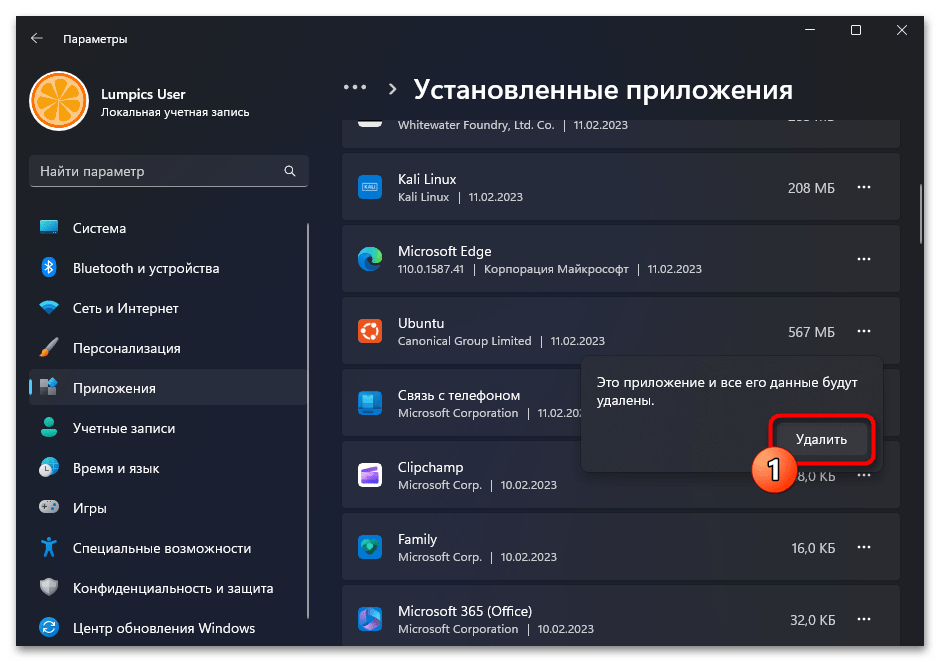
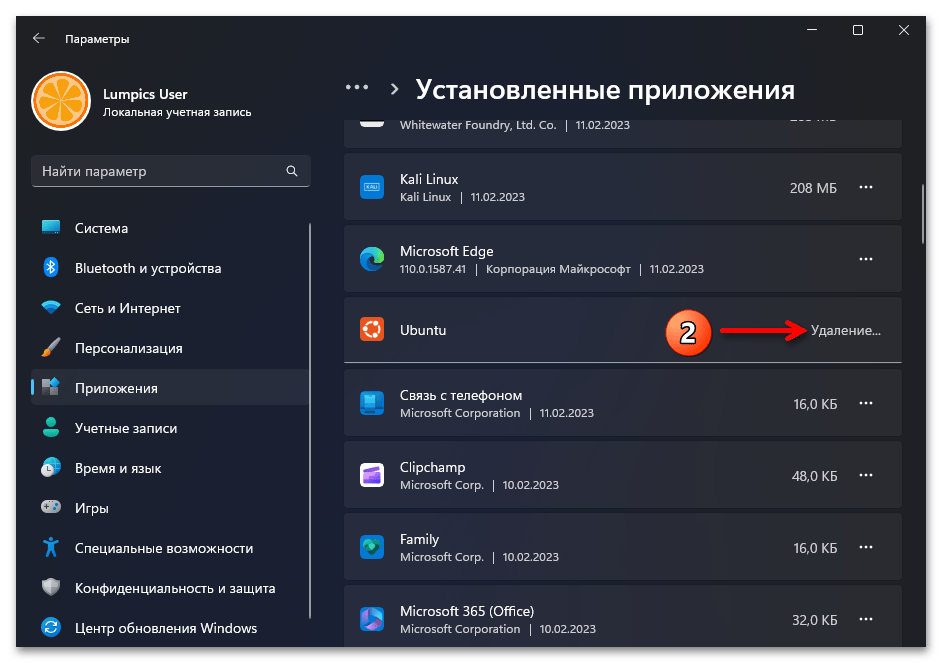
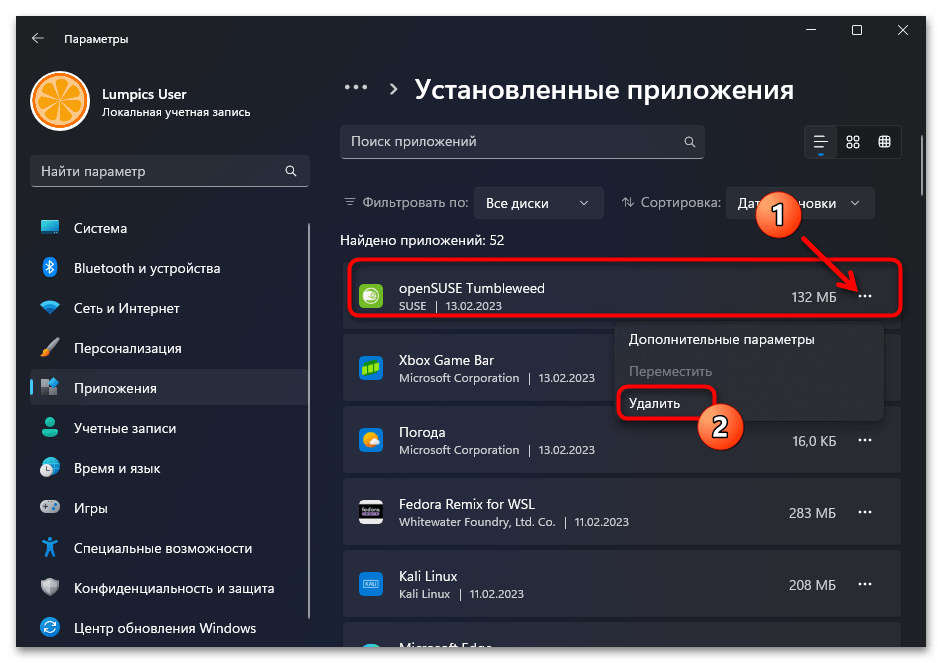
- Находим блок с наименованием деинсталлируемого дистрибутива Линукс в перечне доступного в Виндовс 11 софта,

кликаем по расположенным в его правой части трём точкам,

выбираем «Удалить» в отобразившемся меню.
- Подтверждаем свои намерения, кликнув «Удалить» в следующем меню,

затем ожидаем завершения деинсталляции софта.
- Повторяем выполнение шагов №№3-4 выше относительно всех дистрибутивов Linux, которые обнаруживаются в перечне инсталлированных в Виндовс 11 приложений.
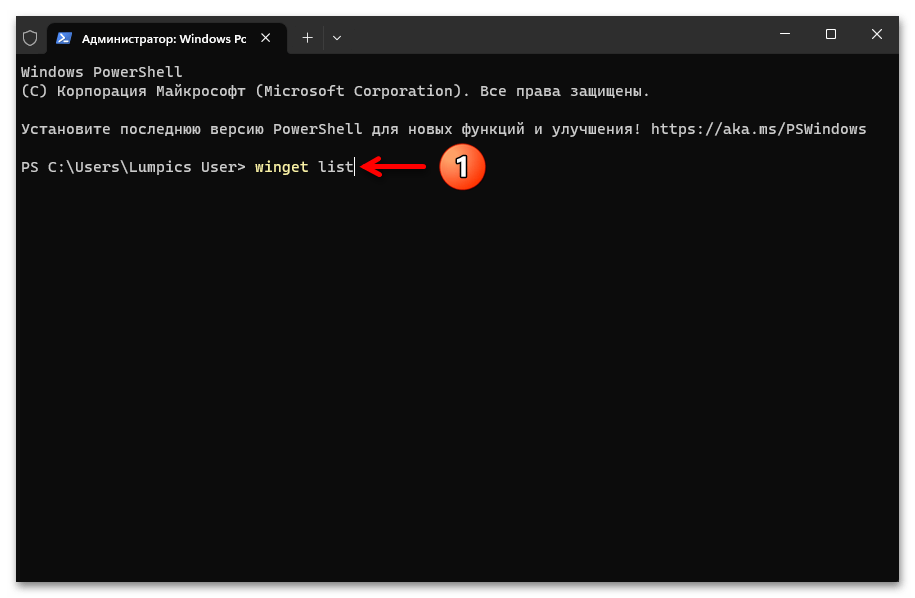
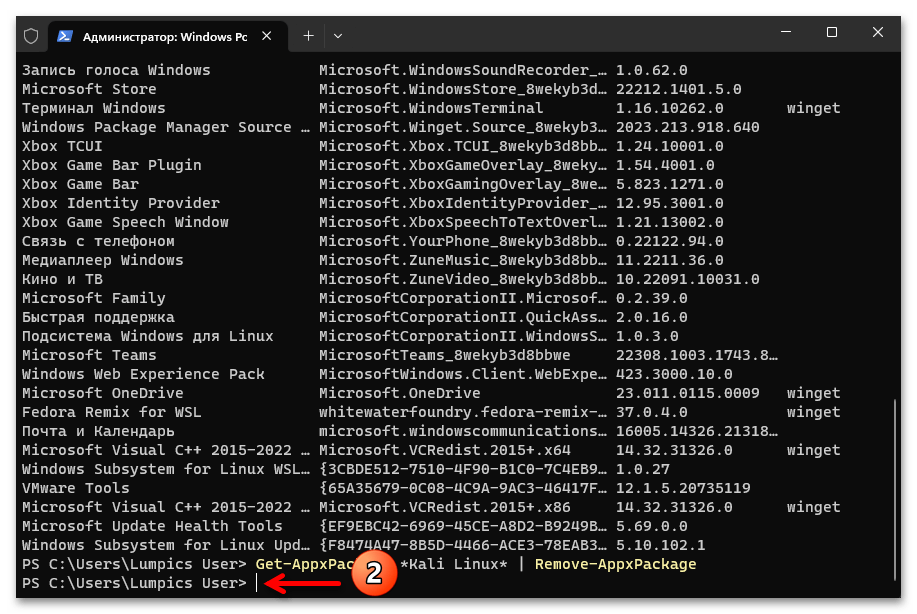
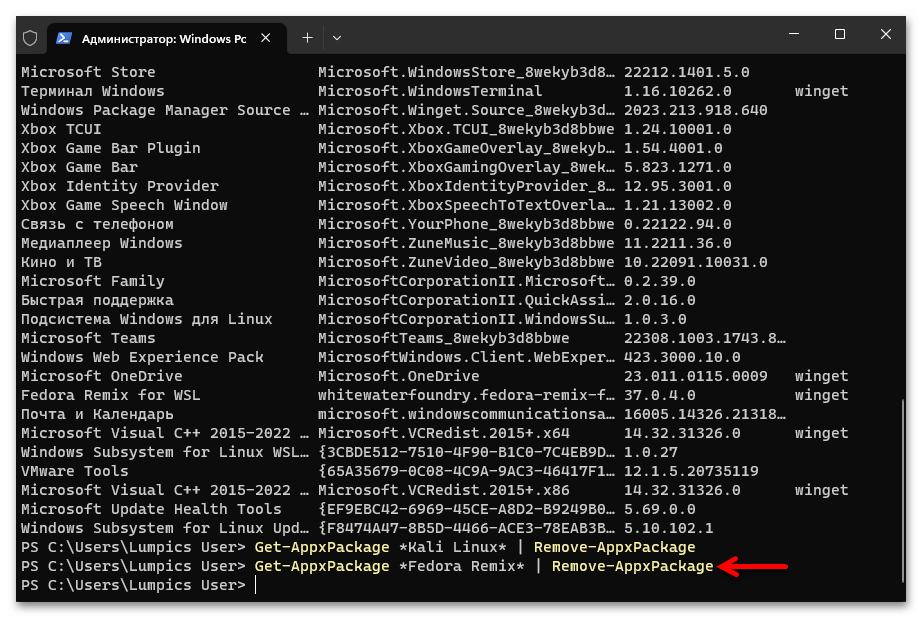
Вариант 2: Диспетчер пакетов Windows
Те, кто для решения различных задач в Windows предпочитают использовать консоль, могут выполнить удаление приложений Linux при помощи программы командной строки «Диспетчер пакетов» («winget»). Один из возможных алгоритмов реализации такого подхода:
- От имени Администратора открываем «Терминал» (в примере далее) или классическую «Командную строку» Виндовс.
- Отправляем на выполнение команду вывода списка установленных в операционке приложений:
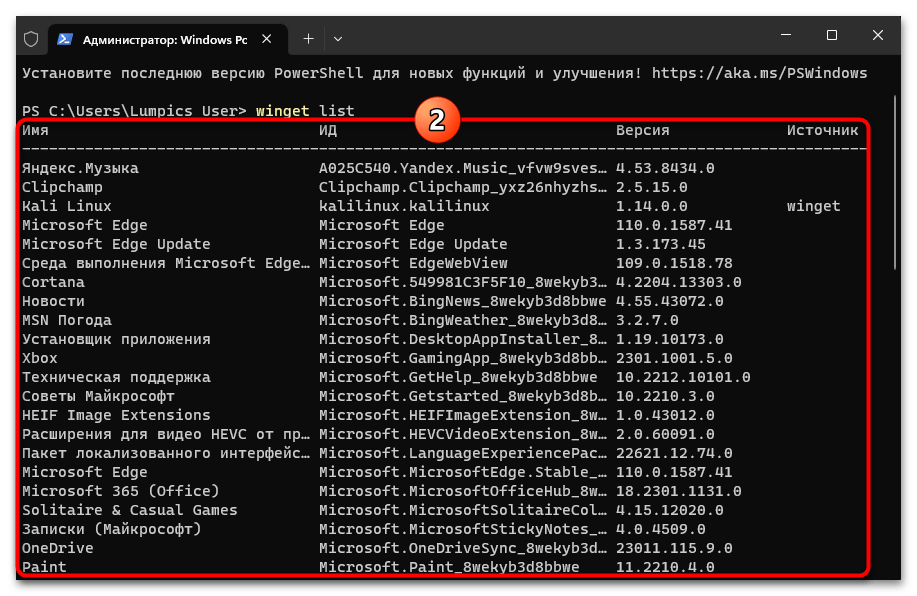
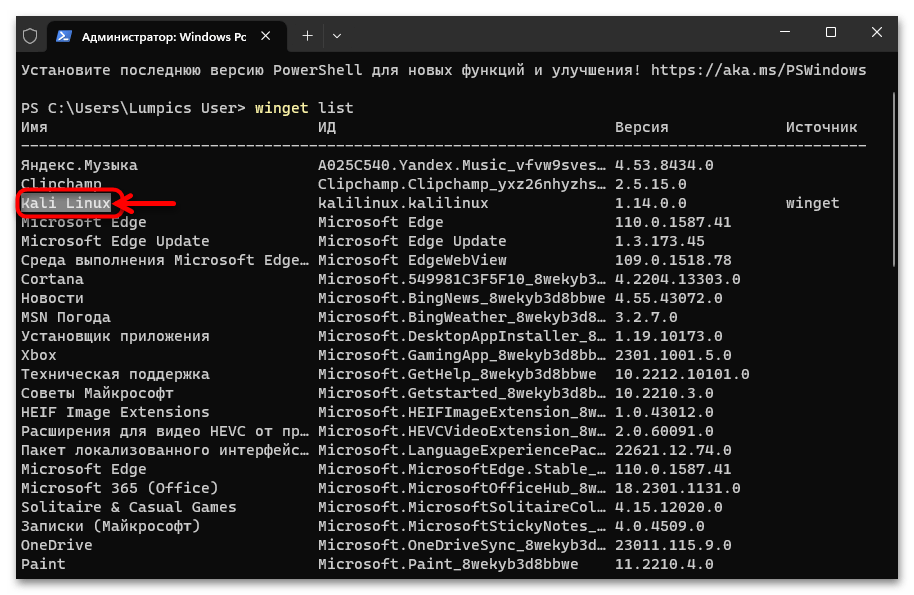
winget list
Немного ожидаем, пока перечень софта будет сформирован и представлен в виде ответа консоли.
- В столбце «Имя» находим наименование удаляемого из системы приложения-дистрибутива Linux, запоминаем его. (Возможно, удобнее и проще будет скопировать Имя в буфер обмена – выделяем текстовое значение параметра мышкой, нажимаем «Ctrl»+«C» на клавиатуре ПК.)
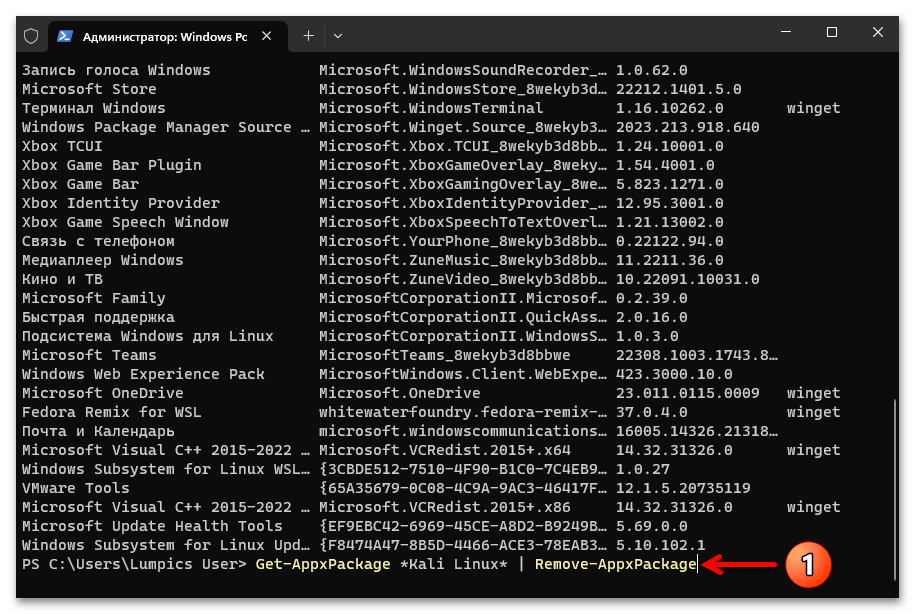
- Вводим команду удаления приложения-дистрибутива Линукс из системы, её синтаксис следующий (ИМЯ_ДИСТРИБУТИВА_LINUX заменяем на полученное на шаге выше значение «Имя», вставка данных в консоль выполнима путём нажатия клавиатурной комбинации «Ctrl»+«V»):
Get-AppxPackage *ИМЯ_ДИСТРИБУТИВА_LINUX* | Remove-AppxPackage
Нажимаем «Ввод» на клавиатуре, чтобы запустить выполнение указания, ожидаем окончания инициированной операции – в консоли отобразиться приглашение к вводу следующих команд.
- Повторяем процедуру деинсталляции относительно всех демонстрируемых перечнем-ответом на команду
winget listдистрибутивов Linux.
Удаление связанных с WSA компонентов Win 11
По сути, после деинсталляции всех дистрибутивов Линукс по предложенным выше инструкциям каких-либо видимых признаков присутствия WSA в Windows 11 не останется, и если есть вероятность, что подсистема потребуется когда-нибудь в будущем, далее можно ничего не предпринимать. Если же целью является действительно полное удаление «Подсистемы Windows для Linux» из состава ОС, выполняем одну из двух следующих инструкций.
Вариант 1: «Компоненты Windows»
Вероятно, наиболее привычный и удобный с точки зрения пользователей Windows метод включения и удаления необязательных компонентов операционки, включая WSA, подразумевает эксплуатацию специализированного элемента «Панели управления».
Читайте также: Включение или отключение компонентов Windows 11
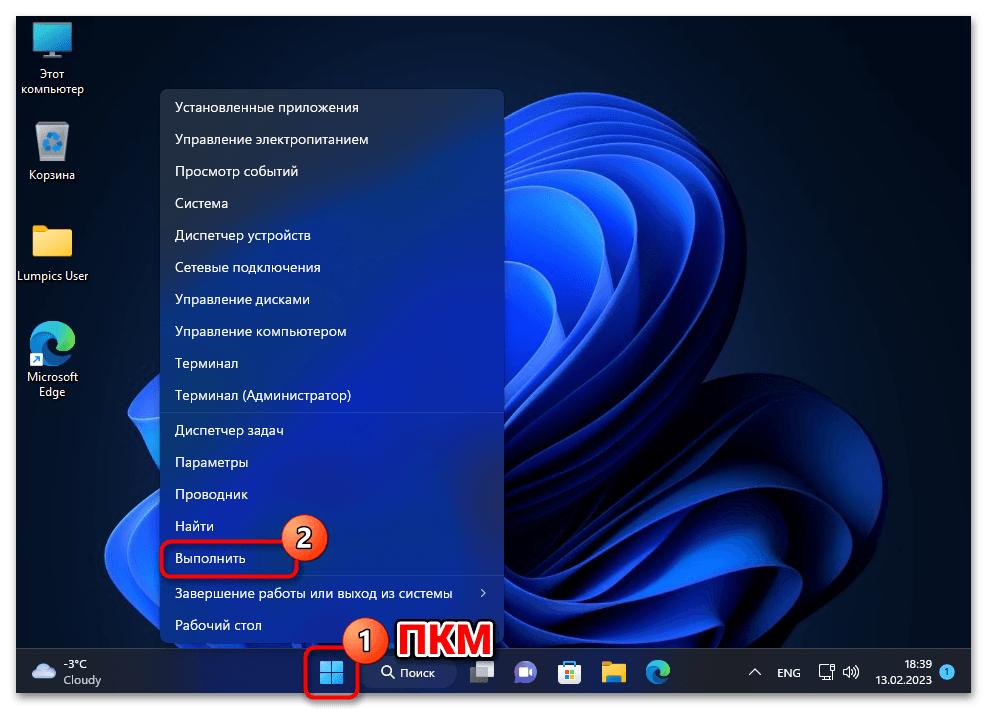
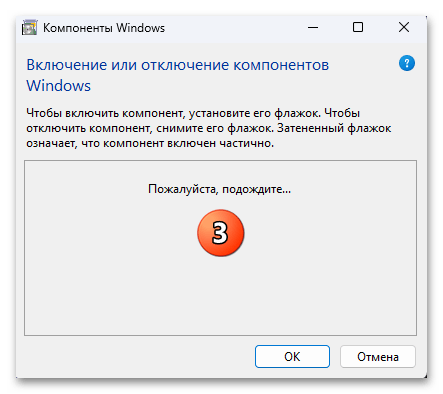
- Открываем окно «Панели управления» «Компоненты Windows». Это выполнимо различными путями, далее один из них:
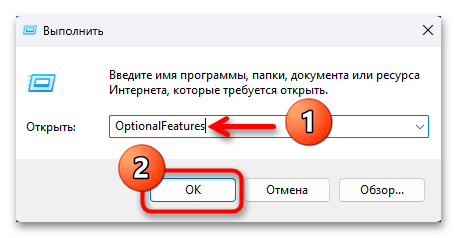
- Вызываем (из контекстного меню кнопки «Пуск» на «Панели задач» или нажав «Win» + «R» на клавиатуре) системную оснастку «Выполнить».
- Вводим в поле «Открыть» отобразившегося окошка следующую команду, после чего кликаем «ОК» или нажимаем «Ввод» на клавиатуре:
OptionalFeatures
В результате откроется требуемый в нашем случае инструментарий:


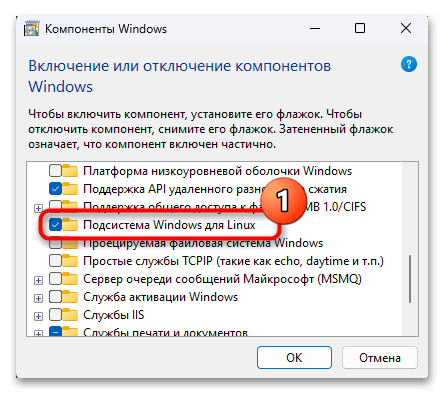
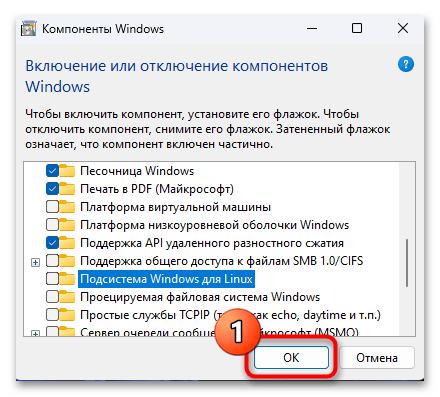
- Прокручиваем список записей в окне «Компоненты Windows»,

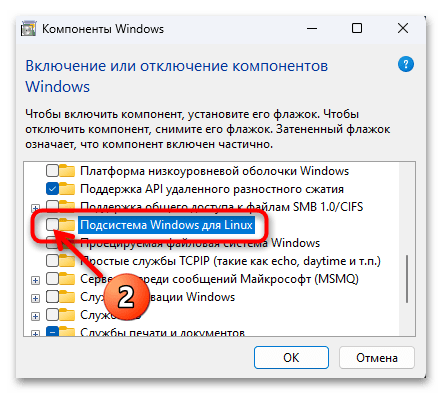
снимаем галочку с чекбокса слева пункта «Подсистема Windows для Linux».
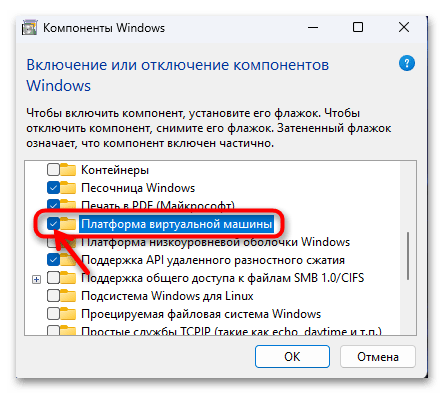
- При желании (когда не требуется для функционирования другого, отличного от WSA софта) можно удалить также «Платформу для виртуальной машины» — убираем отметку с обозначающего её чекбокса.
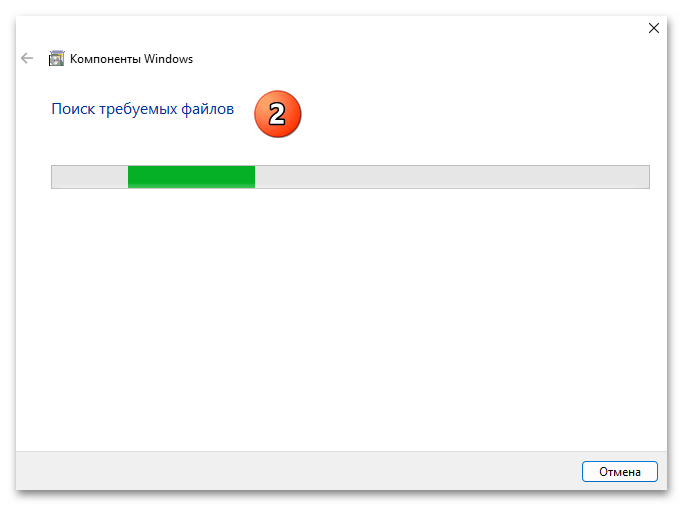
- Кликаем «ОК» в окошке включения/выключения компонентов операционки,

после чего ожидаем, пока система выполнит подразумевающие удаление выбранных объектов манипуляции в автоматическом режиме.
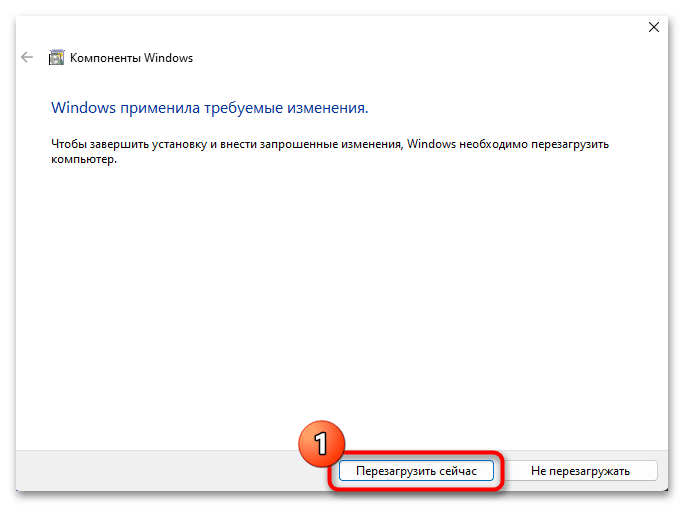
- Щёлкаем «Перезагрузить сейчас» в окне с оповещением «Windows применила требуемые изменения»,

ждём, пока завершится перезапуск ПК и

осуществляемое в этом процессе окончательное удаление «Подсистемы Windows для Linux» из Windows 11.
Вариант 2: Консоль
Второй вариант действий по удалению компонента «Подсистема Виндовс для Линукс» и (при необходимости) «Платформы виртуальной машины» из Windows 11 подразумевает использование средств программы командной строки для изменения образов ОС от Microsoft под названием DISM.
- Открываем (обязательно, с правами Администратора) «Терминал» или «Командную строку».
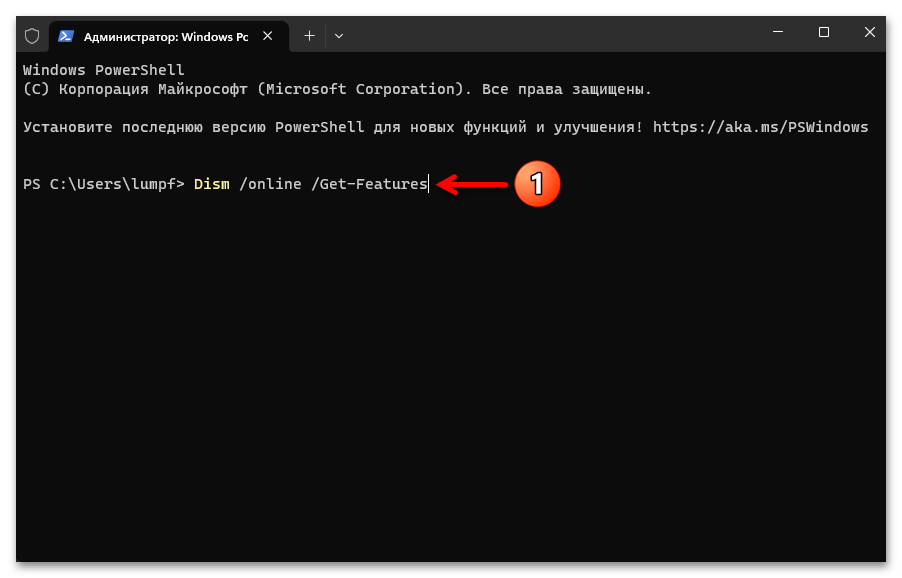
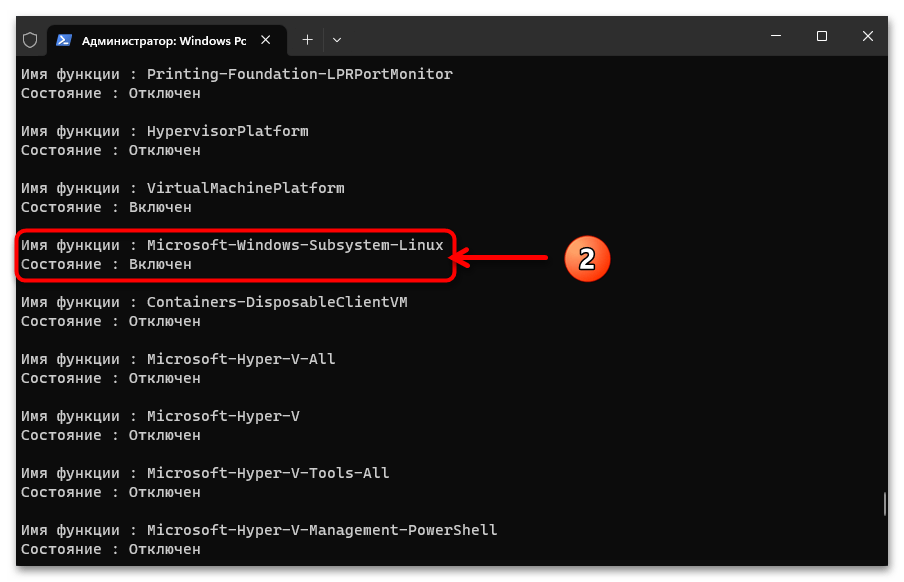
- Для начала можно проверить факт включённости «Подсистемы Windows для Linux» в Win 11, — с такой целью при помощи следующей команды запрашиваем список всех компонентов ОС:
Dism /online /Get-Features
Прокручиваем полученный в консоли перечень, находим в нём запись «Microsoft-Windows-Subsystem-Linux», убеждаемся, что «Состояние» компонента «Включён», и затем переходим к выполнению следующего пункта этой инструкции.
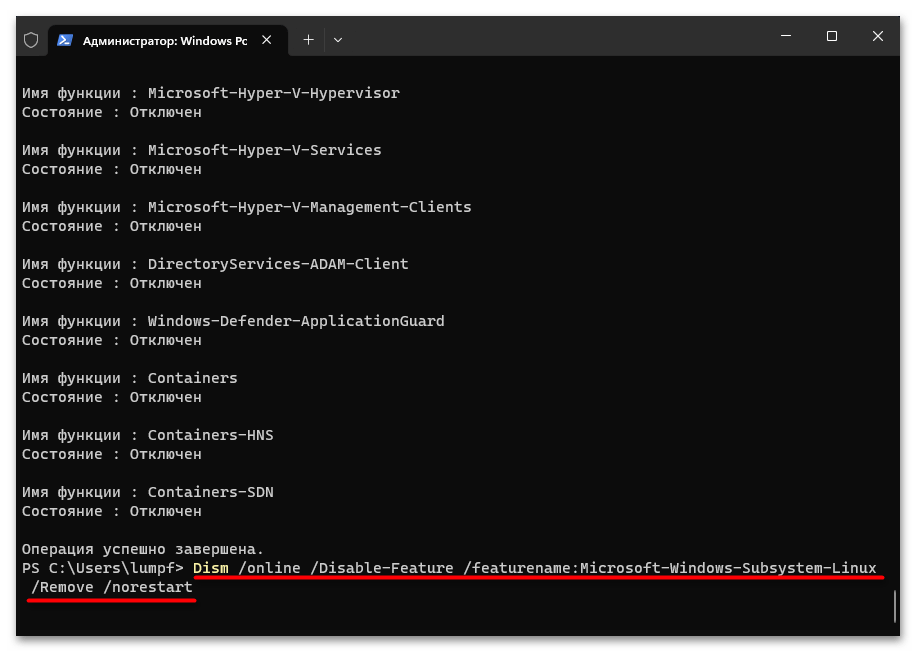
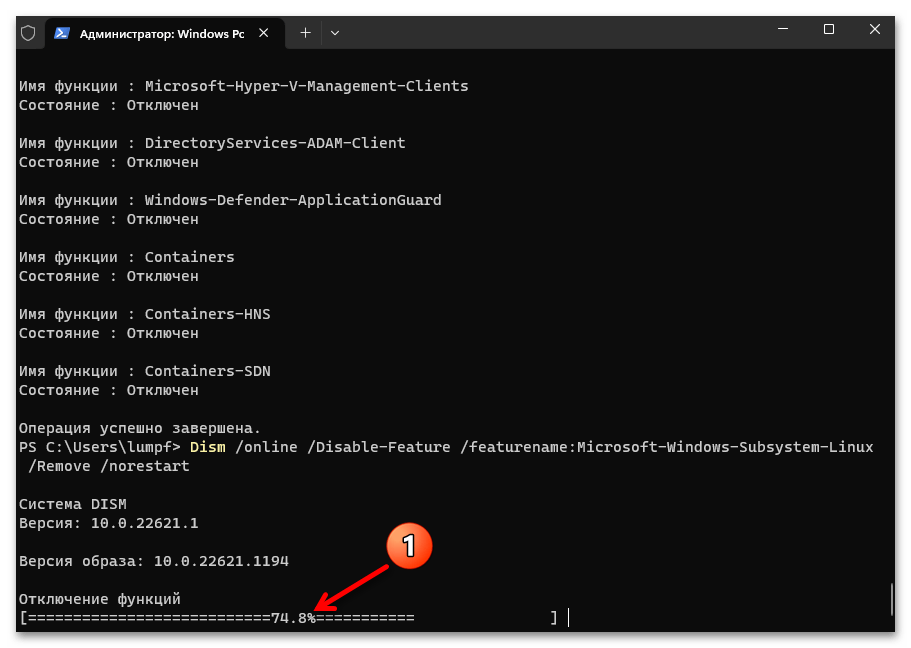
- Пишем в консоли (или копируем из текста этой статьи и затем вставляем в окно «Терминала»/«Командной строки») такое указание:
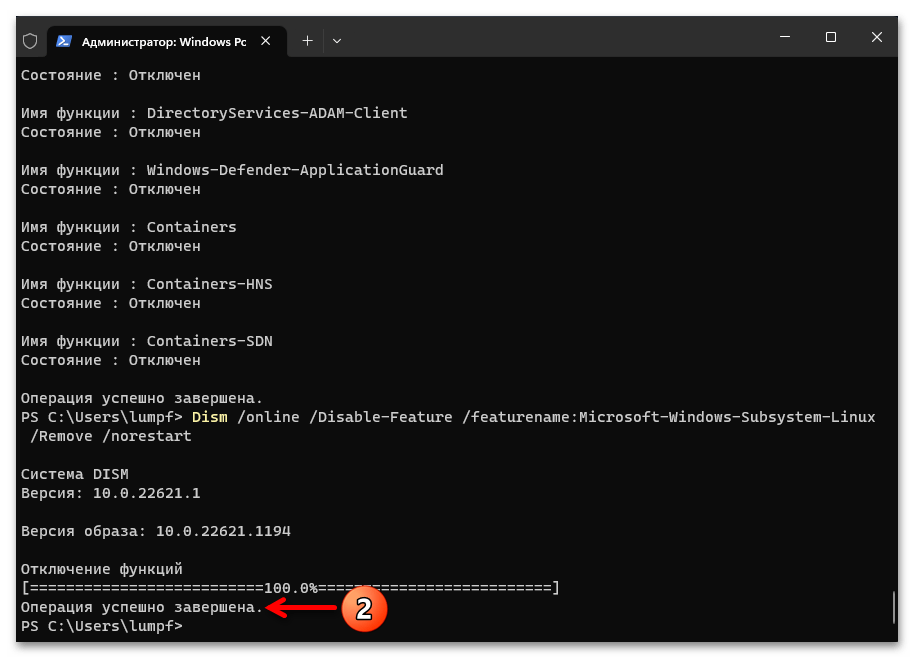
Dism /online /Disable-Feature /featurename:Microsoft-Windows-Subsystem-Linux /Remove /norestart - Нажимаем «Enter», ожидаем

завершения удаления компонента WSA из системы.
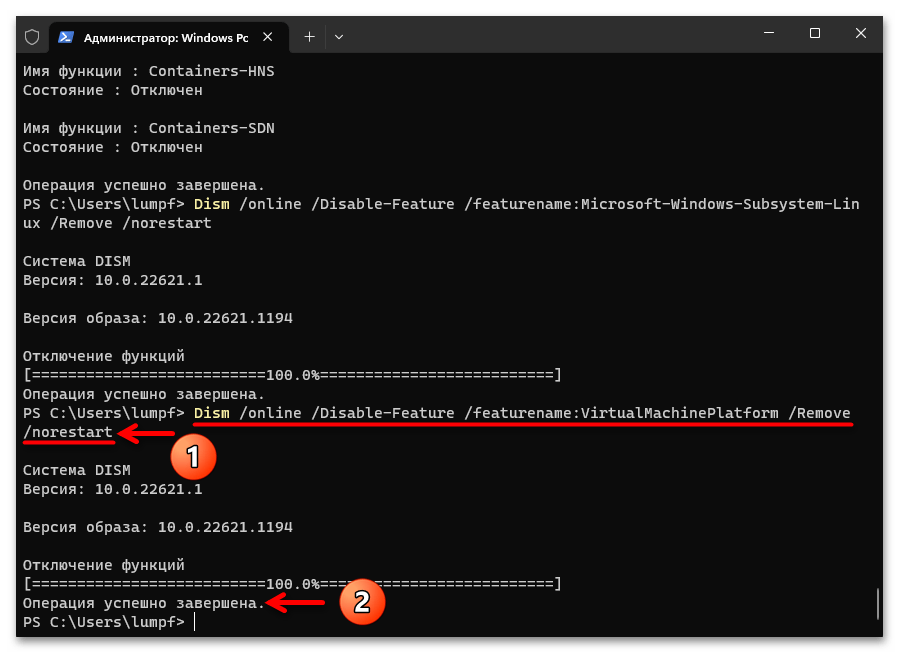
- При необходимости и действуя по аналогии с компонентом WSA «выключаем» через консоль «Платформу виртуальной машины», — команда будет следующей:
Dism /online /Disable-Feature /featurename:VirtualMachinePlatform /Remove /norestart
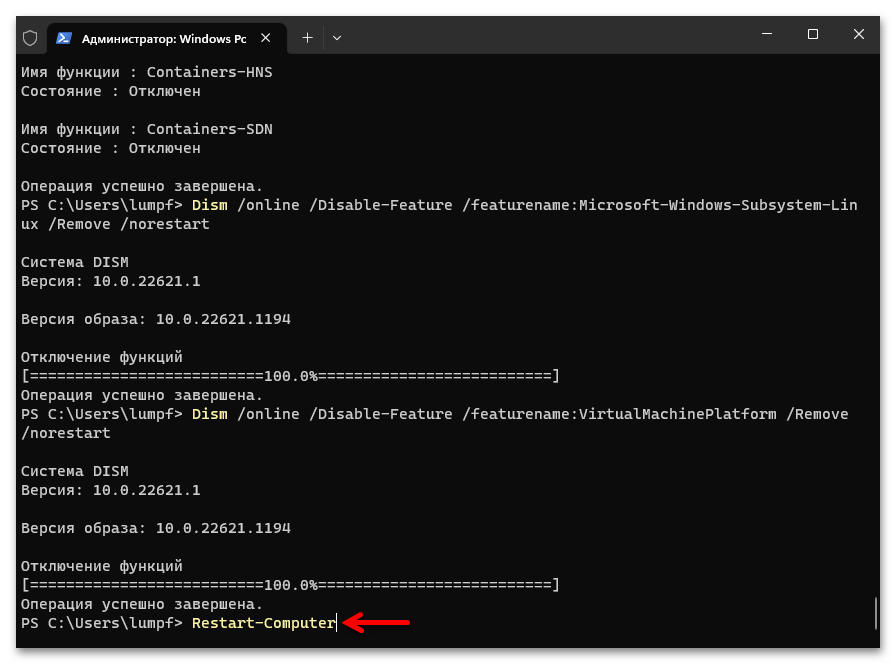
- Завершив запуск деактивирующих компоненты Win 11 непосредственно команд, перезапускаем компьютер. С этой целью, к примеру, через «Терминал» можно отправить на выполнение следующее указание:
Restart-Computer
Читайте также: Как перезагрузить компьютер под управлением Windows 11
- После перезапуска ПК и проведения в этом процессе системой автоматически манипуляций

полное удаление «Подсистемы Windows для Linux» из Windows 11 следует считать завершённым.


Наша группа в TelegramПолезные советы и помощь
Uninstalling WSL (Windows Subsystem for Linux) in Windows 10 is easier than you might think. Just follow a few simple steps: open the Control Panel, go to Programs and Features, and then disable the Windows Subsystem for Linux. This will remove WSL from your system. Let’s get into the details to make sure you nail it.
In this section, we’ll walk you through the steps to uninstall WSL from your Windows 10 machine. By the end of these steps, you’ll have completely removed WSL, freeing up system resources and clearing out any Linux distributions you no longer need.
Step 1: Open the Control Panel
Open the Control Panel by typing «Control Panel» in the Windows search bar and hitting Enter.
The Control Panel is your one-stop-shop for making major system changes, and finding it is as simple as using the search bar. Once you open it, you’ll have access to various system settings and features.
Step 2: Go to Programs and Features
Inside the Control Panel, click on «Programs,» then click on «Programs and Features.»
This is where you can uninstall or modify installed programs. It’s like the app manager on your phone but for your computer. You’ll see a list of all the software installed on your machine.
Step 3: Turn Windows Features On or Off
On the left sidebar, you’ll see an option that says «Turn Windows features on or off.» Click on it.
This option allows you to enable or disable various Windows features, including WSL. This is crucial because WSL isn’t just another app; it’s a subsystem integrated into Windows.
Step 4: Locate and Uncheck Windows Subsystem for Linux
Scroll down until you see «Windows Subsystem for Linux.» Uncheck the box next to it.
By unchecking this box, you’re telling Windows to deactivate WSL. This action won’t take effect until you reboot your system, so don’t be alarmed if nothing seems to happen immediately.
Step 5: Reboot Your System
Finally, restart your computer to apply the changes.
A reboot is necessary to complete the uninstallation process. Once your system restarts, WSL will be fully removed from your machine.
After completing these steps, WSL will be removed from your system. Your computer will no longer support running Linux distributions natively through WSL, and the associated files will be deleted.
Tips for Uninstalling WSL in Windows 10
- Always back up your data before uninstalling any software.
- Ensure no Linux distributions are running when you begin the uninstallation process.
- Check for any dependencies that might rely on WSL before removing it.
- Update your Windows 10 system to the latest version for a smoother uninstallation process.
- If you plan to reinstall WSL later, make a note of any custom settings you have configured.
Frequently Asked Questions
What happens to my Linux files after uninstalling WSL?
Your Linux files will be deleted when you uninstall WSL. Be sure to back up any important data before starting the process.
Can I reinstall WSL later?
Yes, you can. Simply go through the installation process again via the Control Panel or Windows Features.
Do I need administrative privileges to uninstall WSL?
Yes, you need administrative privileges to access and change system features like WSL.
Will uninstalling WSL affect my Windows performance?
Uninstalling WSL may free up some system resources, but it won’t significantly impact overall performance.
Are there alternatives to WSL if I need a Linux environment?
Yes, you can use virtual machines like VirtualBox or VMware, or even dual-boot your system with Linux.
Summary
- Open the Control Panel.
- Go to Programs and Features.
- Click «Turn Windows features on or off.»
- Uncheck Windows Subsystem for Linux.
- Reboot your system.
Conclusion
Uninstalling WSL in Windows 10 is a straightforward process that can be done in just a few steps. By following the steps outlined above, you can efficiently remove WSL and free up system resources. Remember to back up your data and check for any dependencies before proceeding.
If you’re considering alternatives to WSL, options like virtual machines or dual-boot setups are worth exploring. They provide different levels of integration and performance suited to various needs. Whether you’re cleaning up your system or switching to a different Linux environment, understanding how to manage these subsystems is crucial.
For further reading, you might want to explore articles on optimizing Windows performance and managing different operating systems efficiently. And if you ever find the need to reinstall WSL, it’s as simple as reversing the steps outlined in this guide.
So, now that you know how to uninstall WSL in Windows 10, why not give it a try? Your system might just thank you for the extra breathing room!
Matt Jacobs has been working as an IT consultant for small businesses since receiving his Master’s degree in 2003. While he still does some consulting work, his primary focus now is on creating technology support content for SupportYourTech.com.
His work can be found on many websites and focuses on topics such as Microsoft Office, Apple devices, Android devices, Photoshop, and more.
- To uninstall WSL on Windows 11, open Settings > Apps > Installed apps and remove the Linux distros and “Windows Subsystem for Linux” components. Finally, open Settings > System > Optional features > More Windows Features and remove the WSL and virtual machine components.
UPDATED 1/27/2025: On Windows 11, it’s possible to uninstall the Windows Subsystem for Linux (WSL), but it requires multiple (in-order) steps. Although Microsoft has streamlined the installation with a single command or using the Microsoft Store, removing the platform is not as simple as clicking an “Uninstall” button.
If you want to uninstall WSL from your computer completely, you must remove the Linux distros, uninstall additional components, and disable the platform components.
Although the ability to run Linux on Windows 11 is a useful feature for developers and users who need access to both platforms, there might come a time when you no longer need the platform or may need to reset it to fix problems. Whatever the reason, you can permanently remove WSL by uninstalling all the components in order.
In this guide, I will teach you the steps to remove the Windows Subsystem for the Linux platform from Windows 11.
Completely uninstall WSL from Windows 11
To uninstall the Windows Subsystem for Linux from Windows 11, you first want to remove the distros, platform components, and the remaining operating system features.
1. Remove Linux distros
To uninstall a distro of Linux from WSL on Windows 11, use these steps:
-
Open Settings on Windows 11.
-
Click on Apps.
-
Click the Installed apps page.
-
Select the Linux distribution.
-
Click the menu (three-dotted) button on the right and the Uninstall option.

-
Click the Uninstall option again.

Once you complete the steps, repeat the instructions to remove any remaining distro as necessary.
2. Remove Windows Subsystem for Linux components
To uninstall the WSL Linux kernel and GUI components on Windows 11, use these steps:
-
Open Start.
-
Search for PowerShell, right-click the top result, and click the Run as administrator option.
-
Type the following command to view all the installed apps and press Enter:
Get-AppxPackage MicrosoftCorporationII.WindowsSubsystemForLinux | Remove-AppxPackage

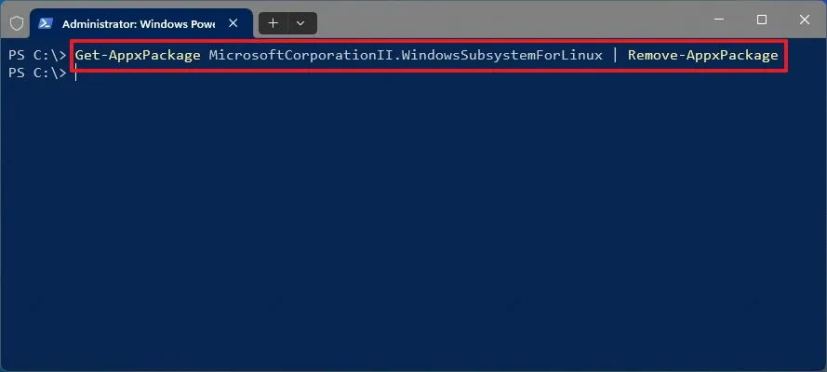
After you complete the steps, you can uninstall the platform from Windows 11.
In the past, Windows 11 offered an option on Settings > Apps > Installed apps to remove the “Windows Subsystem for Linux” component, but then, it was relocated to Settings > System > System Components. However, in this location, the component no longer includes the option to uninstall. As a result, the alternative is to remove the WSL component with PowerShell.
3. Remove WSL from Windows 11
To uninstall the Windows Subsystem for Linux components from Windows 11, use these steps:
-
Open Settings.
-
Click on System.
-
Click the Optional features page.
-
Click the “More Windows features” option under the “Related settings” section.
-
Clear the “Virtual Machine Platform” option.
-
Clear the “Windows Subsystem for Linux” option.

-
Click the OK button to uninstall the features.
-
Click the Restart now button.


Once you complete the steps, the Windows Subsystem for Linux will be completely removed from Windows 11.
You can also follow these instructions in my video tutorial on my YouTube channel. (Remember to like and subscribe.)
If, after uninstalling the platform, the Linux entry remains on File Explorer, you can use these instructions to remove the entry with Registry.
Update January 27, 2025: This guide has been updated to ensure accuracy and reflect changes to the process.