
Provide feedback
Saved searches
Use saved searches to filter your results more quickly
Sign up
Appearance settings
Среда Windows Subsystem for Linux (WSL) позволяет запускать нативные приложения, писать скрипты, выполнять команды и скрипты Linux непосредственно из Windows без использования эмуляторов или развертывания выделенных виртуальных машин. Актуальной версией среды является WSL 2, в которой используется полноценное ядро Linux (версия ядра 5.15) и обеспечивает полную совместимость с системными вызовами. Образ ядра Linux в WSL представляет собой легкую виртуальную машину, для запуска которой не нужно устанавливать полноценную роль Hyper-V.
Содержание:
- Как установить Windows Subsystem for Linux (WSL2)?
- WSL: Установка дистрибутива Linux в Windows
- Команды для управления WSL в Windows
- Использование Linux в среде WSL
Вы можете запустить WSL 2:
- Во всех версиях Windows 10, начиная с 1903, а также в Windows 11 и Windows Server 2022;
- В настройка BIOS/UEFI компьютера должна быть включена поддержка аппаратной виртуализации: Intel VT (Intel Virtualization Technology) или AMD-V (SVM Mode).
Как установить Windows Subsystem for Linux (WSL2)?
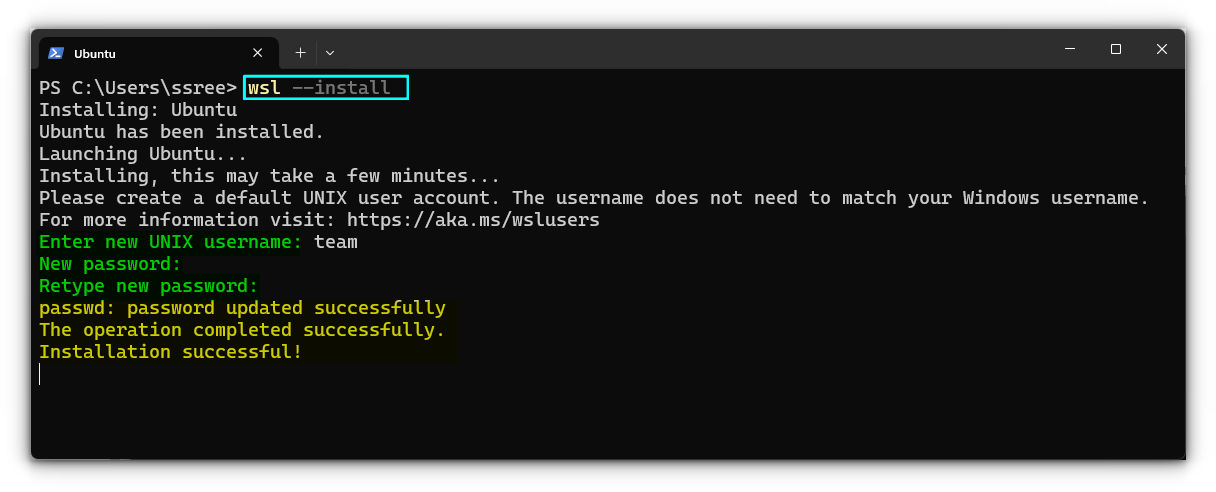
Компонент WSL по умолчанию отключен в Windows. Современных дистрибутивах Windows 10 и Windows 11 для установки среды WSL достаточно выполнить команду:
wsl --install
Этак команда автоматически включит все необходимые компоненты Windows, необходимые для работы WSL, установить обновление ядра Linux для WSL2, загрузит дистрибутив Ubuntu (по-умолчанию) и установит его в WSL.
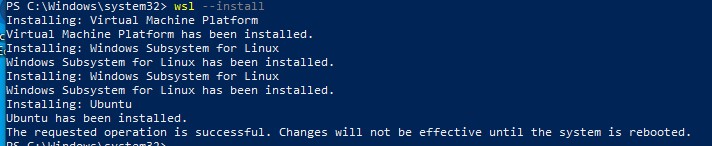
Осталось перезагрузить компьютер, и вы можете запускать среду WSL!
Вы можете установить для WSL другой дистрибутив Linux. Выведите список доступных дистрибутивов:
wsl --list --online
Укажите имя дистрибутива Linux, который установить в WSL. Например:
wsl --install -d kali-linux

Если в BIOS/UEFI компьютера не включена виртуализация, при установке WSL вы получите ошибку:
Installation failed with error 0x80070003 or error 0x80370102” it means that Bios Level Virtualization is not enabled on your computer.
Вы можете установить WSL2 в Windows вручную. Для этого придется вручную последовательно выполнить все этапы, который команда wsl —install запускала автоматически:
- Установить WSL
- Включить компонент виртуалзации VirtualMachinePlatform
- Установить ядро WSL 2
- Скачать и установить дистрибутив Linux для WSL
Сначала установите следующие компоненты Windows:
Enable-WindowsOptionalFeature -Online -FeatureName Microsoft-Windows-Subsystem-Linux
Enable-WindowsOptionalFeature -Online -FeatureName VirtualMachinePlatform
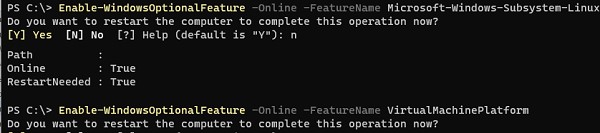
Перезагрузите компьютер.
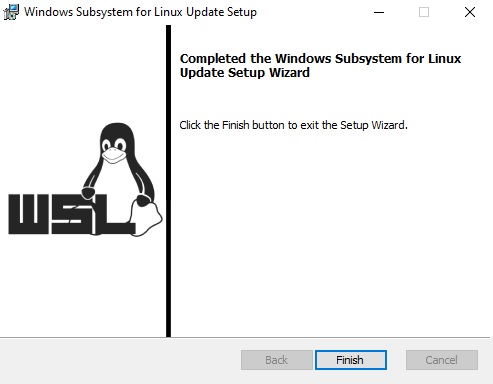
Скачаем и установим обновление ядра Linux для WSL2 (WSL2 Linux kernel update package for x64 machines — https://wslstorestorage.blob.core.windows.net/wslblob/wsl_update_x64.msi). Можете скачать пакет вручную или с помощью PowerShell:
Invoke-WebRequest -Uri https://wslstorestorage.blob.core.windows.net/wslblob/wsl_update_x64.msi -OutFile "$($env:userprofile)\Downloads\wsl_update_x64.msi" -UseBasicParsing
Invoke-Item "$($env:userprofile)\Downloads\wsl_update_x64.msi"
rm "$($env:userprofile)\Downloads\wsl_update_x64.msi"
Еще раз перезагрузите компьютер и назначьте версию WSL 2 в качестве среды по-умолчанию:
wsl --set-default-version 2

WSL: Установка дистрибутива Linux в Windows
После того, как ядро WSL установлено в Windows, вы можете установить один или несколько дистрибутивов Linux на компьютер.
Можно установить пакет с дистрибутивом Linux через Microsoft Store. Доступны следующие дистрибутивы:
- Ubuntu
- Debian
- Kali Linux
- OpenSUSE
- Oracle Linux
- SUSE Linux Enterprise Server
- Fedora
Найдите нужную версию дистрибутива в Store и установите ее, нажав кнопку Получить (Get).

Если у вас отключен Windows Store, вы хотите установить дистрибутив WSL в Core редакции Windows Server или вам нужно установить WSL на Изолированном от интернета компьютере (оффлайн), вы можете скачать дистрибутив Ubuntu с помощью PowerShell командлета Invoke-WebRequest:
Invoke-WebRequest https://aka.ms/wslubuntu2204 -OutFile ubuntu-2204.appx –UseBasicParsing
Установите пакет для WSL с помощью:
Add-AppxPackage .\ubuntu-2204.appx
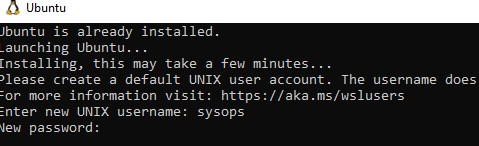
После окончания установки появится окно, в котором вам будет предложено указать имя пользователя и пароль для вашего дистрибутива.
После установки вы можете в меню Пуск появится отдельная программа для запуска Linux.
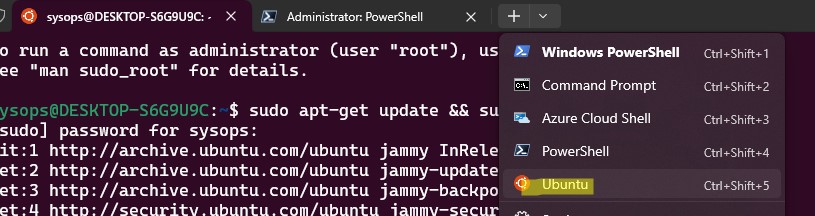
Также вы можете запустить ваш Linux из отдельной вкладки Windows Terminal или с помощью команды
wsl
.
Команды для управления WSL в Windows
Рассмотрим основные команды для управления ядром и дистрибутивами Linux в WSL.
Проверить текущую версию ядра WSL:
wsl --version
Обновить ядро WSL вручную:
wsl --update
Откатится к предыдущему ядру WSL:
wsl --update rollback
Вывести список установленных версий Linux:
wsl --list
Вывести дистрибутив Linux, который используется по-умолчанию:
wsl --status
Дистрибутив Linux по-умолчанию в WSL можно изменить:
wsl --setdefault Ubuntu
Запустить определенный дистрибутив в WSL:
wsl -d kali-linux
Завершить среду WSL:
wsl --shutdown
Можно войти в WSL Ubuntu под root и сбросить пароль:
ubuntu config --default-user root
Passwd
Вернуть пользователя по умолчанию
ubuntu config --default-user your_username
Для настройки параметров WSL и дистрибутивов Linux используются конфиг файлы:
- wsl.conf – файл с настройками конкретного дистрибутива Linux (находится в директории /etc)
- .wslconfig – глобальные настройки WSL, которые применяются ко всем дистрибутовам (находится в профиле пользователя в
%UserProfile%
)
Например, если вы хотите ограничить использование оперативной памяти и CPU компьютера дистрибутивами Linux в WSL, создайте такой файл
%UserProfile%\.wslconfig
:
[wsl2]
memory=2GB
processors=2
Использование Linux в среде WSL
Дистрибутив Linux, установленный в WSL является полноценной операционной системой. Поэтому после установки рекомендуется выполнить обновление пакетов. Для Ubuntu выполните команду:
$ sudo apt-get update && sudo apt-get upgrade -y
Файловая система вашего дистрибутива Linux хранится в профиле пользователя в виде VHDX файла. Например, виртуальный диск Ubuntu хранится в папке
%USERPROFILE%\AppData\Local\Packages\CanonicalGroupLimited.Ubuntu_79rhkp1fndgsc\LocalState
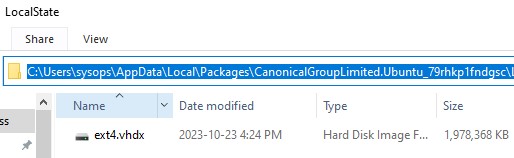
Файловая система Linux в WSL монтируется в виде сетевой папки прямо в проводник Windows.
Также для прямого доступа к файлам WSL из Windows можно использовать UNC путь. Например:
notepad \\wsl$\Ubuntu\sysops\home\1122.txt
В свою очередь локальные диски Windows монтируются в WSL в папку mnt. Вывести список файлов папок на диске C:
wsl
ls /mnt
ls/mnt/c

Другие примеры запуска Linux команд из Windows:
dir | wsl grep Sa
wsl ls ‑la > 123.txt
wsl ls ‑la /proc/cpuinfo
wsl ls ‑la “/mnt/c/Program Files”
Вы можете установить любые пакеты в Linux. Например, установите файловый менеджер Midnight Commander:
$ sudo apt-get install mc
В современной версии WSL 2 вы можете запускать из Windows любые приложения Linux с графическим интерфейсом (X11 и Wayland). Например, установите графический редактор:
$ sudo apt install gimp -y
Чтобы запустить его из Windows просто выполните команду:
wsl gimp

These are some essential WSL commands that you should be aware of.
💡
The command line utility, wsl, used throughout this article, is also available from inside a WSL distribution. In order to access inside a Linux distribution, you need to use wsl.exe instead of wsl.
List available WSL distributions
There are several distributions, that you can install directly from either Microsoft store or through terminal commands. When it comes to listing these distributions, it is easier to use the terminal commands.
Open a terminal in Windows and run:
wsl --list --online
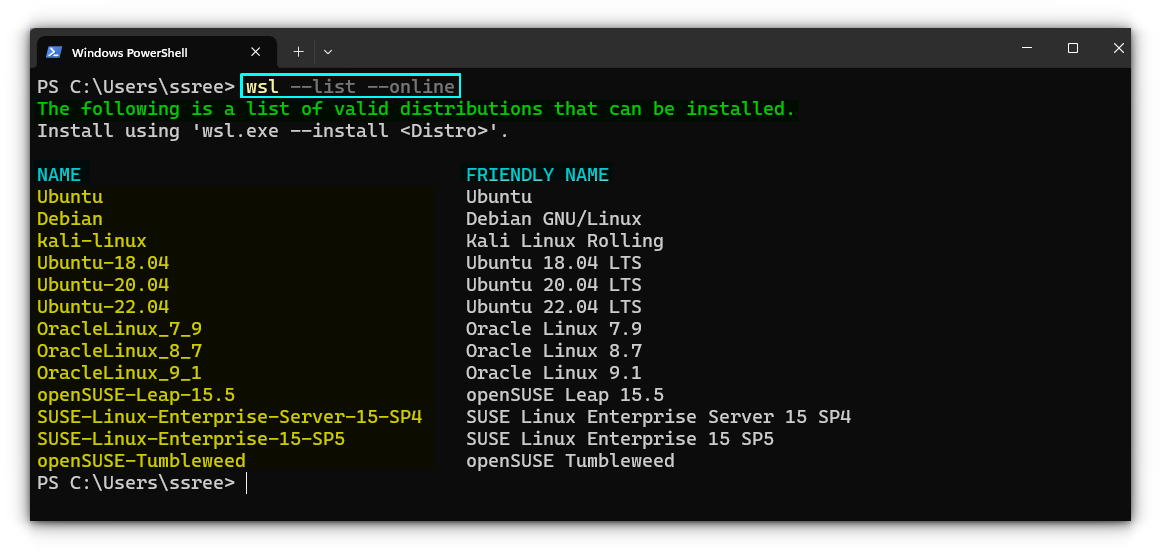
Install Ubuntu, the default distribution
As specified in the above listing command, there are various distributions available, like Ubuntu and several versions of it, Debian, openSUSE, etc. But in WSL, Ubuntu is set as the default distribution, if you didn’t tweak that explicitly.
So, if you want to install Ubuntu, you can open a terminal in Admin mode and run the command:
wsl --install
Install Debian or some other distribution
Not a fan of Ubuntu? Don’t worry! You can install the other distributions, that are available by using the command:
wsl --install --distribution <distribution_name>

OR

wsl --install -d <distribution_name>

You should make sure that, the distribution_name should be same as the name shown in the output of the wsl --list --online command.
List installed distributions
If you have multiple distributions installed, it is important to list those for future management. In order to do that, use the command:
wsl --list --verbose

OR

wsl -l -v
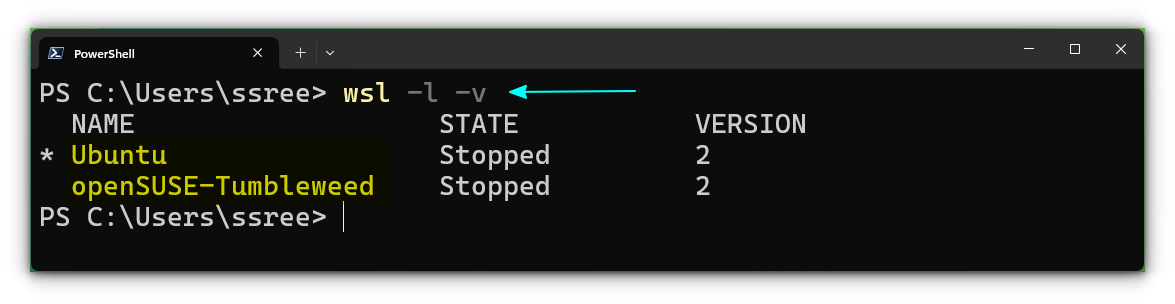
As you can see, this will give the proper name of the installed distributions, including its current status (running or stopped) and the WSL version it is using.
Run a distribution from Windows terminal
If you have installed the distribution from the store, you can launch it from the start menu. But that’s not always the case. Sometimes, you may need to rely on the terminal to run a distribution.
In that case, you can run a distribution by using:
wsl -d <distribution_name>
📋
Remember: The distribution_name is the one that appears on the output of wsl -l -v.
Terminate a running distribution
I have covered this as a separate article as, how to shut down a WSL system. In short, if you want to terminate a running WSL distribution, run:
wsl --terminate <running_distribution_name>
Or, if you intend to shut down the entire WSL system, use:
wsl --shutdown
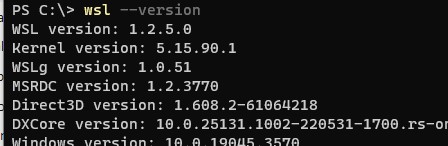
Get the WSL version installed on your system
There are two major versions for WSL; WSL 1 and WSL 2. WSL version 2 has several advanced features and is better compared to WSL 1.
But how would you check the version of WSL on your system? To do that, you can execute the command:
wsl --version
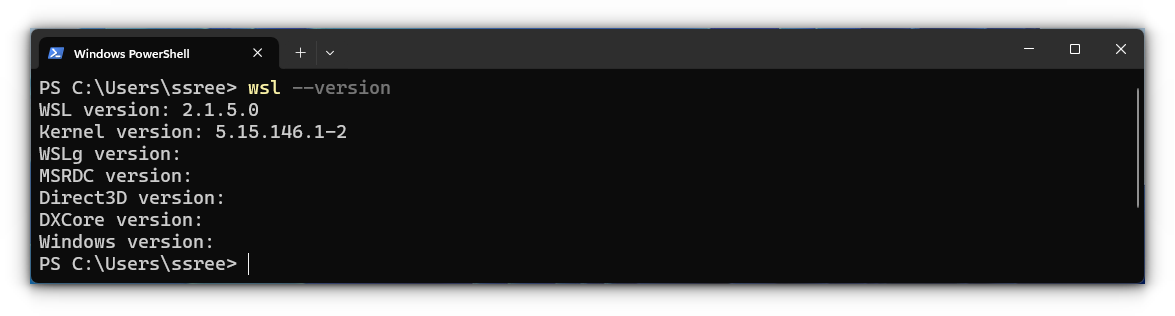
In the screenshot above, this command will print the version of WSL, the kernel version it is using, etc. You can see that I am running WSL 2 version.
Check WSL Status
You can check the status of WSL, its configuration, etc. using the --status option.
wsl --status

Here, you can see that, I use WSL 2 as the default version. It also mentions that, WSL 1 is not configured properly, and what I should do to make it work.
Change the WSL version of a distribution
Let’s say you are running a distribution using WSL 1, and you want to change the WSL version to 2 so that you can install Linux GUI apps with that system. For this, you can open a terminal in Admin mode and use the command below:
wsl --set-version <distribution name> <versionNumber>

So, in my case, I will use:
wsl --set-version Ubuntu 2
🚧
You should be cautious when changing the WSL version of a distribution. Since WSL 1 and WSL 2 use different architectures, failures resulting in data losses are possible.
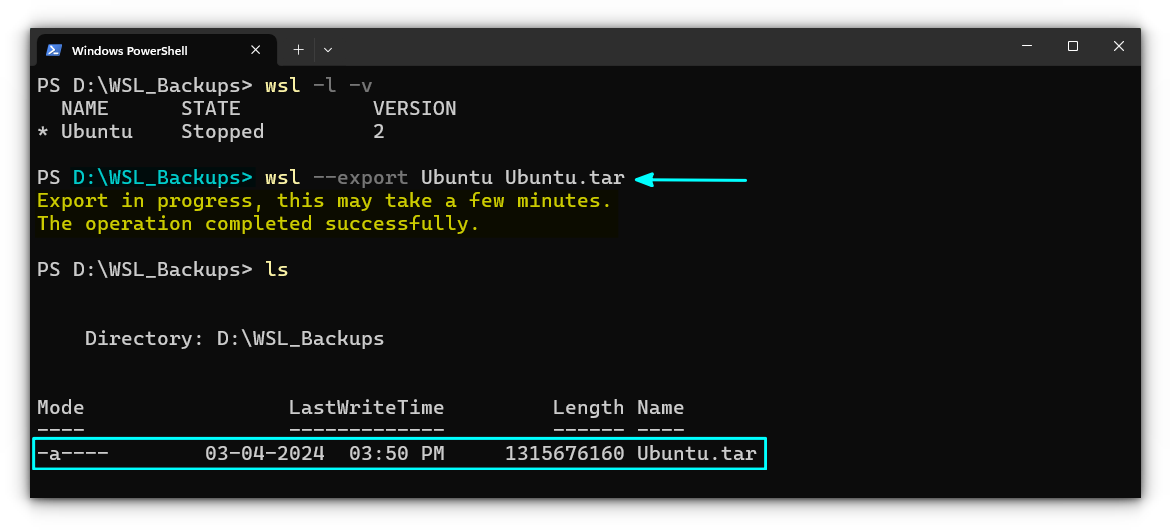
Export a distribution
Backing up data is always important, if you are dealing with critical information. In Linux distributions, we have tools like Timeshift, to create comprehensive system backups.
What about WSL? Yes, WSL provides a built-in method to take a backup of your installed distribution along with all the data.
💡
It is better to create a two separate folders called WSL_Exports and WSL_Imports to keep the exported files and imported distributions. This way, you can avoid cluttering and easy data retrieval.
To export a distribution, use the command inside the WSL_Exports folder (for convenience):
wsl --export <distribution_name> <file_name.tar>
You are exporting the distribution along with the data to a tar file. The distribution_name should be the proper name, as in the output of the command ws -l -v.
Import a distribution
You have exported a distribution. Now, how will you restore it so that you can work with the data it carries? For this, on an elevated terminal, run the command:
wsl --import <Distribution Name> <Import location> <exported file>
Here, for future convenience, I am using a dedicated installation folder for the imports. So, my command will look like:
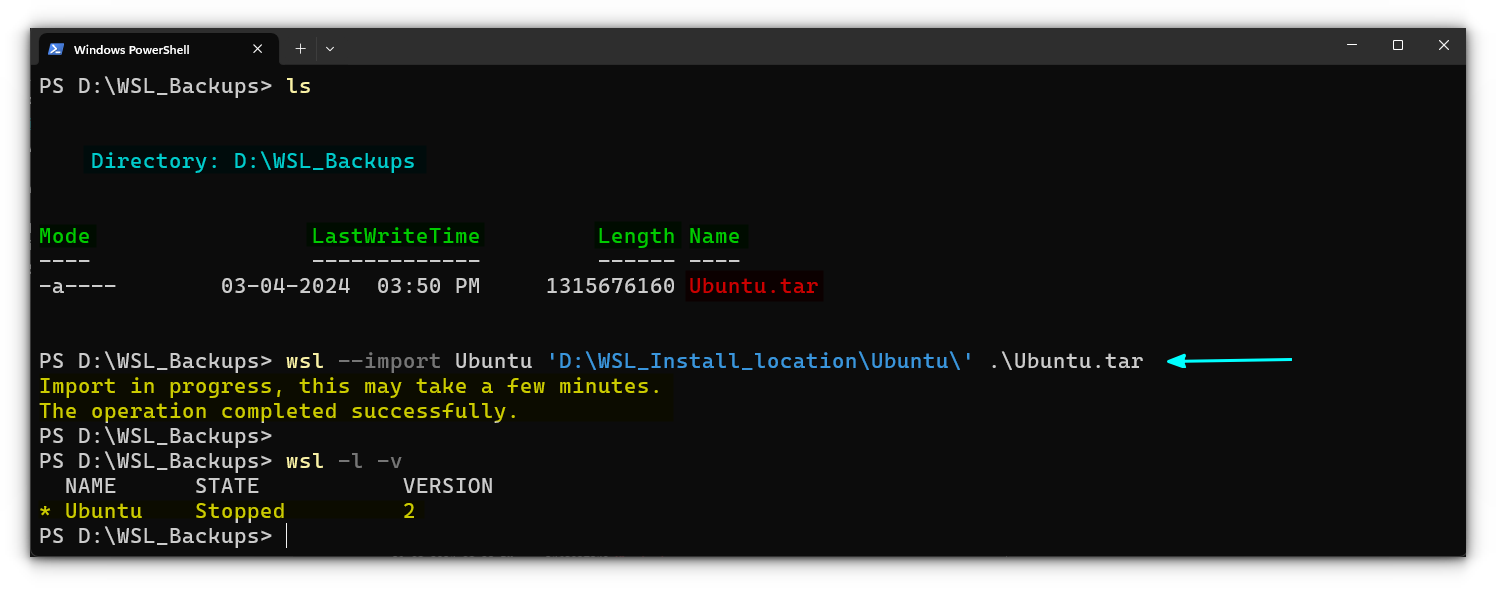
This will import the distribution from the file.
The imported distribution won’t have a start menu entry so that you can open easily. This is the case, even if the original distribution had a start menu entry.
🚧
While importing a distribution, make sure that there is no naming conflict. That means, if there is a distro with the name Ubuntu already in place, use some other name.
Unregister a distribution
To remove a distribution from the system, you can use the --unregister option of WSL. First, list the distribution using wsl -l -v. Note the name of the distribution and then perform the command:
wsl --unregister <distribution_name>
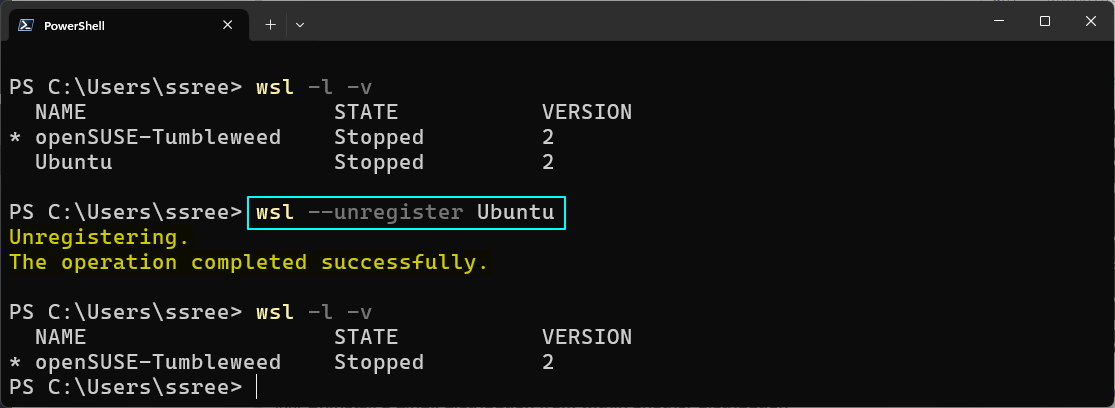
If you have installed the distribution from the list of available distributions (wsl --list --online), you may also need to uninstall the app from the system too.
Update WSL
To update WSL from the command line, you can use the command below on an elevated terminal:
wsl --update

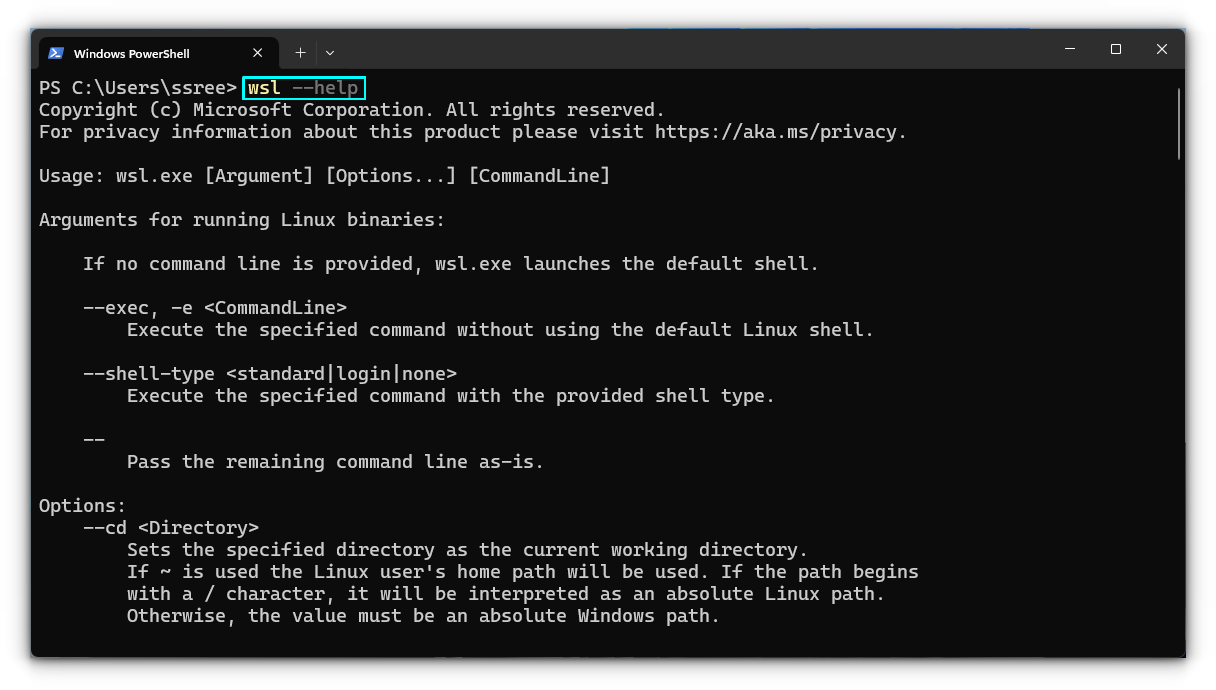
Get help
There are many options and sub commands for WSL, that you can utilize to get the most out of WSL. So, if you need any assistance regarding some options, always use the built-in help mechanism.
wsl --help
Wrapping Up
I have gone through several important commands, that you can use to manage various distributions.
If you are curious, you can download the cheat sheet given below, that lists some more commands, and their purposes.
Upgrade & Secure Your Future with DevOps, SRE, DevSecOps, MLOps!
We spend hours on Instagram and YouTube and waste money on coffee and fast food, but won’t spend 30 minutes a day learning skills to boost our careers.
Master in DevOps, SRE, DevSecOps & MLOps!
Learn from Guru Rajesh Kumar and double your salary in just one year.
Get Started Now!
Windows Subsystem for Linux (WSL) allows you to run a Linux distribution directly on Windows without the overhead of a traditional virtual machine or dual-boot setup. Here are some commonly used commands and operations related to WSL:
You guys might learn these commands in your Computer Science course. While studying CS coursework you might consider expert help in CS HW
Here is a list of some of the most common WSL commands:
wsl: This command will start a new WSL session.wsl -l: This command will list all of the installed WSL distributions.wsl -d <distribution name>: This command will start a new WSL session using the specified distribution.wsl --shutdown: This command will shut down all running WSL sessions.wsl --terminate <distribution name>: This command will terminate the WSL session for the specified distribution.wsl --set-version <version number>: This command will set the default WSL version.wsl --status: This command will display the status of all running WSL sessions.wsl --import <distribution name> <tarball path>: This command will import a new WSL distribution from a tarball file.wsl --export <distribution name> <export path>: This command will export a WSL distribution to a tarball file.wsl --mount <source path> <mount point>: This command will mount a Windows file system path to a WSL mount point.wsl --unmount <mount point>: This command will unmount a WSL mount point.wsl --default <distribution name>: This command will set the default WSL distribution.
WSL Management Commands
- List installed WSL distributions:
wsl --list or wsl -l - List all distributions, including those that aren’t currently installed:
wsl --list --all or wsl -l -a - Set a default distribution (this is the distribution that will be used if you just type
wslinto the command prompt):wsl --setdefault <DistributionName> - Set version of WSL for a distribution (WSL 1 or WSL 2):
wsl --set-version <DistributionName> <VersionNumber> - Terminate a running WSL distribution:
wsl --terminate <DistributionName> - Shutdown all running WSL instances:
wsl --shutdown - Install a new distribution (this command will install the distribution but allow you to set up a new user, etc., later):
wsl --install -d <DistributionName> - Unregister and remove a distribution (WARNING: This will remove the Linux distribution from WSL and also delete the user account and data):
wsl --unregister <DistributionName>
General WSL Commands
- Open a new WSL terminal window: Simply type
wslinto the command prompt or PowerShell. - Run a Linux command without entering the WSL terminal:
wsl <LinuxCommand>For example, to list files in the Linux home directory:wsl ls -la ~ - Access Windows files from WSL: In WSL, your Windows drives are mounted under the
/mntdirectory. So, for example, your C drive would be available at/mnt/c/.cd /mnt/c/Users/<YourWindowsUsername>/ - Access WSL files from Windows: For WSL 2, you can access the Linux file system by navigating to
\\wsl$\<DistributionName>in File Explorer.
Configuration
- Edit WSL settings: WSL configurations can be modified by editing the file:
C:\Users\<YourWindowsUsername>\.wslconfig
Certification Courses
DevOpsSchool has introduced a series of professional certification courses designed to enhance your skills and expertise in cutting-edge technologies and methodologies. Whether you are aiming to excel in development, security, or operations, these certifications provide a comprehensive learning experience. Explore the following programs:
- DevOps Certification — Learn the fundamentals and advanced concepts of DevOps practices and tools.
- DevSecOps Certification — Master the integration of security within the DevOps workflow.
- SRE Certification — Gain expertise in Site Reliability Engineering and ensure reliability at scale.
- MLOps Certification — Dive into Machine Learning Operations and streamline ML workflows.
- AiOps Certification — Discover AI-driven operations management for next-gen IT environments.

Explore our DevOps Certification, SRE Certification, and DevSecOps Certification programs at DevOpsSchool. Gain the expertise needed to excel in your career with hands-on training and globally recognized certifications.
Here is a list of some of the most common WSL commands:
wsl: This command will start a new WSL sessionwsl -l: This command will list all of the installed WSL distributionswsl --list --online: This command will list all of the available WSL distributionswsl --list --running: This command will list all of the running WSL distributionswsl -d <distribution name>: This command will run the specified distributionwsl --install <distribution name>: This command will install the specified distributionwsl --unregister <distribution name>: This command will remove the specified distribution to free up the disk spacewsl --shutdown: This command will shut down all running WSL sessionswsl --terminate <distribution name>: This command will terminate the WSL session for the specified distributionwsl --set-version <version number>: This command will set the default WSL versionwsl --status: This command will display the status of all running WSL sessionswsl --import <distribution name> <tarball path>: This command will import a new WSL distribution from a tarball filewsl --mount <source path> <source path>: This command will mount a Windows file system path to a WSL mount pointwsl --unmount <mount point>: This command will unmount a WSL mount pointwsl --default <distribution name>: This command will set the default WSL distribution
In WSL, your Windows drives are mounted under the /mnt directory. So, for example, your C drive would be available at /mnt/c/. cd /mnt/c/Users/<YourWindowsUsername>/
For WSL 2, you can access the Linux file system by navigating to \\wsl$\<DistributionName> in File Explorer.
WSL configurations can be modified by editing the file: C:\Users\<YourWindowsUsername>\.wslconfig.