
Синий экран MEMORY_MANAGEMENT в Windows 10 — распространенная, и, одновременно, часто сложная в диагностике проблема, однако, выяснить её причины и устранить обычно оказывается возможным.
В этой инструкции подробно о возможных методах исправить ошибку MEMORY MANAGEMENT в Windows 10 и о том, чем она может быть вызвана.
- Простые способы исправить ошибку MEMORY MANAGEMENT
- Синий экран MEMORY MANAGEMENT — поиск причины и исправление
- Что делать, если ошибка возникает до загрузки Windows 10
Простые способы исправить ошибку MEMORY MANAGEMENT
В связи со сложностью определения причин синего экрана MEMORY MANAGEMENT начинающими пользователями, рекомендую начать с простых подходов, которые, возможно, смогут достичь решения проблемы, не прибегая к более сложным манипуляциям.
Эти методы подойдут в случае, если Windows 10 запускается и какое-то время работает, а синий экран появляется позже:
- Если ошибка возникла после недавних обновлений системы или драйверов, возможно, использования каких-либо программ для оптимизации и ускорения Windows 10, попробуйте использовать точки восстановления системы (Панель управления — Запуск восстановления системы).
- Если точек восстановления нет, а вы обновляли какие-то драйверы, попробуйте зайти в диспетчер устройств (правый клик по кнопке «Пуск» — «Диспетчер устройств»), выбрать устройство, драйвер которого обновлялся, открыть его свойства и на вкладке «Драйвер» проверить доступность кнопки «Откатить».
- Если вы точно знаете, после установки какой программы появилась проблема, а программа работает в фоновом режиме (автоматически загружаясь с системой), возможно, стоит удалить эту программу или убрать её из автозагрузки Windows 10.
- Если устанавливались какие-либо сторонние антивирусы, они могут быть причиной ошибки. Проверьте, будет ли она проявлять себя, если отключить или удалить этот антивирус.
- Если синий экран MEMORY MANAGEMENT стал появляться сразу после чистой установки Windows 10 на компьютер или ноутбук, возможно, причина в том, что те драйверы, которые установила сама система не вполне подходят. Вручную скачайте и установите официальные драйверы с сайта производителя ноутбук или материнской платы (если это ПК) — включая драйверы чипсета и другие драйверы.
- Если вы включали какие-то опции ускорения памяти, процессора, видеокарты в БИОС/UEFI или с помощью сторонних программ, попробуйте отключить их.
- Если ошибка MEMORY_MANAGEMENT появляется только при запуске определенной игры или программы, проблема может быть именно в этой программе или, если игра или программа платная, а вы её не совсем купили, то в антивирусе (попробовать запуск при отключенном антивирусе, в том числе встроенном Защитнике Windows).
К сожалению, не всегда указанные простые подходы к решению проблемы оказываются результативными. В этом случае переходим к более сложным вариантам определения причин проблемы и исправления ошибки.
Синий экран MEMORY_MANAGEMENT — ищем причину и исправляем ошибку
Следующие этапы могут помочь разобраться в том, что именно вызывает появление рассматриваемого синего экрана. Опять же, предполагается, что вы можете зайти в Windows 10 и работать в ней. Если же синий экран MEMORY MANAGEMENT появляется до загрузки системы — об этом в последнем разделе инструкции.
Чистая загрузка Windows 10
В качестве первого шага следует попробовать выполнить чистую загрузку Windows 10 без сторонних служб и программ в автозагрузке — это позволит выяснить, не являются ли какие-либо сторонние программы причиной ошибки. Для того, чтобы сделать это, выполните следующие шаги:
- Нажмите клавиши Win+R на клавиатуре, введите msconfig в окно «Выполнить» и нажмите Enter.

- На вкладке «Общие» отметьте пункт «Выборочный запуск» и снимите отметку «Загружать элементы автозагрузки».
- Перейдите на вкладку «Службы», отметьте «Не отображать службы Майкрософт», а затем нажмите «Отключить все».

- Желательно также зайти на вкладку «Автозагрузка» перейти в параметры автозагрузки диспетчера задач и там отключить все пункты (даже нужные).
- Примените настройки и перезагрузите компьютер.

Если после перезагрузки ошибка MEMORY_MANAGEMENT больше не появляется, по-видимому, причина в одной из программ в автозагрузке или какой-то сторонней службе. Можно попробовать включать элементы по одному или несколько, пока снова не появится проблема, чтобы выяснить, что именно её вызвало и после этого принимать решения о возможном удалении этого стороннего ПО или других действиях.
Проверка драйверов
Синий экран MEMORY MANAGEMENT часто может быть вызван проблемой с драйверами. Для того, чтобы выявить сбойный драйвер оборудования, можно использовать встроенную утилиту для проверки драйверов:
- Перезагрузите компьютер в безопасном режиме. Самый простой метод сделать это — нажать клавиши Win+R на клавиатуре, ввести msconfig и нажать Enter, отметить «Безопасный режим» на вкладке «Загрузка», применить настройки и перезагрузить компьютер.
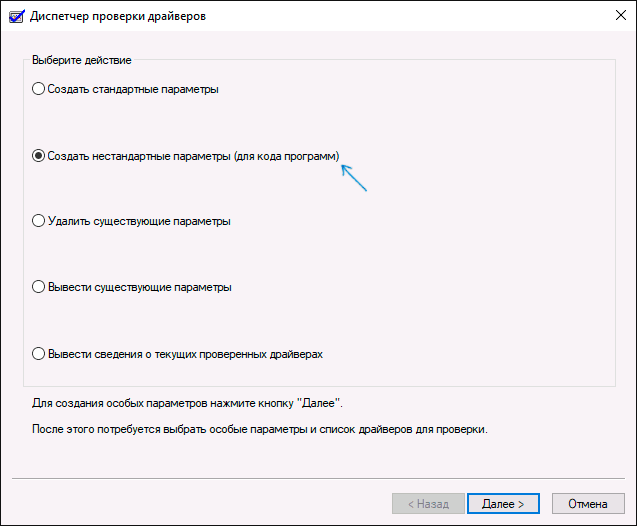
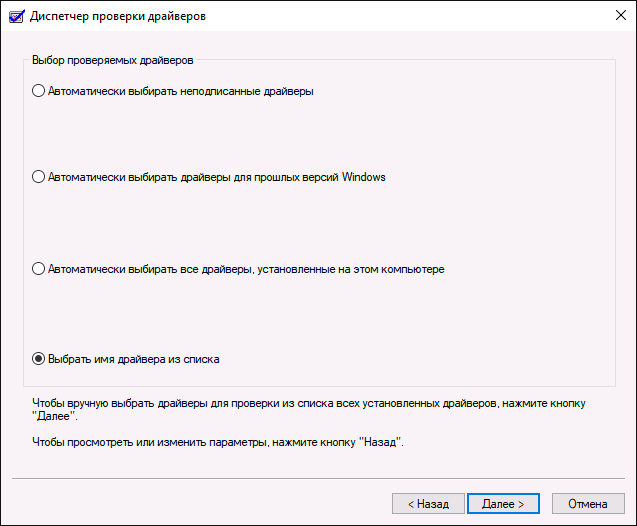
- В безопасном режиме нажмите клавиши Win+R и введите verifier для запуска диспетчера проверки драйверов.
- На первом экране выберите «Создать нестандартные параметры (для кода программ)».

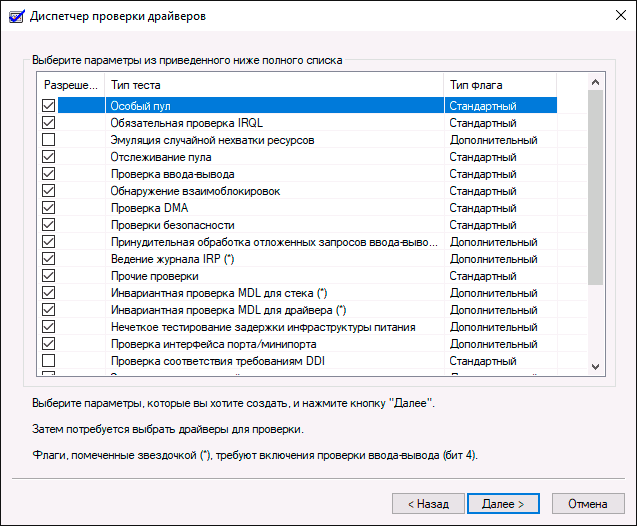
- Далее отметьте все пункты, кроме «Эмуляция случайной нехватки ресурсов» и двух пунктов, связанных с проверкой соответствия требованиям DDI.
- Выберите пункт «Выбрать имя драйвера из списка».
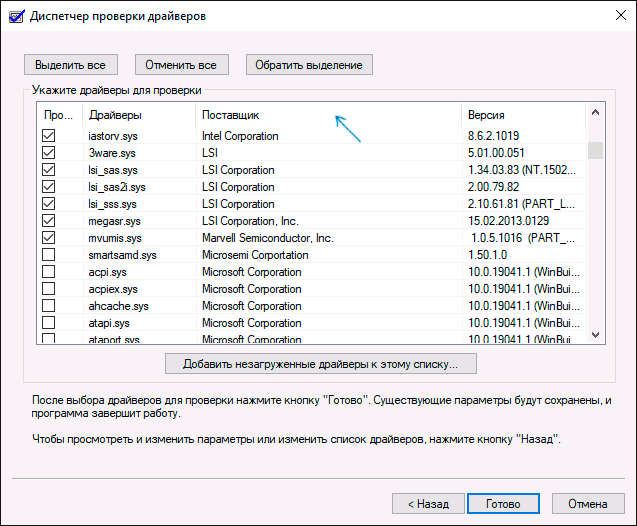
- Отсортируйте драйверы по колонке «Поставщик» (нажав на заголовок столбца) и отметьте все драйверы, кроме предоставленных Microsoft. Нажмите кнопку «Готово».
- Если вы запускали безопасный режим с помощью msconfig, снова зайдите (как на первом шаге) и отключите загрузку в безопасном режиме.
- Перезагрузите компьютер.
После этого возможны следующие варианты развития событий:
- Система загрузится, некоторое время проработает, а затем появится синий экран с прежней ошибкой MEMORY_MANAGEMENT или новой, наподобие DRIVER_VERIFIED_DETECTED_VIOLATION с указанием имени файла .sys (если имя файла указано — запомните или запишите его, это и есть сбойный драйвер).
- Система покажет синий экран еще до загрузки системы.
В первом случае перезагрузите компьютер и отключите проверку драйверов, для этого запустите командную строку от имени администратора и введите команду verifier /reset
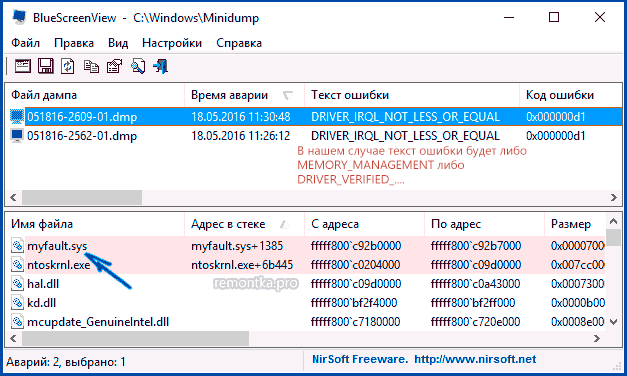
После этого, если на синем экране отображалось имя сбойного драйвера, найдите в Интернете, что это за драйвер — по всей видимости, проблема именно в нем. Если имя драйвера не отображалось, попробуйте использовать бесплатную утилиту BlueScreenView и в ней посмотреть, какой именно файл вызвал последний сбой (на скриншоте пример для другого синего экрана). Утилита доступна на официальном сайте https://www.nirsoft.net/utils/blue_screen_view.html
Если система не запускается, то после двух сбоев загрузки вы получите возможность открыть дополнительные параметры и инструменты восстановления и там, запустив командную строку, отключить проверку драйверов с помощью команды verifier /reset а затем перезагрузить компьютер. Далее, можно использовать действия из предыдущего абзаца.
После выявления вызывающего неполадки драйвера вы можете предпринять действия по его обновлению (в идеале — путем скачивания вручную с официального сайта производителя оборудования) или откату на предыдущую версию.
Проверка оперативной памяти и целостности системных файлов, ошибок диска
Иногда ошибка может быть вызвана проблемами с оперативной памятью. Если у вас есть подозрения на то, что дело в этом, то для начала рекомендую отключить любые ускорения RAM, если раньше вы их применяли, а затем попробовать выполнить проверку оперативной памяти на ошибки.
Еще пара рекомендаций — выполнить проверку целостности системных файлов Windows 10 и проверку жесткого диска на ошибки.
Исправление ошибки, если система не запускается

В случае, если сообщение об ошибке MEMORY MANAGEMENT появляется еще до загрузки системы, то после двух неудачных загрузок вы должны получить доступ в дополнительные параметры восстановления в разделе «Поиск и устранение неисправностей», где вы можете:
- Попробовать загрузку в безопасном режиме (пункт «Параметры загрузки»).
- Выполнить восстановление из точек восстановления (пункт «Восстановление системы»).
- Удалить последние установленные обновления Windows
И в крайнем случае, можно прибегнуть к сбросу системы в исходное состояние.
The Memory Management BSOD (Blue Screen of Death) error is a common issue on Windows 10 and 11, indicating a problem with the system’s memory management. This error can occur due to faulty hardware, corrupted system files, or outdated drivers, leading to system crashes and instability. If you’re facing this blue screen error, it’s important to troubleshoot and resolve it to prevent further system crashes.
In this guide, we’ll walk you through how to fix the Memory Management BSOD error on Windows 10/11 using several troubleshooting methods.
Methods to Fix Memory Management BSOD Error on Windows 10/11?
The computer’s operating system experiences a memory management error message because of a memory management issue. This error typically arises when the system memory becomes corrupt or the drivers managing it are outdated.
Here, we’ll see some easy methods to troubleshoot the memory management BSOD error on Windows 10/11.
Method 1: Disconnect External Devices & Restart Your PC
Whenever you see a blue screen, unplug all external devices such as USB drivers, printers, or external storage devices. This helps find if they’re causing the problem.
Then Restart Your Computer to see if the error goes away, restarting your computer is crucial. This basic step resolves glitches, and conflicts in software causing the error Blue Screen of Death (BSOD).
Step 1: Close all active windows and open windows on your desktop.
Step 2: Simultaneously press Alt and F4.
Step 3: A popup window titled «Shut Down Windows» will appear, offering several options. From the dropdown menu, select «Restart«
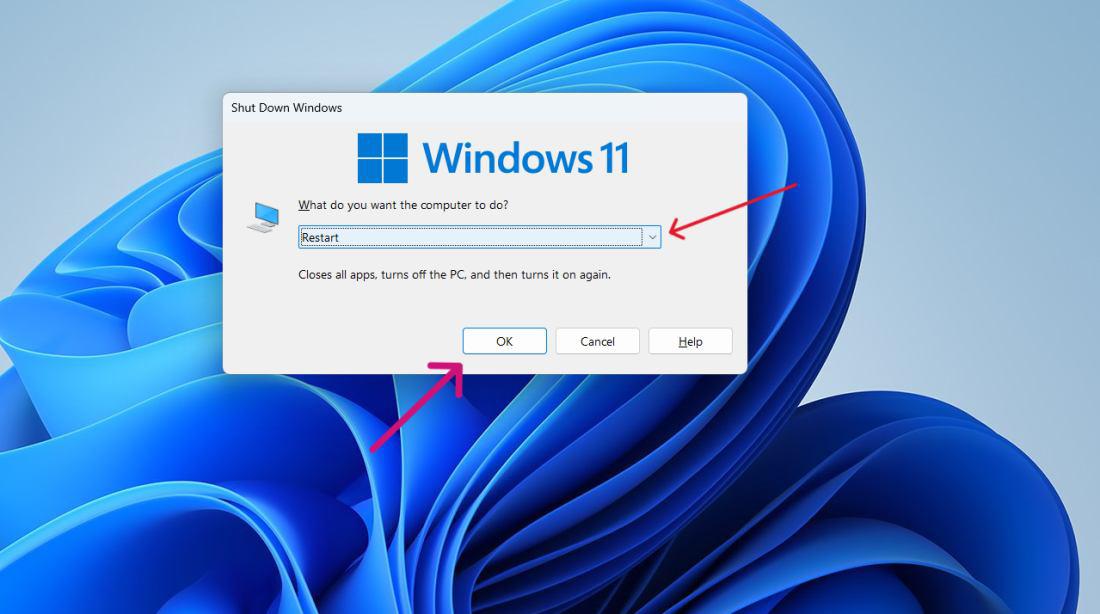
Step 4: Choose OK to confirm your choice
Method 2: Update Windows Computer
To ensure smooth operation, regularly update your Windows operating system. Updates provide essential patches for security vulnerabilities and bug fixes that may resolve the Memory Management BSOD Error.
Step 1: Press the Windows key + I to open the settings application
Step 2: Then on the left side bar click on the «Windows Update«
Step 3: Click on “Check for updates”. then download and update if any are available

Step 4: Restart Your computer
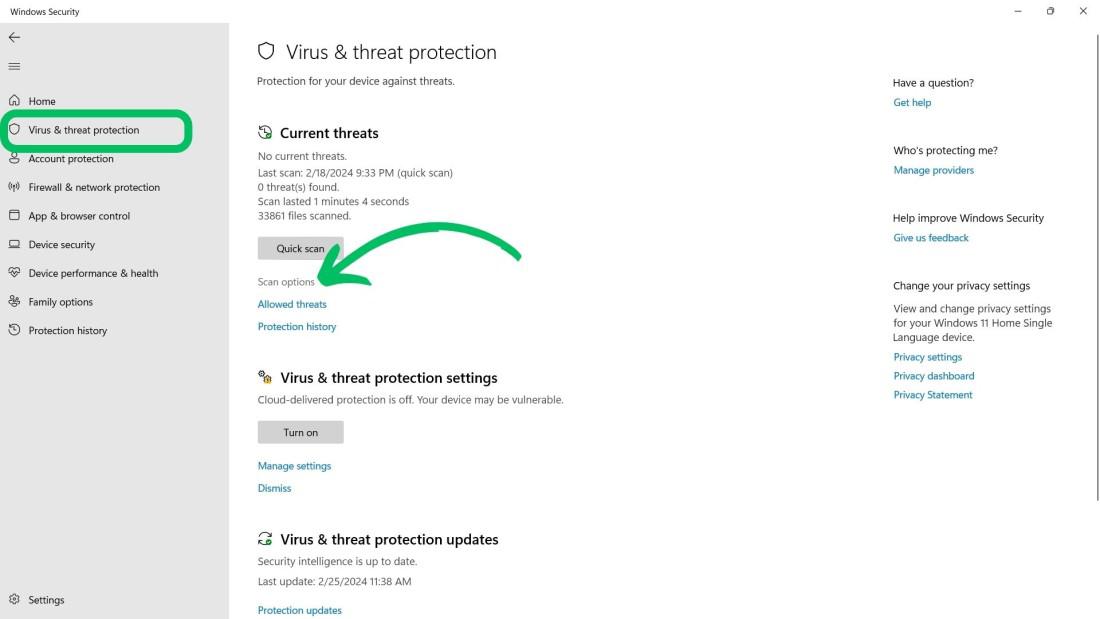
Method 3: Quick scan your PC using Windows Security
Windows Security safeguards your device from harmful software threats, like viruses, malware, and spyware. It monitors emails, apps, the cloud, and the web. A quick scan detects and removes these threats swiftly and effectively.
Step 1: Open the settings app by pressing Windows Key + I
Step 2: Then, Go to Privacy & Security > Windows Security.
Step 3: Click on “Open Windows Security«
Step 4: Click “Virus & Threat Protection”.
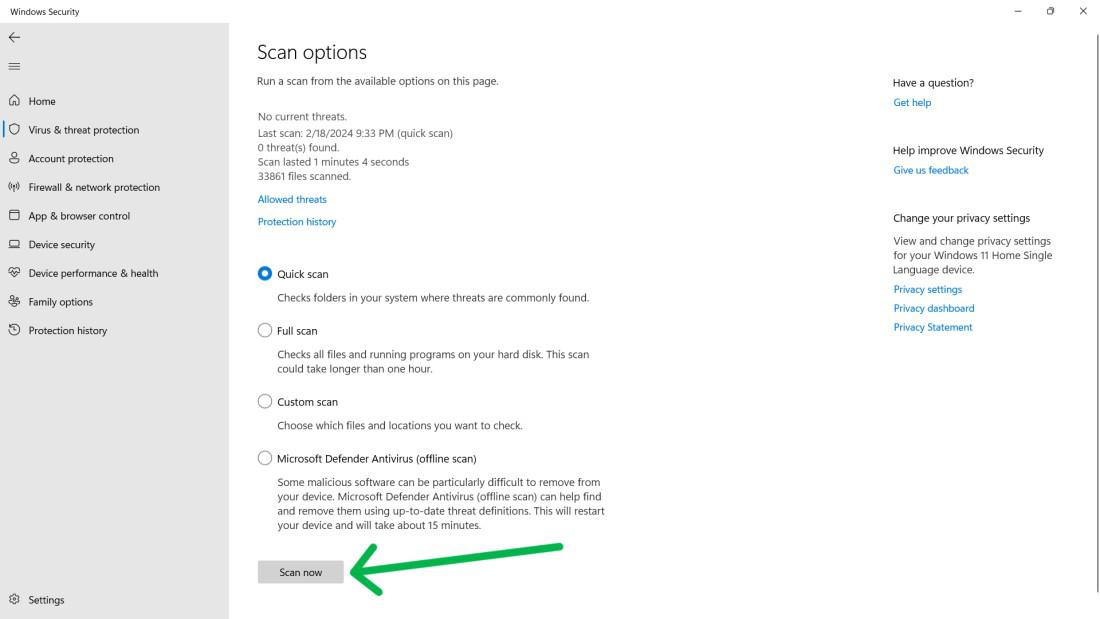
Step 5: Then Click on “Scan Options«
Step 6: Click on “Scan Now” after selecting “Full Scan«
Method 4: Update GPU Driver
The GPU driver handles communication between the computer’s graphics hardware and OS. An outdated driver can create problems like the MEMORY MANAGEMENT error.
Step 1: Press Windows Key + S to open the search bar on the search bar type «dxdiag» and then open it
Step 2: Then navigate «Display» tab
Step 3: Your system GPU details will show here

Step 4: Visit your GPU manufacturer’s website, download the latest driver, install it on your PC, and then reboot your system.
Method 5: Run a disk check
Check the disk to spot faults on your computer. These errors may cause «MEMORY MANAGEMENT» issues. Perform a full disk check. Fix the problems found.
Step 1: Press Windows Key + S to open the search bar then on the search bar type «CMD» and run as administrator.
Step 2: Then, In CMD type this command and press enter button
chkdsk /f /r

Step 3: Then press Y.
Step 4: Close the CMD
Method 6: Run Windows memory diagnostic test
Run the Memory Diagnostic to scan your computer’s memory. That process checks for errors that may indicate faulty RAM. This is especially useful if you think your RAM may be faulty.
Step 1: Press Windows Key + R then on run dialog type «mdsched.exe» and hit Enter
Step 2: From pop up menu select «Restart now and check for problems (recommended) «

Step 3: During the test, you’ll see the progress and passes displayed on the screen.
Method 7: Repair system files
The System File Checker tool fixes corrupt or missing system files. These files could cause the MEMORY MANAGEMENT BSOD error. So, run the checker to repair them.
Step 1: Press Windows Key + S to open the search bar then on the search bar type «CMD» and run as administrator
Step 2: Then, In CMD type the following commands one by one
DISM /online /cleanup-image /restorehealth
sfc /scannow
-Tool.jpg)
Method 8: Reset Windows 11
Step 1: Press Win + I to open settings and start the reset process.
Step 2: From the right-hand menu, select «System,» followed by «Recovery«.
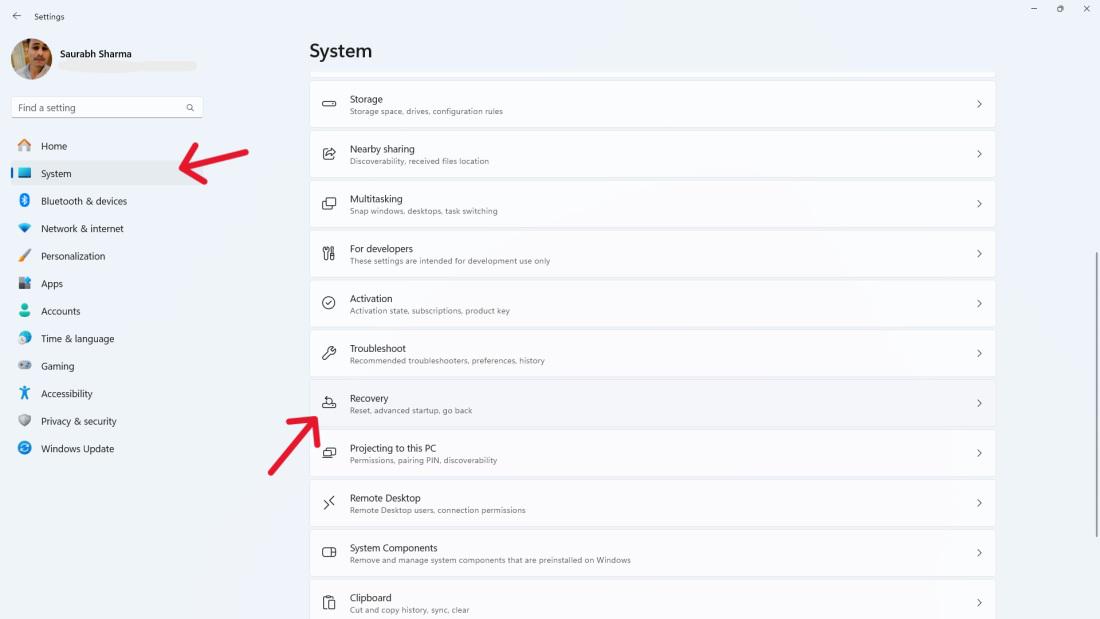
Step 3: Click on “Reset PC«
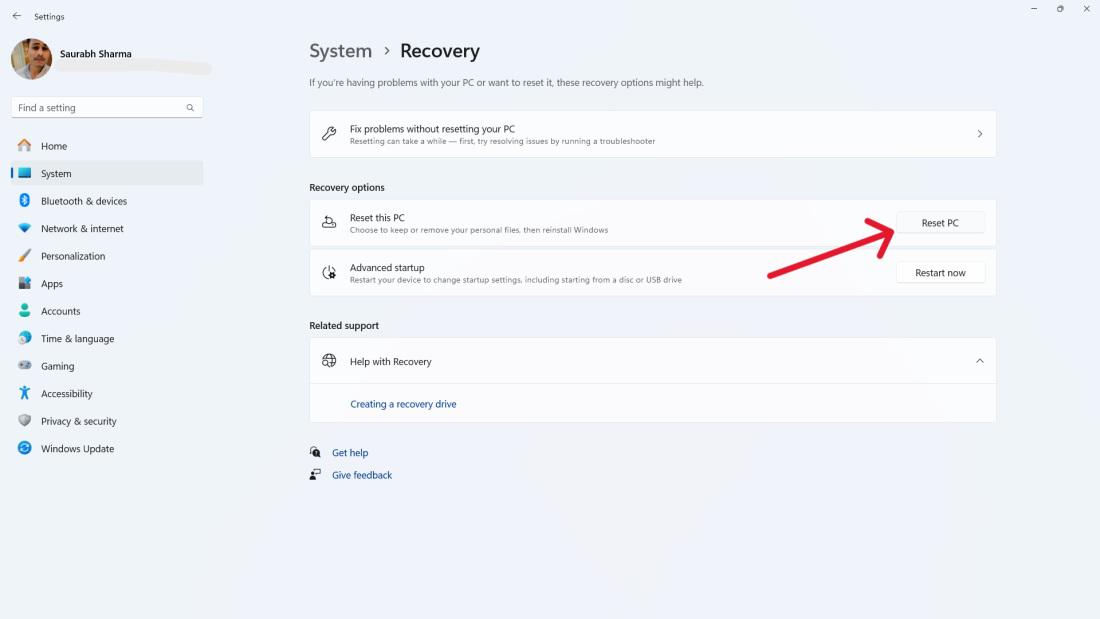
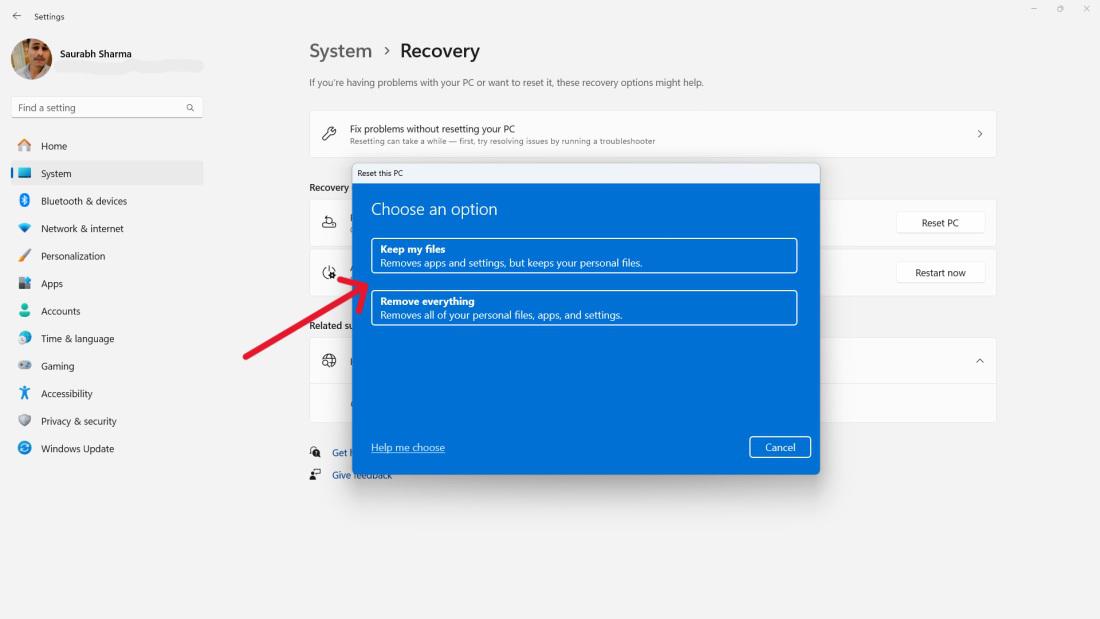
Step 4: Within the «Reset this PC» window, select:
Keep My Files: Deletes apps and settings but keeps personal files.
Remove everything. Deletes apps, settings, and personal files. Use it for selling or giving away your device.
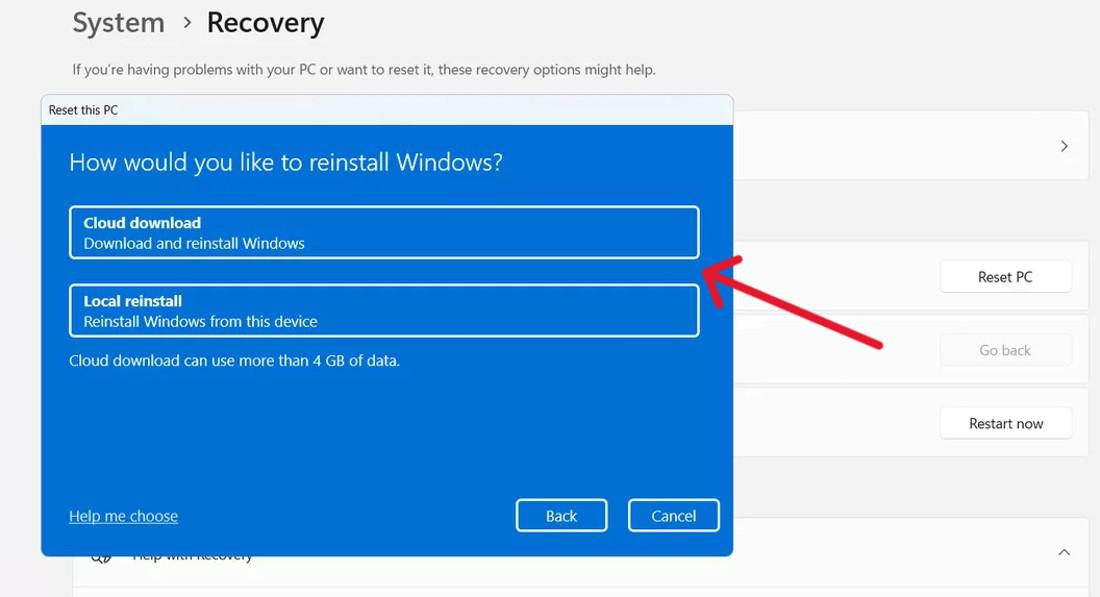
Step 5: At the «How Would You Like to Reinstall Windows» screen:
Cloud Downloads: This option allows you to reinstall from the cloud.
Local Reinstall: Select this option to perform a local reinstallation of Windows 11.
Method 9: Scan for Virus or Malware Infection
Viruses or malware can cause Windows crashes and blue screens. Run a full system scan using Windows Security or another antivirus to remove harmful programs. Follow these steps to perform scan for virus & malware.
Step 1: Open Windows Security App on your PC.

Step 2: Click On Virus & threat Protection

Step 3: Click on Scan Options to select type on scan.

Step 4: Choose Full scan from the available options and click Scan Now button at the bottom. It start full scan and resolve any potential threat.
Malware threats can cause various system issues such as memory management error. By performing Scan for Virus or Malware Infection, we can resolve the Memory Management BSOD Error .
Also, check if your computer is overheating, as this can cause problems too.
Reasons for Memory Management BSOD Error on Windows 10 and 11
The «Memory Management» Blue Screen of Death (BSOD) error on Windows 10 and 11 can occur due to a variety of hardware and software issues, each capable of destabilizing your PC and triggering that infamous blue screen. Understanding the reasons behind this error is the first step to fixing it. Here are the primary reasons
- Faulty Physical Memory (RAM): Defective or failing RAM modules can cause memory management issues. If your RAM has hardware defects—due to age, overheating, or manufacturing flaws—Windows may struggle to read or write data properly, leading to a crash.
- Outdated or Incompatible Device Drivers: Drivers act as bridges between your hardware and Windows. When they’re outdated, buggy, or incompatible with Windows 10 or 11, they can mismanage memory resources, resulting in the BSOD error.
- Corrupted System Files: Essential Windows files can become corrupted due to malware, improper shutdowns, or disk errors. When these files—responsible for memory management—are damaged, the system may fail to allocate memory correctly, triggering the error.
- Software Conflicts: Running incompatible or poorly coded applications (e.g., overzealous antivirus software or memory-intensive programs) can interfere with Windows’ memory management processes, causing instability.
- Overclocking or Hardware Overheating: Pushing your RAM, CPU, or GPU beyond their default speeds (overclocking) without proper cooling can lead to memory errors. Overheating hardware may also corrupt memory operations, prompting the BSOD.
- Disk Errors or Bad Sectors: A failing hard drive or SSD with bad sectors can disrupt how memory is swapped between RAM and virtual memory (paging file), contributing to the error.
- Recent Windows Updates or Bugs: Occasionally, a flawed Windows update or an unresolved bug in Windows 10 or 11 can introduce memory management glitches, especially if the update conflicts with existing drivers or hardware.
How to Avoid Memory Management BSOD Error on Windows 10 and 11
Prevention is better than cure so if you don’t want a memory management BSOD error on Windows, then you can follow the below tips.
- Keep Drivers Updated: Regularly update your device drivers (especially for graphics, chipset, and storage) via Device Manager, manufacturer websites (e.g., NVIDIA, Intel), or tools like Windows Update to ensure compatibility and proper memory handling.
- Maintain Healthy RAM: Test your RAM periodically using Windows Memory Diagnostic (type «mdsched» in Run) to catch hardware issues early. Replace faulty modules and avoid overclocking unless you’re confident in your cooling setup.
- Run System File Checks: Use the System File Checker (SFC) and DISM tools (sfc /scannow and DISM /Online /Cleanup-Image /RestoreHealth in Command Prompt) monthly to repair corrupted system files that could destabilize memory management.
- Avoid Software Conflicts: Install only trusted, compatible applications, and keep antivirus software updated but configured to avoid aggressive memory scans that might interfere with Windows processes.
- Monitor Hardware Health: Use tools like HWMonitor to check for overheating (CPU, GPU, RAM) and ensure proper ventilation. Clean dust from your PC and replace thermal paste if needed to prevent heat-related memory errors.
- Manage Windows Updates: Install Windows updates promptly to patch known bugs, but check forums (e.g., Microsoft Community) for reports of update-related issues before applying them. Roll back problematic updates via Settings > Update & Security > Recovery if needed.
- Optimize Virtual Memory: Let Windows manage your paging file (Settings > System > About > Advanced system settings > Performance > Virtual Memory) to ensure sufficient memory allocation without manual tweaks that could backfire.
- Maintain Disk Integrity: Run chkdsk /f /r in Command Prompt periodically to fix bad sectors on your drive, preventing memory swap issues between RAM and storage.
Conclusion
By following these troubleshooting steps, you can effectively fix the Memory Management BSOD error and restore system stability on your Windows 10 or 11 device. Whether the issue is caused by faulty RAM, outdated drivers, or corrupted system files, resolving this error will help prevent further crashes and ensure your system runs smoothly.
Also Read
- Fix ‘Page Fault in Non-Paged Area’ BSOD in Windows 10
- How to Fix Blue Screen of Death Errors On Windows 11?
- How to Fix the System Service Exception Stop Code in Windows 10?
Содержание статьи:
- Что можно предпринять для исправления проблемы
- ШАГ 1
- ШАГ 2
- ШАГ 3
- ШАГ 4
- ШАГ 5
- ШАГ 6
- Вопросы и ответы: 2
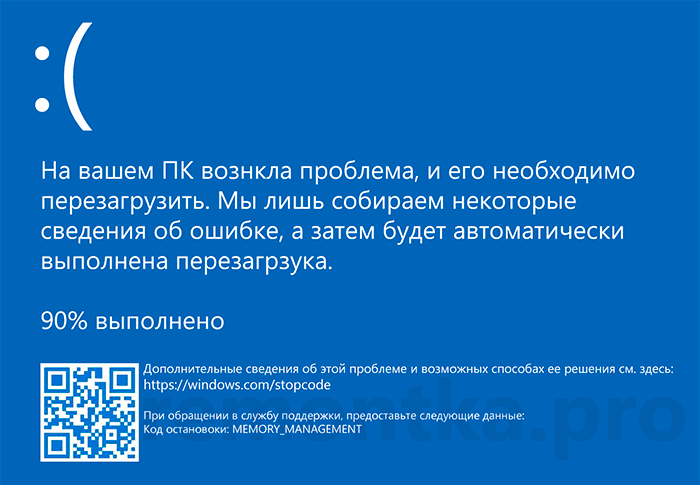
Здравствуйте!
Можно ли самому себе (со скуки) быстро «насоздавать» лишних проблем с ПК?.. 👀 Легко! Один мой знакомый в попытках ускорить систему, почти «убил» ее стабильность — начала появляться ошибка со стоп-кодом «Memory management» при попытке включить ПК и загрузить ОС Windows (пример на фото ниже 👇).
Собственно, мне пришлось ему немного помочь (само собой, так и появилась эта заметка).
Вообще, этот стоп-код переводится на русский как «Управление памятью» (но не всегда проблема напрямую связана с ОЗУ). Как бы там ни было, здесь (ниже) я приведу несколько рекомендаций, которые в ряде случаев (не всегда!) помогают устранить сию проблему.
И так…
*
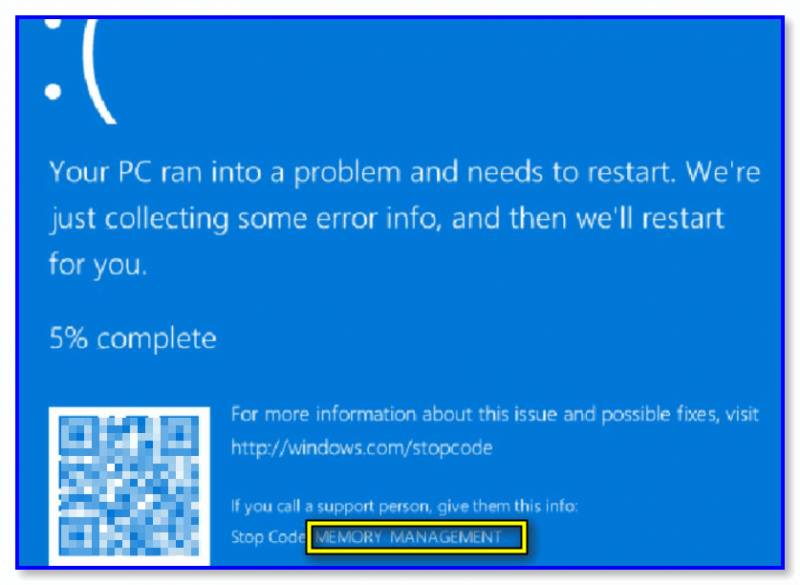
Синий экрана со стоп-кодом Memory management // фото с проблемного ПК
*
Что можно предпринять для исправления проблемы
ШАГ 1
Для начала 👉 обратите внимание после чего стала появляться эта ошибка, не подключали ли вы накануне новое оборудование, не устанавливали ли драйвера, программы и т.д. и т.п.?
Совет банален: отключите это новое оборудование (удалите программу, установленную накануне). Установите «старый» драйвер, при котором система работала стабильно.
Кроме этого, можно попробовать откатить систему 👉 к точке восстановления (на ту дату, когда Windows «вела» себя стабильно). Для этого нужно нажать на WIN+R, и использовать команду rstrui.

Выбор точки для отката системы
*
ШАГ 2
Далее посоветовал бы 👉 проверить плашки ОЗУ (прим.: оперативную память). Причем, желательно перед этим выключить ПК и вынуть все плашки из слотов, кроме одной из них (и именно с ней провести тест). Затем, подобный тест провести с другой плашкой (возможно, что есть неисправность конкретно с одной из них).
Как провести тест:
- нажать сочетание Win+R, чтобы появилось окно «выполнить»;
- ввести команду mdsched и нажать Enter. Должно появиться окно, с предложением провести тест ОЗУ. Пример ниже. 👇
👉 В помощь!
Тест ОЗУ (RAM): проверка оперативной памяти на ошибки — см. пошаговую инструкцию
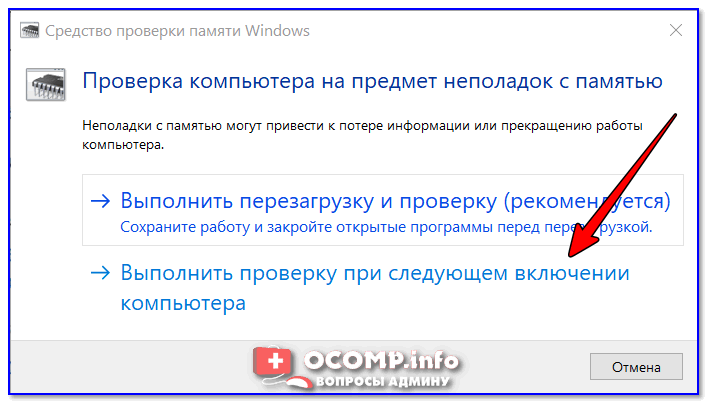
Средство проверки памяти Windows
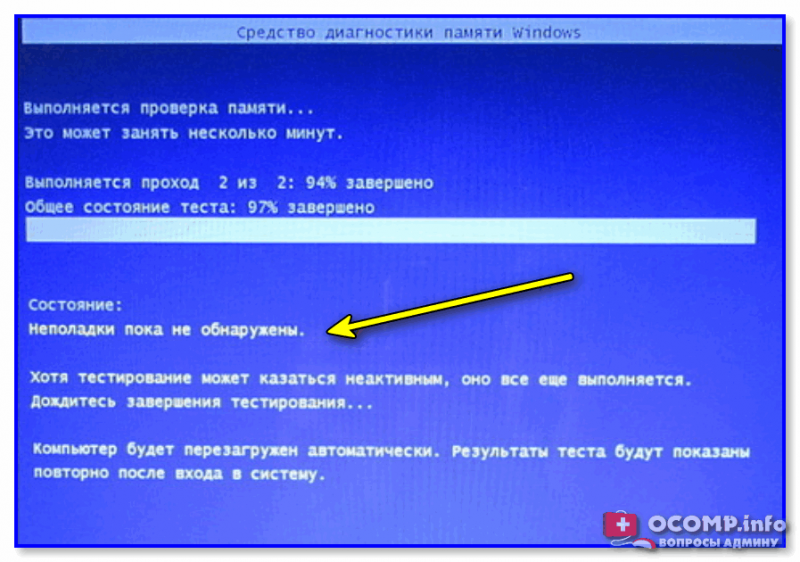
После перезагрузки ПК — запустится проверка памяти. Основное, куда нужно смотреть — вкладка «Состояние»: если с памятью все в порядке — должен быть статус «Неполадки пока не обнаружены».
Пример проверки плашки
*
ШАГ 3
Этот шаг больше актуален для ПК, где в BIOS можно задавать соотв. настройки.
Далее я бы посоветовал приглядеться 👉 к частоте, на которой работает память (2400 / 2666 / 3200 Mhz и пр.). В Windows 10, кстати, частоту (на которой работает память) можно посмотреть в диспетчере задач (Ctrl+Alt+Del). 👇

Диспетчер задач — память
Некоторые плашки при загрузке XMP профиля (это задается в BIOS), скажем для поднятия с 2400 Mhz до 3200 Mhz — начинают вести себя нестабильно: время от времени из-за этого вылетают «синие экраны» с перезагрузкой ПК… (чаще всего такое наблюдал на плашках от AMD и китайских «no-name»)
Я бы вообще, порекомендовал 👉 зайти в BIOS и 👉 сбросить настройки в оптимальные (после ничего не менять, кроме раздела BOOT, если того требует загрузка ОС).
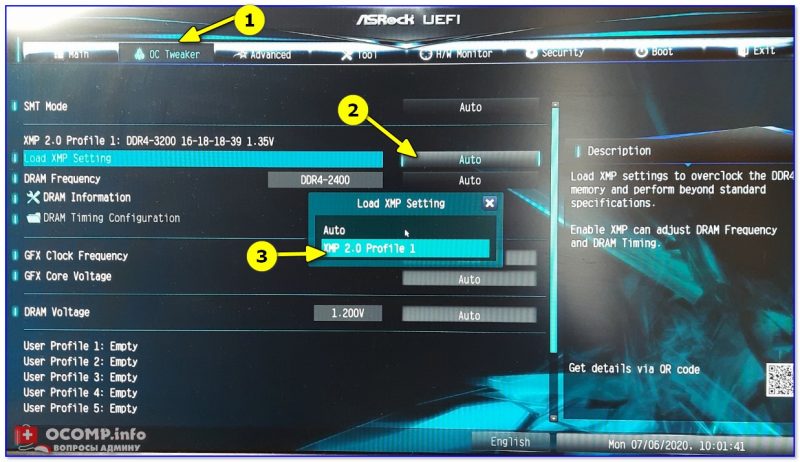
ASRock UEFI — загружаем XMP профиль
*
👉 Важно!
В некоторых случаях (это редко, но бывает) возможно есть проблема «несовместимости»* ОЗУ и мат. платы (*официально совместимы, но на практике постоянно сбои…).
Например, сталкивался с этим у производителей мат. плат AsRock и определенных плашек ОЗУ от AMD: в отдельности друг от друга работают вполне стабильно, но «вместе» — ошибки…
Мотив: по возможности, попробуйте заменить все свои плашки памяти на одну от другого производителя. Будет ли появл. синий экран?..
*
ШАГ 4
В Windows 8/10 драйверы для большинства оборудования 👉 устанавливаются автоматически (с одной стороны — это хорошо; но с другой — часто драйвера ставятся не самые «подходящие»… В результате получаем ошибки и «вылеты» синих экранов).
*
Что я бы посоветовал:
- загрузить драйверы с офиц. сайта (особенно это касается драйверов для видеокарты, мат. платы, чипсета, звуковой карты, сетевых адаптеров. Точные модели ваших «железок» можно узнать в AIDA, например). Если у вас ноутбук — скачивайте с сайта производителя ноутбука (т.е. с сайта ASUS, Lenovo и пр., а не AMD, nVidia…);
- затем отключите компьютер от интернета и произведите установку «родных драйверов»;
- после, отключите в Windows авто-обновление драйверов. О том, как это сделать — 👉 см. в этой заметке;
- подключите снова компьютер к интернету и проверьте работу. Будут ли снова сыпаться ошибки со стоп-кодом Memory management…
*
Кстати, как вариант, можно воспользоваться спец. утилитами для поиска и обновления драйверов. Например, 👉 Driver Booster, помимо всего прочего, может помочь найти и установить недостающие пакеты Net FrameWork, Visual C++ и пр.
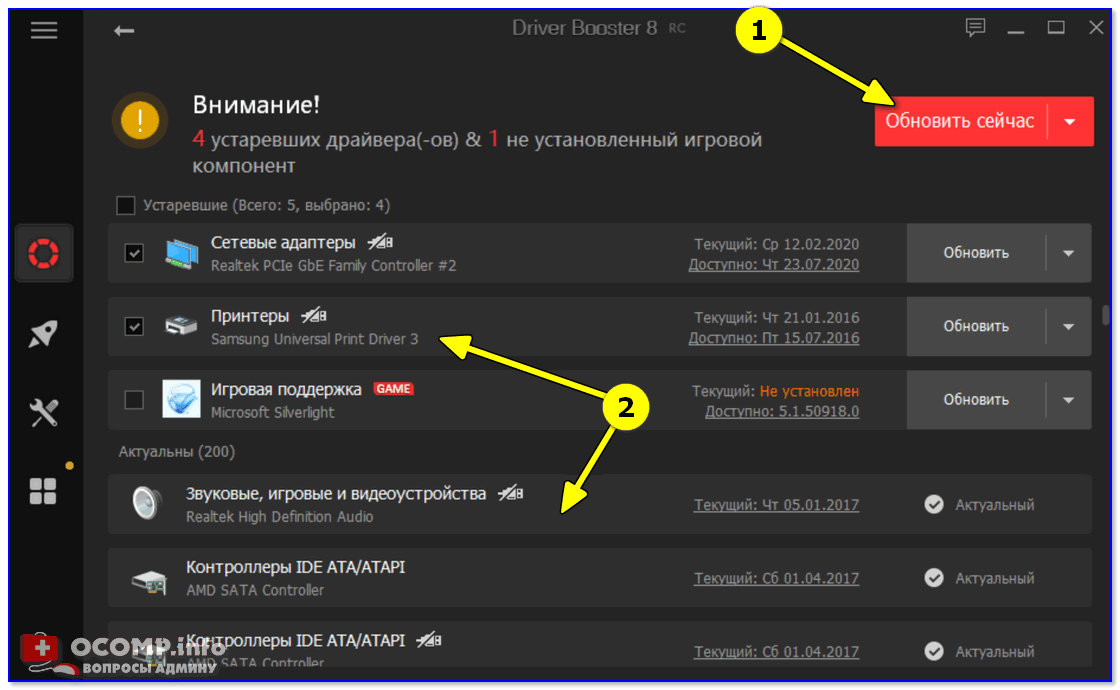
Driver Booster — найдено 4 устаревших драйвера, и 1 игровой компонент // пример работы программы
*
ШАГ 5
Следующее, что посоветовал бы — это проверить работу ПК 👉 с помощью LiveCD-флешки. Это позволит нам хотя бы понять, не связана ли проблема с текущей ОС (с ее системными ошибками, сбоями, конфликтами драйверов и пр.).
Кроме этого, на LiveCD-флешке есть программа OCCT (на том LiveCD, который порекомендовал я). И с помощью нее можно запустить довольно «жесткий тест», который поможет 👉 проверить стабильность работы БП, ЦП, видеокарты и пр.
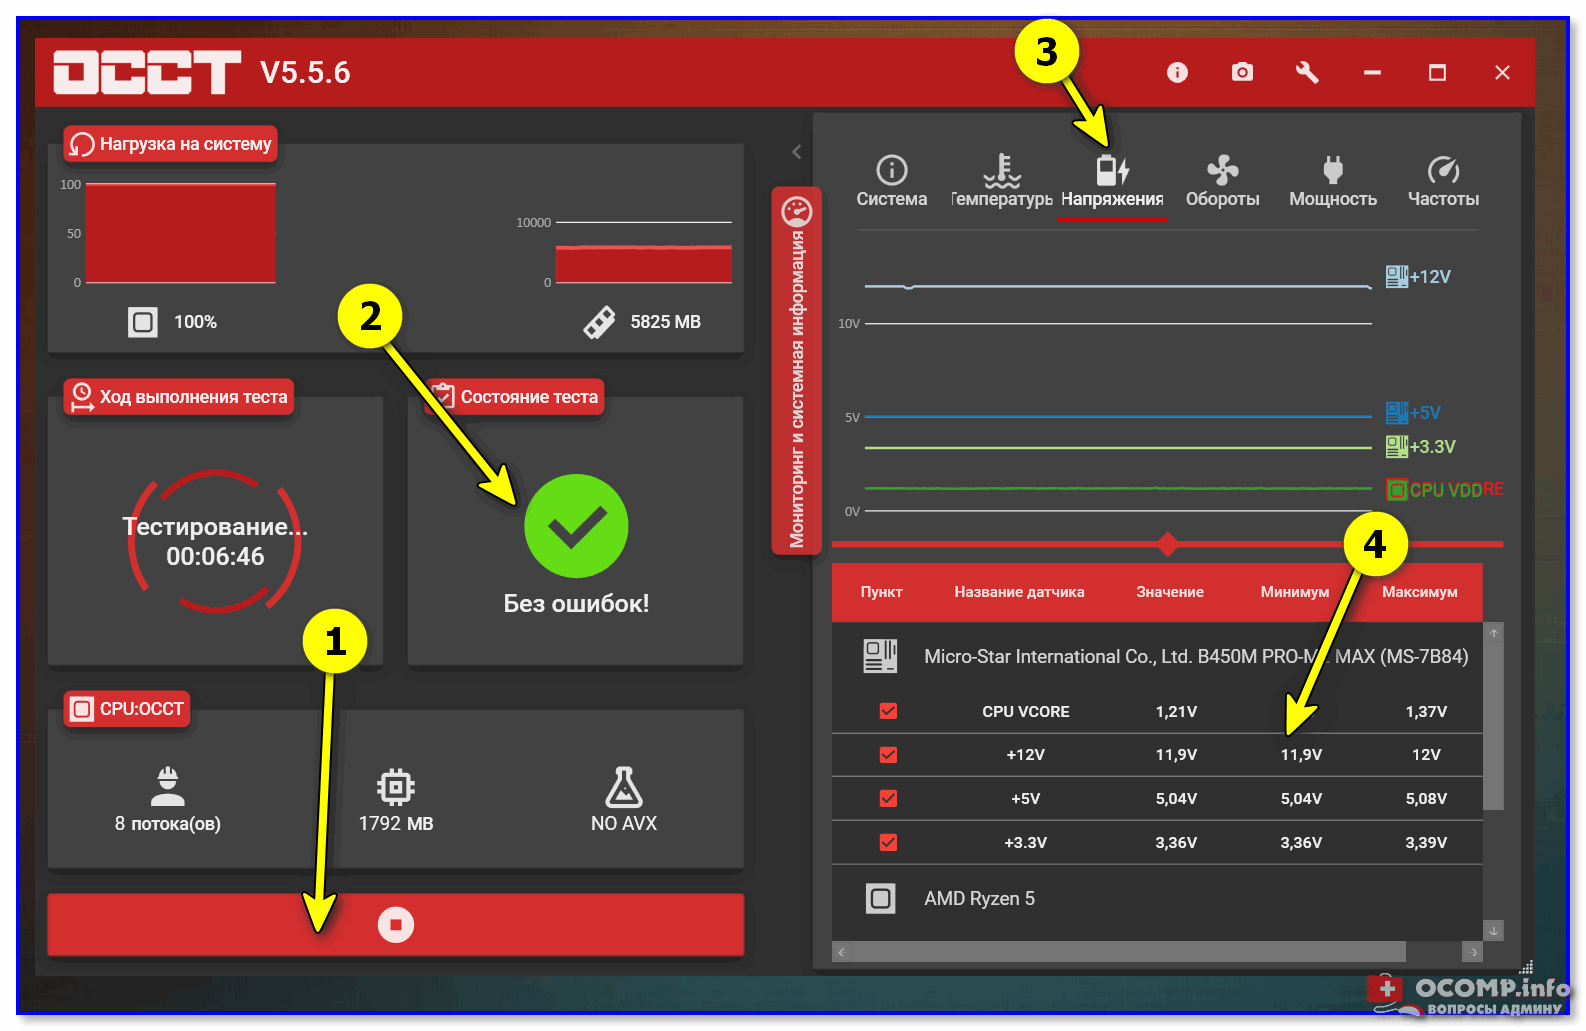
OCCT (программа для тестирования ПК) — вкладка с напряжениями
*
Если, загрузившись с LiveCD, синие экраны «пропали» и компьютер работает стабильно, на мой взгляд можно попробовать:
- установить новую ОС Windows в свободное место жесткого диска (👉 это можно сделать без удаления данных и текущей копии ОС). Причем, я бы посоветовал взять версию 👉 Windows LTSC (она без Store, Edge, Cortana, OneDrive и пр.);
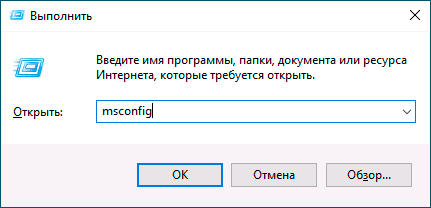
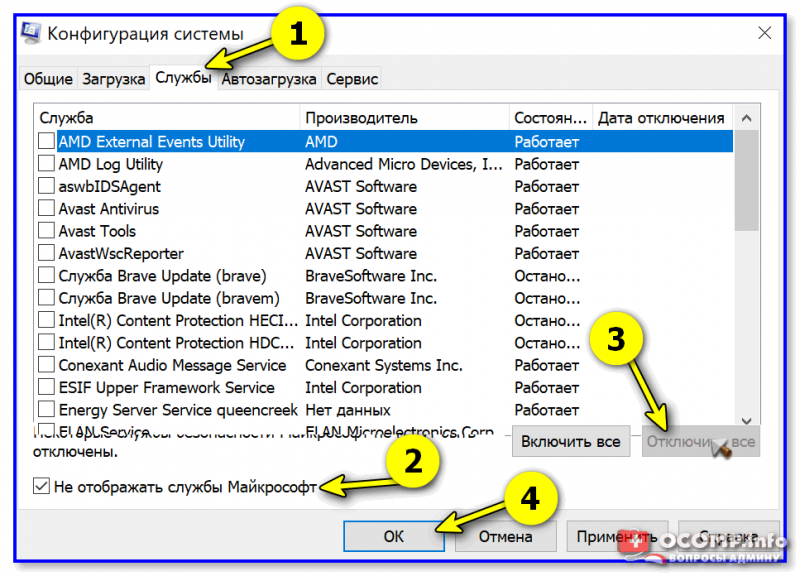
- попробовать произвести загрузку «проблемной» Windows без «сторонних» служб. Чтобы это сделать: нажмите Win+R, и используйте команду msconfig. Далее в списке служб отключите все, кроме служб от Microsoft. См. скриншот ниже. 👇

Конфигурация системы — отключение служб
- если ОС Windows будет корректно работать без сторонних служб — попробуйте поочередно их включать и проверять работу ПК. Чаще всего сбои бывают из-за антивирусов, панелей управления от драйверов, виртуальных CD-дисководов и пр.
*
ШАГ 6
Если всё вышеприведенное не дало результатов — могу лишь порекомендовать ко всему прочему выполнить общие рекомендации при появлении синего экрана. Их я приводил в одной своей инструкции (ссылочка ниже).
*
👉 В помощь!
Синий экран в Windows 10: «На вашем ПК возникла проблема…» (а за ним перезагрузка компьютера).
*
PS
Всё же (я настаиваю 😉) в первую очередь при появл. стоп-кода Memory management — нужно перепроверять ОЗУ (в т.ч. с заменой плашек), драйвера (на мат. плату, чипсет, видеокарту, сетевые карты), настройки и версию BIOS (возможно стоит произвести обновление). В подавляющем большинстве случаев — причина в «этом»… ☝
*
Если вы решили проблему иначе — дайте знать в комментариях!
Всего доброго!
👋
If something goes wrong, Windows 10 will throw up a lot of error messages and error codes. If BSOD or bluescreen of death error occurs, you can use the Windows 10 stop code to pinpoint the problem. Sometimes, these are linked to specific errors when you may need to undergo Windows 10 fixes a few times. You will experience the Windows 10 “Memory Management” stop code later. This article lets you know how you should fix memory management errors.
What is Windows Memory Management?
Windows memory management is essential for keeping the OS ticking over nicely, and it is a function that can adjust the system memory. If it doesn’t go right, your Operating System will begin displaying a blue screen of death errors at regular intervals.
This tool helps to track each memory location on the operating system. It helps to adjust the memory transition and procedures between your physical memory and RAM. Thus, you get to know the amount of memory available for allocation. As soon as you shut down a program, it will reallocate the memory to other methods. When it crashes, it will also take your System with it.
What is Stop Code Memory Management Error?
Stop code memory management is a common BSOD error. There are a lot of Windows 10 users who have faced this error, and this error is specific to the System’s memory management. However, you can solve this problem easily.
If you get a memory management BSOD, it indicates a critical memory management error. The stop code of the error is 0x0000001A. Usually, the system-side issue is related to hardware, but sometimes it can be related to software. In a few cases, the error can refer to firmware issues.
We have given here a few reasons why the stop code can be seen on display.
- Software issues, i.e., damaged or corrupted files in the system directory
- Software or hardware conflict
- RAM errors
- Faulty physical memory sticks
- Hardware problems like a graphics card
- Outdated hardware or hardware failure
- Faulty drivers or missing Disk errors
- Firmware, virus, or malware infection
- Outdated Windows 10 operating system
These are some of the few possible causes of the error. However, these are not the only ones due to which the error can occur, and it is because there may be another reason for which you can face the issue.
How to Fix Stop Code Memory Management:
-
Restart the Computer:
Try to power off the PC and then turn it on again. You can apply the fix to solve all the Windows 10 issues like this error.
-
Update Windows 10:
The first thing you must do is check if your Windows 10 is updated entirely. If your System contains outdated system files, it may create unexpected errors. Check if any update is pending because it is a fast way to find the error.
First, your task is to tap on the Windows key + I for opening the Settings panel. Thereafter, your job is to move to the Update & Security. You should go under Windows Update to check this for pending updates. Whether you see any updates available, your job is to save necessary files. Next, you should tap on the option Restart now. Finally, your System is going to restart during the process.
-
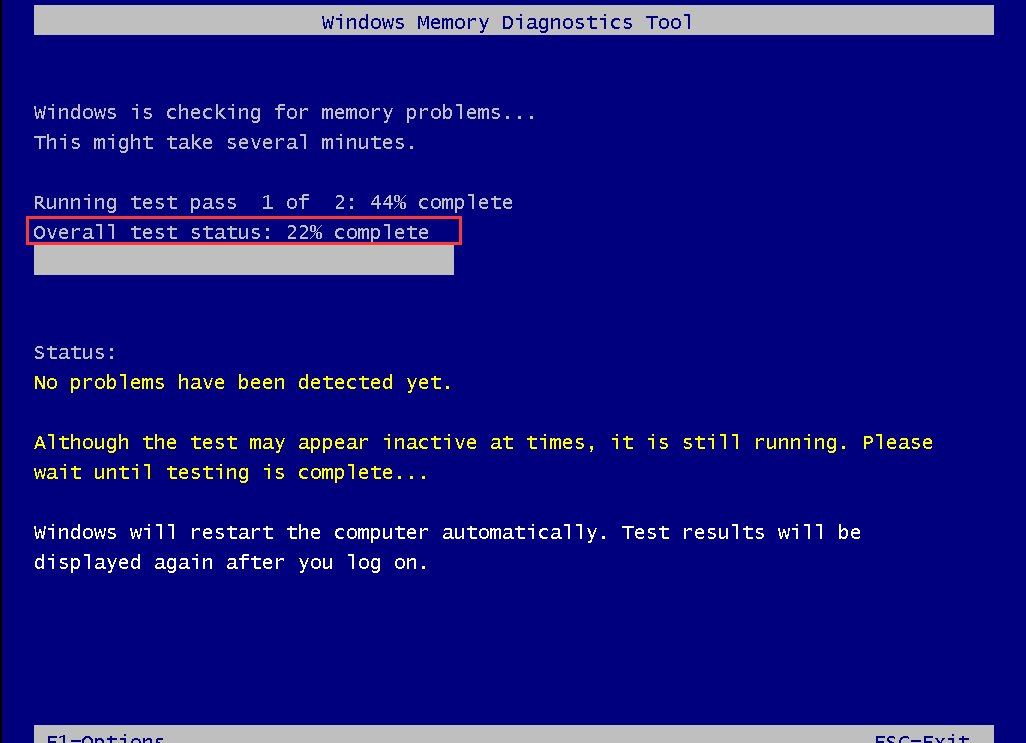
Run Windows 10 Memory Diagnostic Tool:
If you are willing to check if your RAM functions correctly, then take the help of the integrated Windows Memory Diagnostic tool. It runs after a system reboot and helps to check the system memory for errors. The tool helps you to log the Scan to a text file.
Navigate to the Start menu search bar first, and then you should write Windows Memory Diagnostic into it. Thereafter, you should choose the best match.
There are two options available— the first is to restart it instantly and run the tool, or set it to run after the next reboot. When you are going to fix the error, you should save your essential documents first. Then, you are required to restart the operating system instantly, and the tool will start running immediately after you reboot your system.
The log file is not apparent after booting back to Windows 10.
- First, you should tap on the Windows key + X, and thereafter you are required to choose the Event Viewer from the power menu.
- When you enter the Event Viewer, you should go to the Event Viewer (Local), Windows Logs, and System, respectively.
- Then, your task is to move to the right-hand column and then choose the Find option. Next, you should write MemoryDiagnostic on the box. Thereafter, you need to tap on the option Find Next. You can see the diagnostic results displayed at the bottom of your window.
- Now, your job is to investigate the specific errors.
-
Run MemTest86:
Sometimes, you are very much sure that the error is related to the RAM. But the Windows Memory Diagnostic tool is unable to display it. If something like this happens to you, then your task is to take the help of MemTest86 for performing an in-depth memory test.
It is a standalone memory testing tool used freely for x86 machines. In this case, you are required to boot MemTest86
from a USB flash drive. If you want, use a bootable disc and leave this for checking the system RAM. The process of checking generally consumes plenty of time to complete. A single-pass can take hours, but it relies on installed RAM.
-
Update the Drivers:
Updating the system drivers is another way to solve the error. Sometimes, when you have new software, it may contain new drivers, and your operating system may not receive the specific message. Nowadays, driver fault errors are rare because Windows 10 can handle driver updates.
You should tap on the Windows Key + I button to open the Settings panel. After that, your job is to choose the Update & Security option and the View update history option. You are capable of finding driver updates.
Next, you need to write device manager by going to the Start menu search bar. Thereafter, choose your best match. Navigate to the list now and check if there exists an error symbol. If you won’t find anything, then the driver status is not causing the error. Hence, you can use a third-party tool for updating the system drivers simultaneously. If necessary, then take the help of the free tools to solve most Windows issues.
IOBit’s Driver Booster and Snappy Driver Installer are the two examples.
-
Update the GPU Drivers:
You should know that if your System has outdated or brand-new GPU drivers, there is a chance of the BSOD error. The error may be the memory management stop code, but
a video memory management-specific stop code can sometimes cause an issue. 0x0000010E is the video memory management internal stop code that may refer to a faulty GPU driver.
If you are willing to update the GPU drivers, your job is to move to the manufacturer’s website. Then, you should download the recent update. In most cases, the drivers are usually either Nvidia or AMD.
If you don’t know what your GPU is using, you have to write dxdiag by going to the Start Menu search bar. Choose the one that is suitable best for you. As soon as you open the DirectX Diagnostic Tool, your job is to choose the Display tab. Now, you can see the GPU of your System available.
If you have Nvidia GPU, you can install the Nvidia GeForce Experience.
-
Run CHKDSK:
It is a Windows preloaded tool used for verification of the file system. Certain settings can solve the issue when you run. First, navigate to the Command Prompt, and then your job is to run the CHKDSK from there. The tool contains plenty of features, and it helps to identify and repair the errors to solve the BSOD.
- First, your job is to head towards the search bar and open it in the taskbar. To do this, you are required to tap on the magnifying glass icon. Using the Windows + S keyboard shortcut, it is possible to bring it up.
- Go to the search box and write Command Prompt there. As soon as it appears in the results, you are required to tap on it. Then, you should select Run as Administrator.
- If you are prompted by the User Account Control (UAC), you need to tap on the Yes button to allow the app to launch with administrative permissions.
- You need to write chkdsk C: /f /r, and then your task is to hit Enter. As soon as you apply the command in the C: drive, it will scan the errors and repair them. If you are willing to check disks, then exchange the C: with the entry letter of other disks.
- The error message can appear “Chkdsk cannot run because another process uses the drive” on display. Hence, you are required to tap on Y and next hit Enter.
- The Chkdsk tool can automatically scan and repair bad sectors when used to boot the System next time.
- Now, you need to reboot the device. Wait for a while till the tool is not analyzing your System.
-
Run SFC:
Are you still encountering the Memory management error! Then, take the help of System File Check or SFC tool. Using the Windows system tool, you can check if there are missing and corrupt Windows system files.
The System File Check tool is used to check the Windows system files mainly whereas the previous CHKDSK tool helps to scan the entire drive for errors. Before running the SFC command, you need to check that it works appropriately two times.
Deployment Image Servicing and Management or DISM is an integrated Windows tool with many functions. Use the DISM Restorehealth command to make sure that it will work accurately. To do this, perform the steps.
- First, your job is to write Command Prompt (Admin) by going to the Start menu search bar. After that, tap on the Run and then choose it as administrator. It helps you to open the elevated Command Prompt.
- You are required to write the given command and then hit Enter: DISM /online /cleanup-image /restorehealth
- Next, wait for a while till it finishes. This method may consume up to 20 minutes, but it relies on the System’s health. Sometimes, the procedure can get stuck in the middle. That’s why you need to wait for some time to finish it.
- As soon as the method completes, it would be best to write sfc /scannow and hit Enter.
-
Replace the Hardware:
If any faulty driver is the cause of the BSOD error, then there is no need to apply any software fix or Windows reinstallation process. Whether you have found an issue with your RAM while testing, then the only choice is to replace it.
-
Reset Windows 10:
Resetting the windows can help you and solve the Stop Code Memory Management error without any hassle. When you reset Windows 10, it will exchange the system files with a completely fresh set of files.
Theoretically, it can clear the lingering problems related to the memory management error and keep the essential files intact.
Step 1: First, your job is to tap on the ‘Windows + I’ so that you can enter the Settings interface. Thereafter, you are required to look for the Update & Security option. Then, you need to hit the option for accessing its interface.
Step 2: You need to find the Recovery option available from the left panel page. After that, you should hit Get Started, which is available under Reset this PC.
Step 3: When you open the Reset this PC window, you can see two options: Keep my files and Remove everything. Select the Keep my files option so that you can remove apps and settings. Then, you should tap on it.
Step 4: A list of apps will appear, which you need to remove. If you are willing to reinstall some apps later, capture a picture. After that, you are required to tap on the Next for removing your apps.
Step 5: Whether you are ready to reset the computer, you need to hit the Reset to operate. As soon as you complete the resetting procedure, the PC will reboot automatically.
-
Scan Computer for Virus or Malware Infection:
Malware infection is a major reason due to which you can experience PC issues. There are a lot of scripts and applications that can cause irreversible harm to one’s device. Due to a virus, the Stop Code Memory Management error can also occur, although it happens very rarely.
You are required to scan the System with taking help of a quality antivirus program. Whether you haven’t installed any third-party antivirus program on the computer, then you can take the help of the built-in Windows Defender.
- Head towards the search bar first available in the taskbar. To move to the search bar, you must hit the magnifying glass icon.
- If you want to bring up this, use the Windows + S keyboard shortcut.
- After that, your job is to choose Windows Security and then launch this from search results.
- Now, take the help of the home screen or the menu available in the left-side pane for switching to the Virus & Threat Protection tab. You should now tap on the Scan Options link.
- Next, you should choose the Full scan option. It will check every file on your drives to ensure that no thread can hide. You need to note that the Scan can last more than 1-2 hours, and it relies on the number of files you need on the operating system.
- You are required to tap on the Scan now button to start the scanning process. If you detect any threat, Windows 10 will remove this completely. If necessary, you should try to review the scan results to see the removed infected files.
-
Clear Temporary Files and Folders:
Windows often generate temporary folders. In case these accumulate mistakenly, it can cause affect the speed of your computer. Even due to this, you can experience stop code memory management errors. You should remove the junk files with the help of the Disk Cleanup utility, and it will help you to save space and solve issues.
- Your first task is to move to the search bar and open it in the taskbar. Tap on the magnifying glass icon to do so. You can bring this up with the Windows + S keyboard shortcut.
- You should now type Disk Cleanup there and tap on the first search result.
- Now, your job is to choose the Windows 10 system drive and thereafter hit the OK button. The operating system is generally available on disk C:
- When the new window appears, you will find the temporary files taking all space. One thing which you are required to o ensure is that you should select the Temporary Internet Files and Temporary Files. If necessary, then remove other junk files like Thumbnails or DirectX Shader Cache. As soon as you choose what you are willing to remove, you should tap on the OK button.
- Thereafter, your task is to tap on the Delete Files button to see available in the dialog box. This removal method will begin to clear space on the device. If you are willing to delete files permanently, you should hit Yes.
-
Check Latest Installed Applications:
In this case, you are required to check if there is any new software installed on your device very recently. Whether your device has newly installed applications, it might not support the operating system. Besides, it may conflict with the other available programs on the PC. It can trigger the memory management BSOD problem.
- Whether you see that some newly installed apps cause the issue, then your job is to uninstall these instantly. Then, check if the problem remains.
- Your first job is to hit the Windows icon available in the bottom left of the display. As soon as you tap on this, you can see the Start menu appearing.
- After that, you are required to select the Settings option. If you want, then use Windows + I shortcut.
- Next, you are required to tap on the Apps tile, where you can get each app installed on the PC.
- Now, your job is to sort the apps by Install date.
- Your task is to tap on a newly installed app as soon as you choose it. Thereafter, your job is to hit the Uninstall button.
- After that, you are required to tap on Uninstall again for confirmation of your choice. Next, you need to go through the on-screen instructions provided by the program’s uninstaller. You need to ensure that you have removed the software entirely.
- You need to repeat the steps for all apps available in the list. As soon as you uninstall all problematic apps, you need to reboot the PC. Then, check if the error has been fixed.
-
Install Pending Windows Updates:
If any update is pending, it can cause an error in your operating system. Therefore, you are required to look for the pending Windows Update packages. Then, you should install these to check if the problem is available.
You should first hit the Windows icon available in the bottom left of the display. As soon as you tap on this, you can see the Start menu appearing. Next, you are required to select the Settings option. If you want, then use Windows + I shortcut.
Next, you are required to tap on the Update & Security tile, where most of the Windows Update settings are available.
Now, you should see if any updates are available that are pending and install them. Your job is to hit the Install Updates button for installing the Windows Updates. You should tap on the Check for updates option if you don’t find any pending updates available. Finally, you should wait till your windows find available updates.
If you find some updates that you must download, you should tap on the Download option. Allow to download the Windows 10 components, and you should install the updates thereafter.
We recommend you check for updates daily to ensure that your operating system is always updated. The updates can squish bugs and solve the security holes.
-
Use Reimage to Repair & Replaces Corrupted System Files:
It is a strong tool that you can use for repairing and rebuilding Windows. The tool works automatically, and you don’t have to worry about losing any programs and your data.
- First, your job is to download the Reimage and install it thereafter.
- After that, you should open the tool and then run the free Scan. It can take some minutes to be complete.
- A summary of the detected problems can appear on the computer. You need to tap on the START REPAIR thereafter. As soon as you tap on this, you have to solve it automatically. In this case, it will be better to purchase the full version. Try a 60-day Money-Back Guarantee so that it can be refunded anytime if the tool doesn’t solve the issue.
-
Stop Code Memory Management on Boot Run Windows 10 in Safe Mode:
Your first task is to launch Windows 10 in safe mode, and it will boot up the operating system with nothing more than basic drivers. Besides, it lets you check if you get the Stop Code Memory Management error.
Especially, it closes any process that the PC will not require. If you find the memory management error ceasing, you get to know that it is not hardware. It may be software issues like a patch in an update or a driver. If you find the error still available, you are required to exchange some faulty hardware.
If you are willing to boot the System in Safe Mode, you must perform the steps given below.
- First, your task is to take the help of the Win+R keyboard shortcut. Then, write msconfig, and tap on Enter thereafter.
- You should choose the Boot tab available in the upper section of the display.
- Thereafter, your job is to choose Safe Boot.
- Finally, you should select the Minimal option from the list of boot options.
-
Upgrade Hardware of the Computer:
You may need to upgrade the System’s hardware, but it relies on the results of the troubleshooting adventures.
When you are going to purchase new hardware, you should first make sure that each thing is seated properly. If a hardware piece becomes loose or you have moved your machine, you need to perform the step. You should do this in case you find components filthy.
If it is a preloaded machine or does not belong to the warranty period, you must find new components to get the PC up and running again. Sometimes, the older machines don’t support the latest OS versions and PC components. It may be because your device has a new graphics card or requires more RAM. If you have applied the above methods but the error is still available, ensure that the issue is hardware-related.
-
Increase Virtual Memory Manually:
If the memory usage is full in your Windows 10, then it can cause memory management errors. In this case, if you add virtual memory, it can fix the issue.
Step 1: Hit ‘Windows+R’ first to launch the Run dialog box. Then, your task is to enter the command ‘system.cpl’ in the box. Next, you should hit the OK button for accessing System Properties.
Step 2: As soon as the System Properties window appears, you must hit the Advanced option in the toolbar. Next, you have to tap on the Settings available under Performance.
Step 3: When you open the Performance Options window, you need to hit Advanced, available in the toolbar. Thereafter, your job is to tap on the Change option available under Virtual memory.
Step 4: While you see the Virtual Memory window, you have to add virtual memory. To do so, you are required to uncheck the Automatically manage paging file size for the drives first. Thereafter, your job is to choose the system drive and then select the Custom size option. At last, you should set the actual values in the boxes of Initialize size (MB) and Maximum size (MB).
-
Perform Startup Repair:
If you cannot access your PC to execute the operations mentioned above, your job is to generate an installation media for rebooting the PC. Thereafter, you must perform the Startup Repair procedure to begin the Windows normally.
Step 1: Your first task is to attach the USB installation media to the PC. Then, you need to begin the PC. After that, you need to set the PC to boot from USB installation media to access WinRE. You should tap on the Repair your computer option and then hit the Troubleshoot.
Step 2: As soon as you see the page available, you need to tap on the Advanced options.
Step 3: While the Advanced options window appears, your job is to hit the
Startup Repair option.
Step 4: You should select an account here to continue, and then you need to enter the password to begin the repairing process.
Step 5: Now, you can see the Start Repair tool diagnosing the computer. You need to repair it again, and the process can take some time to finish.
Whether you cannot run the Start Repair process, you may try other options such as Resetting your computer, command prompt, etc.
-
Restore System:
If you have made a restore point before the Stop Code Memory Management error appears, try to perform the System restore process to fix the problem.
Step 1: Your first task is to tap on the ‘Windows+R’ key for opening the Run dialog box. Thereafter, your job is to write ‘system.cpl’ in this box. Next, you need to tap on the OK to access System Properties.
Step 2: When you see the System Properties window appearing, you should move to the System Protection tab. Thereafter, you are required to hit the System Restore option to undo system changes.
Step 3: As the System Restore window appears, your task is to tap on the Next to go on. Next, you need to choose the restore point you want, and then you should hit the Next option.
The System Restore process can uninstall the programs that you have installed.
Tap on the Scan for affected programs to check whether any essential programs will affect or not. If you have found any, you should back up these before restoring them.
Step 4: Now, the PC will get restored to the earlier restore point that you have chosen. Next, your job is to tap on the Finish to confirm the restore point.
If you don’t want to lose data, save open files before confirming the restoring point. Thereafter, you should shut down all programs.
Step 5: A pop-up window appears that displays the ‘Once started, System Restore cannot be interrupted’ option. Next, you need to hit Yes to continue. Now, the PC will restart to perform the changes automatically.
Conclusion:
Usually, the blue screen of death errors is very rare. But if you are the one who has encountered the error, then you should try to fix the problem. Generally, the stop code memory management error is a sign of an issue related to RAM. However, you may have to run the Windows Check Disk tool to check the errors with the hard drive.
If you cannot solve the error, then look at the testing for bad memory on the computer.
Frequently Asked Questions:
- What causes BSOD memory management?
The error can occur due to faulty RAM module, corrupt system files, disk drive issues, incorrectly seated RAM stick, outdated OS or drivers, etc.
- Does RAM cause BSOD?
If your device has a defective RAM module or the RAM is not placed correctly, then it can cause the error.
- How to prevent BSOD memory management?
Install the recent OS and driver updates to prevent the memory management error. Try to run CHKDSK and SFC commands if necessary. You please replace the aging memory sticks and inserted them properly.
Have you ever suffered from Blue Screen of Death (BSOD) while working on the computer, saying MEMORY MANAGEMENT? You are not alone and many users may be encountering such an error. The good news is that you can easily fix memory management BSOD in Windows 11/10 via these solutions.
Memory Management BSOD Windows 11/10
In Windows 11/10, it could throw various stop codes and error messages when things go wrong. While suffering from Blue Screen of Death (BSOD), you could see a Windows stop code on the screen which helps to pinpoint the issue and fix it. Memory management BSOD is one of the common blue screen errors.
Memory management is responsible for managing and allocating proper memory space to make sure the OS, applications, and other running processes have needed memory to run their operations. It could crash due to some reasons, soon you meet memory management blue screen error code 0x0000001A.
What causes the memory management BSOD? Fault RAM, corrupted system files, a faulty graphics card driver, disk errors, virus infection, etc. can trigger the issue.
This could be a frustrating situation since it can come out of nowhere and break your workflow. Sometimes the BSOD error can disappear after a restart but you begin facing it frequently over time and this could make things worse. So, how to fix memory management error? Let’s go through some fixes to eliminate this error as soon as possible.
Related post: Solved: Memory Management Error 0x0000001a Blue Screen
Fix 1. Run Windows Memory Diagnostic
Windows 11/10 offers a utility called Windows Memory Diagnostic in the operating system which is designed to check for many memory problems that block your computer from working properly. If you are confronted with Windows stop code memory management 0x0000001A, try to run this tool to test your RAM.
Step 1: Press Win + R to open Run, type mdsched.exe, and click OK.
Step 2: Tap on Restart now and check for problems (recommended) to begin the check straight away.
Step 3: The test process begins and it could take several minutes. After that, you will see the result. If you cannot see any error on the screen (or the next time you log in), your memory runs fine, and try other fixes to resolve your issue.
Fix 2. Update Windows
Microsoft releases updates to Windows to fix some known issues and improve the system. When suffering from memory management BSOD, update Windows 11/10.
Step 1: Open Settings and go to Windows Update (in Windows 10, go to Update & Security > Windows Update).
Step 2: Check for updates and see if some updates are available.
Step 3: Download and install them. Then, restart the PC to finish the update process.
Windows 11/10 memory management blue screen error could be blamed for recently installed software and cumulative temporary files.
To be specific, newly installed software may be incompatible with your operating system or cause a conflict with other programs. You should uninstall it to resolve error code 0x0000001A memory management.
Besides, Windows generates some unnecessary files and they could cumulate over time, affecting the PC speed and even resulting in the memory management BSOD. You should try to clear temporary files.
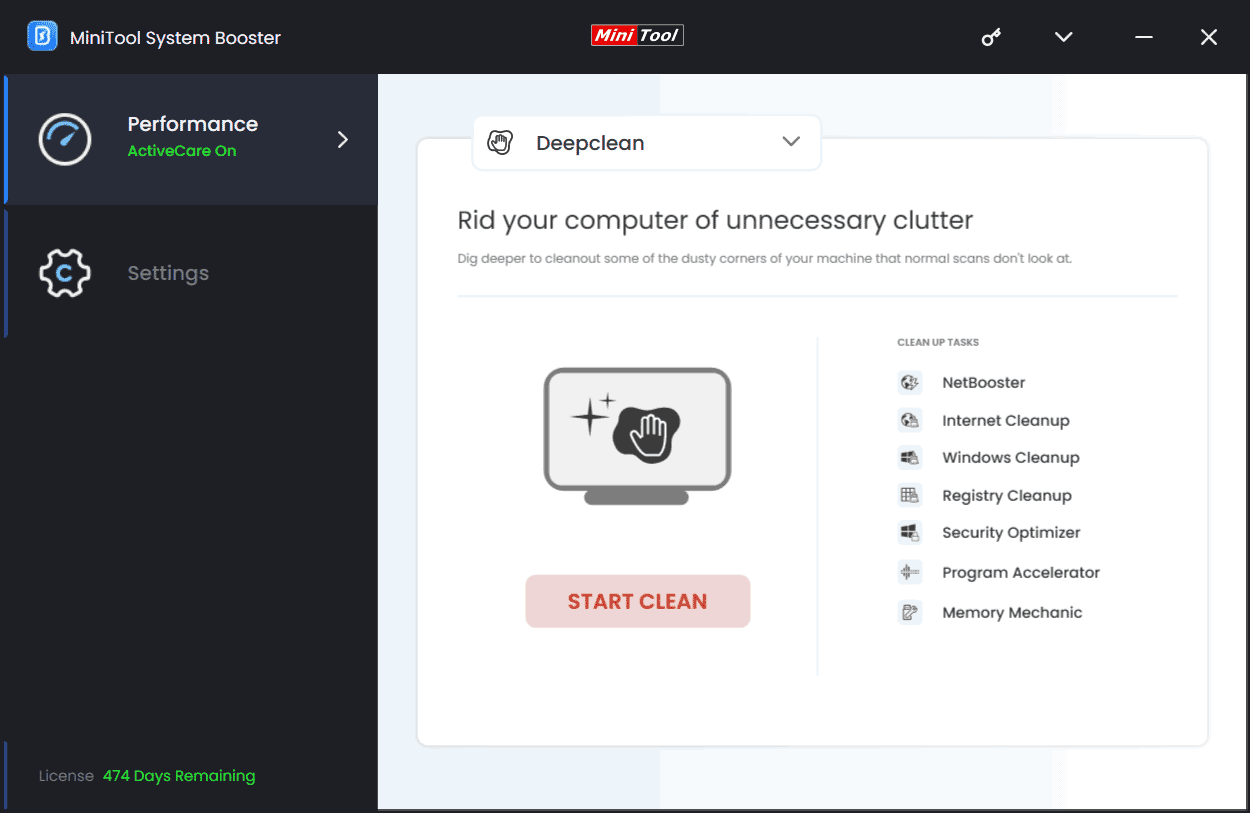
To do these two operations, run MiniTool System Booster, a professional PC optimizer for Windows 11/10/8.1/8/7. This tool allows you to deeply clean up junk files from your PC, uninstall unwanted & harmful software, disable intensive background tasks, reduce startup time, etc. For a try, download and install it on your PC.
MiniTool System Booster TrialClick to Download100%Clean & Safe
Step 1: Launch MiniTool System Booster to enter the Performance window.
Step 2: Choose Deepclean from the drop-down menu and click START CLEAN to begin 7 cleanup tasks. You can skip the one you don’t want. To fix the memory management BSOD error, Internet Cleanup, Windows Cleanup, Registry Cleanup, and Memory Mechanic are recommended.
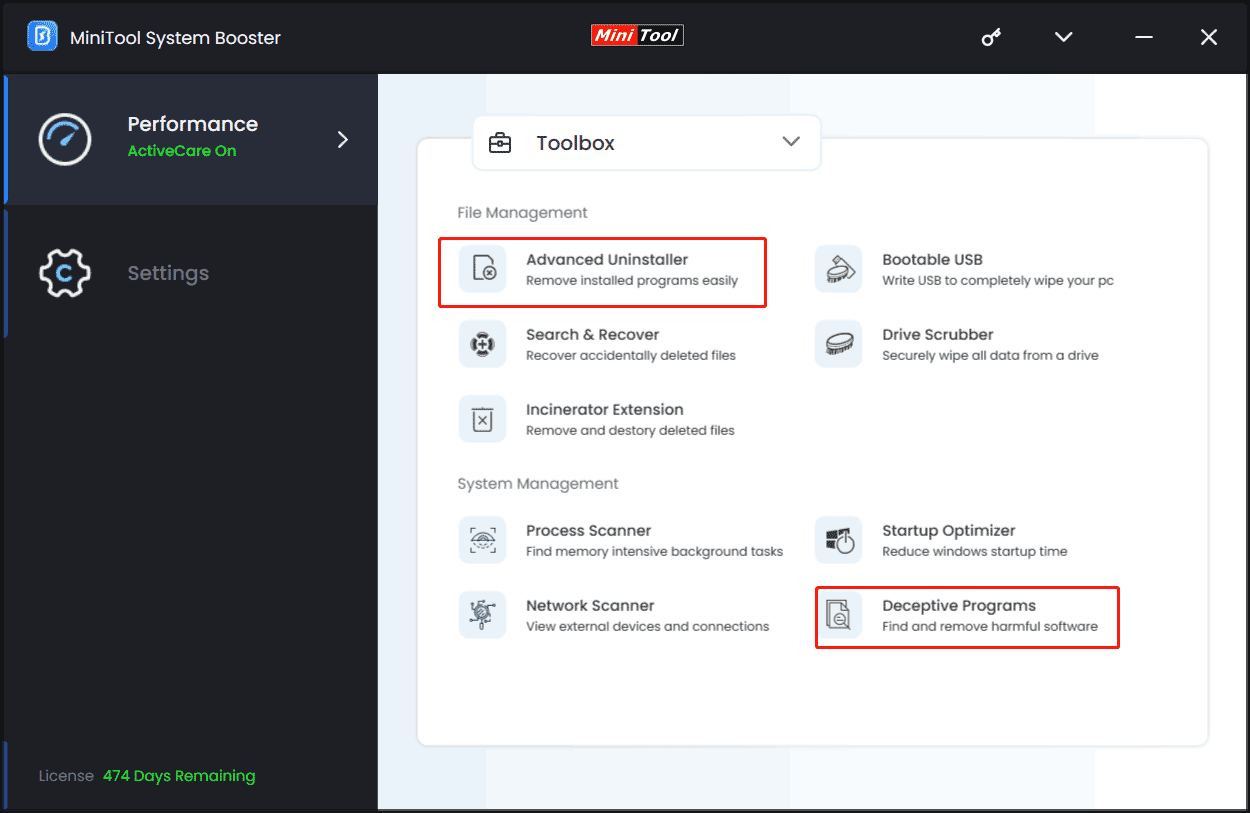
Step 3: To uninstall recently installed software, click Advanced Uninstaller and tap on UNINSTALL. Sometimes harmful software is installed on your PC, so also click Deceptive Programs to check and delete it.
Fix 4. Update Graphics Card Driver
A video card driver takes charge of the communication between the operating system and the PC’s graphics hardware. Once the GPU driver gets corrupt or outdated, some problems could happen including the Windows 11/10 memory_management BSOD error. Try to update the driver to its latest version to eliminate this error code 0x0000001A.
Step 1: First check which GPU you are using: press Win + R, type dxdiag, click OK, go to Display, and then you can see the GPU details.
Step 2: Move to the GPU manufacturer’s website, search for the drive, and download it.
Step 3: Install that driver on your PC and reboot the PC. Then, Windows stop code memory management should disappear.
Tips:
In addition to this way, you have other options to update your graphics card driver and follow the guide — How to Update Graphics Driver Windows 11 (Intel/AMD/NVIDIA).
Fix 5. Repair System Files
Corrupted/missing system files can also cause issues with memory management, throwing the blue screen error. So, try to repair system files by running SFC (System File Checker).
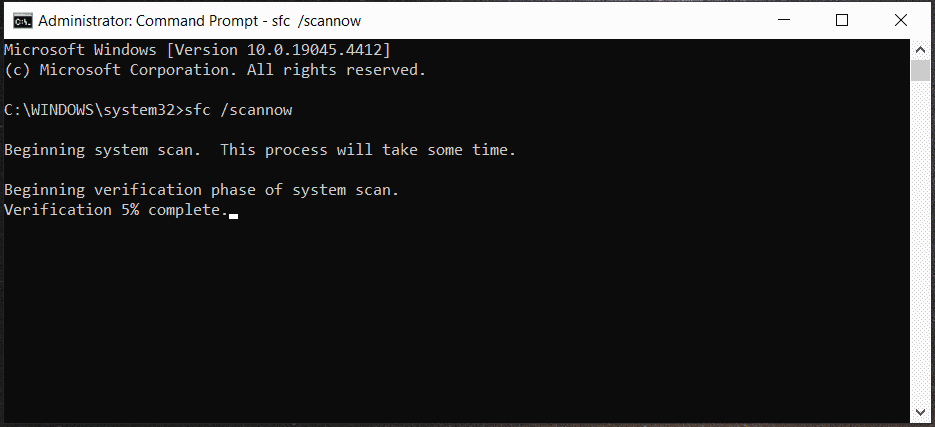
Step 1: Type CMD into the search box, right-click on Command Prompt, and click Run as administrator to open this tool with admin rights.
Step 2: Type sfc /scannow and press Enter. Then, wait for the scan to finish.
Also read: Windows 10 SFC /Scannow Stuck at 4/5/30/40/73, etc.? Try 7 Ways
Step 3: Besides, you can execute this command – DISM /online /cleanup-image /restorehealth.
Fix 6. Run CHKDSK
Sometimes Windows memory_management BSOD appears due to a disk error or a damaged volume. You can run CHKDSK to spot faults on your computer.
Step 1: In the elevated Command Prompt window, type chkdsk /f /r and press Enter.
Step 2: Enter Y to schedule a volume check the next time the system restarts.
Step 3: Exit CMD and restart your PC.
Fix 7. Scan for Viruses
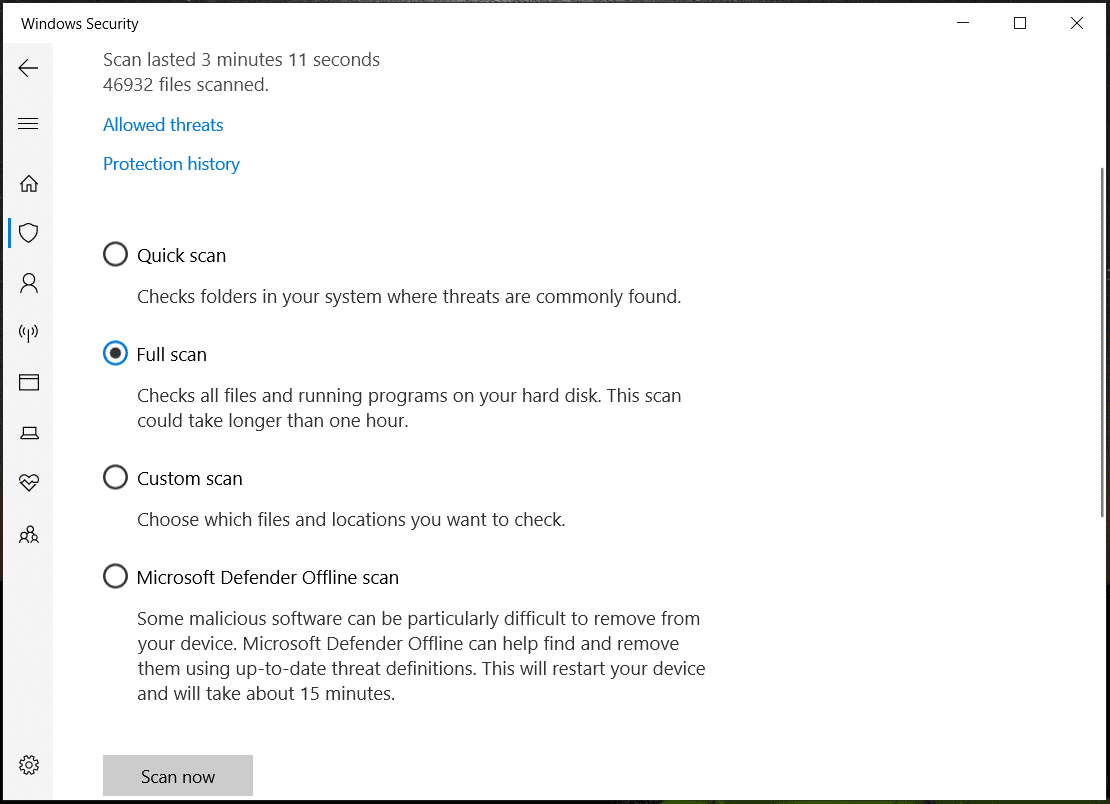
After trying these above fixes, memory management BSOD may still happen in Windows 11/10 and chances are that the PC meets a virus infection. So, run a scan using Windows Security, a built-in antivirus program.
Step 1: Launch Windows Security via the search box.
Step 2: Tap on Virus & threat protection.
Step 3: Click Scan options to choose a scan method, such as Full scan.
Step 4: Start the scan now by clicking the corresponding button.
Fix 8. Reset Windows
If none of the solutions above fail to address the Windows stop code memory management, the last way you can resort should be resetting Windows 11/10.
Tips:
Before taking the plunge, remember to back up your important files as the resetting operation could delete your files. For file backup, run MiniTool ShadowMaker, an excellent PC backup software.
MiniTool ShadowMaker TrialClick to Download100%Clean & Safe
Then, start resetting Windows to default settings:
In Windows 10, go to Settings > Update & Security > Recovery and click Get started under Reset this PC.
In Windows 11, go to Settings > System > Recovery > Reset this PC.
Then, complete the rest operations by following the prompted instructions.
Final Words
Suffering from memory management BSOD on Windows 10/11? How to fix memory management error? Multiple solutions could help you and try them one by one to find the ones that work for you.