
Синий экран с ошибкой KERNEL DATA INPAGE ERROR — одна из самых распространённых ошибок такого рода в Windows 11, Windows 10, 8.1 или Windows 7. В большинстве случаев к ошибке приводят те или иные проблемы с оборудованием, в частности — жестким диском, SSD или оперативной памятью, но возможны и иные варианты.
В этой пошаговой инструкции подробно рассмотрены способы исправить ошибку KERNEL_DATA_INPAGE_ERROR, от простых к более сложным.
Первые шаги для исправления ошибки KERNEL_DATA_INPAGE_ERROR

Прежде чем начать, некоторая дополнительная информация, которая может быть полезной. При появлении синего экрана с ошибкой KERNEL DATA INPAGE ERROR вы также можете увидеть код ошибки, в некоторых случаях он может помочь сузить выбор вариантов действий для решения проблемы. Коды и сопутствующие им причины ошибки:
- 0x0000007A — ошибки доступа к файлам. Здесь конкретные причины всё так же остаются не ясны.
- 0x0000009C и 0xC000016A — ошибки жесткого диска или SSD, поврежденные сектора.
- 0xC000009D — проблемы с подключением HDD или SSD, поврежденные кабели подключения, неисправности накопителя.
- 0xC0000185 — ошибки ввода-вывода, предположительно, проблемы с подключением HDD или SSD: плохо подключенные или поврежденные кабели, неисправности разъёмов.
- Также может указываться файл драйвера. Например, наиболее распространенный вариант msfs.sys говорит нам о том, что причина кроется в накопителе (или его подключении). Поиск по другим отображаемым именам файлов .sys может указать на то, с каким именно оборудованием возникла проблема.
Учитывая наиболее распространенные причины ошибки KERNEL DATA INPAGE ERROR, список первых шагов, которые имеет смысл произвести, чтобы их исправить, выглядит следующим образом:
- Перепроверьте подключение накопителей: заново подключите кабели (при возможности, заменив их на новые) со стороны самого диска и со стороны материнской платы, для дисков M.2 — отключите и заново подключите накопитель. При наличии дополнительных разъёмов, попробуйте использовать ранее не использовавшийся разъём.
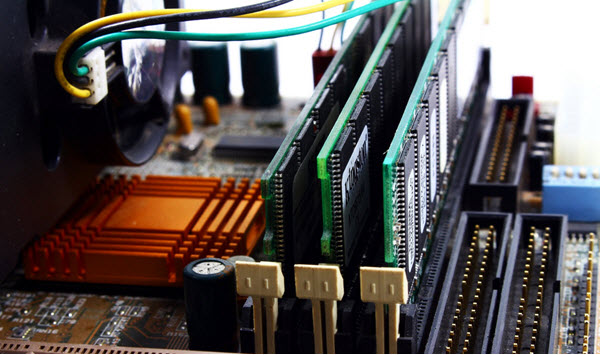
- Извлеките модули оперативной памяти, протрите контакты, установите модули RAM на место.
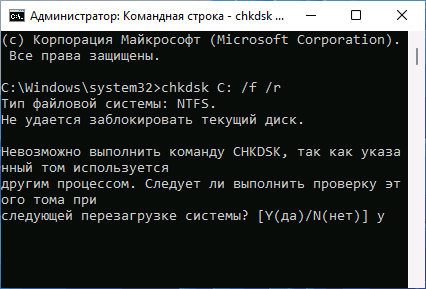
- Выполните проверку системного диска жесткого диска: не только файловой системы, но и поврежденных секторов. Запустите командную строку от имени администратора. Для этого можно начать вводить «Командная строка» в поиске на панели задач, нажать правой кнопкой мыши по найденному результату и выбрать пункт «Запуск от имени администратора». Введите команду chkdsk C: /f /r и нажмите Enter. В случае предложения перезагрузить компьютер, введите Y и нажмите Enter, затем перезагрузите компьютер. Если ошибки были найдены и исправлены, это может исправить ошибку. Также может оказаться, что они не подлежат исправлению и в ближайшем будущем придется менять жесткий диск.

- Выполните проверку оперативной памяти на ошибки. Для этого можно использовать встроенную утилиту: нажмите клавиши Win+R на клавиатуре, введите команду mdsched.exe и нажмите Enter. Следуйте указаниям утилиты проверки оперативной памяти. Подробнее по использованию утилиты: Диагностика оперативной памяти в Windows.

- Выполните проверку и восстановление системных файлов. Подробнее: Проверка и восстановление целостности системных файлов Windows 11, Восстановление системных файлов Windows 10.
- Если недавно на компьютере устанавливалось новое оборудование, проверьте, появляется ли ошибка, если отключить его.
- В случае, если ранее вы изменяли параметры файла подкачки, попробуйте включить автоматическое определение параметров файла подкачки в Windows.
- Проверьте, появляется ли ошибка, если отключить все накопители, кроме системного при условии наличия более чем одного диска на компьютере.

Обычно, один из подходов срабатывает или же позволяет выявить, что именно является причиной ошибки, но не всегда. В случае, если синий экран KERNEL_DATA_INPAGE_ERROR продолжает появляться, можно попробовать следующие варианты решения.
Дополнительные методы решения проблемы
В случае, если предыдущие способы не привели к результату, попробуйте выполнить следующие шаги:
- Если на компьютере есть точки восстановления на дату, когда ошибка не появлялась, попробуйте использовать их: Точки восстановления Windows 11, Точки восстановления Windows 10.
- Если у вас есть сторонний антивирус, проверьте, появляется ли ошибка, если его отключить. Если вы используете встроенный антивирус Windows (Microsoft Defender или Защитник Windows), в разделе «Безопасность устройства» попробуйте отключить проверку целостности памяти в пункте «Изоляция ядра».
- Если ошибки стали появляться после переустановки Windows, вручную скачайте и установите оригинальные драйверы устройств с сайта производителя материнской платы или вашего ноутбука. В первую очередь, любые драйверы для чипсета, SATA и USB контроллеров. Если на официальном сайте доступны лишь драйверы для более старых версий ОС, обычно их можно установить и на более новых версиях Windows, при этом они исправно работают.
- Если ошибка возникает лишь при работе с определенной программой или игрой, причина может быть в самой этой программе.
- Выполните проверку компьютера на вирусы и наличие других вредоносных программ. Здесь может быть полезным: Лучшие программы для удаления вредоносных программ в Windows.
В ситуации, если вы продолжаете сталкиваться с ошибкой KERNEL_DATA_INPAGE_ERROR, а неисправности оборудования исключены, опишите как именно проявляет себя сбой на вашем компьютере: при каких условиях, есть ли какие-то закономерности, после каких событий, предположительно, впервые стал появляться синий экран. Не исключено, что решение для вашего случая удастся найти.
The KERNEL_DATA_INPAGE_ERROR is a Windows blue screen stop code error. The stop error can occur randomly during PC startup or when you’re in the middle of doing something in Windows. When this stop error occurs, Windows will force a restart and you will lose your progress of whatever you’re working on. This post will show you what the Kernel Data Inpage Error means and what you can do to fix the issue.
What is Stop Code Kernel_Data_Inpage_Error
The Kernel Data Inpage Error indicates that there are missing or corrupted kernel data in the Windows page files. The term “inpage” exclusively relates to memory modules (RAM) or hard disk drive.
In most cases, the error is caused by hardware issue such as loose or faulty cable, faulty RAM or failing hard drive, which directly cause the corruption of kernel data. It could also be caused by bad sectors in the hard drive or virus that indirectly causes missing and corruption of kernel data in the Windows page files.

What can you do to fix the STOP error
If you’re in the blue screen loop and still be able to boot into Windows, the very first thing you should do is to backup all the important data that you couldn’t afford to lose before trying any fix.
If the blue screen also returns a STOP status code, it can tell you the possible cause of the error. Below is a list of common codes associate with the Kernel_Data_Inpage_Error.
- 0xC000009C – Bad sectors on hard drive
- 0xC000009D – Loose cable or hard disk failure
- 0xC000016A – Bad sectors on hard drive
- 0xC0000185 – Unseated or bad cable
- 0x0000007A – File access error
- 0xC000009A – Lack of pool resources
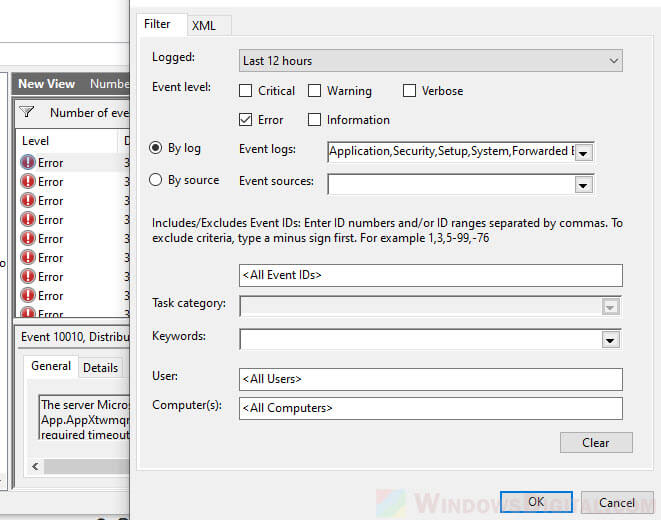
If there is no status code of such on the Kernel_Data_Inpage_Error blue screen, and if you are still able to access into Windows, you can check the code of the stop error from the Event Viewer in Windows 10. To check the BSOD log, follow the steps below.
- Search for and open “Event Viewer” from the Windows 10 search bar.
- In the Action pane on the right side of the window, click on Create Custom View.
- Select a time range (the time when the BSOD happened).
- Check the “Error” checkbox.
- In the Event logs drop-down menu, select Windows logs.
- Click OK.
- Give a name (any name) to the custom view and click OK.
- Sort the list of error events by date and locate your last BSOD error.
- Double click on the error event to open its event properties. For more details regarding the stop error such as status code, go to Details tab.
Check the hardware
The vast majority of the Kernel_Data_Inpage_error cases are caused by hardware issue, mainly the hard disk drive or RAM – loose or faulty cable, faulty RAM, faulty RAM slot on the motherboard or failing hard drive.
Check all the cables that connect your hard drives to the motherboard and see if there is any unseated or loose cable. Replug the cables and see if the problem persists.
Try to also switch your RAM into different RAM slots and see if it fixes the issue.
Run CHKDSK
Corrupted kernel data can also be caused by bad sectors on the hard disk drive. There are two types of bad sectors – soft bad sectors when data is written badly, or hard bad sectors when there are physical damage to the hard drive.
The CHKDSK tool is able to repair soft bad sectors and make hard bad sectors so they won’t be used again. To run CHKDSK on the system drive, follow the steps below.
If you can boot into Windows:
On Windows 10 search bar, search for “cmd“. Right-click Command Prompt from the search result and select “Run as administrator“.
In the command prompt window, enter the following command.
chkdsk C: /f /r
- Replace C: if your Windows installation is on other drive.
- “/f” parameter is to allow chkdsk command to fix any found error.
- “/r” parameter is to enable chkdsk to also locate bad sectors on the drive and recover readable information.
If you’re stuck in the Kernel_Data_Inpage_Error blue screen loop:
If you can’t even boot into Windows to begin with, or if the blue screen kicks in before the chkdsk process could finish running, you need to run CHKDSK before boot.
To learn how to do so, read: How to Run CHKDSK in Windows 10 from CMD or Before Boot.
Windows Memory Diagnostic
If CHKDSK couldn’t fix the issue, the next thing to try is to run a diagnostic of your RAM. to check your RAM, search for and open “Windows memory diagnostic” from the Windows 10 search bar.
Click on “Restart now and check for problems (recommended)” option. Windows will then restart and begin the scan upon startup.
Note that the scan is just a diagnostic to check if there is any problem with your RAM. It won’t fix the problem if any is found. If the scan returns errors, it indicates that there are indeed problems with your RAM.
Try to switch out your RAM and put it into a different RAM slot and then run the diagnostic again. If the scan still returns errors, you may have a faulty RAM or a motherboard with a faulty RAM slot.
Scan your PC for Virus and other threats
In some rare cases, a virus or malware may be able to corrupt kernel data and cause the stop code Kernel_Data_Inpage_Error. If you can boot into Windows, try to run a full system scan with an antivirus software. If any virus or other threat is found, allow your antivirus program to fix it and see if the stop error persists.
Summary: Have you ever faced Blue Screen of Death (BSOD) accompanied by an error message: kernel data inpage error? The error usually happens when your computer encounters alarming hardware or system failure. Although it may not be as fatal and crippling as some malicious virus, it usually leads to unexpected data loss. So, in this article, we are going to layout several solutions to this issue and introduce an effective and reliable data recovery tool, Bitwar Data Recovery, to help you recover lost data.
WIN VERSION MAC VERSION
Table of Contents
Possible Reasons for the Kernel Data Inpage Error
Kernel data inpage error is one of the BSOD error codes, which is also known as stop code. BSOD can be considered as a tool computers use to protect themselves against further problems, as we have mentioned in the article: Fix: Thread Stuck in Device Driver Error [16 Solutions], which deals with another notorious BSOD error. For users who are curious about reasons for the issue, here we have posted a list of possible ones:
- Hard drive failures
- System file corruption
- Outdated device drivers
- Paging file corruption
- Virus or malware infection
Basic Solutions
Solution 1: Check Hardware Connections
This is the first step you should try when you try to fix the kernel data inpage error. You should pay attention to the power cable and hard drive cables. If necessary, disconnect and reconnect the wires. Make sure that the error didn’t occur on account of hardware problems. After the checking, boot the computer to see whether the problem persists.
Solution 2: Check the Health Status of The Hard Drives
Since the connections related to the hardware are in good condition, the next step is to check the health status of the hard drives with the help of SMART attributes, which will present some basic information about a drive you need to know to determine whether it’s bad or not. Refer to the following steps to learn how to run SMART.
Step 1: Right-click the Start Menu button and then select Command Prompt(Admin).
Step 2: Type in the following command: wmic diskdrive get model, status.
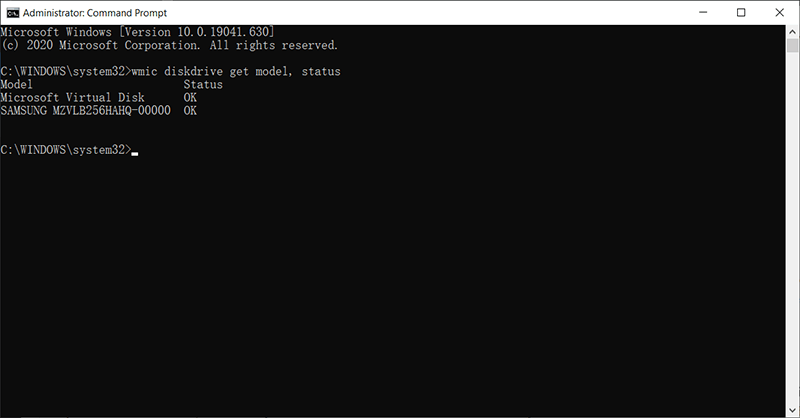
Step 3: Press Enter and wait for the scanning process to finish.
Step 4: After the process, the window will show you one of the three results under the Status column:
- Unknown, Bad: Indicates High probability of hard drive errors.
- Caution: Indicates that the hard drive is deeply affected and needs repair.
- OK: Indicates that the drive works properly.
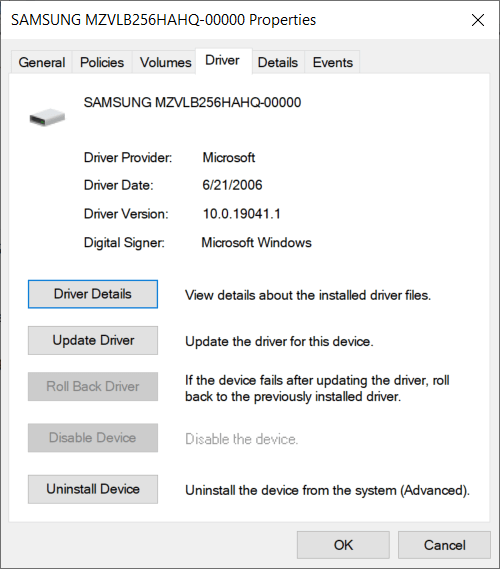
Solution 3: Reinstall or Update Device Drivers
As this article has said before, one of the possible reasons for the kernel data inpage error is the outdatedness of the device drivers. To reinstall or update devices drivers, you can use the following steps:
Step 1: Press Win + Q, type in Device Manager, and open it.
Step 2: Expand the tree labeled Disk drives.
Step 3: Right-click on the hard drive and select Properties.
Step 4: Check the status of the device driver and decide whether to reinstall (update) it or not.
Solution 4: Clean Boot
It’s reported that several peripheral devices, for example, external storage media, can cause the kernel data inpage error. In this case, you can power on your computer with a clean boot, which means to boot the computer with all unnecessary peripheral devices disconnected.
Step 1: Restart your computer.
Step 2: At the moment when the computer is powered on, immediately and continuously press the F8 key until the screen shows Advanced Boot Options.
Step 3: Select the Safe mode with Networking and press Enter.
Step 4: Login and then press Win + R.
Step 5: Type in msconfig and click on OK.
Step 6: Switch to the General button and then tick off the box next to the Selective Startup option.
Step 7: Uncheck the Local Startup items option.
Step 8: Switch to the Services button and uncheck the box next to Hide all Microsoft services.
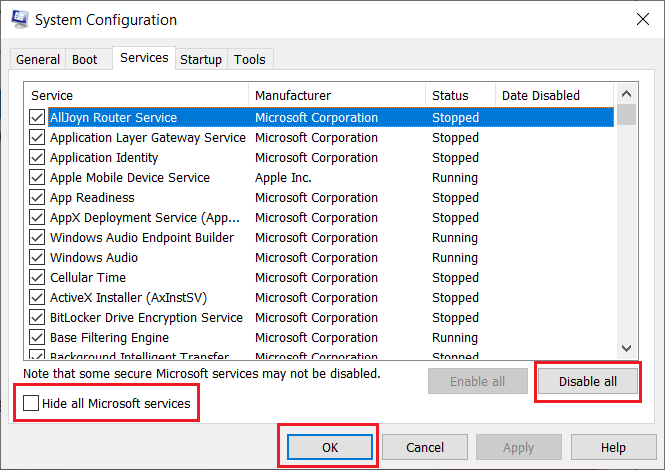
Step 9: Click on the Disable all button, click on OK, and then restart the computer.
Solution 5: Uninstall Incompatible Software
If you have recently installed some program that came from an untrustworthy source and then you came across kernel data inpage error, you should consider uninstalling it, because incompatibility between software can definitely cause the issue. To uninstall a program, you can use the following guide:
Step 1: Type in Control Panel in the search bar and then open it.
Step 2: Select Programs and Features.
Step 3: Click on the Installed On button to sort the list.
Step 4: Uninstall suspicious programs.

Step 5: Reboot the computer to see whether the error persists.
Solution 6: Run Anti-Virus Software
According to the possible causes we have mentioned before, Virus attacks are likely to trigger the kernel data inpage error issue. You had better run a reliable anti-virus program to scan your PC and eradicate lurking viruses. Users of Windows 10 can use Windows Security to do the trick, as the following steps show.
Step 1: Press Win + I to launch Settings.
Step 2: Navigate to Update & Security > Windows Security.
Step 3: On the right page, click on Virus & threat protection.
Step 4: Click on Quick Scan to scan your computer.
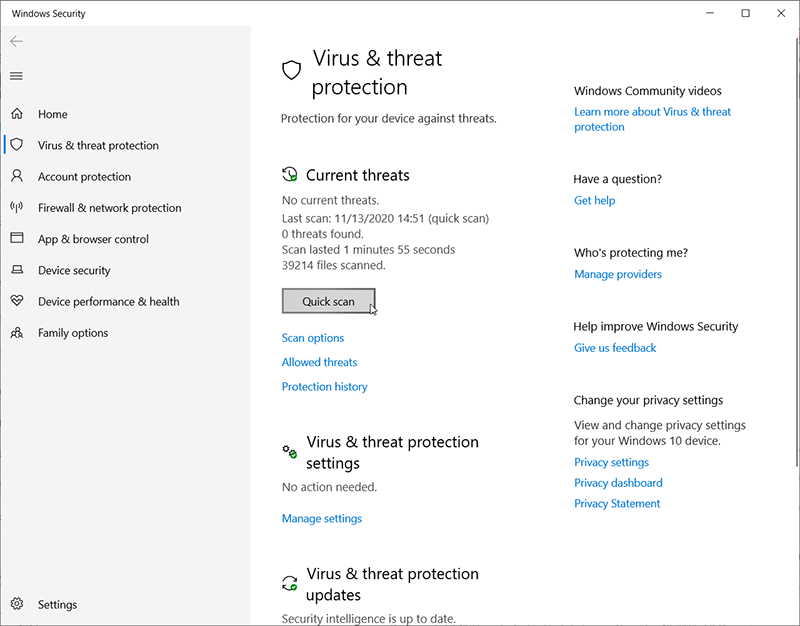
Step 5: Or you can click on the Scan options button under it and select the desired mode.
Step 6: After the scanning is complete, check whether the issue still goes on.
Bring Lost Data Back Using Bitwar Data Recovery
As we have discussed in the beginning part of this article, kernel data inpage error is highly likely to induce data loss issues. If you can’t find those files that you were using or editing after the error has put a halt to the computer, don’t worry as you can use the powerful and reliant software, Bitwar Data Recovery, to bring back your precious data. Here is a simple guide that shows how it works like magic.
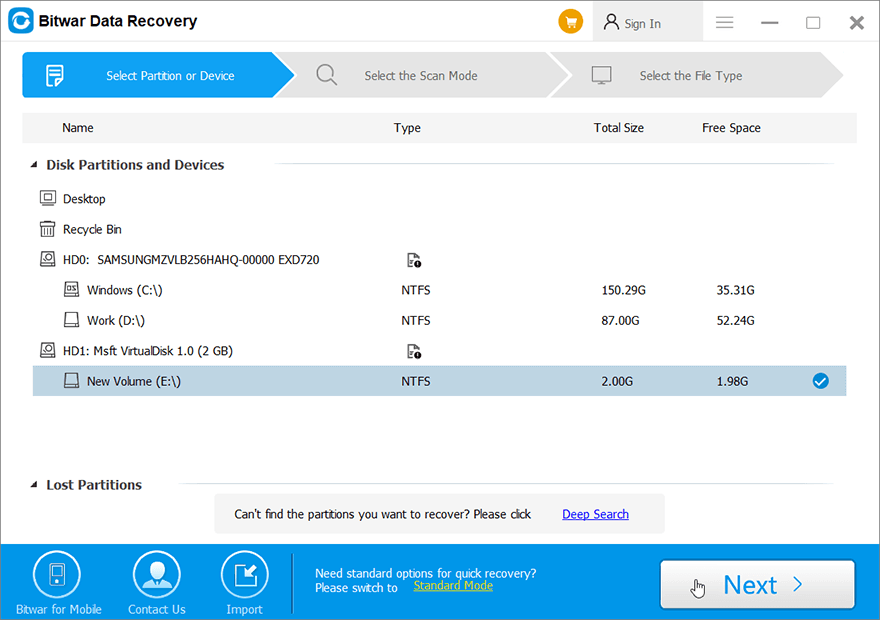
Step 1: Download Bitwar Data Recovery from the official website and install it.
Step 2: Launch the software. Tick off the partition or drive where the data got lost and click on Next.
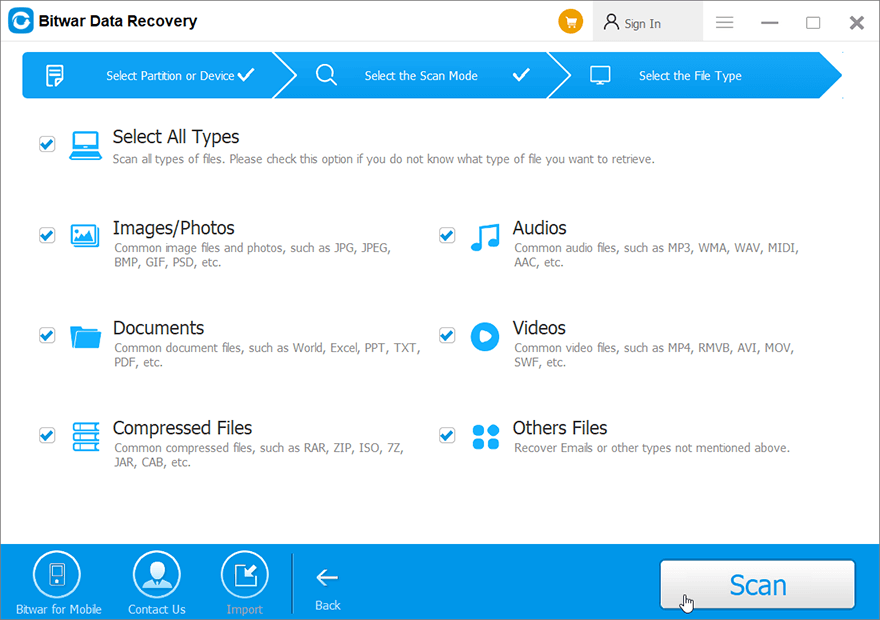
Step 3: Select a scan mode. We recommend you to use Quick Scan at first, which can scan a whole drive in a few minutes and is capable of handling most data loss problems. If the mode doesn’t work on your computer, then you can try using Deep Mode, which is more effective.

Step 4: Select the types of files you want to recover and then click on Next.
Step 5: Double-click a file to preview it. Select the wanted files and click on Recover to retrieve them.
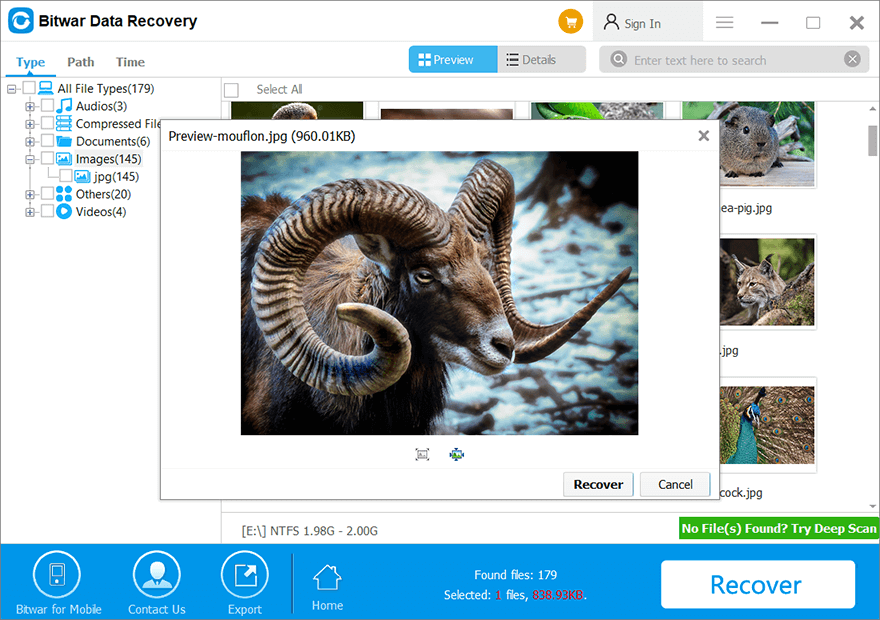
Note: To preclude the possibility of overwriting the deleted data, files you are going to recover should not be saved to the original drive that stored them.
Advanced Solutions
Solution 7: Use Disk Repair Tools
There are a plethora of repair tools you can find on the Internet. But to spare you from the trouble of further download and installation, here we introduce only two built-in repair tools offered by Windows, which are usually effective enough to handle most issues.
Error Checking
This tool can be found in Windows 10/8/7/Vista/XP. It’s the graphical version of the next tool, CHKDSK.
Step 1: Press Win + E to open File Explorer.
Step 2: Right-click on a disk drive and then select Properties.
Step 3: Switch to the Tools tab and then click on the Check button within the Error Checking box.
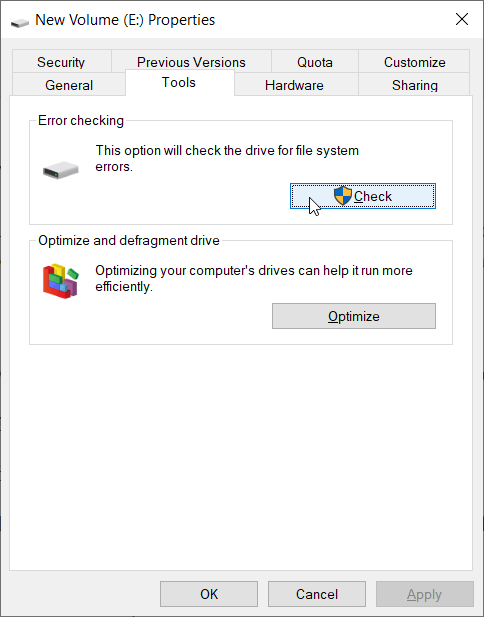
Step 4: Click on Scan Drive to confirm your operation.
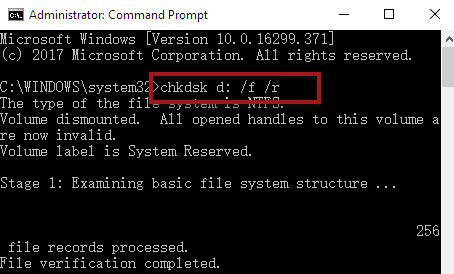
CHKDSK
It is a command-line tool and has been widely used since its birth. It boasts more advanced options than Error Checking.
Step 1: Right-click the Start Menu button and then select Command Prompt (Admin).
Step 2: Type in the following command: chkdsk X: /f /r
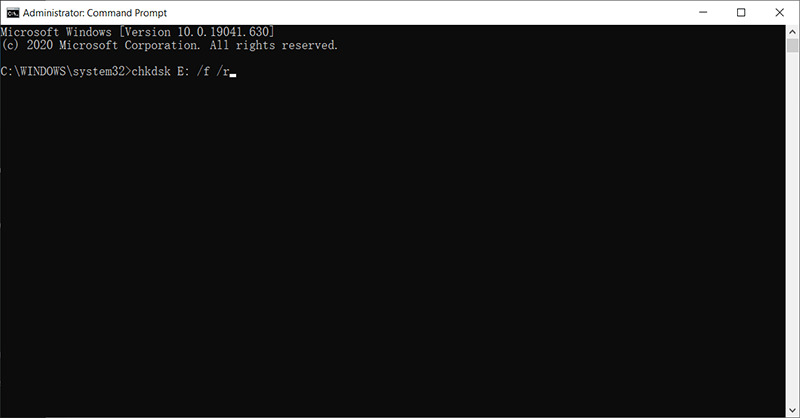
Note: Remember to Replace the letter X with the faulty drive letter.
Step 3: Wait for the process to end and reboot your computer to see whether this solution works.
Solution 8: Run SFC Scan
Short for System File Checker, SFC is a repair tool offered by Windows that serves to help users scan the operating system, replace damaged or corrupted versions with the correct versions, and restore files. To run it, follow these steps:
Step 1: Right-click the Start Menu button and select Command Prompt (Admin).
Step 2: In the Command Prompt window, type in the following command: SFC /scannow and then press Enter.

Step 3: After the SFC scan, exit Command Prompt and reboot your PC.
Solution 9: Run DISM
DISM, the shorthand for Deployment Image Servicing and Management, is more powerful than SFC when it comes to solving computer problems and is hailed as the tool to fix what SFC can’t. If the kernel data inpage error issue keeps harassing you after you have run SFC, you can use this solution to run a deeper scanning and to root out more elusive problems.
Step 1: Press Win + Q, type in Command Prompt and right-click on it to choose Run as Administrator.
Step 2: Type the following command and then press Enter.
Dism /Online /Cleanup-Image /CheckHealth
Step 3: If no problem is found after you have entered the above-mentioned command, you can run a more advanced mode to check out the health status of the component store. Type the command and then press Enter:
Dism /Online /Cleanup-Image /ScanHealth
Step 4: If the scanning result shows that problems do exist, You can use the following command to repair those problems. Note that the whole process could take up to 10 minutes if necessary.
Dism /Online /Cleanup-Image /RestoreHealth
Step 5: Once the process is done, restart your computer to see whether this solution works.
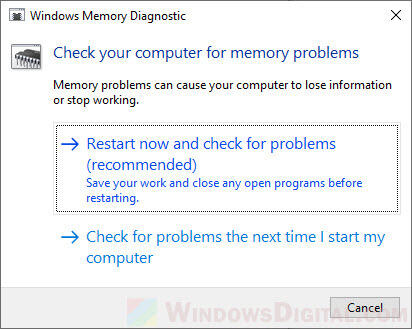
Solution 10: Use the Memory Diagnostic Tool to Check RAM
Memory Diagnostic Tool, which is a built-in program, serves to test and verify the RAM. It helps users to determine whether there are any errors resulted from hardware failures, including motherboards, RAM, and others. Before using this tool, you should save the files you have opened and close other unnecessary applications you are using. After that, use the following steps:
Step 1: Press Win + Q, type in Windows Memory Diagnostic, and open it.
Step 2: Click the Restart now and check for problems option.
Step 3: Your PC will reboot and do a series of scanning operations, don’t interfere with it or interrupt it. After the process is complete, the computer will reboot again.
Step 4: You should use the Event Viewer to check out the results of the scanning and to find out whether there is an issue related to RAM. Hence, type in eventvwr in the search bar and open it.
Step 5: Expand the Windows Logs folder.
Step 6: Right-click on System and then select Find.
Step 7: Type in MemoryDiagnostics-results in the bar of the new window and click on the Find Next button.
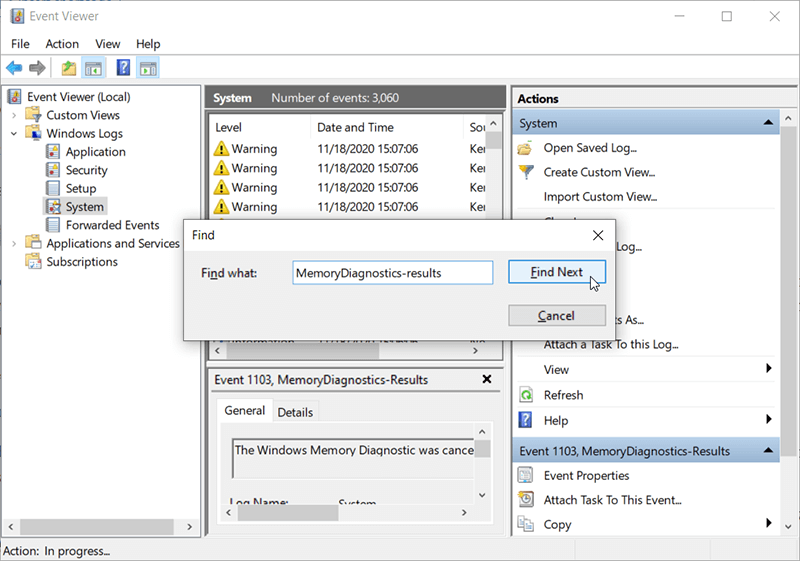
Step 8: Double-click on the Memorydiagnostic-Results option to check the result. If the result says “The Windows Memory Diagnostic tested the computer’s memory and detected no errors,” then there is no problem with RAM.
Step 9: If the result claims that the scanning has found several errors, It’s highly likely that the RAM modules are damaged. To corroborate the result, you can use other test tools to scan your RAM and recheck the result. Once the result is verified, you may need to replace it to avoid the kernel data inpage error.
Solution 11: Change Paging File Management to Automatic
As one of the possible factors for the kernel data inpage error issue, paging file corruption can lead to bad blocks or sectors in a paging file. To fix the problem, you can use these steps:
Step 1: Press Win + E to open File Explorer.
Step 2: Right-click on This PC on the left panel and then select Properties.
Step 3: Click on Advanced system settings on the left part.
Step 4: Switch to the Advanced tab and then click on Settings within the Performance section.
Step 5: Switch again to the Advanced tab and then click on Change within the Virtual memory section.
Step 6: Tick off the box next to the Automatically Managem paging file size for all drives option.
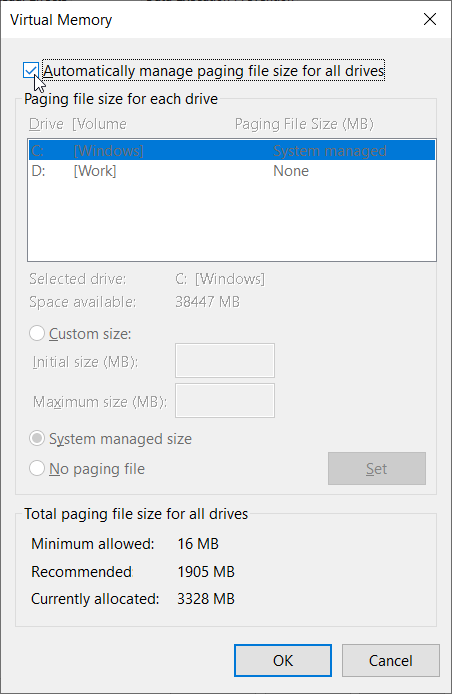
Step 7: Click OK to save the change.
Solution 12: Reboot Windows in Safe Mode
If none of the solutions mentioned above works, Safe Mode may serve your need. It’s a particular way users can use to launch Windows. The aim of Safe Mode is to allow users to troubleshoot Windows and find out the causes behind critical system problems, hence enabling you to solve them. Once problems get solved, you can reboot the computer in the normal way. To boot Windows 10/8.1/8/7 in Safe Mode, you can use these steps:
In Windows 7:
Step 1: Restart the computer and continuously press F8 right after the computer is powered on.
Step 2: You will see a page titled Advanced Boot Options, on which there are three options: Safe Mode, Safe Mode with Networking, and Safe Mode with Command Prompt.
Step 3: Depending on what you need, press F4, F5, or F6 to select one of the three options.
In Windows 8/8.1/10:
Since Windows 8/8.1/10 usually boot more quickly, deterring users from using the traditional way, we can use two other ways to do the trick instead of pressing F8 to boot Windows in Safe mode.
Via Settings:
Step 1: Press Win + I to open Settings.
Step 2: Navigate to Update & Security > Recovery > Restart Now
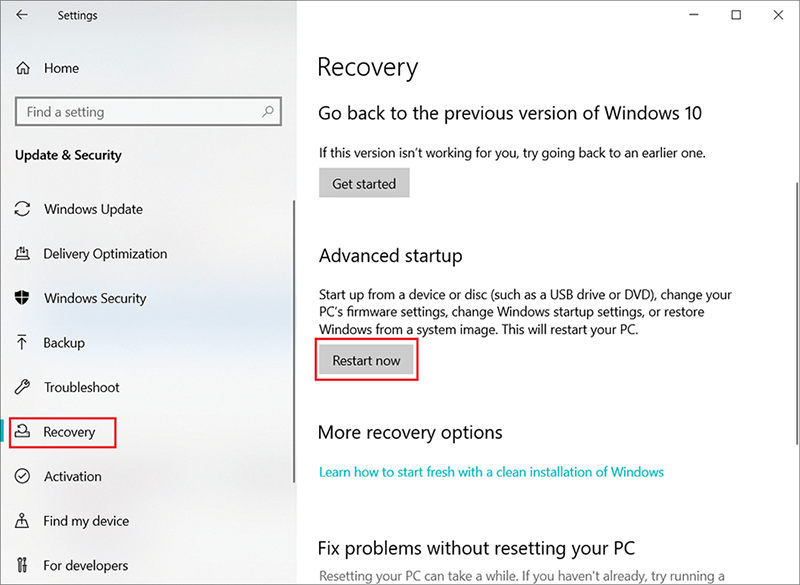
Step 3: After entering the Windows Recovery Environment, navigate to Troubleshoot > Advanced Options – Startup Settings > Restart
Step 4: Based on what you need, select one of the three Safe Mode options.
Via msconfig:
Step 1: Press Win + R to open the Run box. Type in msconfig and press Enter.
Step 2: Switch to the Boot tab and then tick off the box next to the Safe boot option.
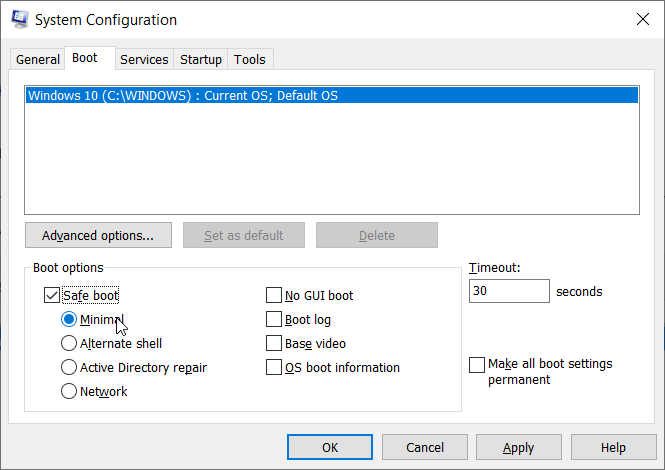
Step 3: Select the desired Safe Mode and click OK.
Step 4: A message will come up, asking whether you want to restart immediately.
Step 5: This change to the settings will make the computer boot in a safe mode every time from now on. To annul it you can uncheck off the box next to Safe boot option.
Conclusion
Kernel data inpage error, one of the Blue Screen of Death (BSOD) error codes, is notorious for inducing computer crashes, cutting short your work, and at times causing vexed data loss issues. It’s usually hard to pin down the main culprit behind this conundrum since there is a staggering list of possible causes.
Hence we post this article, which is intended to include as many feasible and effective solutions as possible, and hope it can help every user to grapple with the error in his/her particular scenario. On top of that, in case you are confronted with some data loss issue, we also introduce a powerful and user-friendly tool, Bitwar Data Recovery, to help recover your significant files.
Всем привет на портале WiFiGiD.RU. Сегодня мы рассмотрим очередную ошибку с синим экраном смерти – KERNEL DATA INPAGE ERROR. Чаще всего она возникает при неправильном получении данных с жесткого диска (SSD или HDD) или оперативной памяти. В итоге какая-то из функций системы неправильно выполняет алгоритм. Ошибка может возникать на любой версии операционных систем Windows 7, 8, 8.1, 10 и 11.
Но пока не будем торопиться с выводами, все будет зависеть от того, какой из вариантов решения, который описан в статье, вам поможет. Если что-то будет не получаться или возникнут дополнительные трудности, пишите в комментариях.
Содержание
- Как понять, что именно вызывает проблему?
- Решение 1: Переподключение дисков
- Решение 2: ОЗУ
- Решение 3: Проверка жесткого диска и битых секторов
- Решение 4: Проверка ОЗУ
- Решение 5: Восстановление целостности системных файлов
- Дополнительные решения
- Задать вопрос автору статьи
Как понять, что именно вызывает проблему?

Если вам удалось сфотографировать синий экран, то вы можете заметить, что иногда можно увидеть код ошибки или файл, который мог его вызвать. Вы также можете просмотреть дамп синего экрана с помощью BlueScreenView – это бесплатная программа.
После запуска выделяем DMP файл и смотрим, какой файл стал причиной проблемы. Вы также можете ориентироваться на «Bug Check Code». Если вам этот файл не известен, то вы можете загуглить его название.
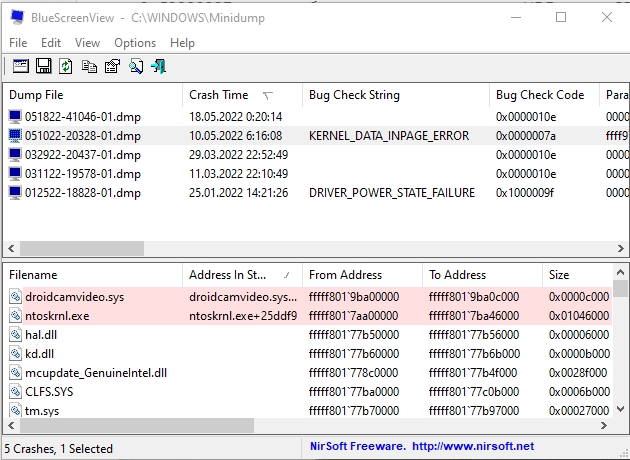
Давайте рассмотрим самые популярные причины:
- 0x0000009C или 0xC000016A – данные были получены из поврежденного сектора жесткого диска.
- 0xC000009D – неисправность электропитания жесткого носителя (SSD или HDD). Стоит выключить компьютер, снять боковую крышку и проверить подключение питания и SATA кабеля. Можно даже переподключить провода повторно.
- 0xC0000185 – ошибка связана с подключением жесткого диска к материнской плате. Возможно, есть проблема в SATA.
- msfs.sys – проблема с внешним накопителем, флешкой или внешним жестким диском. Возможно, проблема с драйверами.
В любом случае стоит гуглить информацию по виновнику или коду. Ниже я рассмотрю решения, которые в 99% помогают.
Решение 1: Переподключение дисков
Как я уже и писал раньше, стоит проверить подключение питания и SATA. Вам нужно снять боковую крышку, или, если у вас ноутбук, снять заднюю. Доберитесь до жесткого диска, который у вас установлен. После этого отключите от него все провода и переподключите снова. Возможно, на контактах образовалось окисление. Если есть возможность, можно попробовать использовать другой разъем на материнской плате. Также проверьте, чтобы кабели питания стояли плотно.
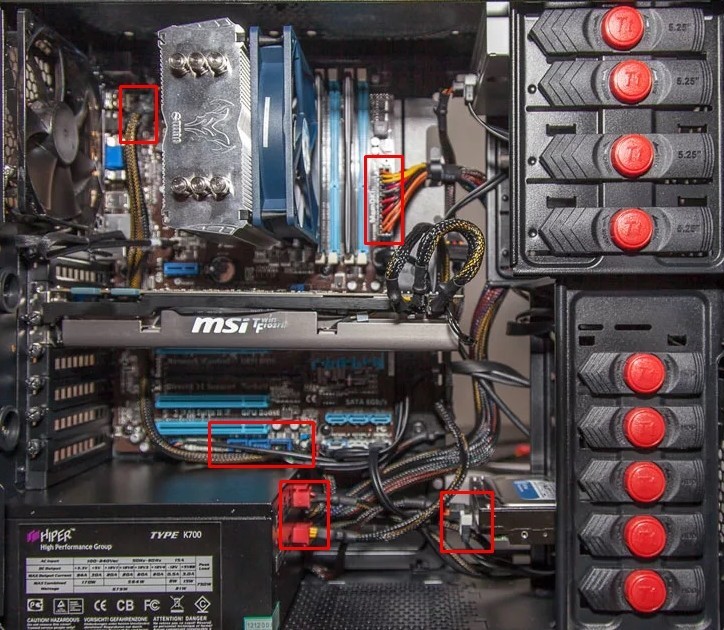
Решение 2: ОЗУ
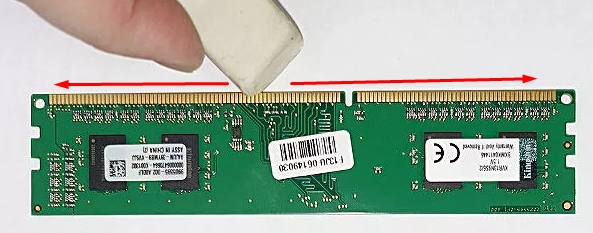
Дополнительно я бы на вашем месте попробовал почистить контакты на плашках оперативной памяти. Вытащите все плашки, которые у вас подключены – для этого нажмите на боковые ушки.
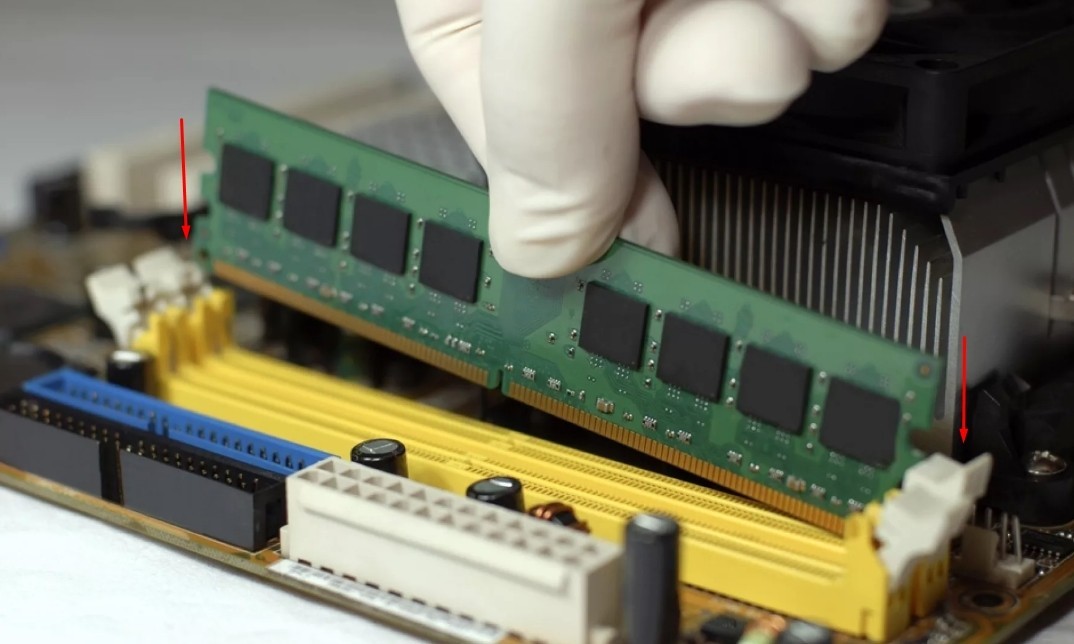
Как только плашки будут у вас, возьмите стирательную резинку и аккуратно потрите контакты с двух сторон. Наша задача убрать окисление, которое могло образоваться. После этого устанавливаем ОЗУ обратно.
Решение 3: Проверка жесткого диска и битых секторов
У операционной системы есть свой модуль, который проверяет и исправляет ошибки битых секторов. Запустите командную строку с правами администратора. После этого делаем проверку системного раздела:
chkdsk C: /f /r
Если во время проверки вас попросят сделать перезагрузку (Y) – сделайте это. При следующей загрузке система начнет проверку и исправление ошибок. Если вы видите, что ошибок слишком много, то я советую дополнительно проверить жесткий диск с помощью программы «Victoria» – она покажет вам, насколько побит ваш жесткий диск. Если после проверки вы обнаружите, что носитель имеет плохую оценку – нужно будет его менять на новый.
Решение 4: Проверка ОЗУ
В Виндовс есть встроенная утилита – для её запуска зажимаем одновременно две клавиши + R и вводим команду:
mdsched.exe
После этого комп нужно будет перезапустить. Но я все же советую использовать программу MemTest86 с загрузочной флешки. Делаем несколько проходок проверки и смотрим результат. Если у вас возникнут проблемы, то плашку памяти надо будет менять.
Решение 5: Восстановление целостности системных файлов
Есть вероятность, что какие-то системные файлы были повреждены программами или вирусами. В таком случае может возникать ошибка «KERNEL_DATA_INPAGE_ERROR». Можно попробовать их восстановить с помощью встроенной функции. О том, как это можно сделать, подробно написано тут (ссылка). Также советую почитать и другие советы из той статьи – они тоже могут помочь.
Дополнительные решения
Если ничего не помогло, а ошибка возникает вновь, то вот ряд дополнительных советов, которые должны помочь:
- Попробуйте отключить все внешние носители – проследите, возникает ли ошибка в таком случае.
- Если вы до этого изменяли какие-то параметры файла подкачки – например, убирали его или уменьшали размер, то верните все на свои места.
- Попробуйте выполнить откат системы до самой ранней точки восстановления.
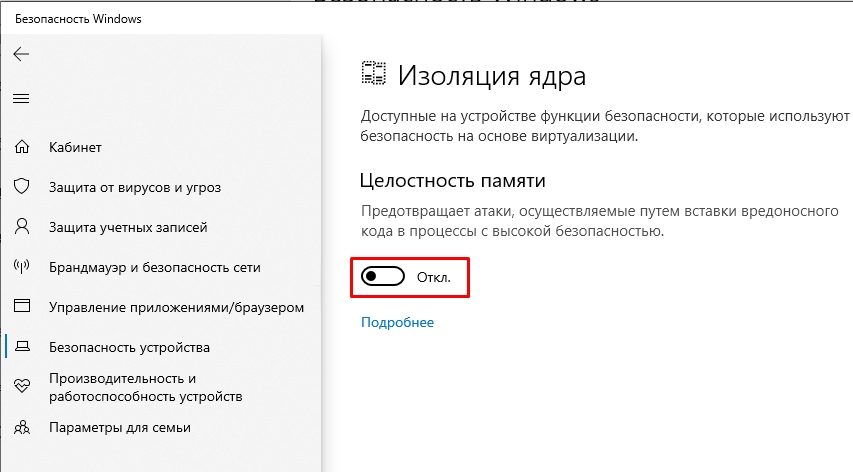
- На Windows 10 зайдите в «Пуск» – «Параметры» – «Обновление и безопасность» – «Безопасность Windows» – «Безопасность устройства» – ниже пункта «Изоляция ядра» жмем по ссылке «Сведения об изоляции ядра» – проверьте, чтобы была отключена функция проверки.
- Попробуйте полностью обновить драйвера на все железо. Все драйвера скачиваем вручную с официального сайта производителя. Особенно это касается дров для материнской платы.
- Проверьте комп антивирусной программой со свежими базами.
- Если ошибка возникает только в какой-то программе или игре – попробуйте сделать переустановку. Лучше всего скачивать ПО с официального сайта и не пользоваться сторонними сборками.
На этом все. Если вы найдете свое собственное решение, или у вас возникнут вопросы – пишите в комментариях. Всем добра!
232
232 people found this article helpful
The blue screen of death kernel security check failure doesn’t mean the problem can’t be fixed
Updated on September 12, 2024
The kernel data inpage error is a Windows error code displayed on the Blue Screen of Death (BSOD). Your computer will typically compile some diagnostic data and then restart when this error occurs. If the problem persists, your computer will eventually crash again with the same kernel data inpage error message.
Kernel data inpage errors are usually associated with hardware failures related to memory modules and hard drives. In other cases, this same error will appear due to the effects of a virus.
How the Kernel Data Inpage Error Appears
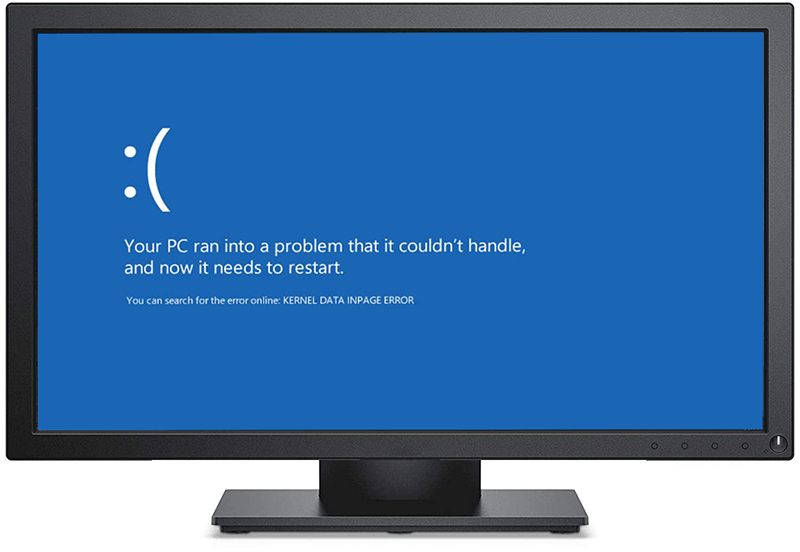
When this error occurs, you’ll usually see a message like one of these:
Your PC ran into a problem and needs to restart. We're just collecting some error info, and we'll restart for you.If you'd like to know more, you can search online later for this error: KERNEL_DATA_INPAGE_ERRORKERNEL_DATA_INPAGE_ERROR
How to Fix a Kernel Data Inpage Error
Since most kernel data inpage errors are because of bad memory modules or hard drives, the fix usually involves locating the malfunctioning component and replacing it.
Computers that experience this problem will typically restart after crashing. If your computer won’t turn on or boot up after experiencing a kernel data inpage error, check out our guide to fixing a computer that won’t turn on.
In other cases, you’ll find that a memory module or hard drive isn’t correctly connected, or a virus caused the entire problem. Follow these troubleshooting steps to fix your kernel data inpage error:
Back up your data. If it’s a problem with your hard drive, you could end up losing important data. If you have anything stored you don’t want to lose, you should perform a backup before starting the diagnostic process. Make copies of any files you can’t afford to lose, and store them on a USB flash drive, SD card, or cloud storage service.
-
Inspect and reseat your memory modules.
In some circumstances, the problem can be due to improperly seated memory modules. Open your computer and inspect your RAM to rule this out and prevent any unnecessary expenses. If any modules aren’t correctly installed or have come loose, reseat them and check to see if the kernel data inpage error still occurs.
Exercise caution when opening a computer and adjusting components. Without a correctly set up anti-static bracelet, static electricity may permanently damage components like RAM.
-
Inspect and reseat your hard drive cables.
This error usually indicates that the drive has physical defects like bad sectors. In some cases, you may experience this problem due to an improperly seated hard drive cable.
Open your computer, locate your hard drive, and reseat the connector cable to rule this possibility out. You’ll also need to check and reseat the cable where it connects to your motherboard.
When your hard drive is running, listen carefully for any loud clicking noises. If you hear them, your hard drive may be in the process of failing, which can cause this type of error. The fix is to back up all your data and replace your hard drive.
-
Test your memory.
Windows 10 has a built-in memory diagnostic tool. Free options are available for Windows 7, Windows 8, and Windows 10. If you have Windows 10, type «memory» into the taskbar search field, then select Windows Memory Diagnostic > Restart now and check for problems.
The best free memory diagnostic tool is MemTest 86, which you can download and use to check your RAM.
You may want to run more than one memory diagnostic tool. If any of these tools report a problem with your memory, consider replacing your RAM. Doing so will probably fix your kernel data inpage error, but your RAM is likely to fail in the future either way if one of these tools finds a problem.
-
Use a program to test your hard drive.
You can check for problems with your hard drive using the built-in Windows error-checking tool or the chkdsk command.
If your diagnostic tool of choice finds any problems, like bad sectors, allow it to attempt a fix. If successful, you should be able to use your computer without any further kernel data inpage error crashes.
13 Free Hard Drive Testing Tools (2025)
-
Unplug hardware peripherals.
While less likely, this error can occur due to other peripherals. To rule this out, shut down your computer, unplug all of your hardware peripherals, and turn your computer back on.
If your computer doesn’t crash with the kernel data inpage error, reconnect each device one at a time. When you find the device causing the problem, you can either leave it unplugged or replace it.
-
Run a virus scan.
In some cases, a virus may corrupt important files and cause a kernel data inpage error. It’s less likely than other possibilities, but it’s still important to check. If nothing else has worked, try running a virus scan. If any of these programs locate a virus, allow it to fix the problem, then check to see if you are still experiencing kernel data inpage errors.
Other Blue Screen Problems Like the Kernel Data Inpage Error
The kernel data inpage error is just one of many errors that can show up when Windows crashes, revealing the infamous blue screen of death. If you’re experiencing blue screen issues, we have a complete list of blue screen error codes that can help you get to the bottom of your problem.
We also have a general guide to fixing the blue screen of death that may be useful.
Causes of the Kernel Data Inpage Errors
The kernel data inpage error is a stop code displayed during blue screen crashes and is usually because of a problem with the random access memory (RAM) or hard drive.
Here are some additional codes associated with this error and the specific problems they refer to:
- 0x0000007A: File access errors
- 0xC000009C: Bad hard drive sectors
- 0xC000009D: Loose cables or hard disk failure
- 0xC000016A: Bad hard drive sectors
- 0xC0000185: Unseated or damaged cables
FAQ
-
The kernel is a low-level program that’s responsible for interfacing all applications with the physical hardware of the computer. Without the kernel, none of your applications would work. Every operating system has a kernel.
-
To fix a kernel security check failure error, remove any peripheral devices, disable Windows automatic restart, scan for corrupt files, and check the hard disk for errors. If you’re still having trouble, restore the system to a past working point, use the Startup Repair Tool, or reset the computer.
-
The Linux kernel is typically located in the /boot directory. In the terminal window, enter ls /boot and look for a file called vmlinuz or vmlinux.
Thanks for letting us know!
Get the Latest Tech News Delivered Every Day
Subscribe