Howto install the Windows version of Steam on Apple Silicon runing macOS Sonoma or Sequoia
We will install the x86 version Homebrew in order to be able to use Apple’s modified version of Wine and to install the Windows version Steam on Apple Silicon hardware.
We will make sure that our existing environment (and the Apple silicon version of Homebrew we need for ‘serious’ work) remains undisturbed.
This guide is only tested for Apple Silicon machines.
: Apple’s homebrew recipe uses heavily patched infrastructure components and is currently broken. This guide uses a prebuilt toolkit.
Alternative: use Asahi Linux instead of unreliable macOS for gaming
- Given the fact that arbitrary and undocumented and intranspartent updates of Apple’s macOS continue to break efforts to use macOS for gaming, and
- Given the recent progress of graphics support and wine support with Asahi Linux, the recommended path of action is to instead use an Asahi Linux installation for Steam gaming, see AAA Gaming on Asahi Linux.
The trade-offs are:
- you’ll have a second (excellent!) operating system on your Mac hardware, which requires additional disk space
- You will need technical skills to install and maintain Asahi Linux
- The graphics environment for Asahi Linux is still in a very early stage and under heavy development
- On the plus-side you’ll have an ever-improving, transparent and open operating system to work with
Latest tested versions
- 2024-12-11: : This guide is currently broken. Steam setup seems to crash on new installations. Some hints if you want to experiment:
winehas to be replaced bywine64when using the latest (2024/11) beta 3 of GCenX’s game-porting-toolkit.
ALTERNATIVE: See note on Asahi Linux above.
- 2024-09-22: macOS 15.1 Sequoia and GCenX prebuilt toolkit (see Update notes)
- 2024-06-15: macOS 14.5 and the prebuilt
game_porting_toolkitversions provided by Dean Greer (GCenX) which includes the latest 2.0 beta drivers for easy & up-to-date installation, it’s no longer necessary (and anyway broken) to build the toolkit yourself, and all necessary components are included CGenX’s build, so no longer necessary to download Apple’s toolkit, Xcode or Command Line Toolkits.
Preparations:
- Download Steam. Make sure to download the Windows setup, and not the (default) Mac version. You should now have a file
SteamSetup.exe.
Step-by-step installation
- The minimum macOS version is macOS Sonoma 14.5, a prebuilt game-porting-toolkit will be downloaded later via homebrew.
- This guide only applies to Apple Silicon Macs. No Intel support.
- Open a terminal (or iTerm2)
- Make sure that rosetta is installed by entering:
softwareupdate --install-rosetta
Now your Mac is able to execute x86_64 code. This is the basis for all the following installation.
- Now switch to a x86 shell by entering:
Type arch again, to make sure that you are using Intel. It should not show arm64, but i386 ( 
Now, from a terminal that uses x86_64 arch, install homebrew for x86:
/bin/bash -c "$(curl -fsSL https://raw.githubusercontent.com/Homebrew/install/HEAD/install.sh)"
This will install the Intel x86 version of homebrew to /usr/local. If you already installed homebrew
for Apple Silicon, then that version resides in /opt/homebrew and won’t be touched. This guide will assume that the Apple Silicon
homebrew is your important version, and will remain the default when working with terminal or using brew. If you do not have
an Apple Silicon version of homebrew installed, don’t worry, nothing we do here requires that or modifies any of it.
Do not follow the recommendation at the end of the x86-homebrew install script to put shellenv into .zprofile. (That
would put the x86 Version of Homebrew into your paths, conflicting with an Apple Silicon version of homebrew. No paths or
environment modifications are needed in order to proceed!)
In order not to mess up the two homebrew versions, we create an alias for the Intel homebrew:
alias brew86=/usr/local/bin/brew
Note: if you are following Apple’s readme, make sure to replace all instances of brew in Apple’s doc with brew86 from now on.
Installation using a pre-built toolkit
Use Dean Greer’s (GCenX) versions of the toolkit that have been prebuilt. This is the faster installation method (and currently the only non-broken one):
brew86 install --cask --no-quarantine gcenx/wine/game-porting-toolkit
This installs a macOS Application «Game Porting Toolkit» based on the old working binaries that opens a pre-configured terminal with all the game-porting tools. Go to macOS ‘Applications’ and open «Game Porting Toolkit». In the terminal window that gets started by the application, enter:
wine winecfg
to verify everything is working. Close Winecfg and start with the update procedure to the latest drivers.
Updating the drivers (OPTIONAL, currently not necessary)
Since CGenc’s toolkit already contains the 2.0 beta drivers, it’s currently not necessary to manually update the drivers. Skip to Steam installation, if current version of toolkit is 2.0 beta.
Make sure that you have opened the «Evaluation environment for Windows Games». You should see a folder at
/Volumes/Evaluation environment for Windows games 2.0. Then start the update:cd /Applications/Game\ Porting\ Toolkit.app/Contents/Resources/wine/lib/external mv D3DMetal.framework D3DMetal.framework-old; mv libd3dshared.dylib libd3dshared.dylib-old ditto /Volumes/Evaluation\ environment\ for\ Windows\ games\ 2.0/redist/lib/external/ .This is silent on success.
Steam installation
Now you are ready to install Steam. Again, use a Terminal that is opened by the «Game Porting Toolkit» application in your Applications folder, not the default terminal. Enter:
MTL_HUD_ENABLED=0 WINEESYNC=1 wine ~/Downloads/SteamSetup.exe
After some time, the Steam login appears!
Steam has been installed into the wine prefix at ~/.wine and your Toolkit software resides within the application «Game Porting Toolkit». From any Terminal, you can now start Steam directly with:
MTL_HUD_ENABLED=0 WINEESYNC=1 /Applications/Game\ Porting\ Toolkit.app/Contents/Resources/wine/bin/wine ~/.wine/drive_c/Program\ Files\ \(x86\)/Steam/steam.exe
This takes some times, but then Steam starts.
Create a shortcut for Steam
We can use Apple’s ‘Shortcuts’ app to automate the process of launching Wine & Steam Windows. Start the Shortcuts app, create a new shortcut and add the action ‘Run Shell Script’.

The script text is:
cd ~/.wine/drive_c
MTL_HUD_ENABLED=0 WINEESYNC=1 /Applications/Game\ Porting\ Toolkit.app/Contents/Resources/wine/bin/wine ~/.wine/drive_c/Program\ Files\ \(x86\)/Steam/steam.exe
Note: ‘Shortcut’ might ask you for confirmation, if you want to run scripts, and you need to enable that via the settings-link provided.
Add an icon to the shortcut, and you are ready to go. The shortcut can be put into the dock, and now you simply can directly start Steam for Windows!
(Right-click the shortcut script in the ‘Shortcuts’ app and select ‘Add to dock’ to create shortcut for your shortcut in the Shortcuts app…)
Just be patient when starting Steam, it takes quite a long time!
Update or repair notes
- Steam should work with macOS 15.0 and Gcenx’s version of the game-porting-toolkit.
- I had to reinstall and update
brew86and Steam, your mileage might vary.
After an OS update, you might want:
- Make sure that you have Xcode 16 or the v16 Command Line Tools installed. When using Xcode, start Xcode at least once, because Apple only allows to compile code after you accepted their license agreement.
Switch to X86 console:
Add an alias:
alias brew86=/usr/local/bin/brew
Upgrade x86 brew:
Reinstall or upgrade Dean Greer’s (GCenX) game-porting-toolkit Use upgrade instead of install below to simply look for upgrades of the toolkit:
brew86 upgrade --cask --no-quarantine gcenx/wine/game-porting-toolkit
or
brew86 install --cask --no-quarantine gcenx/wine/game-porting-toolkit
Note: if install fails, because there are still debris of old versions, (Errors like «wine already exists«), look at ls /usr/local/bin/wine* and remove the files that block the install.
Now check that wine works correctly:
The Wine setup screen should appear. There’s no need to adapt settings in the setup dialog, simply close it with ‘OK’.
At last, install a fresh copy of steam, after downloading the Windows version of Steam’s setup: SteamSetup.exe, then:
MTL_HUD_ENABLED=0 WINEESYNC=1 wine ~/Downloads/SteamSetup.exe
The setup throws quite a number of warning, not-implemented, and error messages. Nevertheless, after waiting patiently for a few minutes, the Steam login should appear!
References
- Good collection of information: Apple Gaming Wiki
- A ‘batteries-included’ GUI version to get the game-porting-toolkit running: Whisky
- Pre-built versions of the toolkit are available at Gcenx repository
- Apple Games hosts the original Game Porting Toolkit. There are two possible downloads: «Evaluation environment for Windows games 2.0 beta» and «Game porting toolkit 2.0 beta». The later is larger and contains the ‘Evaluation environment’ too. We will need the «Evaluation environment for Windows games 2.0» only. The «Evaluation environment for Windows games 2.0» contains a Readme that outlines the installation process, but here we will customize it, in order to run Steam.
History
- 2024-12-11: This guide stops recommending to fight against Apple’s undocumented and intransparent macOS updates and recommends using Asahi Linux instead.
- 2024-09-22: Retested installation with macOS 15.0 Sequoia, added paragraph ‘Update notes’.
- 2024-06-15: Installation based on Gcenx repository is now even easier, since it already contains the toolkit components.
- 2024-06-11: Apple releases
game_porting_toolkit2.0 beta 1, self-built is still broken, but a work-around is available using a pre-built toolkit. The self-builder instructions have been moved here (build is broken!). - 2024-03-26: Apple’s
game_porting_toolitrequires Command Line Tools version 15.1 to build successfully, newer versions are not (yet) supported. - 2024-03-24: Apple’s
game_porting_toolkitis broken, the project currently doesn’t install until the build is fixed by Apple. - 2024-03-08: macOS 14.4 testet ok.
- 2023-11-24: Apple Game Porting Toolkit 1.1 changes. Addressed suggestions by @mobigroup and @cdtj concerning username placeholders.
- 2023-10-06: New installations with Xcode 15, Sonoma 14.0 release and
game-porting-toolkit1.0 retested, ok. - 2023-10-06: Small fixes for release version of
game-porting-toolkit1.0, Uninstallation and troubleshooting notes. - 2023-09-26: macOS Sonoma 14.0 Release tested ok. No changes.
- 2023-09-24: Retest with Sonoma RC,
game-porting-toolkitBeta 4 (Note: library path on Apple’s IMG has changed fromlibtoredist/lib. - 2023-08-14: Updates for
game-porting-tookitBeta 3 alias 1.0.3 and Sonoma Beta 5. (No significant changes to the update procedure). - 2023-07-04: Section Update notes added. Apple has published a new version 1.0.2 of the game-porting toolkit.
This wikiHow shows you how to play Windows games for Steam on a Mac computer. You can use popular programs like XQuartz, WineHQ, or Boot Camp to play Windows games on your Mac. While Boot Camp requires a copy of Windows, XQuartz and WineHQ do not. Always using caution when running Windows games on a Mac, as it’s easy to damage your computer by accident.
-
Boot up Windows 10 on your Mac. If you don’t have Windows 10 installed, you’ll need to download it before continuing. Installing Windows on your Mac requires a Windows 10 installation file from Microsoft.com.
-
Open the Steam website.
- Click Install Steam at the top of the page if you don’t see an install button.
-
It should show up in white text. Clicking on this will download the Windows client.
-
- You should finish Installing Steam as you would on a regular PC.
-
-
Type in your account name and password then hit Sign In.
-
-
-
Visit XQuartz.org. This software will allow you to play Windows Steam games without Dual Boot on MacOS.
- XQuartz is required because it simulates what you need from a Windows OS to play games without actually needing an entire copy. It allows cross-platform programs, which are typically not designed to run on a Mac, to be used.
-
A window will pop up asking you if you want to download this file.
-
This file will be downloaded to your Mac.
-
Here’s how:
- Click on the downloaded file in downloads.
- Click the XQuartz dmg file in the folder that pops up. A regular wizard launcher will open.
- Click Continue and Agree until you hit an install window. You’ll know you reached it when you see install instead of continue or agree.
- Select Install and enter your password. If you’re not the administrator you’ll need to ask them to enter their password.
- Click Install Software to begin the installation.
-
Visit Winehq.org. Wine can run Windows software without Dual Boot or emulators. You will need to download this software as well.
-
It’s on the right side of the page under “About”.
-
It will be highlighted blue or in hypertext.
-
Click the link under “Installation”. The link should say wine builds/macosx/download after the main address.
-
This is the most stable installer for WineHQ.
-
Here’s how:
- Double-click the file you downloaded from WineHQ. It will open a folder. Select the DMG file inside the folder.
- Click Continue or Agree until you hit a window titled “Installation Type” on the left side.
- Check the box next to Windows 64 bit. You should still be on the “Installation Type” window of the install wizard.
- Select Install and enter your password.
- After entering your password, click Install Software to begin the installation.
-
Go to the Steam website and click Install Steam at the top.
-
This will download the Windows client.
- If you install the Mac client then you won’t be able to play Windows Steam games.
-
The wine glass will have “Wine Stable” written under it.
-
It will close WineHQ, but you can ignore this message.
-
You may get the pop-up in the previous step a couple of times, but just keep reopening Wine.
-
This square should be listed on a line that looks like “your-mac-type:~ your-mac-name$ “
- The line you want to type “Wine” in is just the last one written in this window.
-
It will leave behind a path that looks similar to /Users/Your-Username/Downloads/SteamSetup.exe.
-
Wine will start the Windows Steam installation.
- If you get a pop-up that says “Wine Gecko Installer” click Cancel.
-
Steam will start updating and installing on to your Mac.
-
Type in your account name and password then hit Sign In.
-
The Steam icon will move to the top-right corner on the navigation bar of your mac.
-
After the installation, you should be able to run the game.
- Files will be installed to a hidden folder on your Mac. To reopen a game you already installed type CMD + SHIFT + PERIOD to show hidden files. The folder will be labeled “Wine” under the Home tab in Finder.
- If you don’t have any Windows games on your Steam account yet, you’ll need to buy some from the Steam store first.
Ask a Question
200 characters left
Include your email address to get a message when this question is answered.
Submit
-
Always ensure your computer exceeds hardware requirements for any games you want to play. Many Mac models are not built for gaming, and attempting to run highly-intensive games on a computer not built for gaming can cause permanent damage to your computer. If the game runs slowly or is «choppy» even on low settings, if you encounter graphics errors, or if your computer runs excessively hot and/or crashes, stop playing — you will damage your computer otherwise.
About this article
Thanks to all authors for creating a page that has been read 5,661 times.
Did this article help you?

С выпуском MacOS 14 Sonoma, Apple интегрировала Game Porting Toolkit, который предназначен для упрощения запуска игр Windows на компьютерах с чипом Apple Sillicon М. Однако, первые пользователи, тестировавшие эту технологию, столкнулись с необходимостью использования сложных гайдов.
Whisky — это инструмент, который позволяет запускать игры в привычном для пользователей окружении. Whisky построен на основе платного CrossOver 22.1.1, который основан на Wine и собственно самого Game Porting Toolkit от Apple.
Подготовка
Устанавливаем Whiskey
Скачиваем программу с официального сайта и устанавливаем ее. Или можно воспользоваться brew
brew install --cask whisky
Скачиваем Steam для Windows
Скачиваем Steam для Windows
Создаем “бутылку”
- Нажимаем Create Bottle

- Задаем имя бутылки и выбираем ОС. Рекомендую оставить Windows 10 и нажимаем Create

- Ждем скачивание файлов

Устанавливаем Steam и игру
- Нажимаем Run

- Выбираем ранее скаченный Steam для Windows

- Устанавливаем Steam “нативно” как в Windows. Next-Next…

- Запускаем Steam из Whisky

- Устанавливаем и ждем пока Play станет активной

Запускаем игру
P.S Список совместимых игр
Список совместимых игр можно глянуть по ссылке и лайхаки для запуска популярных игр
Сегодня расскажем, как установить и играть на Mac в совершенно любые игры для Windows.
Времена, когда считалось, что компьютеры Apple Mac не подходят для игр, уже давно в прошлом. Несмотря на то, что не все разработчики стремятся портировать свои тайтлы на macOS, производительности современных процессоров Apple более чем достаточно для комфортного гейминга.
Важно: этот способ подходит только для компьютеров Mac последнего поколения, которые работают на процессоре Apple M1 и новее, а также нужно обновление до последней версии macOS Sonoma.
- Сначала нам необходимо скачать утилиту Whisky, которая доступна здесь, и установить её. Нужно разрешить ей установку дополнительного ПО;

- Далее нам нужно скачать клиент Steam для Windows — именно для Windows, а не для macOS;
- После этого переходим в Whisky и нажимаем кнопку «Создать бутылку»;


- Далее выбираем установочный файл Steam и начинаем процесс установки, как на Windows;

- Вуаля! Вы прекрасны и восхитительны — теперь можно открыть Steam и устанавливать оттуда любые игры для Windows.
И что делать, если игры из Steam не скачиваются или прерывается звук.
Что за Whisky
Если кратко, то это прослойка между программами для Windows и компьютерами на macOS, позволяющая им взаимодействовать без установки второй операционной системы и имитации другого железа. Подход отличается от установки Windows на Mac или использования виртуальных машин вроде Parallels Desktop тем, что Whisky не эмулирует работу настоящего компьютера. Благодаря этому утилита весит намного меньше, а приложения через неё работают шустрее.
Описание может звучать похоже на Wine, и это неспроста. В основе Whisky — CrossOver, отполированная версия Wine с удобным интерфейсом. Но CrossOver, в отличие от Wine, распространяется платно, так что в Whisky их наработки пошли в урезанном виде. Так, в Whisky не работают лончеры Epic Games, Battle.net и Ubisoft Connect, не поддерживаются игры с защитой Denuvo и нет доступа к актуальной Wine 9.
Whisky подходит для запуска отдельных игр или библиотеки Steam. Он должен хорошо справляться с современными играми на DirectX 11 и 12, тогда как со старыми проектами на DirectX 9 возможны проблемы.
Запустить Whisky можно на любом Mac с процессором Apple Silicon (то есть M1, M2, M3 и их вариации) и версией системы не ниже Sonoma (macOS 14.0). Последние ограничение связано с тем, что для работы программы необходим инструмент Game Porting Toolkit. Это нативная утилита для портирования Windows-игр на Mac, разработанная Apple и внедрённая как раз в обновлении Sonoma. Она расширяет список игр, которые можно запустить на Mac, и упрощает процесс.
Как установить и настроить Whisky
Приложение доступно на официальном сайте разработчиков, для загрузки нажмите «Скачать последнюю версию». После этого откройте Finder и перетащите DMG-файл Whisky в папку «Программы». Затем кликните по иконке для запуска.
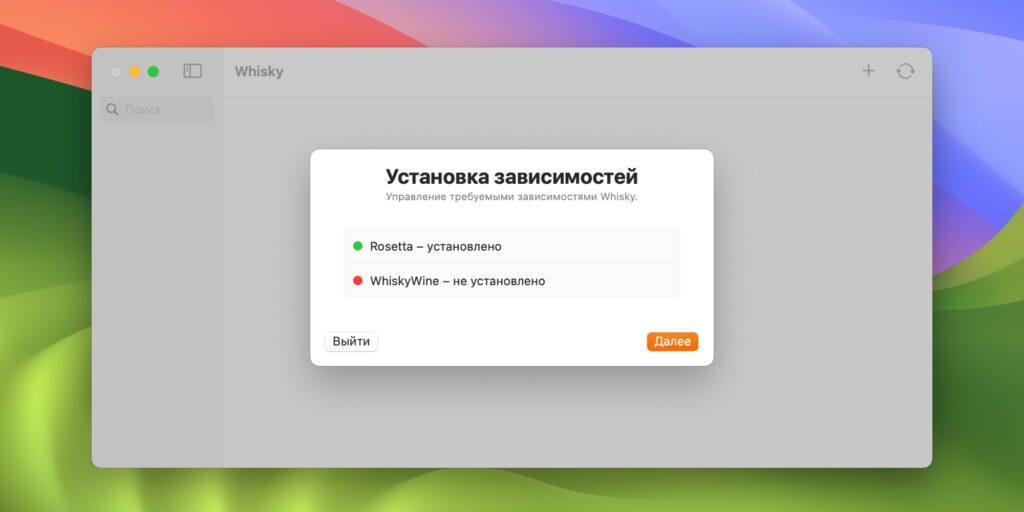
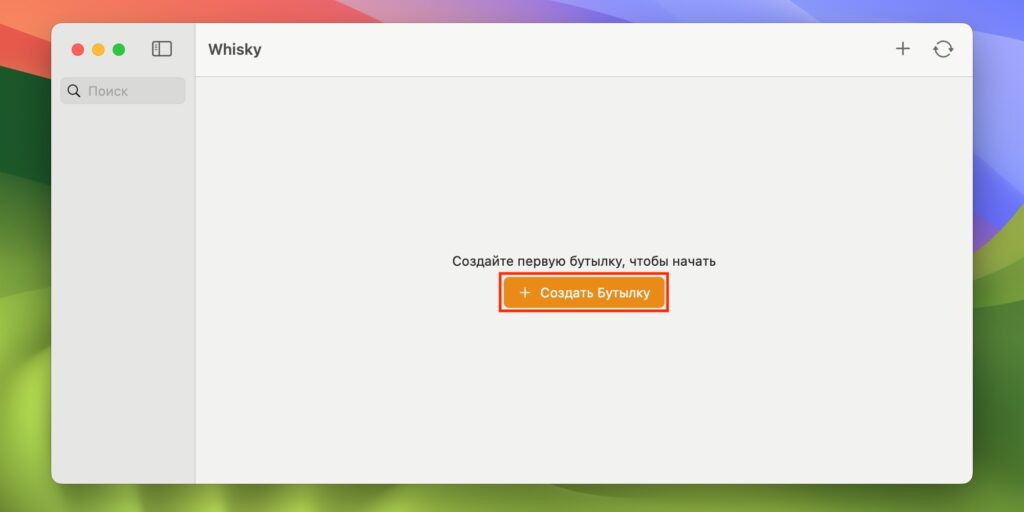
Откроется простой интерфейс: будет не совсем понятно, что делать. Начните с нажатия иконки «+ Создать бутылку». Так здесь называют внутреннее пространство, имитирующее рабочий стол Windows. Почему бутылки? Скорее всего, просто игра слов с Whisky — виски.
На этапе создания бутылки можно настроить только название, версию Windows (от XP до 11) и расположение корневой папки с файлами — в неё пойдут установленные игры и системные файлы, необходимые для работы программы.
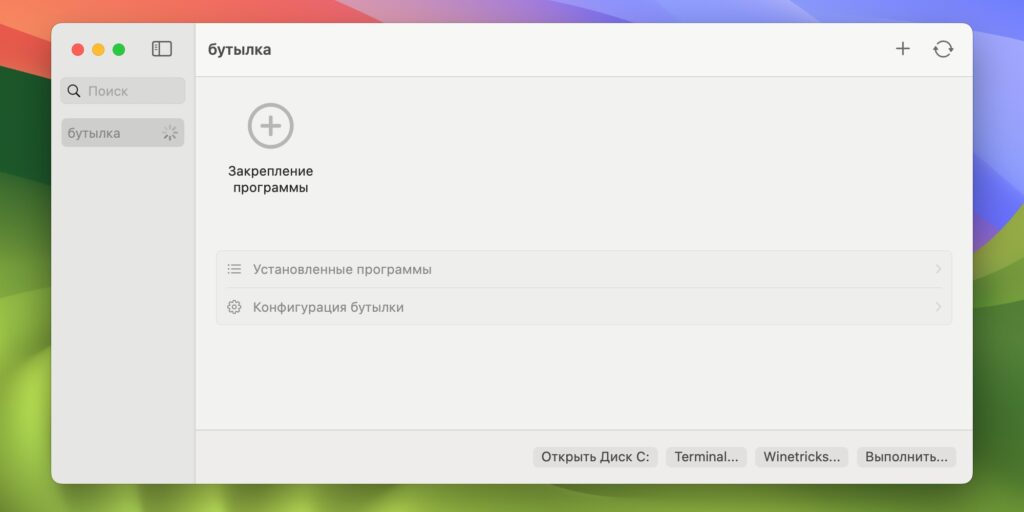
Настройка бутылки занимает буквально пару минут. Когда всё будет готово, пользователю станут доступны кнопки простого взаимодействия с «системой»:
- «Открыть Диск С» — открыть в Finder папку, выделенную под системные файлы.
- Terminal — запустить «Терминал» для управления через командную строку.
- Winetricks — открыть набор уже готовых команд для Whisky. Они нужны для быстрой установки программ (Steam, Firefox, офисные приложения и так далее), бенчмарков, библиотек, шрифтов и настроек.
- «Выполнить» — запустить файл EXE или MSI с компьютера.
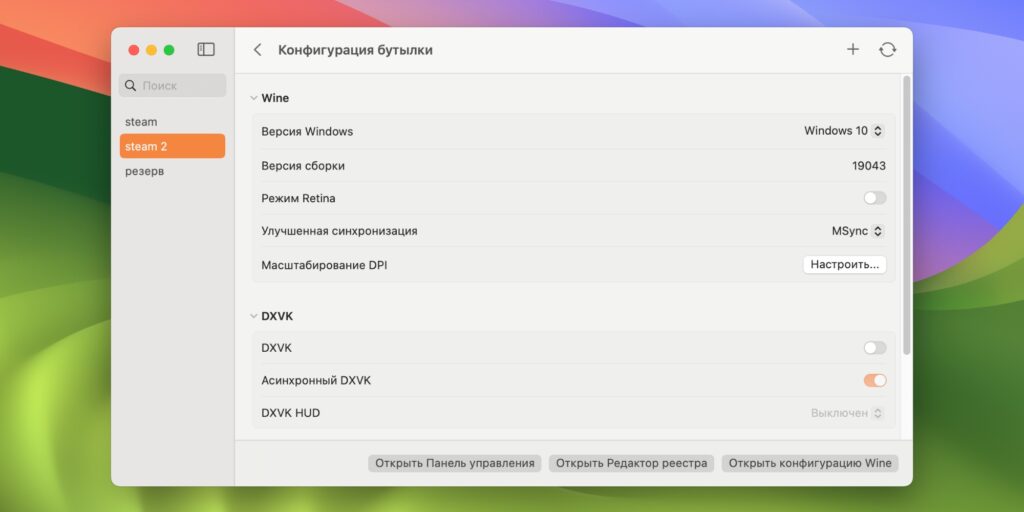
В меню «Конфигурация бутылки» отображается текущая версия сборки Windows. Также можно настроить такие параметры:
- Режим Retina — даёт более высокую чёткость и качество интерфейса в играх, которые обрабатывают интерфейс и игру независимо друг от друга.
- Улучшенная синхронизация — переключение между режимами синхронизации MSync и ESync, которые используются для повышения качества Windows-игр, запущенных через Wine.
- Масштабирование DPI — масштабирование интерфейса (например, 100 или 125%). Параметр лучше изменять в соответствии с настройками монитора.
- DXVK — слой перевода на базе Vulkan. Стоит включать, только если есть проблемы с производительностью в играх на DirectX 9, 10 и 11, либо если игра отказывается запускаться. Эта функция деактивирует D3DMetal — фреймворк, который помогает обеспечивать лучшую производительность в играх на DirectX 11 и 12. Параметр DXVK HUD выводит на экран дополнительный слой интерфейса с информацией о работе DXVK и производительности.
- Metal — технология аппаратного ускорения игр на Mac. Параметр Metal HUD выводит на экран дополнительный слой интерфейса с информацией о работе Metal и производительности.
Также можно открыть редактор реестра и меню расширенных настроек Wine, но для базового использования программы описанных параметров будет достаточно.
Как запускать игры
С помощью Whisky можно запускать отдельные игры, загруженные на компьютер, и проекты из лончеров вроде Steam. Механика немного различается, но есть общее правило.
Одна игра — одна бутылка.
Это советуют сами разработчики. С таким подходом вам не придётся переустанавливать всю свою библиотеку, если в файлах произойдёт путаница, что-то перестанет работать и вы будете вынуждены удалить бутылку и настраивать новую. Из минусов: если речь об игре из Steam, необходимо снова его устанавливать и входить в аккаунт. Соответственно, на компьютере будет несколько независимых копий Steam, каждая из которых займёт место на диске.
С компьютера
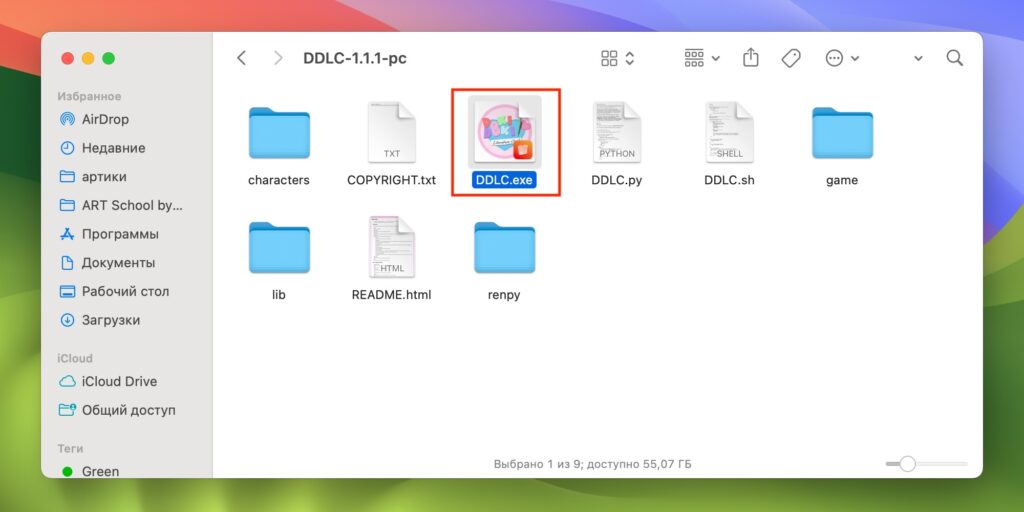
Если нужный EXE-файл уже есть на ПК, действовать можно двумя способами:
- Дважды нажмите на иконку EXE-файла в Finder, если в нижнем правом углу есть логотип Whisky. Если вместо него другая программа, кликните правой кнопкой мыши → «Открыть в приложении» → Whisky. В открывшейся утилите выберите, в какую бутылку нужно установить игру (если их несколько).
- В Whisky откройте нужную бутылку и нажмите «Выполнить…». Найдите EXE-файл на компьютере и дважды кликните по его иконке. Переносить файлы игры в раздел Whisky не нужно: можно запускать прямо из «Загрузок».
Если ваш файл — инсталлятор, то установка произойдёт на диск C, созданный внутри файлов Whisky. Приложение появится в списке установленных, и его можно будет быстро закрепить (по сути, создать ярлык на импровизированном рабочем столе).
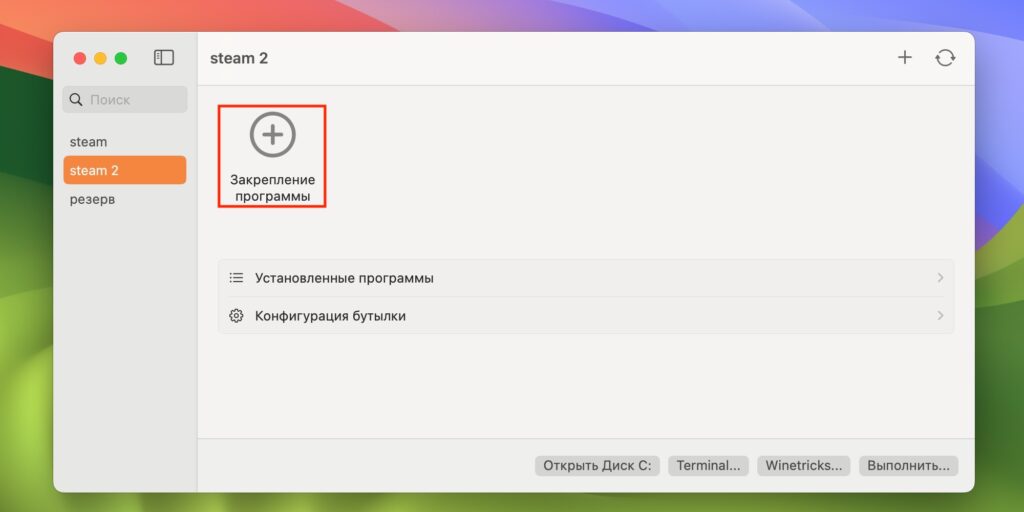
Игры без инсталлятора, которые запускаются сразу из EXE-файлов, не сохранятся в списке «Установленные программы». Добавить их для быстрого доступа можно вручную: нажмите на иконку «Закрепление программы» и найдите исполнительный файл в папке с игрой.
Из Steam
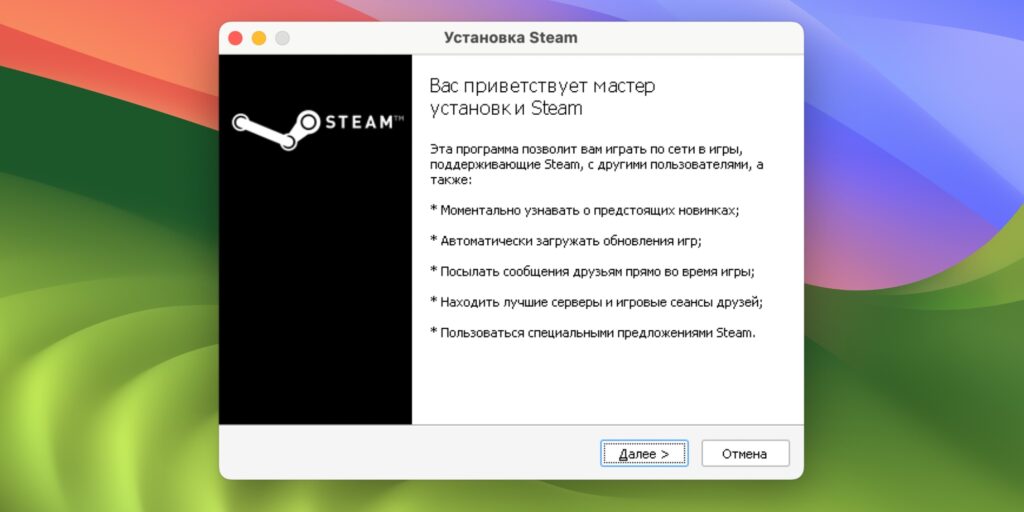
Для начала работы лучше создать новую бутылку. Когда она будет настроена, действуйте так:
- Скачайте EXE-инсталлятор Steam на официальном сайте или нажмите в меню Whisky на кнопку Winetricks и выберите в списке steam. Загрузка запустится автоматически, но может потребоваться выдать разрешения и докачать элементы программы.
- Запустите инсталлятор и установите Steam, следуя инструкциям на экране. Файлы клиента по умолчанию запишутся в папку, выделенную Whisky под Windows.
- Откройте Steam. Войдите в учётную запись и дождитесь обновления клиента.
После этого можно сразу скачивать Windows-игры и играть, а можно настроить быстрый доступ к Steam и проектам. Для этого в Whisky откройте бутылку с загруженным Steam, нажмите на «Установленные программы» и отметьте булавками EXE-файлы утилит, которые хотите закрепить. Например, самого Steam и игры. Важный момент: при запуске проекта через иконку сначала всё равно запустится Steam и лишь потом игра.
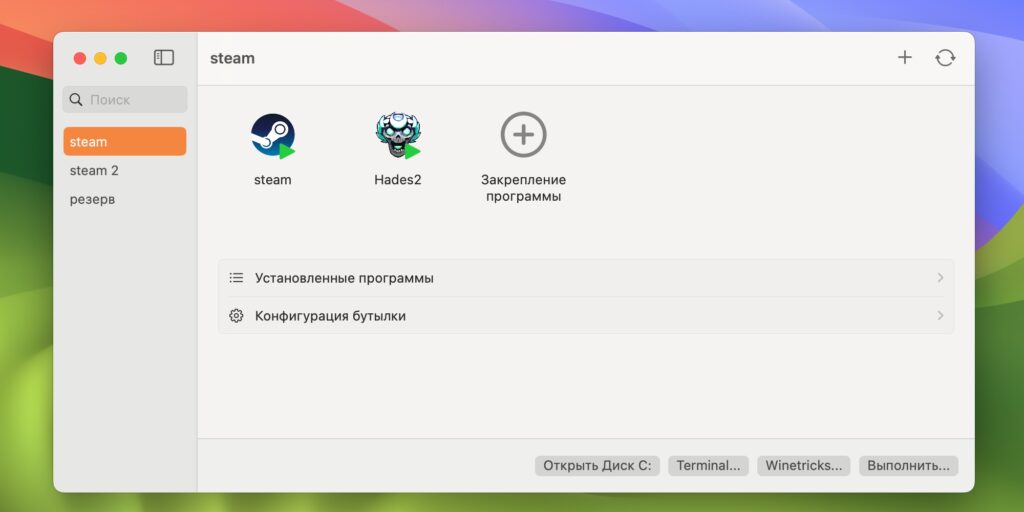
Если вы попытались открыть Steam и ничего не произошло, подождите минуту: клиент запускается довольно медленно. Если сделать это несколько раз, через пару минут у вас может оказаться куча иконок Steam в доке.
Из Epic Games
Как уже упоминалось, Whisky не работает с лончером магазина Epic Games. Но это исправляет Heroic Games Launcher — клиент для установки и запуска игр Epic Games, GOG и Amazon Prime Games. Его можно использовать через Whisky, но есть нюансы.
Скачать Windows-версию Heroic и запустить через Whisky не получится. Вместо этого нужно установить Heroic для macOS. Далее в Heroic откройте «Настройки игры по умолчанию» и убедитесь, что в разделе «Версия Crossover/Wine» выбран вариант Whisky.
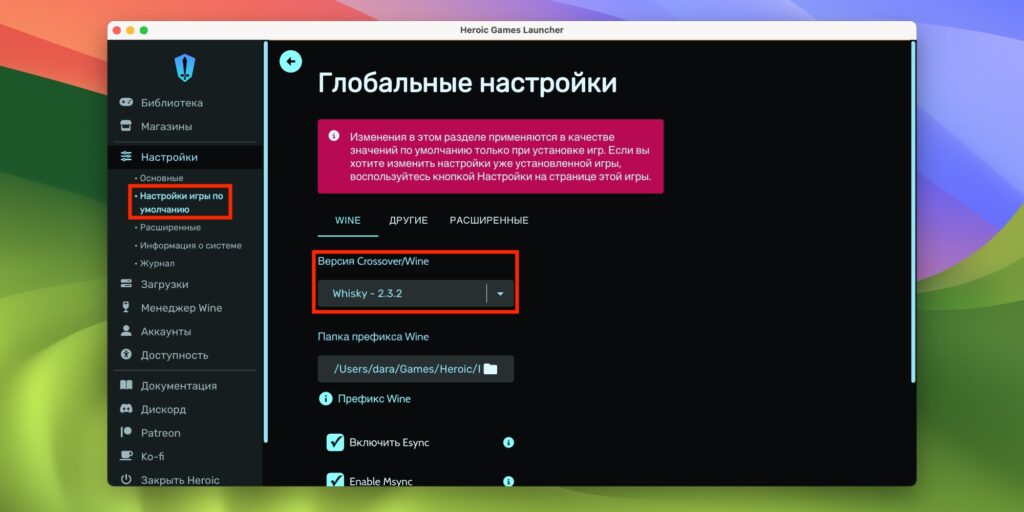
С этой опцией вы сможете запускать Windows-игры из своей библиотеки Epic Games на Mac.
Какие возможны проблемы
Важно понимать, что даже программа, которая опирается на нативный инструмент Apple Game Porting Toolkit, всё равно остаётся костылём. И Windows-версии утилит и лончеров могут работать на Mac некорректно. Самые распространённые проблемы можно решить — как правило, даже несколькими способами.
Steam самопроизвольно открывается, даже если Whisky неактивна
Это не просто раздражает, но и мешает пользоваться Mac-версией Steam: если вы играете в адаптированную под Mac игру через нативный лончер, сессия может завершиться при открытии Windows-версии Steam.
Решений есть несколько:
- В настройках Steam откройте раздел «Интерфейс» и отключите функцию «Автоматически запускать при включении компьютера».
- Закрывайте лончер через иконку в виде крестика, как на Windows, а не через «Завершить» в доке macOS.
- Откройте стандартную утилиту «Мониторинг системы» и принудительно завершите процессы со словом Wine (например, wine64-preloader).
Методы можно комбинировать: отключить автозапуск, закрыть Steam кликом по крестику, а затем завершить процессы Wine.
Игры в Steam не скачиваются до конца
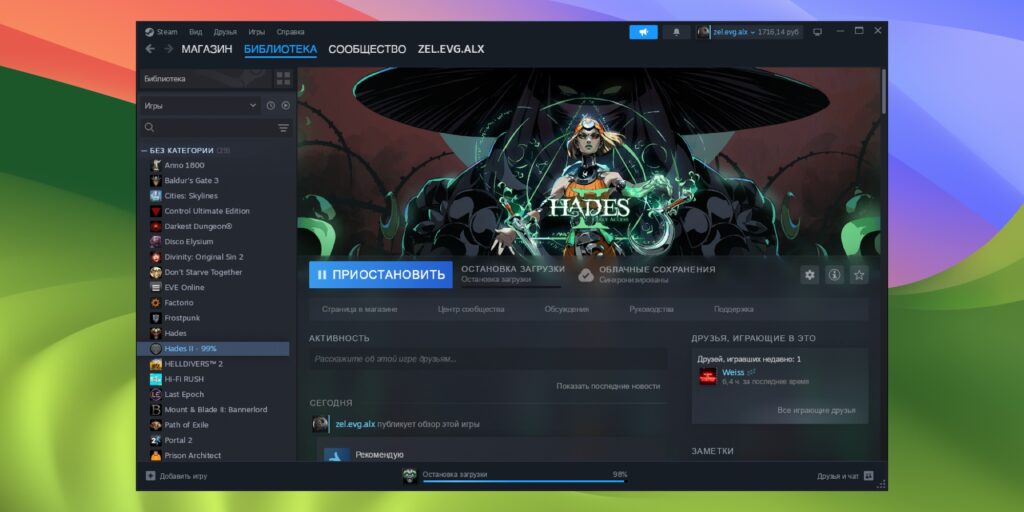
Распространённая проблема: при попытке загрузить игру процесс доходит до 99% и останавливается. При попытке перезапустить процесс появляется надпись «Остановка загрузки», которая не исчезает даже после перезапуска клиента.
Что стоит попробовать:
- Выдайте доступ к управлению приложениями. Возможно, Mac просто не разрешает Whisky управлять другими программами. В настройках компьютера перейдите в раздел «Конфиденциальность и безопасность» → «Управление приложениями», нажмите на «+» и выберите Whisky.
- Поменяйте регион загрузки. Старый способ, который много лет помогает пользователям Steam бороться с такой ошибкой и медленными загрузками. Когда процесс остановится, в настройках Steam перейдите в раздел «Загрузки» и измените город в разделе «Регион загрузки» на любой другой. Выбирать иную страну не обязательно, важно просто изменить значение в этом поле. Принудительно завершите Whisky, Steam и процессы Wine, подождите пару минут и откройте снова.
- Измените компонент для синхронизации в Whisky. Внутри утилиты нажмите кнопку «Конфигурация бутылки» и в разделе «Улучшенная синхронизация» (по умолчанию установлена MSync) выберите «Не задана» или ESync.
После любых изменений завершайте процессы Wine, перезапускайте утилиту и проверяйте, заработали ли загрузки в Steam. Как правило, после исправления ошибки один раз другие игры скачиваются корректно. Учитывайте, что после настройки новой бутылки и нового клиента Steam проблема может повториться, и от неё снова придётся избавляться.
В строке меню появляется несколько иконок приложения
Этим тоже часто грешит Steam. Если несколько раз открывать и закрывать программу, в строке меню могут скапливаться её иконки быстрого доступа.
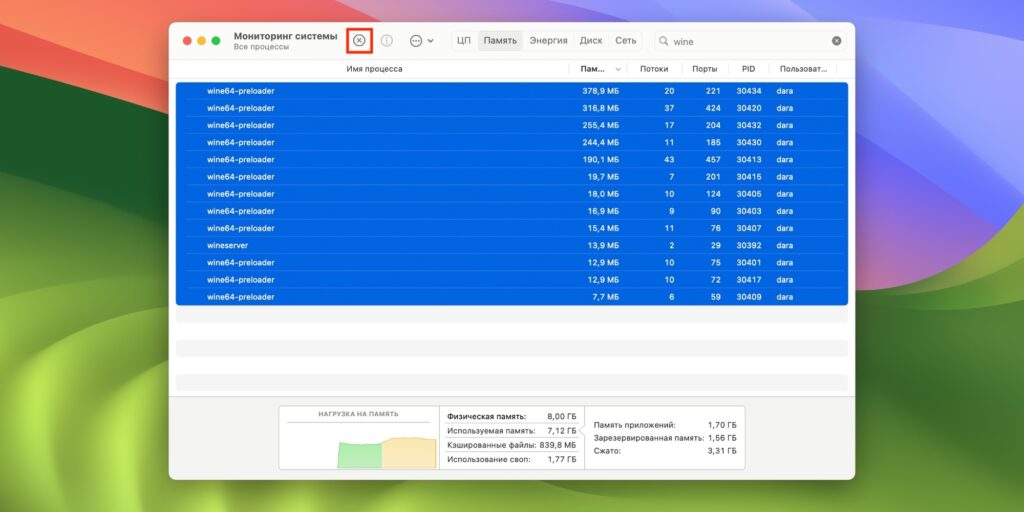
Чтобы почистить лишнее, откройте «Мониторинг системы» и принудительно завершите все процессы со словом Wine. Как правило, за зависшие иконки отвечают процессы внизу списка, которые не занимают много памяти, но проще завершить сразу всё (выделите мышкой или через Shift).
Звук прерывается и подтормаживает
Некоторые игры могут визуально работать совершенно нормально, а вот звук как будто воспроизводится с неправильной скоростью или через хрипящие динамики. Такую проблему с играми на движке Source (вроде Portal 2, Half-Life 2 и Team Fortress 2) и некоторыми другими.
Решение простое, хотя и неочевидное. Откройте стандартную программу «Настройка Audio-MIDI» и измените формат звука динамиков MacBook на 44 100 Гц. Перезапустите игру.
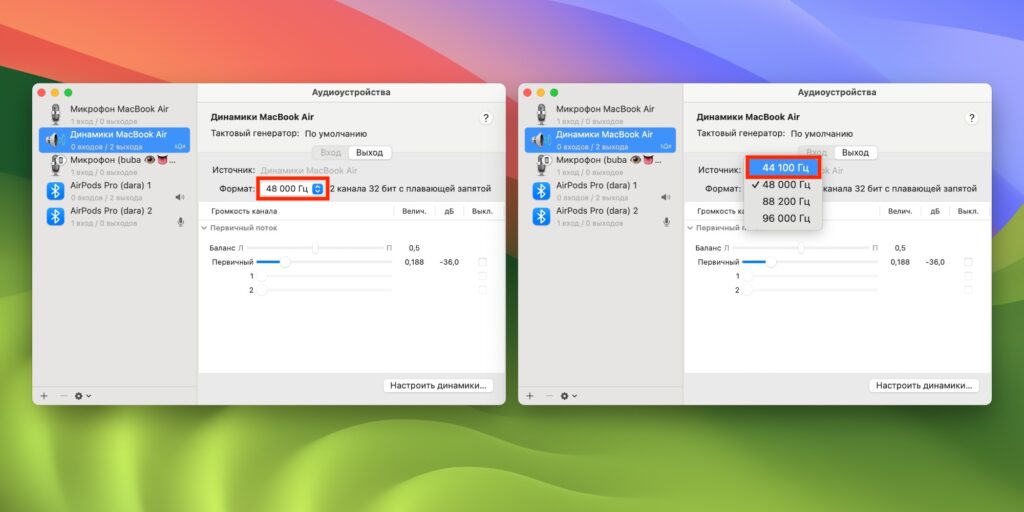
Для воспроизведения большинства контента этот формат подходит, но будьте готовы, что в некоторых играх звук будет сыпаться уже от формата 44 100 Гц. В таком случае нужно переключиться обратно на 48 000 Гц.
Этот способ работает только с динамиками MacBook и проводными наушниками. У беспроводных моделей, как правило, можно выбирать только между 24 кГц и 48 кГц.
Другие баги
Разработчики и сообщество Whisky помогают решать проблемы, возникающие при запуске игр. В баг-листе на GitHub можно посмотреть, как исправить обнаруженные баги, или открыть новую тему, если с похожим ещё никто не обращался.


