
This repository was archived by the owner on Jul 15, 2023. It is now read-only.
This repository was archived by the owner on Jul 15, 2023. It is now read-only.
Description
I am unable to push to git. I see that there have been changes and I’ve been upgrading to catch up, but I’m really stuck. I’m sorry to post this, I’ve been trying to figure it out.
$ git —version
git version 2.17.0.windows.1 // 64 bit
$ git credential-manager version
Git Credential Manager for Windows version 1.16.0
git push origin master
fatal: unable to access ‘https://github.com/Synaccord/synaccord.git/’: SSL certificate problem: self signed certificate in certificate chain
This use to work, but I understand github has gotten more strict about SSL. Fine. But I can’t seem to delete the old certificate and create a new one.
On Windows 10 (Home Version 1709 OS Build 16299.431) when I go to Settings and search for «Credential» I see «Credential Manager», «Manage Windows Credentials», and «Manage Web Credentials». When I click on «Credential Manager» (or any of the three) the list disappears and I’m back to the search option. Has credential management been removed from windows?
I’ve tried
git credential-manager ‘delete https://github.com/Synaccord/synaccord.git/
It returns no error, and has no effect on the git push
git config —list //filtered
http.sslcainfo=C:/Program Files/Git/mingw64/ssl/certs/ca-bundle.crt
http.sslbackend=openssl
credential.usehttppath=true
credential.helper=manager
http.sslbackend=openssl
credential.manager=—version
I’m stuck. Any ideas would be appreciated.
The “SSL Certificate Problem: Self-Signed Certificate in Certificate Chain” error occurs when an SSL/TLS certificate is not found and the client receives a self-signed certificate that it does not trust as part of the certificate chain. This results in an error message informing users of the site’s possible vulnerability.
You get an alert on the browser rather than loading the page after you have selected an SSL subscription or installed a certificate on your site. The problem also arises while attempting to visit a website or service with a self-signed SSL certificate. This can happen on various systems and apps that utilize SSL for secure connections. It also suggests that a trustworthy authority still needs to issue the certificate.
In this blog, get a thorough explanation of the reasons and troubleshooting techniques. Learn steps to resolve “SSL Certificate Problem: Self-Signed Certificate in Certificate Chain” issue. It is critical to understand and address these problems. Website owners and end users can properly use HTTPS security post this guide. Let’s begin!
What is a Self Signed Certificate?
Self-signed TLS/SSL certificates are signed by the website’s owner (developer or company) instead of a publicly trusted certificate authority (CA). This makes them unsuitable for use in public apps and web pages. Self-signed certificates lack verification from a trustworthy entity. It results in security alarms in web browsers and operating systems. These warnings prevent security risks to users. It might be the result of an attacker launching a man-in-the-middle attack. This drives away consumers concerned about their personal or financial information. Since it can be compromised when connected with the website.

Self-signed certificates are signed using the owner’s private key. It benefits internal networks and during software development phases. Yet, they may also pose problems if not properly monitored and controlled.
Self-signed certificates are versatile, customizable, quick, and simple to issue. It allows developers to issue certificates without relying on external authorities. They are helpful in testing settings. But, security teams frequently need more visibility. The certificates’ quantity, location, ownership, and storage are all important to them.
These digital certificates establish secure connections between Internet-connected applications, computers, and devices. Also, they use the same cryptographic private and public key pair as regular CA-signed certificates. However, self-signed certificates are not immediately trusted.
How to use a Self Signed Certificate in a Certificate Chain?
To employ a self signed certificate in a certificate chain, you need to issue one. Following the steps below will help you get a certificate in use easily:

- Firstly, you need to set up a Self-Signed Certificate Authority. Create a CA certificate and a private key that will serve as the certificate chain’s root.
- Then, you’ll have to create a Server Certificate for safe communications. This should be self-signed by the CA.
- After that distribute the CA Certificate by sending the certificate to clients. They later need to trust the server certificate.
- Then configure the server to use the server certificate by installing the server certificate and setting it up for connection security.
- Lastly set up the clients to trust the self-signed CA. You can do so by importing the self-signed CA certificate into the client’s trust store.
How does SSL Certificate Problem: Self Signed Certificate in Certificate Chain work?
The SSL error: self signed certificate in certificate chain happens when a browser or application comes across a self-signed certificate in the certificate chain that was not issued by a trustworthy Certificate Authority (CA). A trusted authority doesn’t support the self signed certificate. Hence, the browser or application cannot check the connection’s validity. This error message indicates a potential security concern. This is because the server’s authenticity cannot be ensured.
The trusted CAs undergo extensive validation processes. They check that the certificates issued are secure and authentic. Without this validation, you are more prone to man-in-the-middle attacks. Many other security vulnerabilities are constant threats. A self-signed certificate has not undergone the same identity verification processes. So, the browser does not automatically trust it.
SSL error: self signed certificate in the certificate chain arises when self-signed certificates lack the endorsement of a trusted CA. This makes it hard for browsers and programs to verify the server’s secure identity. When a browser or program tries to create a secure connection using SSL, it returns the error “SSL Certificate Problem: Self-Signed Certificate in Certificate Chain”.
Reason why SSL Certification Problem: Self Signed Certificate in Certificate Chain Occurs
SSL and TLS are encryption technologies for your web security. They enable secured communication links between a browser and a web server. Certificate authorities (CAs), or trustworthy third parties, provide certificates and these digital papers confirm a website’s identity and encrypt communication. Then certificates constitute a “chain of trust.” It goes back to the CA’s root certificate, embedded in web browsers and devices.
The common reasons for this error include the following:
- Expired or Outdated Certificates:
Certificates with an ended validity period are no longer considered reliable. - Self-Signed Certificates Generated by Web Servers:
These certificates are not validated by a CA, leading to trust issues. - Use of Self-Signed HTTPS Certificates:
Websites bypass CA verification, flagging them as untrusted. - Incomplete Certificate Chain:
A broken or missing link in the chain results in an error. - Untrusted Root Certificate:
You cannot verify the entire certificate chain. This can be due to the untrusted root certificate. - Validation Failure in Intermediate Certificates:
The entire chain is compromised when intermediate certificates fail in their validation.
Identifying the precise reason will lead you to the right answer. So, the “self-signed certificate in certificate chain” SSL error indicates a problem with the certificate chain. A self-signed certificate, an incomplete chain, an untrusted root, or an expired certificate causes it.
How to Resolve the SSL Error: Self Signed Certificate in Certificate Chain?
Users frequently encounter the “SSL error: self-signed certificate in certificate chain” problem. Follow the given steps to resolve this:
- Update the certificate and chain by installing the new files and rebooting services as necessary.
- Use an SSL analysis tool to check the expiration dates of all certificates. Ensure the website certificate is issued to the right domain name and validates the specified server.
- Clear your browser cache and return to the website over HTTPS.
- Check intermediate or chained CA certificates between the root and website certificates. If any are self-signed, there is an issue with the chain. The intermediate certificates should establish an unbroken chain of trust from the root.
- Confirm that the trusted root CA certificate exists in the server’s trust store. It should match the built-in list of trusted CAs in major web browsers and devices. The root CA isn’t generally trusted, so you might have to install the certificate.
- Replace any self-signed certificates with a genuine certificate from a trusted CA. To fix the trust issue, purchase and install a signed certificate that matches your domain.
- Ensure that the entire chain is installed on the server.
Follow best practices to prevent the “self-signed certificate in certificate chain” problem. You can utilize validated certs from reputable CAs and keep chains up to date. This will also provide users with safe, encrypted websites.
How to Prevent an Error: Self-Signed Certificate in Certificate Chain?
Now, coming to the prevention of the error, you must consider the below procedures:
To troubleshoot SSL certificate problem in self signed certificate, follow these steps:
-
Disable extensions
Turn off each one separately until you figure out which one is causing the issue. This process ensures that the source of the SSL problem is identified and eliminated.
-
Turn off the QUIC protocol
Visit your Google Chrome and type chrome://flags/#enable-quic in the address bar. This turns off the Experimental QUIC Protocol. Use the updated settings when you relaunch Chrome.
-
Set the system date, time, and region accurately
Prevent validation issues by setting your system’s date, time, and region settings right. Synchronize your system clock with an online time server for precise time settings.
-
Minimize the degree of privacy and security on the Internet
Go to Start Menu > Control Panel > Network and Internet > Network and Sharing Centre. This will reduce your security and privacy settings. Set the Security tab to Medium in the Internet Properties box. Repeat this process for the Privacy tab.
-
Clear the cache and cookies in Chrome
Attempt to avoid SSL problems and viruses by routine cleaning. Ensure deleting the cache and cookies in your browser. To remove browsing data in Chrome, use Ctrl + Shift + Delete.
Conclusion
The “SSL error: self-signed certificate in certificate chain” occurs when a browser fails in verification. Browsers cannot ensure the website’s authenticity owing to difficulties with the certificate chain. Self-signed certificates, incomplete intermediate chains, expired certificates, and untrusted root CAs commonly resonate.
To fix this problem, verify all certificates, replace self-signed ones, finish the chain, assure root CA trust, and apply updates. After making adjustments, clear the browser cache to guarantee successful connections. Also, proper SSL certificates and chains improve user security.
We hope this post helped you fix the self-signed certificate chain problem. Stay tuned to our well-versed blogs for further updates on SSL certificates. Also, refer to our troubleshooting guides.
Platform Notice: Cloud Only — This article only applies to Atlassian products on the cloud platform.
Summary
While performing any GIT operations, the user encounters the following error message:
1
SSL certificate problem: self-signed certificate in certificate chain
Cause
The error message «self-signed certificate in certificate chain» usually indicates that the SSL certificate provided by the Git server you are trying to connect to is not trusted by your Git client. This can occur if the certificate is self-signed, or if it is signed by an untrusted certificate authority.
Solution
-
Configure all Git clients to trust the self-signed certificate globally: You can configure Git to trust the self-signed certificate globally by adding an ‘http.sslCAInfo’ setting to your Git configuration file. Here’s an example of how to configure Git to trust a self-signed certificate:
1
$ git config --global http.sslCAInfo /path/to/ca.pem -
Windows System: If you are using the Windows System, you may use the configuration below which sets the Secure Channel (schannel) library as the SSL backend for Git’s HTTP communication. This setting is recommended on Windows Systems, as the schannel library is a part of the Windows operating system and is well-integrated with its security features. Once you have configured this, Git will use the Windows certificate store and should not require the http.sslCAInfo configuration setting. The git config —global http.sslBackend channel setting does not bypass SSL validation. It only sets the SSL backend used by Git for its HTTP communication. The schannel library, like other SSL backends, is designed to perform SSL validation by default, which includes verifying the authenticity of the SSL certificate presented by the remote server. The schannel library is considered to be a secure SSL backend, and it supports strong encryption algorithms and certificate validation.
1
$ git config --global http.sslBackend schannel
Was this helpful?
It wasn’t accurateIt wasn’t clearIt wasn’t relevant
Still need help?
The Atlassian Community is here for you.
Introduction
When trying to clone the repository from the GitHub https://www.github.com getting an error fatal unable to access the repository: SSL certificate problem: self-signed certificate in the certificate chain. Below is the screen capture for reference. This mainly occurs on Enterprise Laptops which are owned by organizations.

In most cases, the simple command bypasses the certificate check by running the below command.
git config --global http.sslverify "false"this basically sets sslverify to false, which is not a good practice, rather there is a workaround to clone the repository without modifying SSL verification settings. The sslverify property in git by default is true which it should always be. The credit goes to Matt Federer, and the explanation of this issue and fix can be found in the references section. Below are the steps that worked out in my case.
Reason and Next Steps
To fix the issue, it is first required to understand why the self-signed certificate issue is getting. The reason here is when installing Git on your PC, it creates a trusted bundle certificate. You can view the trusted bundle by running the below command.
git config –list –show-origin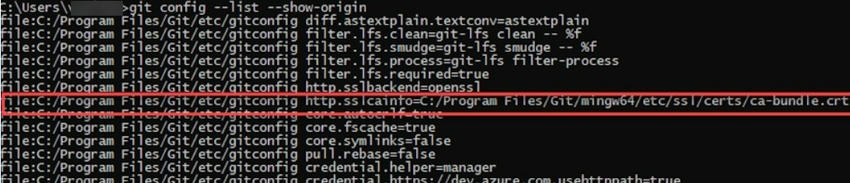
From the screen shot you can see that the ca-bundle is downloaded at C:/Program Files/Git/mingw64/etc/ssl/certs/ca-bundle.crt. This specific ca-bundle is not able to trust the certificates that are installed on your PC and from gateway servers. That is the reason why when trying to run the git clone command the fatal error self-signed certificate in the certificate chain occurs. The other issue could be expired policy / intermediate / root certificates. In this case, work with your enterprise Engineering team to sort the issue. The article focuses on establishing trust between ca-bundle installed by git exe files and certificates that are installed for secure web traffic.
Steps
First, let’s try to understand the certificate information that appears when trying to log in to the GitHub portal https://www.github.com. In this case, I am using the latest Chrome browser.
- It first says the connection is secure.

- On clicking on the lock, it says the certificate is valid.
- On clicking on ‘Show certificate’, it gives the certificate details. Click on the ‘Details’ tab.
- Observe the certificate hierarchy,

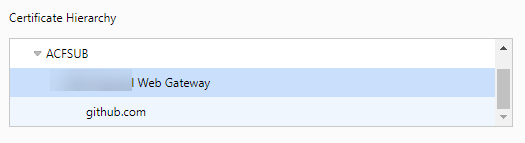
Usually, it will be in the form Root/Intermediate certificate (in this case ACFSUB)/Gateway Certificate (in this case Company Web Gateway)/Site Certificate (in this case github.com).
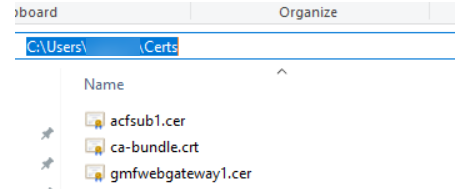
- To establish trust between the ca-bundle and GitHub sites, it is required to copy the ca-bundle to a different location. For this, I have created the “Certs’ folder under c:\Users\<UserName>\Certs
- Exported the Intermediate Certificate(In this example acfsub) and web gateway certificate (in this example company web gateway certificate) to this folder and copied the ca-bundle.crt to this folder.
Exporting the intermediate and immediate certificates
Please follow the instructions to export the certificates. I am doing this only for Intermediate certificates, the same steps are to be followed for other certificates too.
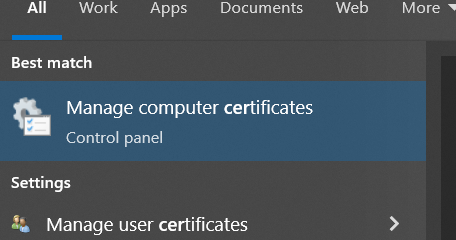
Step 1. To export the certificate, open the ‘Manage Computer Certificate’ option from the control panel.
Step 2. Click on ‘Intermediate Certification Authorities’ and then ‘Certificates’.
Step 3. Click on the desired certificate, and click on the ‘Details’ tab.

Step 4. Click on ‘Copy to File..’.
Step 5. It opens, certificate export wizard, click on ‘Next’.

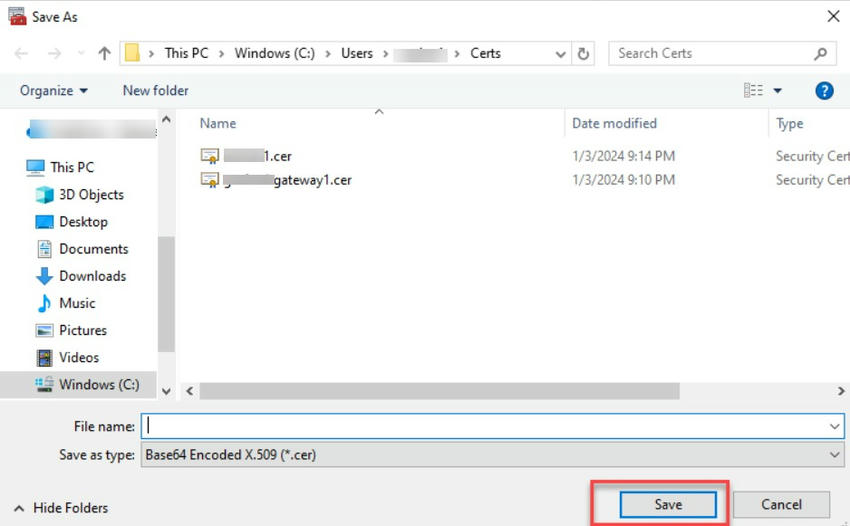
Step 6. Select ‘Base 64 Encoded’.
Step 7. Browse the directory where you would like to save. In my case I have used the folder C:\Users\<UserName>\Certs. I have entered the Filename as acfsub1.
Follow the same steps for other certificates in the path.
Establishing the Trust
To establish the trust, it is required to enter the certificate information in ca-bundle. Follow the below steps.
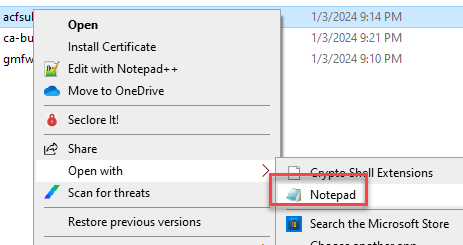
Step 1. Edit the base 64 cer files using Notepad or Notepad++.
Step 2. Copy the certificate information at the bottom of the ca-bundle .crt file. And then save the file.

Step 3. This is very important step. Set the sslcainfo property to ca-bundle certificate.
Git config –global http.sslCAInfo c:\Users\tuser10\Certs\ca-bundle.crt.

Note. your path could be different based on your computer settings.
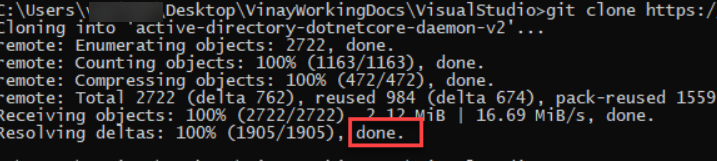
Validation
Run the git clone command you should not face any issue.
Conclusion
Thus, in this article, we have seen why we are getting the Self Signed Certificate in the SSL chain the reason for the FATAL error, and the steps to fix using the industry standards.
References
- https://mattferderer.com/fix-git-self-signed-certificate-in-certificate-chain-on-windows
- https://github.com/scalingexcellence/scrapybook/issues/36