
Вы можете использовать встроенный OpenSSH сервер в Windows для проброса портов через SSH-туннель (SSH туннелирования). Перенаправление портов в SSH позволяет туннелировать (пробрасывать) порты приложений с локального компьютера на удаленный сервер и наоборот. Проброс портов через SSH туннель широко используется в среде Linux/Unix, а теперь вы можете воспользоваться этим возможностями и в Windows. В этом примере мы покажем, как пробросить RDP подключение через OpenSSH на хосте Windows Server.
Содержание:
- Для чего нужны SSH-туннели?
- Защищенный доступ к RDP через SSH туннель (local TCP forwarding)
- SSH туннель в Windows с помощью Putty
- Переброс удаленного порта на локальную машину (Remote TCP forwarding)
Для чего нужны SSH-туннели?
SSH-туннель обеспечивает защищенное шифрованный TCP соединение локальных хостом и удалённым сервером SSH. SSH Port Forwarding позволяет туннелировать поверх SSH подключение к локальному порту на локальном компьютере к любому TCP порту на удаленном сервере (или наоборот)
Порт форвардинг в SSH-туннелях применяются для:
- Обхода межсетевых экранов;
- Открытия бэкдоров в частные сети;
- Организации простых VPN/прокси сценариев для безопасного удаленного подключения;
- Защиты трафика устаревших приложений (протоколов), которые передают данные в открытом тексте (без шифрования).
Вы можете перенаправить в SSH туннель только TCP трафик/порт (UDP и ICMP протоколы не поддерживаются).
Проброс портов через SSH туннель можно использовать в сценариях, когда нужно подключиться к удаленному компьютеру, который защищен межсетевым экраном. Например, у вас имеется сервер c Windows, на котором наружу открыт только SSH порт (TCP 22). Все остальные порты блокируются аппаратным межсетевым экраном или Windows Defender Firewall Windows. Ваша задача подключиться к рабочему столу этого Windows сервера с помощью клиента RDP. Казалось бы, невозможная задача, т.к. порт RDP 3389 блокируется брандмауэром. Однако вы можете получить доступ к любому открытому порты на удаленном хосте через SSH-тунель.
Чаще всего используются следующие сценарии проброса через SSH:
- Local TCP forwarding — проброс локального порта на удаленный сервер;
- Remote TCP forwarding — проброс удаленного порта на локальный компьютер;
- Двойной SSH туннель – позволяет соединить между собой через SSH сервер компьютеры без выделенных белых IP адресов или находящиеся за NAT (если не подходит решение с OpenVPN)
Защищенный доступ к RDP через SSH туннель (local TCP forwarding)
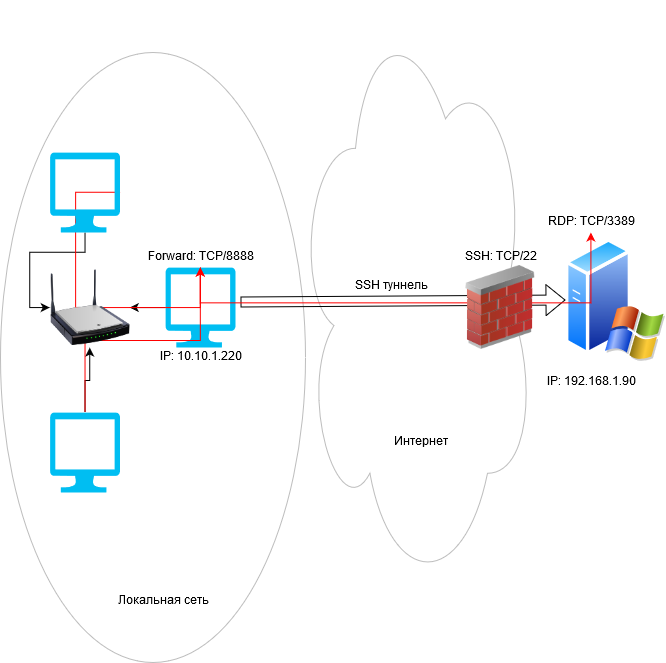
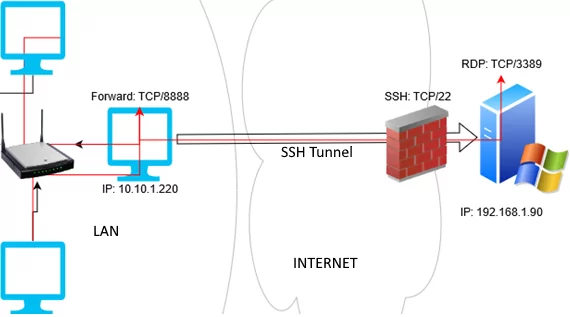
В этом режиме вы создаете на своем компьютере локальный TCP порт, подключения к которому перенаправляются через SSH туннель на указанный порт удаленного сервера. В этом примере мы создадим локальный порт 8888, при подключении к которому выполняется перенаправление на RDP порт 3389 на удаленном компьютере. Общая схема подключения выглядит так:
Для проброса портов нам потребуется SSH клиент. Можно использовать сторонний клиент (например, Putty), но я буду использовать встроенный SSH клиент в Windows. Чтобы установить клиенте OpenSSH, выполните в консоли PowerShell команду:
Get-WindowsCapability -Online | ? Name -like 'OpenSSH.Client*'
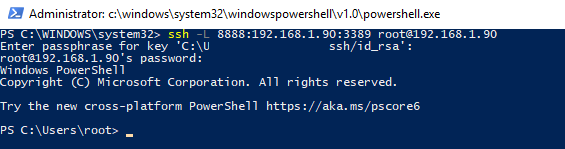
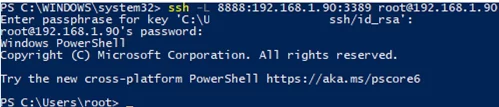
Чтобы создать SSH туннель с удаленным компьютером 192.168.1.90, выполните команду:
ssh -L 8888:192.168.1.90:3389 [email protected]
В этом примере используется формат
LOCAL_PORT:DESTINATION:DESTINATION_PORT
и
USER@DEST_SERVER_IP
(имя пользователя и адрес удаленного SSH сервера)
Чтобы SSH туннель работал в фоновом режиме, нужно добавит параметр –f.
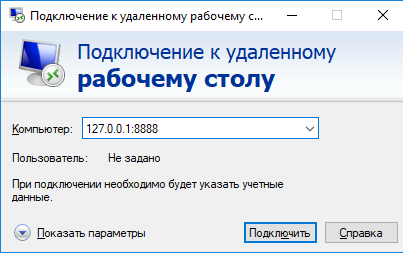
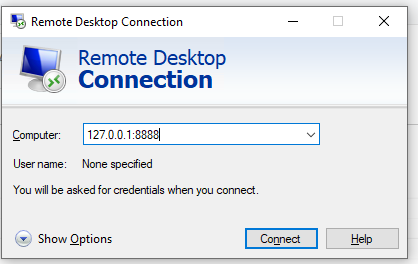
Теперь, чтобы подключится к удаленному компьютеру по RDP через SSH туннель, вам запустить RDP-клиент (mstsc.exe) и подключиться на локальный порт 8888 своего компьютера:
127.0.0.1:8888
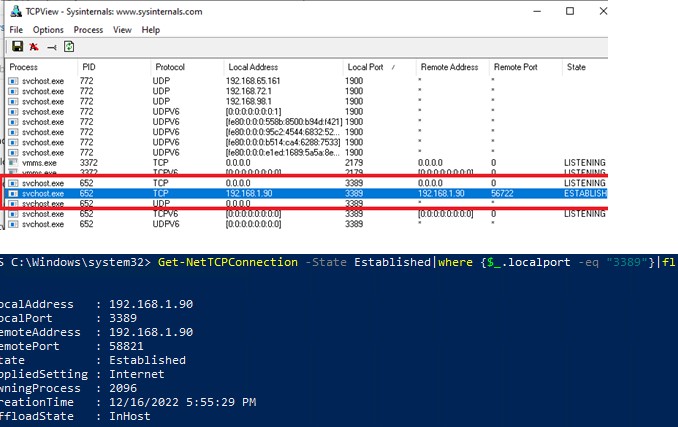
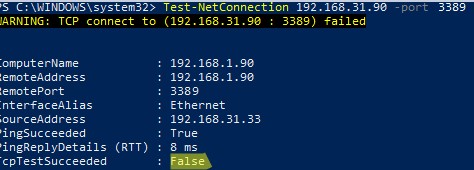
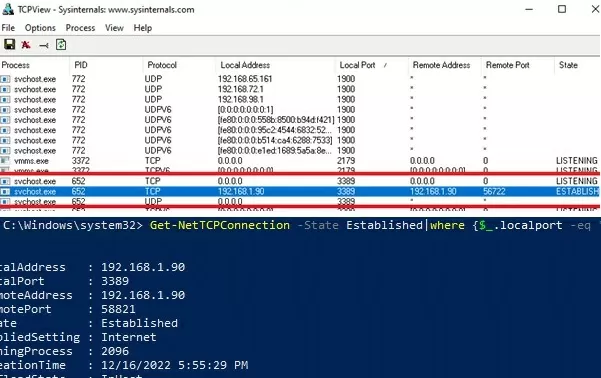
Выполните аутентификацию на удаленном компьютере и можете спокойно работать в RDP-сессии. С помощью команды Get-NetTCPConnection или утилиты TCPView вы можете убедиться, что RDP подключение установлено локально (RDP подключение инициировано запущенным локально SSH сервером):
Get-NetTCPConnection -State Established|where {$_.localport -eq "3389"}|fl
При этом порт TCP/3389 на сервере не доступен с удаленного компьютера. Вы можете проверить доступность порта с помощью командлета Test-NetConnection:
Test-NetConnection 192.168.1.90 -port 3389
TcpTestSucceeded : False
Обратите внимание, что если вы перенаправляете таким образом незашифрованный трафик приложения, то по сети он передается в зашифрованном виде. Трафик шифруется на одном конце SSH соединения и расшифровывается на другом.
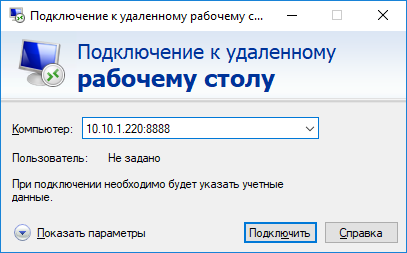
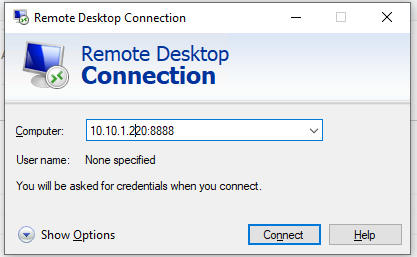
Другие компьютеры в вашей локальной сети смогут одновременно подключиться к удаленному RDP серверу Windows, даже если у них полностью заблокирован прямой доступ к удаленному серверу (как по SSH, так и по RDP). Для этого, они должны подключиться RDP клиентом к порту 8888 на компьютере, на котором создан SSH туннель:
mstsc.exe /v 10.10.1.220:8888
Защита RDP подключения с помощью SSH туннеля может быть хорошей альтернативой VPN для доступа к публичным Windows хостам в Интернете. В этом случае вам не нужно открывать прямой доступ к порту RDP/3389 из Интернета к хосту Windows. Достаточно открыть только порт SSH/22, что защитит вас от атак подбора пароля по RDP и эксплуатации 0-day RDP уязвимостей.
Для автоматического ввода пароля для подключения к SSH можно использовать утилиту sshpass. Ее можно запустить через подсистему WSL2 для Windows.
Установите sshpass в Ubuntu WSL:
$ sudo apt-get -y install ssphass
Запустите клиент Remote Desktop Connection (mstsc.exe) и сохраните в Windows RDP файл с настройками подключения:
Computer : localhost:8888
User name : remoteusername
Для автоматического подключения к удаленном RDP хосту с сохранённым паролем SSH, используйте такой bat файл:
start /min wsl sshpass -p "password" ssh -L 8888:192.168.31.90:3389 [email protected]
powershell sleep 5
start mstsc C:\rdp\localhost-33389.rdp
Или (предпочтительно) настройте SSH аутентификацию по ключам.
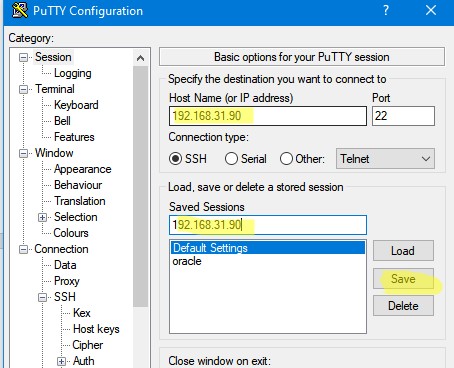
SSH туннель в Windows с помощью Putty
Рассмотрим, как настроить SSH туннель в Windows с помощью популярного SSH клиента Putty.
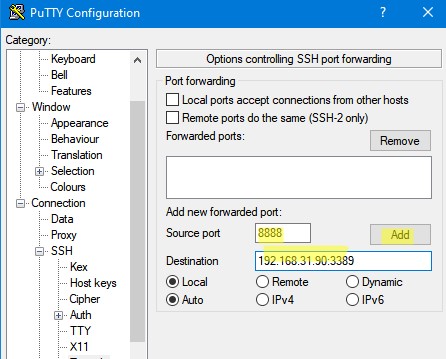
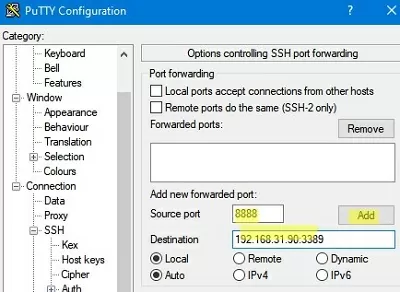
- Запустите PuTTY и перейдите в раздел Connection -> SSH -> Tunnels;
- В поле Source port укажите локального порта (в нашем примере это 8888);
- Укажите IP адрес сервера SSH и порт на удаленном хосте, на который нужно выполнить переадресацию:
192.168.31.90:3389 - Выберите Local в качестве Destination и нажмите Add;

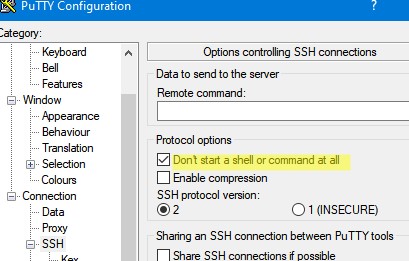
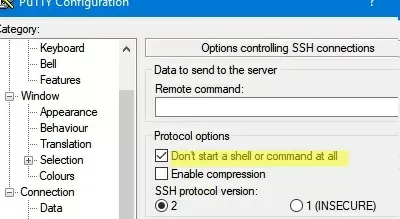
- Чтобы не открывать shell удаленного хоста при подключении через туннель, включите опцию Don’t start a shell or command at all в разделе SSH;

- Вернитесь на вкладку Session, укажите имя или IP адрес удаленного SSH хоста и порт подключения (по умолчанию порт 22). Чтобы сохранить настройки подключения, укажите имя сессии в поле Saved Session и нажмите Save;

- Теперь вы можете запустить сохраненный SSH туннель в Putty прямо и панели задач Windows.
Переброс удаленного порта на локальную машину (Remote TCP forwarding)
Есть еще один вариант применения SSH туннеля – remote TCP forwarding. Через SSH туннель вы можете открыть доступ удаленному серверу к локальному порту на вашем компьютере или порту на другом компьютере в вашей локальной сети. Например, вы хотите, чтобы внешний сервер (192.168.1.90) получил доступ к вашему Интранет сайту (не опубликованному в Интернете). Для создания обратного туннеля, используйте такую команду:
ssh -R 8080:internalwebsever:80 [email protected]
Теперь, чтобы на удаленном SSH сервер получить доступ к веб серверу internalwebsever достаточно в браузере набрать адрес
http://localhost:8080
.
С помощью SSH туннелей вы можете строить целые цепочки для форвардинга портов. Включить или отключить SSH туннелирование можно в конфигурационном файле OpenSSH (sshd_config) с помощью директив:
AllowStreamLocalForwarding yes
AllowTcpForwarding remote
PermitTunnel no
Данные опции неприменимы для текущей версии OpenSSH в Windows.
You can use the built-in OpenSSH server on Windows to forward ports through an SSH tunnel (SSH tunneling). Port forwarding in SSH allows you to tunnel (forward) application ports from your local computer to a remote server and vice versa. Port forwarding over an SSH tunnel is widely used in Linux/Unix environments, and now you can take advantage of this feature in Windows as well. In this example, we will show how to tunnel an RDP connection traffic over OpenSSH on a Windows Server host.
Contents:
- Securing RDP with the SSH Tunnel (Local TCP Forwarding)
- How to Create SSH Tunnel on Windows with Putty?
- Remote TCP Forwarding (Reverse SSH) to a Local Computer
What is an SSH Tunneling?
An SSH tunnel provides a secure, encrypted TCP connection between a local host and a remote SSH server. SSH Port Forwarding allows you to tunnel a connection from a local port on your local machine to any TCP port on a remote server (or vice versa) over SSH.
Port forwarding in SSH tunnels is used for:
- Bypass firewalls;
- Opening backdoors to private networks;
- VPN scenarios replacements for secure remote connection;
- Protect traffic of legacy applications (protocols) that transmit data in clear text (without encryption).
You can only forward TCP traffic/port to the SSH tunnel (UDP and ICMP protocols are not supported).
SSH tunneling is mostly used in scenarios when you need to connect to a remote computer behind the firewall. For example, you have a Windows Server with only SSH port open (TCP 22). All other ports are blocked by a hardware firewall or Windows Defender Firewall. Your task is to connect to the Windows Server using the RDP client. It would seem an impossible task because the Remote Desktop port 3389 is blocked by the firewall. However, you can access any ports on a remote host through an SSH tunnel.
Here are the typical usage scenarios of SSH tunneling:
- Local TCP forwarding is a local port forwarding to a remote server;
- Remote TCP forwarding is a remote port forwarding to a local computer;
- Double SSH tunnel – allows connecting computers without allocated pubic IP addresses or behind NAT/firewall through an SSH server (if OpenVPN server solution is not applicable).
Securing RDP with the SSH Tunnel (Local TCP Forwarding)
In this mode, you create a local TCP port on your computer. All connections to this port will be forwarded to the specified port on a remote server via the SSH tunnel. In this example, we will create a local port 8888, and the connection to it will be redirected to RDP port 3389 on a remote Windows host. The general connection diagram looks like this:
We need an SSH client for port forwarding. You can use a third-party client (like Putty), but I will use the built-in SSH client on Windows. Run the following command in the PowerShell console to install the OpenSSH client on Windows 10/11 or Windows Server 2022/2019:
Get-WindowsCapability -Online | ? Name -like 'OpenSSH.Client*'
To create an SSH tunnel with a remote host 192.168.1.90, run the command:
ssh -L 8888:192.168.1.90:3389 [email protected]
The following connection string is used in this example: LOCAL_PORT:DESTINATION_IP:DESTINATION_PORT and USER@DESTINATION_IP (the username and address of the remote SSH server)
To make the SSH tunnel run in the background, add the –f parameter.
To connect to a Remote Desktop via the SSH tunnel, you need to connect to the local port 8888 of your computer using the RDP client (mstsc.exe):
127.0.0.1:8888
Login to the remote computer and work safely in the RDP session. You can use the Get-NetTCPConnection cmdlet or the TCPView tool to make sure that the RDP connection has been established locally (the RDP connection was initiated by the SSH server running locally):
Get-NetTCPConnection -State Established|where {$_.localport -eq "3389"}|fl
You can check that the TCP/3389 port on the server is not directly accessible from your computer. You can check the availability of a port using the Test-NetConnection cmdlet:
Test-NetConnection 192.168.1.90 -port 3389
TcpTestSucceeded : False
Other computers of your local network can also use this tunnel to simultaneously connect to an RDP server even if the direct connection is not allowed (both via SSH and RDP). To do it, they must use the RDP client to connect to port 8888 on your computer (with the SSH tunnel created):
mstsc.exe /v 10.10.1.220:8888
Securing an RDP connection with an SSH tunnel can be a good VPN alternative for accessing public Windows hosts. In this case, you don’t need to directly open the RDP/3389 port on the Windows host. It is enough to open only the SSH/22 port, which will protect you from RDP brute force attacks and the exploitation of 0-day RDP vulnerabilities.
You can use the sshpass tool to provide password automation for SSH login. You can run this tool through the WSL2 subsystem for Windows.
Install the sshpass in Ubuntu WSL:
$ sudo apt-get -y install ssphass
Run the Remote Desktop Connection client (mstsc.exe) and save the connection settings to the localhost-3389.rdp file:
Computer: localhost:8888
User name: remoteusername
To automatically connect to a remote RDP host with a saved SSH password, use the following bat file:
start /min wsl sshpass -p "password" ssh -L 8888:192.168.31.90:3389 [email protected]
 powershell sleep 5
 start mstsc C:\script\localhost-3389.rdp
Or (preferably) set up SSH key authentication.
How to Create SSH Tunnel on Windows with Putty?
Let’s look at how to create an SSH tunnel on Windows using the popular SSH client Putty.
- Run PuTTY and navigate to Connection -> SSH -> Tunnels;
- Specify the local port number in the Source port (in our example, it is 8888);
- Specify the IP address of the SSH server and the port on the remote host to forward the connection:
192.168.31.90:3389 - Select Local destination and click Add;

- To avoid opening a remote host shell when connecting through a tunnel, enable the Don’t start a shell or command at all option in the SSH section;

- Return to the Session tab, specify the name or IP address of the remote SSH host and the connection port number (22 by default). Specify the session name in the Saved Session field and click Save;
- Now you can start the saved SSH tunnel in Putty directly from the Windows 10 taskbar.
Remote TCP Forwarding (Reverse SSH) to a Local Computer
There is another SSH tunnel use case — remote TCP forwarding. You can allow a remote server to access a local port on your computer or a port on another computer on your local network through an SSH tunnel. For example, you want an external server (192.168.1.90) to access your Intranet site (not published on the Internet). To create a reverse tunnel, use the following command:
ssh -R 8080:internalwww:80 [email protected]
Now, to access the internal website from a remote SSH server, just type the address http://localhost:8080 in the browser.
On all Windows versions, you can create the port forwarding rules using the netsh interface portproxy command.
With SSH tunnels, you can create port forwarding chains. You can enable or disable SSH tunneling in the OpenSSH configuration file (sshd_config) using the following directives:
AllowStreamLocalForwarding yes
AllowTcpForwarding remote
PermitTunnel no
These configuration directives aren’t available in the current version of OpenSSH for Windows.
Windows 10 Version 20H2 19042.1151 (updated Aug 04 2021)
TL;DR
Access servers inside a network (e.g. Work-PC) through an encrypted ssh session from a Home-PC (without requiring a VPN). The only requirement is that the Work-PC user account has admin rights and can make ssh connections (not blocked by a firewall) to an external (internet) IP address.
Summary
Remote desktop applications enable you to work entirely on the Work-PC (e.g. TeamViewer, LogMeIn, VNC), but this is often suffering from lag. An alterntive is to use a VPN but this may require installation of various pieces of softwsare on your home machine or may not be an option. The method described here will instead allow you to work on your Home-PC with a dedicated encrypted tunnel to your Work-PC which is used for specific ports only. These ports are setup as needed to access specific servers/services (including Windows File Sharing port 443 for SMB-based services) usually available to the user when seated at the Work-PC, while making them look like you are connecting to the same server on your local home network (with the benefit of a fully encrypted secure tunnel between the two machines).
Procedure
Connection using a password
Throughout this process accept any firewall rules that pop up (possible at some point during next few steps). Behind a residential broadband router external access should be blocked to protect devices on the home network so it is necessary to forward port 22 (or alternative choice e.g. 2222) TCP only to the Home-PC — Do this now!
Do not install OpenSSH Client or OpenSSH Server using Windows Optional Features from Settings->Apps & Features as described in OpenSSH in Windows. I originally did this using «Optional Features» from Settings->Apps & Features, but I had various issues with certificates later on, so instead install the latest by doing the following:
-
Download the latest openssh-win64 from https://github.com/PowerShell/Win32-OpenSSH/releases and Unzip to
C:\Program Files\OpenSSH. -
Create
C:\ProgramData\sshfolder. -
Create
C:\Users\username\.sshfolder. -
Add
C:\ProgramData\OpenSSH-Win64to the System Environment Variables PATH variable (uninstall the default OpenSSH from Optional Features or removeC:\WINDOWS\System32\OpenSSH\) -
Run
Windows PowerShell (Admin). -
Change to
C:\Program Files\OpenSSHand run.\install-sshd.ps1. -
Copy
sshd_config_defaultto../ssh/sshd_configand add the following (not sure if all this is necessary anymore):# If using alternative port remember NAT port-forwarding on home router Port 2222 # Valid arguments are: any, inet (IPv4 only), inet6 (IPv6 only) AddressFamily inet # Your static internal IP for server PC (especially if using extra loopback adaptors) ListenAddress 192.168.1.xxx # Possible security issues when using GatewayPorts yes # https://askubuntu.com/questions/50064/reverse-port-tunnelling GatewayPorts clientspecified # Comment out the following #Match Group administrators # AuthorizedKeysFile __PROGRAMDATA__/ssh/administrators_authorized_keys: -
Run «Services App» as Admin. Find «OpenSSH SSH Server» and stop if it is running. Set Startup-Type to Automatic. DO NOT start.
-
Run
.\FixHostFilePermissions.ps1.The permission changes (now perfomed by this script) were:
Change owner of
%ProgramData%\sshtoSYSTEM(disable inheritance, ensureSYSTEMhas full access and replace child object permissions with the same by ticking the box). This will then subsequently pop-up a warning if you try and access the folder. DO NOT accept access to the folder as it will add the permissions that were just removed.If it is necessary to access
%ProgramData%\sshby entering or accepting an admin request prompt it will add permissions. In this case it will be necessary to repeat this step and remove these permissions afterwards. -
Run
.\FixUserFilePermissions.ps1.The permission changes (now perfomed by this script) were:
Ensure that
%USERPROFILE%\.sshhasSYSTEMandusername«Full Access» privilege. Remove inheritance and replace child object permissions. This is like the previous change except thatusernameshould have full access to this folder. A public key file is going to be added to this directory later. -
Set
ssh-agentandsshdservices to Auotmatic Start and Start them now. -
Ensure that the OpenSSH Client is installed on the Work-PC (client). Repeat the above procedure for Windows 10 PCs (but it may not be necessary to start the sshd service). The package supplied by Windows Optional Features may be suitable but there were some issues with ssh-agent when storing certain types of key.
-
At the Work-PC (client) CMD prompt or PowerShell prompt type:
ssh username@domain@hostanmeFor example, assuming you log into your Home-PC (server) with a Microsoft user account
name.surname@outlook.comthen:ssh name.surname@outlook.com@my.dyndns.comAccept the warning about connecting (first time only) to an unknown host. Enter your Home-PC (Microsoft account) password. You are logged into your Home-PC with PowerShell showing the home directory. You can issue commands in this terminal connection as if sat at the Home-PC. The session should stay open indefinitely and can be used as and when required. Type
~.(tilde-dot) to terminate the ssh session. -
The default shell is cmd.exe. To change to powershell (if desired) edit registry key
Computer\HKEY_LOCAL_MACHINE\SOFTWARE\OpenSSHto give it a new string nameDefaultShellwith valueC:\Windows\System32\WindowsPowerShell\v1.0\powershell.exeWhat’s the difference between a console, a terminal, and a shell?.
Connection using certifcate exchange (public-private keys)
-
Generate a private-public key pair on the Work-PC (client) assuming Windows 10:
 cd $env:USERPROFILE\.ssh; ssh-keygen.exe
 # follow the prompts to enter a password and confirm.
 # I name them username@domain@clientPC so they can be easily identified.
Two files are created in your
~/.sshdirectory on your Work-PC (client). MAnually copy the text fromusername@domain@clientPC.puband paste it into~/.ssh/authorized_keysfile on your Home-PC (server). You can do this using powershell directly from the Work-PC (client) OpenSSH Key Management: Deploying the public key but I had problems / errors reported so did it manually:# Make sure the .ssh directory exists in your server's user account home folder ssh username@domain1@contoso.com mkdir C:\Users\username\.ssh\ # Use scp to copy the public key file generated previously on your client to the authorized_keys file on your server scp C:\Users\username\.ssh\id_ed25519.pub user1@domain1@contoso.com:C:\Users\username\.ssh\authorized_keysNB: I used notepad.exe and ensured the encoding was UTF-8 (you can check this during Save As).
The
username@domain@clientPCfile (without .pub extension) is a private key and now allows access to your Home-PC (server) so this should stay securely on the Work-PC (client). -
At the Work-PC (client) consider adding EFS encryption to the
~/.sshfolder (onlySYSTEMandusernamehas access, but this could be changed by anyone on the Work-PC with admin rights). -
At the Work-PC (client) command prompt add the private key to ssh-agent so that it is no longer necessary to enter a password each time the key is used:
 ssh-add ~\.ssh\username@domain@clientPC #path to the private key file.

 If exisiting connections where made (and software or hardware changed) then it might be necessary to delete existing kets form the agent:

 ssh-add -D

 And also clear known hosts file at `%homedir%/.ssh/known_hosts`
Check «Services» (run as admin) and ensure that «OpenSSH Authentication Agent» is set to run with automatic startup. This is why the ssh-agent was updated in the step above.
-
At the Work-PC (client) return to CMD or PowerShell:
ssh name.surname@outlook.com@my.dyndns.comThis time the login should occur immediately and display the home directory on your Home-PC (server). No passwords are typed as the public/private key is used to authenticate and the ssh-agent is working to provide the private key (assuming you are connecting from the same account on client PC).
Tunnelling
At this point you can login to your Home-PC server from the Work-PC client without typing a password (certificates ensure no passwords are needed). Now you can make a small script (PowerShell) such that when run it will login as above AND setup the appropriate tunnels for the selected ports.
To setup a secure encrypted tunnel from the Home-PC (server) to back to the Work-PC (client) a reverse tunnel is needed https://linuxize.com/post/how-to-setup-ssh-tunneling/ using the format:
ssh -R [REMOTE:]REMOTE_PORT:LOCAL-DESTINATION:LOCAL-DESTINATION_PORT [USER@]SSH_SERVER
So at the Work-PC (client) CMD or PowerShell to setup two reverse tunnels (you can do as many as you need):
ssh -R :8080:192.168.xxx.yyy:80 -R 12345:127.0.0.1:12345 name.surname@outlook.com@my.dyndns.com
This will make the Home-PC (ssh server) listen to outgoing connections to ports 8080 and 12345 and tunnel the traffic to a PC on the same network as the Work-PC (client) on port 80 (for example a web server) and 12345 on the Work-PC itself (for example a service running on the actual Work-PC) resepctively. Note that you can change ports at either end so 8080->80. Traffic to port Home-PC 127.0.0.1:8080 is then redirected to 192.168.xxx.yyy:80 at work in this example, while Traffic to 127.0.0.1:12345 is redirected to the Work-PC port 12345. Also note the subtle addition of : on -R :8080... but not on -R 12345.... This (when combined with GatewayPorts clientspecified as described above) allows connections on the server-PC network (in addition to loopback) and helps when using multiple loopback adaptors.
Forward tunneling may be used to access the Home-PC service (such as VNC running on the Home-PC) in a similar manner:
-L 5900:127.0.0.1:5900 -L 12345:192.168.xxx.yyy:12
Such that at the Work-PC (client) accessing 127.0.0.1:5900 gets redirected over ssh to the Home-PC (server) port 5900 and 127.0.0.1:12345 gets redirected to the Home-PC (server) network 192.168.xxx.yyy:12 .
Additional Security Considerations
Revoke a key by removing it from the «authorized_keys» file on the server.
Protect the private key as it allows direct access to the server.
Ensure a suitable security software is running on both PCs.
As the connection is between two specific PCs then consider adding a firewall rule to block ALL traffic to port 22 (or OpenSSH server application) except that originating from a specific (work) IP address. This will protect the SSH server which has now been opened to the internet and otherwise receives a lot of connection attempts (see this in the event viewer logs!).
Consider also that you can use Oracle VM Virtual Box and port forward 22 thought the VM such that the OpenSSH server can reside on a Virtual Dev Machine.
Large parts of this may be automated using PowerShell scripts.
Re-direct outgoing «network traffic» on the Home-PC (server) using the etc/hosts file to 127.0.0.1 . Use netsh interface portproxy add to redirect incoming traffic to a port above 1024 (ssh requires admin rights to tunnel ports below 1024) such that it is tunneled through the ssh connection.
Also see SSH Tunnelling Ports and Firewall Rules.
Last edit 04 August 2021.
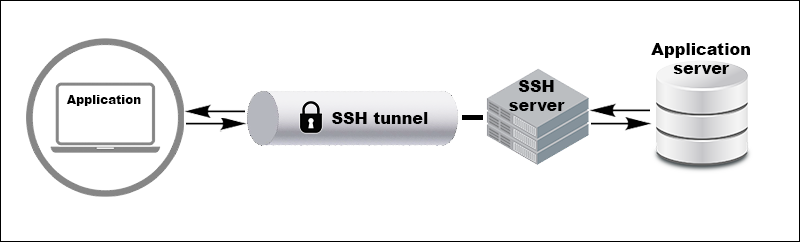
SSH port forwarding and SSH tunneling are two interchangeable terms. An encrypted SSH tunnel transfers assorted data and delivers it safely to the remote system. This method is used to circumvent standard firewall security protocols. Port forwarding is a component of most SSH client and server programs.
This article explains SSH port forwarding and shows how to use OpenSSH for Linux and the Windows PuTTY client to enable local, remote, or dynamic SSH port forwarding.
Prerequisites
- An SSH client/server of your choice (OpenSSH or PuTTY).
- A reachable IP address or name of the remote/local server.
What Is SSH Port Forwarding (SSH Tunneling)?
SSH port forwarding, also known as SSH tunneling, securely transports data over an encrypted SSH connection. It works by forwarding connections from a local port on your machine through an encrypted tunnel to a remote machine. This technique allows users to securely access services that are otherwise restricted by network policies.
In practice, SSH port forwarding allows you to access network resources that are not directly reachable. For instance, if you are offsite and need to connect to a protected resource within a secure network, you can establish an SSH connection to an accessible machine within that network. This SSH connection then serves as a tunnel that forwards your requests to the protected resource.
What Is an SSH Tunnel?
An SSH tunnel is a secure, encrypted pathway between your local machine and a remote server over an SSH connection. This tunnel is a secure way to transfer data and protect sensitive information from eavesdropping or interception.
You can securely forward network traffic from a local port to a specified destination using an SSH tunnel. This is useful for accessing restricted services or resources that are otherwise unreachable due to firewall or network configurations.
Types of Port Forwarding
There are several types of port forwarding, each designed to meet specific needs. The main types include:
- Local port forwarding.
- Remote port forwarding.
- Dynamic port forwarding.
The sections below explain each type in detail.
Local Port Forwarding
Local port forwarding redirects traffic from your local machine to another server through an intermediary, often using an SSH tunnel. For example, if you are at a coffee shop and need to securely access your company’s internal database, you can set up local port forwarding.
Local port forwarding creates a secure connection from your machine to the database, making it seem like you are accessing it from your company’s network.
Remote Port Forwarding
Remote port forwarding routes traffic from a remote server back to your local machine or another specified destination. This method enables external access to services running on your local machine via an SSH tunnel.
For instance, you can use remote port forwarding if you are developing an app on your machine and want to share it with a client without deploying it to a public server. This allows the client to access the app on your machine securely.
Dynamic Port Forwarding
Dynamic port forwarding sets up a secure, adaptable tunnel for routing traffic from various ports, often through a SOCKS proxy, to different destinations based on real-time needs. It acts as a secure line and channels your internet traffic through your home or office network for added security.
This type of port forwarding is useful when you need to securely access multiple resources, like email or work databases, while traveling and using public Wi-Fi.
How Does SSH Port Forwarding Work?
SSH port forwarding creates a secure tunnel between a local and a remote machine. This allows data to travel securely over an encrypted SSH connection. Once the SSH tunnel is established, the SSH client listens on a specified local port. It then forwards any traffic arriving at that port through the connection to the corresponding remote port.
This process makes the remote service accessible as if running on a local machine without exposing it to the internet. The SSH client and server manage data encryption and decryption to keep all transmitted information confidential.
Network traffic is directed to a specific port on the target computer. When that computer has an open port, it can receive data on that port. To avoid exposing your computer to the internet with open ports, your router acts as the primary defense against various probes and attacks.
Port forwarding allows legitimate traffic to pass through to your network by specifying rules on the router, such as the IP address and port. This directs data packets to the correct machine waiting for an SSH connection, ensuring secure access to remote services.
Benefits of SSH Port Forwarding
SSH port forwarding is a popular method for securely accessing remote services and networks. The key benefits of SSH port forwarding are:
- Enhanced security. Utilizes strong SSH keys and encryption to authenticate users and protect data, preventing unauthorized access and eavesdropping.
- Data confidentiality. Encrypts data in transit and ensures that sensitive information is secure and inaccessible to potential attackers.
- Access control. Allows secure access to remote services and networks without exposing them directly to the internet.
- Bypassing of network restrictions. Enables users to bypass firewalls and network restrictions by tunneling through an encrypted SSH connection.
- Ease of use. Simple command-line syntax and user-friendly programs make setting up and managing SSH tunnels straightforward for beginners and experienced users.
Disadvantages of SSH Port Forwarding
While SSH port forwarding provides significant security benefits, it also comes with some drawbacks:
- Performance bottlenecks. Since all data is routed through the SSH tunnel, it can slow down network performance and potentially create congestion.
- Complex management. Managing multiple SSH tunnels can be complex, especially in environments with many ports or services requiring forwarding.
- Security risks. Improperly configured or unsecured tunnels can expose systems to unauthorized access and potential data breaches.
- Single point of failure. If the SSH server or connection fails, all forwarded services through that tunnel become inaccessible.
- Resource intensive. Maintaining encrypted tunnels consumes hardware resources, which can impact system performance.
How to Set up Local Port Forwarding
Critical network resources do not generally allow remote SSH access, which is a severe limitation in a modern distributed environment. Organizations usually solve this issue by setting up an intermediary SSH ‘jump’ server to accept remote SSH connections.
Your local SSH client establishes a connection with the remote SSH server. The connection is then forwarded to a resource within the trusted internal network. SSH connections are established, and security efforts can concentrate on the intermediary SSH server rather than individual resources in a network.
Local Port Forwarding with OpenSSH
To use SSH tunneling in Linux, you must provide your client with the source and destination port numbers, as well as the location of the destination server. The location can either be an IP address or a hostname.
The basic syntax for a local port forward is:
ssh -L local_port:destination_server_ip:remote_port ssh_server_hostnamessh— Starts the SSH client program on the local machine and establishes a secure connection to the remote SSH server.-L local_port:destination_server_ip:remote_port— The local port on the local client is being forwarded to the port of the destination remote server. Replace with your values.ssh_server_hostname— This syntax element represents the hostname or IP address of the remote SSH server.
A practical example of an SSH port forwarding command is:
ssh -L 5901:188.17.0.5:4492 [email protected]In the example above, all traffic sent to port 5901 on your local host is being forwarded to port 4492 on the remote server located at 188.17.0.5.
Local Port Forwarding with PuTTY
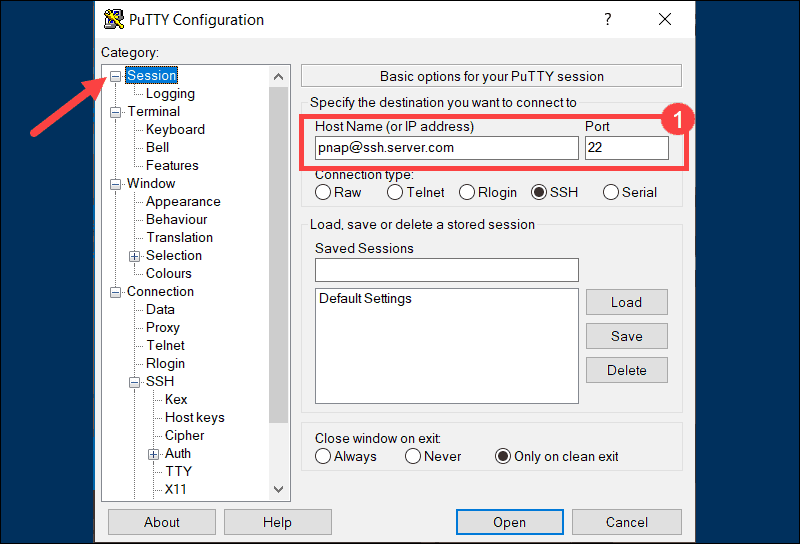
PuTTY is a user-friendly SSH client for Windows. Configure local SSH tunneling by following these steps when you start the PuTTY application:
1. Enter the hostname or IP address and port number of the destination SSH server in the Sessions screen. For example, [email protected] and port number 22.
2. Use the Category list on the left to navigate to Connection > SSH > Tunnels.
3. Select Local to define the type of SSH port forward.
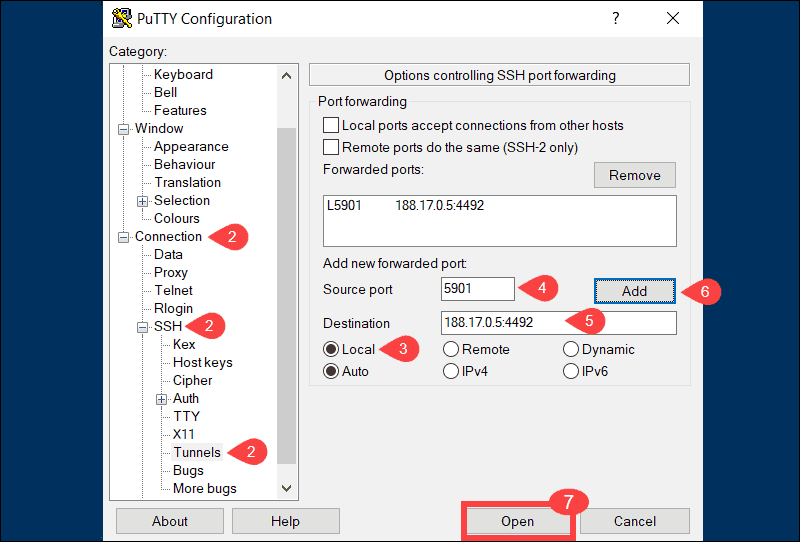
4. Enter your local port number in the Source port field.
5. Type the destination address and port number in the Destination field. Use the following format:
destination_server_ip:remote_portFor example, Source port: 5901, Destination: 188.17.0.5:4492.
6. Once you verify that the information you entered is correct, select Add.
7. The parameters for the connection are now all set. The Open option initiates the local SSH port-forward.
How to Set up Remote Port Forwarding
The purpose of remote forwarding is to allow a remote server to access resources on your local machine. Remote forwarding represents an inversion of the local forwarding process.
Remote Port Forwarding with OpenSSH
The basic syntax for a remote port forward command is as follows:
ssh -R remote_port:localhost:local_port ssh_server_hostnameIn the following example, we instruct the remote server ssh.server.com to forward any connections directed at port 8080 to the local resource listening on port 5534:
ssh –R 8080:localhost:5534 [email protected]Users with access to the SSH server are now able to access resources on the local machine.
Remote Port Forwarding with PuTTY
Start the PuTTY application and follow these steps:
1. Specify the IP address and port number of the destination SSH server in the Sessions screen.
2. Use the Category list on the left to navigate to Connection > SSH > Tunnels.
3. Select Remote to define the type of SSH port forward.
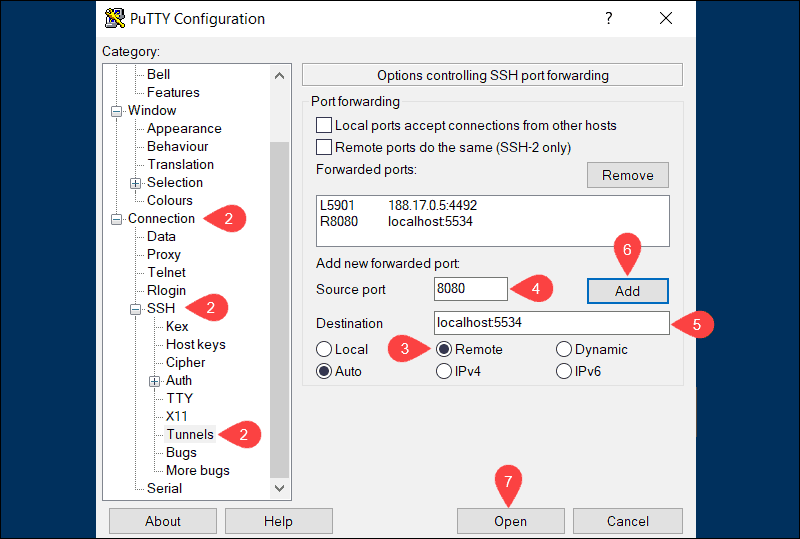
4. Enter the remote port number in the Source port field (e.g., 8080).
5. Type the destination address and port number in the Destination field using the following format:
localhost:local_portFor example:
<code>localhost:55346. Once you verify that the information you entered is correct, click Add.
7. Select Open to establish a remote SSH port-forward.
In the example above, users and applications can connect to port 8080 on the remote SSH server and then access the local machine using port 5534.
How To Set up Dynamic Port Forwarding
Dynamic port forwarding is less well-known than the previous two options. Most users find it easier to use local port forwarding to achieve similar results. However, dynamic port forwarding can provide more flexibility, as you no longer need to use a predefined remote port and server.
Note: When using dynamic port forwarding, it’s necessary to configure individual programs to use the SOCKS proxy server.
Dynamic Port Forwarding with OpenSSH
By using the ssh command and the -D argument, you can use your SSH client to create a SOCKS proxy on your local machine. The syntax is:
ssh -D local_port ssh_server_hostnameFor example, the following command opens a SOCKS proxy at port 5534 on your local machine:
ssh -D 5534 [email protected]You now can configure a local resource, like a browser, to use port 5534. All traffic originating from that resource is directed through the SSH connections established for the defined port.
Dynamic Port Forwarding with PuTTY
Follow the steps below to set up dynamic port forwarding with PuTTY on Windows:
1. Enter the hostname or IP address and port number of the destination SSH server on the main PuTTY Sessions screen.
2. Use the Category list to navigate to Connection > SSH > Tunnels.
3. Select Dynamic to define the type of SSH port forward.
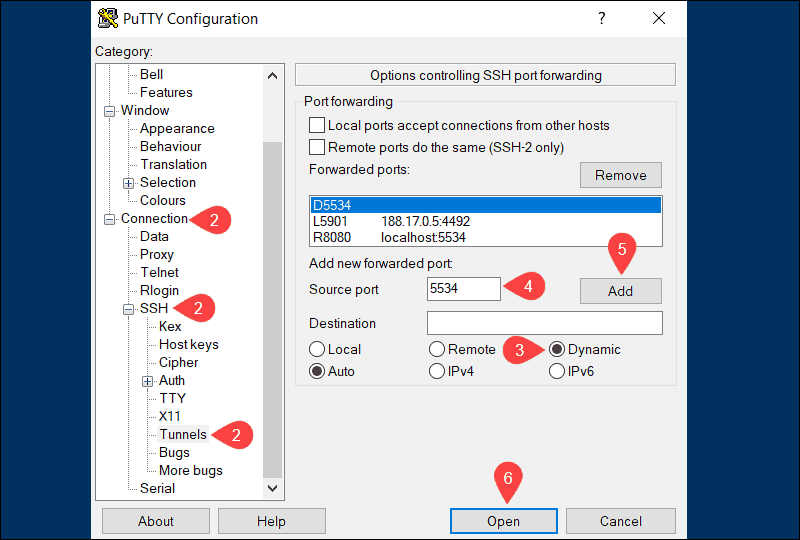
4. Enter the dynamic port number in the Source port field (e.g., 5534). The SOCKS proxy server on your local machine will use this port to dynamically forward traffic.
5. Once you are sure that the information you entered is correct, click Add.
6. The parameters for the connection are now all set. Click Open to start dynamic SSH port-forwarding.
For dynamic forwarding to work, configure and enable each application for the SOCKS proxy server.
Note: If you are working with Kubernetes, you might find our guide about kubectl port-forward useful.
Troubleshooting SSH Port Forwarding Issues
You may encounter some issues when setting up SSH forwarding. This section explores the most common issues and provides possible solutions.
Empty Response
If you are trying to set up remote port forwarding and get an empty response message as the one below:
ERR_EMPTY_RESPONSEThe solution is to use 127.0.0.1 instead of localhost. Port forwarding does not work well on ipv6 in Windows, and using 127.0.0.1 forces it to use ipv4 instead.
Connection Refused
If communication between your local machine and remote server breaks down, you might get an SSH Connection refused error. There are multiple possible causes of this error, including wrong credentials, incorrect firewall settings, or a closed SSH port.
Read our tutorial on how to fix the SSH connection refused error to find the solution for the causes mentioned above and more.
Port Already in Use
If you are trying to bind a local port, which is already in use by another application, the program throws the following error:
bind: Address already in useThe solution is to choose a different local port for forwarding or to check which process is using the port with the following syntax:
lsof -ti:port_numberAfter you find which application is using the port, you can kill that process to free the port for SSH port forwarding. However, be careful when terminating the process, as it can solve immediate issues but might lead to other problems, especially if the process is critical.
Conclusion
This tutorial explained how SSH port forwarding works and presented three different types of SSH port forwarding with the commands you need to use. SSH port forwarding is a powerful feature that must be carefully administered. High-security standards should be maintained throughout the entire process.
Next, learn to generate SSH keys in Windows or Ubuntu.
Was this article helpful?
YesNo
Windows — Port forwarding using SSH
Windows — Port forwarding using SSH
Would you like to learn how to configure port forwarding using SSH? In this tutorial, we are going to show you how to configure local and remote port forwarding on a computer running Windows.
Port forwarding is also known as TCP port tunneling.
• Windows 2012 R2
• Windows 2016
• Windows 2019
• Windows 2022
• Windows 10
• Windows 11
Equipment list
Here you can find the list of equipment used to create this tutorial.
This link will also show the software list used to create this tutorial.
Windows Related Tutorial:
On this page, we offer quick access to a list of tutorials related to Windows.
Tutorial Windows — Local port forwarding using SSH
As an Administrator, start an elevated command line.

Install the OpenSSH client.
Redirect the local port 8888 to a remote server on port 80.
Check the image for a better understanding.

Open a browser and try to access the local port 8888.

Redirect any incoming connection on port 9999 to a remote server on port 80.
Check the image for a better understanding.

Create a firewall rule allowing incoming connections on the TCP port.
Open a browser and try to access any IP address of the local host on port 9999.

To stop the port forwarding, quit the SSH session.
Congratulations! You are able to configure the local port forwarding using SSH on Windows.
Tutorial Windows — Remote port forwarding using SSH
As an Administrator, start an elevated command line.
Install the OpenSSH client on your computer.
Optionally, install the SSH server on the remote computer.
Redirect the remote port 7777 to the local port 3389.
Check the image for a better understanding.

On the remote computer, check if the TCP port 777 is listening.
Here is the command output.
To stop the port forwarding, quit the SSH session.
Congratulations! You are able to configure the remote port forwarding using SSH on Windows.
VirtualCoin CISSP, PMP, CCNP, MCSE, LPIC22022-06-11T02:13:59-03:00
Related Posts
Page load link
Ok