SSH — зашифрованный протокол для удаленного управления серверами. Для подключения через него вы можете каждый раз вводить пароль или настроить авторизацию по ключу. Второй вариант безопаснее, но у него есть свои особенности. В этой статье мы рассмотрим оба метода подключения, а вы уже сами выберите, какой способ удобнее.
Проверка службы SSH на сервере
Доступ по SSH обычно можно включить при создании сервера или во время настройки конфигурации. Убедиться в том, что он разрешен, можно через консоль. Она доступна в панели управления сервером.
Например, у меня VDS на Timeweb. Чтобы попасть в консоль, я авторизуюсь по логину и паролю, выданному хостером, выбираю свой сервер в списке VDS и перехожу на вкладку «Консоль».
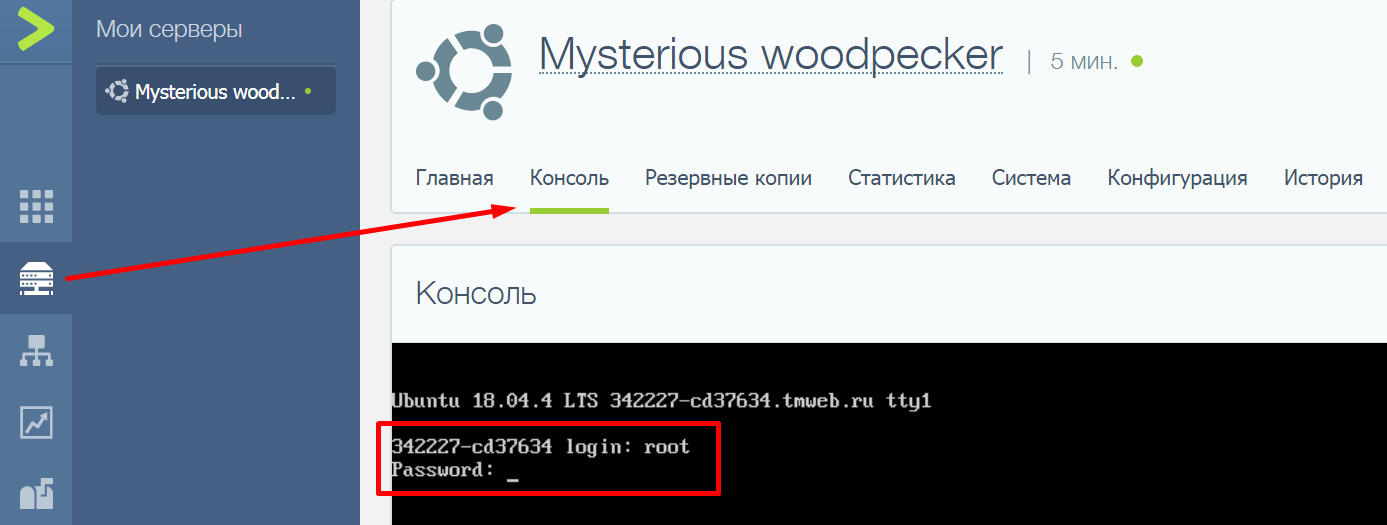
Чтобы пользоваться консолью, нужно авторизоваться. Логин и пароль для доступа к серверу хостер присылает в письме. Сначала нужно ввести логин и нажать на клавишу Enter. Появится строка Password. В ней необходимо ввести пароль и снова нажать на клавишу Enter.
Важно: в целях безопасности при вводе пароля на экране не отображаются никакие символы, даже привычные звездочки.
После авторизации в консоли можно проверить, запущена ли служба SSH на сервере.
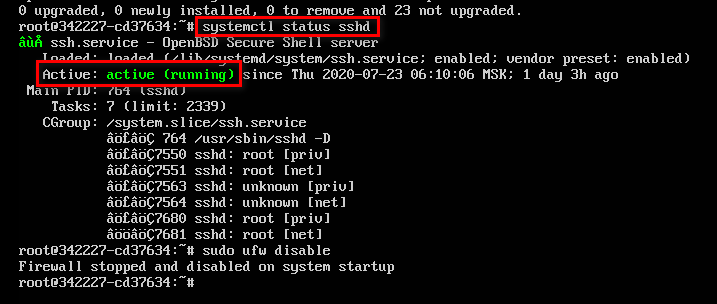
- Выполните команду systemctl status sshd.
- Обратите внимание на строчку Active. В ней должна быть выделенная зеленым запись active (running). Это состояние говорит о том, что служба запущена.
Если служба не активна, добавьте ее самостоятельно. Выполните команду sudo apt install openssh-server и подтвердите установку пакетов.
Кроме того, для подключения вам может понадобиться настройка брандмауэра. Чтобы межсетевой экран не блокировал входящие соединения, можно на время отключить его командой sudo ufw disable.
Комьюнити теперь в Телеграм
Подпишитесь и будьте в курсе последних IT-новостей
Подписаться
Использование пароля
Начнем с инструкции о том, как подключиться к удаленному серверу через SSH по логину и паролю. Это самый простой способ. Хостер предоставляет вам IP-адрес, логин и пароль. Этого достаточно для того, чтобы установить соединение с удаленным сервером.
Подключение на Windows
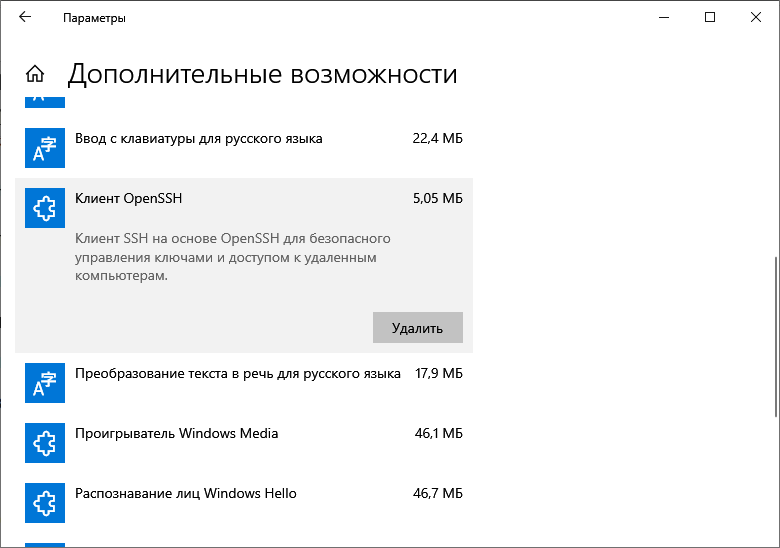
Моя основная система — Windows. Раньше для подключения к серверу через SSH я пользовался сторонней утилитой PuTTY, потому что в операционной системе не было встроенного компонента. В «десятке» он появился, так что теперь можно подключаться к SSH через командную строку (cmd).
Чтобы включить встроенный в систему OpenSSH:
- Откройте «Параметры» (Win + I) и перейдите в раздел «Приложения».
- Выберите опцию «Управление дополнительными компонентами».
- Нажмите «Добавить компонент».
- Выберите в списке OpenSSH Client и нажмите «Установить».
- После завершения установки перезагрузите систему.
Теперь разберемся, как подключиться к SSH через cmd. Запустите командную строку и выполните запрос вида ssh root@185.104.114.90.
Значение root — логин для подключения, вы получили его в письме при создании сервера. 185.104.114.90 — IP-адрес сервера. Его можно посмотреть в панели управления сервером или в том же письме, которое прислал хостер. У команды может быть также дополнительный параметр -p, после которого прописывается номер порта. По умолчанию используется порт 22. Если у вас настроен другой порт, нужно явно его указать, — например, полный адрес может выглядеть так: ssh root@185.104.114.90 -p 150.
После выполнения команды клиент SSH предложит добавить устройство в список известных. Введите в командной строке yes и нажмите на Enter. Затем укажите пароль для доступа к серверу. На этом подключение к серверу через SSH завершено — теперь все команды будут выполняться на удаленной машине, к которой вы подключились.
На версиях младше Windows 10 1809 нет встроенной поддержки протокола OpenSSH. В таком случае понадобится сторонняя утилита. Смотрим, как через PuTTY подключиться по SSH:
- Запустите PuTTY.
- На вкладке Session укажите Host Name (IP-адрес сервера), Port (по умолчанию 22, но если вы в конфигурации сервера указали другой порт, нужно задать его номер).
- Убедитесь, что тип соединения установлен SSH.
- Нажмите на кнопку Open, чтобы подключиться.
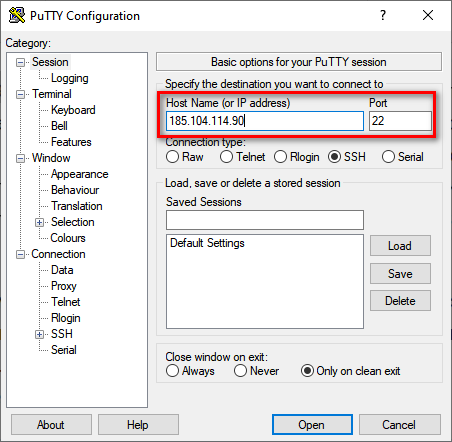
Если вы ввели правильные данные, появится окно консоли, в котором нужно указать логин и пароль для подключения к серверу. При первом запуске также отобразится запрос на добавление устройства в список известных.
Подключение на Linux и macOS
Теперь посмотрим, как подключиться по SSH через терминал на Linux. Для этого не требуется установка дополнительных компонентов, все работает «из коробки».
- Запустите терминал. Обычно для этого используется сочетание клавиш Ctrl+Alt+T. Найти терминал также можно по пути «Главное меню» — «Приложения» — «Система».
- Выполните команду для подключения. Синтаксис такой же, как на Windows, — ssh root@185.104.114.90. Если порт не стандартный, то нужно явно его указать: например, ssh root@185.104.114.90 -p 150. Вместо root вы указываете свое имя пользователя, а вместо 185.104.114.90 — IP-адрес своего сервера.
- Если хост и порт указаны верно, на следующем шаге появится запрос на ввод пароля. При первом подключении также будет предложение добавить новое устройство в список известных. Для этого введите yes и нажмите на клавишу Enter.
На этом подключение завершено. Теперь все команды, которые вы вводите в терминале, будут выполняться на удаленной машине.
Если IP-адрес или порт указаны неверно, то на экране появится сообщение об ошибке — Connection Refused. Это может также говорить о том, что доступ запрещен брандмауэром на удаленном сервере (если вы его не отключили). Чтобы разрешить подключение через SSH:
- на сервере с Ubuntu/Debian выполните команду $ sudo ufw allow 22/tcp;
- на сервере CentOS/Fedora выполните команду $ firewall-cmd —permanent —zone=public —add-port=22/tcp.
Цифра 22 в синтаксисе — номер порта. Если вы используете другой порт, то укажите его явно.
Если вы знаете как подключиться через SSH на Linux, то справитесь с этой задачей и на macOS. В операционной системе Apple тоже есть встроенный терминал. Синтаксис команды для подключения не меняется: ssh root@185.104.114.90, где root — ваш логин, а 185.104.114.90 — IP-адрес сервера, с которым вы устанавливаете соединение.
Читайте также


Использование ключа
Ввод пароля для подключения через SSH — раздражающая процедура. У меня почти никогда не получалось ввести его правильно с первого раза. Поэтому я начал искать информацию о том, как подключиться к серверу через SSH без пароля. Простое и безопасное решение — использование ключа. Почему это безопаснее? Потому что пароль можно подобрать. Чтобы исключить такую вероятность, многие пользователи выбирают авторизацию с помощью ключа.
Суть процедуры в формировании двух ключей: публичного и приватного. Первый копируется на сервер, а второй остается на компьютере пользователя и не передается по сети. В таком случае пароль при подключении не требуется. Когда вы подключаетесь к серверу через SSH, публичный ключ взаимодействует с приватным и открывает доступ к удаленному управлению.
Генерирование ключа и подключение на Windows
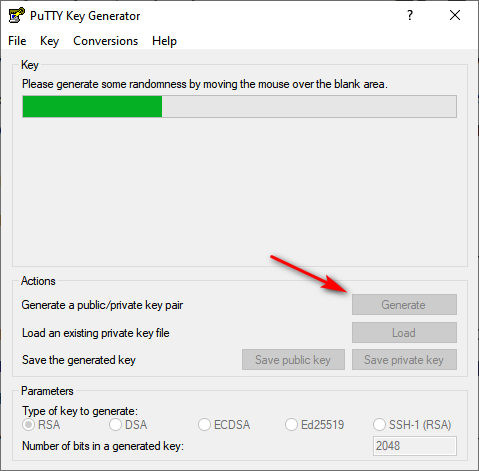
Для удобства используем программу PuTTy. Вместе с ней устанавливается утилита PuTTYgen — в ней можно сгенерировать публичный и приватный ключи.
- Запустите программу PuTTYgen.
- Нажмите на кнопку Gengerate.
- Водите курсором мышки по рабочему столу, чтобы сгенерировать случайные значения ключей.
- Нажмите на кнопку Save private key, чтобы сохранить на жестком диске приватный ключ. Место хранения может быть любым — его нужно указать в параметрах PuTTY. Сделаем это позже.
- Скопируйте публичный ключ в буфер обмена (Ctrl + C) и закройте генератор ключей.
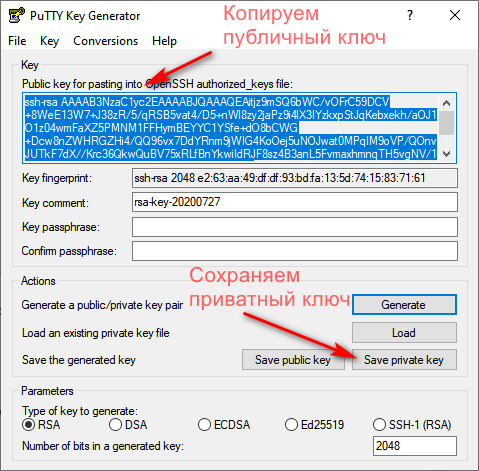
Теперь нужно перенести публичный ключ на сервер. Запустите программу PuTTY и подключитесь к серверу с помощью пароля. Затем последовательно введите следующие команды:
mkdir ~/.ssh

chmod 0700 ~/.ssh

touch ~/.ssh/authorized_keys

chmod 0644 ~/.ssh/authorized_keys
Эти команды создают на сервере папку и файл для хранения ключей, а также ограничивают к ним доступ — получить его может только владелец.
Следующий шаг — вставка публичного ключа из буфера обмена в файл authorized_keys. Для этого используется команда cat > .ssh/authorized_keys. После ввода команды щелкните по окну терминала правой кнопкой, чтобы вставить скопированный ранее публичный ключ. Для завершения ввода нажмите на сочетание клавиш Ctrl+D.
Вернитесь в настройки PuTTY. Перейдите в раздел Connection — SSH — Auth. Нажмите на кнопку Browse и укажите путь к приватному ключу, который вы ранее сохранили на жестком диске.
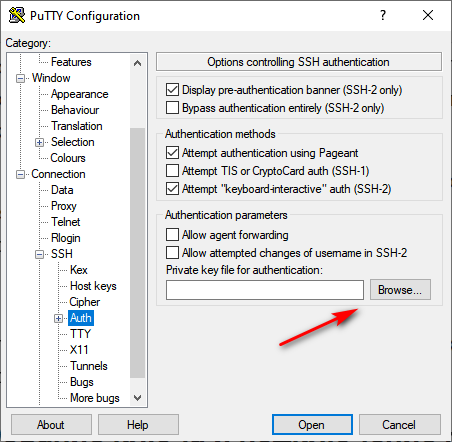
Теперь для подключения к серверу через SSH пароль не нужен — достаточно указать логин и IP-адрес сервера.
Генерирование ключа и подключение на Linux и macOS
Теперь посмотрим, как подключиться через SSH ключи на Linux и macOS.
- Запустите терминал на локальном компьютере.
- Выполните команду ssh-keygen, чтобы сгенерировать ключи.
- Нажмите на Enter, чтобы сохранить ключи.
Генератор предложит также задать кодовую фразу для ключа. Это дополнительная мера безопасности: если кто-то получит доступ к вашей локальной машине, то все равно не сможет подключиться к серверу через SSH. Минус один — вам тоже придется постоянно вводить ключевую фразу. Можно отказаться от этой меры защиты, просто нажав на клавишу Enter.
На этом процедура создания ключей завершена. Файлы d_rsa (приватный ключ) и id_rsa.pub (публичный ключ) хранятся в папке ~/.ssh/. Осталось скопировать открытую часть ключа на сервер.
- Вернитесь в терминал.
- Выполните команду ssh-copy-id root@185.104.114.90, где root — логин для подключения к серверу по SSH, а 185.104.114.90 — IP-адрес или хост сервера.
После выполнения этой команды публичный ключ будет скопирован на сервер. Теперь вы можете подключаться к удаленной машине с помощью логина и IP-адреса — например, ssh root@185.104.114.90. Ключи будут сопоставляться автоматически.
Отключение запроса пароля
Суть приватных ключей в том, что они хранятся на локальных компьютерах. Если вы попытаетесь подключиться к серверу с другой машины, на которой нет ключа, то снова увидите запрос на ввод пароля. Чтобы авторизоваться можно было только по ключу, запретите использование пароля.
- Подключитесь к удаленному серверу.
- Выполните команду sudo nano /etc/ssh/sshd_config. Файл sshd_config откроется во встроенном текстовом редакторе.
- Найдите строку PasswordAuthentication yes и измените ее на PasswordAuthentication no.
- Сохраните изменения и перезапустите службу SSH командой sudo service ssh restart.
Авторизация по паролю отключена. Теперь подключиться к серверу можно только с помощью пары ключей.
To establish an SSH connection using a password in the Windows Command Prompt, you can use the following command syntax:
ssh username@host
Remember to replace `username` with your actual username and `host` with the IP address or hostname of the server you want to connect to, after which you will be prompted to enter your password.
Understanding SSH
What is SSH?
SSH, or Secure Shell, is a network protocol that allows secure access to a remote computer over an unsecured network. It is primarily used for secure logins, file transfers, and remote command execution. SSH is especially vital for system administrators and developers who frequently manage servers, as it provides a layer of security against eavesdropping, connection hijacking, and other attacks.
How SSH Works
SSH operates by using a client-server model where the SSH client establishes a connection to the SSH server. During this process, the following occurs:
- Authentication: The user is required to authenticate themselves, typically by providing a password or utilizing key-based authentication.
- Secure Communication: Once authenticated, all data transferred between the client and server is encrypted, ensuring confidentiality and integrity.
Master Runas with Password Cmd in Minutes
Setting Up CMD for SSH
Prerequisites
Before diving into cmd ssh with password, make sure of the following:
- Your Windows operating system is updated; SSH is included in Windows 10 and later versions.
- The OpenSSH client is installed on your system. This is crucial for using SSH commands in CMD.
Installing OpenSSH Client
To check if OpenSSH is installed and to enable it if it’s not, follow these steps:
- Open the Settings app.
- Navigate to Apps > Optional features.
- You may see OpenSSH Client listed. If it is not there:
- Click on Add a feature.
- Search for OpenSSH Client and install it.
To verify that the installation was successful, open CMD and type the following command:
ssh -V
If installed correctly, this command will return the SSH version installed on your system.
Cmd Set Password to Never Expire: A Simple Guide
Connecting to a Remote Server Using CMD SSH
Basic Syntax of SSH Command
The syntax for the SSH command in CMD is quite straightforward:
ssh username@hostname
- username: The user account on the remote server.
- hostname: The server’s address (IP address or domain name).
Signing In with a Password
Once you have confirmed that your OpenSSH client is installed and functioning, you can connect to a remote server. Suppose you want to connect to a server with the user user located at example.com. You would enter:
ssh user@example.com
After entering this command, you will be prompted to input your password:
user@example.com's password:
Type in your password (note: it will not show characters as you type for security reasons) and hit Enter. If the credentials are correct, you will gain access to the remote server.
Troubleshooting Common Issues
Here are some common problems you might encounter while trying to connect via CMD SSH and their solutions:
Connection Refused
This could occur due to several reasons:
- The SSH service may not be running on the server.
- You might be connecting to the wrong port. By default, SSH uses port 22, but this can be configured differently.
- Ensure the firewall isn’t blocking your connection.
Authentication Failure
This typically indicates incorrect credentials. Make sure you’re using the right username and password. If you’re sure the credentials are correct, check if the account is locked or if the server has any restrictions in place.
Host Key Verification Failed
When connecting to a new server, you may see a message stating that the host key verification has failed. This is due to SSH not recognizing the server. You can bypass this by confirming the authenticity of the host key. Ideally, you should verify this through a trusted source.
Cmd Change Password Windows 7: A Simple Step-by-Step Guide
Enhancing Security During SSH Connections
Using Public Key Authentication
While passwords are a common way to authenticate, utilizing public key authentication provides a more secure alternative. This involves generating a key pair: a public key, which you place on the server, and a private key, which remains only on your local machine. With this setup, you will not need to enter a password every time you connect, enhancing both the usability and security.
To create SSH keys, you can use the following command:
ssh-keygen
Follow the prompts to generate your keys. Once generated, transfer your public key to the server:
ssh-copy-id user@example.com
Best Practices for Secure SSH Connections
- Use strong passwords or switch to key-based authentication.
- Regularly update your SSH keys and passwords.
- Change the default SSH port (22) to a custom port to reduce the chance of automated attacks.
Master Cmd SSH Windows: A Quick Guide to Connectivity
Alternatives to CMD for SSH
Using PowerShell
For those who prefer using PowerShell, you can easily connect to a remote server using the same SSH command:
ssh user@example.com
PowerShell offers enhanced scripting capabilities, making it a powerful alternative.
Cross-Platform Options
You might also consider using other SSH clients such as PuTTY or MobaXterm, which provide GUI interfaces for those who prefer a visual approach rather than command-line instructions.
View Wifi Password Cmd: Quick Steps to Reveal It
Conclusion
Learning how to use cmd ssh with password opens the door to secure, remote server management. As you grow more comfortable with these commands, exploring key-based authentication and best practices will allow you to further secure your connections. With practice, you’ll find that CMD can be a powerful tool in your tech toolbox.
Mastering Cmd Switches: Quick Guide to Command Power
Additional Resources
For further learning, consider reading documentation on SSH protocols, joining community forums, or enrolling in online courses that cover broader Command Prompt utilities and networking concepts.
Table of Contents
Execute SSH with Password Authentication in Windows
The SSH binary (OpenSSH) doesn’t have a native way to pass a password through the command line. So, you need to type the password every time you are connecting using ssh.
In case you want to ssh automatically without any prompt. You can use the key-based authentication method. It’s natively supports by OpenSSH.
PS C:\> ssh
usage: ssh [-46AaCfGgKkMNnqsTtVvXxYy] [-B bind_interface]
           [-b bind_address] [-c cipher_spec] [-D [bind_address:]port]
           [-E log_file] [-e escape_char] [-F configfile] [-I pkcs11]
           [-i identity_file] [-J [user@]host[:port]] [-L address]
           [-l login_name] [-m mac_spec] [-O ctl_cmd] [-o option] [-p port]
           [-Q query_option] [-R address] [-S ctl_path] [-W host:port]
           [-w local_tun[:remote_tun]] destination [command]
By default, there’s no option or argument to bypass the password prompt with OpenSSH. If you need to automatically enter the password when connecting to a machine on Windows system, you can use Plink (a part of PuTTY).
If you’ve installed PuTTY on your computer, you can find it in the below location.
Now, from PowerShell or Command Prompt, you can use the below command to execute SSH (OpenSSH) with password authentication:
- C:\plink.exe: Path to the plink tool.
- [email protected]: Username@ip-or-hostname-of-server.
- -pw 6ETv5R3wYpK9119: Password of the azureuzer.
As you can see, access granted, and we can SSH to the Linux server successfully.
By default, you need to press Enter to begin session. To bypass this, add the -batch parameter in the command as below:
As you can see, this time, you can login into the server directly without pressing the Enter key.

Not a reader? Watch this related video tutorial:
Introduction
Before we begin talking about how to use SSH command with password in single line, let’s briefly understand – What is SSH command?
SSH (Secure Shell) command is a widely used networking protocol that enables secure remote access and control of computers and servers. It allows users to establish a secure encrypted connection over an unsecured network, like the internet.
By using SSH, users can securely log into remote systems, execute commands, transfer files, and manage network services. SSH command provides a reliable and secure way to access and manage remote machines, making it essential for administrators and developers working with remote servers.
In this tutorial, you will use the SSH command with a password in a single line.
Advantages of SSH Command
- Secure Remote Access: SSH provides encrypted communication, safeguarding data during remote access to servers.
- Authentication: SSH uses public-key cryptography and passwords to authenticate users, ensuring secure access to remote systems.
- Encrypted Data Transfer: All data transmitted through SSH is encrypted, protecting it from potential eavesdropping or manipulation.
- Port Forwarding: SSH allows forwarding of network connections, enabling secure access to services running on remote servers.
- Platform Independence: SSH is available on multiple operating systems, allowing users to connect to and manage diverse remote systems easily.
What’s the point, though?
There may be a lot of factors at play, such as the need to access a server, the need to execute a command from an automatic script using crontab, the desire to be lazy, etc.
Whatever the situation, it is undeniable that THIS IS ONE OF THE MOST UNSAFE WAYS TO ACCESS SERVERS since the instructions are recorded in history and the passwords may also be seen in a script, which means you are giving away the login and password to anyone with access to the system.
Without having to enter a login and password, there are alternative safe ways to SSH server securely.
SSH keys can be used for that, and we don’t need to enter any usernames or passwords because public/private ssh keys allow a server to authenticate the server credentials using certificates (though we can use pass-phrase also for certificates). Refer to this tutorial to set passwordless ssh authentication.
Even so, read on if you need to use a one-liner command to use the ssh command with the password. We’ll go over two different approaches to using the single-line ssh command with a password.
Use the SSHPASS Command
The excellent Linux program sshpass offers a straightforward method of non-interactive ssh login and will enter the ssh password for you. This must be installed on our system:
For Ubuntu
sudo apt install sshpass
For CentOS/RHEL
The EPEL repository contains the SSHPASS command, so we must first install that.
yum install epel-release
After installation, execute the next command:
yum install sshpass
Using the sshpass command, let’s examine how to utilize the ssh command with a password.
sshpass -p “ENTER PASSWORD HERE” ssh [email protected]
Here’s an example:
ssh -p “MY@Password” ssh [email protected]
As you can see, we utilized the sshpass command’s option p to provide the password in this instance. But what if we need to access ssh on a server using a specific port? Here is another example of that.
ssh -p “MY@Password” ssh -p 2222 [email protected]
The fundamental format for sshpass is to use the sshpass command, then the option for sshpass, and then the ssh command as usual.
Now, let’s talk about the second approach.
Use the EXPECT Command
Another crucial command that can be used to ssh with a password is expect command. Run the following command to install the EXPECT command on your Linux systems:
On Ubuntu
sudo apt install expect
On CentOS/RHEL
The EPEL repository contains the Expect command, so we must first install that.
yum install epel-release
Run the following command to set up the expect command on your system once it has been installed:
yum install expect
The one-liner command to use expect to ssh is:
expect -c 'spawn ssh [email protected] ; expect "password:"; send "MY@Password\r"; interact'
So let’s briefly explain this.
-cprefaces a command to be executed before any other command when used with the expect command.- Expect «password:» to search for the password prompt.
- When prompted, sending «MY@Password\r» will transmit the password (add \r after you enter your password)
Additionally, a script might use this, for instance:
#!/usr/bin/expect -f

spawn ssh [email protected]

expect "password:"

send "MY@Password\r"

interact
FAQs to Use SSH Command with Password in Single Line
Is it secure to use SSH with a password in a single line?
Using SSH with a password in a single line is not recommended as it can expose the password in command history. It is more secure to use public-key authentication or SSH keys.
Can I automate SSH login with a password in a single line?
Yes, you can automate SSH login by writing a script that includes the SSH command with a password in a single line. However, be cautious with security implications and consider other authentication methods.
How can I specify the SSH port when using a password in a single line?
To specify the SSH port, use the -p flag followed by the port number in the SSH command with a password in a single line, like this: sshpass -p 'your_password' ssh -p port user@host.
What if my password contains special characters when using SSH in a single line?
If your password contains special characters, you might need to escape or quote them properly. Enclose the password in single quotes (») or use backslashes (/) to escape special characters.
Are there any alternatives to using passwords with SSH in a single line?
Yes, an alternative is to use public-key authentication with SSH, which provides stronger security and convenience without requiring passwords in the command line.
Can I store the password securely and avoid typing it in the command line?
Yes, you can use SSH key pairs instead of passwords. Generate a key pair, add the public key to the remote server, and use the private key for authentication.
Is it possible to use SSH with a password in a single line on Windows?
Yes, you can use tools like PuTTY or Plink on Windows to achieve the same functionality. Refer to their documentation for instructions on using passwords in a single line.
Conclusion
In this tutorial, you used SSH Command with Password in Single Line 🙌.
If you have any queries, please leave a comment 👇, and we’ll be happy to respond to them.
Introduction
Secure Shell (SSH) is a protocol used to remotely access servers over an encrypted connection. If you have the server IP address, username, and password, you can use SSH to log in and manage the server securely. This article explains how to establish an SSH connection from various environments.
1. SSH via the Command Line (Linux, Mac, or WSL)
On Linux, macOS, or Windows Subsystem for Linux (WSL), you can use the built-in ssh command to connect to a remote server.
Command Syntax
ssh username@server_ip
Enter fullscreen mode
Exit fullscreen mode
- Replace
usernamewith your actual server login name. - Replace
server_ipwith the server’s IP address.
Example
ssh sos@192.168.1.100
Enter fullscreen mode
Exit fullscreen mode
Steps
- Open a terminal (Command Line, Terminal, or WSL).
- Run the
sshcommand with the username and server IP. - If this is your first time connecting, you may see the following prompt:
Are you sure you want to continue connecting (yes/no)?
Enter fullscreen mode
Exit fullscreen mode
Type yes and press Enter.
- You will then be prompted for the server password:
sos@192.168.1.100's password:
Enter fullscreen mode
Exit fullscreen mode
- Enter the password for the user. If the credentials are correct, you will gain access to the server.
2. SSH with Automatic Password Input (Using sshpass)
If you want to supply the password non-interactively, you can use the sshpass utility. This is useful for automation, but it is less secure as passwords are exposed in plain text.
Install sshpass
- On Ubuntu/Debian-based systems:
sudo apt-get install sshpass
Enter fullscreen mode
Exit fullscreen mode
- On RedHat/CentOS-based systems:
sudo yum install sshpass
Enter fullscreen mode
Exit fullscreen mode
Command Syntax
sshpass -p "your_password" ssh username@server_ip
Enter fullscreen mode
Exit fullscreen mode
Example
sshpass -p "mypassword123" ssh sos@192.168.1.100
Enter fullscreen mode
Exit fullscreen mode
This command connects to the server without prompting for a password.
Security Warning: Avoid using
sshpassin production environments, as it exposes the password in plain text. Consider using SSH keys for secure and automated logins.
3. SSH Using PuTTY (Windows)
For Windows users, PuTTY is a popular graphical SSH client that simplifies the process of connecting to servers.
Steps to Use PuTTY
-
Download PuTTY:
- Visit the official PuTTY website: https://www.putty.org/.
- Download and install the appropriate version for your system.
-
Open PuTTY:
- Launch the PuTTY application.
- In the «Host Name (or IP address)» field, enter the server IP.
- Set the Port to
22(default SSH port). - Select SSH as the connection type.
-
Login:
- Click Open to initiate the connection.
- When prompted, enter the username and password to log in.
-
Trust the Server:
- If it’s your first connection, PuTTY will ask you to trust the server’s fingerprint. Click Yes to proceed.
4. Troubleshooting Common Issues
If you encounter problems connecting via SSH, consider the following troubleshooting tips:
-
Connection Timeout:
- Ensure the server is reachable over the network.
- Verify that the SSH service (
sshd) is running on the server. - Confirm that the server firewall allows traffic on port
22.
-
Connection Refused:
- Verify that SSH is installed and enabled on the server.
- Check that the SSH port is set to
22(or a custom port, if configured).
-
Password Authentication Failure:
- Double-check the username and password.
- If password authentication is disabled, the server may require SSH key-based authentication.
-
Host Key Verification Failed:
- This happens if the server’s key changes. Remove the old key by running:
ssh-keygen -R server_ip
5. Enhancing Security with SSH Keys
Using passwords for SSH can be insecure and cumbersome. For better security and convenience, consider using SSH keys instead of passwords. With SSH keys:
- Passwords are no longer required for login.
- Authentication is faster and more secure.
To set up SSH keys:
- Generate a key pair with:
ssh-keygen -t rsa -b 4096
Enter fullscreen mode
Exit fullscreen mode
- Copy the public key to the server:
ssh-copy-id username@server_ip
Enter fullscreen mode
Exit fullscreen mode
- Connect without a password:
ssh username@server_ip
Enter fullscreen mode
Exit fullscreen mode
Let me know if you’d like a detailed guide on setting up SSH keys!
Conclusion
SSH is a powerful tool for managing servers remotely. By using the ssh command, sshpass, or tools like PuTTY, you can easily connect to servers with an IP, username, and password. However, for enhanced security, transitioning to SSH keys is highly recommended. If you encounter any issues, double-check network connectivity, server configuration, and credentials.

