
Unlocking the Power of Windows SSH Key Location for Seamless Connectivity 🗝️
Greetings, tech enthusiasts! In this article, we delve into the intricacies of Windows SSH key location, unraveling its mysteries and shedding light on how it enhances your connectivity experience. Whether you are a seasoned developer, a network administrator, or a curious user, understanding the significance of SSH key location in the Windows environment is vital for optimizing performance and ensuring secure connections. So, without further ado, let’s embark on this enlightening journey!
Introduction: SSH Key Location Explained
Before we dive into the specifics of Windows SSH key location, let’s grasp the fundamentals. SSH (Secure Shell) is a cryptographic network protocol that facilitates secure communication between various devices over an insecure network. SSH keys, consisting of a public and private key pair, are at the heart of this protocol, ensuring confidentiality and integrity of data transfers.
But where exactly are these SSH keys stored in a Windows system? Well, fear not! We are here to demystify this for you.
1. Default Location: C:\Users\{your_username}\.ssh
The default location where SSH keys are stored in Windows is in a hidden directory called .ssh within the user’s home directory. To access it, simply navigate to C:\Users\{your_username} and reveal the hidden files and folders. Here, you should find the precious id_rsa (private key) and id_rsa.pub (public key) files.
2. Customizing SSH Key Location
While the default location suffices for most users, there might be instances where you prefer storing your SSH keys in a different directory. Luckily, OpenSSH, the widely used SSH implementation in Windows, offers flexibility in this regard. By modifying the SSH configuration file, you can specify an alternative location for your SSH keys.
…
The Pros and Cons of Windows SSH Key Location
Now that we have explored the ins and outs of Windows SSH key location, let’s weigh its advantages and disadvantages:
1. Advantages of Windows SSH Key Location
🔶 Enhanced Security: By storing SSH keys in a specific location, you minimize the risk of unauthorized access and potential exposure to malicious actors.
🔶 Streamlined Workflow: Having a centralized repository for SSH keys simplifies key management, making it effortless to add, remove, or update keys.
…
2. Disadvantages of Windows SSH Key Location
🔶 Increased Vulnerability: Placing all your SSH keys in one location might present a security risk if that directory is compromised.
🔶 Limited Accessibility: In certain scenarios, accessing SSH keys located in a particular directory might be challenging, especially for users operating with restricted permissions.
…
…
| S.No. | FAQ | Answer |
|---|---|---|
| 1 | Can I change the default location of SSH keys in Windows? | Yes, you can easily customize the location of SSH keys by modifying the SSH configuration file. |
Conclusion: Empowering Your Windows SSH Experience
In conclusion, understanding the intricacies of Windows SSH key location is crucial for seamless connectivity and enhanced security. By having a clear knowledge of where your SSH keys are stored and the advantages and disadvantages associated with their location, you can optimize workflows and safeguard your sensitive data.
…
Closing Note: Secure the Path to Connectivity
As you embark on your journey with Windows SSH key location, remember to prioritize security and follow best practices. Regularly update your SSH keys, revoke unnecessary ones, and remain vigilant against potential threats. With proper implementation, Windows SSH key location can become your gateway to a secure and efficient computing experience.
Unlock the potential of Windows SSH key location today, and take your connectivity to soaring heights! 🚀
Disclaimer
The information provided in this article is for educational purposes only. While utmost care has been taken to ensure accuracy, the authors and publishers do not assume any responsibility for potential consequences arising from the use of this information. Implement suggestions at your own discretion and consult professional advice when needed.
В этой статье мы настроим SSH аутентификацию в Windows по RSA или EdDSA ключам для безопасного доступа к удаленным компьютерам/серверам. Рассмотрим, как сгенерировать открытый и закрытый ключи (сертификаты) в Windows и настроить сервер OpenSSH в Windows 10/11 и Windows Server 2019/2022 для аутентификации по ключам (без паролей).
Аутентификация по SSH ключам широко используется в мире Linux, а в Windows этот функционал появился относительно недавно. Идея заключается в том, что на SSH сервере добавляется открытый ключ клиента и при подключении сервер проверяет наличие соответствующего закрытого ключа у клиента. Таким образом удаленный пользователь может аутентифицироваться в Windows без ввода пароля.
Содержание:
- Генерация SSH ключей на клиенте Windows
- Настройка OpenSSH в Windows для авторизации по ключам
- Вход по SSH ключу для локальных администраторов Windows
Генерация SSH ключей на клиенте Windows
На клиентском, компьютере, с которого вы будет подключаетесь к удалённому серверу Windows с OpenSSH, вам нужно сгенерировать пару ключей (открытый и закрытый). Закрытый ключ хранится на клиенте (не отдавайте его никому!), а открытый ключ нужно скопировать в файл authorized_keys на SSH сервере. Чтобы сгенерировать SSH ключи на клиенте Windows, вы должны установить клиент OpenSSH.
В Windows 10/11 и Windows Server 2019/2022 клиент OpenSSH устанавливается как отдельный встроенный компонент с помощью PowerShell:
Add-WindowsCapability -Online -Name OpenSSH.Client~~~~0.0.1.0
Запустите обычную (непривилегированную сессию PowerShell) и сгенерируйте пару ED25519 ключей:
ssh-keygen -t ed25519
По умолчанию утилита ssh-keygen генерирует ключи RSA 2048. В настоящий момент вместо RSA ключей рекомендуется использовать именно ED25519.
Утилита попросит вас указать пароль для защиты закрытого ключа. Если вы укажете пароль, то каждый раз при использовании этого ключа для SSH авторизации, вы должны будете вводить этот пароль. Я не стал указывать пароль для ключа (не рекомендуется).
Generating public/private ed25519 key pair. Enter file in which to save the key (C:\Users\myuser/.ssh/id_ed25519):

Enter passphrase (empty for no passphrase): Enter same passphrase again: Your identification has been saved in C:\Users\myuser/.ssh/id_ed25519. Your public key has been saved in C:\Users\myuser/.ssh/id_ed25519.pub. The key fingerprint is: SHA256:C2wXeCQSUcJyq0 myuser@computername The key's randomart image is: +--[ED25519 256]--+ | ..*O=..o. | +----[SHA256]-----+
Утилита ssh-keygen создаст каталог .ssh в профиле текущего пользователя Windows (%USERPROFILE%\.ssh) и сгенерирует 2 файла:
-
id_ed25519
– закрытый ключ (если вы сгенерировали ключ типа RSA, файл будет называться
id_rsa
) -
id_ed25519.pub
– публичный ключ (аналогичный RSA ключ называется
id_rsa.pub
)
После того, как ключи созданы, вы можете добавить закрытый ключ в службу SSH Agent, которая позволяет удобно управлять закрытыми ключами и использовать их для аутентификации.
SSH Agent может хранить закрытые ключи и предоставлять их в контексте безопасности текущего пользователя. Запустите службу ssh-agent и настройте автоматический запуск с помощью PowerShell команд управления службами:
Set-service ssh-agent StartupType ‘Automatic’
Start-Service ssh-agent
Добавьте ваш закрытый ключ в базу ssh-agent:
ssh-add "C:\Users\user\.ssh\id_ed25519"
Identity added: C:\Users\kbuldogov\.ssh\id_ed25519 (kbuldogov@computername)

Или так:
ssh-add.exe $ENV:UserProfile\.ssh\id_ed25519
Настройка OpenSSH в Windows для авторизации по ключам
SSH сервер (в этом примере это удаленный компьютер с Windows 11 и настроенной службой OpenSSH).
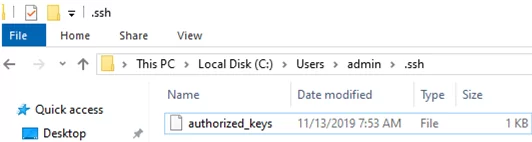
Скопируйте файл id_ed25519.pub в каталог .ssh профиля пользователя, под которым вы будете подключаться к SSH серверу. Например, у меня в Windows 11 создан пользователь user1, значит я должен скопировать ключ в файл C:\Users\user1\.ssh\authorized_keys.
В данном примере подразумевается, что user1 это обычная учетная запись пользователя без прав локального администратора на компьютере с сервером SSH.
Если каталог .ssh в профиле отсутствует, его нужно создать вручную.
Можно скопировать ключ на SSH сервер с клиента с помощью SCP:
scp C:\Users\youruser\.ssh\id_rsa.pub [email protected]:c:\users\user1\.ssh\authorized_keys
В один файл authorized_keys можно добавить несколько открытых ключей.
По умолчанию в OpenSSH сервере в Windows отключена аутентификация по ключам. Вы можете проверить это в конфигурационном файле sshd_config. Проще всего получить список разрешенных способов аутентификации в OpenSSH с помощью такой PowerShell команды (Select-String используется как аналог grep в PowerShell):
cat "C:\ProgramData\ssh\sshd_config"| Select-String "Authentication"
#PubkeyAuthentication yes
#HostbasedAuthentication no
# HostbasedAuthentication
 PasswordAuthentication yes
#GSSAPIAuthentication no

В этом примере строка PubkeyAuthentication закомментирована, значит этот способ аутентификации отключен.
Откройте файл sshd_config с помощью блокнота, раскоментируйте строку:
Notepad C:\ProgramData\ssh\sshd_config
PubkeyAuthentication yes
Также в конфигурационном файле sshd_config придется отключить режим StrictModes. По умолчанию этот режим включен и запрещает аутентификацию по ключам, если закрытый и открытый ключ недостаточно защищены. Раскомментируйте строку
#StrictModes yes
, измените на
StrictModes no
.
Сохраните файл и перезапустите службу sshd:
Restart-Service sshd
Теперь вы можете подключиться к SSH серверу без ввода пароля пользователя. А если вы не задали пароль (passphrase) для закрытого ключа, вы сразу автоматически подключитесь к вашему удаленному серверу Windows.
Для подключения через SSH к удаленному хосту используется следующая команда:
ssh (username)@(имя или IP адрес SSH сервера)
Например,
ssh [email protected]
Это означает, что вы хотите подключиться к удаленному SSH серверу с адресом 192.168.1.90 под учетной записью admin. Служба SSH Agent автоматически попытается использовать для авторизации сохраненный ранее закрытый ключ.
- Если вы не хотите использовать ssh-agent для управления ключами, вы можете указать путь к закрытому ключу, который нужно использовать для SSH аутентификации:
ssh [email protected] -i "C:\Users\user\.ssh\id_ed25519" - Для подключения с помощью учетной записи пользователя из домена Active Directory используется формат:
ssh [email protected]@168.1.90 -i <private_key_absolute_path>

При первом подключении нужно добавить отпечаток ключа SSH сервера в доверенные. Наберите yes -> Enter.
The authenticity of host '192.168.1.90 (192.168.1.90)' can't be established.
ECDSA key fingerprint is SHA256:LNMJTbTS0EmrsGYTHB3Aa3Tisp+7fvHwZHbTA900ofw.
Are you sure you want to continue connecting (yes/no/[fingerprint])? yes
Информацию по аутентификации в Windows с помощью SSH ключей можно найти в журнале события. В современных версиях OpenSSH логи пишутся не в текстовые файлы, а в отдельный журнал Event Viewer (Application and services logs -> OpenSSH -> Operational).
При успешном подключении с помощью ключа в журнале появится событие:
EventID 4
sshd: Accepted publickey for locadm from 192.168.14.1 port 55772 ssh2: ED25519 SHA256:FEHDWM/J74FbIzCCoJNbh14phS67kQgh7k8UrKPSvCM
Если вы не смогли подключиться к вашему SSH серверу по RSA ключу, и у вас все равно запрашивается пароль, скорее всего пользователь, под которым вы подключаетесь, входит в группу локальных администраторов сервера (SID группы S-1-5-32-544). Об этом далее.

Вход по SSH ключу для локальных администраторов Windows
В OpenSSH используются особые настройки доступа по ключам для пользователей с правами локального администратора Windows.
В первую очередь, вместо ключа authorized_keys в профиле пользователя нужно использовать файл с ключами C:\ProgramData\ssh\administrators_authorized_keys. Вам нужно добавить ваш ключ в этот текстовый файл (в целях безопасности права на этот файл должны быть только у группы Administrators и SYSTEM).
Вы можете изменить NTFS права на файл с помощью:
- утилиты icacls:
icacls.exe "C:\ProgramData\ssh\administrators_authorized_keys" /inheritance:r /grant "Administrators:F" /grant "SYSTEM:F - или с помощью PowerShell командлетов get-acl и set-acl:
get-acl "$env:programdata\ssh\ssh_host_rsa_key" | set-acl "$env:programdata\ssh\administrators_authorized_keys"

После этого SSH аутентификация по ключам работает даже при отключенном режиме StrictModes
alert]Чтобы использовать ключ authorized_keys из профиля пользователя, и не переносить данные открытого ключа в файл administrators_authorized_keys, вы можете закомментировать строку в файле конфигурации OpenSSH (C:\ProgramData\ssh\sshd_config).
Закомментируйте строки:
#Match Group administrators
# AuthorizedKeysFile __PROGRAMDATA__/ssh/administrators_authorized_keys
Дополнительно в файле sshd_config вы можете запретить SSH подключение по паролю по паролю:
PasswordAuthentication no
После сохранения изменений в файле sshd_config не забудьте перезапустить службу sshd.
restart-service sshd
Если вы установили PasswordAuthentication no, и некорректно настроите аутентификацию по ключам, то при подключении по ssh будет появляться ошибка:
[email protected]: Permission denied (publickey,keyboard-interactive).

В OpenSSH на Linux доступна опция PermitRootLogin, позволяющая ограничить доступ к SSH серверу под аккаунтом root. В Windows OpenSSH эта директива не доступна и для ограничения доступа администраторов нужно использовать параметр DenyGroups.
Итак, вы настроили SSH аутентификацию в Windows по открытому RSA-ключу (сертификату). Теперь вы можете использовать такой способ аутентификации для безопасного доступа к удаленным северам, автоматического поднятия проброса портов в SSH туннеле, запуска скриптов и других задачах автоматизации.
In Windows 10, finding your SSH public key is a necessary skill, especially if you want to connect securely to remote servers or share your public key for access to certain services. To locate your SSH public key, you’ll need to navigate to where it’s stored on your computer. The process involves using Windows’ built-in terminal to search your system for the key file.
In this section, I’ll guide you through finding your SSH public key on a Windows 10 machine. By following these simple steps, you’ll be able to easily locate and view your key.
Step 1: Open Command Prompt or PowerShell
To get started, open the Command Prompt or PowerShell on your Windows 10 computer.
You can do this by typing “cmd” or “PowerShell” in the Start menu search bar and hitting Enter. Both Command Prompt and PowerShell will work for this task, but PowerShell tends to offer more features.
Step 2: Navigate to the .ssh Directory
Next, navigate to the .ssh directory by typing cd %userprofile%.ssh and pressing Enter.
This command jumps straight to the .ssh folder within your user profile, where your SSH keys are usually stored. If you receive an error, the .ssh directory might not exist yet, indicating you need to generate a key.
Step 3: List the Files
Once you’re in the .ssh directory, list all files by typing dir in Command Prompt or ls in PowerShell.
You should see a list of files, one of which will likely be named id_rsa.pub or id_ecdsa.pub. These are common names for SSH public key files. If no such file exists, you might need to generate a new SSH key pair.
Step 4: Display the Public Key
To view your public key, type type id_rsa.pub in Command Prompt or cat id_rsa.pub in PowerShell.
This command displays the contents of the id_rsa.pub file, which is your public key. The text that appears is what you would share with others to allow them to verify your identity securely.
Step 5: Copy the Key
Finally, copy the displayed key by selecting the text and using Ctrl + C.
Ensure you select the entire key, as partial keys won’t work. You can then paste it wherever you need, such as on a GitHub account or remote server configuration.
After you complete these steps, you should be able to access your SSH public key. This key can be shared safely with others or used to configure your access to servers and services. Remember, never share your private key, as doing so can compromise your security.
Tips for Finding Your SSH Public Key in Windows 10
- Ensure your SSH key exists by checking for
id_rsa.puborid_ecdsa.pubin the .ssh directory. - If the key isn’t found, generate one using
ssh-keygenin your terminal. - Use PowerShell for more advanced features and better command support.
- Keep a backup of your SSH keys in a secure location for easy retrieval.
- Always be cautious and never share your private SSH key.
Frequently Asked Questions
What if I can’t find the .ssh folder?
If the .ssh folder doesn’t exist, you may need to generate a key pair. Use ssh-keygen in PowerShell to create it.
How do I generate a new SSH key?
Run ssh-keygen in PowerShell and follow the prompts to create a new key pair.
Can I have multiple SSH keys?
Yes, you can generate multiple keys for different purposes. Name them uniquely to keep track.
How do I secure my SSH keys?
Store them in a safe location and restrict file permissions. Never share your private key.
What is the difference between a private and public key?
The public key is shared to verify your identity, while the private key is kept secret to secure your access.
Summary
- Open Command Prompt or PowerShell.
- Navigate to the .ssh directory.
- List the files.
- Display the public key.
- Copy the key.
Conclusion
Understanding how to find your SSH public key in Windows 10 is an essential skill for anyone dealing with secure server connections or software development. By mastering these steps, you ensure that you’re equipped to manage your secure connections efficiently. This knowledge not only enhances your technical abilities but also bolsters your confidence when interacting with digital security measures.
Once you’ve located your SSH public key, you’ll likely find yourself using it in various contexts, whether it’s accessing remote servers, collaborating on GitHub, or any other application that requires secure access. Remember always to keep your private key safeguarded to prevent unauthorized access. In today’s digital age, managing your SSH keys is akin to having the keys to your digital kingdom—treat them with care.
For those interested in learning more, further reading on SSH key management, security practices, and additional configuration options can be invaluable. Dive deeper into topics like key generation methods, advanced configuration, or integrating SSH keys with various platforms. The more you understand about these tools, the more control you’ll have over your digital security landscape.
Matt Jacobs has been working as an IT consultant for small businesses since receiving his Master’s degree in 2003. While he still does some consulting work, his primary focus now is on creating technology support content for SupportYourTech.com.
His work can be found on many websites and focuses on topics such as Microsoft Office, Apple devices, Android devices, Photoshop, and more.
Prerequisites
- Windows Subsystem for Linux (WSL) is installed
- For this example we will use the Ubuntu Linux distro/distribution.
- Visit this link to rocket academy to find out more about WSL
Step 1: Understand how to access Linux On Windows
Method 1: Using the file explorer
-
Type
\\wsl$\into the file explorer. This will direct you to the location of the Ubuntu folder.
-
Navigate to your linux folder.
Ubuntu -> Home -> <LINUX USERNAME>


Method 2: Using the WSL terminal
# This command navigates to the linux folder

cd ~/
Enter fullscreen mode
Exit fullscreen mode
# This command lists the files that are in the linux folder

ls -a ~
Enter fullscreen mode
Exit fullscreen mode
Step 2: Create .ssh folder (this is where we’ll put the ssh key)
Notes: If this is your first time accessing this folder, you probably do not have a folder for ssh files and will have to create your own.
Method 1: Using the file explorer
- Create a folder in your linux folder and name it «.ssh»
- Done! Now you can put the key pairs in this folder

Method 2: Using the WSL terminal
# 1. Check if you have a .ssh folder. If you don't have an ssh folder it'll return "No such file or directory"

ls ~/.ssh
Enter fullscreen mode
Exit fullscreen mode
# 2. Create a folder called .ssh

mkdir ~/.ssh
Enter fullscreen mode
Exit fullscreen mode
# 3. Copy any key pairs you need into this folder
# Note: You have to be in the same directory as the file you want to copy
# syntax: cp <FILENAME> ~/.ssh

cp my-aws-ec2-keypair.pem ~/.ssh
Enter fullscreen mode
Exit fullscreen mode
In this article, we will show how to configure SSH authentication in Windows using RSA or EdDSA keys. Let’s see how to generate public and private key pair on Windows and configure an OpenSSH server on Windows 10/11 or Windows Server 2019/2022 for key-based authentication (without passwords).
SSH key-based authentication is widely used in the Linux world, but in Windows, it has appeared quite recently. The idea is that the client’s public key is added to the SSH server, and when a client tries to connect to it, the server checks if the client has the corresponding private key. This way a remote user can authenticate in Windows without entering a password.
Contents:
- Generating an SSH Key Pair on Windows
- OpenSSH: Configuring Key-Based Authentication with Public Key on Windows
- Logging Windows with SSH Key Under Administrative User
Generating an SSH Key Pair on Windows
You must generate two SSH keys (public and private) on the client computer that you will use to connect to the remote Windows host running OpenSSH. A private key is stored on the client-side (keep the key safe and don’t share it with anyone!), and a public key is added to the authorized_keys file on the SSH server. To generate RSA keys on a Windows client, you must install the OpenSSH client.
On Windows 10/11 and Windows Server 2019/2022, the OpenSSH client is installed as an optional Windows feature using PowerShell:
Add-WindowsCapability -Online -Name OpenSSH.Client~~~~0.0.1.0
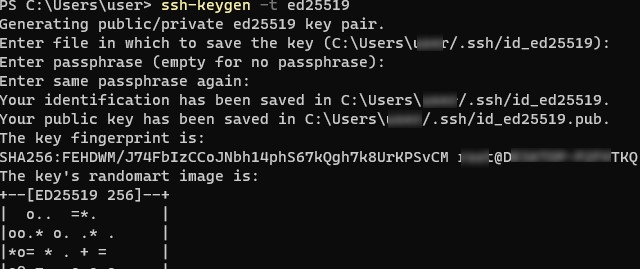
Open a standard (non-elevated) PowerShell session and generate a pair of ED25519 keys using the command:
ssh-keygen -t ed25519
By default, the ssh-keygen tool generates RSA 2048 keys. Currently, it is recommended to use ED25519 instead of RSA keys.
You will be prompted to provide a password to protect the private key. If you specify the password, you will have to enter it each time you use this key for SSH authentication. I did not enter a passphrase (not recommended).
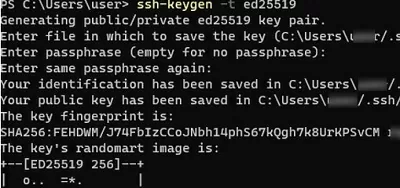
Generating public/private ed25519 key pair.
Enter file in which to save the key (C:\Users\myuser/.ssh/id_ed25519):
Enter passphrase (empty for no passphrase):
Enter same passphrase again:
Your identification has been saved in C:\Users\myuser/.ssh/id_ed25519.
Your public key has been saved in C:\Users\myuser/.ssh/id_ed25519.pub.
The key fingerprint is: SHA256:xxxxxxxx myuser@computername
The key's randomart image is:
+--[ED25519 256]--+
+----[SHA256]-----+
Ssh-keygen will create the .ssh directory in the profile of a current Windows user (%USERPROFILE%\.ssh) and generate 2 files:
id_ed25519– private key (if you generated an RSA key, the file will be namedid_rsa)id_ed25519.pub– public key (a similar RSA key is calledid_rsa.pub
After the SSH keys are generated, you can add your private key to the SSH Agent service, which allows you to conveniently manage private keys and use them for authentication.
The SSH Agent service can store your private keys and provide them in the security context of the current user. Run the ssh-agent service and configure it to start automatically using PowerShell:
set-service ssh-agent StartupType ‘Automatic’
 Start-Service ssh-agent
Add your private key to the ssh-agent database:
ssh-add "C:\Users\youruser\.ssh\id_ed25519"
Identity added: C:\Users\youruser\.ssh\id_ed25519 (youruser@computername)

Or as follows:
ssh-add.exe $ENV:UserProfile\.ssh\id_rsa
OpenSSH: Configuring Key-Based Authentication with Public Key on Windows
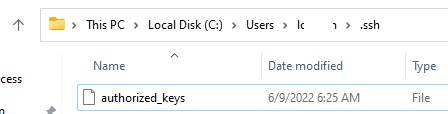
Now you need to copy your SSH public key to the SSH server. The SSH server in this example is a remote Windows 11 machine that has the OpenSSH service installed and configured.
Copy the id_ed25519.pub file to the .ssh directory in the profile of the user you will use to connect to the SSH server. For example, I have a user1 account on my remote Windows 11 device, so I need to copy the key to C:\Users\user1\.ssh\authorized_keys.
You can copy the public key to the SSH server from the client using SCP:
scp C:\Users\youruser\.ssh\id_rsa.pub [email protected]:c:\users\admin\.ssh\authorized_keys
You can add multiple public keys to a single authorized_keys file.
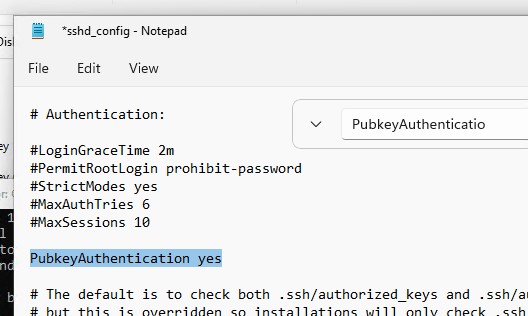
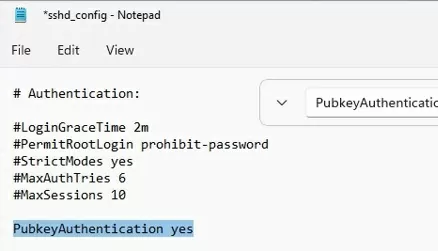
Public key authentication is disabled by default in the OpenSSH server on Windows. You can check this in the sshd_config. You can get a list of allowed authentication methods in OpenSSH by grepping the config file:
cat "C:\ProgramData\ssh\sshd_config"| Select-String "Authentication"
#PubkeyAuthentication yes
#HostbasedAuthentication no
#HostbasedAuthentication
PasswordAuthentication yes
#GSSAPIAuthentication no
In this example, the PubkeyAuthentication line is commented out, which means that this authentication method is disabled. Open the sshd_config file with Notepad and uncomment the line:
Notepad C:\ProgramData\ssh\sshd_config
PubkeyAuthentication yes
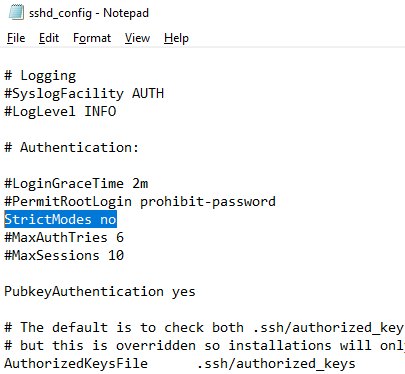
Also, you will have to disable the StrictModes option in the sshd_config configuration file. By default, this mode is enabled and prevents SSH key-based authentication if private and public keys are not properly protected. Uncomment the line #StrictModes yes and change it to StrictModes no
Now you can connect to your Windows SSH server without a password. If you have not set a password (passphrase) for the private key, you will automatically connect to your remote Windows host.
To connect to a remote host using a native SSH client, use the following command:
ssh (username)@(SSH server name or IP address)
For example:
ssh [email protected]
It means that you want to connect to a remote SSH server with the IP address 192.168.1.15 under the user1 account. SSH Agent service will automatically try to use your private key to authenticate on a remote host.
- If you do not want to use the ssh-agent service to manage SSH keys, you can specify the path to the private key file to be used for the SSH authentication:
ssh [email protected] -i "C:\Users\youuser\.ssh\id_ed25519" - To connect SSH host using a user account from an Active Directory domain, use the following format:
ssh [email protected]@192.168.1.15 -i <private_key_absolute_path>

When connecting for the first time, you need to add the fingerprint of the SSH server key to the trusted list. Type yes -> Enter.
The authenticity of host '192.168.1.15 (192.168.1.15)' can't be established.
ECDSA key fingerprint is SHA256:xxxxxxx.
Are you sure you want to continue connecting (yes/no/[fingerprint])? yes
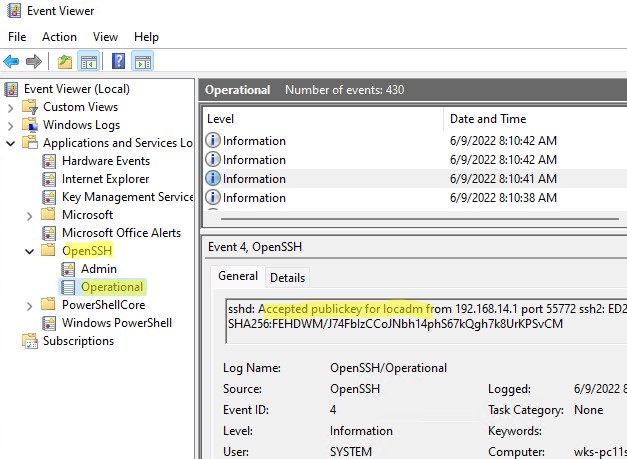
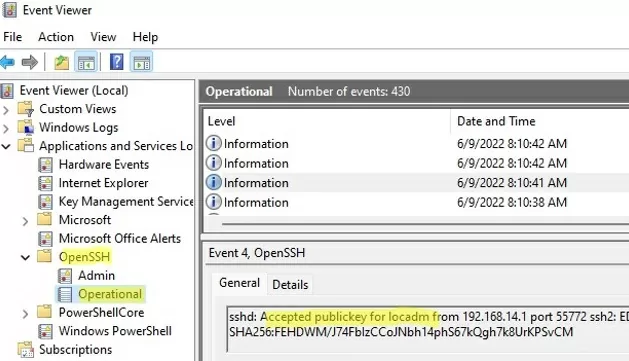
ETW logging is used in Windows OpenSSH to store SSH logs instead of plain text files. You can check the SSH key-based authentication logs in the Windows Event Viewer (Application and Services Logs -> OpenSSH -> Operational).
If the SSH connection with the private key is successful, the following event will appear in the OpenSSH log:
EventID 4
sshd: Accepted publickey for locadm from 192.168.15.20 port 55772 ssh2: ED25519 SHA256:xxxxxxx
If you were not able to connect to your SSH server using your private key and you are still prompted to enter a password, the user account you are trying to connect to is likely a member of the local Windows administrators group (the group SID is S-1-5-32-544). We will discuss it later.

Logging Windows with SSH Key Under Administrative User
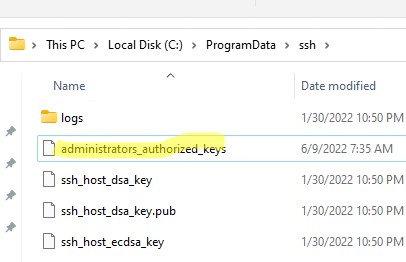
OpenSSH uses special key-based authentication settings for admin user accounts on Windows.
You need to use the C:\ProgramData\ssh\administrators_authorized_keys file instead of the authorized_keys key in the user profile. Add your public SSH key to this text file (for security reasons, only the Administrators and SYSTEM groups should have permission to read this file).
You can change the NTFS permissions on a file with:
- The icacls tool:
icacls.exe "C:\ProgramData\ssh\administrators_authorized_keys" /inheritance:r /grant "Administrators:F" /grant "SYSTEM:F" - or using the Get-Acl and Set-Acl PowerShell cmdlets:
Get-Acl "$env:programdata\ssh\ssh_host_rsa_key" | Set-Acl "$env:programdata\ssh\administrators_authorized_keys"

After that, SSH key authentication works even if the StrictModes is disabled.
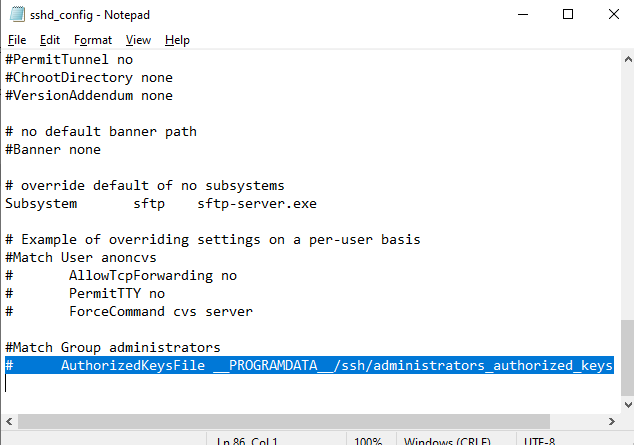
To use the authorized_keys file from a user profile and not to move the public key info to the administrators_authorized_keys file, you can comment out a line in the OpenSSH configuration file (C:\ProgramData\ssh\sshd_config).
#Match Group administrators
# AuthorizedKeysFile __PROGRAMDATA__/ssh/administrators_authorized_keys

Additionally, you can disable SSH password login in the sshd_config:
PasswordAuthentication no
Don’t forget to restart the sshd service after making the changes in the sshd_config.
restart-service sshd
If you set PasswordAuthentication no, and configure SSH key authentication incorrectly, then an error will appear when connecting via SSH:
[email protected]: Permission denied (publickey,keyboard-interactive).
You can use the PermitRootLogin option in OpenSSH on Linux to restrict SSH root login. This directive is not applicable in Windows OpenSSH, and you must use the DenyGroups parameter to deny SSH login under admin accounts:
DenyGroups Administrators
So, you have configured SSH authentication in Windows using a key pair. Now you can use this authentication method to securely access remote servers, automatically forward ports in the SSH tunnel, run scripts, and perform other automation tasks.