
Introduction
In the early days of doing server administration on Windows we were mostly using the Putty SSH client, either with a ton of profiles, or within some third
party program like mRemote.
None of these made it simple to export and move your remote hosts config around.
At some point, Microsoft added the GNU SSH client to their official Windows packages, we briefly touched on the
subject in our article about WSL and the new Windows terminal — We’ll be using the latter in our screenshots.
We’ll present what we think is a nice way to neatly organize your server accesses and switch to key pair
authentication for better security.
Installing the SSH client
It just sits in the Windows optional features.
On my test system it was already installed:

The feature installs multiple executables aside from ssh.exe, including scp, the ssh-agent
service and more.
If you had to install it, you may need to restart your user session for it to be immediately available in command
line sessions.
We could already log into our server using something like:
ssh admin@172.20.1.117Where admin is the administrative user name you were given with the server access information, and
172.20.1.117 here is the local IP address of your server on the Net7 VPN (which is required to be connected).
For other servers on different providers you may have to use a public IP address or domain name.
Even Windows machines could technically be setup to offer SSH sessions but that is out of scope for this article.
The SSH client will ask you to confirm the host public key when connecting for the first time. That key is unique to
that SSH server and is used to make sure you’re connecting to the right server.
The client will cache the key and alert you if a server at the same IP address suddenly presents a different host
key.
Key pair authentication
It’s possible to use pairs of keys instead of passwords to connect to SSH servers.
These key pairs are composed of a public key and a private key which are linked by mathematical
properties but in such a way that it’s extremely hard to derive the private key from the public key.
Which comes in handy because the public key is what you can copy and share around, whereas the private key should be
safely kept only on trusted storage and is usually (will be the case if you follow this article) encrypted by its own
password.
As far as SSH is concerned, servers can have a list of public keys that are allowed to connect.
The SSH client has to demonstrate being the real owner of that public key by performing signatures that are only
doable with
the private key from that specific key pair.
The rest of the SSH session will be encrypted using a negociated session key so that, in case your private key is
compromised, past communications with the server still can’t be decrypted.
In short, your key pair is used to identify or authenticate you very precisely and safely, possibly on multiple
services.
Key pairs (including the encrypted private key — in case it leaks) are much harder to break than password
hashes and thus are considered safer than passwords. We also tend to not write private keys down somewhere.
Generating your key pair
To generate your key pair, open a terminal and run the following command:
ssh-keygen -t ed25519 -C "<YOUR_EMAIL_ADDRESS>"Where you should fill in your email address. In case you’d want to use the key pair for Github later on,
make sure
you use the email address registered to your Github account (same goes for Gitlab and others).
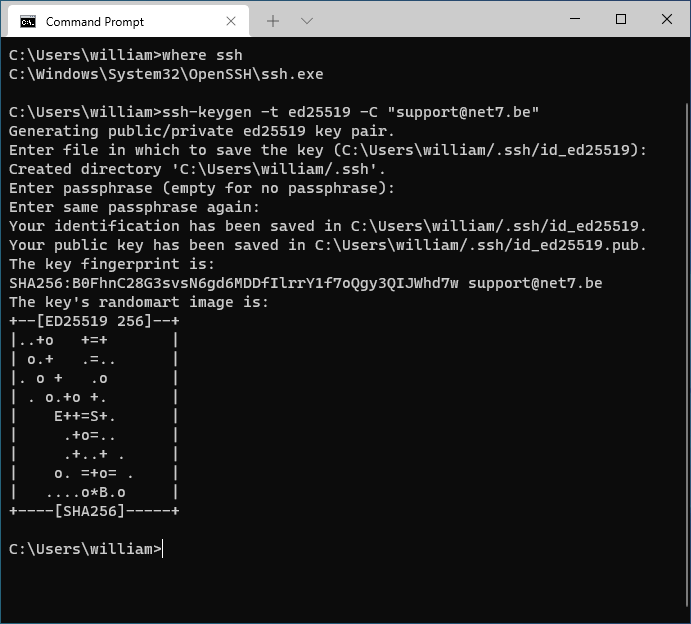
You will be asked for a passphrase to encrypt the private key with. You should always provide one. A possible
exception to this rule is when you need two servers to access each other and you’re certain of the security of the
whole thing.
Having an encrypted system and user volume and adequate session security (auto-locking etc.) could also justify not
using a passphrase in some cases.
You should never move your private key around over the Internet and strive to be extremely safe when doing so. An
encrypted private key adds an extra layer of security in case your private key does leak around somewhere.
In case you need to connect to older servers, you might need a RSA key pair, which is an older algorithm (it’s
still safe provided you use large key sizes):
ssh-keygen -t rsa -b 4096 -C "<YOUR_EMAIL_ADDRESS>"You should now have a .ssh directory in your user directory (C:\Users\<YOUR_NAME>) with the following
files:
- id_ed25519 — This is your private key; On Linux systems it shouldn’t be visible to other users
(should have been created with the right permissions) - id_ed25519.pub — This is your public key. You can copy it around safely; When you need to provide a
key to any service or copy a key to any server, it’s always the public key
Creating the config file (list of SSH hosts)
Open a command line and make sure your current directory is your user directory (c:\Users\<YOUR_USER>).
You need to create a new file in .ssh called config.
Here’s how to do it with notepad but any editor should do:
notepad .ssh\configIn case the file doesn’t exist, notepad should ask you if you want to create it.
You can now add your SSH hosts in there following a specific format:
Host <HOST_FRIENDLY_NAME>
  HostName <IP_ADDRESS_OR_DOMAIN_NAME>
  User <REMOTE_USERNAME>
Let’s say our server is called triceratops and sits on VPN IP address 192.168.77.117, and your
user on the server is just admin, this is the entry we’d use:
Host triceratops
  HostName 192.168.77.117
  User admin
As depicted here in notepad:
We’re free to add more of these Host sections for any SSH host you’d want to connect to.
There are a lot more options you can set per host in the config file. Most of them described here.
We won’t list them here per se but that would be how you set a host to be
on a port that isn’t 22, force using a different key pair, command to run on server upon connection (could be
tmux), …
With your config file in place, you should be able to use the host friendly name (triceratops in our
example) ssh and scp commands. Connecting to the server is now as simple as:
ssh triceratopsWhich will ask you for your password because our server hasn’t been configured to allow our key pair yet:
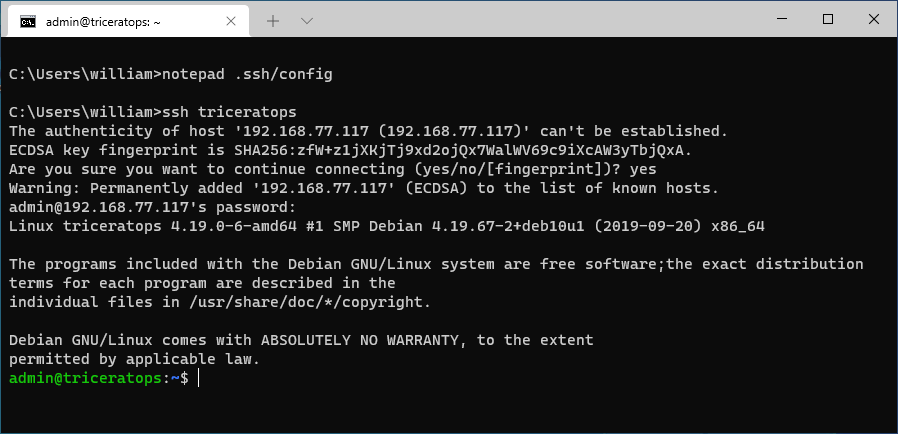
The config file is portable to any system that uses the classic SSH client and can be brought over to Linux,
Mac, and Windows. It shouldn’t contain any secret except for revealing IP address information for your services.
Authorizing our keys on the server
To log into a SSH server as a specific user, your public key has to be present in a special file in the «.ssh»
directory your remote user — which has to be in their home directory, e.g.:
/home/<YOUR_USER>/.ssh/authorized_keysThe .ssh directory might not exist if you have never used the SSH client on that server.
We devised some
command line magic to create the directory when it’s not present and put your public key in authorized_keys
(will append your key to the file in case you already have other keys in there).
The following command assumes your session current directory is your Windows user directory
(c:\Users\<YOUR_USER>).
ssh triceratops "mkdir -p ~/.ssh; tee -a ~/.ssh/authorized_keys" < .ssh\id_ed25519.pubMake sure you’re referencing the .pub file and NOT the private key.
When we try to connect to triceratops afterwards, it’s still asking for a password, but looking more closely,
that’s not the server password, it’s they private key passphrase.
In practice it looks like nothing has changed but that’s not true, not only can you reuse your key pair for all of
your servers and many services (including Github) and thus use a single master password to access all of these but we
also benefit from the increased security of the key pair authentication scheme.
Optional: Store the private key in the Windows session
It’s possible to make it so that you don’t have to enter your private key passphrase to use the key pair.
We need a Windows service called the «OpenSSH Authentication Service» or sometimes shortened as «ssh-agent». It
should be disabled by default.
To open the Services console, you can press the Windows Key + R and then type services.msc, press enter
to open the services console.
Look for the «OpenSSH Authentication Service» in the list, right click and open properties.
From there, set «Startup type» to automatic if you want that service to start with Windows from now on, and then
start the service (use the «Start» button or right click the service and use start from here).
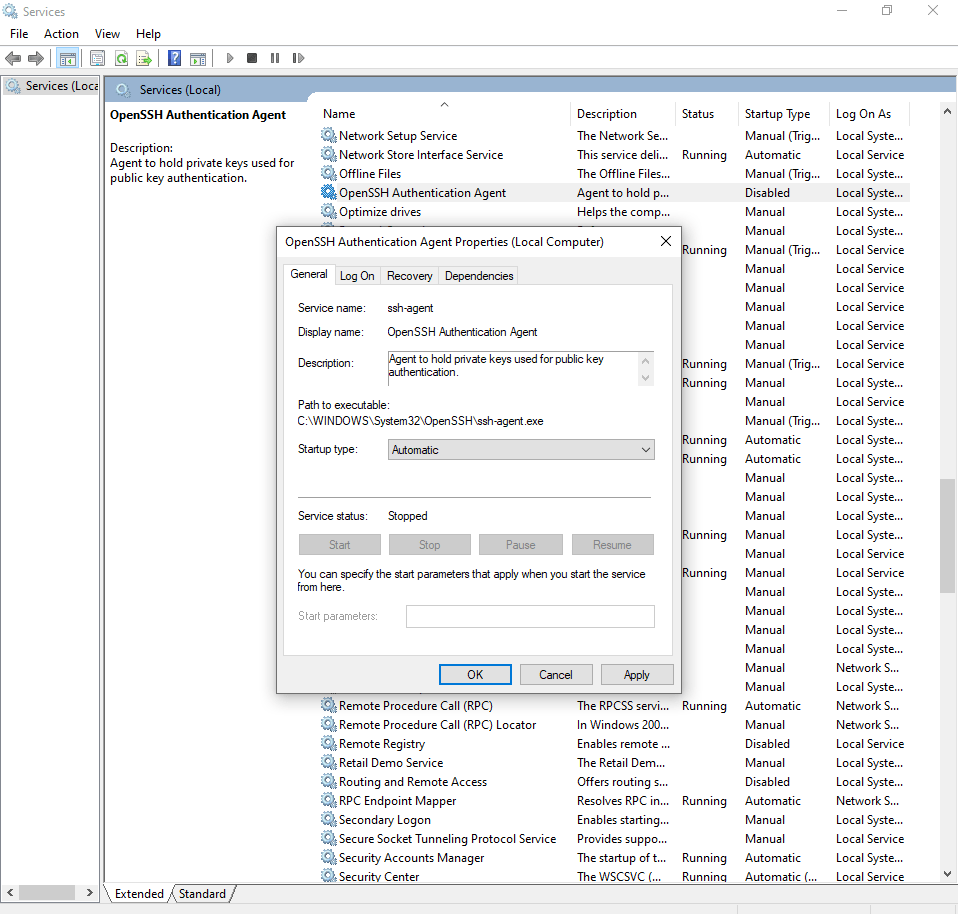
On some Windows installations, you may have to manually run the services console as administrator or it may not allow
you to start the service.
You can now add your private key to the agent using a command prompt:
ssh-add .ssh\id_ed25519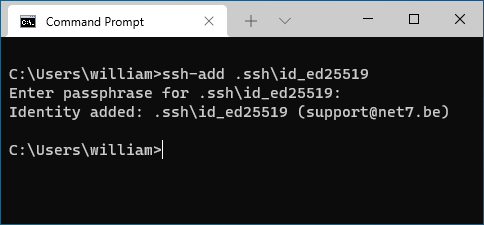
You should now be able to use the key pair with no password prompt.
Ideally you’d want to manually delete the private key, as it’s now stored in the SSH Agent service and encrypted in
such a way that you can’t get it back.
This is both good and bad as it means moving your private key to another computer is now impossible — You’d
have to create a new key pair. As such it’s not
a bad idea to backup your private key, maybe by storing it on a special USB stick (some USB sticks are even meant to
store
sensitive data).
To delete your private key from the command prompt, when inside of your user directory, you can use:
del .ssh\id_ed25519Keep in mind that you should now be extra careful with open sessions on your Windows machines, because anyone with
access to
your computer and keyboard could connect to your servers with no password when a session is open.
We suggest having a strong Windows password and locking your screen automatically after a few minutes. You can also
lock it manually using Windows Key + L.
Copying files with scp
You can also use your keypair and config file to easily copy files to your servers using the scp command.
NB: scp uses a «normal» SSH session for file copy and is different from SFTP, even though
the OpenSSH Server can do both of
these.
Copying a single file to remote directory /var/www/html:
scp some_file.html triceratops:/var/www/html/Copying a directory to your home folder:
scp -r my_project triceratops:/home/admin/You can also use scp to bring files from the server over to your client machine. For instance, to bring a log
file back to the current directory on your client machine:
scp triceratops:/var/log/auth.log .
The SSH protocol creates a secure connection between two remote machines. An SSH config file helps easily configure the default values for these connections and enables efficient streamlining of SSH connections.
This article explains how to use SSH config files to manage SSH connections.

Prerequisites
- Access to the terminal (CTRL+Alt+T).
- Access to a text editor, such as nano or Vim.
- A remote server to test connections.
What are SSH Config Files?
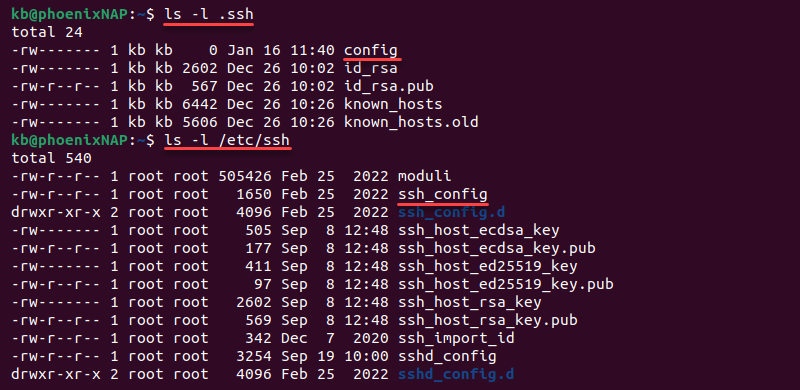
SSH configuration files are a powerful tool for automating SSH connections. The default location of a user-specific config file is in ~/.ssh/config, whereas the system-wide configuration file for all users is in /etc/ssh/ssh_config. Both file locations should stay unchanged.
A config file is a plain text file with various SSH connection options. Use any text editor to open, read, or edit a config file.
How are SSH Config Files Used?
When an SSH config file is in the appropriate location, run an ssh command with the correct parameters to read the options specified in the config file.
For example, if an SSH config file contains an example Host section like the following:
Host my-website.com
    HostName my-website.com
    User my-user
    IdentityFile ~/.ssh/id_rsa
This ssh command connects to the remote host:
ssh my-website.comThe command applies the options for the given HostName of the server, such as the User and IdentityFile. The configuration file contains default connection information for a host and avoids having to enter connection details manually.
A chain of multiple host options and wildcards enables the creation of default values for all servers or lets you add specific parameters for some servers.
How to Create SSH Config Files?
To create an SSH config file, do the following:
1. Open the terminal (CTRL+Alt+T).
2. Navigate to the .ssh directory:
cd ~/.sshNote: If the directory does not exist, create it with the mkdir command:
mkdir ~/.ssh3. Use a text editor to create and open the config file. For example, if you use nano, run:
nano configThe editor creates and opens the file for editing.
4. After filling out the file with information, close nano and save the changes.
5. Give read and write permissions to the current user only:
chmod 600 ~/.ssh/configThe file requires strict permissions due to abuse potential.
The sections below explain how to format the SSH config file and all the available parameters.
Format of the SSH Config File
SSH config files follow a specific format to work correctly. An example config file looks like the following:
Host hostname_1
    PARAMETER argument
    PARAMETER argument

Host hostname_2
    PARAMETER argument

Host *
    PARAMETER argument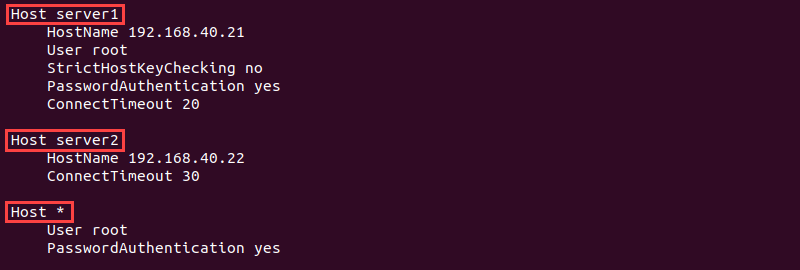
The SSH config file is divided into Host sections with specific configuration options for every host. The argument is the exact hostname, IP address, or a match pattern.
Use whitespace as a separator between parameters and arguments or an equals sign (=). If the value contains whitespaces, encase the string between quotation marks ("). Use a comma-separated list for multiple arguments.
The following characters help define different patterns:
- An asterisk (
*) matches zero or more characters. For example,Host *.commatches any host ending in the .com domain set, whereasHost *matches any host. - A question mark (
?) matches exactly one character. For example,192.168.1.?matches all hosts in192.168.1.[0-9]range. - An exclamation mark (
!) negates a pattern. For example,!192.168.1.1, 192.168.1.*
Empty lines and lines starting with the hash sign (#) are comments. SSH ignores these lines and uses the first obtained values when searching through the config file. Place host-specific information near the beginning of the file and general default information near the end.
Parameters for SSH Config Files
The SSH config file offers many parameters to configure SSH connections. Below is a brief description of all the available parameter keywords and their functionality.
Note: The parameters and arguments are case-sensitive.
AddressFamily
The AddressFamily parameter sets the address family to use when connecting via SSH. Possible arguments are inet (IPv4 only), inet6 (IPv6 only), or any.
BatchMode
The BatchMode parameter controls whether to prompt for a password or not. The value is set to no by default and asks to enter a password.
Set the argument to yes if using SSH in scripts.
BindAddress
The BindAddress parameter helps specify the bind address in a multi-address system. If the UserPrivilegedPort value is yes, the option does not work.
ChallengeResponseAuthentication
The ChallengeResponseAuthentication parameter controls whether to challenge-response authentication when using SSH to connect to a server. The default value is yes.
CheckHostIP
The CheckHostIP parameter tells SSH whether to perform additional checks on the host IP address in the known_hosts file. The parameter allows SSH to detect host key changes. By default, the value is yes.
Cipher
Cipher is a protocol version 1 parameter for stating the cipher type for encrypting sessions. Supported types are blowfish, des, and 3des (default).
Ciphers
The Ciphers parameter states the cipher type for encrypting sessions in protocol version 2. The available ciphers and default values are:
aes128-ctr, aes192-ctr, aes256-ctr, arcfour256, arcfour128,
aes128-cbc, 3des-cbc, blowfish-cbc, cast128-cbc, aes192-cbc, aes256-cbc, arcfour
Provide multiple ciphers in a comma-separated list.
ClearAllForwardings
The parameter controls whether to clear all dynamic, local, and remote port forwarding from the command line or configuration file. The default value for ClearAllForwardings is no.
When running SSH from the command line, clear any preset configuration using the parameter.
Compression
The Compression parameter controls whether to use compression or not. The default value is no.
CompressionLevel
The CompressionLevel parameter sets the compression amount if the Compression parameter is yes. The level is an integer between 1 (fastest, worst) and 9 (slowest, best), with level 6 as default. The parameter applies to protocol version 1 only.
ConnectionAttempts
The ConnectionAttempts parameter controls how many connection attempts to try before exiting. One try happens per second, and the default number of attempts is 1. Add the parameter to a script if attempts sometimes fail.
ConnectTimeout
The ConnectTimeout parameter defines the connection timeout in seconds when connecting to an SSH server. The default timeout value is the system TCP timeout.
ControlMaster
The ControlMaster parameter allows sharing a connection through the same network. The parameter enables the following arguments:
yes— Enables listening on a control socket provided inControlPath.no— Disables listening but still allows connecting through theControlPaththrough the master’s network connection (default).ask— Listens for connections and requires confirmation. If theControlPathdoes not open, SSH continues without connecting to the master connection.auto— Allows opportunistic multiplexing and creates a new connection if it does not exist.autoask— Combines theaskandautooptions.
ControlPath
The ControlPath parameter contains the information for the control socket in shared connections. The none argument disables connection sharing. If providing a path, the following substitutions are available:
%l— The local hostname.%h— The target hostname.%p— The connection port.%r— The remote login username.
The minimum recommendation is %h, %p, and %r to ensure connections have unique identifiers.
DynamicForward
The DynamicForward parameter enables dynamic TCP port forwarding over the secure channel. The format is bind_address:port or bind_address/port.
Use localhost as the bind address to bind the port for local use or * to make the port available from all interfaces.
EnableSSHKeysign
The EnableSSHKeysign parameter in the global SSH configuration file (/etc/ssh/ssh_config) starts a program to generate digital signatures for host-based authentication. The available arguments are yes or no.
EscapeChar
The EscapeChar parameter defines the escape character. The default escape character is a tilde (~). Use none to turn off escape characters.
ExitOnForwardFailure
The ExitOnForwardFailure parameter indicates whether to terminate the connection if port forwarding fails. The possible arguments are yes or no (default).
ForwardAgent
The ForwardAgent parameter controls whether an authentication agent forwards to the remote machine. The default value is no. Enable the option with caution since users who can bypass file permissions can gain access to the local agent.
ForwardX11
The ForwardX11 parameter controls X11 (windowing system) forwards to the remote machine. The value is no by default and disallows forwarding X11 controls.
Users who bypass file permissions and have enabled ForwardX11Trusted can perform keystroke monitoring and other potentially unwanted tasks when the parameter value is yes.
ForwardX11Trusted
The ForwardX11Trusted parameter enables complete control over X11 clients to the original display. The default value is no, and the xauth token expires after twenty minutes for X11 clients. Enable the option with caution because it lifts all restrictions.
GatewayPorts
The GatewayPorts parameter defines whether remote hosts can connect to local forwarded ports. The default value is no, and the local forwarded ports bind to the loopback address when disabled.
GlobalKnownHostsFile
The GlobalKnownHostsFile parameter allows specifying a different location for the global host key file. The default location is /etc/ssh/ssh_known_hosts.
GSSAPIAuthentication
The GSSAPIAuthentication parameter is a protocol version 2 option that controls whether GSSAPI is enabled. The GSSAPI provides access to various security services, and by default, the parameter is disabled and set to no.
GSSAPIKeyExchange
The GSSAPIKeyExchange parameter is a protocol version 2 option that enables key exchange based on GSSAPI and is set to no by default. The server does not need a host key when the parameter value is yes.
GSSAPIClientIdentity
The GSSAPIClientIdentity parameter specifies the client identity SSH uses for GSSAPI. The parameter has no client identity by default, so SSH uses the default identity.
GSSAPIDelegateCredentials
The GSSAPIDelegateCredentials parameter controls whether to forward credentials to the server. The default value is no, and no credentials are delegated to the server.The parameter only works for protocol version 2.
GSSAPIRenewalForcesRekey
The GSSAPIRenewalForcesRekey parameter triggers rekeying the SSH connection if GSSAPI credentials renew. The parameter is no by default.
GSSAPITrustDns
The GSSAPITrustDns parameter controls whether to securely trust the DNS to normalize the host’s name. The default argument value is no, and the hostname provided through the command line passes to the GSSAPI as is. The parameter is available for protocol version 2.
HashKnownHosts
The HashKnownHosts parameter controls whether to hash known host entries in the ~/.ssh/known_hosts file. SSH uses the hashed values as usual while not disclosing the file’s contents.
By default, the parameter is set to no. Change the value to yes to hash all future entries. Old entries remain unchanged.
HostbasedAuthentication
The HostbasedAuthentication parameter indicates whether to try rhost based authentication with public key authentication. The default value for the parameter is no and applies only to protocol version 2.
HostKeyAlgorithms
The HostKeyAlgorithms parameter sets the preference order for host key algorithms in protocol version 2. The default order is ssh-rsa,ssh-dss.
HostKeyAlias
The HostKeyAlias parameter allows setting an alias name for the host key to use when saving or looking up the host key. Use the parameter when running multiple servers on a single host or for SSH tunneling.
HostName
The HostName parameter contains the actual login hostname. The default value is the hostname given in the command line. Use the parameter to specify nicknames, abbreviations, or numerical IP addresses.

IdentitiesOnly
The IdentitiesOnly parameter specifies to only use identity files stated in ssh_config. By default, the value is set to no. Use the parameter when ssh-agent offers multiple identities.
IdentityFile
The IdentityFile parameter contains the path to the identity file with a user’s RSA or DSA identity. The default path for protocol version 1 is ~/.ssh/identity, whereas protocol version 2 uses either ~/.ssh/id_rsa or~/.ssh/id_dsa.
The identity file path allows using the tilde (~) for a user’s home directory, and the following substitutions:
%dis the local user’s home directory.%uis the local user’s username.%lis the local hostname.%his the remote hostname.%ris the remote username.
The parameter allows using multiple identity files which apply the provided order.
KbdInteractiveAuthentication
The KbdInteractiveAuthentication controls whether to use the interactive keyboard mode for authentication. The default value for the parameter is yes.
KbdInteractiveDevices
The KbdInteractiveDevices parameter contains a list of methods to use with keyboard-interactive authentication. The default values list depends on the server type. For example, an OpenSSH server uses zero or more of the following: bsdauth, pam, and skey.
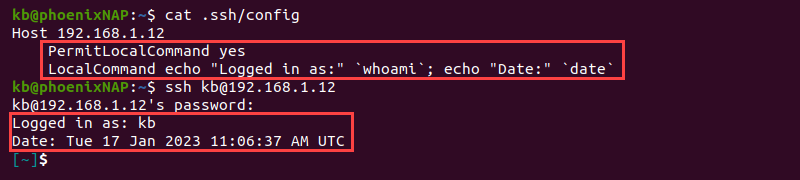
LocalCommand
The LocalCommand parameter allows a command to run on the local machine after successfully connecting via SSH. The command string executes in the user’s shell.
To permit executing the command, enable the PermitLocalCommand parameter.
LocalForward
The LocalForward parameter specifies a local port to forward through the secure channel to a target host and a port on the remote machine. The parameter requires two arguments:
bind_address:portfor IPv4 orbind_address/portfor IPv6 addresses. The bind address is optional.host:hostportfor IPv4 orhost/hostportfor IPv6 addresses.
For multiple ports, specify multiple arguments or provide additional forwarding information via the command line.
LogLevel
The LogLevel parameter controls the output verbosity of SSH messages. The available options are:
QUIET, FATAL, ERROR, INFO, VERBOSE, DEBUG, DEBUG1, DEBUG2, and DEBUG3The INFO argument is the default value, whereas DEBUG and DEBUG1 indicate the same level.
MACs
The MACs parameter allows listing the message authentication algorithms (MACs) for protocol version 2. The algorithms determine the algorithm for data integrity protection. Possible values are:
hmac-md5, hmac-sha1, [email protected],
hmac-ripemd160, hmac-sha1-96, hmac-md5-96
State multiple algorithms in a comma-separated list. The algorithms apply in the specified order.
NoHostAuthenticationForLocalhost
The NoHostAuthenticationForLocalhost parameter disables authentication for localhost. The default value is no, meaning the host key check happens for localhost.
Enable the option to allow sharing a home directory across machines. Warnings for changed host keys appear because «localhost» refers to a different device on every machine.
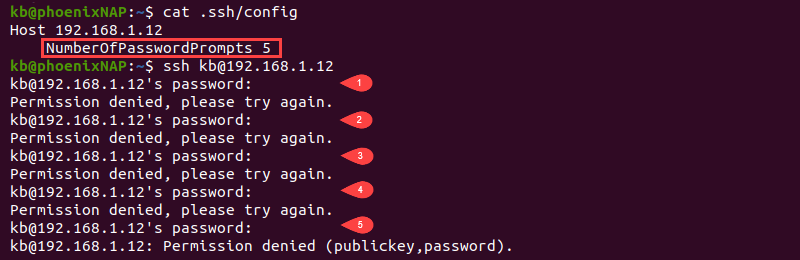
NumberOfPasswordPrompts
The NumberOfPasswordPrompts parameter allows stating how many password prompts happen upon failure. The argument for the parameter is an integer value, which is 3 by default.
PasswordAuthentication
The PasswordAuthentication parameter controls whether there should be password authentication. The default value for the parameter is yes.
PermitLocalCommand
The PermitLocalCommand option controls whether the LocalCommand parameter executes a command on a local machine after connecting. By default, the parameter is turned off with the value no.
Port
The Port parameter contains the port number on the remote host. The default port for SSH is port number 22.
PreferredAuthentications
The PreferredAuthentications parameter is a list of authentication methods the client uses in order of preference. The list contains protocol version 2 authentication methods, and the possible values are:
gssapi-with-mic, hostbased, publickey, keyboard-interactive, passwordChanging the order also changes the client’s preference for authentication.
Protocol
The Protocol parameter contains the preferred protocol version for SSH. The possible values are 1 and 2. List the values in order of preference to create a fallback option if the first option does not work.
ProxyCommand
The ProxyCommand parameter defines the command for connecting to the server, and the argument is a command string that executes in the user’s shell.
The command should connect to an OpenSSH daemon server running on a machine or execute sshd -i. For example, use Netcat to connect to an HTTP proxy with the following:
ProxyCommand nc -X connect -x <address>:<port> %h %pThe nc command contains proxy support and works with the ProxyCommand parameter to connect via proxy. The %h parameter substitutes the host, whereas %p is the port number.
PubkeyAuthentication
The PublicKeyAuthentication parameter controls whether to use public key authentication or not. The default value is no and works for protocol version 2 only.
RekeyLimit
The RekeyLimit parameter sets the maximum amount of data to transmit before the key renegotiates. The argument value is the number of bytes and allows suffixes for kilobytes (K), megabytes (M), and gigabytes (G).
Depending on the cipher, the default value is between 1G and 4G.
RemoteForward
The RemoteForward parameter defines a TCP port on a remote machine to forward through the secure connection. Provide the following two arguments:
bind_address:portfor IPv4 orbind_address/portfor IPv6 addresses. The bind address is optional.host:hostportfor IPv4 orhost/hostportfor IPv6 addresses.
To use multiple ports, specify multiple arguments or provide additional forwarding information via the command line.
RhostsRSAAuthentication
The RhostRSAAuthentication parameter sets whether to use rhost based authentication and RSA-host authentication. The available options are yes or no (default).
RSAAuthentication
The RSAAuthentication parameter controls whether to attempt RSA authentication. The parameter only applies to protocol version 1, and the default value is yes. The RSA authentication attempt occurs only when an identity file exists, or the authentication agent is running.
SendEnv
The SendEnv parameter contains environment variables to send from the local environment to the server. Configure the server to accept environment variables through the AcceptEnv parameter in the /etc/ssh/sshd_config file.
No variables are sent by default. To send multiple environment variables, use SendEnv multiple times or provide a comma-separated list with variable names.
ServerAliveCountMax
The ServerAliveCountMax parameter sets the maximum number of server alive messages (default is 3). The session terminates when the connection reaches the threshold, defined as ServerAliveInterval*ServerAliveCountMax, in seconds.
The messages help a client or server know when a connection is inactive.
ServerAliveInterval
The ServerAliveInterval parameter is the timeout interval in seconds where no data comes from the server. After the interval elapses, SSH sends an encrypted request to respond to the server. The default value for the parameter is 0, meaning SSH sends no messages to the server.
SmartcardDevice
The SmartcardDevice parameter controls which smartcard device to use. Smartcard support is inactive by default. If active, the default argument is the smartcard SSH public keys.
StrictHostKeyChecking
The StrictHostKeyChecking parameter flags whether to automatically add host keys to the ~/.ssh/known_hosts file upon changes. The default options are yes, no, or ask (default). The check is a good security measure against trojan horse attacks.
TCPKeepAlive
The TCPKeepAlive parameter sends TCP messages to the server to check for connectivity. If the network is down or the server crashes, the client gets the information through the TCP messages.
By default, the messages are set as yes. Turn the parameter off to avoid disconnecting during temporary route downtimes.
Tunnel
The Tunnel parameter requests a tunnel interface device forwarding between the client and server. The available options are yes, point-to-point, ethernet, or no (default). The tunnel option for yes is point-to-point.
TunnelDevice
The TunnelDevice parameter helps determine which devices to open on the client (local tunneling) and server (remote tunneling). The argument is local:remote, whose values are the device IDs or any. The remote device ID is optional and defaults to any when omitted.
The default value for the tunnel device is any:any and uses the next available device in both cases.
UsePrivilegedPort
The UserPrivilegedPort parameter determines whether to use a privileged port for outside connections. The possible values are yes or no (default). If using RhostsRSAAuthentication with older servers, set the parameter value to yes.
User
When establishing a connection, the User parameter sets the login username. Use the option when the username differs on machines or to avoid specifying it in the command line.
UserKnownHostsFile
The UserKnownHostsFile parameter sets the path for the known hosts file. The default location is ~/.ssh/known_hosts.
VerifyHostKeyDNS
The VerifyHostKeyDNS parameter determines whether to use DNS and SSHFP file records to verify the remote key. The default value is no, and changing it to yes automatically enables trusting keys that match the DNS fingerprint. Use the option ask to display fingerprint matches and to require confirmation.
VisualHostKey
The VisualHostKey parameter controls whether to print the ASCII art of the remote host key fingerprint for unknown host keys. By default, the value is no, and only the hex string fingerprint prints for unknown host keys.
XAuthLocation
The XAuthLocation parameter holds the full path to the X authority file utility. The default location is /usr/bin/xauth.
Conclusion
After reading this guide, you know how to use an SSH config file to set up connection options automatically.
Next, check out the most common SSH Linux commands.
Was this article helpful?
YesNo
Secure Shell (SSH) is a protocol used to securely connect to remote servers and devices over an unsecured network. An often overlooked but incredibly useful feature of SSH is the SSH configuration file, which streamlines the process of connecting to multiple servers by allowing you to define custom connection parameters. In this article, we will delve into how to effectively manage an SSH config file on both Windows and Linux, including its creation, structure, common options, and best practices.
Understanding SSH and the Config File
SSH is primarily used for remote access to servers. The SSH client on your local machine communicates with an SSH server on a remote machine, enabling secure communication. The SSH config file allows users to create shortcuts for connections. Instead of typing the full command every time, users can reference hosts using aliases defined in the config file.
Location of SSH Config File
For Linux and macOS, the SSH configuration file is typically located at:
~/.ssh/configIn contrast, Windows now provides a similar structure through various methods, including the Windows Subsystem for Linux (WSL) or third-party applications such as Git Bash or PuTTY.
- Using WSL or Linux Tools on Windows: If using WSL or Git Bash, the configuration file will also be located at:
~/.ssh/config- Using PuTTY: PuTTY does not use an SSH config file like OpenSSH. Instead, it utilizes its own saved session profiles.
Creating the SSH Config File
For Linux and macOS
-
Open the Terminal: You can do this by searching for “Terminal” in your applications.
-
Create the .ssh Directory if it Doesn’t Exist:
mkdir -p ~/.ssh -
Create or Edit the Config File:
nano ~/.ssh/config -
Set Permissions: Ensure that the
.sshdirectory andconfigfile have the right permissions:chmod 700 ~/.ssh chmod 600 ~/.ssh/config
For Windows Using WSL or Git Bash
- Follow the same steps as above, as WSL and Git Bash mimic the Linux environment.
Using PuTTY on Windows
-
Open PuTTY: Launch the application.
-
Create a New Session: Input the hostname and port number.
-
Save the Session: Before connecting, make sure to save the session with a recognizable name.
Basic Structure of the SSH Config File
The SSH config file consists of multiple sections where each section specifies a host and its related settings. Below is the basic syntax:
Host
    HostName
    User
    Port
    IdentityFile
Example SSH Config File Entry
Host myserver
    HostName example.com
    User myusername
    Port 2222
    IdentityFile ~/.ssh/id_rsa
In this example, you can use the command ssh myserver instead of typing the full SSH command with all parameters.
Common SSH Config Options
Host
This is the alias for your connection. This can be anything you choose but is often a simple name that makes it easy to remember.
HostName
This is the actual domain name or IP address of the server you’re connecting to.
User
This specifies the username you wish to log in as on the remote system.
Port
By default, SSH operates on port 22, but if your server uses a different port for SSH connections, specify it here.
IdentityFile
If you’re using key-based authentication, use this option to point to your private key file.
Other Useful Options
-
ForwardAgent: Allows SSH agent forwarding, which can be useful for using your local SSH key on a remote server.
ForwardAgent yes -
ProxyCommand: This specifies a command to be executed to connect to the server, useful when dealing with jump servers.
ProxyCommand ssh -q -W %h:%p [email protected] -
ServerAliveInterval: This option sets a timeout interval to send keepalive messages to the server, useful for preventing idle disconnections.
ServerAliveInterval 60
Managing Multiple SSH Configurations
When managing multiple servers, keeping your SSH config organized is essential. Below are some strategies for better management.
Grouping Hosts
You can group similar hosts under a single block to avoid redundancy. For example, if you have multiple servers in the same project:
Host project1-server1
    HostName project1-server1.example.com
    User deploy
    IdentityFile ~/.ssh/project1_id_rsa

Host project1-server2
    HostName project1-server2.example.com
    User deploy
    IdentityFile ~/.ssh/project1_id_rsa
Using Wildcards
If you’re connecting to multiple hosts that share the same configuration, you can use wildcards:
Host droplet-*
    User root
    IdentityFile ~/.ssh/digitalocean_id_rsa
Comments for Clarity
Adding comments can aid in quick references when dealing with a large number of hosts.
# Web servers
Host webserver1
    HostName web1.example.com
    User deploy

Host webserver2
    HostName web2.example.com
    User deploy
Including Additional Configurations
If you have a large number of connections and configurations, consider breaking them into multiple files using the Include directive (supported in OpenSSH 7.3 and later):
Include ~/.ssh/config.d/*You can then put configuration snippets in separate files under ~/.ssh/config.d/.
Testing Your Configuration
After setting up your ~/.ssh/config, you can test your connections to ensure everything works as intended. Use the following command:
ssh -G This command shows the effective options for the given alias. If you encounter any issues, the output will help identify what might be wrong, including missing keys or misconfigured options.
Common Errors and Troubleshooting
Even after correctly setting up the SSH config file, you might encounter some issues. Here are a few common problems and their solutions:
Permission Denied (Publickey)
This error often occurs when the SSH server cannot find the correct key for authentication. Ensure that:
-
The private key specified in the configuration exists and has the right permissions (
chmod 600). -
The public key is added to the
~/.ssh/authorized_keysfile on the server.
Host Key Verification Failed
If you see this error, it means the host key stored in your known_hosts file does not match the server’s current host key. This may indicate a man-in-the-middle attack or simply that the server’s key has changed.
- To resolve, you can remove the old key from your
~/.ssh/known_hostsfile using the following command:
ssh-keygen -R Then attempt to reconnect, and you’ll be prompted to add the new key.
Connection Timed Out
This indicates that your SSH request is not reaching the server. Ensure that:
- The server is running and accessible over the network.
- You are connecting to the right IP address.
Security Best Practices
When managing SSH config files, keep security in mind to minimize risks.
Use Key-Based Authentication
Using SSH keys instead of passwords can significantly enhance your security posture. Generate a new key pair:
ssh-keygen -t rsa -b 4096 -C "[email protected]"Don’t forget to add your public key to the server’s ~/.ssh/authorized_keys file.
Disable Root Login
To reduce the risk of unauthorized access, disable root login in your SSH configuration on the server:
PermitRootLogin noUse Strong Passwords
If you must use passwords (for instance, two-factor authentication), ensure they are strong and unique.
Keep Software Updated
Regular updates to your SSH client and server software are crucial for protecting against vulnerabilities. Check for software updates regularly.
Managing SSH Configurations in Windows with PuTTY
While PuTTY doesn’t use a config file per se, it allows for saving profiles that function similarly. Here’s how you can manage SSH connections in PuTTY.
Saving Sessions
- Open PuTTY.
- In the Session category, enter the hostname or IP address in the «Host Name» field.
- Choose a port, typically
22for SSH. - Under «Connection» -> «SSH», you can configure options like the username and authentication method.
- Return to the Session category, type a name for your session, and click «Save.»
Loading Sessions
To connect later, simply open PuTTY, select the session name, and click «Load,» followed by «Open.»
Exporting and Backing Up Profiles
There’s no built-in feature for exporting configurations like an SSH config file, but you can manually back up the settings by exporting the Windows registry keys PuTTY uses.
- Open the Command Prompt and run:
reg export HKCUSoftwareSimonTathamPuTTY C:pathtoyourbackup_file.reg
Managing Keys in PuTTY with Pageant
Pageant is an SSH authentication agent for PuTTY, allowing you to manage your private keys securely. It keeps keys loaded and can save you from entering passphrases repeatedly.
- Start Pageant from the programs list.
- Right-click the Pageant icon in the system tray.
- Click “Add Key” and select your private key (e.g.,
id_rsa).
Using Third-Party Tools
You can also consider third-party tools that offer easier SSH management, such as:
-
MobaXterm: A feature-rich SSH client that includes a built-in X server, file transfer capabilities, and the ability to save SSH configurations.
-
WinSCP: Primarily a file transfer tool but provides SSH access and can be used to manage configurations efficiently.
Conclusion
Managing SSH config files is an essential skill for system administrators, developers, and anyone who frequently interacts with remote systems. Both Windows and Linux provide robust mechanisms for configuring SSH connections, enhancing usability and productivity.
By following best practices, organizing configurations efficiently, and ensuring robust security policies, you can streamline your workflow while maintaining a secure environment.
With this comprehensive guide, you should now have a solid understanding of how to create, manage, and troubleshoot SSH config files on both Windows and Linux systems. Embrace these practices, and you’ll find managing remote connections much easier and far more secure.
This page is about OpenSSH client configuration. For OpenSSH server configuration, see sshd_config. For Tectia SSH configuration, see Tectia SSH Server Administrator Manual. For configuring passwordless public key authentication, see ssh-keygen.
The ssh program on a host receives its configuration from either the command line or from configuration files ~/.ssh/config and /etc/ssh/ssh_config.
Command-line options take precedence over configuration files. The user-specific configuration file ~/.ssh/config is used next. Finally, the global /etc/ssh/ssh_config file is used. The first obtained value for each configuration parameter will be used.
Commonly used configuration options
There are many configuration options available. In practice, only a few of them are ever changed, and user-specific configuration files are rarely used. In most cases, just /etc/ssh/ssh_config is edited.
Enabling X11 forwarding and agent forwarding
Developers, students, and researchers often want to enable X11 forwarding and SSH agent forwarding. These allow running graphical applications remotely and eliminate the need for typing a password whenever moving from one server to another, respectively. Setting these options in /etc/ssh/ssh_config makes life easier for end users, saves overhead, and reduces support load. However, they increase the risk of an attack spreading from a compromised server to a user’s desktop, so the most security-critical environments may want to leave them disabled. There is generally no reason to enable them on production servers in enterprises.
ForwardAgent yes ForwardX11 yesPort forwarding
Local and remote port forwarding can be used for tunneling applications, accessing intranet web services from home, tunneling database access, and many other purposes. For instructions on configuring port forwarding, see the port forwarding configuration page. Note, however, that port forwarding can also be used to tunnel traffic from the external Internet into a corporate intranet. Employees sometimes do this to be able to work from home even when company policy does not permit it. Hackers use it to leave permanent backdoor. See the page on SSH tunneling for more information.
Configuring public key authentication
Public authentication is used for passwordless logins between systems. It is often used for automated processes, such as backups, configuration management, and file transfers. It is also used by sophisticated end users and system administrators for single sign-on. See the public key authentication for configuring it.
When a user has created more than one SSH key for authentication, the -i command line option may be helpful for specifying which key to use. In the client configuration file, this can be specified using the IdentityFile options.
Certificate-based authentication
OpenSSH certificates can be used for authentication either using ssh-agent or by specifying the CertificateFile option in the client configuration file. See SSH certificates for more information.
Format of SSH client config file ssh_config
The ssh_config client configuration file has the following format. Both the global /etc/ssh/ssh_config and per-user ~/ssh/config have the same format.
-
Empty lines and lines starting with ‘#’ are comments.
-
Each line begins with a keyword, followed by argument(s).
-
Configuration options may be separated by whitespace or optional whitespace and exactly one =.
-
Arguments may be enclosed in double quotes («) in order to specify arguments that contain spaces.
 Listing of client configuration options

The following keywords can be used in SSH client configuration files. Keywords are case-insensitive and arguments are case-sensitive. Any algorithm or method names that include an at sign (@) are for experimental use only and not recommended for production.
Host
Restricts the following declarations to be only for those hosts that match one of the patterns given after the keyword. The pattern is matched against the host name given on the command line.
Match
Restricts the following declarations to apply only for hosts that match the specified criteria. For detailed information, see SSH man page.
AddressFamily
Specifies which address family to use when connecting. Valid arguments are: any, inet, inet6.
BatchMode
If set to yes, passphrase/password querying will be disabled. This is useful for running the ssh client from shell script that do not have an interactive user, and prevents accidentally blocking on a password prompt.
BindAddress
Specifies to use the specified address on the local machine as the source address of the connection.
ChallengeResponseAuthentication
Specifies whether to use challenge-response authentication. This is mostly a legacy method and has been replaced by KbdInteractiveAuthentication.
CheckHostIP
Directs ssh to additionally check the host IP address in the known_hosts file.
Cipher
Specifies the cipher to use for encrypting the session in protocol version 1. Note that use of protocol 1 is not recommended.
Ciphers
Specifies the ciphers allowed for protocol version 2 in order of preference. Multiple ciphers must be comma-separated. The ssh -Q cipher command can be used to query supported ciphers. The following list is supported in OpenSSH 6.7:
3des-cbc blowfish-cbc cast128-cbc arcfour arcfour128 arcfour256 aes128-cbc aes192-cbc aes256-cbcrijndael-cbc@lysator.liu.se aes128-ctr aes192-ctr aes256-ctr aes128-gcm@openssh.comaes256-gcm@openssh.com chacha20-poly1305@openssh.comClearAllForwardings
Specifies that all local, remote, and dynamic port forwardings specified in the configuration files or on the command line be cleared.
Compression
Specifies whether to use compression. yes enables compression.
CompressionLevel
Specifies the compression level to use if compression is enabled.
ConnectionAttempts
Specifies the number of attempts to make before exiting.
ConnectTimeout
Specifies the timeout (in seconds) used when connecting to the SSH server, instead of using the default system TCP timeout.
ControlMaster
Enables the sharing of multiple sessions over a single network connection.
ControlPath
Specify the path to the control socket used for connection sharing as described in the ControlMaster section above or the string none to disable connection sharing.
DynamicForward
Specifies that a TCP port on the local machine be forwarded over the secure channel, and the application protocol is then used to determine where to connect to from the remote machine.
EscapeChar
Sets the escape character.
ExitOnForwardFailure
Specifies whether ssh should terminate the connection if it cannot set up all requested dynamic, tunnel, local, and remote port forwardings.
ForwardAgent
Specifies whether the connection to the authentication agent will be forwarded to the remote machine.
ForwardX11
Specifies whether X11 connections will be automatically redirected over the secure channel and DISPLAY set.
ForwardX11Trusted
If this option is set to yes, remote X11 clients will have full access to the original X11 display.
GatewayPorts
Specifies whether remote hosts are allowed to connect to local forwarded ports.
GlobalKnownHostsFile
Specifies a file to use for the global host key database instead of /etc/ssh/ssh_known_hosts.
GSSAPIAuthentication
Specifies whether user authentication based on GSSAPI is allowed. GSSAPI is typically used for Kerberos authentication, e.g., with Active Directory.
GSSAPIKeyExchange
Specifies whether key exchange based on GSSAPI may be used.
GSSAPIClientIdentity
If set, specifies the GSSAPI client identity that ssh should use when connecting to the server.
GSSAPIDelegateCredentials
Forward (delegate) credentials to the server.
GSSAPIRenewalForcesRekey
If set to yes then renewal of the client’s GSSAPI credentials will force the rekeying of the ssh connection.
GSSAPITrustDns
Set to yes to indicate that the DNS is trusted to securely canonicalize the name of the host being connected to. If no, the hostname entered on the command line will be passed untouched to the GSSAPI library.
HashKnownHosts
Indicates that ssh should hash host names and addresses when they are added to ~/.ssh/known_hosts. These hashed names may be used normally by ssh and sshd, but they do not reveal identifying information should the file’s contents be disclosed.
HostbasedAuthentication
Specifies whether to try rhosts based authentication with public key authentication, using the .rhosts or .shosts files in the user’s home directory and /etc/hosts.equiv and /etc/shosts.equiv in global configuration.
HostKeyAlgorithms
Specifies the protocol version 2 host key algorithms that the client wants to use in order of preference. The following values are supported in OpenSSH 6.7:
ssh-ed25519 ssh-ed25519-cert-v01@openssh.com ssh-rsa ssh-dss ecdsa-sha2-nistp256 ecdsa-sha2-nistp384 ecdsa-sha2-nistp521 ssh-rsa-cert-v01@openssh.com ssh-dss-cert-v01@openssh.com ecdsa-sha2-nistp256-cert-v01@openssh.com ecdsa-sha2-nistp384-cert-v01@openssh.com ecdsa-sha2-nistp521-cert-v01@openssh.com ssh-rsa-cert-v00@openssh.com ssh-dss-cert-v00@openssh.com
HostKeyAlias
Specifies an alias that should be used instead of the real host name when looking up or saving the host key in the host key database files.
HostName
Specifies the real host name to log into. This can be used to specify nicknames or abbreviations for hosts. The default is the name given on the command line. Numeric IP addresses are also permitted (both on the command line and in HostName specifications).
IdentitiesOnly
Specifies that ssh should only use the identity keys configured in the ssh_config files, even if ssh-agent offers more identities.
IdentityFile
Specifies a file from which the user’s identity key is read when using public key authentication. The default for protocol version 1 is ~/.ssh/identity; and ~/.ssh/id_rsa or ~/.ssh/id_dsa for protocol version 2.
KbdInteractiveAuthentication
Specifies whether to use keyboard-interactive authentication. This is a common method for password authentication, one-time passwords, and multi-factor authentication.
KbdInteractiveDevices
Specifies the list of methods to use in keyboard-interactive authentication.
LocalCommand
Specifies a command to execute on the local machine after successfully connecting to the server.
LocalForward
Specifies that a TCP port on the local machine be forwarded over the secure channel to the specified host and port from the remote machine. The first argument must be [bind_address:]port and the second argument must be host:port.
LogLevel
Specifies the verbosity level of logging messages from ssh. The possible values are: QUIET, FATAL, ERROR, INFO, VERBOSE, DEBUG, DEBUG1, DEBUG2, and DEBUG3.
MACs
Specifies the MAC (message authentication code) algorithms in order of preference. The ssh -Q mac command can be used to query supported MAC algorithms. The following list is supported in OpenSSH 6.7:
hmac-sha1 hmac-sha1-96 hmac-sha2-256 hmac-sha2-512 hmac-md5 hmac-md5-96 hmac-ripemd160 hmac-ripemd160@openssh.com umac-64@openssh.com umac-128@openssh.com hmac-sha1-etm@openssh.comhmac-sha1-96-etm@openssh.com hmac-sha2-256-etm@openssh.com hmac-sha2-512-etm@openssh.comhmac-md5-etm@openssh.com hmac-md5-96-etm@openssh.com hmac-ripemd160-etm@openssh.com umac-64-etm@openssh.comumac-128-etm@openssh.comNoHostAuthenticationForLocalhost
This option can be used if the home directory is shared across machines. In this case localhost will refer to a different machine on each of the machines and the user will get many warnings about changed host keys.
PreferredAuthentications
Specifies the order in which the client should try protocol 2 authentication methods.
Protocol
Specifies the protocol versions in order of preference. The possible values are ‘1’ and ‘2’. Multiple versions must be comma-separated. Use of protocol version 1 is NOT RECOMMENDED for security reasons. There is reason to believe it may be susceptible to man-in-the-middle attacks.
ProxyCommand
Specifies the command to use to connect to the server. The SSH client communicates with the proxy command using its standard input and standard output, and the proxy command should pass the communication to an SSH server.
PubkeyAuthentication
Specifies whether to try public key authentication using SSH keys. Valid values are yes and no. When public key authentication is used in a production environment, a proper SSH key management system should also be put in place.
RemoteForward
Specifies that a TCP port on the remote machine be forwarded over the secure channel to the specified host and port from the local machine. The first argument must be: [bind_address:]port and the second argument must be host:port. SSH tunneling is a powerful tool, but see security considerations on SSH tunneling.
RhostsRSAAuthentication
Specifies whether to try rhosts based authentication with RSA host authentication. This is for protocol version 1 only and is deprecated.
RSAAuthentication
Specifies whether to try RSA authentication. This is for protocol version 1 only and is deprecated.
SendEnv
Specifies what environment variables should be sent to the server.
ServerAliveCountMax
Sets the number of keepalive messages that may be sent by the client without the client receiving any messages back from the server. When this threshold is reached the client will terminate the session.
ServerAliveInterval
Specifies interval for sending keepalive messages to the server. The messages are sent through the encrypted channel, and serve to detect if the server has crashed or the network has gone down.
SmartcardDevice
Specifies which smartcard device to use.
StrictHostKeyChecking
Specifies if ssh should never automatically add host keys to the ~/.ssh/known_hosts file, and refuses to connect to hosts whose host key has changed.
TCPKeepAlive
Specifies whether to send TCP keepalives to the other side. These operate on the level of the TCP protocol. Sending keepalives helps properly close the socket when the network or server goes down. On the other hand, without it, the connection may stay alive and any windows open, even if the network is down for a while.
Tunnel
If yes, request tun device forwarding between the client and the server. This used for implementing a VPN over SSH.
TunnelDevice
Specifies the tun devices to open on the client (local_tun) and the server (remote_tun).
UsePrivilegedPort
Specifies whether or not to use a privileged port for outgoing connections. The client must run as root to use a privileged port. A privileged port is required for host-based authentication.
UserKnownHostsFile
Specifies a file to use for per-user known host key database instead of the default ~/.ssh/known_hosts.
VerifyHostKeyDNS
Specifies whether to verify the remote key using DNS and SSHFP resource records.
VisualHostKey
Specifies whether an ASCII art representation of the remote host key fingerprint is printed in addition to the hex fingerprint string at login and for unknown host keys.
A Comprehensive Guide to Understanding and Configuring SSH on Windows
Greetings, readers! In this article, we will delve into the fascinating world of the Windows SSH config file. 🌐💻 As technology continues to evolve, the need for secure remote connections has become increasingly important. The SSH protocol provides a robust solution for establishing secure connections over an unsecured network, ensuring privacy and data integrity. In the realm of Windows operating systems, configuring SSH can be a daunting task, but fear not! We are here to demystify this process and empower you with the knowledge to manage SSH configurations effectively.
Introduction: Exploring the Windows SSH Config File
The Windows SSH config file, commonly known as ssh_config, is a configuration file that allows you to customize the behavior of the SSH client on your Windows machine. By tweaking various settings within this file, you can enhance your SSH experience and optimize it according to your specific requirements.
Understanding the structure and syntax of the SSH config file is essential for harnessing its power. Let’s dive into the intricacies of this file and explore its capabilities.
The Purpose of the SSH Config File
The primary purpose of the SSH config file is to provide a centralized location to specify various options that influence the behavior of the SSH client. Rather than repeatedly providing command-line arguments or relying solely on the default settings, the config file allows you to define and modify these options as needed.
Location and Naming Convention
The SSH config file is typically located at C:\Program Files\OpenSSH\ssh_config or C:\Users\[YourUsername]\.ssh\config. It is important to note that the file might not exist by default, and you may have to create it. The naming convention of the config file is critical—it must be named config (without any extension) for the SSH client to recognize it.
Configuring SSH Connections
Now that we understand the basics, let’s explore how to configure SSH connections using the Windows SSH config file. By utilizing the appropriate directives and options, we can tailor SSH connections to our specific needs.
Host Specification
The Host directive in the SSH config file allows you to define different configurations for specific hosts or groups of hosts. This powerful feature enables you to fine-tune settings on a per-host basis, providing flexibility and control over your SSH connections.
Modifying Connection Options with Match Blocks
The Match directive enables you to apply specific configurations based on various criteria such as the user, hostname, or IP address. This allows for even more granular control over your SSH connections. Using Match blocks, you can define different options for specific scenarios, ensuring optimal security and compatibility.
Authentication and Key Management
Securely authenticating with remote servers is crucial in SSH connections. The SSH config file provides directives to manage authentication methods, specify preferred cryptographic algorithms, and configure key-based authentication. These options allow you to strike the right balance between security and convenience.
Managing Connection Timeouts and KeepAlive
Network issues and idle connections can disrupt your SSH experience. Thankfully, the SSH config file allows you to configure connection timeouts and enable the KeepAlive mechanism to maintain a persistent connection. By tweaking these settings, you can ensure a reliable and uninterrupted SSH session.
Advanced Options and Tunneling
The SSH config file offers a myriad of advanced options to cater to diverse use cases. From configuring port forwarding to creating SSH tunnels, these options enable you to extend the capabilities of your SSH connections and harness the full potential of SSH.
Advantages and Disadvantages of Using the Windows SSH Config File
Advantages
1. Simplified SSH connections: The SSH config file allows you to define and manage SSH connections effortlessly, eliminating the need for repetitive command-line arguments.
2. Enhanced customization: With the config file, you can tailor SSH settings for specific hosts or scenarios, providing granular control over your connections.
3. Improved security: Fine-tuning authentication methods, cryptographic algorithms, and other security settings ensures a robust and secure SSH experience.
4. Streamlined management: Centralized configuration simplifies the management of SSH connections across multiple hosts, saving time and effort.
5. Increased productivity: Optimizing connection timeouts and enabling KeepAlive guarantees a reliable and efficient SSH session.
6. Flexibility and extensibility: Advanced options in the SSH config file enable various SSH tunneling and forwarding techniques, enabling a wide range of use cases.
7. Community support: The SSH config file is widely used and well-documented, with a vast community of users and experts providing guidance and assistance.
Disadvantages
1. Learning curve: Configuring the SSH config file requires understanding its syntax and various directives, which may pose a challenge for beginners.
2. Error-prone: Incorrect configurations within the file can lead to connectivity issues or security vulnerabilities, necessitating careful attention.
3. Compatibility limitations: Some SSH clients or servers may not fully support or recognize all the options available in the SSH config file.
4. System-wide impact: Modifying settings in the config file affects all SSH connections on the system, which may not always be desirable.
5. Limited graphical interface: Unlike some SSH GUI clients, the config file relies on manual text-based editing, which may be less intuitive for some users.
6. Multi-platform considerations: While the SSH config file is specific to Windows, cross-platform configurations might require adjustments in separate configuration files.
7. Over-customization risks: Excessive customization within the SSH config file can lead to complex configurations that are harder to maintain and troubleshoot.
Complete Information about the Windows SSH Config File
| Config Directive | Description |
|---|---|
| Host | Defines configurations for specific hosts or groups of hosts |
| Match | Applies configurations based on specified criteria (user, hostname, IP address) |
| Port | Specifies the port number to connect to on the remote host |
| User | Specifies the user to log in as on the remote host |
| IdentityFile | Specifies the private key file to use for authentication |
| PreferredAuthentications | Specifies the preferred authentication methods |
| Ciphers | Specifies the preferred encryption algorithms |
| Compression | Enables or disables compression for the SSH connection |
| ForwardAgent | Specifies whether to forward the authentication agent to the remote host |
| ProxyJump | Specifies one or more jump hosts for SSH connections |
| ConnectTimeout | Specifies the maximum time (in seconds) to wait for a connection attempt |
| ServerAliveInterval | Specifies the time (in seconds) between server alive messages |
| LocalForward | Specifies port forwarding from the client to the server |
| RemoteForward | Specifies port forwarding from the server to the client |
Frequently Asked Questions (FAQs)
1. Can I use the SSH config file on other operating systems like macOS or Linux?
Yes, while this article focuses on Windows, SSH config files are widely supported across various operating systems, including macOS and Linux.
2. How do I create the SSH config file if it doesn’t exist?
If the SSH config file doesn’t exist, you can create it using a text editor and save it with the name “config” (without any file extension).
Yes, you can include comments by prefixing them with the ‘#’ symbol. This helps to document and annotate your configurations.
4. How can I troubleshoot SSH configuration issues?
If you encounter any issues with your SSH configurations, reviewing log files and utilizing verbose mode can provide valuable insights. Additionally, consulting documentation or reaching out to the SSH community for assistance is advisable.
5. Does modifying the SSH config file require administrative privileges?
No, modifying the SSH config file does not usually require administrative privileges unless the file is located in a restricted directory.
6. Can I restrict SSH configurations within the SSH config file?
While the SSH config file allows extensive customization, ensuring proper access control and security measures at the system level is essential to restrict unauthorized modifications.
7. How can I ensure compatibility between SSH clients and servers?
To ensure compatibility, verify the compatibility of SSH options and versions between the SSH client and server software. Regularly updating your SSH client and server can also help minimize compatibility issues.
8. Is it possible to use wildcards in host specifications?
Yes, wildcards such as ‘*’ and ‘?’ can be used in host specifications within the SSH config file to match multiple hosts or patterns.
9. Can I override global settings in specific host configurations?
Yes, configurations specified within the host-specific sections of the SSH config file override the corresponding global settings for the specified hosts.
10. How can I test my SSH configuration changes?
You can test your SSH configuration changes by establishing SSH connections with the modified settings and verifying that the desired behavior is observed.
Yes, you can copy your SSH config file to other machines where you require the same settings, thereby allowing easy replication and synchronization of configurations.
12. Can I use the SSH config file with third-party SSH clients on Windows?
While the SSH config file is primarily designed for OpenSSH on Windows, some third-party SSH clients may support using the same config file or offer similar configuration options.
13. What should I do if the SSH config file is not taking effect?
If the SSH config file is not taking effect, verify that the file is in the correct location and properly formatted. Ensure that your SSH client recognizes the config file and that there are no conflicting settings.
Conclusion: Empowering Secure and Convenient Windows SSH Connections
In conclusion, the Windows SSH config file serves as a powerful tool to simplify and optimize your SSH connections. By utilizing its various options and directives, you can customize and fine-tune your SSH experience according to your unique requirements.
While the learning curve may initially seem steep, the advantages of using the SSH config file are abundant. From enhanced customization and improved security to streamlined management and increased productivity, the benefits far outweigh the challenges.
So, embrace the Windows SSH config file and unlock the full potential of secure remote connections. Take control of your SSH experience, protect your valuable data, and explore the possibilities that await!
Closing and Disclaimer
Thank you for taking the time to explore the Windows SSH config file with us. We hope this comprehensive guide has provided valuable insights and empowered you with the knowledge to leverage SSH configurations effectively.
While every effort has been made to ensure the accuracy and completeness of the information presented in this article, it is essential to exercise caution and test configurations in a controlled environment. We are not responsible for any adverse consequences resulting from the use of the techniques and information provided herein.
Now, armed with this newfound knowledge, we encourage you to embrace the Windows SSH config file and embark on a journey of secure and efficient remote connections. Happy SSHing! 😊🚀