Если вы видите это сообщение, значит, произошла проблема с загрузкой файлов в стилей (CSS) нашего сайта. Попробуйте сбросить кэш браузера (Ctrl+F5).
Если это не поможет, а вы находитесь в регионе, где возможны ограничения интернет-трафика с российских серверов — воспользуйтесь VPN.
|
Для чего разработана эта функция, что делает при работе Windows 10, как аппаратно отключить? Функция в составе Windows 10 «Windows: Spotlight» предназначена для автоматической загрузки и установки на экран блокировки изображений. На этих изображениях можно увидеть различные пейзажи, исторические достопримечательност Отключить функцию «Windows: Spotlight» («Windows: Интересное») можно тремя способами:
Знаете ответ? |
Windows 11 introduces the eye-catching ‘Windows Spotlight’ feature, which transforms your lock screen with dynamic images and insights. If you wish to enable or disable this feature, follow the steps in this guide to Enable or disable Windows Spotlight in Windows 11.
Page Contents
What is Windows Spotlight?
Windows Spotlight enhances the lock screen experience by displaying a variety of images, including photography, artwork, and other visually appealing content. These images change regularly, often daily, offering users a fresh and dynamic background each time they log in.
In addition, Windows Spotlight can also provide users with interesting facts, tips, or app suggestions on the lock screen. This feature aims to provide a more engaging and personalized user experience by delivering content that is both visually appealing and informative.
Below are three solutions that allow you to enable or disable Windows Spotlight in Windows 11:
Solution 1: Enable or disable Windows Spotlight in Windows 11 Using Settings App
Customizing your lock screen background in Windows is a straightforward process. Follow these steps to do it using the Settings app:
1. Open the Settings app and go to “Personalization“.
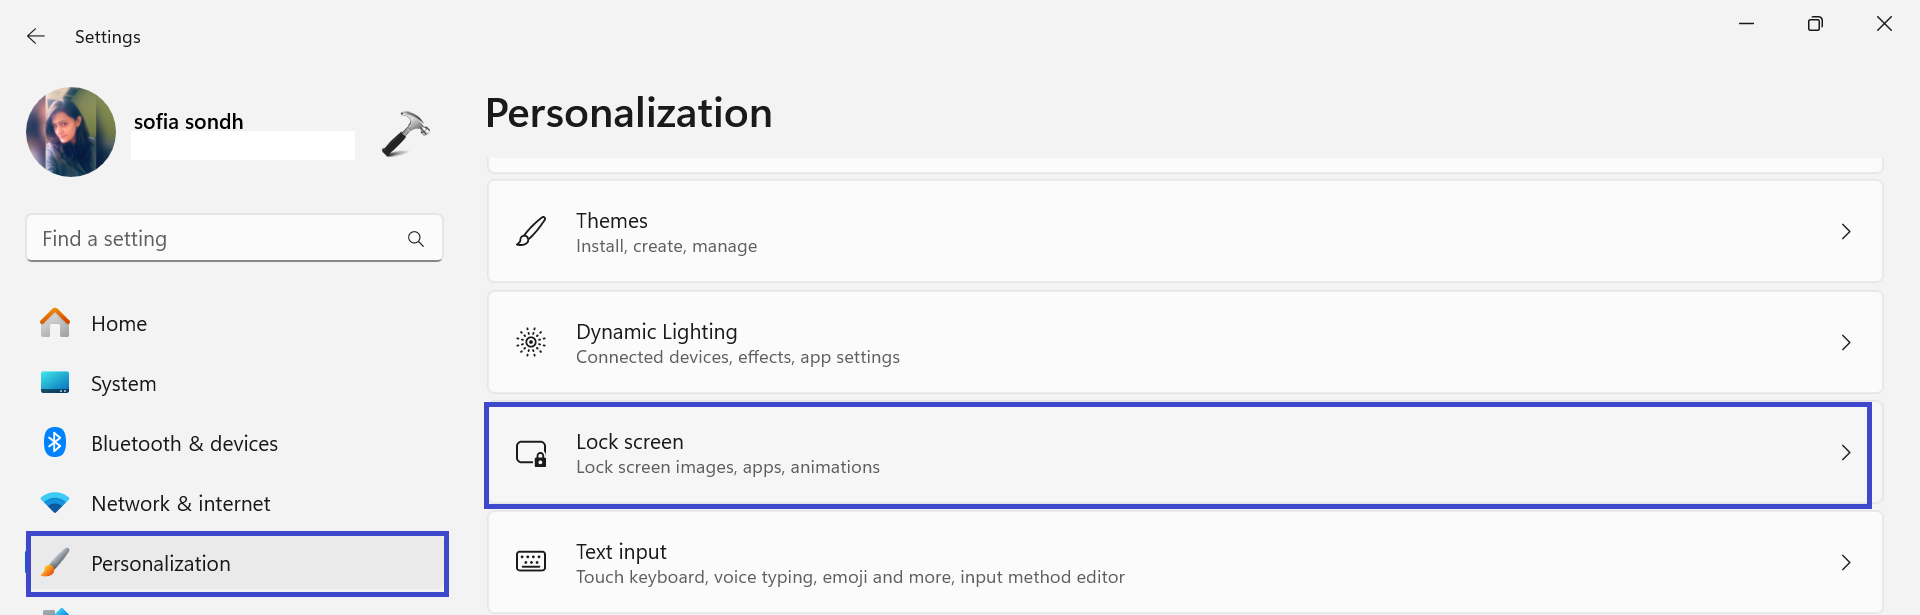
2. Now, click on “Lock screen“.
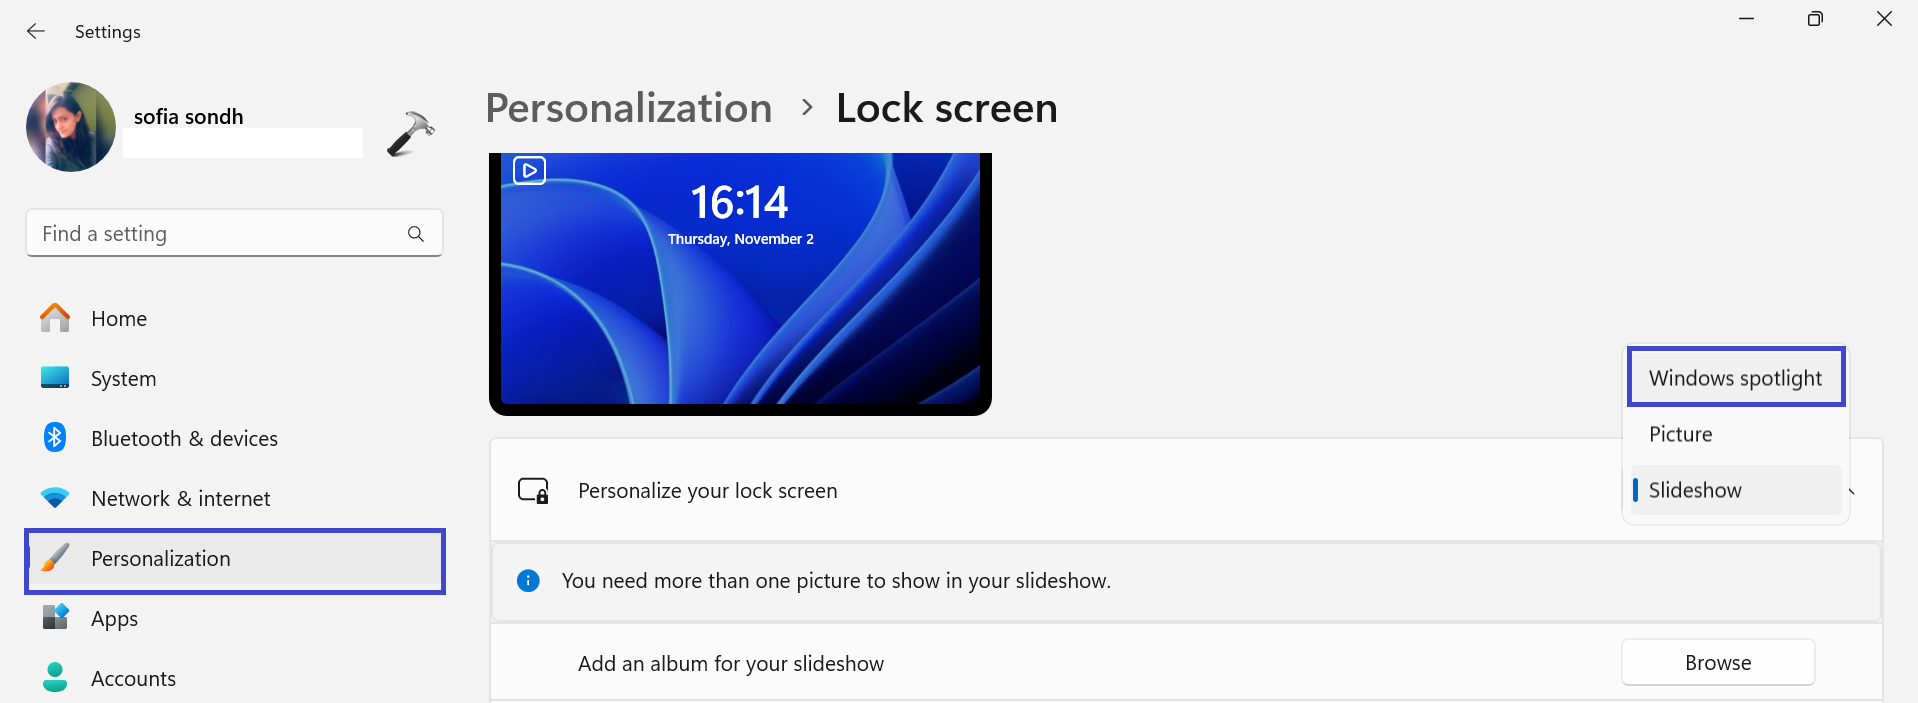
3. Under Background, select “Windows Spotlight” and select a different lock screen background.
Solution 2: Enable or disable Windows Spotlight Using Local Group Policy Editor
If you prefer to configure Windows Spotlight using the Local Group Policy Editor, follow these steps to gain more control over Windows Spotlight settings:
1. Press the Windows Key + R. Type “gpedit.msc” and click OK.
2. Navigate to the following path:
User Configuration > Administrative Templates > Cloud Content
3. Here, you will find 7 settings that you can do to enable or disable Windows Spotlight using Local Group Policy Editor.

1. Configure Windows Spotlight on lock screen
- Enabled: Enables Windows Spotlight on the lock screen.
- Disabled: Disables Windows Spotlight on the lock screen.
Additionally, if you select the “Include content from Enterprise spotlight” checkbox.
2. Do not use diagnostic data for tailored experiences
- Enabled: Prevents Windows from using diagnostic data to provide tailored experiences to the user.
- Disabled: Allows Windows to use diagnostic data to provide tailored experiences to the user.
3. Do not suggest third-party content in Windows spotlight
- Enabled: Prevents Windows Spotlight from suggesting apps and content from third-party software publishers.
- Disabled: Allows Windows Spotlight to suggest apps and content from third-party software publishers.
4. Turn off all Windows spotlight features
- Enabled: Disables all Windows Spotlight features, including the lock screen, Windows tips, and Microsoft consumer features.
- Disabled: Enables all Windows Spotlight features.
5. Turn off Windows Spotlight on Action Center
- Enabled: Prevents Windows Spotlight notifications from being shown on the Action Center.
- Disabled: Allows Windows Spotlight notifications to be shown on the Action Center.
6. Turn off Windows spotlight on Settings
- Enabled: Prevents Windows Spotlight suggestions from being shown in the Settings app.
- Disabled: Allows Windows Spotlight suggestions to be shown in the Settings app.
7. Turn off the Windows Welcome Experience
- Enabled: Disables the Windows Welcome Experience, which helps onboard users to Windows.
- Disabled: Enables the Windows Welcome Experience.
Solution 3: Enable or Disable Using Registry Editor
Adjusting Windows Spotlight settings through the Windows Registry Editor offers a high level of control. To begin, follow these steps closely:
1. Press the Windows key + R. Type “regedit.exe” and click OK.
2. Navigate to the following path:
HKEY_CURRENT_USER\SOFTWARE\Policies\Microsoft\Windows\CloudContent
3. Now, right-click on “CloudContent” and select “New => DWORD (32-bit) Value“.
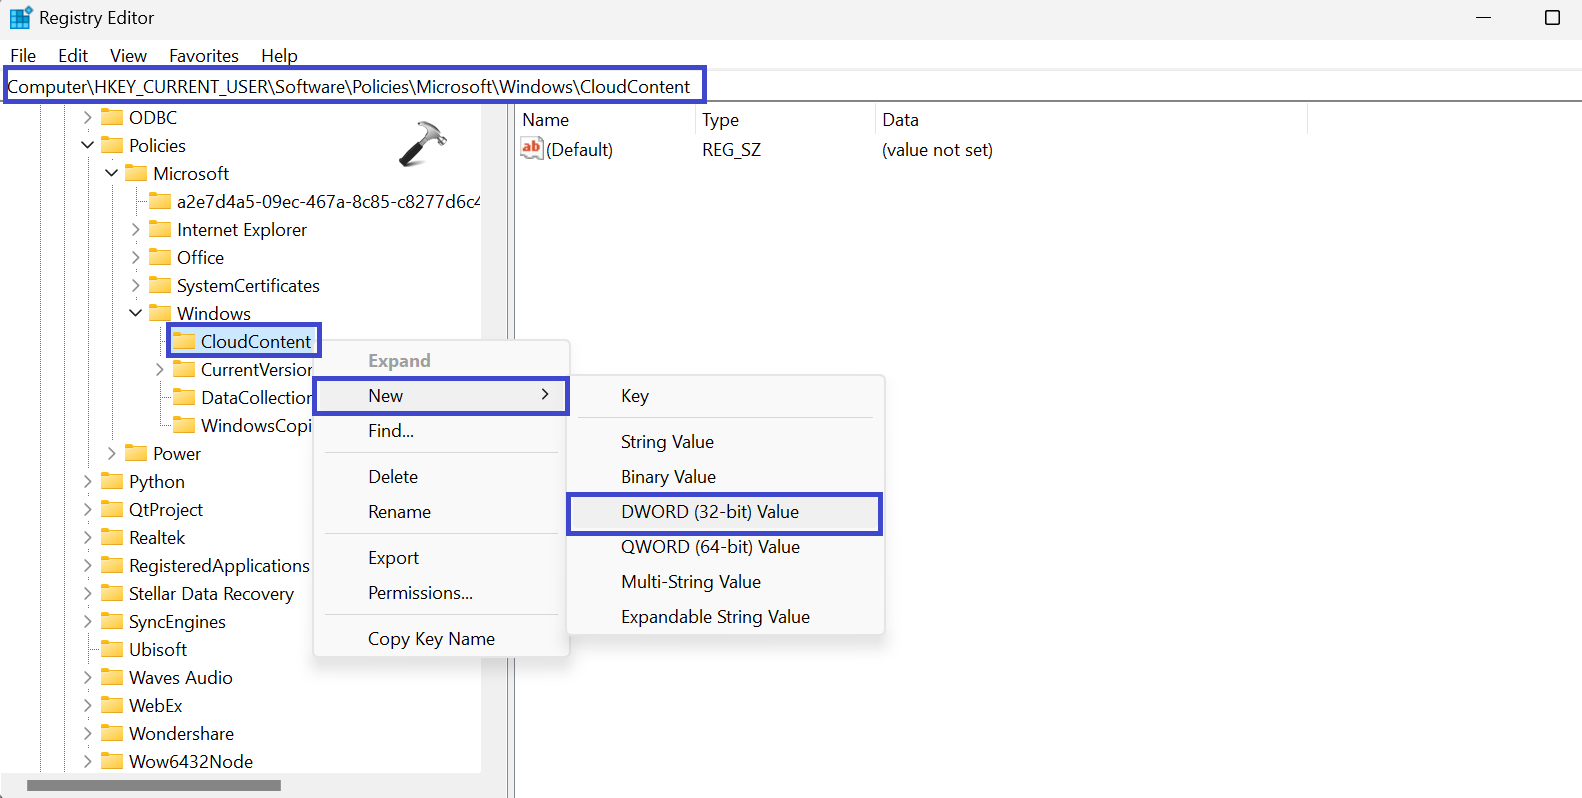
Type “DisableWindowsSpotlightFeatures” and press Enter.
4. Now, double-click on the “DisableWindowsSpotlightFeatures” registry key. Click “Modify“.
A prompt box will appear. Set the value to 1.
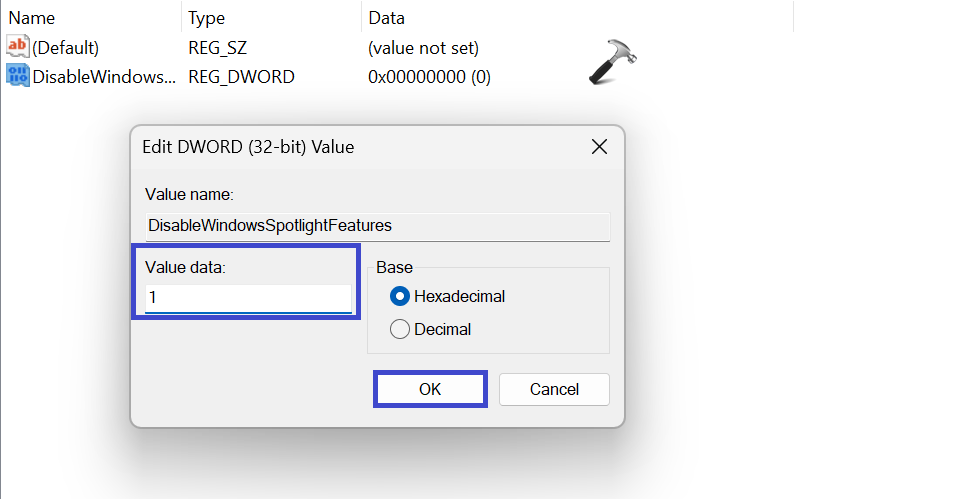
5. Click OK.
That’s It!
RELATED ARTICLES
Introduction
Windows Spotlight is a feature exclusive to Windows 10 and Windows 11 that automatically downloads eye-catching wallpapers from the internet for your lock screen. It not only enhances the aesthetic appeal of your computer but also provides insights about the images being displayed, thereby enriching user experience. However, there may be times when you want to disable or enable this feature for various reasons, such as optimizing system performance, preserving bandwidth, or simply preferring to use static images. In this article, we’ll explore the Windows Spotlight feature in detail, including how to enable and disable it on both Windows 10 and Windows 11.
What is Windows Spotlight?
Windows Spotlight is a service that downloads and displays a rotating set of photographs from Bing, Microsoft’s search engine. The feature not only updates the lock screen backgrounds regularly but also allows users to provide feedback on the images they like or dislike, contributing to a more personalized experience.
Key Features of Windows Spotlight:
-
Dynamic Wallpapers: Windows Spotlight brings fresh, high-resolution images to your computer’s lock screen every day.
-
Personalization: Users have the opportunity to give feedback via “Like” or “Not a fan” options, helping the feature to tailor future images to user preferences.
-
Informative Snippets: Alongside beautiful imagery, Windows Spotlight also allows users to learn more about the displayed pictures with additional snippets of information.
Why Disable or Enable Windows Spotlight?
While Windows Spotlight is a visually appealing feature, there are several scenarios where you might want to disable or enable this functionality:
-
Performance Optimization: For certain systems, especially those with limited resources, dynamic wallpaper features can utilize some processing power. Disabling the feature may contribute to an overall smoother experience.
-
Network Constraints: If you have limited internet bandwidth or you’re using a metered connection, disabling Windows Spotlight can help minimize data usage.
-
Preference for Static Images: You might simply prefer a consistent background rather than a rotating one, opting for static wallpapers that reflect your taste.
-
Personal Privacy: Some users may prefer to minimize data sent to Microsoft for personalization purposes.
How to Enable or Disable Windows Spotlight in Windows 11
Method 1: Through Settings
-
Open Settings: Pressing
Windows + Iwill instantly launch the Settings application. -
Select Personalization: In the left-side window pane, look for the ‘Personalization’ option and click on it.
-
Choose Lock Screen: Under the Personalization section, click on ‘Lock screen’.
-
Engage Windows Spotlight:
- To enable: In the drop-down menu under the Lock screen background setting, select “Windows Spotlight”.
- To disable: Choose either “Picture” or “Slideshow” in the drop-down menu.
-
Feedback Option: You can also configure the “Get fun facts, tips, and more from Windows and Cortana on your lock screen” option to let Microsoft know your preferences.
Method 2: Using Registry Editor
If you want to dig deeper into your system settings and manually adjust features, you can use the Registry Editor:
-
Launch Registry Editor: Press
Win + R, typeregedit, and hit Enter. Make sure to be cautious when altering registry settings. -
Navigate to the Following Path:
HKEY_CURRENT_USERSoftwareMicrosoftWindowsCurrentVersionPersonalization -
Change Values:
- To Enable Windows Spotlight:
- Look for a key named
NoLockScreen. If it exists, double-click and set its value to 0.
- Look for a key named
- To Disable Windows Spotlight:
- If you want to disable it, set
NoLockScreento 1.
- If you want to disable it, set
- To Enable Windows Spotlight:
-
Close Registry Editor: Exit the Registry Editor and restart your PC for the changes to take effect.
Method 3: Using Group Policy (Windows Pro / Enterprise Versions)
Group Policy provides an additional layer of control over Windows settings if you’re on a Professional or Enterprise version.
-
Open Group Policy Editor: Press
Windows + R, typegpedit.mscand hit Enter. -
Navigate to the Path:
Computer Configuration -> Administrative Templates -> Control Panel -> Personalization -
Locate the Setting: Look for “Do not display the lock screen”.
-
Enable/Disable:
- To enable the lock screen so that Spotlight can function, set it to Not Configured or Disabled.
- To disable: Set it to Enabled.
-
Apply and Exit: After modifying settings, click Apply and OK, then close the Group Policy Editor.
How to Enable or Disable Windows Spotlight in Windows 10
The process of enabling or disabling Windows Spotlight in Windows 10 is very similar to that of Windows 11.
Method 1: Through Settings
-
Open Settings: Use the shortcut
Windows + I. -
Select Personalization: On the Settings page, click ‘Personalization’.
-
Go to Lock Screen: Click on ‘Lock screen’ in the left pane.
-
Enable or Disable:
- For enabling Windows Spotlight, select «Windows Spotlight» from the dropdown under ‘Background’.
- For disabling Windows Spotlight, select “Picture” or “Slideshow” instead.
Method 2: Using Registry Editor
Similar to Windows 11, you can modify Windows Spotlight settings via the Registry Editor:
-
Launch Registry Editor: Use
Win + R, typeregedit, and press Enter. -
Navigate to the Personalization Path:
HKEY_CURRENT_USERSoftwareMicrosoftWindowsCurrentVersionPersonalization -
Modify Values:
- To Enable: Set
NoLockScreento 0. - To Disable: Set
NoLockScreento 1.
- To Enable: Set
-
Restart Your Computer: After the change, restart your computer to see the effects.
Method 3: Using Group Policy (Windows Pro / Enterprise Versions)
-
Open Group Policy Editor: Press
Windows + R, typegpedit.msc, and hit Enter. -
Navigate to Path:
Computer Configuration -> Administrative Templates -> Control Panel -> Personalization -
Find Lock Screen Setting:
- You’ll see the option for “Do not display the lock screen”.
-
Modify Settings:
- To keep the lock screen and use Windows Spotlight, set it to Not Configured or Disabled.
- To disable, set it to Enabled.
-
Apply Changes: Click Apply and then OK before closing the Group Policy window.
Troubleshooting Windows Spotlight
At times, despite your best efforts, Windows Spotlight might not function as intended. The feature might freeze, or the lock screen could fail to update. Here are a few troubleshooting steps to consider:
Check the Internet Connection
Since Windows Spotlight relies heavily on internet access to fetch images, ensure your connection is stable and functioning correctly.
Reset Windows Spotlight
Windows Spotlight settings can occasionally become corrupted. Resetting it could resolve many issues:
-
Navigate to Settings: Open
SettingsusingWindows + I. -
Go to Personalization: Click on ‘Personalization’.
-
Open Attention to Background: Open the drop-down menu and switch to «Picture».
-
Delete the Cache: You can delete files located in
C:Users[YourUsername]AppDataLocalPackagesMicrosoft.Windows.ContentDeliveryManager_cw5n1h2txyewyLocalStateAssets. This cache is commonly associated with Windows Spotlight. -
Enable Windows Spotlight Again: Switch back to Windows Spotlight in the lock screen settings.
Run Troubleshooter
Windows includes a built-in troubleshooter for various functionalities. Running this can help rectify issues related to Windows Spotlight.
-
Open Settings: Use
Windows + Iand navigate to ‘Update & Security’. -
Click on Troubleshoot: Select ‘Troubleshoot’ from the left pane and proceed to Additional troubleshooters.
-
Run the Troubleshooter: Following the on-screen prompts can help detect and fix any potential issues with Windows Spotlight.
Conclusion
Windows Spotlight is a compelling feature that can significantly enhance the aesthetic experience of using your computer. Whether you find it beneficial or preferable to disable the feature, the methods to enable and disable it are straightforward, whether you’re using Windows 10 or Windows 11.
Remember, personalization is key to the Windows OS experience, and adjusting features such as Windows Spotlight helps tailor the system to your preferences and requirements. With the provided steps and tips, feel empowered to manage the Windows Spotlight feature effectively, giving you control over your visual experience on your PC.
You can disable Windows Spotlight using 4 ways – locally, registry, group policy and Intune (MEM). We will look at multiple methods to turn off or disable the Windows Spotlight features.
First, we will understand what exactly is Windows Spotlight, the features that it offers, Spotlight settings and ways to disable or turn off Windows Spotlight using different methods.
Windows Spotlight is available in all desktop editions of Windows 10. If you visit the Lock screen settings, the Windows Spotlight should appear under Background options.

When you enable the Windows Spotlight, the Windows Spotlight displays a new image on the lock screen each day. You can also see suggestions, tips, fun facts on the lock screen.
Enterprises that run Windows 10 and have strict policies may not want users to display different lock screens and want to restrict the usage of spotlight, and its features.
In such cases, the admins can disable Windows Spotlight features for all users using different methods. With Intune, it’s straightforward to block the Windows Spotlight settings, which I will be covering in this post.
Table of Contents
What is Windows Spotlight?
Windows Spotlight is an option for the lock screen background that displays different background images and occasionally offers suggestions on the lock screen. Windows Spotlight is available in all desktop editions of Windows 10.
A Windows Spotlight includes the following features.
- Background Image
- Feature suggestions, fun facts, tips
Ways to Turn off Windows Spotlight
If you want to restrict using the Windows Spotlight, you can do that using 4 methods.
- Manually turn off Windows Spotlight locally
- Turn off Windows Spotlight using Registry
- Disable Windows Spotlight features using Group Policy
- Disable Windows Spotlight using Intune
The first two methods described above is something that you have to do manually on a local computer. It’s not preferred if you have got many computers in your setup.
If you want to turn off Windows Spotlight setting on enterprise managed devices, you must use either group policy or Intune (MEM) to do that.
Windows Spotlight is enabled by default on Windows 10 devices. However, you can turn off Windows Spotlight manually on every machine. But if you have many computers, manual method may be time-consuming.
Enterprise administrators can configure a mobile device management (MDM) setting to prevent users from using the Windows Spotlight background.
Manually turn off Windows Spotlight locally
Here are the steps to turn off Windows Spotlight locally on your Windows 10/Windows 11 computer.
- Log in to your Windows computer.
- Go to Settings > Personalization and select Lock screen.
- Under Background, choose Windows Spotlight and select a different lock screen background.
- This turns off the Windows Spotlight.

Turn off Windows Spotlight features using Registry Editor
To turn off Windows Spotlight features using Registry Editor, follow these steps.
- Launch the Registry editor by running the regedit command.
- Navigate to
HKEY_CURRENT_USER\SOFTWARE\Policies\Microsoft\Windows\CloudContent. - Right-click anywhere on right side of the screen and select New > DWORD (32-bit) Value.
- Name it as DisableWindowsSpotlightFeatures.
- Double-click on DisableWindowsSpotlightFeatures and set the Value data as 1.
- Click OK to save the changes.

You may have to log off and log in if you don’t see the Spotlight features are disabled.
Note – Whenever you plan to make any changes to the Registry, it is recommended that you back up the registry files. You may also create a system restore point and use it in case something goes wrong.
Disable Windows Spotlight using Group Policy
Using Group Policy, you can turn off or disable Windows Spotlight features on AD domain joined computers. The Windows Spotlight group policy settings are included in the following path – User Configuration > Administrative Templates > Windows Components > Cloud Content.
When you create and deploy a group policy, you always don’t apply it at domain level. So even with this policy, you first test the policy by applying to a OU containing some test computers. If you find the policy working, you can apply it to other required OU’s.
Log in to the domain controller and launch the group policy management console. Right click Group Policy objects and click New. Specify the GPO name as Disable Windows Spotlight.
Remember to link the GPO to the OU when you are done with configuring the settings.
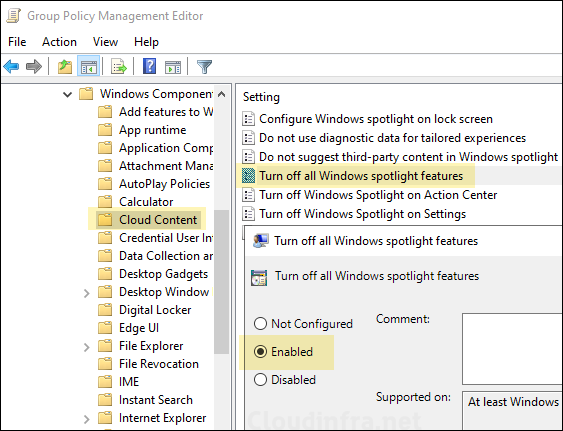
Right-click the GPO that you created and click Edit. In the group policy management editor, go to User Configuration > Administrative Templates > Windows Components > Cloud Content.
There are 7 settings that you see here, and let me cover each of them in order.
We will enable only one policy setting here, which is Turn off all Windows Spotlight features. The rest of the settings are optional and should be enabled or turned on only if you require them.

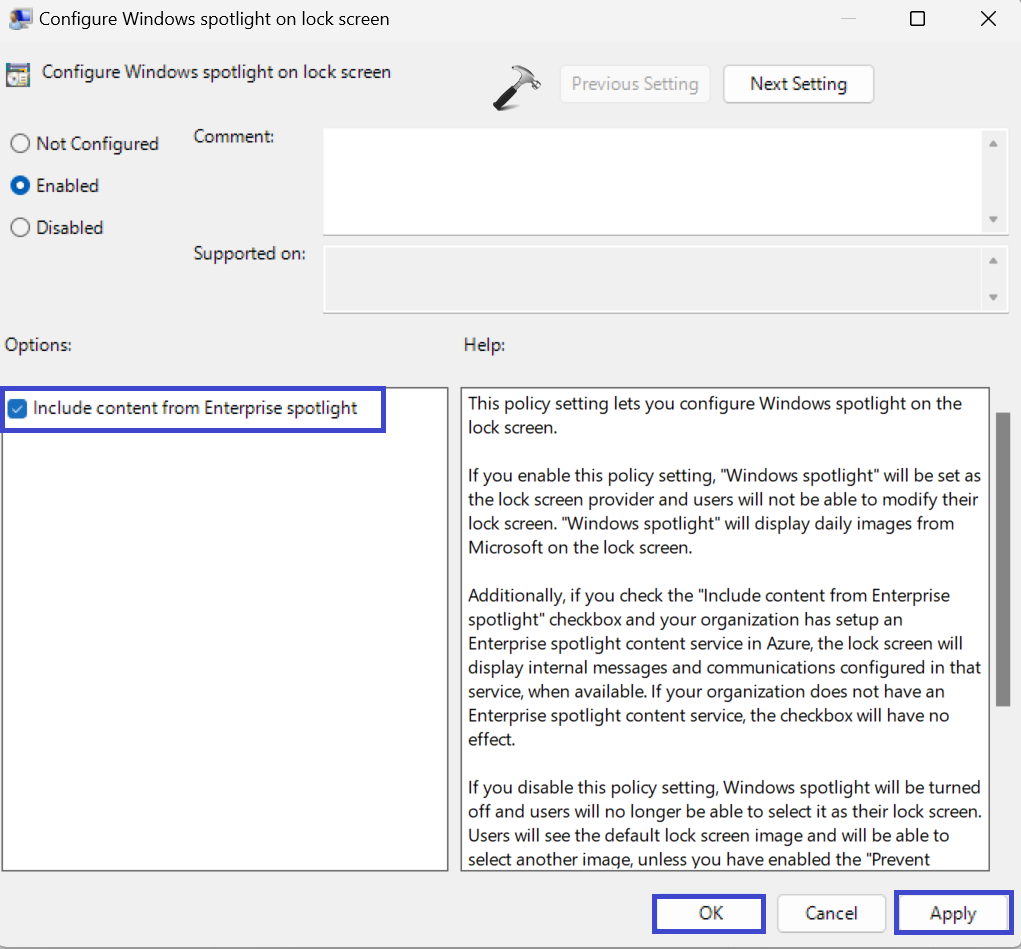
Configure Windows Spotlight on lock screen
This policy setting lets you configure Windows spotlight on the lock screen. If you enable this policy setting, “Windows spotlight” will be set as the lock screen provider and users will not be able to modify their lock screen. “Windows spotlight” will display daily images from Microsoft on the lock screen.
Additionally, if you check the Include content from Enterprise spotlight checkbox and your organization has set up an Enterprise spotlight content service in Azure.
After you enable the enterprise spotlight, the lock screen will display internal messages and communications configured in that service, when available.
If you disable this policy setting, Windows spotlight will be turned off and users will no longer be able to select it as their lock screen.

Do not use diagnostic data for tailored experiences
This policy setting lets you prevent Windows from using diagnostic data to provide tailored experiences to the user.
The diagnostic data includes browser, app and feature usage, depending on the “diagnostic data” setting value.
If you enable this policy setting, Windows will not use diagnostic data from this device to customize content shown on lock screen, Windows tips, Microsoft consumer features and other related features.
If these features are enabled, users will still see recommendations, tips and offers, but they may be less relevant.
If you disable or do not configure this policy setting, Microsoft will use diagnostic data to provide personalized recommendations, tips and offers to tailor Windows for the user’s needs, and make it work better for them.

Do not suggest third-party content in Windows Spotlight
If you enable this policy, Windows spotlight features like lock screen spotlight, suggested apps in Start menu or Windows tips will no longer suggest apps and content from third-party software publishers.
However, users may still see suggestions and tips to make them more productive with Microsoft features and apps.
If you disable or do not configure this policy, Windows spotlight features may suggest apps and content from third-party software publishers in addition to Microsoft apps and content.

Turn off all Windows Spotlight features
This one policy setting will turn off or disable all Windows Spotlight features at once. If you enable this policy setting, Windows spotlight on lock screen, Windows tips, Microsoft consumer features and other related features will be turned off.
You should enable this policy setting if your goal is to minimize network traffic from target devices.
If you disable or do not configure this policy setting, Windows spotlight features are allowed and may be controlled individually using their corresponding policy settings.
Select Enabled and click Apply and OK.

Turn off Windows Spotlight on Action Center
If you enable this policy, Windows Spotlight notifications will no longer be shown on Action Center.
If you disable or do not configure this policy, Microsoft may display notifications in Action Center that will suggest apps or features to help users be more productive on Windows.

Turn off Windows Spotlight on Settings
If you enable Turn off Windows Spotlight on Settings policy, Windows Spotlight suggestions will no longer be shown in Settings app.
If you disable or do not configure this policy, Microsoft may suggest apps or features in the Settings app to help users be productive on Windows or their linked phone.

Turn off the Windows Welcome Experience
This policy setting lets you turn off the Windows Spotlight Windows Welcome experience. This feature helps onboard users to Windows, for instance launching Microsoft Edge with a web page highlighting new features.
If you enable this policy, the Windows Welcome Experience will no longer display when there are updates and changes to Windows and its apps.
If you disable or do not configure this policy, the Windows Welcome Experience will be launched to help onboard users to Windows telling them about what’s new, changed, and suggested.

Steps to Disable Windows Spotlight using Intune (MEM)
Using the Configuration Profiles, you can disable Windows Spotlight in Intune (MEM). First, sign-in to Microsoft Endpoint Admin center and go to Devices > Configuration Profiles. Click Create Profile.

On Create a profile window, select Platform as Windows 10 and later and profile type as Settings Catalog (preview). Click Create.

On the Basics section, specify the profile name as Disable Windows Spotlight or something similar. You can add a profile description and click Next.

On the Configuration Settings section, click Add Settings.

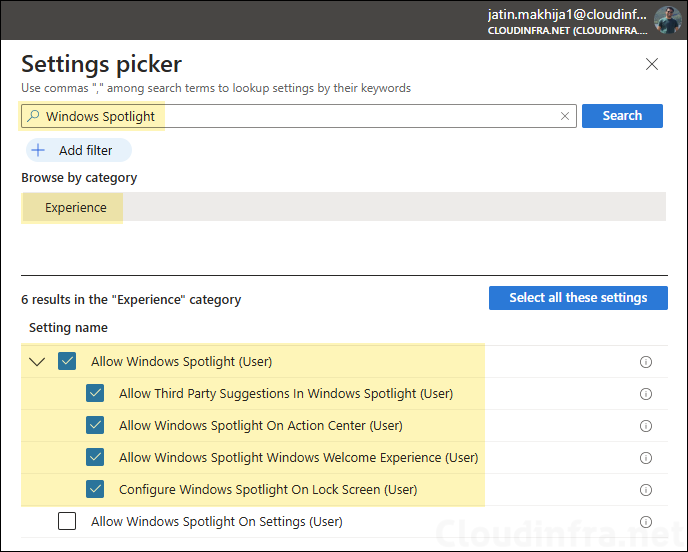
Now you see Settings Picker window where you filter and select the Windows Spotlight settings. In the search box, type Spotlight and click Search. Under Browse by category, select Experience.
This loads all the settings related to Windows Spotlight applicable to Experience category. Select the settings and close the Settings picker window.

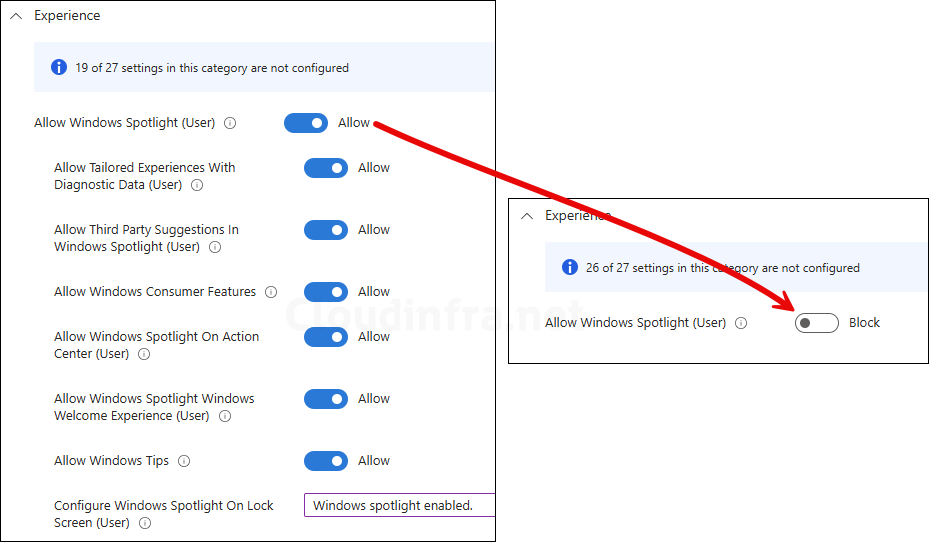
Very similar to GPO settings, even here we see Windows Spotlight related settings. You can disable or block Allow Windows Spotlight (User) and that should disable all the Windows Spotlight features.
Before you click Next, if you are interested to know what each of the setting does, keep reading. You may skip to the next section if you just want to disable the Windows Spotlight settings at once.

Allow Windows Spotlight (User)
Specifies whether to turn off all Windows spotlight features at once. If you enable this policy setting, Windows spotlight on lock screen, Windows Tips, Microsoft consumer features and other related features will be turned off.
You should enable this policy setting if your goal is to minimize network traffic from target devices. If you disable or do not configure this policy setting, Windows spotlight features are allowed and may be controlled individually using their corresponding policy settings. The most restricted value is 0.
Allow Tailored Experiences With Diagnostic Data (User)
This policy allows you to prevent Windows from using diagnostic data to provide customized experiences to the user.
If you enable this policy setting, Windows will not use diagnostic data from this device to customize content shown on the lock screen, Windows tips, Microsoft consumer features, or other related features.
Allow Third Party Suggestions In Windows Spotlight (User)
Specifies whether to allow app and content suggestions from third-party software publishers in Windows spotlight features.
This includes features like lock screen spotlight, suggested apps in the Start menu, and Windows tips. Users may still see suggestions for Microsoft features, apps, and services.
Allow Windows Consumer Features
This policy allows IT admins to turn on experiences that are typically for consumers only, such as Start suggestions, Membership notifications, Post-OOBE app install and redirect tiles.
Allow Windows Spotlight On Action Center (User)
This policy allows administrators to prevent Windows spotlight notifications from being displayed in the Action Center.
If you enable this policy, Windows spotlight notifications will no longer be displayed in the Action Center.
If you disable or do not configure this policy, Microsoft may display notifications in the Action Center that will suggest apps or features to help users be more productive on Windows. The most restricted value is 0.
Allow Windows Spotlight Windows Welcome Experience (User)
This policy setting lets you turn off the Windows spotlight Windows welcome experience feature. The Windows welcome experience feature introduces onboard users to Windows.
If you enable this policy, the Windows welcome experience will no longer be displayed when there are updates and changes to Windows and its apps.
If you disable or do not configure this policy, the Windows welcome experience will be launched to inform onboard users about what’s new, changed, and suggested.
Allow Windows Tips
Enables or disables Windows Tips / soft landing.
Configure Windows Spotlight On Lock Screen (User)
Allows IT admins to specify whether spotlight should be used on the user’s lock screen. If your organization does not have an Enterprise spotlight content service, then this policy will behave the same as a setting of 1.
Alright, let’s get back to the Configuration profile. On the Assignments tab, include the groups that you want to target this configuration profile. Click Next.

On the Scope tags section, click Next.

On the Review and Create section, click Create. We have now created a configuration profile to disable or turn off Windows Spotlight features in Intune.
Keep an eye on the notifications which confirm the policy has been created successfully.

After you deployed the configuration profile to disable Windows Spotlight features, let’s monitor and check if the devices have received the settings.
Select the Disable Windows Spotlight Configuration profile. Under Device and user check-in status, click View report.

You can see the device name and logged-in username.

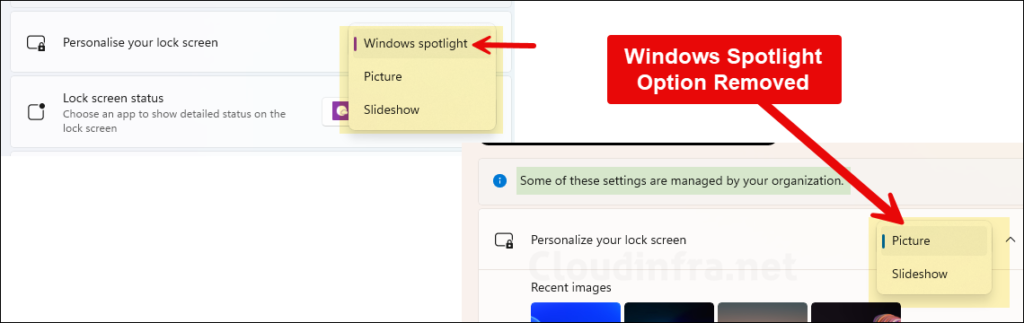
I am logged in to one of the VM and I see the Windows Spotlight option has been removed from the list of background options. This confirms that the Windows Spotlight settings are disabled on the device or VM.

Still Need Help?
If you need further assistance on the above article or want to discuss other technical issues, check out some of these options.
In this blog post, we will explore multiple ways to disable/block Windows Spotlight using Intune on managed Windows 10/11 devices. Windows Spotlight, enabled by default, is a feature that personalizes your lock screen and desktop background with stunning, regularly updated images from around the world (sourced from bing), while occasionally providing tips, fun facts, suggestions and organizational messages.
For a cleaner desktop and lock screen and to save network bandwidth, you can disable Windows Spotlight. Please note that this feature is only available on Windows Enterprise and Education editions. To manually configure Windows Spotlight on Windows 10 and 11 devices, you can use the steps given on MS documentation link: Configuration options. Below is a screenshot of how a Windows Spotlight wallpaper looks like on a Windows 11 device.

You can create an Intune device configuration policy to disable Windows Spotlight. Let’s check the policy details and assign it to Windows devices.
- Sign in to Intune admin center > Devices > Windows > Configuration > Create > New Policy.
- Platform: Windows 10 and later
- Profile type: Settings catalog
- Click Create.
- On the Basics tab, provide a Name and Description of the policy and click Next.
- On Configuration settings tab, click on + Add settings and use the Settings picker to search for Windows Spotlight and select Allow Windows Spotlight (User) along with the settings under it.
Move the toggle switch next to Allow Windows Spotlight (User) to Block and disable Windows Spotlight completely. You can also individually use the toggle switches next to the feature you want to disable while keeping the Windows Spotlight enabled.
- Scope tags: Click Next.
- Assignments: Assign this policy to an Entra group containing users or devices.
- Review + create: Review the policy and click on Create.
Monitoring Windows Spotlight Policy Progress
- Sign in to the Intune admin center > Devices > Configuration.
- Choose the Device Configuration profile you want to work with, and at the top of the page, you’ll see a quick view of the Success, Failure, Conflict, Not Applicable, and In Progress status.
- Click on View report to access more detailed information.
Sync Intune Policies
The device check-in process might not begin immediately. If you’re testing this policy on a test device, you can manually kickstart Intune sync from the device itself or remotely through the Intune admin center.
Alternatively, you can use PowerShell to force the Intune sync on Windows devices. Restarting the device is another way to trigger the Intune device check-in process.
End User Experience
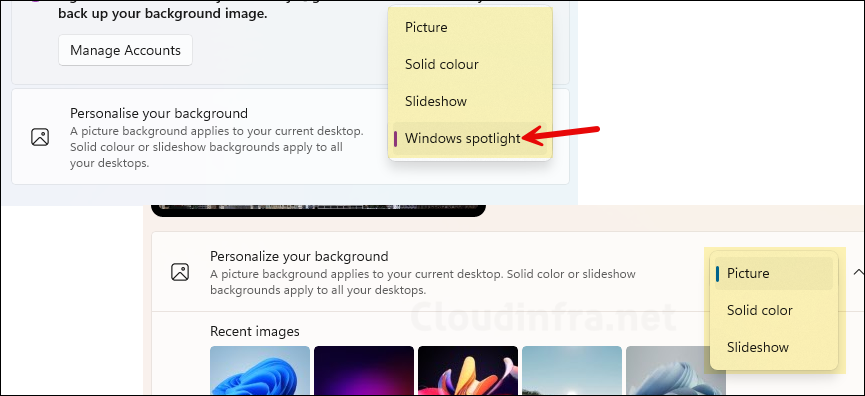
After Intune device check-in process is completed on the device, You will find that Windows Spotlight is disabled, and you no longer will see any tips, fun facts, automatic wallpaper changes. Along with that I observed that the Windows spotlight option under Settings > Personalization > Background and Settings > Personalization > Lock Screen is no longer available.
Policy CSP for Windows Spotlight
You can read more about Windows Spotlight Policy CSP here: AllowSpotlightCollection. Link of all Policy settings related to Windows Spotlight: Policy settings.
Disable Windows Spotlight using GPO
We will not go into much detail on demonstrating the policy deployment via GPO as it works in the same way as shown above. I will provide you the policy which you need to configure to disable Windows Spotlight via GPO.
- Login to a domain controller and open Group Policy Management Console (gpmc.msc).
- Create or Edit a GPO and Navigate to User Configuration > Policies > Administrative Templates > Windows Components > Cloud Content. Enable Turn off all Windows spotlight features policy.
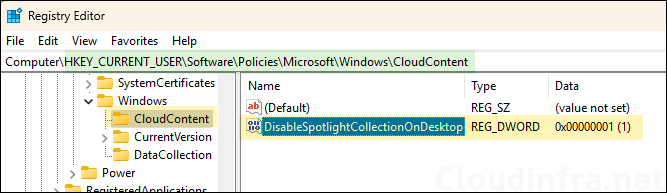
Disable Windows Spotlight using Registry Editor
You can also enable or disable Windows Spotlight using registry editor. Let’s check the steps:
- Press Windows + R to open the Run dialog box.
- Type regedit and press Enter to open the Registry editor.
- Navigate to HKEY_CURRENT_USER\Software\Policies\Microsoft\Windows\CloudContent and create a new DWORD registry entry called DisableSpotlightCollectionOnDesktop and set its value to 1 to Disable Windows Spotlight.