
Если для каких-либо целей, например, для установки ограничений подключений к роутеру, вам потребовалось посмотреть MAC-адрес сетевой карты, Wi-Fi или Bluetooth адаптера в Windows 11, сделать это можно несколькими простыми способами.
В этой пошаговой инструкции подробно о том, как узнать MAC-адрес для Ethernet, Wi-Fi и Bluetooth в Windows 11, используя Параметры, командную строку и PowerShell, окно сведений о системе и другие методы.
Просмотр MAC-адреса в Параметрах Windows 11
Параметры Windows 11 позволяют быстро узнать MAC-адрес сетевой карты (Ethernet-адаптера) или Wi-Fi адаптера. Достаточно использовать следующие шаги:
- Откройте «Параметры» — «Сеть и Интернет».

- Если вам требуется определить MAC-адрес сетевой карты, выберите пункт Ethernet и внизу окна вы увидите пункт «Физический адрес (MAC)» — это то, что вы искали. Все эти данные можно скопировать в буфер обмена, используя соответствующую кнопку справа.

- Если нужен MAC-адрес Wi-Fi адаптера, нажмите по пункту «Wi-Fi», а затем откройте «Свойства оборудования».

- Внизу списка свойств оборудования будет отображаться пункт, содержащий MAC-адрес — «Физический адрес (MAC)».


Обратите внимание на следующие два нюанса, которые могут оказаться важными:
- В случае если в окне Параметры — Сеть и Интернет — Wi-Fi включена опция «Случайные аппаратные адреса», MAC-адрес Wi-Fi адаптера будет автоматически меняться при подключении к точкам доступа
- В качестве разделителя между разрядами MAC-адреса в Параметрах используется знак «-», однако может оказаться, что где-то, например, в настройках маршрутизатора, вам потребуется вводить двоеточие в качестве разделителя.
Как узнать MAC-адрес в командной строке, Терминале Windows и PowerShell
Для просмотра MAC-адреса в командной строке, достаточно выполнить следующие шаги:
- Запустить командную строку (Windows Терминал и PowerShell тоже подойдут).
- Ввести команду
getmac /v /fo list
и нажать Enter. Эта команда покажет MAC-адреса физических адаптеров Ethernet, Wi-Fi и Bluetooth.

- Следующую команду можно использовать только в PowerShell (или Терминале Windows с открытой консолью PowerShell), она покажет MAC-адреса не только физических устройств, но и виртуальных сетевых адаптеров:
Get-WmiObject win32_networkadapterconfiguration | select description, macaddress

- Еще один вариант команды для командной строки, показывающий также и дополнительную информацию о подключениях: ipconfig /all — нужные сведения вы увидите в пунктах «Физический адрес».


Информация о MAC-адресах сетевых адаптеров в окне «Сведения о системе»
В Windows 11, как и в предыдущих версиях системы, присутствует утилита «Сведения о системе», которая содержит и информацию о MAC-адресах физических и виртуальных Ethernet, Wi-Fi и Bluetooth устройств:
- Нажмите правой кнопкой мыши по кнопке «Пуск», выберите пункт «Выполнить», введите msinfo32 и нажмите Enter.
- Откройте раздел «Компоненты» — «Сеть» — «Адаптер».
- В списке справа отобразится полный список сетевых адаптеров, содержащий в том числе и MAC-адреса в соответствующем пункте.


В списке подключений и свойствах адаптеров
Ещё одна возможность — использовать список подключений Windows 11, шаги будут следующими:
- Нажмите правой кнопкой мыши по кнопке «Пуск», выберите пункт «Выполнить», введите ncpa.cpl и нажмите Enter.
- Откроется список подключений, нажмите по нужному подключению правой кнопкой мыши и выберите пункт «Свойства».
- Откроется окно свойств подключения, вверху которого вы увидите поле «Подключение через». Если задержать указатель мыши над этим полем, отобразится MAC-адрес устройства.
- Если в списке подключений нажать правой кнопкой мыши по активному подключению, выбрать пункт «Состояние», а в следующем окне — «Сведения», в окне сведений вы увидите текущий MAC-адрес (в пункте «Физический адрес»).


Большинство программ для просмотра аппаратных характеристик компьютера также позволяют посмотреть MAC-адрес имеющихся сетевых адаптеров Windows 11, однако для этой задачи их использование мне кажется излишним.
В случае, если у вас остаются вопросы — задавайте их в комментариях, не исключено, что решение найдётся.
Прочитано: 36 480
Итак, перед Вами поставлена задача, провести соответствие устройств с их MAC адресами в локальной сети, как бы вы поступили? Вопрос номер два: а для чего все это нужно, таким образом, я преследую несколько целей:
- Составить список всех зарегистрированных устройств
- Настроить авторизацию в сети только тех устройств из первого списка, которые реально определяют те устройства, которые реально работают и я их знаю, в общем как то так, позже обобщу все-то чего я хочу добиться этим пунктом.
План исполнения поставленной задачи:
- Просканировать локальную сеть по маске, используемой на предприятии, но может быть, что машины закрыты фаерволом, поэтому нужно посылать arp request’ы.
- Посредством ARP запрос проверить каждый узел сети на получение его MAC адреса, уникального идентификатора устройства.
MAC адрес – это, к примеру:
C:\Users\ekzorchik>ping -n 1 192.168.0.1
Обмен пакетами с 192.168.0.1 по с 32 байтами данных:
Ответ от 192.168.0.1: число байт=32 время=2мс TTL=128
C:\Users\ekzorchik>arp -a 192.168.0.1
Интерфейс: 192.168.0.186 — 0xb
адрес в Интернете Физический адрес Тип
192.168.0.1 00-15-5d-0a-06-00 динамический -> вот это и есть MAC адрес устройства, где первые 6 байт: 00-15-5d это идентификатор производителя, вычисляется он по полной базе (Задача: прикрутить к скрипту опознавание кто это), а следующие 6 байт – это уникальный идентификатор сетевого адаптера установленного в системе.
Как я бы решал поставленную задачу:
Т.к. я преимущественно отожествляю себя, как Ubuntu специалист, то и средство на котором я буду разбирать пути решения – это система Ubuntu 12.04.5 серверная редакция:
Получить результат можно следующими способами:
А) Утилита arp–scan – данная утилита может просканировать все сеть и получить заветные значения: IP & MAC
ekzorchik@srv-host:~$ sudo apt-get install arp-scan –y
Запускаю утилиту на сканирование текущей сети, в которой сетевой адаптер получил от DHCP сервера IP адрес:
ekzorchik@srv-host:~$ arp-scan --interface=eth0 --localnet
You need to be root, or arp-scan must be SUID root, to open a link-layer socket.
link_open: Operation not permitted
Как видно выше и из документации (arp–scan –help) утилита может работать только с правами root, поэтому задействуем утилиту sudo для предоставления ей таких прав на запуск:
ekzorchik@srv-host:~$ sudo arp-scan --interface=eth0 --localnet
Interface: eth0, datalink type: EN10MB (Ethernet)
Starting arp-scan 1.8.1 with 256 hosts (http://www.nta-monitor.com/tools/arp-sca n/)
192.168.0.1 00:15:5d:0a:06:00 Microsoft Corporation
192.168.0.2 00:15:5d:0a:06:01 Microsoft Corporation
192.168.0.3 00:50:56:9c:25:c3 VMware, Inc.
192.168.0.5 00:21:91:fb:c9:45 D-Link Corporation
192.168.0.6 00:22:64:0a:e0:e8 Hewlett Packard
192.168.0.7 00:15:17:fa:a6:ac Intel Corporate
192.168.0.9 00:15:5d:0a:06:0d Microsoft Corporation
192.168.0.10 00:0c:29:34:c4:b4 VMware, Inc.
192.168.0.11 00:0c:29:c2:ee:15 VMware, Inc.
192.168.0.12 d8:eb:97:d0:5d:0d (Unknown)
Здесь я прерываю список, т.к. он очень большой, что теперь я могу сделать:
Сохранить его в txt
Открыть в программе LibreOffice Calc и произвести с ним некоторое форматирование, добавив такие колонки, как: Сервис на этом IP адресе, местонахождение устройства.
На заметку: Также можно использовать данную утилиту не для всего пула устройства в сети, а для конкретных IP адресов:
ekzorchik@srv-host:~$ sudo arp-scan --interface=eth0 192.168.0.1 192.168.0.20 192.168.0.10
Interface: eth0, datalink type: EN10MB (Ethernet)
Starting arp-scan 1.8.1 with 3 hosts (http://www.nta-monitor.com/tools/arp-scan/)
192.168.0.20 00:15:17:73:be:84 Intel Corporate
192.168.0.1 00:15:5d:0a:06:00 Microsoft Corporation
192.168.0.10 00:0c:29:34:c4:b4 VMware, Inc.
6 packets received by filter, 0 packets dropped by kernel
Ending arp-scan 1.8.1: 3 hosts scanned in 0.106 seconds (28.30 hosts/sec). 3 responded
Просканировать локальную сеть, ограничив результаты маской подсети:
ekzorchik@srv-host:~$ sudo arp-scan --interface=eth0 192.168.0.0/24
ekzorchik@srv-host:~$ sudo arp-scan --interface=eth0 192.168.0.0:255.255.255.0
Просканировать локальную сеть, огранив результаты, указанным диапозоном IP адресов:
ekzorchik@srv-host:~$ sudo arp-scan --interface=eth0 192.168.0.1-192.168.0.10
Interface: eth0, datalink type: EN10MB (Ethernet)
Starting arp-scan 1.8.1 with 10 hosts (http://www.nta-monitor.com/tools/arp-scan/)
192.168.0.1 00:15:5d:0a:06:00 Microsoft Corporation
192.168.0.2 00:15:5d:0a:06:01 Microsoft Corporation
192.168.0.3 00:50:56:9c:25:c3 VMware, Inc.
192.168.0.6 00:22:64:0a:e0:e8 Hewlett Packard
192.168.0.5 00:21:91:fb:c9:45 D-Link Corporation
192.168.0.7 00:15:17:fa:a6:ac Intel Corporate
192.168.0.9 00:15:5d:0a:06:0d Microsoft Corporation
192.168.0.10 00:0c:29:34:c4:b4 VMware, Inc.
11 packets received by filter, 0 packets dropped by kernel
Ending arp-scan 1.8.1: 10 hosts scanned in 0.363 seconds (27.55 hosts/sec). 8 responded
В комплекте с утилитой идет также утилита: arp–fingerprint – которая по своей базе отпечатком может косвенно определить, к какому типу операционных систем принадлежит тот или иной IP адрес:
ekzorchik@srv-host:~$ sudo arp-fingerprint -o "--interface=eth0 --numeric" 192.168.0.1
192.168.0.1 11110100000 FreeBSD 5.3, 7.0, DragonflyBSD 2.0, Win98, WinME, NT4, 2000, XP, 2003, Catalyst IOS 12.0, 12.1, 12.2, FortiOS 3.00
ekzorchik@srv-host:~$ sudo arp-fingerprint -o "--interface=eth0 --numeric" 192.168.0.10
192.168.0.10 01010100000 Linux 2.2, 2.4, 2.6, Vista, 2008, Windows7
Из обоих примеров, я вынес для себя, что получаемые результаты слишком расплывчаты и не могут со 100% точностью характеризовать систему.
Также очень интересным считаю, это выявление факта того, что в сети каким либо образом появляется двойник (конфликт) с точно таким же IP адресом как и у зарегистрированного клиента:
ekzorchik@srv-host:~$ sudo arp-scan --interface=eth0 --arpspa=dest 192.168.0.10
За дополнительными параметрами следует обращаться к справочной информации: man arp–scan
Б) Вторым способом получения, точно такого же результата, как выше из утилиты arp–scan является сетевой сканер безопасности: – nmap
ekzorchik@srv-host:~$ sudo apt-get install nmap –y
На заметку: обозначение опций используемых для получения результата: IP = MAC
–sP -> Пинг сканирование – просто определить, работает ли хост
–PR -> Задействовать проверку ARP Ping ,т.е. по хосту определить производителя сетевой карточки.
ekzorchik@srv-host:~$ sudo nmap -sP -PR 192.168.0.* | head -n 20
Starting Nmap 5.21 ( http://nmap.org ) at 2015-02-09 09:34 MSK
Nmap scan report for server.dsplit.local (192.168.0.1)
Host is up (0.0030s latency).
MAC Address: 00:15:5D:0A:06:00 (Microsoft)
Nmap scan report for ekt-ts10.dsplit.local (192.168.0.2)
Host is up (0.0027s latency).
MAC Address: 00:15:5D:0A:06:01 (Microsoft)
Nmap scan report for tserver.dsplit.local (192.168.0.3)
Host is up (0.0027s latency).
MAC Address: 00:50:56:9C:25:C3 (VMware)
Nmap scan report for vmw1.dsplit.local (192.168.0.5)
Host is up (0.0082s latency).
MAC Address: 00:21:91:FB:C9:45 (D-Link)
Nmap scan report for 192.168.0.6
Либо так:
ekzorchik@srv-mon:~$ sudo nmap -sP 192.168.0.1/24 | grep 'MAC' | awk '{print $3 $4}'
00:15:5D:0A:06:00(Microsoft)
00:15:5D:0A:06:01(Microsoft)
00:50:56:9C:25:C3(VMware)
00:21:91:FB:C9:45(D-Link)
00:22:64:0A:E0:E8(Hewlett
00:15:17:FA:A6:AC(Intel
00:15:5D:0A:06:0D(Microsoft)
Всё, конечно же, хорошо, но вот получаемый вывод без дополнительного форматирования не очень удобен для экспорта в программу Calc для последующей обработки, но задачу свою утилита nmap выполняет также хорошо.
В) Третьим способом это использование расширенной версии стандартной утилиты ping, а именно утилита fping которая проверяет доступность систем в сети путем отправки ICMP ECHO_REQUEST пакетов, но с указанием нескольких узлов или тектового файла со списком узлов
ekzorchik@srv-host:~$ sudo apt-get install fping –y
Определить список хостов, которые находятся online в сети:
ekzorchik@srv-host:~$ fping -g 192.168.0.1/24 2>&1 | grep alive
192.168.0.1 is alive
192.168.0.2 is alive
192.168.0.3 is alive
192.168.0.5 is alive
192.168.0.6 is alive
Определить все живые хосты в сети и произвести их опрос на предмет, какой сетевой адаптер установлен на этой системе:
ekzorchik@srv-host:~$ fping -r0 -g 192.168.0.1/24 2>&1 | grep alive | arp –a
ekzorchik@srv-host:~$ fping -r0 -g 192.168.0.1/24 2>&1 | grep alive | arp -a | grep -v "incomplete"
npi04e51e (192.168.0.199) at bc:5f:f4:af:c6:c5 [ether] on eth0
? (192.168.0.130) at 00:09:45:58:04:be [ether] on eth0
constr-i7 (192.168.0.65) at 14:14:4b:1e:25:f9 [ether] on eth0
? (192.168.0.158) at 00:09:45:58:03:9e [ether] on eth0
ws13 (192.168.0.93) at 8c:89:a5:29:38:67 [ether] on eth0
meb-015 (192.168.0.154) at e0:cb:4e:82:95:0e [ether] on eth0
? (192.168.0.24) at d8:eb:97:d2:ae:c2 [ether] on eth0
? (192.168.0.89) at 00:09:45:59:27:ae [ether] on eth0
? (192.168.0.150) at 00:0b:82:25:75:9f [ether] on eth0
android-2c8fcfe7f74b52e1 (192.168.0.85) at a0:b3:cc:ca:07:71 [ether] on eth0
holml (192.168.0.146) at 00:0c:29:21:16:82 [ether] on eth0
, где значение наиболее нужных в пояснение ключей:
grep –v “incomplete“ –> исключить из вывода строки содержащие слово “incomplete”
Также можно и так:
Определяем широковещательный адрес в сети:
ekzorchik@srv-phone:~$ ifconfig | grep "Bcast"
inet addr:192.168.0.10 Bcast:192.168.0.255 Mask:255.255.255.0
Делаем запрос к широковещательному адресу в сети:
ekzorchik@srv-phone:~$ pinb -b -c1 192.168.0.255
А теперь производим запрос к локальному кэшу для извлечения информации по IP адресам и их MAC адресам:
ekzorchik@srv-phone:~$ arp -a
? (192.168.0.89) at 00:09:45:59:27:ae [ether] on eth0
? (192.168.0.187) at 00:09:45:59:cb:96 [ether] on eth0
? (192.168.0.170) at 00:09:45:58:03:86 [ether] on eth0
? (192.168.0.62) at 34:08:04:16:31:36 [ether] on eth0
? (192.168.0.157) at 00:09:45:58:03:9c [ether] on eth0
client4 (192.168.0.66) at 00:09:45:5a:a3:4c [ether] on eth0
? (192.168.0.57) at 00:09:45:5a:f4:5e [ether] on eth0
tserver.dsplit.local (192.168.0.3) at 00:50:56:9c:25:c3 [ether] on eth0
c377a6442 (192.168.0.40) at 14:14:4b:b1:76:90 [ether] on eth0
pc (192.168.0.134) at 00:09:45:59:f8:16 [ether] on eth0
? (192.168.0.192) at f8:d1:11:88:21:1c [ether] on eth0
ws17 (192.168.0.175) at 00:09:45:58:04:c6 [ether] on eth0
npi05c1a0 (192.168.0.51) at 2c:44:fd:05:c1:a0 [ether] on eth0
? (192.168.0.158) at 00:09:45:58:03:9e [ether] on eth0
rpcws (192.168.0.182) at 00:09:45:5a:a2:64 [ether] on eth0
? (192.168.0.58) at 00:09:45:58:03:96 [ether] on eth0
Вывод: утилита также отрабатывает поставленную задачу, после конечно загруженный вывод в программу LibreOffice Calc позволит привести результаты к упорядоченному представлению.
Итак, из опробованных трех утилит я не могу выделить фаворита, потому используя каждую из них я получаю результаты наиболее подходящие для выполнения тех или иных задач.
На этом считаю, данную заметку завершенной, я добился решения поставленной задачи по первому пункту, второй же предусматривает тонкую настройку оборудования, посредством которого будет ограничиваться доступ, а это уже тема отдельной заметки. В последствии я, конечно же покажу, как я это делал. А пока все, с уважением – автор блога ekzorchik.

Overview – MAC
Address in Windows 11
MAC Address (also known as Physical Address) comprises 12-digit hexadecimal numbers are shown in groups of two with colons separating each set of two digits assigned by the hardware vendor/manufacturer of your PC. The first three sections are Organizational Unique Identifier (OUI), responsible for identifying the manufacturer, and the other three sections network interface-specific values allotted to identify the network cards and are unique for all devices.
For Example, “A8:8C:3E:XX:XX:XX” is one of the MAC Addresses for Microsoft Corporation. Here, “A8:8C:3E” is the OUI, and the remaining section “XX:XX:XX” is the network interface-specific values (also called device identifier, which is different for every device).

OUI and NIC Identifiers in MAC Address
It appears that you want to perform an integrity check, whether or not your MAC Address is properly assigned to the network interface controller on your computer’s hardware. By the end of this article, you’ll be able to check MAC Address in Windows 11:
Using Windows Settings
Using Control Panel
Using Command Prompt
Using PowerShell
Using System Information
Note: The Physical Address and MAC Address are the same, only the naming conventions vary.
MAC Address: A8:8C:3E:XX:XX:XX
Physical Address: A8-8C-3E-XX-XX-XX
1. Check MAC Address
using Windows Settings
Step 1: Open the Windows Settings from the Start menu.

Windows Settings App
Step 2: Select the “Network & Internet” option from the left sidebar. Depending on your network connection, either select the “Wi-Fi” or “Ethernet” option.

Wi-Fi or Ethernet Connection
Step 3: You’ll find the Physical Address (MAC) listed at the end.

Check MAC Address
2. Find MAC Address
using Control Panel
Step 1: Open the Control Panel from the Start menu.
Control Panel Icon
Step 2: Select the “Network and Internet” button.

Network and Internet
Step 3: Click the “Network and Sharing Center” button.

Network and Sharing Center
Step 4: Click the “Wi-Fi” or “Ethernet” option, depending on the connection your device is connected to.

Wi-Fi or Ethernet
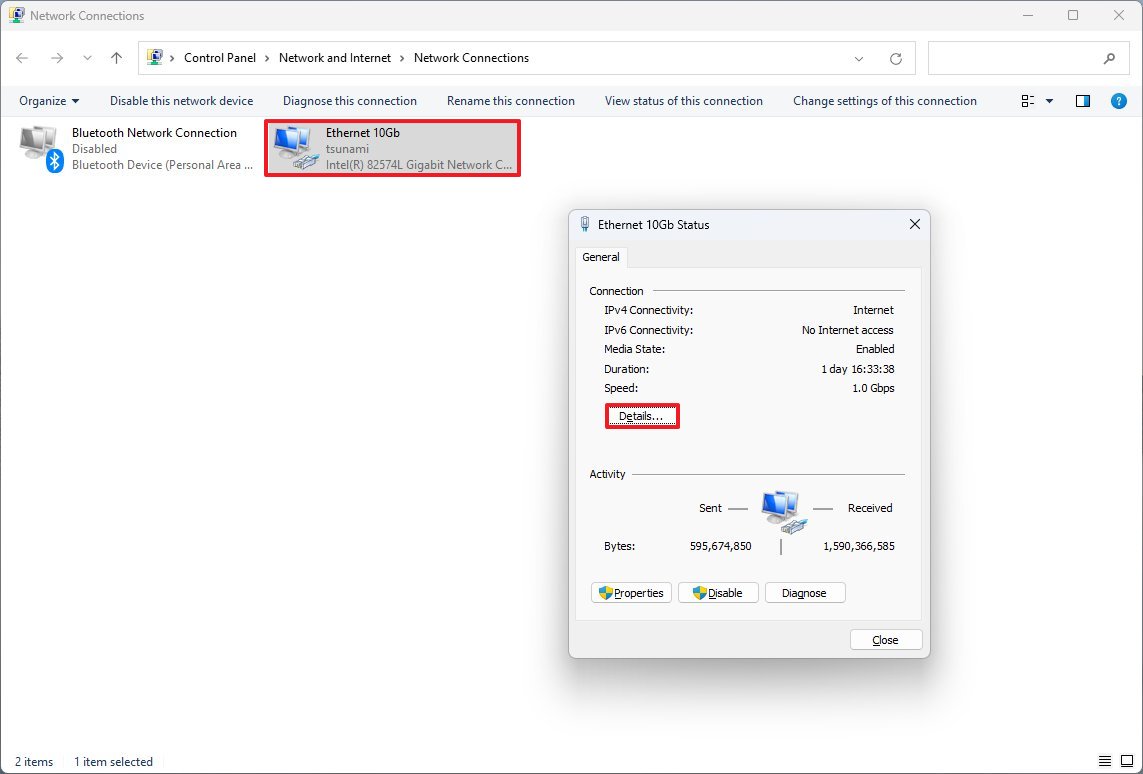
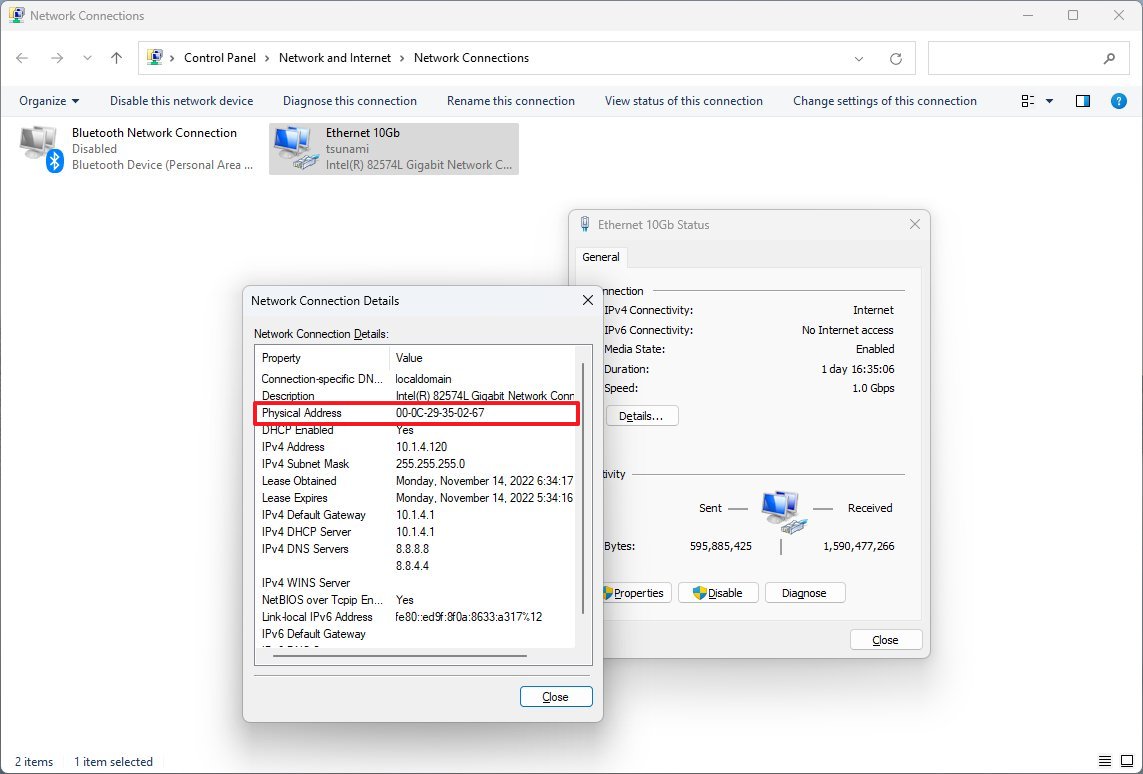
Step 5: The Connection Status tab (Wi-Fi or Ethernet) will appear. Click the “Details” button and you’ll find the Physical Address listed.

Check MAC Address
3. Check MAC Address
using Command Prompt
Step 1: Open the Command Prompt (CMD) from the Start menu.
Command Prompt (CMD) Icon
Step 2: To check the MAC Address, type the following command:
ipconfig /all and you’ll find the Physical Address (MAC) section listed for all the network adapters on your computer.

Check MAC Address in CMD
Note: Also, you can use the command: getmac to list the physical address of all network adapters on your device.
4. Find MAC Address
using PowerShell
Step 1: Open the PowerShell from the Start menu.
PowerShell App Icon
Step 2: To check the MAC Address, type the following command:
Get-NetAdapter and you’ll find the MAC Address section for the respective network adapters on the right side.

Check MAC Address in PowerShell
5. Check MAC Address
using System Information
Step 1: In the Start menu, type “System Information” and hit the enter key.
System Configuration Icon
Step 2: Expand the “Components” section on the left sidebar, expand the “Network” section and click the “Adapter” option.
Step 3: You’ll find the MAC Address listed on the right pane, under their respective network adapters.

Check MAC Address using System Information
How To Find the MAC
Address Vendor
Step 1: Go to OuiLookup’s official website.
Step 2: Enter your device’s MAC Address and you’ll find the associated hardware manufacturer.
FAQs Related to MAC
Address in Windows
Can MAC Address be
same for multiple devices?
Yes, the MAC address can be the same for some devices. Sometimes the MAC Address of Virtual Machines and PC overlaps.
Can websites see the MAC
Address?
The MAC Address is not visible to websites. Software that relies on any specific network adapter manufacturers to function may, however, detect it.
Next
Steps
We’ve covered how to find MAC Addresses on Windows 11. You can obtain the MAC Address of your network adapters by using any of the methods listed above.
Improve your device’s overall network connectivity by following the related articles below.
(Image credit: Future)
On Windows 11, a network adapter (Ethernet, Wi-Fi, and Bluetooth) includes a unique physical identifier referred to as the Media Access Control (MAC, MAC address, or physical address), an essential component, which in addition to the Internet Protocol (IP), allows a computer to connect to the network and communicate with other devices.
Since these addresses are embedded into the network card and never change, you don’t have to worry about them. However, sometimes, you may need to find the MAC address for various reasons. For example, to find a computer and configure access lists on the router, and many other reasons.
Regardless of the reason, Windows 11 includes multiple ways to find the physical address of your computer through the Settings app, Control Panel, System Information, Command Prompt, and even PowerShell.
This guide will walk you through the different ways to determine the MAC address of the active network adapters available on Windows 11.
How to find MAC address from Settings
To determine the MAC of the network adapter on Windows 11, use these steps:
- Open Settings.
- Click on Network & internet.
- Click the Ethernet or Wi-Fi page on the right side.
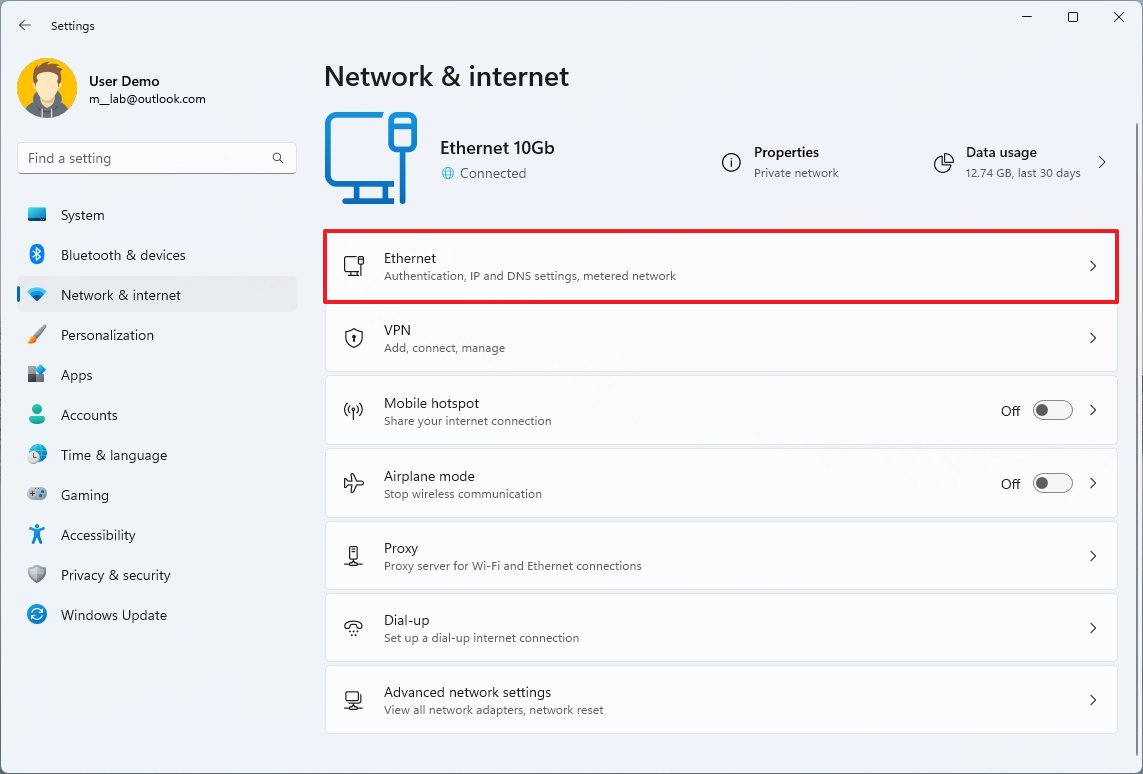
- Quick note: If you have a Wi-Fi connection, you will need to access the wireless properties setting to access connection information.
- Under the «Physical address (Mac)» section, confirm the address.
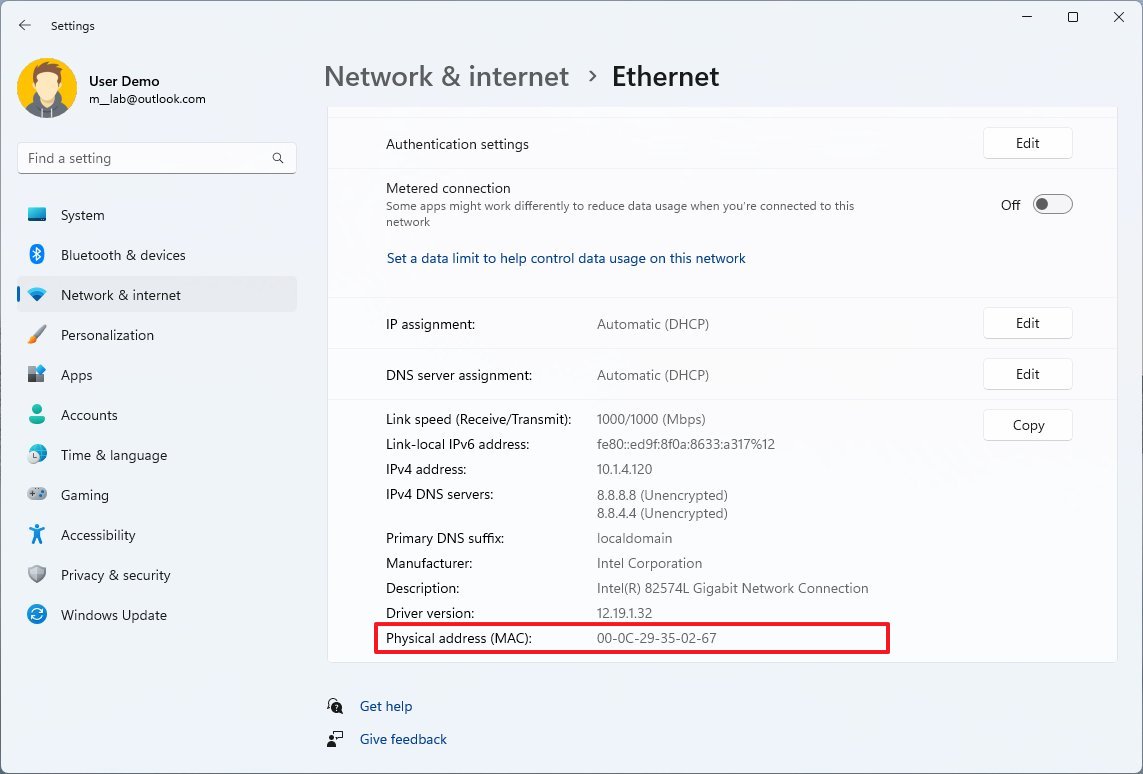
Once you complete the steps, the Settings app will display the physical address of the network adapter.
Determine MAC for all adapters
All the latest news, reviews, and guides for Windows and Xbox diehards.
Alternatively, you can also find the MAC address of all the network adapters from the «Hardware and connection properties» page. Here’s how:
- Open Settings.
- Click on Network & internet.
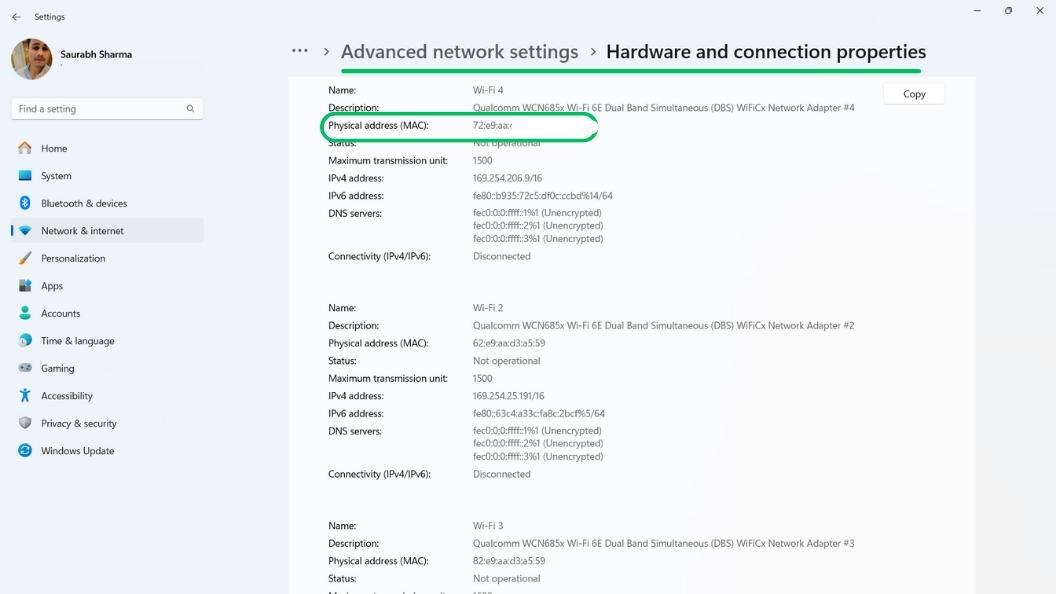
- Click the «Advanced network settings» page on the right side.
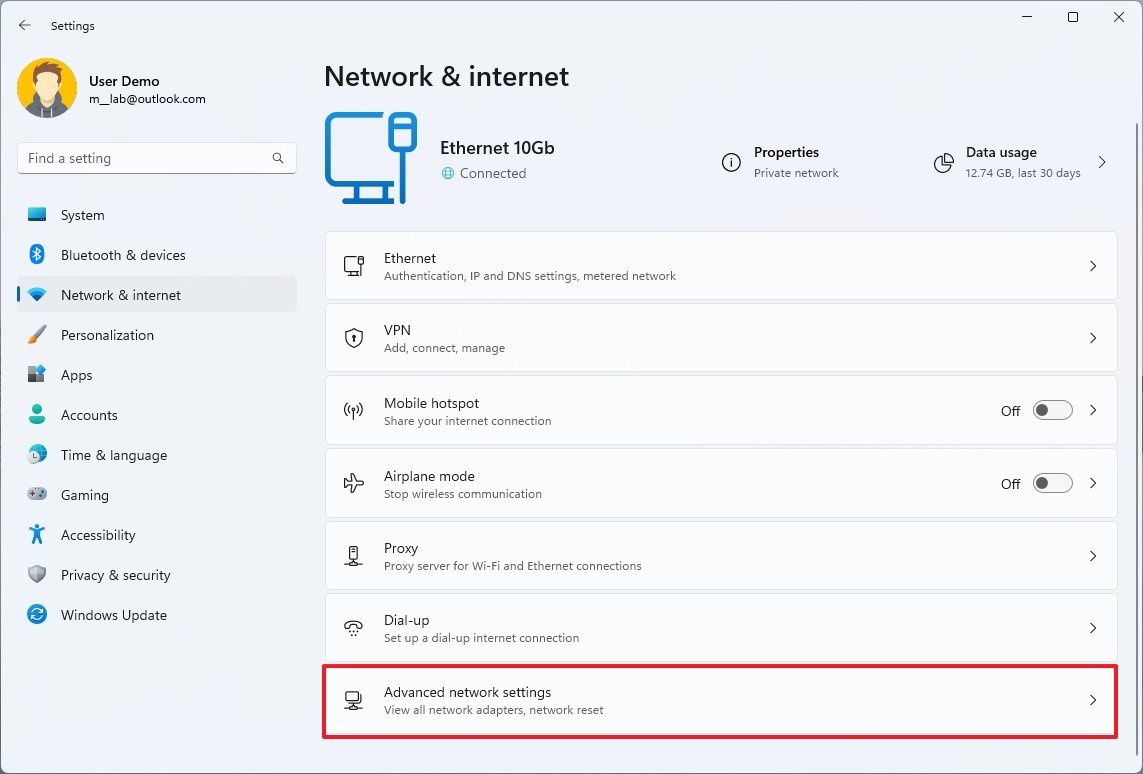
- Under the «More settings» section, click the «Hardware and connection properties» setting.
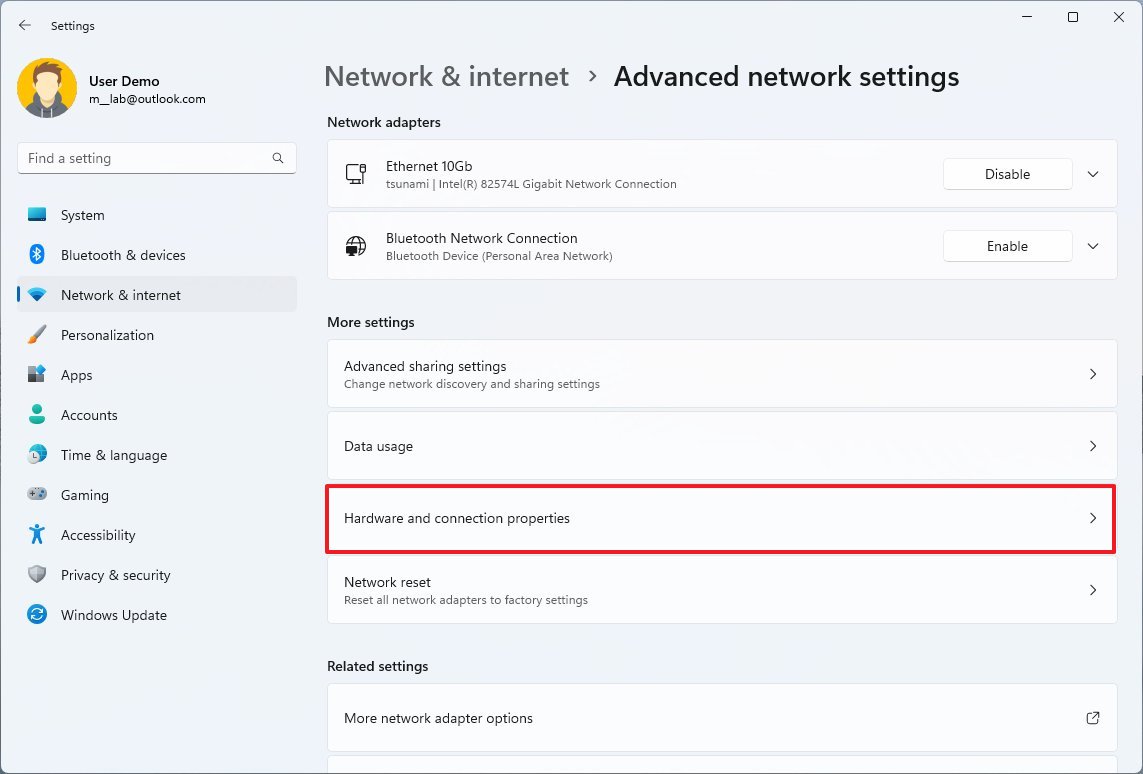
- Identify the name of the network adapter.
- Under the «Physical address (MAC)» section, confirm the address for the network adapter.
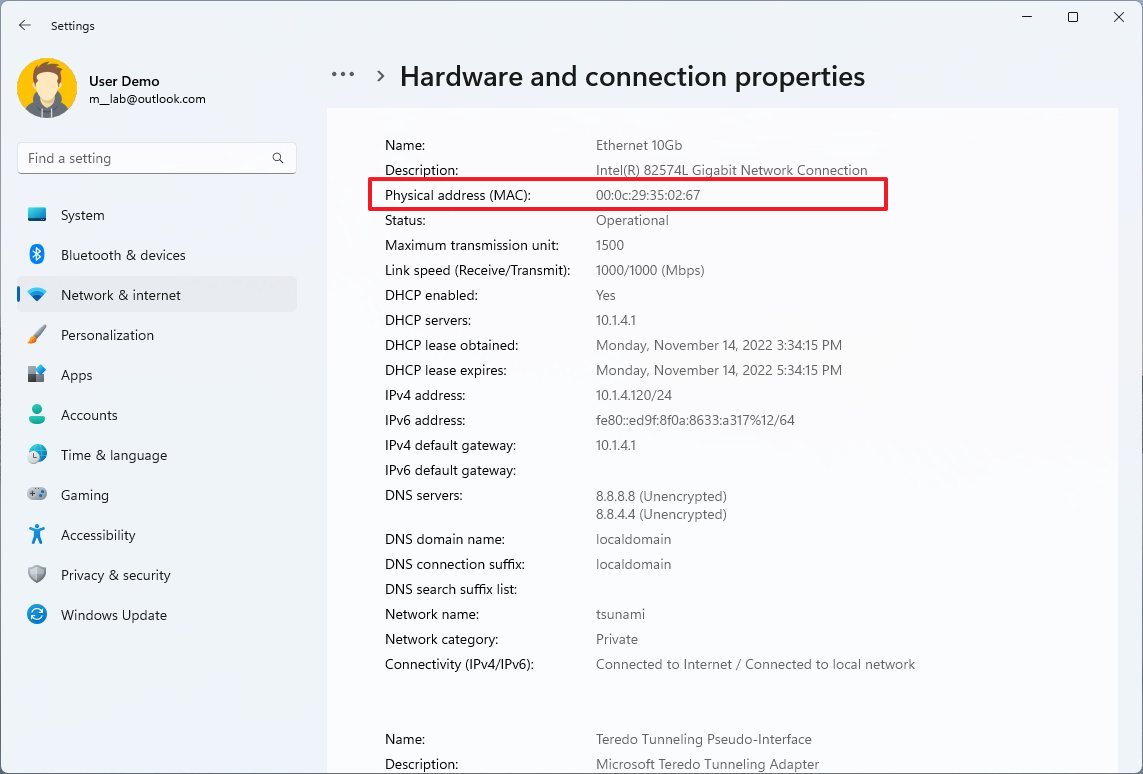
After you complete the steps, the properties page will list the configuration for every network adapter on your computer alongside the MAC address.
How to find MAC address from Control Panel
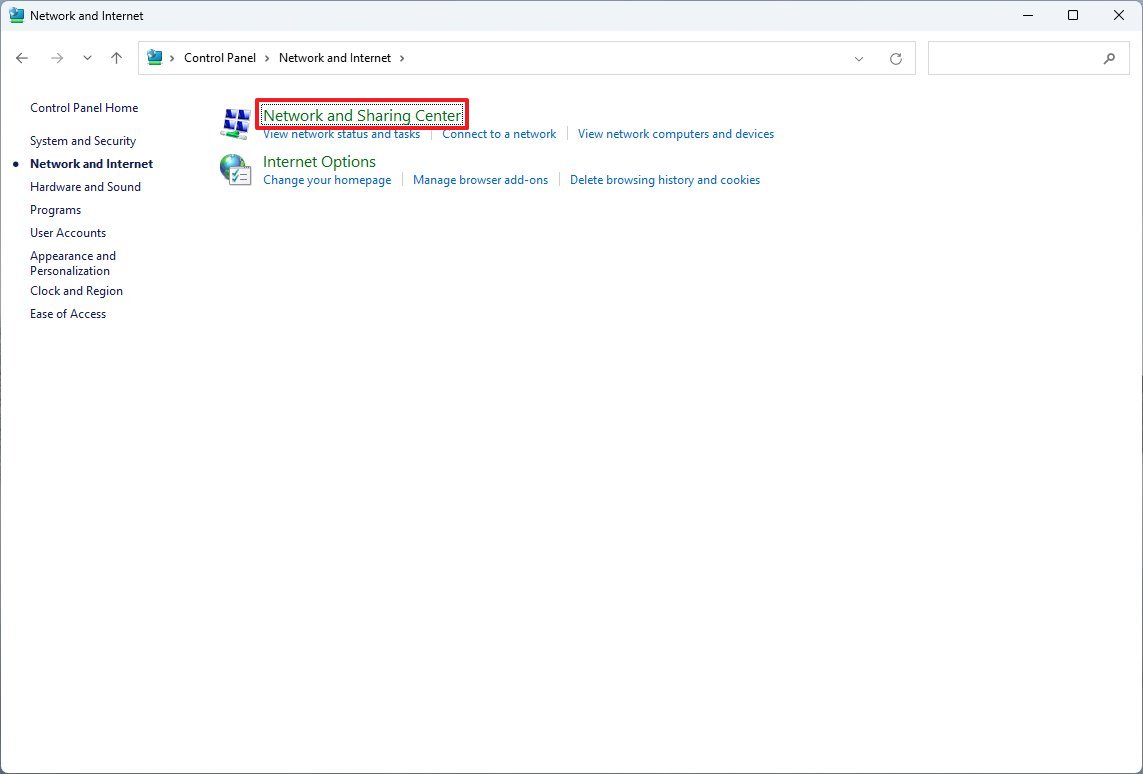
To find the MAC address from the Control Panel settings, use these steps:
- Open Control Panel.
- Click on Network and Internet.
- Click on Network and Sharing Center.
- Click the «Change adapter settings» from the left pane.
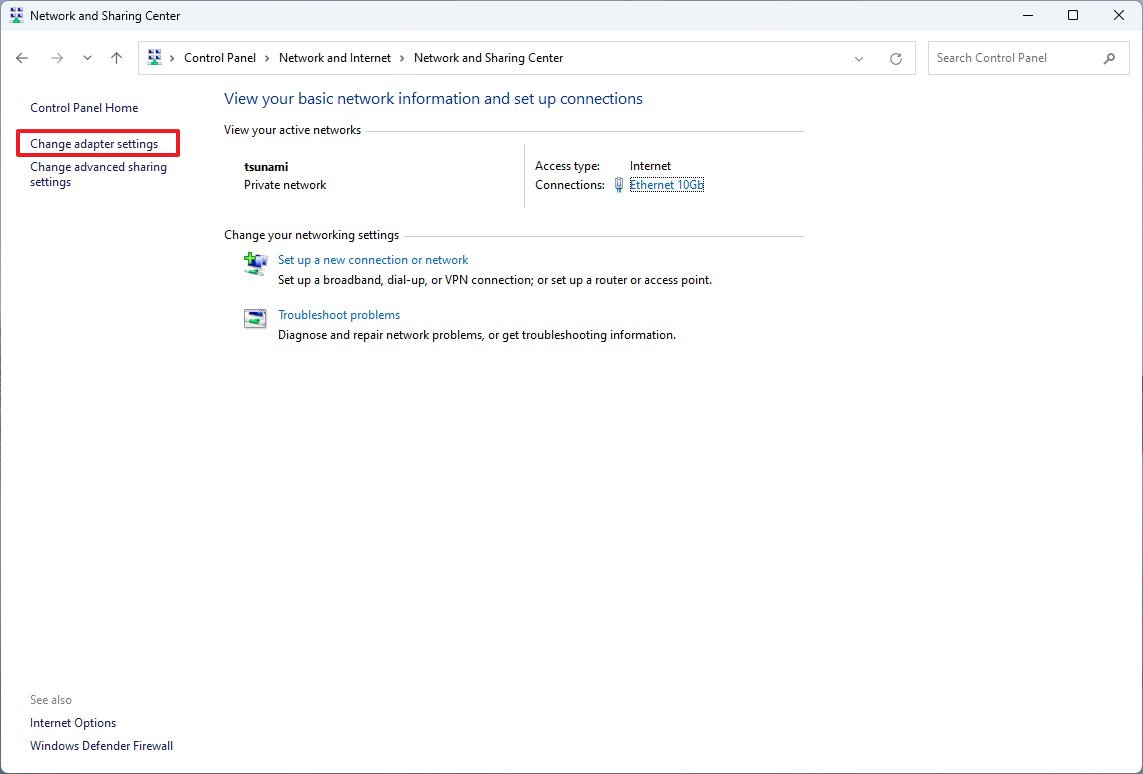
- Double-click the active network adapter (Ethernet or Wi-Fi).
- Click the Details button.
- Under the «Physical address (MAC)» section, confirm the address for the adapter.
Once you complete the steps, the page will display the network configuration, including the physical address of the adapter.
How to find MAC address from System Information
To determine the MAC with the System Information app on Windows 11, use these steps:
- Open Start.
- Search for System Information and click the top result to open the app.
- Expand the Components branch.
- Expand the Network branch.
- Select the Adapter option.
- Scroll down to the network adapter you want.
- Under the «MAC Address» section, confirm the hardware address.
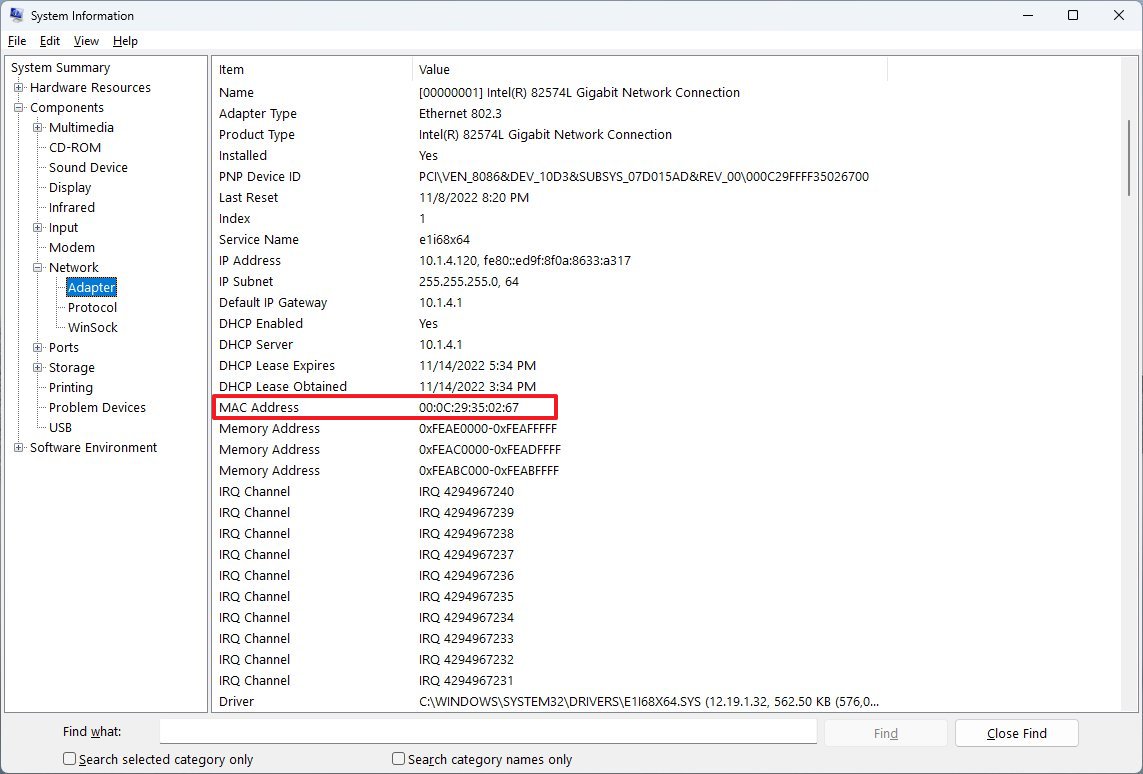
After completing the steps, you will know the adapter’s MAC address.
How to find MAC address from Command Prompt
To determine the MAC address on Windows 11 with Command Prompt, use these steps:
- Open Start.
- Search for Command Prompt and click the top result to open the app.
- Type the following command to determine the MAC of your computer’s network connection and press Enter: ipconfig /all
- Identify the name of the network adapter (if applicable).
- Under the «Physical Address» section, confirm the MAC address of your computer.
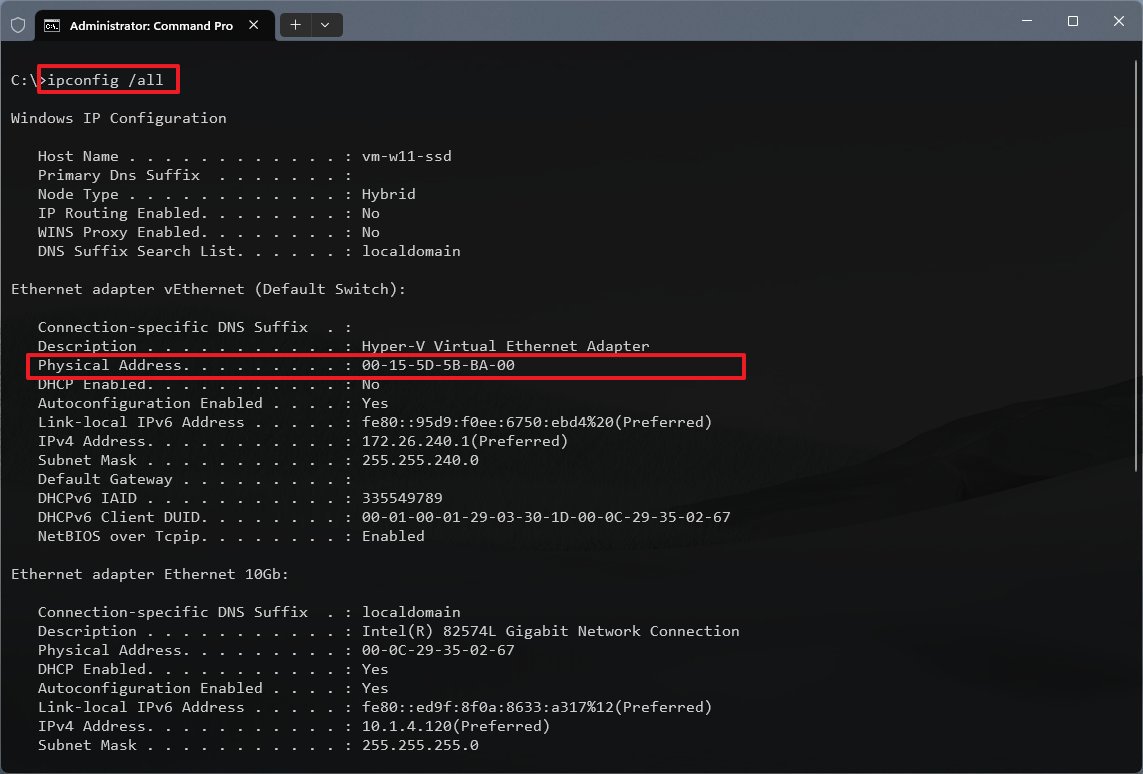
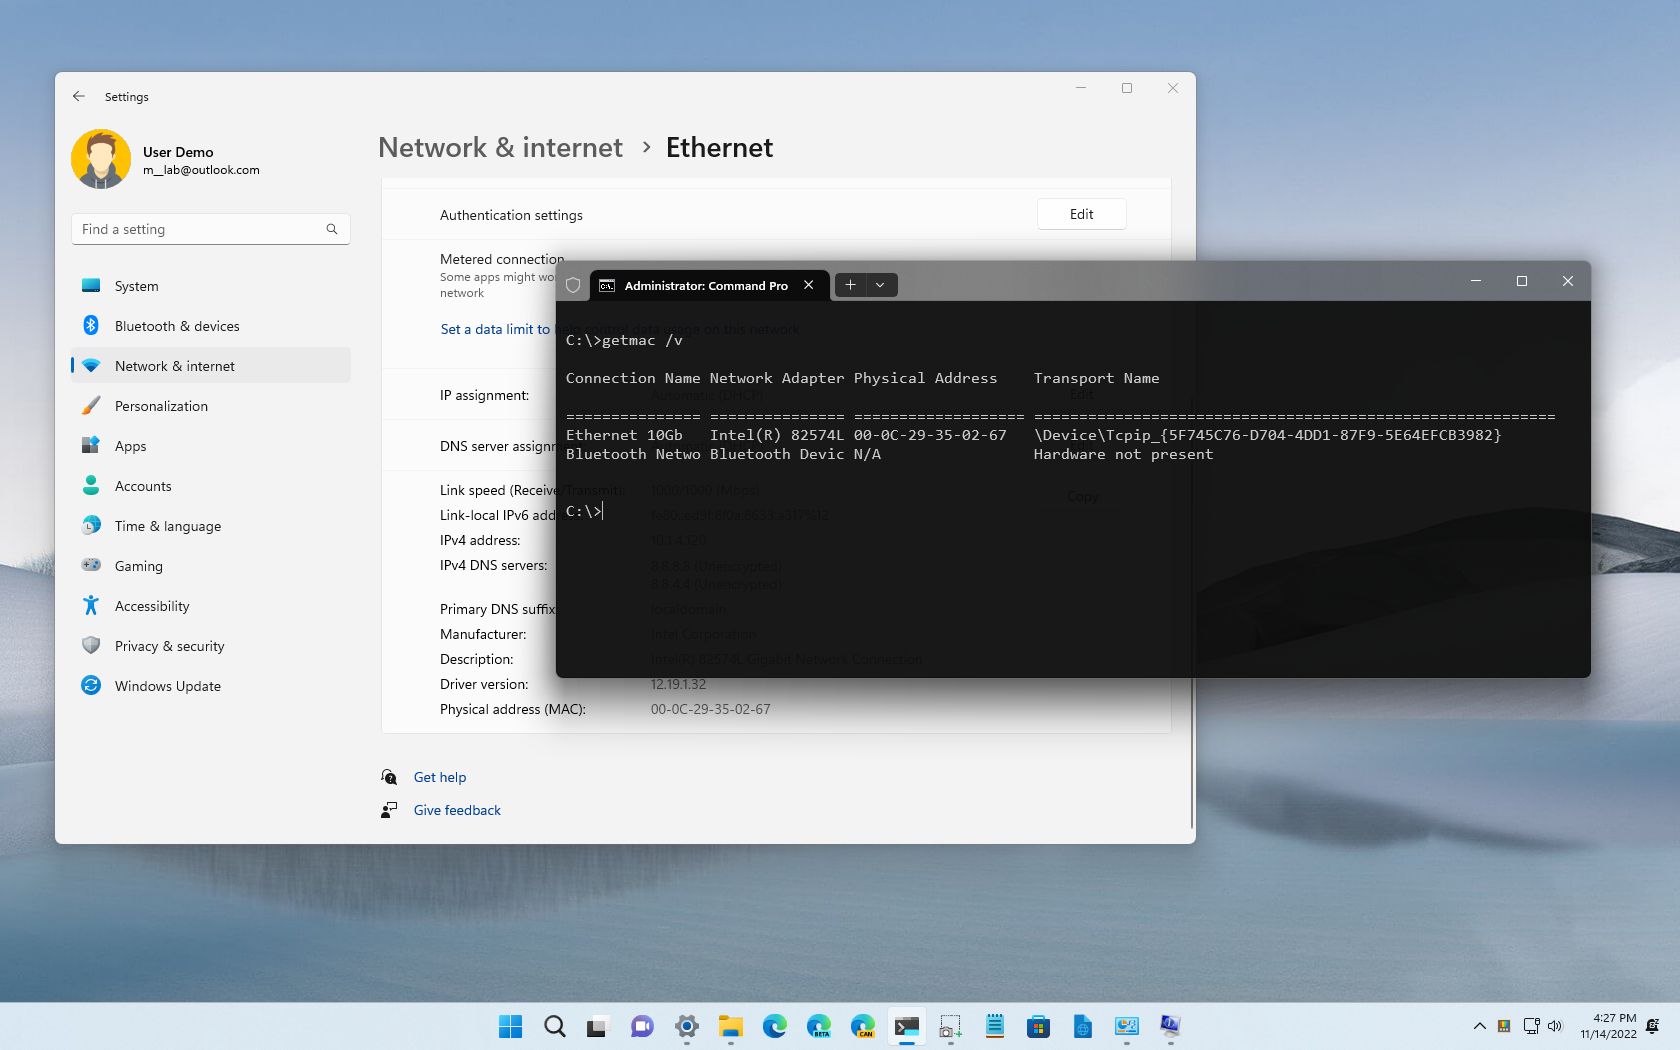
- (Optional) Type the following command to check the MAC address of the active network adapters and press Enter: getmac /v
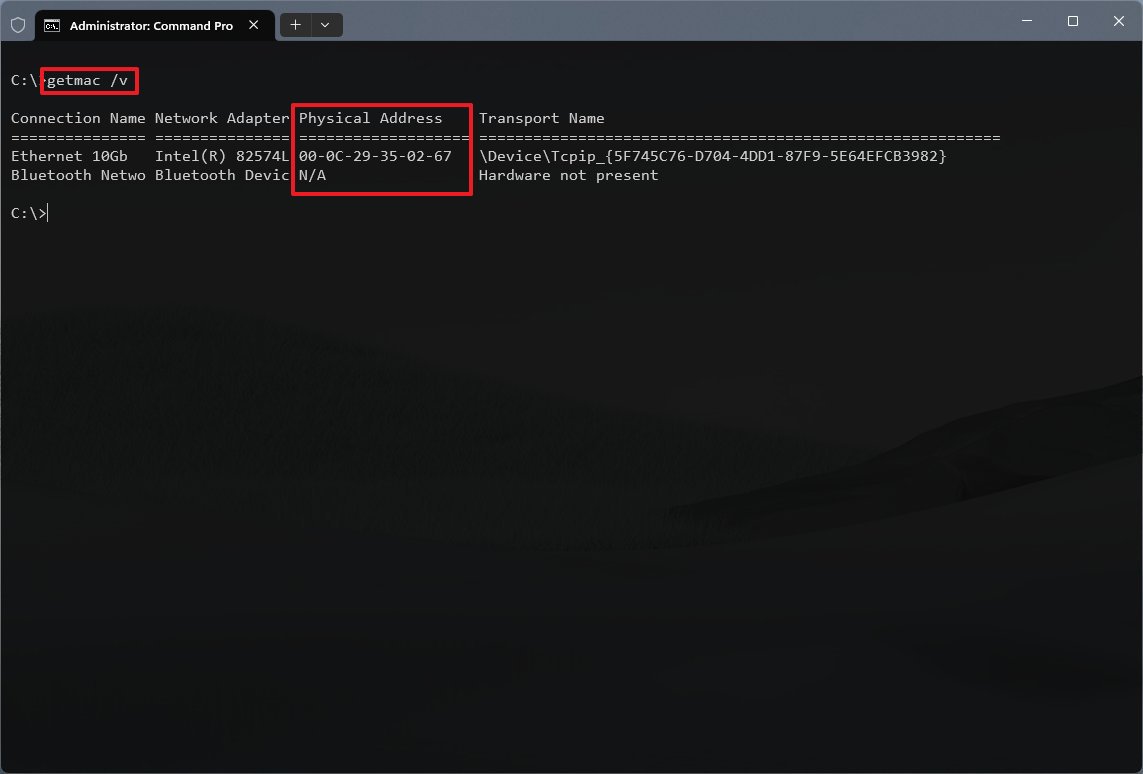
Once you complete the steps, the command will return the MAC information for the network adapters installed on your computer.
How to find MAC address from PowerShell
To check the network adapter MAC address with PowerShell commands, use these steps:
- Open Start.
- Search for PowerShell and click the top result to open the app.
- Type the following command and press Enter: Get-NetAdapter
- Under the «MacAddress» section, confirm the physical address for the active network adapter.
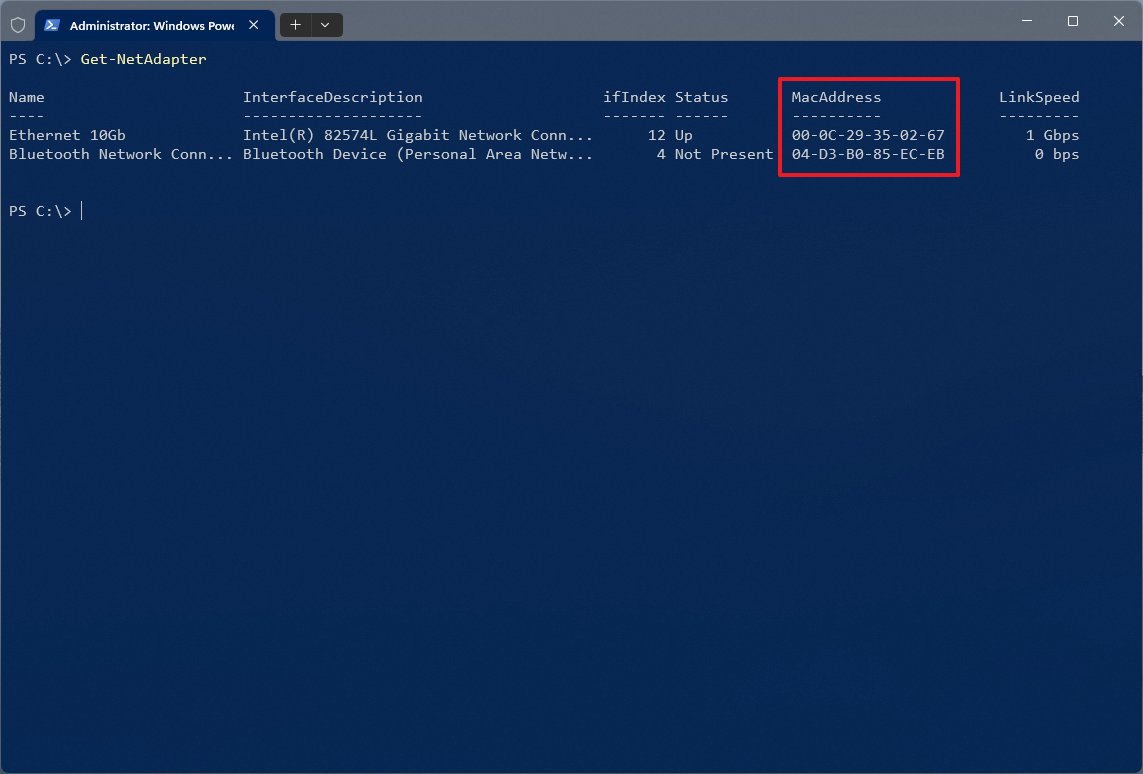
After you complete the steps, the PowerShell command will list the adapters with the respective MAC addresses on Windows 11.
More resources
For more helpful articles, coverage, and answers to common questions about Windows 10 and Windows 11, visit the following resources:
- Windows 11 on Windows Central — All you need to know
- Windows 10 on Windows Central — All you need to know
Mauro Huculak has been a Windows How-To Expert contributor for WindowsCentral.com for nearly a decade and has over 15 years of experience writing comprehensive guides. He also has an IT background and has achieved different professional certifications from Microsoft, Cisco, VMware, and CompTIA. He has been recognized as a Microsoft MVP for many years.
Last Updated :
24 Sep, 2024
This post will explain how to find your MAC address in Windows 11 if you’re wondering how to accomplish it. For networking purposes, your network adapter’s MAC address is a unique identification that you must know. It’s simple to find your MAC address in Windows 11 for troubleshooting or network setting purposes. Join us as we walk you through the process of verifying that you have the right information by checking the MAC address in Windows 11.
Table of Content
- How to Find Your MAC Address in Windows 11?
- Method 1: How to Find MAC Address Using Settings App
- Method 2: How to Find MAC Address Using Control Panel
- Method 3: How to Find MAC Address Using PowerShell
- Method 4: How to Find MAC Address Using System Information
- Method 5: How To Check MAC Address in Windows 11 Using Command Prompt
- How to Find Your MAC Address in Windows 11 — FAQs
How to Find Your MAC Address in Windows 11?
Below are the methods for finding your MAC address in Win 11.
Method 1: How to Find MAC Address Using Settings App
Check mac address windows 11 is simple using the Settings app. Just follow these easy steps:
Step 1: Press Win + I to open the settings app
Step 2: Click «Network & Internet» in the left panel.
Step 3: Select «Advanced network settings.»
Step 4: Click on «Hardware and Connection Properties.»
Step 5: Your MAC address is listed under «Physical address (MAC)» for the chosen adapter.
By following these steps, you can easily locate your MAC address using the Settings app in Windows 11.
Method 2: How to Find MAC Address Using Control Panel
Another way to find your MAC address in Windows 11 is by using the Control Panel. Here’s how you can check mac address windows:
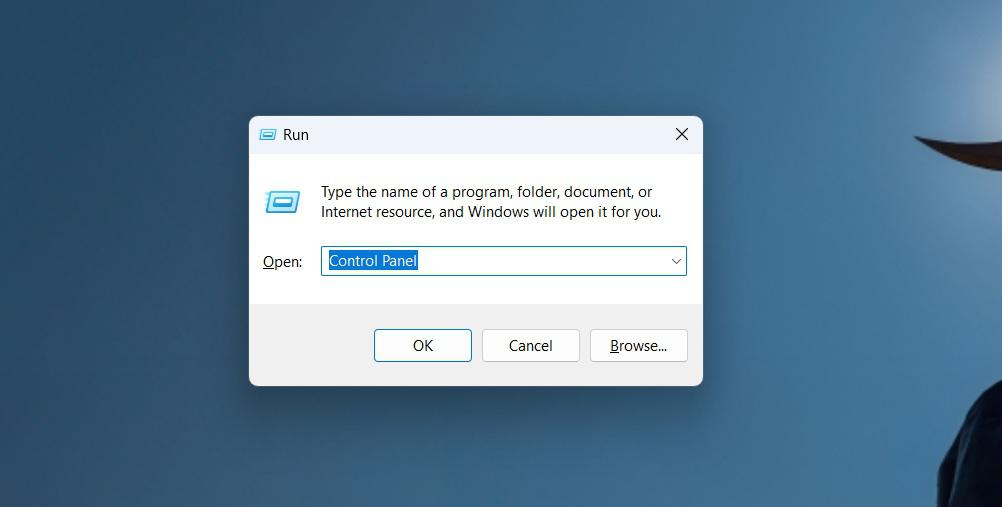
Step 1: Press Win + R then run dialog type «Control Panel«.
Step 2: Select «Network and Internet.»
Step 3: Click on «Network and Sharing Center.»
Step 4: Choose «Change adapter settings» in the left pane.
Step 5: Right-click on your network adapter and select «Status.»
Step 6: Click on «Details» and locate the MAC address under «Physical Address.»
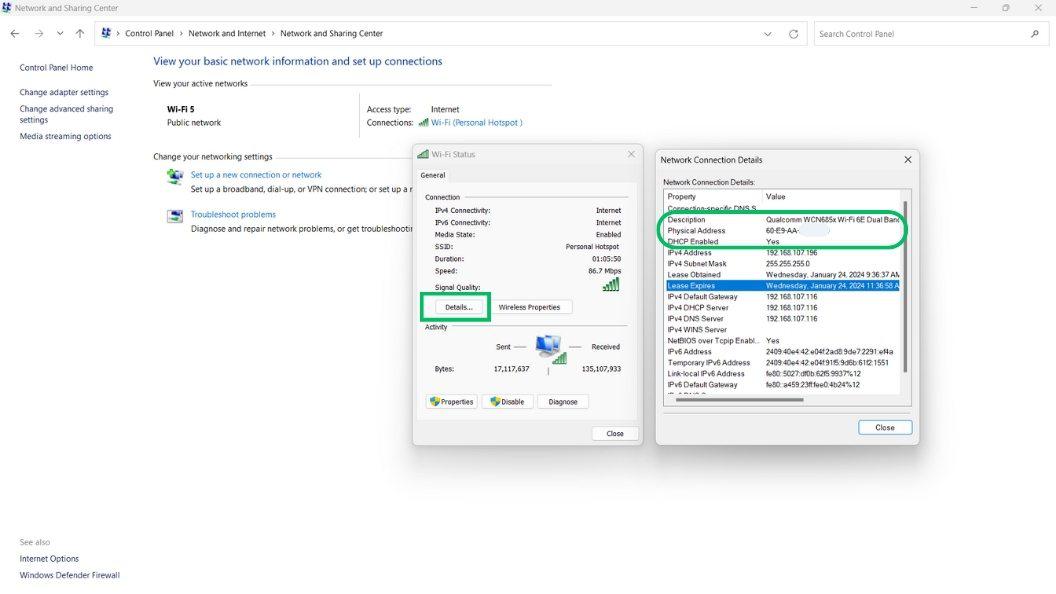
Using the Control Panel is a straightforward way to find your MAC address on Windows 11, providing you with a quick method to access your network connection details.
Method 3: How to Find MAC Address Using PowerShell
Using PowerShell is a quick and efficient way to find your MAC address in Windows 11. Follow these simple steps:
Step 1: Open the Start menu and search for «PowerShell.»
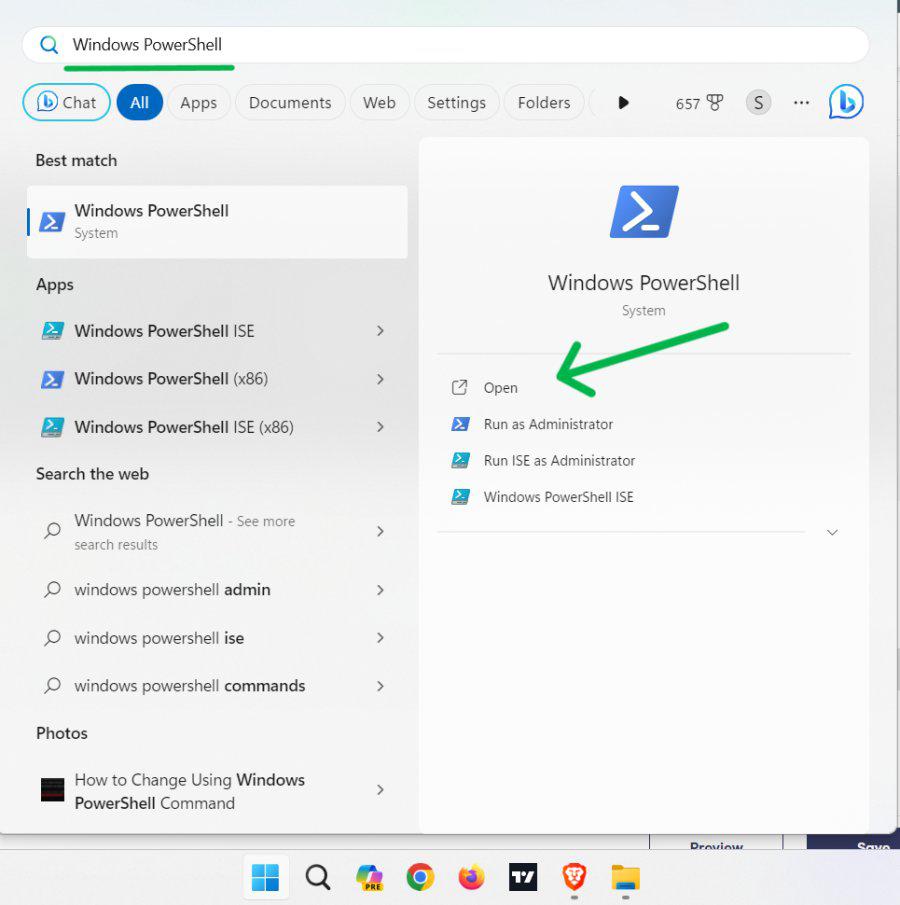
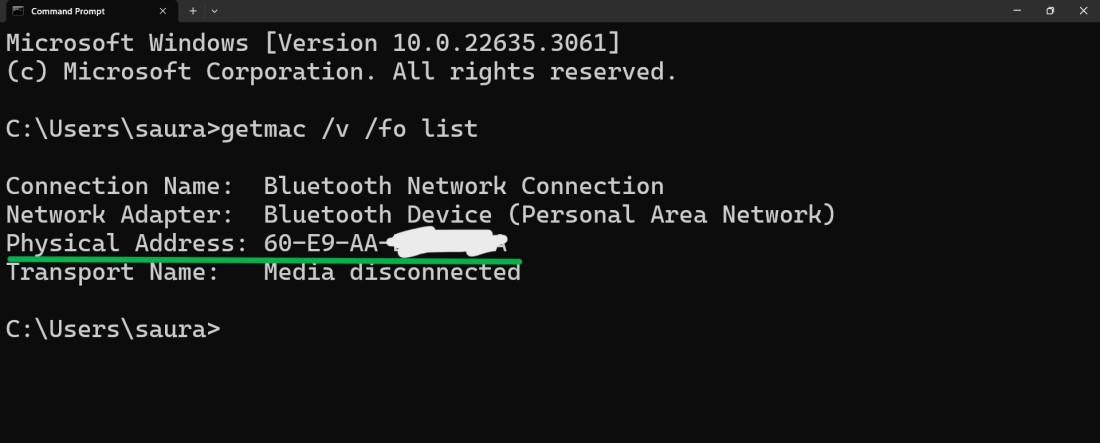
Step 2: Step 2: Type the command getmac /v /fo list and press Enter.
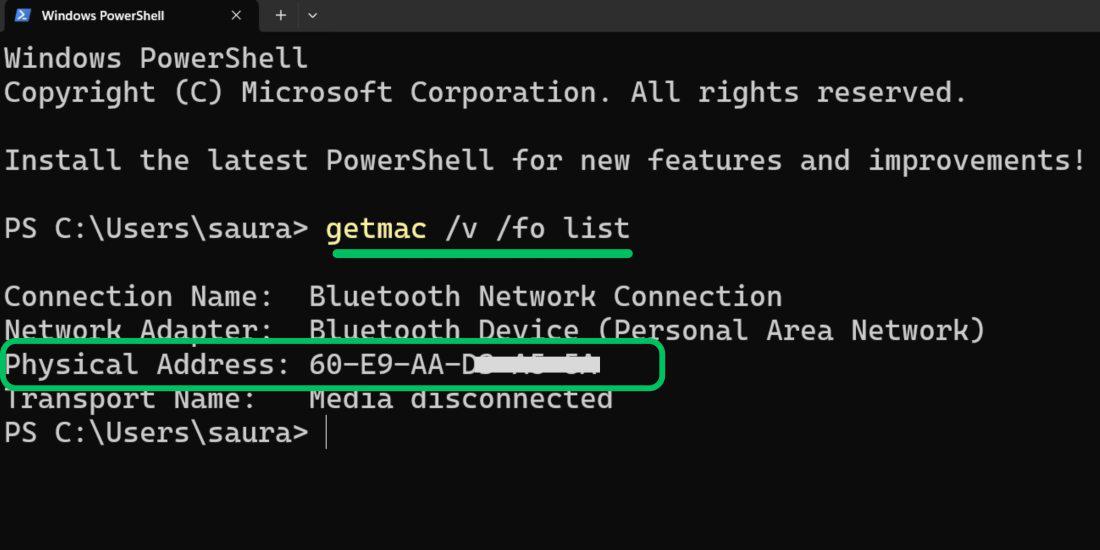
Step 3: Your MAC address will be displayed for each network adapter listed.
This method is straightforward and allows you to quickly check MAC address windows for your network adapter using PowerShell.
Method 4: How to Find MAC Address Using System Information
Step 1: Open the Start menu and search for «System Information.»
Step 2: Expand the «Components» branch and then «Network.»
Step 3: Double Click on «Network» then click on «Adapter«
Step 4: Step 4: Under «MAC Address,» you’ll find the unique identifier for your chosen adapter.
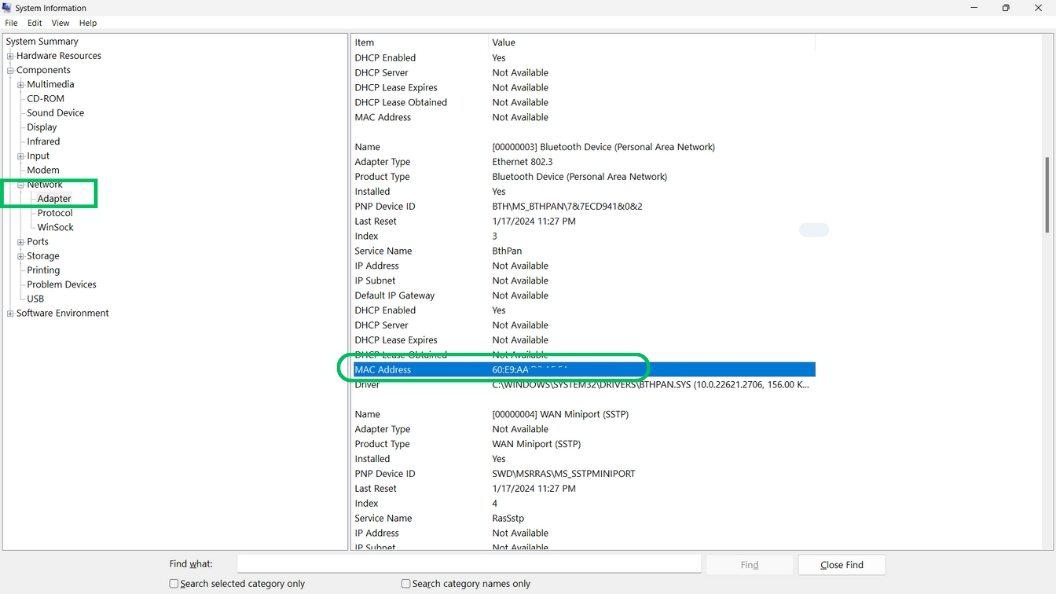
By following these steps, you can easily find your MAC address using the System Information tool in Windows 11. This method provides a detailed view of your network configuration and can help you manage your network settings more effectively.
Method 5: How To Check MAC Address in Windows 11 Using Command Prompt
You can use Command Prompt to check your MAC address in Windows 11 easily. Follow these steps:
Step 1: Open the Start menu and search for «CMD.»
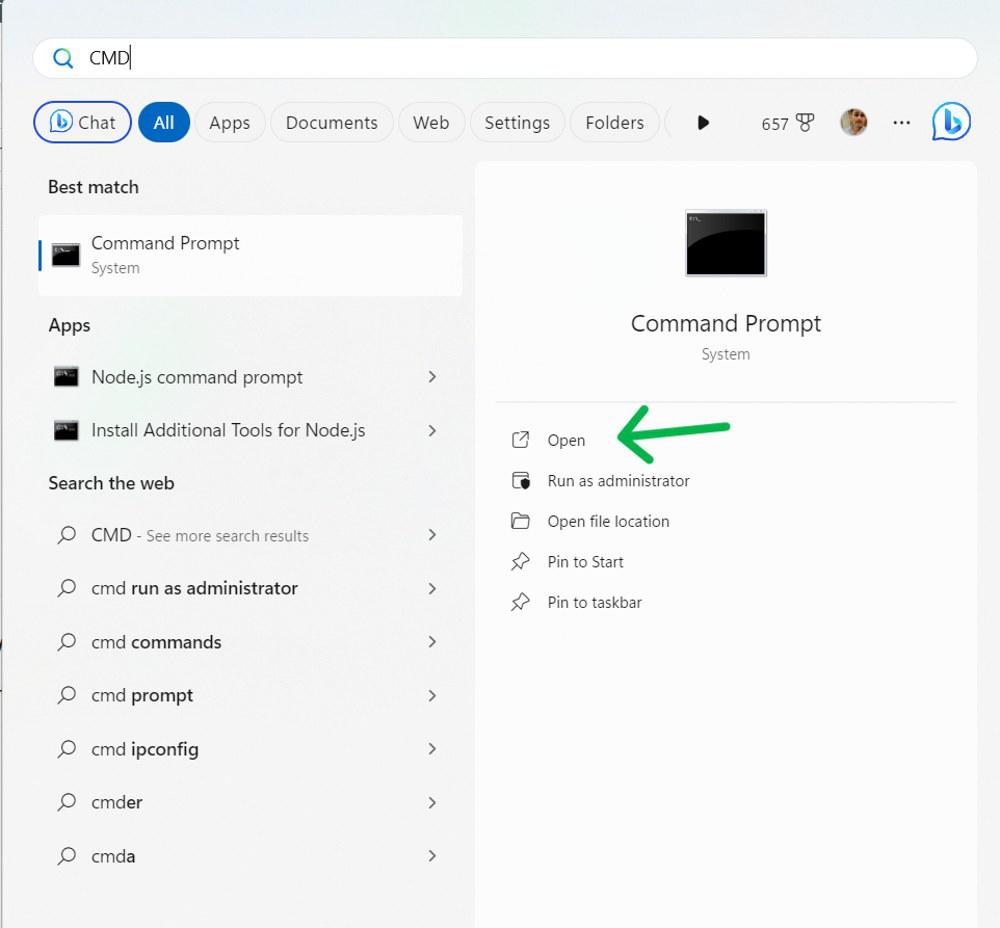
Step 2: Type the following command and hit enter
getmac /v /fo list
Conclusion
In Windows 11, locating your MAC address is an easy procedure that only requires a few steps to complete. For the purposes of device identification, network configuration, and network troubleshooting, it is helpful to know how to acquire your MAC address in Windows 11. In Windows 11, you can quickly check your MAC address and use it for a variety of network-related operations, regardless of whether you access it via the settings menu or command prompt.