
The tar command, which is very common in Unix and Linux systems for archiving and compressing files (also known as zipping), is also available in Windows 11 and Windows 10. It mainly helps you pack many files and folders into one file, called a tarball. In this guide, we’ll show you how to use the tar command in Windows to make ZIP archives.
Also see: How to Open or Extract .Gz, Tar.gz or .Tar File in Windows 11/10
Check if you have tar installed in Windows 11
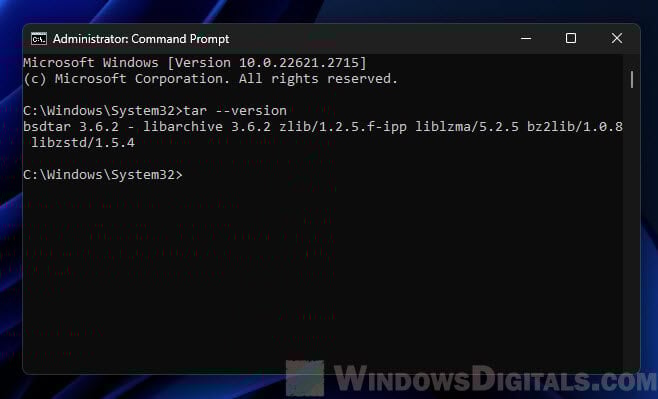
Before we start making ZIP files with the tar command, make sure you have all the needed tools on your Windows 11 or Windows 10 PC. Starting with Windows 10’s Fall Creators Update and also in Windows 11, the tar command is built-in and you can use it from Command Prompt or PowerShell. Below is how you can check if tar is on your computer and install it if it’s not.
- Open Command Prompt or PowerShell.
- Type
tar --versionand press Enter. - If you see a version number, tar is already on your computer. If you get an error or the command doesn’t work, you need to install it.

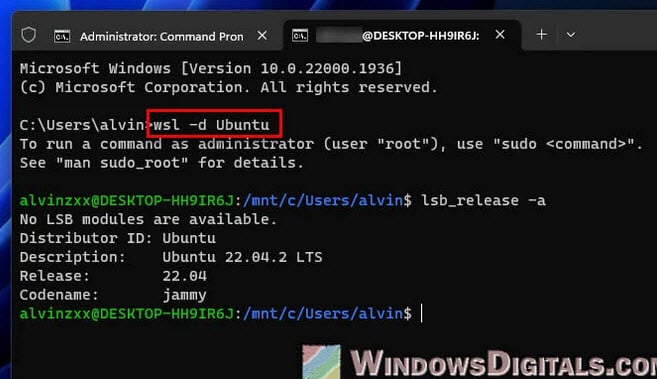
- If tar is not on your computer, the simplest way to install it is by turning on the Windows Subsystem for Linux (WSL).
- Go to the Windows search bar, type “Turn Windows features on or off”, and click on it.
- In the Windows Features window, tick the box for “Windows Subsystem for Linux” and click OK.
- Restart your computer when asked.
- After restarting, you can install the Linux version you like from the Microsoft Store, like Ubuntu.

- Once you have WSL with your chosen Linux version installed, you can use tar by starting the Linux app from the Start menu.
- You can also use tar directly in Windows Command Prompt or PowerShell.
With tar ready to use on your Windows machine, you can now start making ZIP archive files. In the next part, we’ll go through the basic commands and how to use them.
Suggested read: How to Zip Files and Folders in Windows 11/10 Without Any Software
Create ZIP archives with tar command
Now that you have tar ready on your Windows computer, let’s see how to use it to make ZIP archive files. It’s quite simple and uses basic command line steps.
- Start Command Prompt or PowerShell, whichever you like more.
- Move to the folder where your files are by using the
cdcommand. For instance,cd C:\Users\Username\Desktop\.
- The basic way to make a ZIP file with
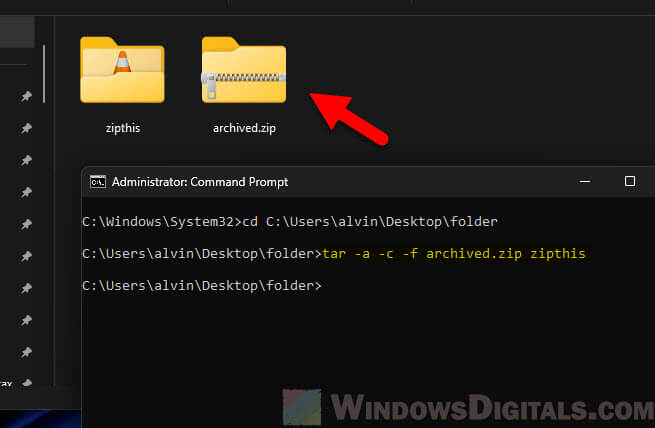
taris like this:tar -a -c -f archive_name.zip file_or_directory_to_compress
- Here,
-apicks the ZIP format automatically,-cmeans create, and-fnames the archive. - To make a ZIP archive of a folder called MyFolder, the command would be:
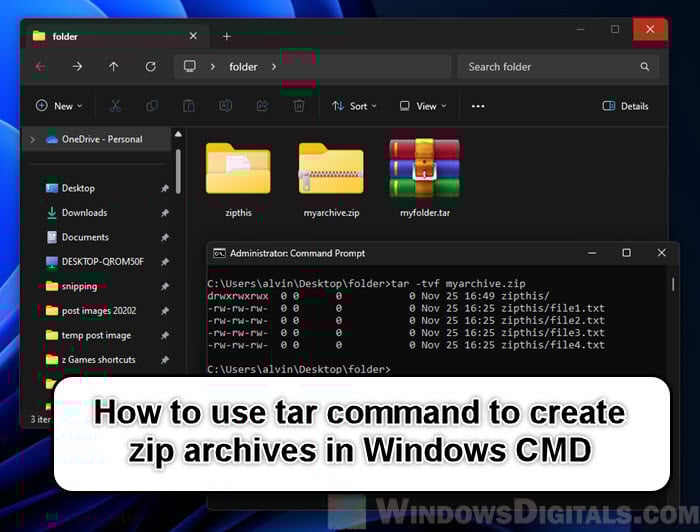
tar -a -c -f myarchive.zip MyFolder

- This command makes a ZIP file named myarchive.zip with MyFolder inside.
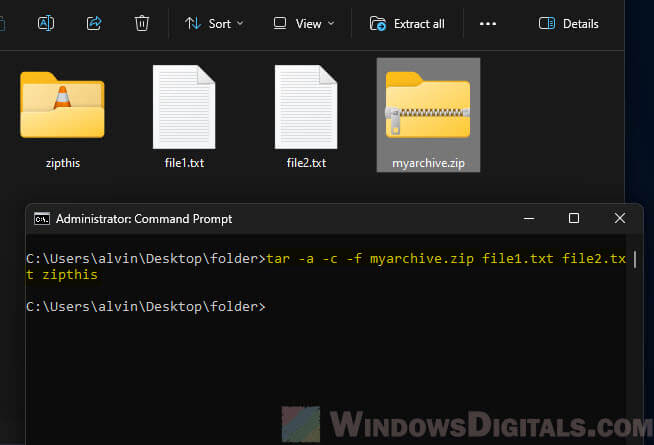
- You can also pack several files or folders in one go:
tar -a -c -f myarchive.zip file1.txt file2.txt MyFolder

- This makes a ZIP file with file1.txt, file2.txt, and the MyFolder folder inside.
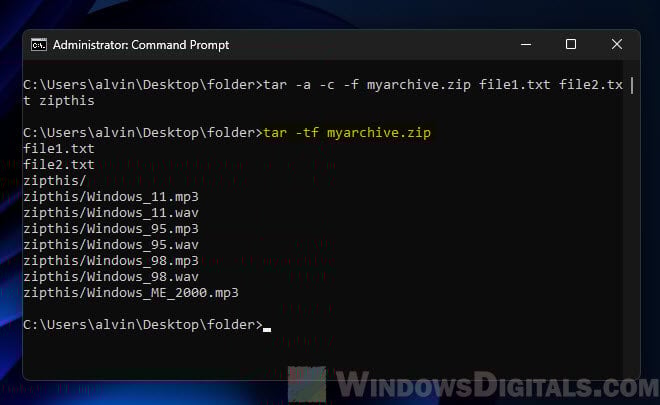
- To check if your files are correctly packed, you can list what’s in the ZIP file:
tar -tf myarchive.zip

- This shows the files in myarchive.zip.
Pro tip: How to Split a File Into Multiple Files in Windows 11
In the next part, we’ll share some extra tips to make your ZIP archiving with tar even better.
Some tips for more efficient ZIP archiving with tar command
The basic tar command for making ZIP files is simple, but there are more options and tricks that can help you archive better and fit your needs.
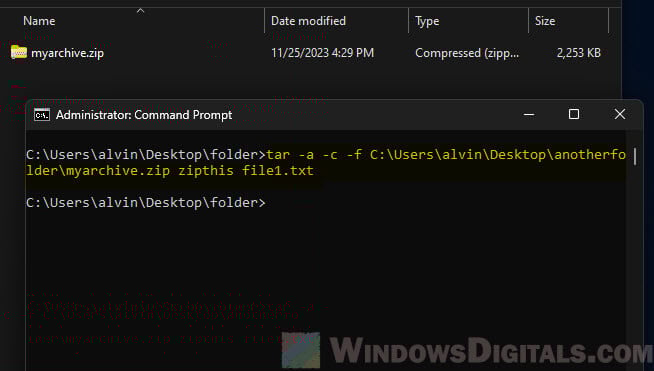
- Usually,
tarmakes the ZIP file right where you are. To make the archive in a different place, add the path to the archive name. For example:tar -a -c -f C:\Archives\myarchive.zip MyFolder

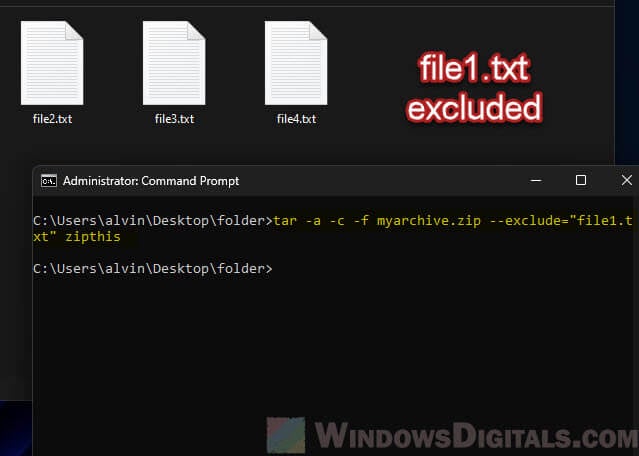
- Sometimes, you might not want to include certain files or folders in the archive. Use the
--excludeoption for this:tar -a -c -f myarchive.zip --exclude="file1.txt" MyFolder

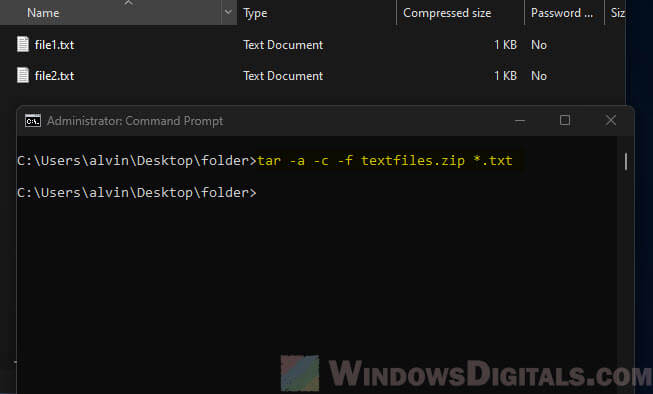
- You can use wildcards (*) to pack files that match a certain pattern. For example, to pack all
.txtfiles:tar -a -c -f textfiles.zip *.txt

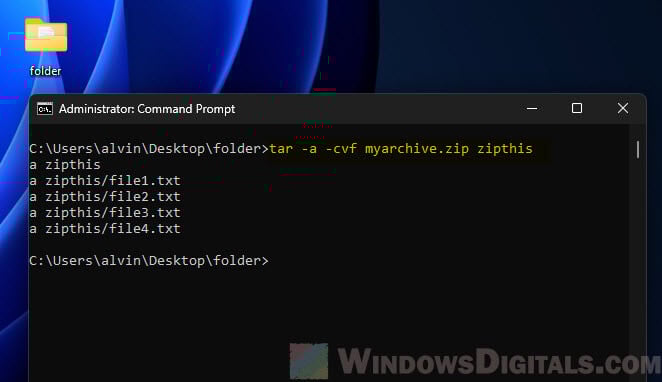
- If you want to see the files being packed, add the
-v(verbose) option:tar -a -cvf myarchive.zip MyFolder

- This will show each file as it’s added to the archive.
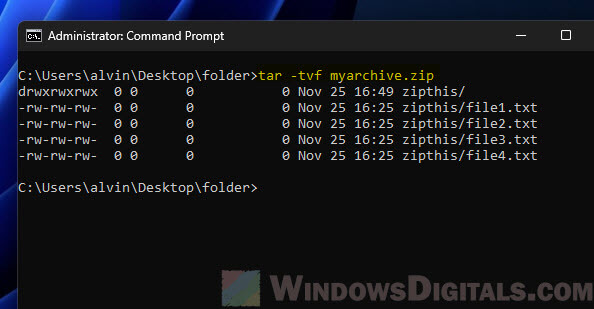
- After making an archive, it’s good to check if it’s all okay. Do this by:
tar -tvf myarchive.zip

- This not only shows the contents but also checks if the files are fine.
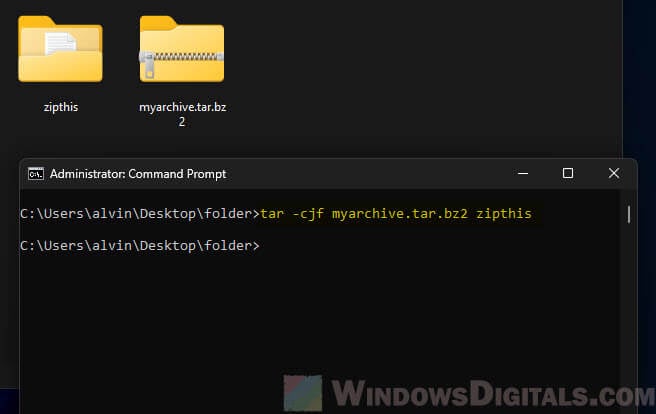
- While
-apicks ZIP compression by itself, you can choose other compression methods like gzip or bzip2 with-zor-j:tar -czf myarchive.tar.gz MyFolder tar -cjf myarchive.tar.bz2 MyFolder

- Note that these commands make
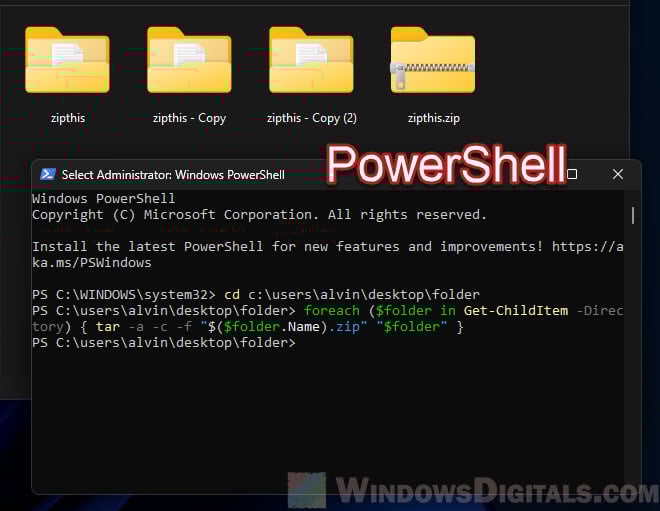
.tar.gzor.tar.bz2files, not ZIP. - For batch archiving multiple directories into separate archives, you can use a simple script or loop in the command line. For example, in PowerShell:
foreach ($folder in Get-ChildItem -Directory) {
tar -a -c -f "$($folder.Name).zip" "$folder"
}
Useful guide: Move All Files from Subfolders to Main Folder (Windows)
Create tar.gz and tar archives with tar command in Windows 11
Besides making ZIP files, the tar command in Windows can also make .tar.gz (tarball compressed with gzip) and .tar (uncompressed tarball) archives. These types are very common in Unix and Linux systems and are useful for many things, like backing up and sharing software.
Create a tar.gz archive
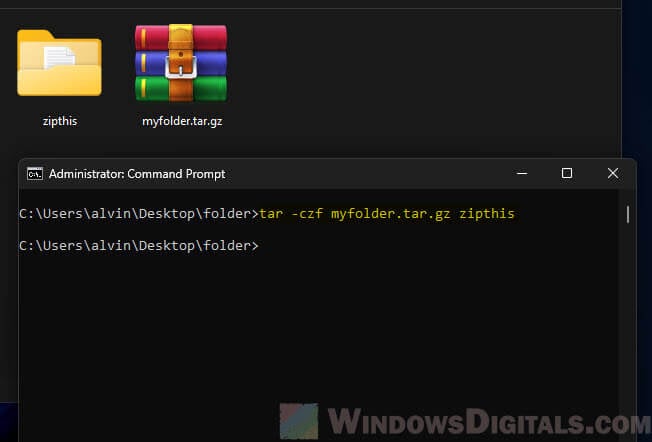
- To make a .tar.gz archive, use the
-zoption for gzip compression. The basic command looks like this:tar -czf archive_name.tar.gz file_or_directory_to_compress
- Here,
-cmeans create,-zapplies gzip compression, and-fnames the archive file. - To compress a folder called MyFolder into a .tar.gz archive, the command is:
tar -czf myfolder.tar.gz MyFolder

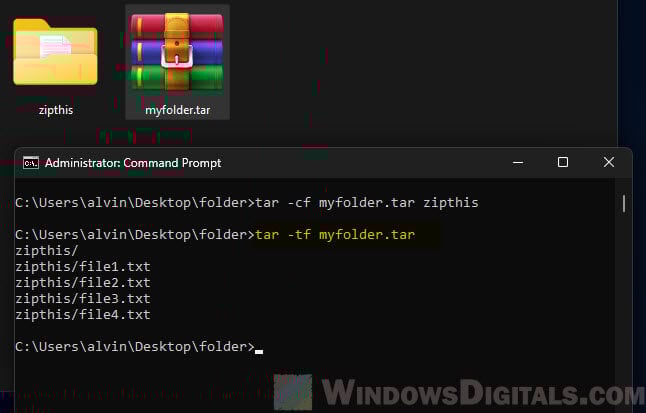
Create a tar archive
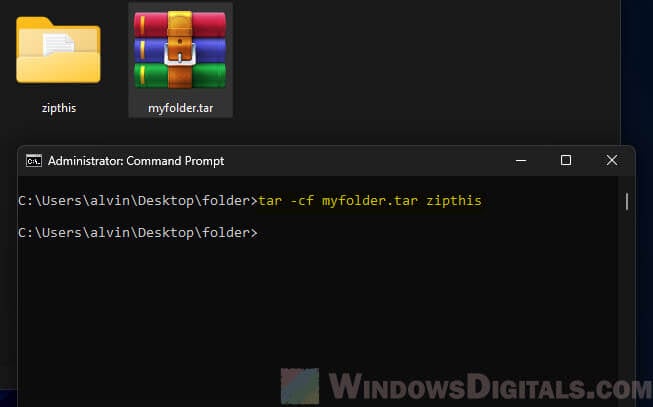
- Making an uncompressed tar archive is simple. Just leave out the compression option (
-zfor gzip or-jfor bzip2). The command goes like this:tar -cf archive_name.tar file_or_directory_to_compress
- To pack MyFolder into a .tar file, use:
tar -cf myfolder.tar MyFolder

Some other options
- Just like with ZIP archiving, you can use the
-v(verbose) option to see the files being added to the archive. - The
--excludeoption works the same way as with ZIP files, letting you leave out specific files or folders. - Use
tar -tf archive_name.tar.gzortar -tf archive_name.tarto list what’s in your .tar.gz or .tar archive.

Windows does not have built-in support for TAR/GZip files.
Files with a «.tgz» or «.tar.gz» extension are compressed archives that users of Unix-based operating systems use to more easily transfer or back up multiple files at once. TGZ files are created by a two-step process that first combines multiple files into a single one («tar») and then compresses this single file so that it takes up less space («gzip»).
TGZ files perform a similar role as ZIP files that are more familiar to Windows users, but unlike ZIP, Windows does not contain any built-in support for working with TGZ files. If you are transferring files between Windows and Unix computers, however, you may need the ability to create TGZ archives from within Windows.
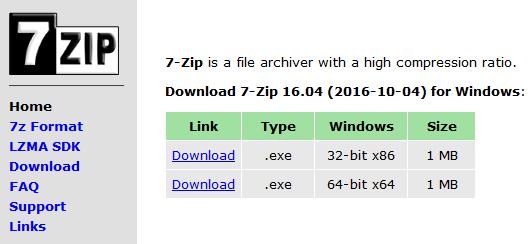
Step 1
Download the free and open-source application «7-Zip» by going to their website (see Resources) and clicking the «Download» link for the «.exe» file (if you are running 32-bit Windows) or the «.msi» file (if you are running 64-bit Windows).
Step 2
Install 7-Zip by double-clicking on the file that you downloaded and following the directions in the wizard that appears.
Step 3
Select the files in Windows Explorer that you want to add to a TGZ archive.
Step 4
Right-click on one of the files that you have selected, select «7-Zip» from the menu and then select «Add to archive…»
Step 5
Enter a new name for the archive in the field labeled «Archive» and then select «Tar» from the «Archive format» drop-down list. Leave the other options set to their default values and click «OK.» A file with the extension «.tar» will be created in the current directory.
Step 6
Right-click on the new «.tar» file, select «7-Zip» from the menu, and then select «Add to archive…»
Step 7
Select «GZip» from the «Archive format» drop-down list. Leave the other options set to their default values and click «OK.» A file with the extension «.tar.gz» will be created in the current directory. This file is the complete TGZ archive.
В этой статье рассмотрим несколько способов создания архивов gzip (tar.gz) на операционной системе Windows.
Прежде всего, вспомним, что такое формат gzip и как он применяется на практике, из Wikipedia:
❝
gzip (сокращение от GNU Zip) — утилита сжатия и восстановления (декомпрессии) файлов, использующая алгоритм Deflate. Применяется в основном в UNIX-системах, в ряде которых является стандартом де-факто для сжатия данных. Была создана Жан-Лу Гайи (фр. Jean Loup Gailly) и Марком Адлером (Mark Adler). Версия 0.1 была выпущена 31 октября 1992 года, а версия 1.0 — в феврале 1993 года.
В соответствии с традициями UNIX-программирования, gzip выполняет только две функции: сжатие и распаковку одного файла; упаковка нескольких файлов в один архив невозможна. При сжатии к оригинальному расширению файла добавляется суффикс .gz. Для упаковки нескольких файлов обычно их сначала архивируют (объединяют) в один файл утилитой tar, а потом этот файл сжимают с помощью gzip. Таким образом, сжатые архивы обычно имеют двойное расширение .tar.gz, либо сокращённое .tgz.
- Установите Cygwin, который предоставляет среду Linux на Windows.
- В процессе установки выберите пакеты tar и gzip.
- Откройте терминал Cygwin и используйте команды для создания архива и упаковки его в
tar.gz:
tar -czvf archive.tar.gz your_folder_or_file
Здесь archive.tar.gz — это имя вашего архива, а your_folder_or_file — это файлы и папки, которые вы хотите упаковать.
- Установите GNUWin32, который предоставляет набор утилит GNU для Windows.
- В процессе установки выберите пакеты tar и gzip.
- Откройте командную строку Windows и используйте аналогичную команду для создания архива tar.gz:
tar -czvf archive.tar.gz your_folder_or_file
- Установите 7-Zip — бесплатный архиватор с поддержкой множества форматов.
- Выделите файлы и папки, которые вы хотите упаковать.
- Нажмите правой кнопкой мыши и выберите «Добавить в архив».
- В окне архивации выберите формат архива «tar» и метод сжатия «gzip».
Альтернативно, можно воспользоваться командой:
7z -ttar a dummy "D:\your_folder\*" -so | 7z -si -tgzip a "D:\archive.tar.gz"
Примечание: чтобы команда 7z работала на Windows, выполняемый файл 7z.exe должен присутствовать в переменных средах: C:\Program Files\7-Zip
Установите WSL, чтобы иметь доступ к среде Linux на Windows.
Откройте терминал WSL и используйте команды для создания архива и упаковки его в tar.gz, так же, как в случае с обычной средой Linux:
tar -czvf archive.tar.gz your_folder_or_file
Windows 10, Windows 11, Windows 7, Windows 8, Windows Server, Windows Vista, Windows XP
- 23.10.2021
- 25 778
- 5
- 24.12.2023
- 60
- 58
- 2
- Содержание статьи
- Создание архива tar.gz в 7-Zip
- Создание архива tar.gz средствами Windows
- Комментарии к статье ( 5 шт )
- Добавить комментарий
Популярный в среде UNIX-подобных операционных систем формат архива tar.gz, появился в далеком 1992 году вместе с утилитой gzip. Тем не менее, не смотря за столь большой промежуток времени, в среде операционных систем Windows данный формат не получил особого распространения, и как итог, его поддержка стандартными средствами Windows отсутствует. К счастью, большинство архиваторов без проблем работают с данным форматом, к примеру бесплатный 7-Zip, о работе с которым мы сейчас и поговорим.
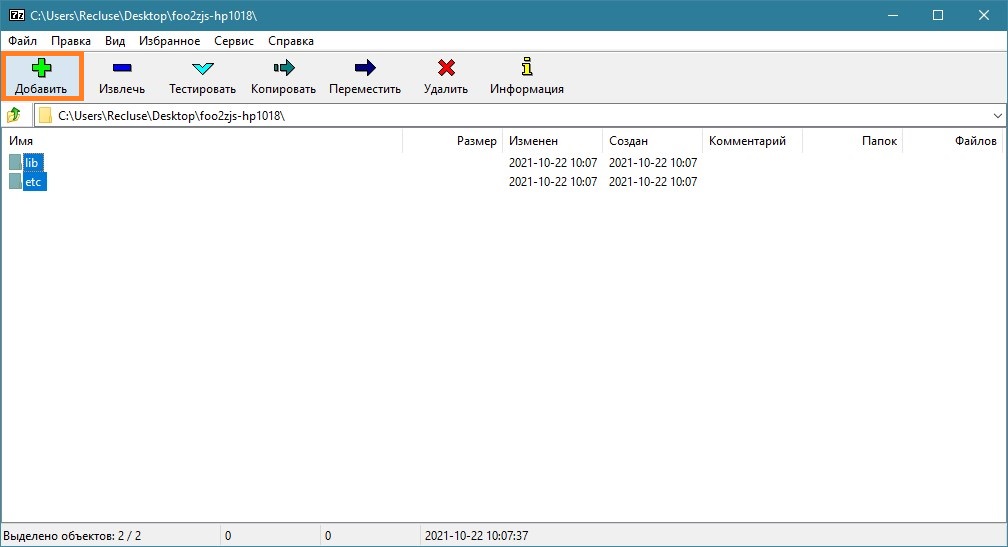
Создание архива tar.gz в 7-Zip
Скачать архиватор 7-Zip можно с его официального сайта.
- Открываем 7-Zip, и выбираем файлы, которые планируем заархивировать, после чего нажимаем на кнопку «Добавить«.

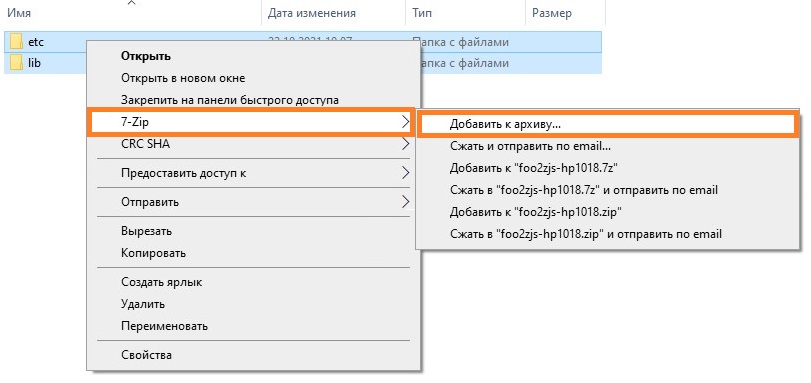
Альтернативный вариант — в Проводнике находите нужные файлы или папки, выделяете их, и вызываете контекстное меню, в котором выбираете пункт «7-Zip — Добавить к архиву…«.

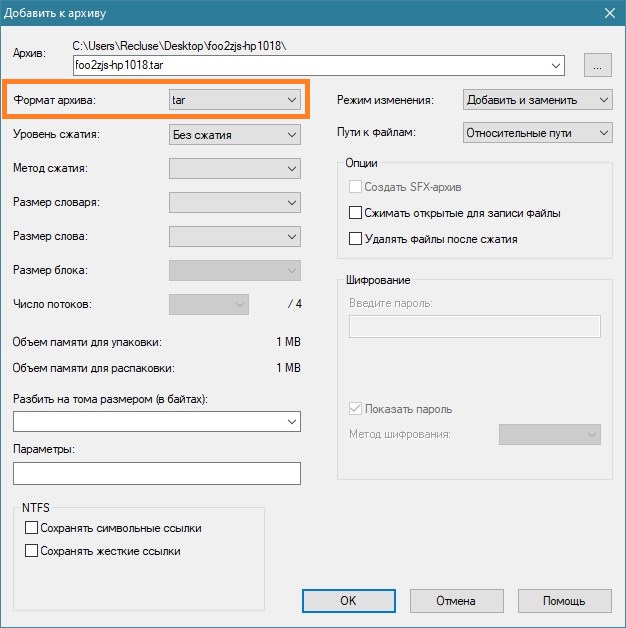
- В окне создания архива выбираем формат архива tar. Сейчас уровень сжатия установить не получиться, поскольку формат tar его не поддерживает, но мы сможем сжать архив на следующем этапе.

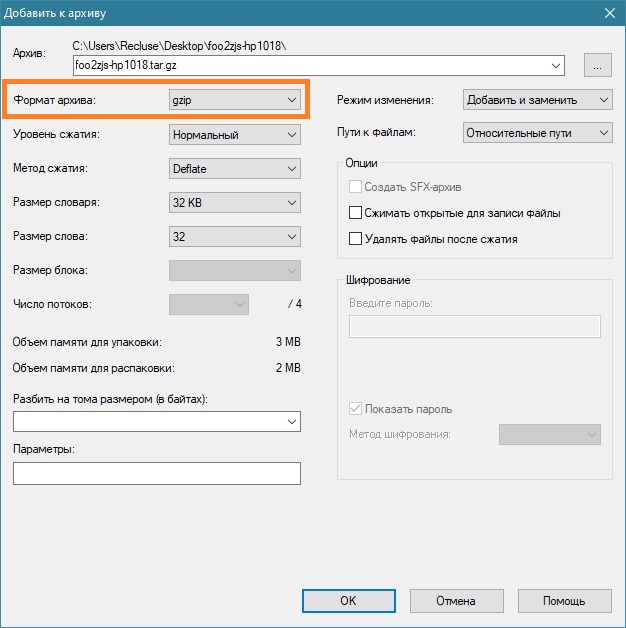
- Теперь, нужно заархивировать ранее полученный архив формата tar. Проделываем те же действия, что и ранее, с только что сделанным архивом, только на этот раз выбираем формат архива gzip. Так же можно установить желаемый уровень сжатия.
- После этого, на выходе получится архив формата tar.gz.
Создание архива tar.gz средствами Windows
Начиная с Windows 10, появилась возможность создавать архивы данного формата встроенной в систему утилитой tar. Для этого, используется стандартный синтаксис этой утилиты:
tar -cvzf [ИМЯ АРХИВА].tar.gz [ПУТЬ К ДИРЕКТОРИИ]То есть, если вы хотите запаковать директорию C:\Test, для этого нужно выполнить следующую команду:
tar -cvzf test.tar.gz C:\TestЕсли нужно задать место сохранения архива, то его следует написать спереди имени архива:
tar -cvzf C:\Temp\test.tar.gz C:\Test-
Что такое Tar
-
Как установить, создать архив Tar и распаковать его в Windows
-
Как запаковать архив tar.gz и tar.bz2 в Ubuntu, Debian, CentOS
-
Как распаковать архив tar.gz и tar.bz2 Ubuntu, Debian, CentOS
-
Просмотр архивов tar в Linux
-
Иные возможности tar
Tar — это популярный файловый архиватор в Unix/Linux системах. Tar зачастую используется вместе с архиваторами GZip или BZip2, так как они отлично взаимодополняют друг друга: Tar не может сжимать файлы, только собирать их в одни архив, а GZip и BZip2 не могут сжимать несколько файлов одновременно, поэтому если вам нужно запаковать несколько файлов и директорий, сначала они собираются в один несжатый архив с помощью Tar, который сохранит их некоторые атрибуты, например такие, как права доступа, а затем этот архив сжимается с помощью GZip или BZip2. Весь процесс запускается одной консольной командой, про которые далее.
Как установить, создать архив Tar и распаковать его в Windows
Чтобы использовать Tar в Windows, нужно воспользоваться одним из следующих вариантов:
- Установить Far Manager.
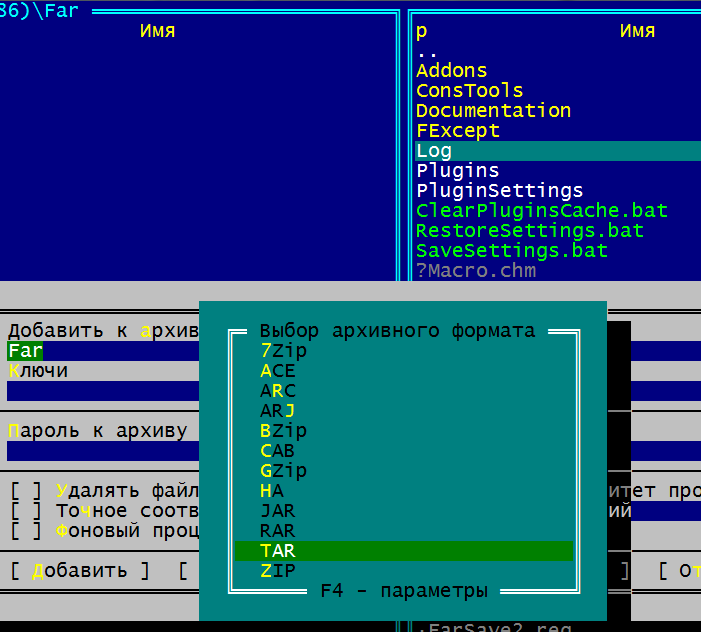
Инструкция по созданию и распаковке архива.tarс помощью Far Manager:-
Теперь просто выделяете ПКМ (правой кнопкой мыши) или кнопкой клавиатуры Insert нужные вам файлы и папки и жмёте
Shift + F1, затем выбираете нужный формат (в нашем случае, TAR) и создаёте архив:
Создание архива в Far Manager
При желании, в поле Добавить к архиву можно изменить название архива, а в поле Ключи можно ввести пароль от него.
-
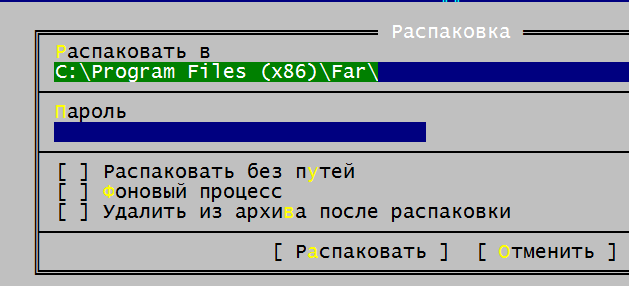
Чтобы распаковать архив Tar, просто выделяете ПКМ или Insert нужный архив и жмёте
Shift + F2
Как распаковать Tar в Far Manager
В поле Распаковать в вводится путь, куда распаковать архив. Если нужно распаковать в текущую папку, нужно оставить поле
Распаковать архивпустым. Если архив запаролен, пароль вводится в поле Пароль.
-
Теперь просто выделяете ПКМ (правой кнопкой мыши) или кнопкой клавиатуры Insert нужные вам файлы и папки и жмёте
- Также, можно обойтись без Far Manager, установив 7-Zip

Скачать 7-zip архиватор
Всё управление — создать архив и распаковать его — через ПКМ и Проводник Windows
Как запаковать архив tar.gz и tar.bz2 в Ubuntu, Debian, CentOS
tar cfvz archive.tar.gz *.php
где tar — команда, cfvz — ключи, archive.tar.gz — имя будущего архива, *.php — список файлов, которые нужно заархивировать.
Список можно заменить директорией, которую нужно запаковать целиком, для этого указываем путь до неё, абсолютный или относительный
tar cfvz archive.tar.gz /forpack
Теперь подробнее про ключи
-с— команда, которая означает «создать архив»-f— команда на упаковку файлов и директорий в один файл архива-v— включает визуальное отображение процесса архивации-z— использовать для сжатияGZip
Также, можно использовать для сжатия BZip2. Для этого нужно использовать ключ -j вместо -z.
В этом случае, команда для запаковки tar.bz2 будет выглядеть так
tar cfvj archive.tar.bz2 /forpack
Вместо GZip и BZip2 можно пользоваться иными архиваторами, для этого просто нужно подобрать соответствующий ключ.
Чтобы исключить определённый каталог или файл из архива, можно воспользоваться ключом --exclude.
Сначала переходим в нужный каталог, затем используем следующую команду:
tar cfvz wp-content.tgz wp-content --exclude=wp-content/updraft --exclude=wp-content/uploads --exclude=wp-content/cache
Тут мы запаковываем каталог /wp-content/ на WordPress, исключая раздел Updraft wp-content/updraft, раздел Загрузки wp-content/uploads и Кеш wp-content/cache.
Важный момент — чтобы исключить ошибки, не указывайте слеш
/в конце пути исключаемого каталога.
Как распаковать архив tar.gz и tar.bz2 Ubuntu, Debian, CentOS
Чтобы распаковать архив tar.gz или tar.bz2, в команде нужно заменить -с на ключ -x, а также указать путь до архива, абсолютный или относительный
Команда для распаковки архива в текущую директорию выглядит так
tar xfvz archive.tar.gz
С помощью ключа -С можно указать путь, куда нужно распаковать архив
tar xfvj archive.tar.bz2 -C /var/www
Просмотр архивов tar в Linux
Для просмотра содержимого архивов можно использовать ключ -t
tar -tf archive.tar.bz2
Будет выведен список файлов и директорий в архиве. При добавлении ключа -v также будет выведена подробная служебная информация о правах доступа, размерах файлов и прочем.
Иные возможности tar
Tar имеет много дополнительных возможностей, к примеру, добавление файлов в существующий архив, исключение некоторых файлов и директорий при запаковке архива и так далее. Подробнее вы можете узнать о них при помощи команды
tar --help
Загрузка…