-
Home
-
News
- How to Rename or Delete Software Distribution Folder on Windows
By Daisy | Follow |
Last Updated
If your Windows Update isn’t working, it could be caused by a problem with the Software Distribution folder. If you need to delete or rename this folder, this post offered by MiniTool Solution will tell you how to that.
Is It Safe to Delete Software Distribution Folder?
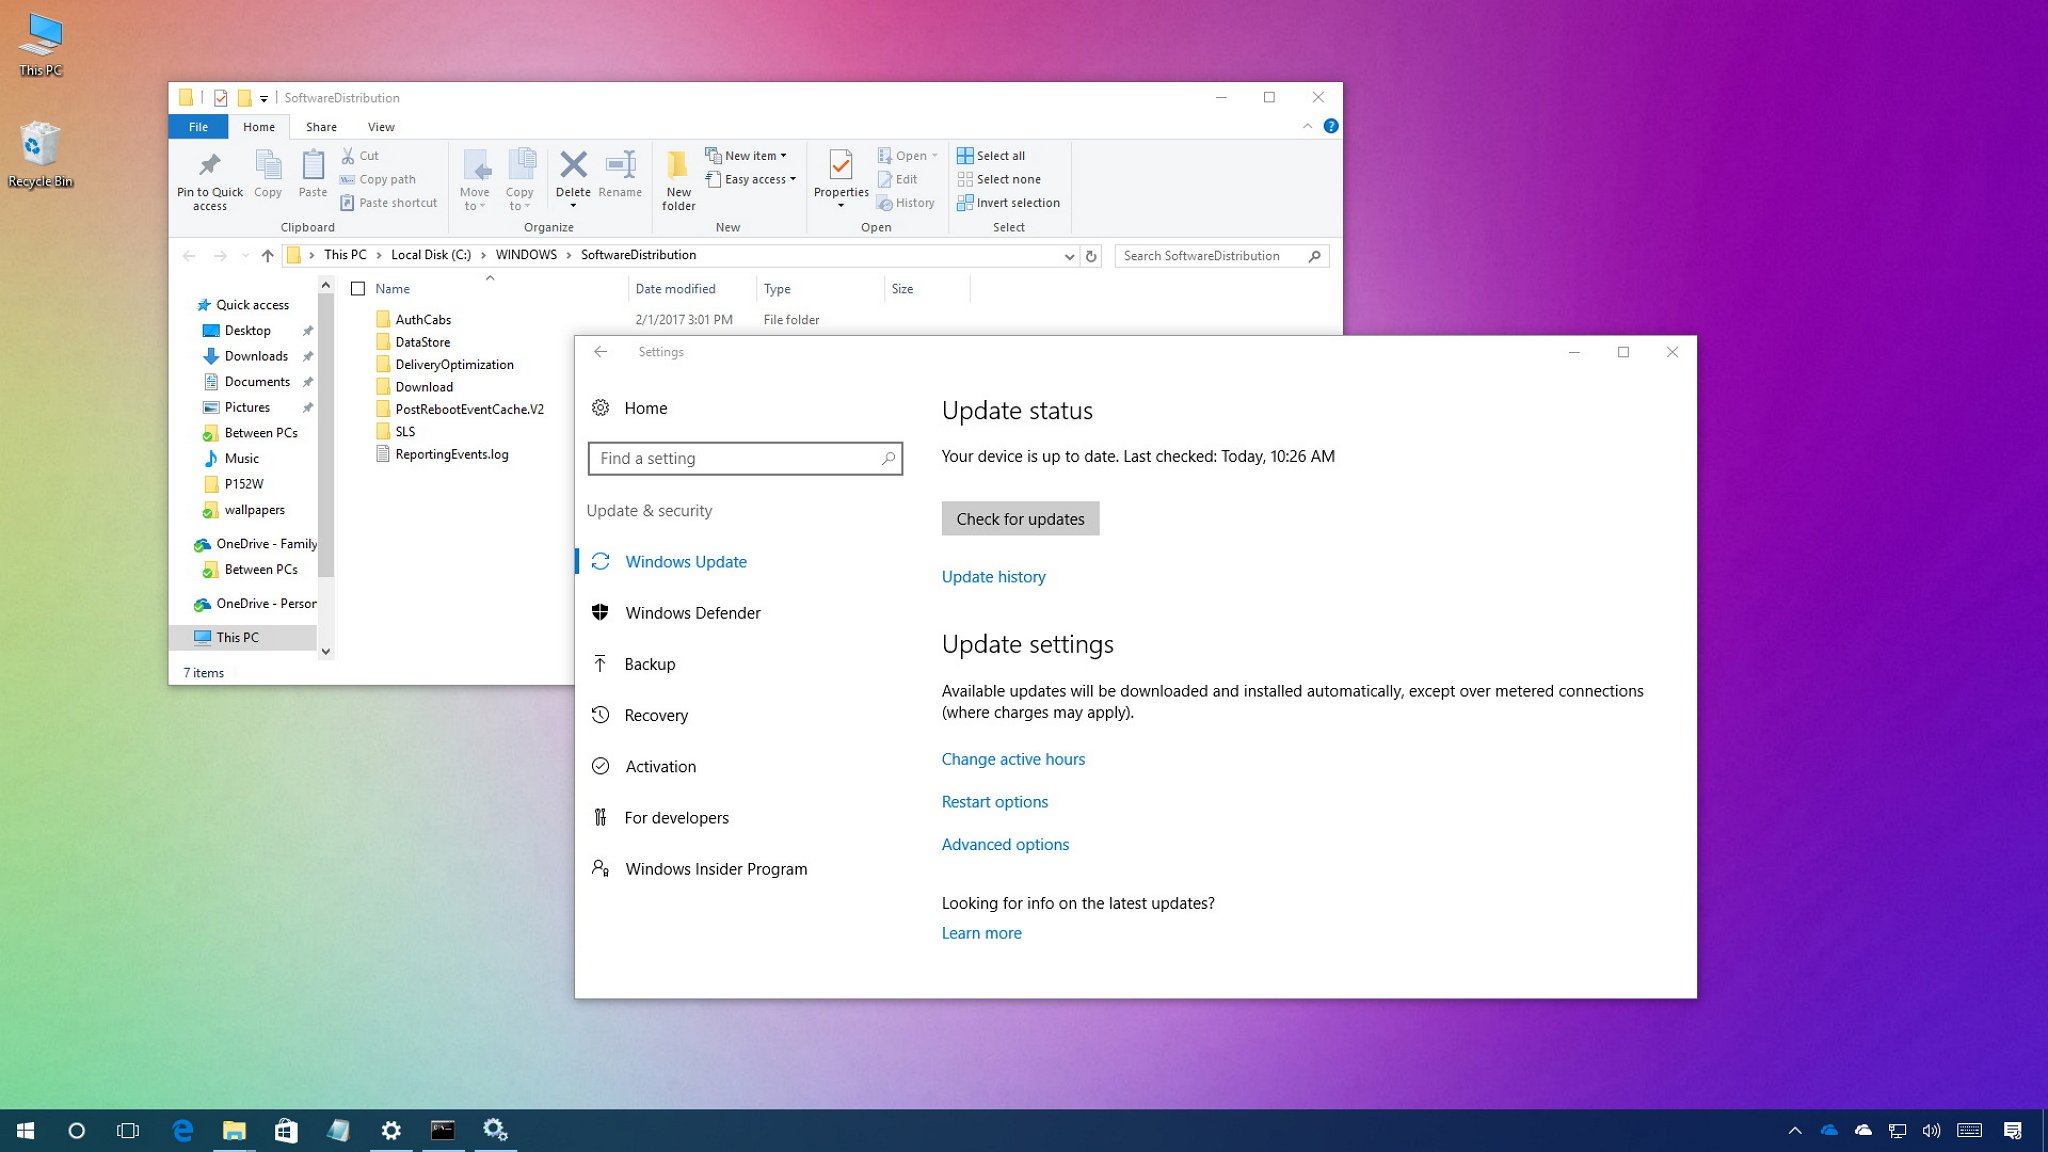
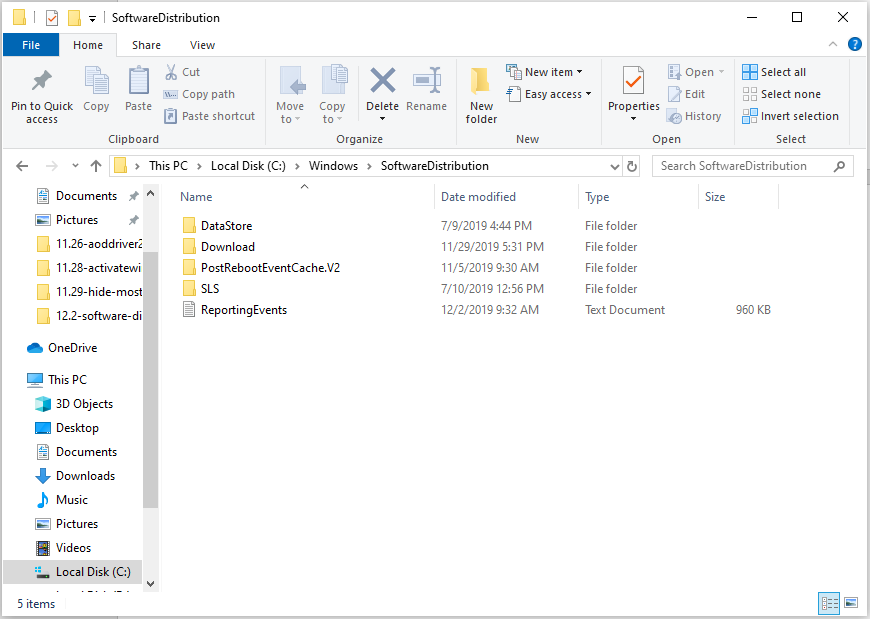
The Software Distribution folder in the Windows operating system is a folder in the Windows directory. It is used to temporarily store files that may be needed to install Windows Update on your computer. The Software Distribution folder in Windows 10/8/7 is located in the following location in File Explorer: C:\Windows\SoftwareDistribution.
Sometimes you need to empty its contents when your system’s Datastore and the Download folder have got de-synchronized because it results in your Windows Updates not working properly. Generally, once all the files it needs have been used to install Windows Update, you can delete the contents of the Software Distribution folder.
Even if you delete files in other ways, they will download automatically. If you delete the folder itself, the folder will be automatically recreated and the required WU components will be downloaded automatically.
However, your Windows Update History files are also contained in this data store. If you delete them, you will lose your Update history. In addition, the next time you run Windows Update, this will result in longer detection times.
You can consider deleting the Software Distribution folder on Windows 10/8/7 if your Windows Update is not working properly or not working at all or if you find that the size of this folder has really grown large.
How to Delete Software Distribution Folder?
To delete the contents of Windows SoftwareDistribution folder, you can follow the steps.
Step 1: Type Command Prompt in the Search menu. Then right-click it to choose Run as administrator:
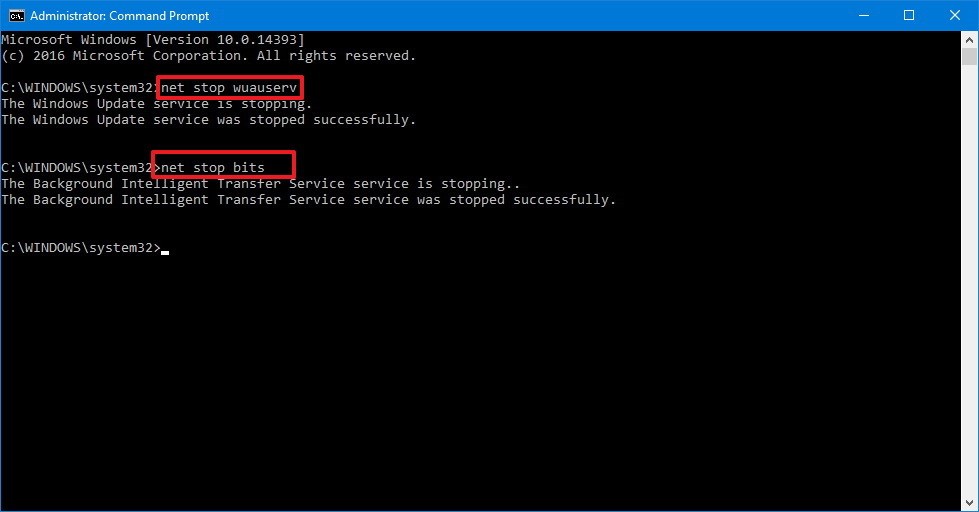
Step 2: Run the following commands one by one:
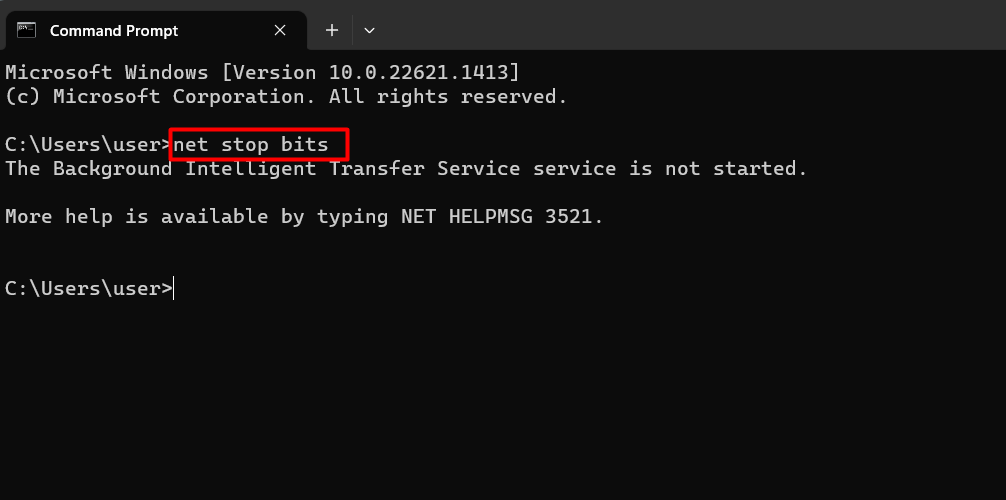
net stop wuauserv
net stop bits
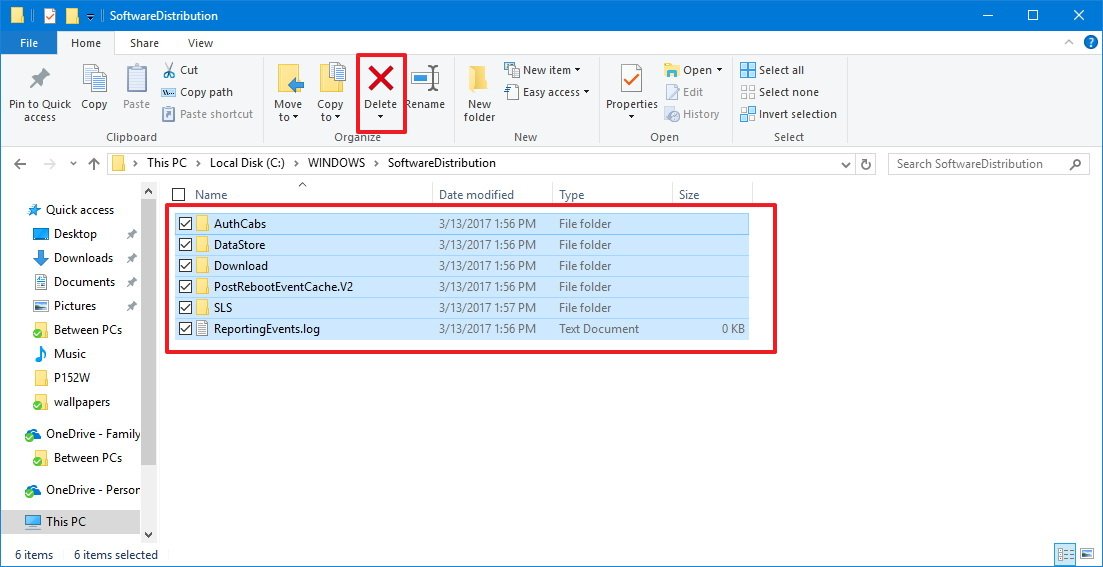
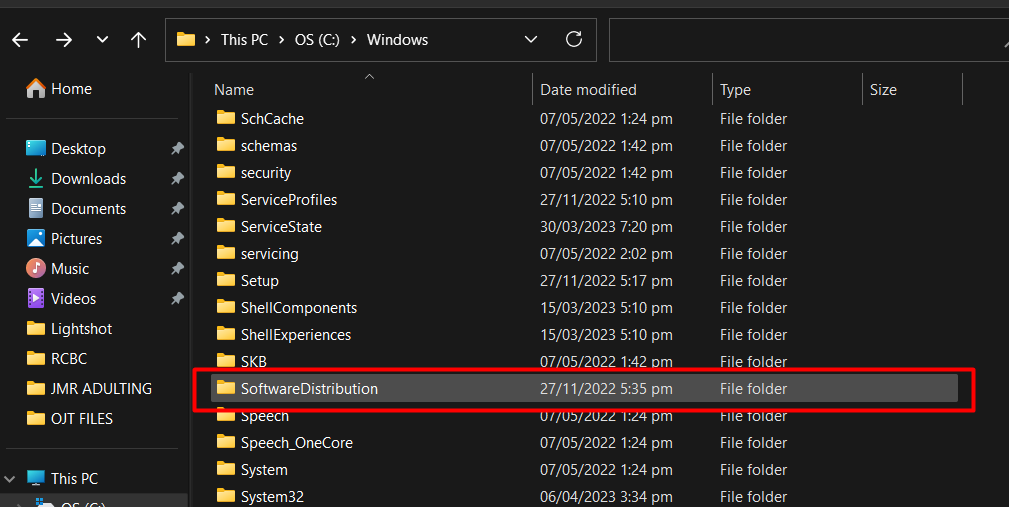
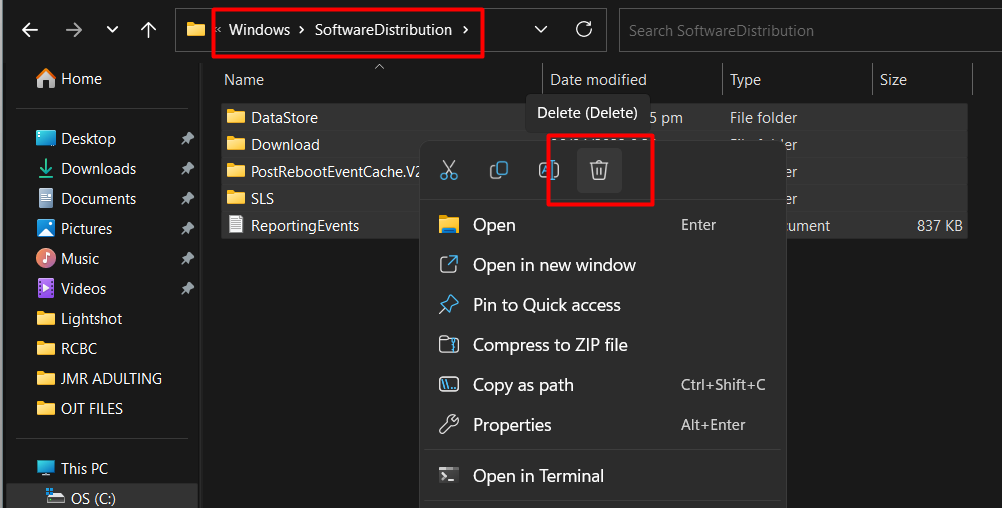
Step 3: Now go to the C:\Windows\SoftwareDistribution folder and delete all the files and folders inside by pressing the Ctrl+A keys to select all and then right-click to choose Delete.
If files are in use and you cannot delete some files, then you should restart your device. Run the above command again after restarting. Now you will be able to delete files from Software Distribution folder on Windows 10.
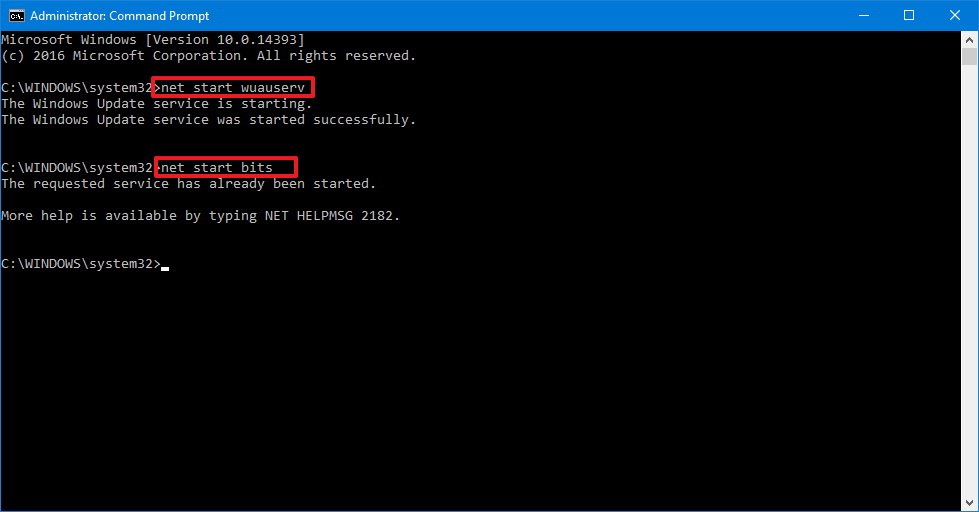
After emptying this folder, you can either restart your computer or type the following command one by one in Command Prompt and press Enter to restart Windows Update related services:
net start wuauserv
net start bits
How to Rename Software Distribution Folder?
If you want to rename the Software Distribution folder, let’s see how to do that:
Open an elevated command prompt and type the following commands one after the other, and press Enter:
net stop wuauserv
net stop bits
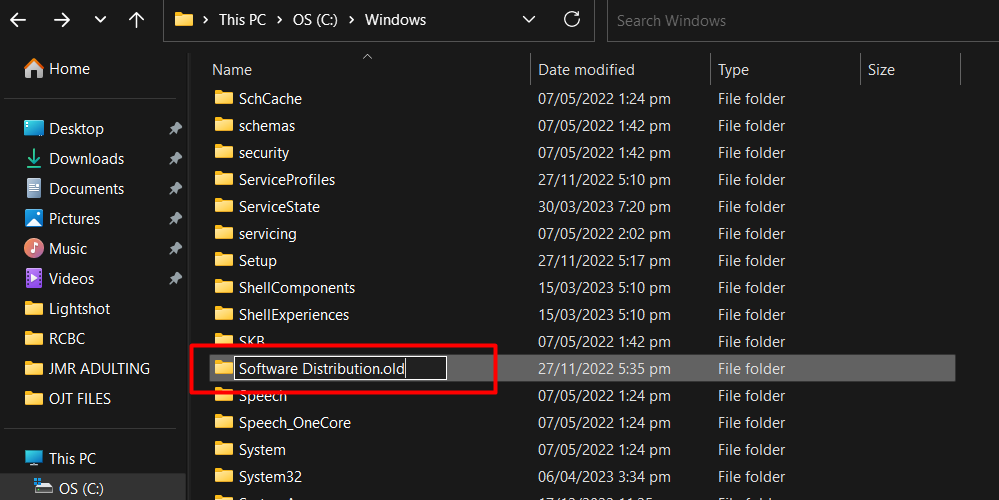
rename c:\windows\SoftwareDistribution SoftwareDistribution.bak
net start wuauserv
net start bits
Alternatively, you can also try to boot Windows 10 into Safe Mode, and rename SoftwareDistribution to SoftwareDistribution.bak or SoftwareDistribution.old.
Bottom Lines
In conclusion, you can know how to delete Software Distribution Folder and how to rename it. In addition, I analyze the risk of deleting it and you don’t need to worry about doing that. I hope this post can be useful to you.
About The Author
Position: Columnist
Having been an editor at MiniTool since graduating college as an English major, Daisy specializes in writing about data backups, disk cloning, and file syncing as well as general computer knowledge and issues. In her free time, Daisy enjoys running and going with friends to the amusement park.
What is the SoftwareDistribution folder and what is it used for? Although many users are not aware of this folder, so let’s shed some light on the importance of the SoftwareDistribution folder. This folder is used by Windows to temporarily stores files needed to install the latest Windows Updates on your device.
Windows updates are important as it provides security updates & patches, fixes a lot of bugs and improves your system performance. SoftwareDistribution folder is located in the Windows directory and is managed by WUAgent (Windows Update Agent).
Do you think that deleting this folder is ever required? On what circumstances, you would delete this folder? Is it safe to delete this folder? These are some questions that we all come across while discussing this folder. On my system, it is consuming more than 1 GB space of C drive.
Why would you ever delete this folder?
SoftwareDistribution folder should be left alone but there comes a time when you may need to clear the contents of this folder. One such case is when you’re unable to update Windows or when Windows updates which are downloaded & stored in the SoftwareDistribution folder are corrupt or incomplete.
In most of the cases, when Windows Update stops working properly on your device and you are getting an error message, you need to flush out this folder to solve the problem. Moreover, if you find that this folder is accumulating a large chunk of data taking more space of the drive, you can manually clear out the folder to free up some space on your drive. However, if you face Windows Update issues such as Windows Update not working, Windows Updates fails, Windows Update stuck while downloading the latest updates, etc. then you need to delete SoftwareDistribution folder on Windows 10.

Is it safe to delete SoftwareDistribution folder?
You don’t need to touch this folder under any normal circumstances, but if the content of the folder is corrupted or not synchronized causing issues with Windows updates then you need to delete this folder. It is completely safe to delete this folder. However, you need to first make sure that you are experiencing a problem with your Windows Update. Next time when Windows Update files are ready, Windows will automatically create this folder and download the update files from the scratch.
How to Delete SoftwareDistribution Folder on Windows 10
Make sure to create a restore point just in case something goes wrong.
To delete SoftwareDistribution folder from your device, you need to either open the Command Prompt or Windows PowerShell
1.Open Command Prompt or Windows PowerShell with Administrator access. Press Windows key + X and select the Command Prompt or PowerShell option.
2.Once PowerShell opens, you need to type below-mentioned commands to stop the Windows Update Service and the Background Intelligent Transfer Service.
net stop wuauserv
net stop bits

3.Now you need to navigate to SoftwareDistribution folder in C drive to delete all its components:
C:\Windows\SoftwareDistribution

If you are not able to delete all files because some files are in use, you just need to restart your device. Upon rebooting, you need to again run the above commands again and follow the steps. Now, again try to delete all the content of the SoftwareDistribution folder.
4.Once you have deleted the content of the SoftwareDistribution folder, you need to type the following command to activate the services related to Windows Update:
net start wuauserv
net start bits

An alternate way to Delete SoftwareDistribution Folder
1.Press Windows Key + R then type services.msc and hit Enter.
2.Right-click on Windows Update service and select Stop.

3.Open File Explorer then navigate to the following location:
C:\Windows\SoftwareDistribution
4.Delete all the files and folders under SoftwareDistribution folder.
5.Again right-click on Windows Update service then select Start.

6.Now to try to download the Windows updates and this time it will without any issues.
How to Rename SoftwareDistribution folder
If you’re worried about deleting the SoftwareDistribution folder then you can simply rename it and Windows will automatically create a new SoftwareDistribution folder to download the Windows updates.
1.Press Windows Key + X then select Command Prompt (Admin).
2.Now type the following commands to stop Windows Update Services and then hit Enter after each one:
net stop wuauserv
net stop cryptSvc
net stop bits
net stop msiserver

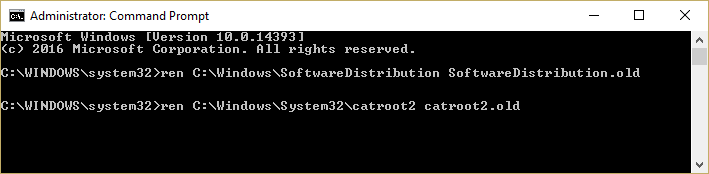
3.Next, type the following command to rename SoftwareDistribution Folder and then hit Enter:
ren C:\Windows\SoftwareDistribution SoftwareDistribution.old
ren C:\Windows\System32\catroot2 catroot2.old
4.Finally, type the folowing command to start Windows Update Services and hit Enter after each one:
net start wuauserv
net start cryptSvc
net start bits
net start msiserver

Once you have completed these steps, Windows 10 will automatically create a folder and download the necessary elements for running Windows Update services.
If the above step is not working then you can boot Windows 10 into Safe Mode, and rename SoftwareDistribution folder to SoftwareDistribution.old.
Note: The only thing which you may lose in the process of deleting this folder is the historical information. This folder also stores the Windows Update history information. Thus, deleting the folder will delete the Windows Update history data from your device. Moreover, the Windows Update process will take more time than it used to take earlier because WUAgent will check and create the Datastore information.
Overall, there is no problem associated with the process. It is a small price to pay for getting your device updated with the latest Windows Updates. Whenever you notice Windows Update problems such as Windows Updates files missing, not updating properly, you can opt for this method to restore the Windows Update process.
Recommended:
- Remove Activate Windows Watermark from Windows 10
- How to Fix Bluetooth problems in Windows 10
- Enable Flash for Specific Websites in Chrome
- How to Sideload Apps on Windows 10
I hope the above steps were helpful and now you can easily Delete SoftwareDistribution folder on Windows 10, but if you still have any questions regarding this tutorial then feel free to ask them in the comment’s section.
Windows Cache folders are the folders that contain all the details about past Windows updates, their dates of installation, and other relevant information. SoftwareDistribution and Catroot2 are two such folders. When the data in these folders exceeds the permissible limit, they often start causing issues while updating your Windows OS. In such a case, it is better to clear the SoftwareDistribution folder on your Windows PC.
Is it Safe to delete the Software Distribution Folder?
Since this is a cache folder, deleting it won’t cause any issues on your computer. However, before you do so, make sure to disable all update-related services. If not, you may end up encountering more update issues than before.
The best thing about this folder is that it auto-generates. This simply means that even when you delete this folder from your system, this file will be pop-up the next time you restart your computer. In short, this folder is never gone from your system.
To purge the SoftwareDistribution folder on Windows 11/10 PC, follow these easy steps –
- Press Windows + R to launch the Run dialog.
- Type “CMD” without quotes on it and hit Ctrl + Shift + Enter.
- When the UAC prompt appears, hit Yes to authorize accessing Command Prompt as an administrator.
- On the elevated console, copy/paste the below commands, and press the Enter key separately.
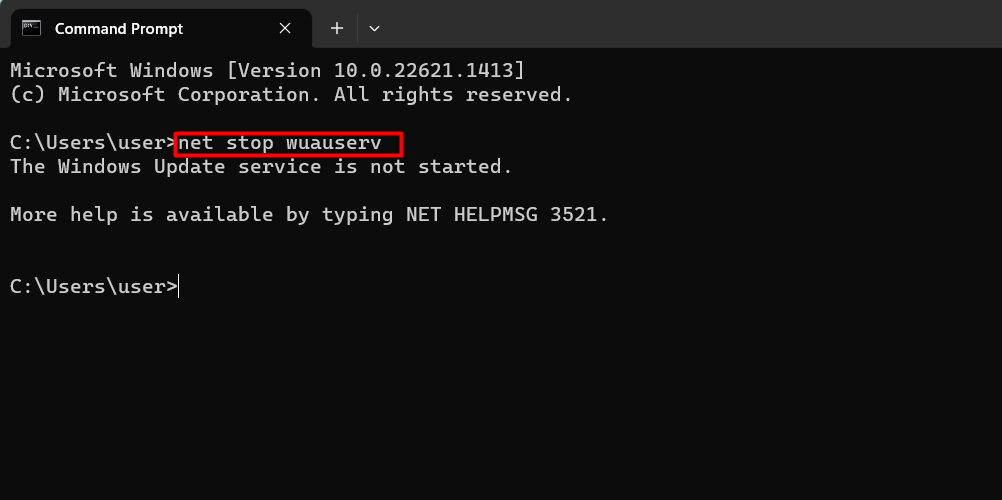
net stop wuauserv
net stop bits
net stop appidsvc
net stop cryptsvc

- These codes will stop all essential update-related services from running on your computer.
- Now that you have stopped the essential services, press Windows + E to launch File Explorer.
- When the explorer opens up, navigate to the below path –
C:\Windows\SoftwareDistribution

- If the root drive differs from C: on your computer, use the appropriate root drive’s letter in the above command.
- The system will take you inside the SoftwareDistribution folder.
- Use Ctrl + A to select all items, and then Ctrl + X to move the selected items to a different folder.
- Open a new folder anywhere on the non-root drive, and use Ctrl + V to paste the copied items here.
Note: If you want, you may even choose to delete all items instead of copying the cache items to a new folder. However, we don’t recommend doing so, as you may end up losing some important files or folders.
- Now that you have purged all items from the SoftwareDistribution folder, you may now restart all those services that you stopped earlier.
- To do this, re-open the Command prompt as administrator and run the following codes on it –
net start wuauserv
net start bits
net start appidsvc
net start cryptsvc
- Restart your computer so that the recent changes come into effect from the next login.
That’s it, you have successfully cleared the SoftwareDistribution folder on Windows 11. Catroot2 is another important cache folder on Windows PC. If you want to clear the contents inside this folder as well, read this guide.
Renaming the SoftwareDistribution folder in Windows
Alternatively, users may also rename the SoftwareDistribution folder on their computers. Proceeding this way, you may easily re-use the previous folders that you have renamed recently. Here’s how to perform this task on your Windows PC –
- Launch Windows PowerShell as administrator first and then run the following codes on it.
net stop wuauserv
net stop bits
net stop appidsvc
net stop cryptsvc
- After all update services are disabled or stopped, you may go ahead and rename the SoftwareDistribution folder. You may rename this folder to anything, however, we recommend adding an extension “
.old” by its name end. This way you need not require remembering the folder name to be used in the future. - Here are the codes that you need to run on the PowerShell.
rename C:\Windows\SoftwareDistribution SoftwareDistribution.old
rename C:\Windows\System32\catroot2 Catroot2.old
- While the first command renames the SoftwareDistribution folder, the second one renames the Ctaroot2 folder.
- Restart all those services that you have stopped previously next. To do this, run these commands one after another.
net start wuauserv
net start bits
net start appidsvc
net start cryptsvc

- Restart your PC and check if the SoftwareDistribution folder is cleared of its old contents. When you reach out to the C:\Windows path, you will see two SoftwareDistribution folders, out of which one bears the
.oldextension. - You may delete the earlier instances of this folder if your device is functioning pretty well.
How do I delete the SoftwareDistribution Folder on Windows 11?
If you don’t want to manually move all the items from inside the SoftwareDistribution to a different folder, or even rename this folder, use the following codes on the elevated console to delete these folders. Make sure to disable the update-related services first so that they don’t get compromised and corrupt the entire operating system.
rmdir %systemroot%\SoftwareDistribution /S /Q
Note: The above two commands will remove both the SoftwareDistribution and Catroot2 folders along with their subdirectories. The “/S” switch works to delete the specified directory and all subdirectories within the main folder while the “/Q” switch is used to delete directories quietly without confirmation.
- Wait for a few seconds and then restart all those services that you have stopped from running on your Windows PC.
Sometimes, when you run the above codes, it fails to run on an error message – “The process cannot access the file because it is being used by another process.” If that’s the case, you should attempt again from the start. There’s a possibility that one of the stopped services might have restarted unexpectedly. So, you need to disable that service first and then proceed ahead with the deletion part.
If you’re a Windows 10 or 11 users, you may have encountered issues with your system’s automatic update feature.
One solution to this problem is to delete or rename the Software Distribution folder, which stores files related to Windows updates.
In this step-by-step guide, we’ll show you how to delete or rename the Software Distribution folder in Windows 10/11.
So, let’s get started and learn how to delete or rename the Software Distribution folder in Windows 10/11.
Table of Contents
- What is the Software Distribution folder
- Why do Windows update issues occur
- How does deleting or renaming the Software Distribution folder help with Windows update issues
- Steps to delete the Software Distribution folder in Windows 10/11
- Steps to rename the Software Distribution folder in Windows 10/11
- How to prevent Windows update issues in the future
- FAQs
- Final Thoughts
What is the Software Distribution folder
The Software Distribution folder is a special folder in Windows that helps your computer to receive important updates. When your computer gets a new update from Microsoft, the update files are downloaded and saved to the Software Distribution folder.
These files are then used to install the updates on your computer.
The Software Distribution folder is important because it helps your computer stay up-to-date and secure. Updates often include:
- Important bug fixes
- Security patches
- New features that can improve your computer’s performance
It is in the Windows directory, a special folder on your computer that holds important system files. You can find the Software Distribution folder by going to the Windows directory on your computer.
Sometimes, however, the files in the Software Distribution folder can become corrupted, which can cause problems with Windows updates. Deleting or renaming the folder may be necessary to fix the problem.
Deleting or renaming the Software Distribution folder is a safe and effective method for resolving Windows update issues. It can help ensure your computer receives the updates to stay secure and run smoothly.
Why do Windows update issues occur
Sometimes, when you try to update your Windows operating system, you may encounter issues that prevent the update from completing.
Different things can cause these issues, but here are some of the most common reasons why Windows update issues occur:
- Corrupted or missing system files: System files are important for your computer to function properly. If these files become corrupted or are deleted, it can cause problems with Windows Update and prevent them from working correctly.
- Connectivity issues: Windows Update requires a stable and fast internet connection to download and install updates. If your internet connection is slow or unstable, it can cause issues with Windows Update.
- Outdated drivers: Drivers are software programs that help your computer communicate with hardware devices. Outdated or corrupted drivers can cause issues with Windows Update.
- Insufficient storage space: Windows updates require a certain amount of storage space to download and install. If your computer lacks free space, it can cause issues with Windows Update.
- Third-party software conflicts: Some third-party software programs can cause issues with Windows Update. Ensuring that any installed software is compatible with your operating system is important.
How does deleting or renaming the Software Distribution folder help with Windows update issues
If you are having Windows Update issues, one solution you can try is to delete or rename the Software Distribution folder. This folder contains files used by Windows Update; if they become corrupted, it can cause problems with the update process.
Renaming the Software Distribution folder is a safe and effective method for resolving Windows update issues. When you rename the folder, it creates a new Software Distribution folder, which can fix any issues that corrupted files in the original folder may have caused.
To rename the Software Distribution folder, you can follow these steps:
- Open the Command Prompt as an administrator.
-
Type the command «net stop wuauserv» and press Enter. This stops the Windows Update service.

-
Type the command «net stop bits» and press Enter. This stops the Background Intelligent Transfer Service.
-
Go to the Windows directory on your computer and find the Software Distribution folder.
- Right-click on the folder and select «Rename.»
-
Change the name of the folder to «Software Distribution.old» and press Enter.
- Close the Command Prompt and restart your computer.
After renaming the Software Distribution folder, you can try running Windows Update again to see if the issue has been resolved.
Steps to delete the Software Distribution folder in Windows 10/11
If you’re having issues with Windows Update, you may need to delete the Software Distribution folder. This folder contains files used by Windows Update; if they become corrupted, it can cause problems with the update process.
Here’s how you can delete the Software Distribution folder in Windows 10 or 11:
- Restart your computer and enter Safe Mode. This special mode allows you to perform maintenance tasks without interference from other programs.
- Open File Explorer by clicking the folder icon in your taskbar or pressing the Windows key + E.
- Navigate to the C:\Windows\SoftwareDistribution folder. You can do this by clicking on This PC, selecting Local Disk (C:), then Windows, and finally SoftwareDistribution.
- Once you’ve opened the folder, press Ctrl + A to select all the files and folders.
-
Press the Delete key on your keyboard. You’ll be prompted to confirm the deletion, so ensure you delete the correct files.
- Close File Explorer and restart your computer normally.
After you’ve deleted the Software Distribution folder, Windows will recreate it the next time you try to update your computer. This should fix any issues you were experiencing with Windows Update.
Steps to rename the Software Distribution folder in Windows 10/11
If you’re having issues with Windows Update, you may need to rename the Software Distribution folder. This folder contains files used by Windows Update; if they become corrupted, it can cause problems with the update process.
Here’s how you can rename the Software Distribution folder in Windows 10 or 11:
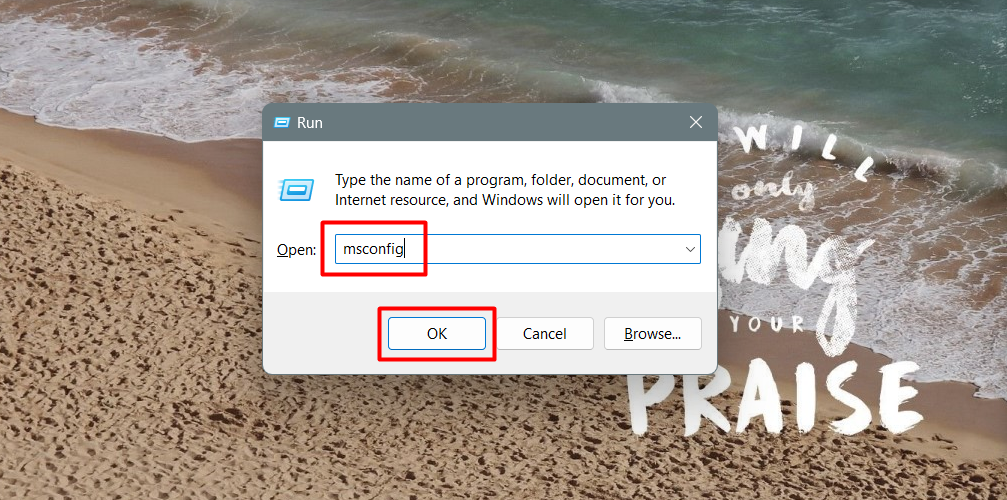
- Press the Windows key + R to open the Run dialog box.
-
Type «msconfig» (without the quotes) in the box and hit Enter.
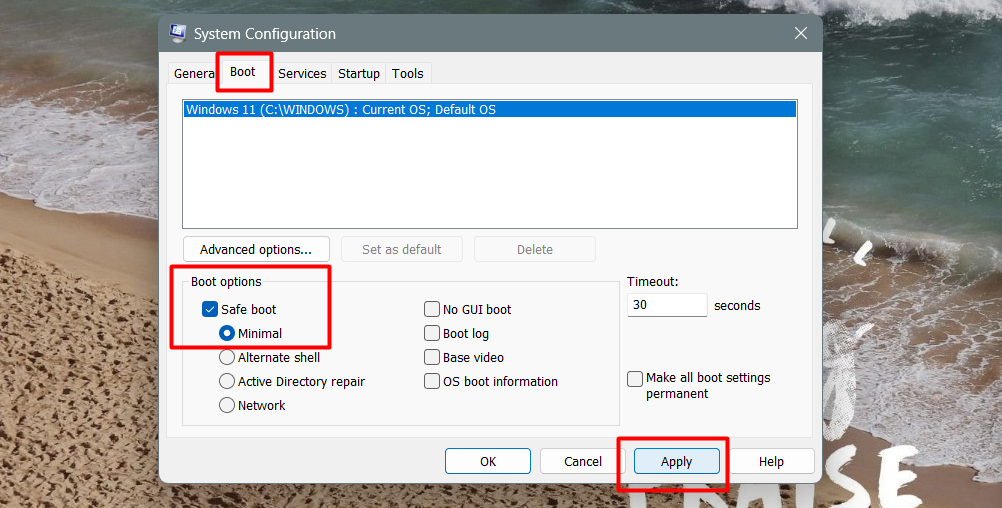
- In the System Configuration window that appears, click on the «Boot» tab.
- Check the «Safe boot» box and select «Minimal» from the options below.
-
Click on «Apply» and then «OK.»
Restart your computer. Your computer will now start in Safe Mode.
- Open the Command Prompt by pressing the Windows key + X and selecting «Command Prompt (Admin)» from the menu that appears.
-
In the Command Prompt window, type «ren C:\Windows\SoftwareDistribution SoftwareDistribution.old» (without the quotes) and hit Enter.
- Close the Command Prompt window and restart your computer normally.
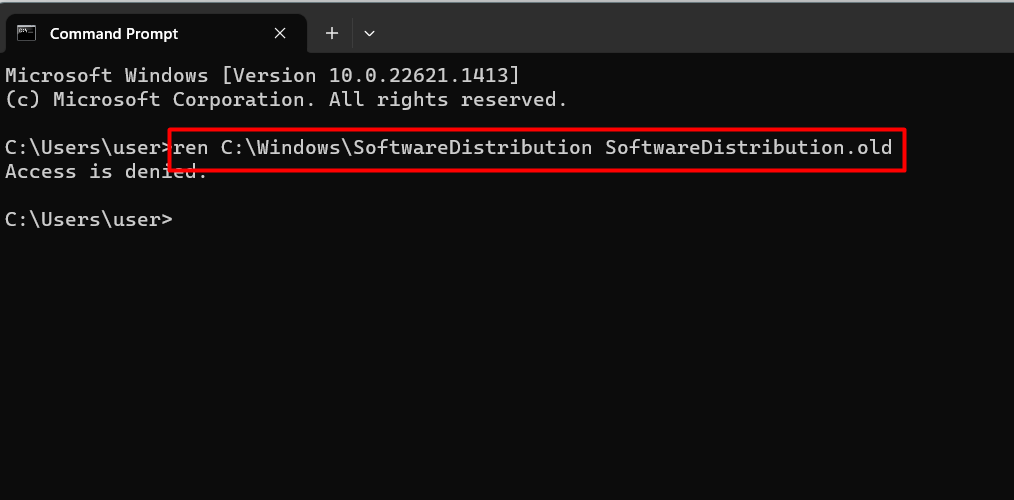
After you’ve renamed the Software Distribution folder, Windows will create a new one when you try to update your computer. This should fix any issues you were experiencing with Windows Update.
How to prevent Windows update issues in the future
Windows updates are important for keeping your computer running smoothly and securely. However, if you’ve experienced issues with Windows updates in the past, you may be wondering how to prevent them from happening again in the future.
Here are some steps you can take to prevent Windows update issues:
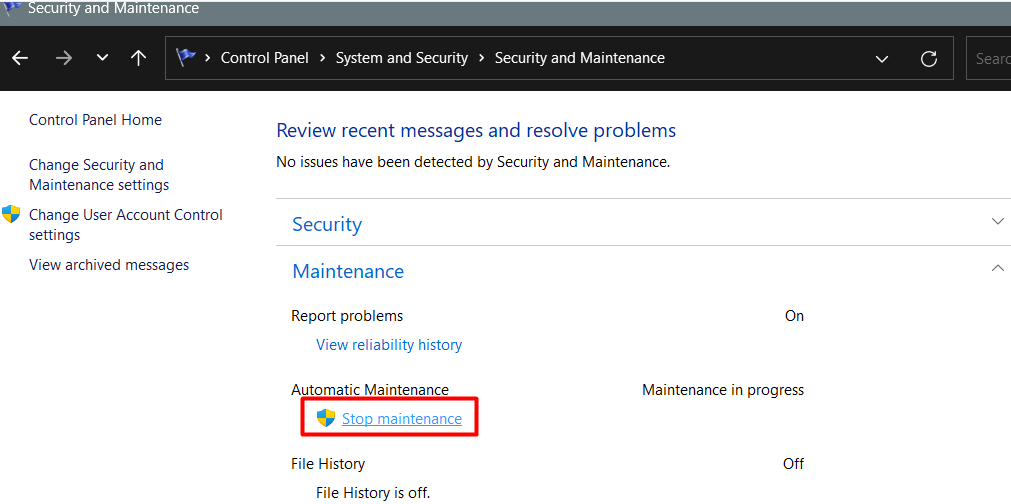
-
Go to Control Panel > System and Security > Security and Maintenance > Maintenance > Stop Maintenance. This will prevent your computer from performing maintenance tasks that could interfere with updates.
To do this:
- Go to Settings
- Update & Security
- Windows Update
- Advanced Options
- Choose how updates are delivered
- Toggle off «Updates from more than one place.«
- Set «Automatically download updates» to «Off.»
- Press Windows key + R, type «gpedit.msc» and hit Enter.
- In the Local Group Policy Editor, navigate to Computer Configuration > Administrative Templates > Windows Components > Windows Update.
- Double-click on «Configure Automatic Updates» and select «Disabled.»
By taking these steps, you can prevent future Windows update issues and ensure your computer stays up-to-date and secure.
FAQs
How do I rename a Software Distribution folder in Windows 11?
To rename the Software Distribution folder in Windows 11, you need to stop the Windows Update service, navigate to the folder location (C:\Windows\SoftwareDistribution), right-click on it, select «Rename,» and enter the desired name.
How do I rename a Windows Software Distribution folder?
To rename the Windows Software Distribution folder, you should stop the Windows Update service, go to the folder location (C:\Windows\SoftwareDistribution), right-click on it, choose «Rename,» and provide a new name for the folder.
Can I delete Windows Software Distribution folder?
Yes, you can delete the Windows Software Distribution folder, but it is recommended to stop the Windows Update service before deleting it to avoid potential issues.
What happens if we delete Software Distribution folder?
If you delete the Software Distribution folder, it will be recreated automatically by Windows when you restart the Windows Update service, and it will clear the update history and temporary files associated with Windows Updates.
Is it safe to delete SoftwareDistribution old?
Yes, it is generally safe to delete the «SoftwareDistribution.old» folder, which is created when you perform a Windows update, as it contains previous versions of the Software Distribution folder, and deleting it will free up disk space.
Final Thoughts
In conclusion, renaming or deleting the Software Distribution folder can help resolve Windows update issues. Windows use this folder to store updated files temporarily, and problems can occur if these files become corrupted or outdated.
Renaming or deleting the folder can allow Windows to rebuild it from scratch and potentially fix any issues. However, following the steps correctly and using caution when deleting files from your system is important.
Additionally, future update issues can be prevented by disabling automatic updates or stopping maintenance tasks in the Windows settings. Managing Windows updates can be frustrating, but it can be made easier with the right knowledge and tools.
One more thing
If you have a second, please share this article on your socials; someone else may benefit too.
Subscribe to our newsletter and be the first to read our future articles, reviews, and blog post right in your email inbox. We also offer deals, promotions, and updates on our products and share them via email. You won’t miss one.
Keep Learning
» Why Does Windows 11 Need TPM 2.0? What is TPM?
» How to Fix ‘Hardware Problems Were Detected’ Error on Windows Memory Diagnostic
» Fixed: Windows Could Not Automatically Detect This Network’s Proxy Settings