
Are you looking to declutter your system and considering if you can remove the Windows Software Development Kit? We’ve got you covered.
Let’s jump into the nitty-gritty of removing this kit and optimizing your Windows experience.
Feeling overstimulated by the unnecessary software taking up space on your device? It’s not only you. We understand the frustration of dealing with bloated systems. In this info piece, we’ll address the pain points you’re experiencing and guide you through the process of removing the Windows Software Development Kit efficiently.
With years of skill in software management, we’re here to provide you with expert ideas on removing the Windows Software Development Kit. Trust us to deliver clear and actionable steps to streamline your system and improve its performance. Let’s plunge into this voyage hand-in-hand towards a cleaner and more efficient Windows environment.
Key Takeaways
- Windows SDK Purpose: Understand the role of Windows Software Development Kit in making easier Windows programming using various languages like C++, C#, and Visual Basic.
- Reasons to Remove: Evaluate the benefits of removing Windows SDK such as freeing up disk space, simplifying the development environment, reducing system complexity, and resolving compatibility concerns.
- Precautions Before Uninstalling: Take precautions like checking dependencies, backing up projects, consulting official documentation, and updating the system to avoid potential issues during the uninstallation process.
- Uninstallation Process: Follow correct procedures when uninstalling the Windows SDK, including checking dependencies, backing up projects, consulting official documentation, and updating the system to ensure a smooth uninstallation.
- Benefits of Removal: Enjoy benefits like freeing up storage space, improving system performance, simplifying the software environment, improving security, and improving the development process by removing the Windows SDK.
Understanding the Windows Software Development Kit (SDK)
When it comes to Windows programming, the Windows Software Development Kit (SDK) is huge. It provides developers with the tools, libraries, and documentation needed to create software that runs on Windows.
Here are key points to understand about the Windows SDK:
- Purpose: The SDK helps developers build applications for Windows using a variety of programming languages, including C++, C#, and Visual Basic.
- Components: It includes various components such as headers, libraries, sample code, and tools that streamline the development process.
- Compatibility: Different versions of the Windows SDK are designed to work with specific versions of Windows, ensuring compatibility and optimal performance.
For additional in-depth information on the Windows SDK, you can refer to the official Microsoft documentation.
Reasons to Remove the Windows SDK
When considering whether to remove the Windows Software Development Kit (SDK) from your system, it’s super important to weigh the benefits and drawbacks.
Here are a few key reasons why some users opt to remove the Windows SDK:
- Limited Disk Space: The Windows SDK can take up a significant amount of storage space, particularly if you have multiple versions installed. Removing older or unnecessary versions can free up useful disk space for other purposes.
- Simplified Development Environment: For users who do not actively engage in Windows software development, having the Windows SDK installed may not be necessary. Removing it can streamline your system and eliminate unnecessary components.
- Reduced System Complexity: Eliminating the Windows SDK can help declutter your system and improve total system performance by reducing the number of background processes and services running.
- Compatibility Concerns: In some cases, conflicts may arise between the Windows SDK and other software applications, leading to compatibility issues. Removing the SDK can help resolve such conflicts and ensure smooth operation.
For further ideas on managing software development tools and optimizing your system, consider exploring resources like the Windows Developer Website.
Precautions Before Uninstalling
Before uninstalling the Windows Software Development Kit (SDK), it’s critical to take certain precautions to ensure a smooth process.
Here are some key steps to consider:
- Check Dependencies: Verify if any other software relies on the SDK before uninstalling it. Removing it could potentially affect the functionality of other programs.
- Backup Projects: It’s super important to back up all development projects that use the SDK. This prevents any loss of data or code that may occur during the uninstallation process.
- Consult Documentation: Review the official Windows SDK documentation to understand any specific uninstall procedures recommended by Microsoft. This ensures a proper and complete removal of the SDK.
- Update System: Before proceeding with the uninstallation, ensure that your operating system is up to date with the latest patches and updates. This helps in mitigating any compatibility issues that may arise post uninstallation.
By following these precautions, we can minimize the chances of encountering issues when removing the Windows SDK.
For further guidance on managing software development tools, you can visit the Windows Developer Website.
| Important Note |
|---|
| Always ensure to proceed with caution when uninstalling software to avoid any potential data loss or system instability. |
How to Uninstall the Windows SDK
When uninstalling the Windows Software Development Kit (SDK), it’s critical to follow the correct procedures to avoid any potential issues.
Here’s a step-by-step guide to help you through the process:
- Check dependencies: Before uninstalling the Windows SDK, ensure that you review and address any dependencies that other programs may have on it.
- Back up projects: To prevent any data loss, make sure to backup all your projects and important files before proceeding with the uninstallation.
- Consult official documentation: Refer to the official documentation provided by Microsoft for specific instructions on how to properly uninstall the Windows SDK.
- Update the system: It’s recommended to update your system before uninstalling the SDK to minimize any compatibility issues that may arise.
By following these steps, you can safely uninstall the Windows SDK without encountering major setbacks.
If you need further assistance, visit theWindows Developer website For additional guidance on managing software development tools.
Benefits of Removing the Windows SDK
When it comes to removing the Windows Software Development Kit (SDK), there are several benefits that users can enjoy.
Here are some of the key advantages of uninstalling the Windows SDK:
- Free up Storage Space: Removing the Windows SDK can help free up useful storage space on your system, allowing you to allocate resources more efficiently.
- Improve System Performance: By uninstalling unnecessary software like the Windows SDK, you can improve your system’s performance and speed up operations.
- Simplify Software Environment: Getting rid of the Windows SDK can help simplify your software environment and reduce clutter, making it easier to find the way in and manage your programs.
- Improve Security: Removing unused software like the Windows SDK can improve the total security of your system by eliminating potential weak points.
- Streamline Development Process: If you are no longer using the Windows SDK for development purposes, uninstalling it can help streamline your development process and focus on the tools that are important for your projects.
By considering these benefits, you can make an smart decisions about whether removing the Windows SDK is the right choice for you.
For more ideas on managing software development tools, feel free to visit the Windows Developer website.
- Author
- Recent Posts
Stewart Kaplan has years of experience as a Senior Data Scientist. He enjoys coding and teaching and has created this website to make Machine Learning accessible to everyone.
Are you in need of uninstalling Windows Software Development Kit to fix some problems? Are you looking for an effective solution to completely uninstall it and thoroughly delete all of its files out of your PC? No worry! This page provides detailed instructions on how to completely uninstall Windows Software Development Kit.
Possible problems when you uninstall Windows Software Development Kit
* Windows Software Development Kit is not listed in Programs and Features.
* You do not have sufficient access to uninstall Windows Software Development Kit.
* A file required for this uninstallation to complete could not be run.
* An error has occurred. Not all of the files were successfully uninstalled.
* Another process that is using the file stops Windows Software Development Kit being uninstalled.
* Files and folders of Windows Software Development Kit can be found in the hard disk after the uninstallation.
Windows Software Development Kit cannot be uninstalled due to many other problems. An incomplete uninstallation of Windows Software Development Kit may also cause many problems. So, it’s really important to completely uninstall Windows Software Development Kit and remove all of its files.
How to Uninstall Windows Software Development Kit Completley?
Method 1: Uninstall Windows Software Development Kit via Programs and Features.
When a new piece of program is installed on your system, that program is added to the list in Programs and Features. When you want to uninstall the program, you can go to the Programs and Features to uninstall it. So when you want to uninstall Windows Software Development Kit, the first solution is to uninstall it via Programs and Features.
Steps:
a. Open Programs and Features.
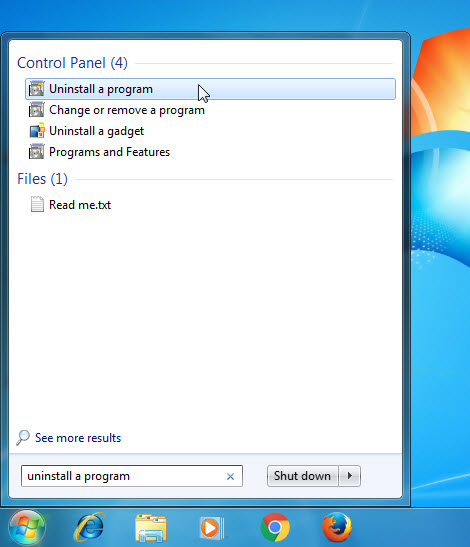
Windows Vista and Windows 7
Click Start, type uninstall a program in the Search programs and files box and then click the result.
Windows 8, Windows 8.1 and Windows 10
Open WinX menu by holding Windows and X keys together, and then click Programs and Features.
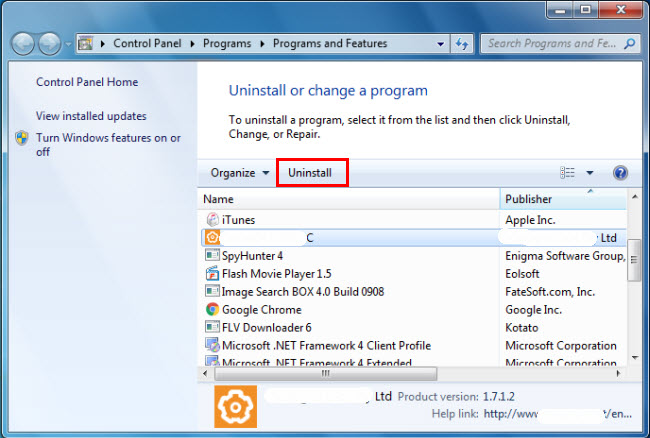
b. Look for Windows Software Development Kit in the list, click on it and then click Uninstall to initiate the uninstallation.
Method 2: Uninstall Windows Software Development Kit with its uninstaller.exe.
Most of computer programs have an executable file named uninst000.exe or uninstall.exe or something along these lines. You can find this files in the installation folder of Windows Software Development Kit.
Steps:
a. Go to the installation folder of Windows Software Development Kit.
b. Find uninstall.exe or unins000.exe.
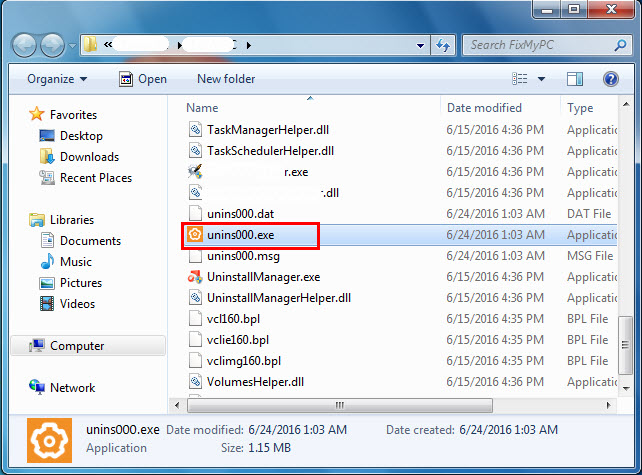
c. Double click on its uninstaller and follow the wizard to uninstall Windows Software Development Kit.
Method 3: Uninstall Windows Software Development Kit via System Restore.
System Restore is a utility which comes with Windows operating systems and helps computer users restore the system to a previous state and remove programs interfering with the operation of the computer. If you have created a system restore point prior to installing a program, then you can use System Restore to restore your system and completely eradicate the unwanted programs like Windows Software Development Kit. You should backup your personal files and data before doing a System Restore.
Steps:
a. Close all files and programs that are open.
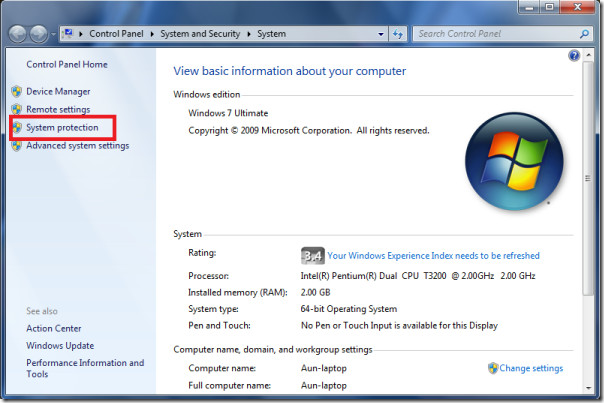
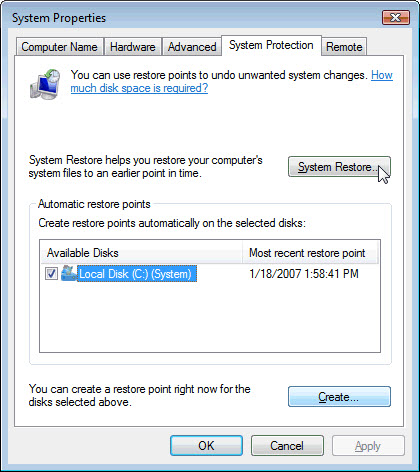
b. On the desktop, right click Computer and select Properties. The system window will display.
c. On the left side of the System window, click System protection. The System Properties window will display.
d. Click System Restore and the System Restore window will display.
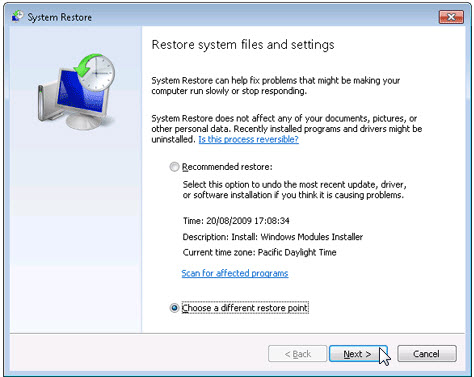
e. Select Choose a different restore point and click Next.
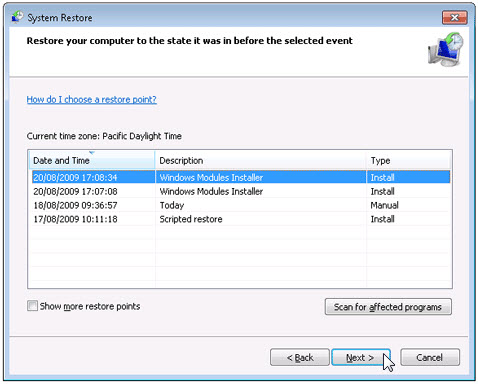
f. Select a date and time from the list and then click Next. You should know that all programs and drivers installed after the selected date and time may not work properly and may need to be re-installed.
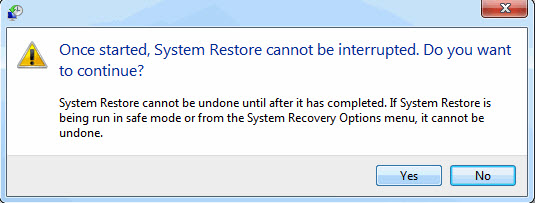
g. Click Finish when the «Confirm your restore point» window appears.
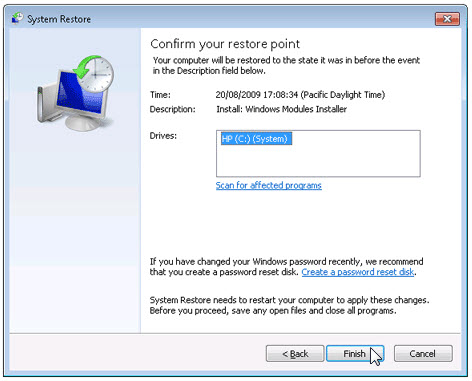
h. Click Yes to confirm again.
Method 4: Uninstall Windows Software Development Kit with Antivirus.
Nowadays, computer malware appear like common computer applications but they are much more difficult to remove from the computer. Such malware get into the computer with the help of Trojans and spyware. Other computer malware like adware programs or potentially unwanted programs are also very difficult to remove. They usually get installed on your system by bundling with freeware software like video recording, games or PDF convertors. They can easily bypass the detection of the antivirus programs on your system. If you cannot remove Windows Software Development Kit like other programs, then it’s worth checking whether it’s a malware or not.
Method 5: Reinstall Windows Software Development Kit to Uninstall.
When the file required to uninstall Windows Software Development Kit is corrupted or missing, it will not be able to uninstall the program. In such circumstance, reinstalling Windows Software Development Kit may do the trick. Run the installer either in the original disk or the download file to reinstall the program again. Sometimes, the installer may allow you to repair or uninstall the program as well.
Method 6: Use the Uninstall Command Displayed in the Registry.
When a program is installed on the computer, Windows will save its settings and information in the registry, including the uninstall command to uninstall the program. You can try this method to uninstall Windows Software Development Kit. Please carefully edit the registry, because any mistake there may make your system crash.
Steps:
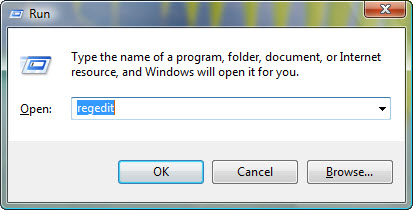
a. Hold Windows and R keys to open the Run command, type in regedit in the box and click OK.
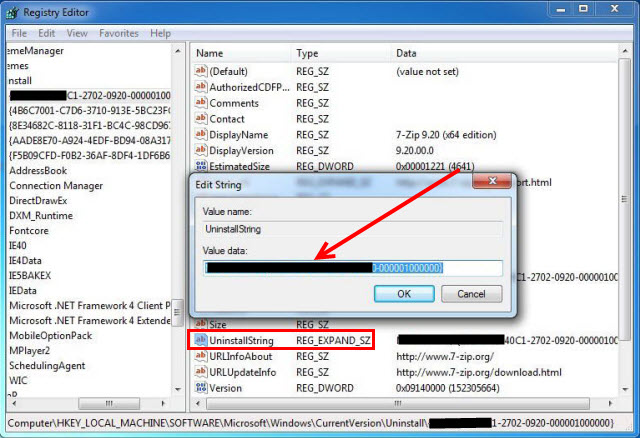
b. Navigate the following registry key and find the one of Windows Software Development Kit:
HKEY_LOCAL_MACHINE\SOFTWARE\Microsoft\Windows\CurrentVersion\Uninstall
c. Double click on the UninstallString value, and copy its Value Data.
d. Hold Windows and R keys to open the Run command, paste the Value Data in the box and click OK.
e. Follow the wizard to uninstall Windows Software Development Kit.
Method 7: Uninstall Windows Software Development Kit with Third-party Uninstaller.
The manual uninstallation of Windows Software Development Kit requires computer know-how and patience to accomplish. And no one can promise the manual uninstallation will completely uninstall Windows Software Development Kit and remove all of its files. And an incomplete uninstallation will many useless and invalid items in the registry and affect your computer performance in a bad way. Too many useless files also occupy the free space of your hard disk and slow down your PC speed. So, it’s recommended that you uninstall Windows Software Development Kit with a trusted third-party uninstaller which can scan your system, identify all files of Windows Software Development Kit and completely remove them. Download this powerful third-party uninstaller below.
7 Crucial Aspects to Consider Before Uninstalling the Windows Software Development Kit
As an expert engineer in software with years of experience, I’ve observed many individuals face dilemmas when it comes to uninstalling specific programs. One such dilemma has recently gained momentum: can I uninstall the Windows Software Development Kit (SDK)? In this in-depth article, we’ll be exploring every aspect you need to know about uninstalling the Windows SDK safely and effectively.
1. Understanding the Function and Purpose of the Windows Software Development Kit
Before diving into the process of uninstalling the Windows SDK, it’s important to understand its function and purpose. The Windows SDK is a collection of tools, libraries, and documentation that developers use to create applications for the Windows operating system. It plays a significant role in the development process as it helps developers build various applications compatible with the Windows ecosystem.
2. Identifying the Need to Uninstall the Windows Software Development Kit
You might wonder why an individual would want to uninstall such a useful tool. The primary reason is often a lack of necessity – some users may have installed the SDK by accident or no longer require it for their projects. Additionally, uninstalling the SDK can free up valuable storage space on the user’s machine, which can improve overall system performance. However, it is crucial to ensure that uninstalling the SDK won’t adversely affect your current projects or system functionality.
3. Evaluating the Impact on Existing Projects
Before proceeding with the uninstallation of the Windows SDK, consider how this action might impact your existing projects that rely on it. If your projects utilize specific features of the SDK, removing it from your system could result in broken code or incomplete functionality. In such cases, it is recommended to either refrain from uninstalling the SDK or seek alternative solutions.
4. Exploring Alternative Solutions
If you’re determined to remove the Windows SDK yet still require specific features, it is vital to research and identify alternative solutions for your projects. There are numerous libraries and tools available that can replace or supplement the functionality provided by the Windows SDK. These include cross-platform development frameworks like Xamarin, React Native, or Flutter, which offer similar capabilities while reducing reliance on a single operating system.
5. The Uninstallation Process
If you’ve concluded that uninstalling the Windows SDK won’t negatively impact your projects or system, follow these steps to remove it safely:
1. Navigate to the Control Panel.
2. Select “Programs and Features.”
3. Locate “Windows Software Development Kit” in the list of installed programs.
4. Right-click on the entry and select “Uninstall.”
The uninstallation process will begin, and upon completion, the Windows SDK will be removed from your system. Keep in mind that some residual files may still be present; however, these are typically harmless and shouldn’t impact system performance.
6. Reinstalling the Windows Software Development Kit (if necessary)
There might come a time when you need to reinstall the Windows SDK after uninstalling it. Whether your projects require specific features, or you’ve discovered a newfound passion for Windows application development, reinstalling the SDK is a straightforward process. Visit the official Microsoft website to download the latest version of the SDK and follow the prompts to complete the installation.
7. Prevention: Making Informed Decisions in the Future
Ultimately, the decision to uninstall the Windows SDK should be made with careful consideration and extensive research. Understanding the implications and potential alternatives is crucial to navigating this decision successfully. In the future, it is highly recommended to make well-informed decisions regarding the installation of software development tools, ensuring that your projects remain stable and functional.
In conclusion, you can indeed uninstall the Windows Software Development Kit if it’s determined not to have a negative impact on your projects or system performance. However, it’s vital to understand the implications of this decision and explore alternative solutions if necessary. Following these guidelines will ensure a smooth and safe uninstallation process, freeing up valuable storage space and potentially improving overall system performance.
Speed up Windows 10 PC for MAXIMUM performance (Hidden secrets) – 2021
Uninstalling Autodesk Software the Easy Way
Yes, you can uninstall the Windows Developer Kit if you no longer need it or want to free up some space on your computer. The Windows Developer Kit, also known as Windows SDK or Software Development Kit, provides tools, libraries, and headers for developers to create applications for the Windows operating system.
To uninstall the Windows Developer Kit, follow these steps:
1. Press the Windows key on your keyboard to open the Start menu.
2. Type “Add or remove programs” in the search bar and click on the corresponding result.
3. In the list of installed programs, look for “Windows Software Development Kit” or a similar name (it may also include the version number, like “Windows Software Development Kit – Windows 10.0.xxxxx”).
4. Click on the Windows Software Development Kit entry, and then click on the “Uninstall” button that appears.
5. Follow the prompts to complete the uninstallation process.
Keep in mind that uninstalling the Windows Developer Kit will remove the tools required to develop and test applications for Windows, so if you need them in the future, you’ll have to reinstall the kit.
What do I need Windows Software Development Kit for?
The Windows Software Development Kit (SDK) is important in the context of uninstall apps because it provides a comprehensive set of tools, libraries, and documentation that developers can use to create, debug, and deploy applications for Windows. One of its key features is the ability to create custom uninstallers for your applications.
By using Windows SDK, you can create a more efficient and user-friendly way of uninstalling an app, giving users more control over their software and system resources. This is particularly useful if you develop complex applications that have intricate installation requirements, as it helps you ensure that all components are removed from the user’s system during the uninstallation process.
What is Windows Software Development Kit Windows?
The Windows Software Development Kit (SDK) is a set of tools, libraries, and documentation designed to help developers create applications specifically for the Windows operating system. In the context of uninstalling apps, the Windows SDK can play a vital role in helping developers understand how their applications interact with the Windows environment and ensure proper removal of their applications from the system. This could include identifying any leftover files or registry entries that should be removed during the uninstallation process, as well as addressing any potential issues that may arise during the uninstallation.
Is Windows 10 SDK needed?
The Windows 10 SDK is not strictly needed in the context of uninstalling apps. It is a software development kit designed for developers to create, test, and debug applications compatible with Windows 10. However, if you are a content creator who focuses on uninstalling apps and providing tutorials, using the Windows 10 SDK may not be necessary for your work. Instead, you can focus on regular methods for uninstalling apps, such as using the Control Panel, Settings, or third-party tools like Revo Uninstaller.
Is it safe to uninstall the Windows Software Development Kit (SDK) from my system if I no longer need it for app development?
Yes, it is generally safe to uninstall the Windows Software Development Kit (SDK) from your system if you no longer need it for app development. The SDK is a set of tools and libraries used by developers to create, test, and debug applications for Windows. However, once the development process is complete and you no longer require these tools, you can safely remove the SDK to free up storage space on your computer.
To uninstall the SDK, follow these steps:
1. Open the Control Panel.
2. Click on Programs and Features.
3. Locate Windows Software Development Kit in the list of installed programs.
4. Right-click on it and select Uninstall.
Keep in mind that uninstalling the SDK will not affect the apps or programs you’ve developed using it; however, if you plan on resuming app development in the future, you’ll need to reinstall the SDK to access its tools and libraries again.
What is the most efficient method to completely remove the Windows Software Development Kit (SDK) without causing any issues on my computer?
The most efficient method to completely remove the Windows Software Development Kit (SDK) without causing any issues on your computer is to follow these steps:
1. Close all running applications: Before starting the uninstallation process, make sure to close all running applications to prevent any conflicts or issues.
2. Open Control Panel: Click on the Start button and type “Control Panel” in the search bar. Select the Control Panel app to open it.
3. Navigate to Programs and Features: Under the Control Panel, click on “Programs,” and then select “Programs and Features.”
4. Locate the Windows SDK entry: In the list of installed programs, find the Windows Software Development Kit (SDK) entry. It may appear as “Windows Software Development Kit” or “Windows SDK.”
5. Uninstall the Windows SDK: Right-click on the Windows SDK entry and select “Uninstall.” Follow the on-screen prompts to complete the uninstallation process. Your computer might require a restart to finalize the changes.
6. Remove leftover files and folders (optional): To ensure that all components are removed, you can manually delete the Windows SDK installation folder, typically located at “C:Program Files (x86)Windows Kits”. Make sure to backup any important files before deleting this folder.
By following these steps, you can efficiently and safely uninstall the Windows Software Development Kit (SDK) without causing any issues on your computer.
Are there any alternative tools I can use to manage or monitor the uninstallation process of the Windows Software Development Kit (SDK) to ensure a clean removal?
Yes, there are alternative tools you can use to manage or monitor the uninstallation process of the Windows Software Development Kit (SDK) to ensure a clean removal. These tools can help you track and remove residual files, registry entries, and other traces left behind by the software.
Two popular alternatives are:
1. Revo Uninstaller: Revo Uninstaller is a powerful third-party uninstaller that can scan your system for leftover files and registry entries, ensuring an effective removal of the Windows SDK. It also comes with additional features such as Autorun Manager, Junk Files Cleaner, and Browser Extensions removal.
2. IObit Uninstaller: IObit Uninstaller is another reliable tool for managing software removal on your system. It effectively removes not only the Windows SDK but also browser plugins, toolbars, and other unwanted programs. It features a batch uninstall option, allowing you to remove multiple applications at once, and it also includes a file shredder to securely delete sensitive data.
Both of these tools offer free versions and provide advanced scanning features to ensure a thorough and clean removal of the Windows Software Development Kit (SDK) from your system.
Post Views: 656
This article will serve as an informative guide and give you a clear understanding of how to perform silent or interactive installs and uninstalls of the Windows 11 Software Development Kit (SDK) using the Powershell App Deployment Toolkit. The PowerShell App Deployment Toolkit can be used to replace your WiseScript, VBScript and Batch wrapper scripts with one versatile, re-usable and extensible tool. This tool is an absolute must for Microsoft Endpoint Manager Configuration Manager (MEMCM) / (SCCM) Administrators or anyone who is responsible for packaging and deploying software.
How to Install the Windows 11 Software Development Kit (SDK) Using the PowerShell App Deployment Toolkit
- Download the Powershell App Deployment Toolkit 3.8.4:
- https://github.com/PSAppDeployToolkit/PSAppDeployToolkit/releases/download/3.8.4/PSAppDeployToolkit_v3.8.4.zip
- Download the zip file to a folder created at (C:\Downloads)
- Open Windows PowerShell by Right-Clicking on Windows PowerShell and selecting Run as Administrator
- Enter the following command to remove the Zone.Identifier:
Unblock-File -Path C:\Downloads\PSAppDeployToolkit_v3.8.4.zip
- Enter the following command to extract the contents of the zip file:
Expand-Archive -Path C:\Downloads\PSAppDeployToolkit_v3.8.4.zip -DestinationPath C:\Downloads\PADT
- Enter the following commands to copy the AppDeployToolkit & Files folders to “C:\Downloads\Win11SDK”:
Copy-Item -Path "C:\Downloads\PADT\Toolkit\AppDeployToolkit" -Destination "C:\Downloads\Win11SDK\AppDeployToolkit" -RecurseCopy-Item -Path "C:\Downloads\PADT\Toolkit\Files" -Destination "C:\Downloads\Win11SDK\Files"
You should now see the AppDeploymentToolkit folder with files & the empty Files folders at “C:\Downloads\Win11SDK”
Next we’ll want to download & extract the EXE installer for the Windows 11 Software Development Kit (SDK).
- Navigate to: https://developer.microsoft.com/en-us/windows/downloads/windows-sdk/
- Select the Download the Installer link
- Download & Copy the winsdksetup.exe to a folder created at (C:\Downloads)
- Open an Elevated Command Prompt by Right-Clicking on Command Prompt and select Run as Administrator
- Navigate to the C:\Downloads folder
- Enter the following command to extract the installation files:
- winsdksetup.exe /layout C:\Downloads\Win11SDK\Files /quiet
- You should now see a similar structure inside the Files directory
- Installers
- Redistributable
- UserExperienceManifest.xml
- winsdksetup.exe
- You should now see a similar structure inside the Files directory
- winsdksetup.exe /layout C:\Downloads\Win11SDK\Files /quiet
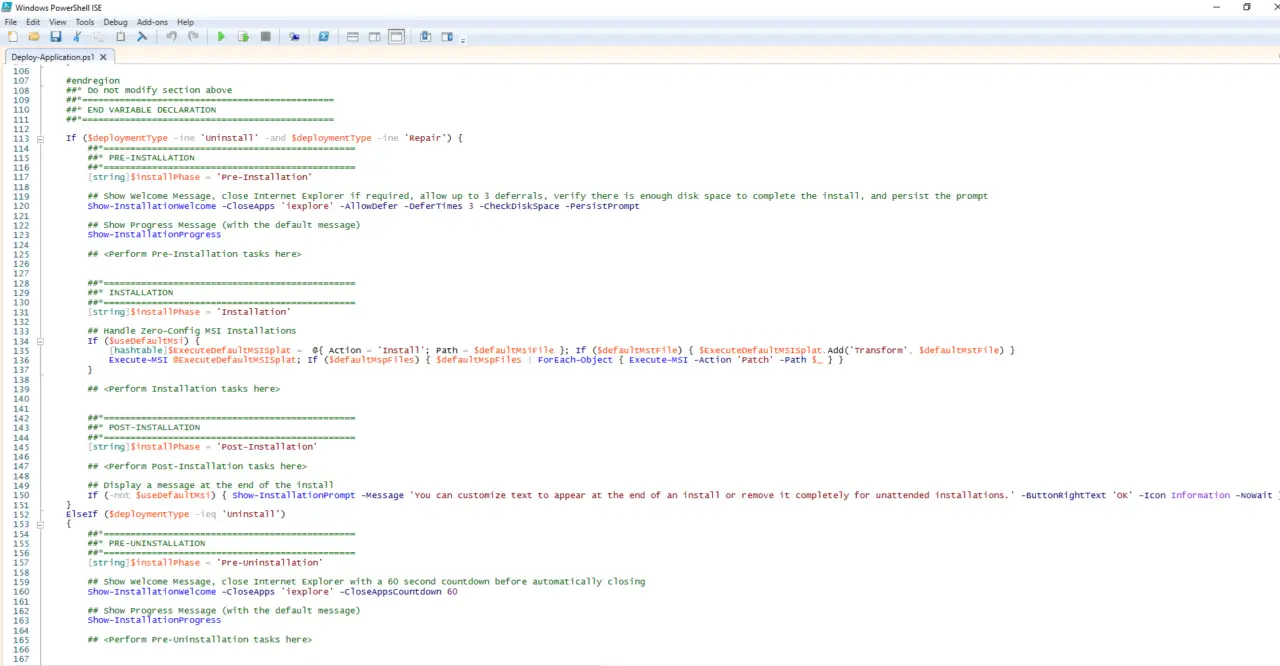
- Copy the PowerShell script below to “C:\Downloads\Win11SDK” & name it Deploy-Win11SDK.ps1
<#
.SYNOPSIS
	This script performs the installation or uninstallation of the Windows 11 Software Development Kit (SDK).
	# LICENSE #
	PowerShell App Deployment Toolkit - Provides a set of functions to perform common application deployment tasks on Windows.
	Copyright (C) 2017 - Sean Lillis, Dan Cunningham, Muhammad Mashwani, Aman Motazedian.
	This program is free software: you can redistribute it and/or modify it under the terms of the GNU Lesser General Public License as published by the Free Software Foundation, either version 3 of the License, or any later version. This program is distributed in the hope that it will be useful, but WITHOUT ANY WARRANTY; without even the implied warranty of MERCHANTABILITY or FITNESS FOR A PARTICULAR PURPOSE. See the GNU General Public License for more details.
	You should have received a copy of the GNU Lesser General Public License along with this program. If not, see <http://www.gnu.org/licenses/>.
.DESCRIPTION
	The script is provided as a template to perform an install or uninstall of an application(s).
	The script either performs an "Install" deployment type or an "Uninstall" deployment type.
	The install deployment type is broken down into 3 main sections/phases: Pre-Install, Install, and Post-Install.
	The script dot-sources the AppDeployToolkitMain.ps1 script which contains the logic and functions required to install or uninstall an application.
.PARAMETER DeploymentType
	The type of deployment to perform. Default is: Install.
.PARAMETER DeployMode
	Specifies whether the installation should be run in Interactive, Silent, or NonInteractive mode. Default is: Interactive. Options: Interactive = Shows dialogs, Silent = No dialogs, NonInteractive = Very silent, i.e. no blocking apps. NonInteractive mode is automatically set if it is detected that the process is not user interactive.
.PARAMETER AllowRebootPassThru
	Allows the 3010 return code (requires restart) to be passed back to the parent process (e.g. SCCM) if detected from an installation. If 3010 is passed back to SCCM, a reboot prompt will be triggered.
.PARAMETER TerminalServerMode
	Changes to "user install mode" and back to "user execute mode" for installing/uninstalling applications for Remote Destkop Session Hosts/Citrix servers.
.PARAMETER DisableLogging
	Disables logging to file for the script. Default is: $false.
.EXAMPLE
    PowerShell.exe .\Deploy-Win11SDK.ps1 -DeploymentType "Install" -DeployMode "NonInteractive"
.EXAMPLE
    PowerShell.exe .\Deploy-Win11SDK.ps1 -DeploymentType "Install" -DeployMode "Silent"
.EXAMPLE
    PowerShell.exe .\Deploy-Win11SDK.ps1 -DeploymentType "Install" -DeployMode "Interactive"
.EXAMPLE
    PowerShell.exe .\Deploy-Win11SDK.ps1 -DeploymentType "Uninstall" -DeployMode "NonInteractive"
.EXAMPLE
    PowerShell.exe .\Deploy-Win11SDK.ps1 -DeploymentType "Uninstall" -DeployMode "Silent"
.EXAMPLE
    PowerShell.exe .\Deploy-Win11SDK.ps1 -DeploymentType "Uninstall" -DeployMode "Interactive"
.NOTES
	Toolkit Exit Code Ranges:
	60000 - 68999: Reserved for built-in exit codes in Deploy-Application.ps1, Deploy-Application.exe, and AppDeployToolkitMain.ps1
	69000 - 69999: Recommended for user customized exit codes in Deploy-Application.ps1
	70000 - 79999: Recommended for user customized exit codes in AppDeployToolkitExtensions.ps1
.LINK
	http://psappdeploytoolkit.com
#>
[CmdletBinding()]
Param (
	[Parameter(Mandatory=$false)]
	[ValidateSet('Install','Uninstall','Repair')]
	[string]$DeploymentType = 'Install',
	[Parameter(Mandatory=$false)]
	[ValidateSet('Interactive','Silent','NonInteractive')]
	[string]$DeployMode = 'Interactive',
	[Parameter(Mandatory=$false)]
	[switch]$AllowRebootPassThru = $false,
	[Parameter(Mandatory=$false)]
	[switch]$TerminalServerMode = $false,
	[Parameter(Mandatory=$false)]
	[switch]$DisableLogging = $false
)

Try {
	## Set the script execution policy for this process
	Try { Set-ExecutionPolicy -ExecutionPolicy 'ByPass' -Scope 'Process' -Force -ErrorAction 'Stop' } Catch {}

	##*===============================================
	##* VARIABLE DECLARATION
	##*===============================================
	## Variables: Application
	[string]$appVendor = 'Microsoft Corporation'
	[string]$appName = 'Windows 11 Software Development Kit (SDK)'
	[string]$appVersion = ''
	[string]$appArch = ''
	[string]$appLang = ''
	[string]$appRevision = ''
	[string]$appScriptVersion = '1.0.0'
	[string]$appScriptDate = 'XX/XX/20XX'
	[string]$appScriptAuthor = 'Jason Bergner'
	##*===============================================
	## Variables: Install Titles (Only set here to override defaults set by the toolkit)
	[string]$installName = ''
	[string]$installTitle = 'Windows 11 Software Development Kit (SDK)'

	##* Do not modify section below
	#region DoNotModify

	## Variables: Exit Code
	[int32]$mainExitCode = 0

	## Variables: Script
	[string]$deployAppScriptFriendlyName = 'Deploy Application'
	[version]$deployAppScriptVersion = [version]'3.8.4'
	[string]$deployAppScriptDate = '26/01/2021'
	[hashtable]$deployAppScriptParameters = $psBoundParameters

	## Variables: Environment
	If (Test-Path -LiteralPath 'variable:HostInvocation') { $InvocationInfo = $HostInvocation } Else { $InvocationInfo = $MyInvocation }
	[string]$scriptDirectory = Split-Path -Path $InvocationInfo.MyCommand.Definition -Parent

	## Dot source the required App Deploy Toolkit Functions
	Try {
		[string]$moduleAppDeployToolkitMain = "$scriptDirectory\AppDeployToolkit\AppDeployToolkitMain.ps1"
		If (-not (Test-Path -LiteralPath $moduleAppDeployToolkitMain -PathType 'Leaf')) { Throw "Module does not exist at the specified location [$moduleAppDeployToolkitMain]." }
		If ($DisableLogging) { . $moduleAppDeployToolkitMain -DisableLogging } Else { . $moduleAppDeployToolkitMain }
	}
	Catch {
		If ($mainExitCode -eq 0){ [int32]$mainExitCode = 60008 }
		Write-Error -Message "Module [$moduleAppDeployToolkitMain] failed to load: `n$($_.Exception.Message)`n `n$($_.InvocationInfo.PositionMessage)" -ErrorAction 'Continue'
		## Exit the script, returning the exit code to SCCM
		If (Test-Path -LiteralPath 'variable:HostInvocation') { $script:ExitCode = $mainExitCode; Exit } Else { Exit $mainExitCode }
	}

	#endregion
	##* Do not modify section above
	##*===============================================
	##* END VARIABLE DECLARATION
	##*===============================================

	If ($deploymentType -ine 'Uninstall' -and $deploymentType -ine 'Repair') {
		##*===============================================
		##* PRE-INSTALLATION
		##*===============================================
		[string]$installPhase = 'Pre-Installation'

		## Show Welcome Message, Close Windows Software Development Kit With a 60 Second Countdown Before Automatically Closing
		Show-InstallationWelcome -CloseApps 'appverif,GPUView,windbg,wpa,wpaexporter,wpr,xperf' -CloseAppsCountdown 60

		## Show Progress Message (with the default message)
		Show-InstallationProgress

        ## Remove Any Existing Version of Windows Software Development Kit (SDK)
        $AppList = Get-InstalledApplication -Name 'Windows Software Development Kit'
        ForEach ($App in $AppList)
        {
        $UninstPath = Get-ChildItem -Path "C:\ProgramData\Package Cache\*" -Include winsdksetup.exe -Recurse -ErrorAction SilentlyContinue
        If($UninstPath.Exists)
        {
        Write-Log -Message "Found $($UninstPath.FullName), now attempting to uninstall $installTitle."
        Execute-Process -Path "$UninstPath" -Parameters "/uninstall /quiet /norestart /log C:\Windows\Logs\Software\WinSDK-Uninstall.log" -WindowStyle Hidden
        Get-Process -Name "winsdksetup" -ErrorAction SilentlyContinue | Wait-Process
        }
        }

		##*===============================================
		##* INSTALLATION
		##*===============================================
		[string]$installPhase = 'Installation'

        ## Install Windows 11 Software Development Kit (SDK)
        $ExePath = Get-ChildItem -Path "$dirFiles" -Include winsdksetup.exe -File -Recurse -ErrorAction SilentlyContinue
        If($ExePath.Exists)
        {
        Write-Log -Message "Found $($ExePath.FullName), now attempting to install $installTitle."
        Show-InstallationProgress "Installing the Windows 11 Software Development Kit (SDK). This may take some time. Please wait..."
        Execute-Process -Path "$ExePath" -Parameters "/features + /quiet /norestart /ceip off /log C:\Windows\Logs\Software\Win11SDK-Install.log" -WindowStyle Hidden
        Get-Process -Name "winsdksetup" -ErrorAction SilentlyContinue | Wait-Process
        }

		##*===============================================
		##* POST-INSTALLATION
		##*===============================================
		[string]$installPhase = 'Post-Installation'

	}
	ElseIf ($deploymentType -ieq 'Uninstall')
	{
		##*===============================================
		##* PRE-UNINSTALLATION
		##*===============================================
		[string]$installPhase = 'Pre-Uninstallation'

		## Show Welcome Message, Close Windows Software Development Kit With a 60 Second Countdown Before Automatically Closing
		Show-InstallationWelcome -CloseApps 'appverif,GPUView,windbg,wpa,wpaexporter,wpr,xperf' -CloseAppsCountdown 60

        ## Show Progress Message (With a Message to Indicate the Application is Being Uninstalled)
        Show-InstallationProgress -StatusMessage "Uninstalling the $installTitle. Please Wait..."


		##*===============================================
		##* UNINSTALLATION
		##*===============================================
		[string]$installPhase = 'Uninstallation'

        ## Uninstall Any Existing Version of Windows Software Development Kit (SDK)
        $AppList = Get-InstalledApplication -Name 'Windows Software Development Kit'
        ForEach ($App in $AppList)
        {
        $UninstPath = Get-ChildItem -Path "C:\ProgramData\Package Cache\*" -Include winsdksetup.exe -Recurse -ErrorAction SilentlyContinue
        If($UninstPath.Exists)
        {
        Write-Log -Message "Found $($UninstPath.FullName), now attempting to uninstall $installTitle."
        Execute-Process -Path "$UninstPath" -Parameters "/uninstall /quiet /norestart /log C:\Windows\Logs\Software\WinSDK-Uninstall.log" -WindowStyle Hidden
        Get-Process -Name "winsdksetup" -ErrorAction SilentlyContinue | Wait-Process
        }
        }
        ## Uninstall Windows SDK AddOn
        Remove-MSIApplications -Name "Windows SDK AddOn"

        ## Uninstall Microsoft .NET Framework 4.8 SDK
        Remove-MSIApplications -Name "Microsoft .NET Framework 4.8 SDK"

        ## Uninstall Microsoft .NET Framework 4.8 Targeting Pack
        Remove-MSIApplications -Name "Microsoft .NET Framework 4.8 Targeting Pack"

		##*===============================================
		##* POST-UNINSTALLATION
		##*===============================================
		[string]$installPhase = 'Post-Uninstallation'


	}
	ElseIf ($deploymentType -ieq 'Repair')
	{
		##*===============================================
		##* PRE-REPAIR
		##*===============================================
		[string]$installPhase = 'Pre-Repair'


		##*===============================================
		##* REPAIR
		##*===============================================
		[string]$installPhase = 'Repair'


		##*===============================================
		##* POST-REPAIR
		##*===============================================
		[string]$installPhase = 'Post-Repair'


    }
	##*===============================================
	##* END SCRIPT BODY
	##*===============================================

	## Call the Exit-Script function to perform final cleanup operations
	Exit-Script -ExitCode $mainExitCode
}
Catch {
	[int32]$mainExitCode = 60001
	[string]$mainErrorMessage = "$(Resolve-Error)"
	Write-Log -Message $mainErrorMessage -Severity 3 -Source $deployAppScriptFriendlyName
	Show-DialogBox -Text $mainErrorMessage -Icon 'Stop'
	Exit-Script -ExitCode $mainExitCode
}
Ok, all the hard work is done and now you can install or uninstall the Windows 11 Software Development Kit (SDK) using one single PowerShell script. Simply change the DeploymentType parameter to install or uninstall. Logging functionality is built-in automatically and you can view the log files under “C:\Windows\Logs\Software”.
Windows 11 Software Development Kit (SDK) NonInteractive Install (PowerShell)
NonInteractive means Very Silent, i.e. no blocking apps. This is automatically set if it is detected that the process is not running in the user session and it is not possible for anyone to provide input using a mouse or keyboard.
- Open Windows PowerShell by Right-Clicking on Windows PowerShell and selecting Run as Administrator
- Change the directory to “C:\Downloads\Win11SDK”
- PS C:\Downloads\Win11SDK>
- Enter the following command:
Powershell.exe -ExecutionPolicy Bypass .\Deploy-Win11SDK.ps1 -DeploymentType "Install" -DeployMode "NonInteractive"
Windows 11 Software Development Kit (SDK) Silent Install (PowerShell)
Silent means no dialogs (progress and balloon tip notifications are suppressed).
- Open Windows PowerShell by Right-Clicking on Windows PowerShell and selecting Run as Administrator
- Change the directory to “C:\Downloads\Win11SDK“
- PS C:\Downloads\Win11SDK>
- Enter the following command:
Powershell.exe -ExecutionPolicy Bypass .\Deploy-Win11SDK.ps1 -DeploymentType "Install" -DeployMode "Silent"
Windows 11 Software Development Kit (SDK) Interactive Install (PowerShell)
Interactive means the install will show dialogs including progress and balloon tip notifications.
- Open Windows PowerShell by Right-Clicking on Windows PowerShell and selecting Run as Administrator
- Change the directory to “C:\Downloads\Win11SDK”
- PS C:\Downloads\Win11SDK>
- Enter the following command:
Powershell.exe -ExecutionPolicy Bypass .\Deploy-Win11SDK.ps1 -DeploymentType "Install" -DeployMode "Interactive"
How to Uninstall the Windows 11 Software Development Kit (SDK) Using the PowerShell App Deployment Toolkit
Windows 11 Software Development Kit (SDK) NonInteractive Uninstall (PowerShell)
NonInteractive means Very Silent, i.e. no blocking apps. This is automatically set if it is detected that the process is not running in the user session and it is not possible for anyone to provide input using a mouse or keyboard.
- Open Windows PowerShell by Right-Clicking on Windows PowerShell and selecting Run as Administrator
- Change the directory to “C:\Downloads\Win11SDK“
- PS C:\Downloads\Win11SDK>
- Enter the following command:
Powershell.exe -ExecutionPolicy Bypass .\Deploy-Win11SDK.ps1 -DeploymentType "Uninstall" -DeployMode "NonInteractive"
Windows 11 Software Development Kit (SDK) Silent Uninstall (PowerShell)
Silent means no dialogs (progress and balloon tip notifications are suppressed).
- Open Windows PowerShell by Right-Clicking on Windows PowerShell and selecting Run as Administrator
- Change the directory to “C:\Downloads\Win11SDK“
- PS C:\Downloads\Win11SDK>
- Enter the following command:
Powershell.exe -ExecutionPolicy Bypass .\Deploy-Win11SDK.ps1 -DeploymentType "Uninstall" -DeployMode "Silent"
Windows 11 Software Development Kit (SDK) Interactive Uninstall (PowerShell)
Interactive means the install will show dialogs including progress and balloon tip notifications.
- Open Windows PowerShell by Right-Clicking on Windows PowerShell and selecting Run as Administrator
- Change the directory to “C:\Downloads\Win11SDK“
- PS C:\Downloads\Win11SDK>
- Enter the following command:
Powershell.exe -ExecutionPolicy Bypass .\Deploy-Win11SDK.ps1 -DeploymentType "Uninstall" -DeployMode "Interactive"
Always make sure to test everything in a development environment prior to implementing anything into production. The information in this article is provided “As Is” without warranty of any kind.