
In today’s fast-paced digital world, monitoring and optimizing CPU utilization is essential for maintaining the performance and efficiency of computer systems. One powerful tool that enables this is SNMP OID (Simple Network Management Protocol Object Identifier) for CPU Utilization. This protocol allows administrators to gather real-time data on CPU usage, enabling them to identify bottlenecks, detect anomalies, and fine-tune resource allocation for optimal performance.
The SNMP OID for CPU Utilization has a rich history in the field of network management. It provides a standardized way to monitor and manage CPU performance across various network devices, such as routers, switches, and servers. By leveraging SNMP-based monitoring systems, administrators can easily collect data on CPU usage, including average load, peak utilization, and historical trends. This valuable information not only helps identify potential issues but also allows for proactive capacity planning and resource allocation, ensuring smooth operation and preventing performance degradation.
Monitoring CPU utilization is crucial for managing network devices efficiently. To obtain CPU utilization data using SNMP, you can use the SNMP OID (Object Identifier) 1.3.6.1.4.1.2021.11.9.0 for Linux-based systems or .1.3.6.1.4.1.9.2.1.57.0 for Cisco devices. By querying this OID, you can retrieve real-time CPU usage information. This data can help troubleshoot performance issues, optimize device resources, and make informed capacity planning decisions. Implementing SNMP-based monitoring ensures smooth network operations and proactively addresses any CPU-related bottlenecks.
Introduction: Understanding SNMP OID for CPU Utilization
SNMP (Simple Network Management Protocol) is a widely used protocol for network management and monitoring. It allows network administrators to gather information from network devices, such as routers, switches, and servers, to monitor their performance and ensure smooth operation. One important aspect of SNMP is its support for Object Identifiers (OIDs), which are unique identifiers used to query specific information about a device. In this article, we will explore SNMP OID for CPU utilization, one of the vital metrics for monitoring and managing network devices.
Understanding SNMP OID
SNMP OID is a hierarchical naming scheme that allows for the identification and retrieval of specific data points within a managed device. Each OID corresponds to a particular parameter or piece of information that can be queried or monitored using SNMP. OIDs consist of a series of numbers separated by dots, representing a unique path to a specific managed object.
For example, the OID for CPU utilization on a network device might be 1.3.6.1.4.1.9.9.109.1.1.1.1.8. By specifying this OID using SNMP, you can retrieve the CPU utilization value of the device. OIDs are defined in a tree-like structure, with each branch representing a different aspect or functionality of the device. Administrators can navigate this tree to locate the desired OIDs for monitoring and managing specific parameters.
SNMP MIBs and OIDs
In SNMP, MIBs (Management Information Base) are a collection of OIDs organized in a structured manner. MIBs provide a standardized set of OIDs for different devices, making it easier for administrators to access and retrieve information. The MIB structure defines the hierarchy and relationship between various OIDs, allowing for efficient management and monitoring.
Each MIB contains multiple OIDs that correspond to different aspects of the device, such as CPU utilization, memory usage, interface statistics, and more. By referencing the appropriate MIB, administrators can quickly identify the relevant OID for a particular metric they want to monitor.
OID Syntax
The syntax of an OID follows the structure of a tree, where each segment represents a different level. The first segment of the OID denotes the internet (1), followed by different branches and sub-branches that lead to the desired OID. Each level of the OID hierarchy has a specific meaning and contributes to the overall uniqueness of the OID.
For example, the OID 1.3.6.1.4.1 represents the private enterprise branch, while 9.9 denotes the Cisco Systems branch. Subsequent segments further narrow down the OID until reaching the specific parameter of interest, such as CPU utilization.
OIDs for CPU Utilization
CPU utilization is a critical metric for assessing the overall performance and health of network devices. Monitoring CPU utilization helps identify potential bottlenecks, resource constraints, and abnormal behavior that could impact the device’s functionality. SNMP provides several OIDs related to CPU utilization that can be used to retrieve this information.
- 1.3.6.1.4.1.9.2.1.58: This OID is used to monitor the overall CPU utilization on Cisco devices.
- 1.3.6.1.4.1.9.2.1.57: This OID is specific to Cisco devices and provides per-core CPU utilization information.
- 1.3.6.1.2.1.25.3.3.1.2: This OID is part of the HOST-RESOURCES-MIB and is used to monitor CPU utilization on general network devices.
- 1.3.6.1.4.1.2021.11.10: This OID is part of the UCD-SNMP-MIB and is used to monitor CPU utilization on UNIX-like systems.
Retrieving CPU Utilization Using SNMP
To retrieve CPU utilization using SNMP, you need an SNMP manager application or tool that supports SNMP queries. The SNMP manager sends a request to the target network device containing the appropriate OID for CPU utilization. The device, acting as an SNMP agent, responds to the request with the current CPU utilization value.
The SNMP manager can retrieve CPU utilization data periodically by periodically sending SNMP requests. This allows the administrator to monitor the CPU usage over time and identify any spikes or unusual patterns that require attention.
Once the SNMP manager receives the CPU utilization value, it can be further processed, logged, or displayed in a graphical format for ease of interpretation. SNMP managers often provide additional features, such as setting thresholds for alarms or triggering notifications when CPU utilization exceeds a certain value.
SNMP Versions and Security Considerations
It is important to note that SNMP offers different versions, namely SNMPv1, SNMPv2c, and SNMPv3, each with varying levels of security features. SNMPv3, the most recent version, introduces encryption and authentication mechanisms to secure SNMP communications. When monitoring CPU utilization or any other sensitive device information, it is recommended to use SNMPv3 for enhanced security.
Additionally, SNMP communication typically occurs over UDP (User Datagram Protocol), which is a connectionless protocol. This means that SNMP queries and responses are not guaranteed to arrive reliably or in a specific order. To ensure data integrity and reliability, it is advisable to implement SNMP traps or use SNMP agents that support SNMP Inform, which provides a more reliable delivery mechanism.
Best Practices for Monitoring CPU Utilization with SNMP
When monitoring CPU utilization using SNMP, there are several best practices to consider:
- Identify the appropriate OID for CPU utilization based on the device type and SNMP MIBs.
- Configure your SNMP manager or monitoring tool to regularly query the CPU utilization OID to ensure up-to-date monitoring.
- Set appropriate thresholds and alarms to trigger notifications when CPU utilization exceeds certain limits or exhibits abnormal patterns.
- Consider using SNMPv3 for secure communication and encrypting SNMP data, especially when monitoring sensitive information like CPU utilization.
Conclusion
SNMP OID for CPU utilization is a crucial aspect of network monitoring and management. By leveraging SNMP OIDs, administrators can retrieve real-time CPU utilization information from network devices, enabling proactive monitoring, resource allocation, and troubleshooting. Understanding SNMP OID hierarchies, MIBs, and versions helps ensure efficient and secure management of CPU utilization and overall network performance.

Understanding SNMP OID for CPU Utilization
When monitoring network devices and servers, SNMP (Simple Network Management Protocol) is a widely used protocol. SNMP OIDs (Object Identifiers) play a crucial role in retrieving specific information from SNMP-enabled devices. One such important metric is CPU utilization.
The SNMP OID for CPU utilization varies depending on the device manufacturer and operating system. For example, on Cisco devices, the OID for CPU utilization is 1.3.6.1.4.1.9.9.109.1.1.1.1.10. On Juniper devices, it is 1.3.6.1.4.1.2636.3.1.13.1.8.2.76.
Monitoring tools like Nagios, Zabbix, and PRTG use these SNMP OIDs to collect CPU utilization data and generate alerts or reports based on pre-defined thresholds. By monitoring the CPU utilization, network administrators can identify potential bottlenecks or performance issues. This information can be used for capacity planning, troubleshooting, and optimizing the overall network performance.
Key Takeaways — Snmp Oid for CPU Utilization
- SNMP OIDs can be used to monitor CPU utilization in network devices.
- OID stands for Object Identifier and is a unique identifier for a specific piece of data in a network device.
- The SNMP OIDs for CPU utilization vary depending on the device and its manufacturer.
- To monitor CPU utilization, you need to find the appropriate OID for your device using the device’s documentation or vendor support resources.
- Once you have the OID, you can use SNMP monitoring software or tools to collect and display CPU utilization data.
Frequently Asked Questions
Here are some commonly asked questions about SNMP OIDs for CPU utilization:
1. What is an SNMP OID for CPU utilization?
An SNMP OID (Object Identifier) for CPU utilization is a unique identifier used in SNMP (Simple Network Management Protocol) to monitor and manage the CPU utilization on network devices. It provides information on the percentage of CPU resources being used, allowing administrators to monitor and optimize device performance.
The OID for CPU utilization can vary depending on the device and SNMP implementation being used, but commonly used OIDs include 1.3.6.1.4.1.2021.11.11 (UCD-SNMP-MIB::ssCpuRawIdle) and 1.3.6.1.4.1.2021.11.9 (UCD-SNMP-MIB::ssCpuRawSystem).
2. How can I retrieve CPU utilization data using SNMP OIDs?
To retrieve CPU utilization data using SNMP OIDs, you need to use an SNMP management tool or write a SNMP query script. The process involves querying the SNMP OID for CPU utilization on the desired network device. The response will provide the current CPU utilization percentage or raw values, which can then be analyzed and monitored.
You can use tools like SNMPwalk or SNMPget to retrieve CPU utilization data from SNMP-enabled devices. These tools allow you to specify the SNMP OID for CPU utilization and retrieve the corresponding data from the device.
3. Are there different SNMP OIDs for different CPU cores?
Yes, there are different SNMP OIDs for different CPU cores on some network devices. These OIDs allow you to monitor the CPU utilization of individual cores or processors within a device.
For example, on devices using the UCD-SNMP-MIB, you can use the OID 1.3.6.1.4.1.2021.11.50 (UCD-SNMP-MIB::extCPULoad) to retrieve the CPU utilization for each core or processor. The index value appended to the OID represents the specific core or processor you want to monitor.
4. Can I set thresholds for CPU utilization using SNMP OIDs?
Yes, you can set thresholds for CPU utilization using SNMP OIDs. SNMP management tools and monitoring systems allow you to define threshold values for CPU utilization. When the CPU utilization exceeds or falls below these thresholds, alerts or notifications can be triggered, providing proactive monitoring and alerting for CPU performance issues.
You can configure SNMP trap settings to receive alerts when the CPU utilization exceeds a certain threshold. This can help administrators take prompt action to optimize CPU performance and prevent any potential bottlenecks.
5. What are some common troubleshooting steps for SNMP OID CPU utilization issues?
If you encounter issues with SNMP OID CPU utilization monitoring, here are some common troubleshooting steps:
— Ensure that the SNMP agent is enabled and configured correctly on the device you are monitoring.
— Verify that the SNMP OID being used for CPU utilization is correct and supported by your device’s SNMP implementation.
— Check if there are any network connectivity or firewall issues between the monitoring system and the device.
— Verify that the SNMP community strings or credentials used for the SNMP query are correct.
— Ensure that the SNMP management tool or monitoring system is properly configured to receive and process SNMP traps or SNMP polling data.
To summarize, the SNMP OID for CPU Utilization is an essential tool in monitoring and managing network devices. It allows network administrators to gather data on CPU usage and performance, enabling them to identify any potential issues and take proactive measures to optimize system performance.
By using the SNMP OID for CPU Utilization, network administrators can easily track the CPU usage of network devices, ensuring that they are not overloaded and operating within acceptable limits. This information is vital for maintaining network stability, preventing bottlenecks, and ensuring optimal performance across the network.
Introduction to SNMP
Simple Network Management Protocol (SNMP) is a widely used protocol for managing devices on IP networks. It enables network administrators to monitor network-attached devices for conditions that warrant administrative attention. SNMP allows for remote management of devices like routers, switches, servers, printers, and more, making it an essential tool in network administration.
SNMP operates in a client-server model, where the client (or manager) sends requests to the server (or agent), which replies with data or action. This communication is facilitated through the exchange of messages known as Protocol Data Units (PDUs). SNMP can use IP networks for monitoring devices, making it extremely valuable in network performance management.
One of the key features of SNMP is the capability to retrieve specific information about devices, often identified by Object Identifiers (OIDs). These OIDs are hierarchical names that uniquely identify managed objects in a device’s Management Information Base (MIB).
Understanding OIDs
An Object Identifier (OID) is a globally unique identifier that is represented as a series of numbers separated by dots. Each number corresponds to a branch on a hierarchical tree structure of data. OIDs are an integral part of SNMP, as they are used to specify the data that can be queried or set on a device.
A typical OID can look something like this: 1.3.6.1.4.1.2021.10.1.5.1.1, where each number represents a node in the hierarchy.
MIB (Management Information Base)
The Management Information Base (MIB) is a database used for managing the entities in a communication network. It contains definitions of OIDs, which represent various parameters of the device being monitored. MIBs describe the data structures used by SNMP and the objects associated with the managed devices.
Different devices have different MIBs, and they often extend a standard set of OIDs laid out in standard MIBs. Examples include the standard MIB-II for network management and specific MIBs designed for particular devices like routers or switches. To effectively manage devices using SNMP, one must have access to the relevant MIB file that corresponds to the device being monitored.
CPU Utilization Monitoring
Monitoring CPU utilization is critical for maintaining network health and ensuring that devices are operating at optimal performance levels. High CPU utilization can indicate potential problems such as overloading, inefficient processes, or malfunctioning applications. Thus, regular monitoring helps in identifying issues before they lead to network downtime or performance degradation.
In a typical environment, CPU utilization data is used for various purposes, including:
- Capacity Planning: Understanding CPU utilization trends can help administrators anticipate future resource needs.
- Performance Tuning: High CPU usage can signal inefficiencies and allow for targeted adjustments in configurations.
- Alerting: Setting thresholds for CPU utilization can trigger alerts, allowing for quick responses to potential issues.
SNMP OIDs for CPU Utilization
In the context of CPU utilization monitoring, various OIDs can be used to retrieve CPU statistics from network devices. The specific OIDs will depend on the device and its vendor, but many devices adhere to certain standards that outline common OIDs.
Standard OIDs for CPU Utilization
-
HOST-RESOURCES-MIB: This MIB is widely adopted and provides standardized OIDs for monitoring system resources.
-
hrProcessorLoad: OID:
1.3.6.1.2.1.25.3.3.1.2- Type: Gauge32
- Description: This OID provides the percentage of time the CPU has spent processing non-idle tasks on a given processor.
-
hrProcessorCount: OID:
1.3.6.1.2.1.25.3.3.1.3- Type: Gauge32
- Description: This OID gives the total number of processors in the system.
-
hrSystemUptime: OID:
1.3.6.1.2.1.1.3.0- Type: TimeTicks
- Description: This OID provides the time since the last reboot, which can be valuable when calculating CPU load over time.
-
-
UCD-SNMP-MIB: This MIB includes additional CPU utilization resources specific to many Unix-like operating systems.
-
ucdavis.load: OID:
1.3.6.1.4.1.2021.10.1.1- Type: Gauge
- Description: Three values representing load averages over 1, 5, and 15 minutes, respectively.
-
ssCpuIdle: OID:
1.3.6.1.4.1.2021.11.50.0- Type: Gauge32
- Description: This OID indicates the percentage of CPU idle time.
-
ssCpuSystem: OID:
1.3.6.1.4.1.2021.11.51.0- Type: Gauge32
- Description: Indicates the percentage of CPU time spent on system processes.
-
Vendor-Specific OIDs
Apart from standard MIBs, many vendors provide extensions that include proprietary OIDs for more detailed monitoring. These vendor-specific MIBs can capture additional metrics or provide enhanced functionality beyond what is available in standard MIBs.
For example:
-
Cisco devices use the
CISCO-PROCESS-MIBfor CPU utilization metrics.- cpmCPUTotalEntry: OID:
1.3.6.1.4.1.9.2.1.57 - Provides access to various CPU load metrics and operational states.
- cpmCPUTotalEntry: OID:
-
Juniper devices may offer OIDs under
JUNIPER-SYSTEM-ALARM-MIBfor specific CPU monitoring needs.
Retrieving CPU Utilization with SNMP
Monitoring CPU utilization through SNMP generally involves these steps:
-
Access the MIB File: Ensure you have the correct MIB file loaded in your SNMP management tool.
-
Choose the OID: Depending on the device and how detailed your monitoring needs to be, choose an appropriate OID.
-
Use SNMP Commands: Execute SNMP commands to query CPU utilization. Common tools for this include
snmpgetandsnmpwalk.
For example, using snmpget:
snmpget -v2c -c public 192.168.1.1 1.3.6.1.2.1.25.3.3.1.2.1This command retrieves the CPU load for the first processor on the device at IP address 192.168.1.1. The -v2c specifies the SNMP version, and -c public is the community string.
Alternatively, using snmpwalk:
snmpwalk -v2c -c public 192.168.1.1 1.3.6.1.2.1.25.3.3.1.2This would walk through all the CPU load values for all processors on the device.
Interpreting CPU Utilization Data
Once you have collected CPU utilization data, interpreting the numbers is critical for effective network management.
-
Normal Range: Typically, CPU utilization is considered normal if it consistently stays below 80%. Values exceeding this may indicate resource constraints or an overloaded system.
-
Idle vs. Active Time: When looking at OIDs such as
ssCpuIdle, a very low idle percentage alongside a high system percentage indicates high CPU utilization. -
Trend Analysis: Monitoring CPU utilization over time can help uncover trends that can inform decisions about upgrades, configurations, and potential load-balancing measures.
-
Alerting: Set thresholds based on best practices for CPU utilization. Many organizations choose to alert at 70-80% utilization.
Best Practices for SNMP CPU Utilization Monitoring
To ensure effective CPU utilization monitoring through SNMP, consider the following best practices:
-
Regular Updates: Keep MIB files and SNMP tools updated to access the latest features and OIDs.
-
Centralize Monitoring: Use a centralized SNMP manager that can interact with multiple devices, streamlining the process and providing a comprehensive view.
-
Use Automation: Automation tools can periodically check CPU utilization and perform specific actions if values exceed predefined thresholds—such as sending alerts or logging incidents.
-
Historical Data Storage: Store historical trends to facilitate advanced troubleshooting and analysis.
-
Limit SNMP Traffic: Especially in larger environments, configure polling intervals properly to avoid overwhelming the network with SNMP requests.
-
Security Measures: Given that SNMP has multiple versions with varying security levels, use SNMPv3 where possible to ensure encrypted communication and authentication.
Conclusion
Monitoring CPU utilization using SNMP OIDs is an invaluable part of network management. Understanding how to leverage OIDs to retrieve accurate CPU data helps network administrators maintain optimal performance, prevent downtime, and effectively plan for future capacity needs.
Whether through standard MIBs or vendor-specific extensions, the power of SNMP provides a detailed view into the operational status of network devices. By establishing best practices and integrating automated monitoring systems, organizations can significantly improve network reliability and performance.
Have you ever wondered how efficiently your computer’s CPU is functioning? Well, SNMP OID for CPU utilization can provide you with the answer. With this powerful tool, you can monitor and measure the CPU performance, ensuring optimal functioning and identifying any potential issues before they escalate.
SNMP (Simple Network Management Protocol) OID (Object Identifier) for CPU utilization allows network administrators to access crucial data about CPU usage on network devices. This information can help in troubleshooting performance bottlenecks, optimizing resource allocation, and improving overall system efficiency. By capturing and analyzing CPU utilization through SNMP OIDs, administrators can make informed decisions to optimize the performance of their network.
When monitoring CPU utilization through SNMP, you can use the OID 1.3.6.1.4.1.2021.11.9.0. This OID belongs to the UCD-SNMP-MIB and provides the CPU percentage used. By polling this OID, you can retrieve the CPU utilization data. This information is crucial for network administrators to monitor and troubleshoot performance issues. Make sure to configure your SNMP monitoring system to query this OID regularly to keep track of CPU utilization in real-time.
Understanding SNMP OID for CPU Utilization
The Simple Network Management Protocol (SNMP) is a widely-used protocol for managing and monitoring network devices. It provides a framework for collecting and organizing information about network devices, including CPU utilization. SNMP uses Object Identifiers (OIDs) to uniquely identify managed objects in the network.
The SNMP OID for CPU utilization allows network administrators and system administrators to monitor and track the CPU usage of network devices. By monitoring the CPU utilization, administrators can identify potential performance bottlenecks, troubleshoot issues, and ensure efficient resource allocation.
In this article, we will explore the SNMP OID for CPU utilization in detail, including its structure, how to query it, and its importance in network management.
Understanding SNMP and OIDs
Before diving into the SNMP OID for CPU utilization, let’s first understand SNMP and OIDs.
SNMP is a protocol that allows network devices, such as routers, switches, and servers, to be monitored and managed remotely. It operates on the concept of agents and managers. Agents are installed on network devices and collect information about the device, while managers are responsible for monitoring and configuring these devices.
SNMP uses OIDs to identify and manage the various objects in a network device. An OID is a unique identifier that represents a specific object, such as CPU utilization, memory usage, or network interface status. OIDs are organized in a hierarchical tree structure, with each node representing a specific object or sub-object.
For example, the OID for CPU utilization might be represented as: 1.3.6.1.4.1.2021.11.110.0.
The OID structure consists of a series of numbers separated by periods. Each number represents a node in the hierarchical structure. The root of the tree is the ISO node (1), followed by the Object Identifier (OID) node (3), and so on.
Querying the SNMP OID for CPU Utilization
To query the SNMP OID for CPU utilization, you will need an SNMP management tool or a programming language that supports SNMP operations. The most common SNMP operations include GET, GETNEXT, and SET.
The GET operation is used to retrieve the value of a specific OID, such as the CPU utilization. The GETNEXT operation is used to obtain the next OID in the tree structure. Finally, the SET operation is used to set the value of a specific OID, allowing for configuration changes.
When querying the SNMP OID for CPU utilization, you will typically use the GET operation to retrieve the current CPU utilization value. The value returned will be a percentage that represents the amount of CPU being utilized at that moment.
It is important to note that SNMP OIDs can vary depending on the device manufacturer and the specific implementation. Therefore, it is recommended to consult the device’s documentation or vendor-specific resources to obtain the correct OID for CPU utilization.
Importance of SNMP OID for CPU Utilization
The SNMP OID for CPU utilization plays a crucial role in network management and performance monitoring. By monitoring and tracking the CPU utilization of network devices, administrators can:
- Identify performance bottlenecks: High CPU utilization can indicate a resource constraint or a misconfiguration in the network. By monitoring the CPU utilization, administrators can identify potential bottlenecks and take necessary actions to optimize performance.
- Troubleshoot issues: Monitoring CPU utilization can help administrators diagnose and troubleshoot network issues. Unusually high CPU usage can be a sign of a malware infection, an improper configuration, or a network attack. By analyzing CPU utilization patterns, administrators can pinpoint the root cause of the problem and take appropriate remedial actions.
- Ensure efficient resource allocation: Monitoring CPU utilization allows administrators to ensure that network resources are allocated optimally. By identifying devices or applications that consume excessive CPU resources, administrators can redistribute the workload and improve overall network performance.
- Plan for capacity upgrades: By monitoring CPU utilization trends, administrators can anticipate future resource requirements and plan for hardware upgrades or capacity expansions. This proactive approach helps prevent performance degradation and ensures a smooth network operation.
Best Practices for SNMP OID for CPU Utilization
To effectively utilize SNMP OIDs for CPU utilization, here are some best practices:
- Regular monitoring: Continuously monitoring CPU utilization allows administrators to catch anomalies and address them promptly.
- Set thresholds: Establishing CPU utilization thresholds helps administrators identify when the CPU usage exceeds acceptable limits. This triggers alerts or notifications, enabling proactive action.
- Collect historical data: Storing and analyzing historical CPU utilization data helps identify patterns, performance trends, and recurring issues.
- Integration with network monitoring systems: Integrate SNMP monitoring with a centralized network monitoring system to streamline management and facilitate alerting and reporting.
- Consider multiple devices: Ensure compatibility and support for SNMP across all network devices to have comprehensive visibility into the entire network infrastructure.
Exploring SNMP OIDs for CPU Utilization
In this section, we will delve deeper into different aspects of SNMP OIDs for CPU utilization.
OID Structure for CPU Utilization
The structure of the SNMP OID for CPU utilization may vary depending on the device and SNMP implementation. However, there are common OIDs that are widely used:
| OID | Description |
| 1.3.6.1.4.1.2021.11.9.0 | Average CPU utilization for the entire system |
| 1.3.6.1.4.1.9.9.109.1.1.1.1.5 | CPU utilization for Cisco devices |
| 1.3.6.1.4.1.2636.3.1.13.1.8 | CPU utilization for Juniper devices |
These OIDs provide specific information on CPU utilization for different devices. However, it is important to consult the device vendor’s documentation for accurate and device-specific OIDs.
Interpreting CPU Utilization Values
The CPU utilization value returned by the SNMP OID is typically represented as a percentage. This percentage reflects the amount of CPU capacity being utilized at a given moment.
For example, a value of 50% indicates that half of the CPU capacity is being used, while a value of 100% implies that the CPU is fully saturated.
It is important to consider the overall system architecture and the number of CPU cores when interpreting CPU utilization values. Higher utilization may be acceptable on systems with multiple cores, while it can indicate performance issues on single-core systems.
SNMP OID vs. SNMP Trap
While SNMP OIDs provide a way to query the CPU utilization of network devices, SNMP traps offer a different approach to event notification. SNMP traps are asynchronous notifications sent by network devices to an SNMP manager to inform it about specific events or conditions.
For example, when the CPU utilization exceeds a predefined threshold, a network device can generate an SNMP trap to notify the SNMP manager. The SNMP manager can then take appropriate actions based on the received trap, such as generating an alert or executing automated scripts.
Both SNMP OIDs and traps provide valuable information for network management. OIDs allow administrators to actively monitor and query the CPU utilization, while traps provide real-time notifications about important events or conditions.
Choosing Between SNMP OIDs and Traps
Deciding whether to use SNMP OIDs or SNMP traps for CPU utilization monitoring depends on the specific requirements and use cases. OIDs are useful for obtaining periodic CPU utilization data and performing trend analysis, while traps are more suitable for immediate event-based notifications.
It is common to employ a combination of SNMP OIDs and traps to gain comprehensive visibility into network performance and respond effectively to critical events. This allows for proactive management and ensures optimal utilization of network resources.
SNMP OID for CPU Utilization in Different Monitoring Tools
Various network monitoring tools and software support SNMP OIDs for CPU utilization monitoring. These tools provide an intuitive interface to query and analyze CPU utilization across network devices.
Some popular network monitoring tools that support SNMP OIDs for CPU utilization include:
- Nagios: A widely-used open-source monitoring tool that offers extensive SNMP support and allows monitoring of CPU utilization.
- Zabbix: A robust monitoring platform that provides flexible SNMP integration and enables real-time monitoring of CPU utilization.
- PRTG Network Monitor: A comprehensive monitoring solution that supports SNMP OID monitoring, including CPU utilization tracking.
- SolarWinds Network Performance Monitor: A feature-rich network monitoring tool that includes SNMP monitoring capabilities, including CPU utilization monitoring.
These tools simplify the process of querying SNMP OIDs and provide visual representations of CPU utilization trends, threshold alerts, and detailed reports.
Conclusion
The SNMP OID for CPU utilization is a crucial aspect of network management, enabling administrators to monitor, troubleshoot, and optimize network devices. Monitoring CPU utilization helps identify performance bottlenecks, troubleshoot issues, ensure efficient resource allocation, and plan for future capacity requirements. By understanding SNMP and OIDs, querying the SNMP OID for CPU utilization, and following best practices, network administrators can effectively utilize this valuable information to ensure smooth and efficient network operations.
Using SNMP OID for CPU Utilization
In network monitoring, SNMP (Simple Network Management Protocol) is a common protocol used to monitor and manage devices such as routers, switches, and servers. SNMP OIDs (Object Identifiers) are unique identifiers that represent specific data values in these devices. One common use case for SNMP OIDs is monitoring CPU utilization.
To monitor CPU utilization using SNMP, you need to identify the specific OID that represents this information on the target device. The SNMP OID for CPU utilization varies depending on the device and the SNMP MIB (Management Information Base) version being used.
For example, in devices using the SNMPv2 MIB, the OID 1.3.6.1.4.1.2021.11.10.0 represents the CPU utilization in percentage. In SNMPv3 devices, the specific OID may be different. It is essential to refer to the device’s documentation or consult the vendor to find the correct SNMP OID for CPU utilization.
Once you have identified the correct OID, you can use SNMP monitoring tools or software to query the device and retrieve the CPU utilization data. This information is valuable for monitoring performance, identifying bottlenecks, and ensuring optimal resource allocation in network devices.
Key Takeaways: Snmp Oid for CPU Utilization
- SNMP OIDs are numerical codes used to identify specific metrics or data points.
- The OID for CPU utilization is often represented as «1.3.6.1.4.1.2021.11.9.0».
- This OID provides information on the percentage of CPU being used at a given time.
- Monitoring CPU utilization with SNMP allows for proactive identification of performance issues.
- SNMP-based monitoring tools can alert administrators when CPU utilization exceeds certain thresholds.
Frequently Asked Questions
Here are some common questions related to SNMP OID for CPU utilization:
1. What is SNMP OID for CPU utilization?
SNMP OID for CPU utilization is a unique identifier used in Simple Network Management Protocol (SNMP) to monitor and measure the CPU usage of a network device or server. It provides valuable information about the CPU performance and enables network administrators to identify any potential bottlenecks or performance issues.
For example, the SNMP OID 1.3.6.1.4.1.2021.11.11.0 is commonly used to retrieve the CPU utilization value from a network device using SNMP queries.
2. How can I use SNMP OID for CPU utilization?
To utilize SNMP OID for CPU utilization, you need to have a network monitoring tool or SNMP manager that supports SNMP queries. You can use this tool to send queries to the network devices and retrieve the CPU utilization value using the specific SNMP OID.
Once you have obtained the CPU utilization value, you can analyze the data and take necessary actions to optimize the performance of the network devices, such as identifying processes or applications consuming high CPU resources and resolving any potential issues.
3. Are there different SNMP OIDs for CPU utilization?
Yes, there are different SNMP OIDs available for CPU utilization, depending on the specific hardware or operating systems used in the network devices. Some common SNMP OIDs include:
— 1.3.6.1.4.1.2021.11.9.0: This OID is used to retrieve the overall CPU idle percentage.
— 1.3.6.1.4.1.2021.11.10.0: This OID is used to retrieve the system CPU utilization percentage.
— 1.3.6.1.4.1.2021.11.50.0: This OID is used to retrieve the utilization percentage of a specific CPU core.
It’s important to consult the documentation of your specific network devices or operating systems to find the appropriate SNMP OID for CPU utilization.
4. Can SNMP OID for CPU utilization be used for historical analysis?
Yes, SNMP OID for CPU utilization can be used for historical analysis. Network monitoring tools can collect and store SNMP data over time, allowing you to analyze the historical CPU utilization trends of your network devices.
This historical data can help in identifying patterns, peak usage periods, and potential issues that may affect CPU performance. It can also assist in capacity planning and resource allocation to ensure optimal CPU utilization.
5. Are there any SNMP OID tools available for CPU utilization monitoring?
Yes, there are several SNMP OID tools available for CPU utilization monitoring. Some popular SNMP monitoring tools include:
— SolarWinds Network Performance Monitor
— Zabbix
— Nagios
— PRTG Network Monitor
These tools provide a user-friendly interface for monitoring and managing SNMP OIDs, including CPU utilization. They offer features like real-time monitoring, alerting, and historical data analysis, making it easier to optimize CPU performance in a network environment.
In summary, the SNMP OID for CPU Utilization is a valuable tool for monitoring and managing computer systems. By using SNMP to retrieve the CPU utilization OID, administrators can keep a close eye on the performance of their devices and take proactive measures to optimize resource usage.
With the SNMP OID for CPU utilization, administrators can monitor the CPU load in real-time, identify potential bottlenecks, and make informed decisions to improve system performance. This OID provides crucial information that helps optimize resource allocation, troubleshoot performance issues, and ensure the smooth operation of computer systems.
Or: Nothing Is Ever Easy.
We have a small farm of Citrix servers. They run a particular app for about 130 users. After a recent upgrade to the app, we are beginning to suspect that the new version of the app is putting more load on the CPUs. Alas, we have no historical data to refer to… but doesn’t it sound like the kind of thing that some Cacti graphs would be perfect for? For example, in this next graph of our network traffic, you can see a sudden jump in outbound network traffic at the end of March — that’s when the Bacula backup system became live:
So for spotting trends, and detecting changes, this kind of graph is invaluable.
Since we already have Cacti, why not poll the Citrix servers for CPU load, and graph that too… maybe also memory use… all sounds good, right? All you have to do is enable SNMP on the Windows host, figure out the OIDs of each CPU (each core counts as a CPU) and hey presto, graphs! As we’ll see, it’s not that easy.
OK, first step: enable SNMP on your Windows host — go to Start -> Control Panel -> Add/Remove Programs -> Windows Components -> Management and Monitoring Tools and make sure «Simple Network Management Protocol» is selected:
Next step: Go to Services, scroll down to SNMP Service, and right click, select «Properties»
Now click the Agent tab, and in the Service section, enable Physical:
Without Physical selected, the SNMP service will not report on physical hardware components such as the CPUs or memory. Strangely enough, it will report on physical hardware such as disks. I’m still scratching my head over that one.
OK, so now we should be able to get some info on the CPU load. The MIB that deals with this info is the HOST-RESOURCES-MIB and the interesting bits relating to CPU load are in the hrProcessor table. Let’s take a walk… an snmp-walk:
pyarra@iceberg:~$ snmpwalk -v1 -cpublic windows-server 1.3.6.1.2.1.25.3.3
HOST-RESOURCES-MIB::hrProcessorFrwID.12 = OID: SNMPv2-SMI::zeroDotZero
HOST-RESOURCES-MIB::hrProcessorFrwID.13 = OID: SNMPv2-SMI::zeroDotZero
HOST-RESOURCES-MIB::hrProcessorFrwID.14 = OID: SNMPv2-SMI::zeroDotZero
HOST-RESOURCES-MIB::hrProcessorFrwID.15 = OID: SNMPv2-SMI::zeroDotZero
HOST-RESOURCES-MIB::hrProcessorLoad.12 = INTEGER: 30
HOST-RESOURCES-MIB::hrProcessorLoad.13 = INTEGER: 15
HOST-RESOURCES-MIB::hrProcessorLoad.14 = INTEGER: 20
HOST-RESOURCES-MIB::hrProcessorLoad.15 = INTEGER: 35
Cool! We’re all done, right? Well… no. You see, as the Net-snmp doco makes clear, the indexes into this table (12,13,14,15 in this example) are the device IDs of the CPUs. As such, this table is sparse — there won’t be entries for other device IDs. That’s okay, so long as we know the OIDs we want, no dramas. Sort of… except that when you look at how Windows enumerates those device IDs, you’ll find that printers get enumerated before CPUs:
pyarra@iceberg:~$ snmpwalk -v1 -cpublic em-fap HOST-RESOURCES-MIB::hrDeviceDescr
HOST-RESOURCES-MIB::hrDeviceDescr.1 = STRING: Microsoft XPS Document Writer
HOST-RESOURCES-MIB::hrDeviceDescr.2 = STRING: Xerox Phaser 8560DT
HOST-RESOURCES-MIB::hrDeviceDescr.3 = STRING: FX DocuPrint C2100 PCL 6
HOST-RESOURCES-MIB::hrDeviceDescr.4 = STRING: HP Universal Printing PCL 6
HOST-RESOURCES-MIB::hrDeviceDescr.5 = STRING: HP Universal Printing PCL 6
HOST-RESOURCES-MIB::hrDeviceDescr.6 = STRING: Dell Laser Printer 1720dn
HOST-RESOURCES-MIB::hrDeviceDescr.7 = STRING: FX DocuPrint C2100 PCL 6
HOST-RESOURCES-MIB::hrDeviceDescr.8 = STRING: HP LaserJet 4
HOST-RESOURCES-MIB::hrDeviceDescr.9 = STRING: HP Universal Printing PCL 6
HOST-RESOURCES-MIB::hrDeviceDescr.10 = STRING: HP Universal Printing PCL 6
HOST-RESOURCES-MIB::hrDeviceDescr.11 = STRING: HP Universal Printing PCL 6
HOST-RESOURCES-MIB::hrDeviceDescr.12 = STRING: Intel
HOST-RESOURCES-MIB::hrDeviceDescr.13 = STRING: Intel
HOST-RESOURCES-MIB::hrDeviceDescr.14 = STRING: Intel
HOST-RESOURCES-MIB::hrDeviceDescr.15 = STRING: Intel
On reboot, if you have added a printer… yes, the device IDs get re-enumerated, and suddenly your CPU device IDs get changed. Some brave souls have attempted to find ways to deal with this. Me, I dunno if it’s worth it.
For the record, Linux doesn’t re-number the CPU OIDs on a reboot, at least, not when I added a network interface. It seems like the CPU OIDs start at 768 regardless of what else there is… I really am curious about why they start there. I’m sure it’s some sort of fixed offset to avoid OID renumbering issues, but why 768? I would have expected a power of 2. Maybe I think too much like a programmer.
Anyhow, back to WIndows: I also have my doubts about how useful the moment-to-moment CPU load will be, since sampling it at one- or five-minute intervals doesn’t give us a great overall picture of CPU load. What we really need is something more like the Unix load average figures. And lo and behold, UCD MIBs implement this in the laTable in a range of helpful ways:
pyarra@verbena:~$ snmpwalk -v1 -cpublic localhost .1.3.6.1.4.1.2021.10
UCD-SNMP-MIB::laIndex.1 = INTEGER: 1
UCD-SNMP-MIB::laIndex.2 = INTEGER: 2
UCD-SNMP-MIB::laIndex.3 = INTEGER: 3
UCD-SNMP-MIB::laNames.1 = STRING: Load-1
UCD-SNMP-MIB::laNames.2 = STRING: Load-5
UCD-SNMP-MIB::laNames.3 = STRING: Load-15
UCD-SNMP-MIB::laLoad.1 = STRING: 1.19
UCD-SNMP-MIB::laLoad.2 = STRING: 1.12
UCD-SNMP-MIB::laLoad.3 = STRING: 0.94
UCD-SNMP-MIB::laConfig.1 = STRING: 12.00
UCD-SNMP-MIB::laConfig.2 = STRING: 14.00
UCD-SNMP-MIB::laConfig.3 = STRING: 14.00
UCD-SNMP-MIB::laLoadInt.1 = INTEGER: 118
UCD-SNMP-MIB::laLoadInt.2 = INTEGER: 112
UCD-SNMP-MIB::laLoadInt.3 = INTEGER: 93
UCD-SNMP-MIB::laLoadFloat.1 = Opaque: Float: 1.190000
UCD-SNMP-MIB::laLoadFloat.2 = Opaque: Float: 1.120000
UCD-SNMP-MIB::laLoadFloat.3 = Opaque: Float: 0.940000
UCD-SNMP-MIB::laErrorFlag.1 = INTEGER: noError(0)
UCD-SNMP-MIB::laErrorFlag.2 = INTEGER: noError(0)
UCD-SNMP-MIB::laErrorFlag.3 = INTEGER: noError(0)
UCD-SNMP-MIB::laErrMessage.1 = STRING:
UCD-SNMP-MIB::laErrMessage.2 = STRING:
UCD-SNMP-MIB::laErrMessage.3 = STRING:
So now, I’m beginning to think that net-snmp on Windows might be the way to go. Time to create some VM images and start experimenting!
Часть 1 – установка.
Часть 2 – общие настройки.
Часть 4 – Обновление ROS, создание бэкапа.
SNMP.
Протокол SNMP предназначен для мониторинга различных устройств в IP-сетях и позволяет получать с них дистанционно требуемые параметры. wiki
Версии SNMP можно поделить на 2 варианта:
v1 и v2c – не безопасные версии, которые передают данные между агентом и менеджером (системой управления сетью NMS) в открытом не зашифрованном виде, создавая угрозу информационной безопасности. Используется условный логин (комьюнити) и IP-адрес с которого разрешено подключение. Паролей нет. Эти версии можно ограниченно использовать внутри защищенной сети. На клиенте указывается комьюнити (по дефолтной настройке «public») и IP-адрес устройства, с которого разрешено подключение. При совпадении комьюнити и IP-адреса клиент начинает передавать данные менеджеру (системе управления или мониторинга сети).
v3 – применяет шифрование передаваемых данных и аутентификацию пользователя (логин-пароль), ее можно использовать между сетями и в Интернете.
Освоить MikroTik Вы можете с помощью онлайн-куса
«Настройка оборудования MikroTik». Курс содержит все темы, которые изучаются на официальном курсе MTCNA. Автор курса – официальный тренер MikroTik. Подходит и тем, кто уже давно работает с микротиками, и тем, кто еще их не держал в руках. В курс входит 162 видеоурока, 45 лабораторных работ, вопросы для самопроверки и конспект.
Чаще всего мониторят такие параметры: имя устройства, модель, загрузка процессора, использование ОЗУ, использование диска, нагрузка на WAN (для роутеров), температура, напряжение питания, время работы системы. Для определенных устройств могут быть какие-то их специфические параметры, например расход тонера в сетевом принтере.
Система сетевого мониторинга The Dude поддерживает все версии SNMP.
Если используется v1, v2, то необходимо заменить название комьюнити «public» на что-то другое. Использовать эти версии в защищенных сетях или отдельных VLAN.
Создадим новое комьюнити, заменим его название и установим по умолчанию (default).
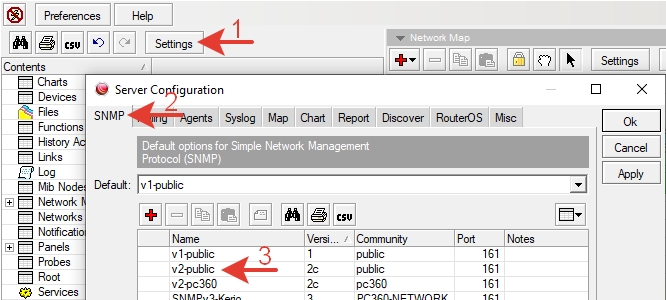
Выбираем v2-public. Нажимаем кнопку Copy.
Переименовываем копию профиля, заменяем в нем название комьюнити.
Выставляем в значении default созданный только что профиль.
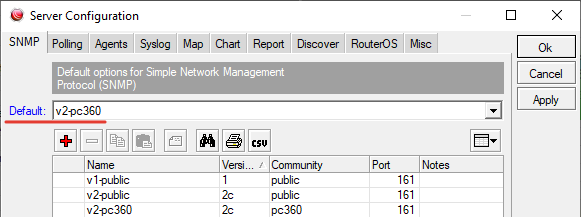
Теперь в любом устройстве на карте в настройке по умолчанию будет профиль с измененным именем комьюнити и версией протокола v2c.
Если у кого-то пока нет опыта работы с SNMP, то сперва нужно потренироваться с комьюнити «public». Это имя используется в большинстве сетевых устройств по умолчанию. И в большинстве случаев SNMP v1 и v2 сразу работают без дополнительных настроек.
Для v3 нужно создать профиль и указать учетные данные. Выполним это.
Переходим в меню Settings >> SNMP. Добавляем новый профиль, нажав +.
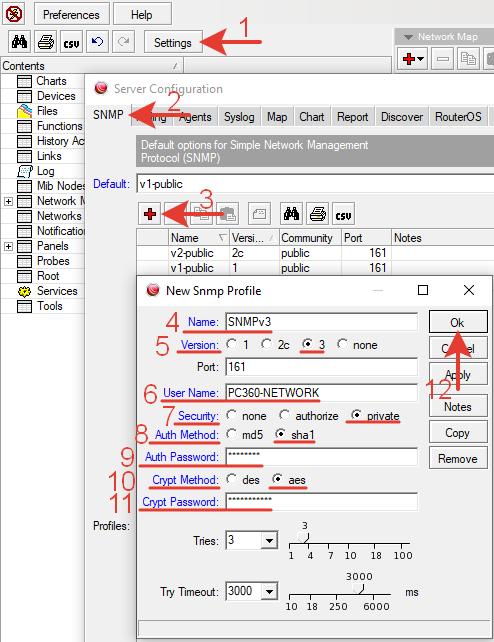
Name: SNMPv3 – Любое понятное имя профиля.
Version: 3 – версия протокола.
Port: 161 без изменений.
User Name: PC360-NETWORK – Имя пользователя, которое в предыдущих версиях SNMP было комьюнити (Community).
В SNMPv3 нельзя использовать дефолтное значение «public» по причинам информационной безопасности.
При создании имя рекомендуется использовать только строчные буквы и цифры. Многие устройства при настройке имя SNMPv3 не поддерживают спец-символы. В данном случае имя содержит большие буквы и тире для наглядности.
Security: private – тип безопасности.
Auth Method: sha1 – способ аутентификации.
Auth Password: Pass-123 – сложный пароль из латинских букв разного регистра, цифр и спец-символов, не менее 8 знаков.
Crypt Method: aes – метод шифрования.
Crypt Password: 321-Pass – сложный пароль.
Количество попыток запроса Tries и время таймаут после каждой попытки Try Timeout изменяются индивидуально и по ситуации.
Нажимаем кнопку ОК для сохранения настроек.
Желательно сразу создать второй профиль методом копирования с другим методом шифрования. В настройках некоторых сетевых устройств не всегда есть возможность сменить шифрование DES на AES.
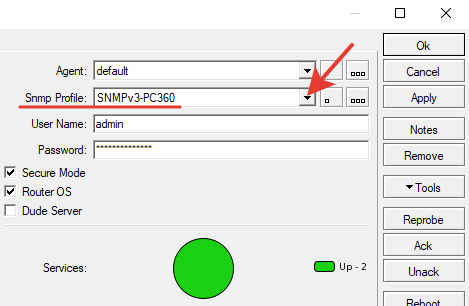
Чтоб профиль начал работать его необходимо выбрать в настройке устройства Settings.
Далее представлена активация и использованию SNMP в различных сетевых устройствах, которые были в ближайшем доступе.
SNMP в RouterOS.
Настройка на примере одного из сетевых роутеров. Подключаемся через WinBox.
Переходим в IP >> SNMP >> Communities и создаем новое комьюнити нажав +
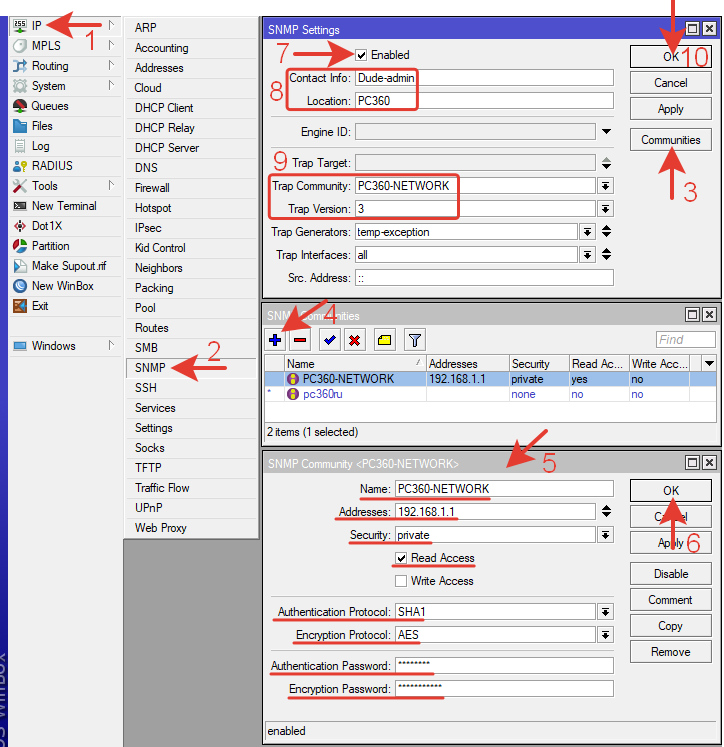
В открывшемся окне вводим параметры.
Name: PC360-NETWORK – имя такое же, как указывали в настройках SNMPv3 в сервере Dude.
Adressess: 192.168.1.1 – адрес сервера The Dude. С этого адреса разрешается подключение к роутеру по SNMP.
Security: private – тип безопасности.
Read Access – только чтение.
Authentication Protocol: SHA1 – способ аутентификации.
Encryption Protocol: AES — протокол шифрования
Authentication Password: Pass-123 – сложный пароль такой же как в профиле The Dude.
Encryption Password: 321-Pass – сложный пароль такой же как в профиле The Dude.
Нажимаем ОК для сохранения.
Переходим в верхнее окно с настройками.
Enabled – отмечаем галочкой активацию SNMP.
Contact Info – вводим контактную информацию.
Location – место расположения.
Trap Community – указываем созданную только что комьюнити.
Trap Version: 3 – версия SNMP.
Нажимаем ОК для сохранения.
Отключаем существующее комьюнити public в целях информационной безопасности. Для этого меняем имя комьюнити public на что-нибудь любое другое, например pc360ru. Отключаем доступ на чтение и запись.
Те же настройки через терминал.
|
/snmp community set [ find default=yes ] name=pc360ru read—access=no add addresses=192.168.1.1/32 authentication—password=Pass—123 authentication—protocol=SHA1 encryption—password321—Pass encryption—protocol=AES name=PC360—NETWORK security=private /snmp set contact=Dude—admin enabled=yes location=PC360 trap—community=PC360—NETWORK trap—interfaces=all trap—version=3 |
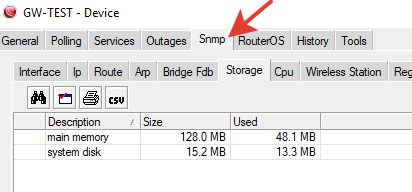
Переходим в The Dude. Проверяем роутер (или добавляем на схему). В его настройках должен быть указан профиль SNMPv3.

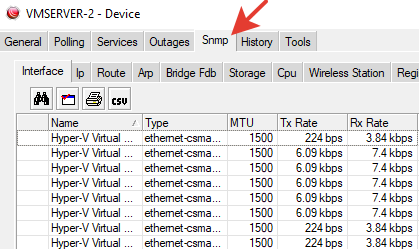
Если все сделано правильно, то информация по SNMP уже передается. На значке роутера появится строка с отображением производительности.
На вкладке SNMP появятся некоторые параметры.
Если роутер находится где-то вне сети или работает через VPN, то в его firewall нужно открыть доступ по порту 161 для IP-адреса сервера The Dude или интерфейса VPN.
|
/ip firewall filter add action=accept chain=input comment=«SNMP ACCEPT» dst—port=161 in—interface=VPN—TO—MAIN—OFFICE protocol=udp |
MIB и OID: мониторинг и вывод желаемых параметров на этикетку устройства.
MIB – Management Information Base (база управляющей информации) – виртуальная база данных, используемая для управления объектами в сети передачи данных. wiki
Простыми словами это файл, в котором хранятся записи обо всех объектах конкретного устройства. Под объектом подразумевается параметр, состояние или настройка в устройстве.
OID – Object identifier (идентификатор объекта) – уникальный цифровой идентификатор для объектов в иерархическом дереве MIB.
Кроме этих двух определений в протоколе SNMP еще используется понятие Object Name – уникальное имя объекта, соответствующее определенному OID.
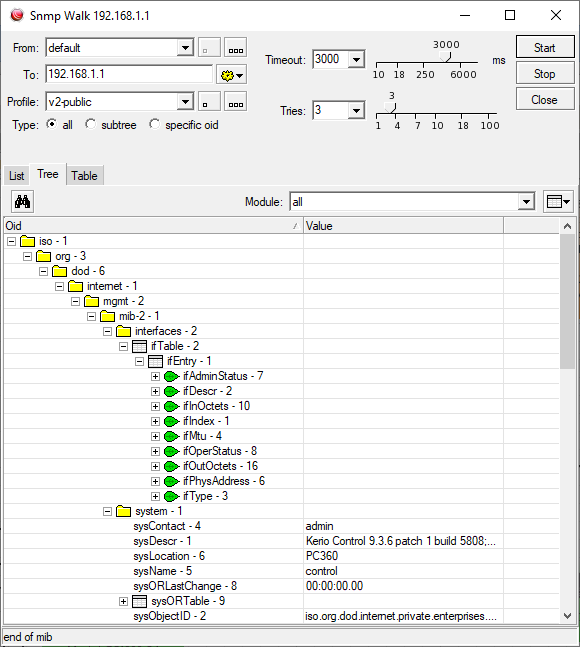
Проще один раз увидеть, чтоб понять. Для просмотра использован MIB-браузер iReasoning.
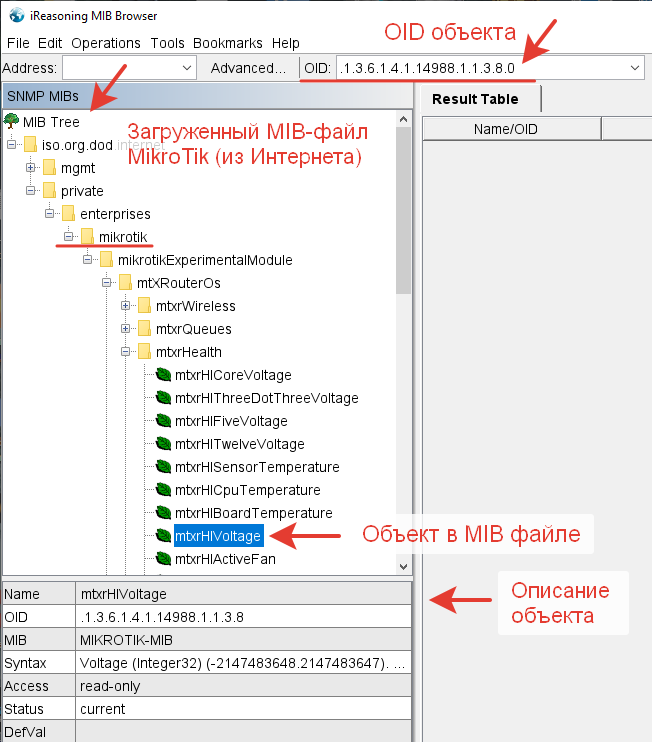
В Dude тоже можно посмотреть MIB, но нельзя выбрать OID.
OID в Dude можно составить самому по следующему принципу (но это долго). Открываем нужный MIB в отображении дерева и справа от каждой ветки папок видим номер.
Переписываем номера от каждой нужной ветки до искомого объекта.
iso-1, org-3 и тд, mgmt – эта ветка не подходит, ее номер не пишем, и тд.
1.3.6.1.4.1 …
В результате получаем значение OID объекта для напряжения питания. 1.3.6.1.4.1.14988.1.1.3.8 Есть другие способы получения OID.
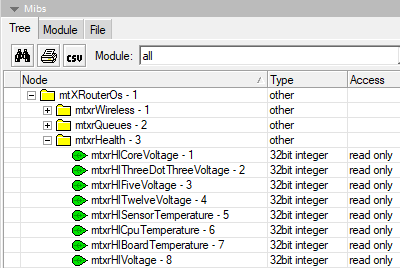
Допустим мы, хотим отслеживать все параметры Health у роутера. В роутере должны быть соответствующие датчики. Можно посмотреть их наличие в меню WinBox System >> Health или по модели на сайте производителя.
Как видно отображаются температура и напряжение питания. Нам необходимо узнать OID этих объектов и затем добавить их в этикетку роутера на карте.
В терминале роутера вводим команду:
В ответ будут выведены нужные значения.
voltage: .1.3.6.1.4.1.14988.1.1.3.8.0
temperature: .1.3.6.1.4.1.14988.1.1.3.10.0
Другие полезные запросы:
system resource cpu print oid – загрузка процессора в процентах
system resource print oid – различные системные ресурсы (время работы, память и тп)
Еще один альтернативный более долгий способ, но так же более универсальный для нахождения других OID.
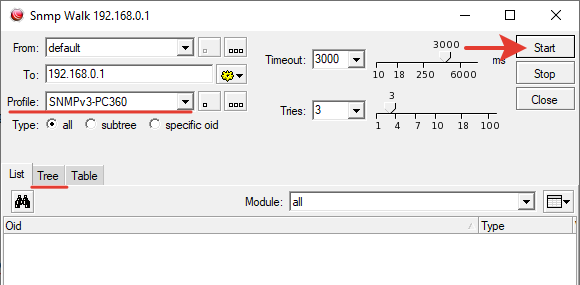
Переходим в The Dude. Нажимаем правой кнопкой мыши на выбранном роутере. Выбираем Tools >> Snmpwalk.
Выбираем нужный профиль SNMP. Можно сменить просмотр на Tree (дерево). Нажимаем кнопку Start.
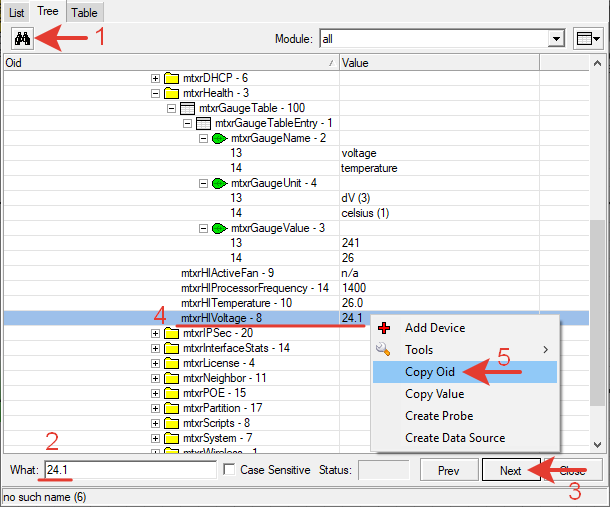
В результате сканирования появится большое количество доступных OID.
Нажимаем Ctrl+F или кнопку «Бинокль» и находим нужный OID по известному параметру, который посмотрели ранее в WinBox этого роутера. Если это температура – ищем значение 27. Если это напряжение – ищем значение 24.1.
В описании найденного OID присутствует слово Voltage. Это то, что нужно. Копируем OID правой кнопкой мыши.
Вставляем OID в этикетку, дополнив нужным синтаксисом.
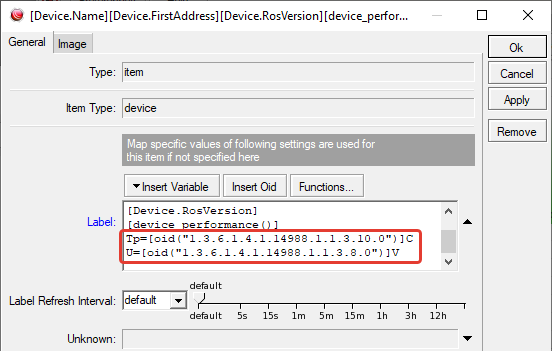
Tp=[oid(«1.3.6.1.4.1.14988.1.1.3.10.0»)]C
U=[oid(«1.3.6.1.4.1.14988.1.1.3.8.0»)]V
В результате этих действий на этикетке роутера будет отображаться динамическое значение температуры и напряжения питания.
Аналогичным методом находятся другие необходимые OID для мониторинга. Однако такой метод не всегда может найти значение (Value) или имя OID, потому что эти параметры могут отображаться по-другому.
Функции.
Небольшой пример как можно использовать функции. Допустим нам нужно узнать свободную память в роутере в процентах, чтоб быстро оценить его состояние.
Найти такой OID не получилось. Но есть другие OID.
[oid(«1.3.6.1.2.1.25.2.3.1.5.65536»)] Всего памяти.
[oid(«1.3.6.1.2.1.25.2.3.1.6.65536»)] Использовано памяти.
Чтоб узнать свободную память нужно найти процент числа от общего количества.
Всего памяти – X.
Использовано памяти – Y.
Свободно памяти – Z.
Найдем свободную память.
Z =X – Y
Процент свободной памяти от общего количества.
Z%=100% / (X/Z)
Теперь все то же самое, только с использованием OID.
100/(oid(«1.3.6.1.2.1.25.2.3.1.5.65536»)/(oid(«1.3.6.1.2.1.25.2.3.1.5.65536»)-oid(«1.3.6.1.2.1.25.2.3.1.6.65536»)))
Далее нужно создать новую функцию и разместить это выражение в ней.
В имени функции не должно быть пробелов.
В результате цифра на этикетке получилась без округления, что выглядит не очень приемлемо. Поэтому к выражению нужно применить синтаксическую функцию округления round(x).
Итоговое выражение.
round(100/(oid(«1.3.6.1.2.1.25.2.3.1.5.65536»)/(oid(«1.3.6.1.2.1.25.2.3.1.5.65536»)-oid(«1.3.6.1.2.1.25.2.3.1.6.65536»))))
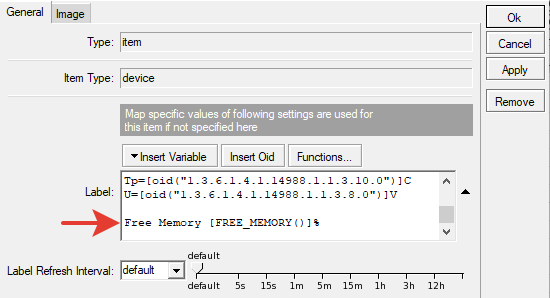
Выносим функцию на этикетку и подписываем ее для понятности.
Free Memory [FREE_MEMORY()]%
Результат.
В реальности, для понимания администратора проще видеть не процент свободной памяти, а процент использованной.
Поэтому 100% / (X/Y).
round(100/(oid(«1.3.6.1.2.1.25.2.3.1.5.65536»)/(oid(«1.3.6.1.2.1.25.2.3.1.6.65536»))))
Used Memory [USED_MEMORY ()]%
Кому как удобно.
Это просто пример, используя который можно выводить какие-то другие необходимые значения.
SNMP в ПК с Windows.
Изначально в ранние версии Windows была добавлена поддержка SNMP v1 и v2c, но затем поддержка прекратилась для предотвращения утечек информации с незашифрованными данными. При этом во всех ОС до Windows 10 SNMP v1 и v2c еще можно активировать. SNMPv3 отсутствует в Windows. Его можно использовать только, если установить стороннее ПО или агента, например NET-SNMP.
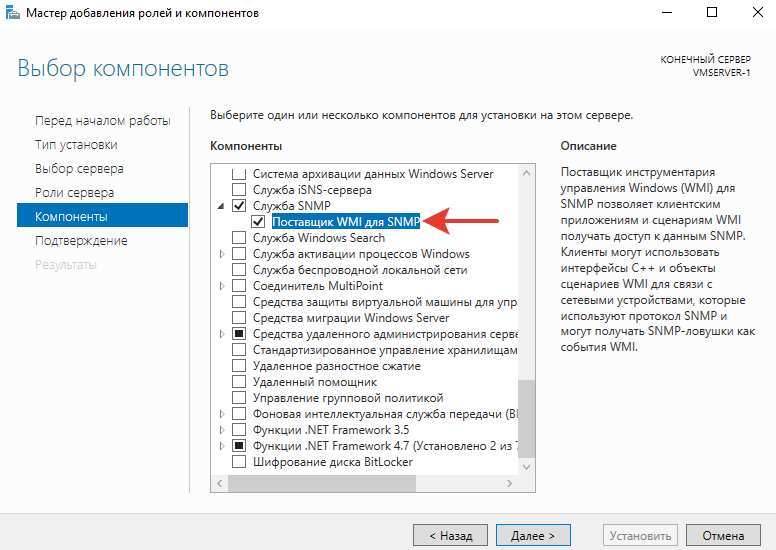
Для активации службы SNMP v1 и v2 первоначально нужно добавить соответствующую роль.
В серверных Windows это делается через мастер добавления ролей и компонентов.
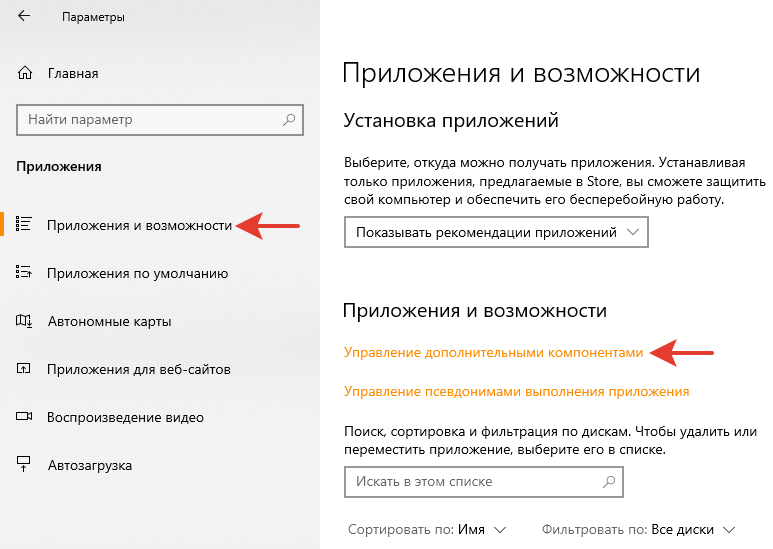
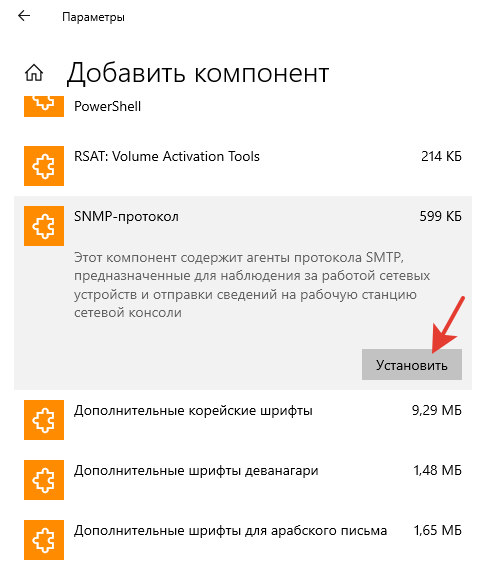
Для Windows 10 добавление этой службы перенесли в параметры конфигурации.
Далее, через панель управления переходим в службы и находим службу SNMP.
Выполняем ее настройку.
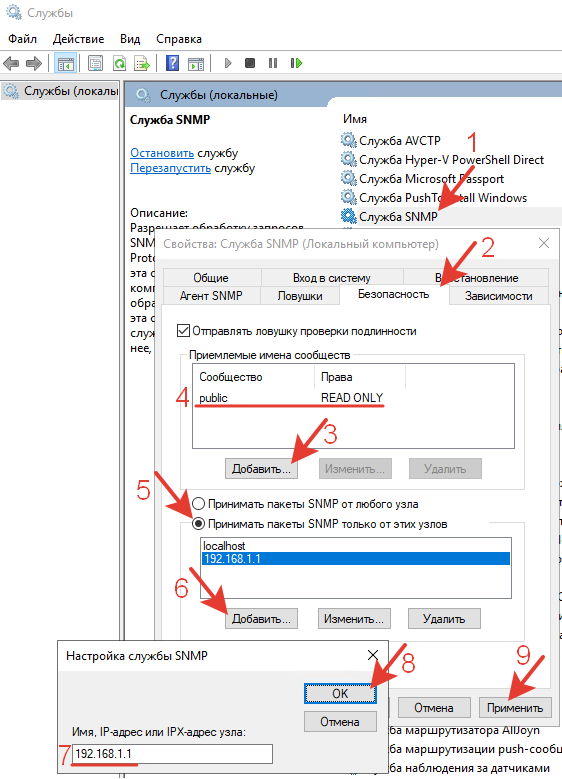
Добавляем сообщество (комьюнити) «public». Если в настройках профиля SNMP в Dude изменялось имя комьюнити, то нужно указать его.
Разрешаем прием пакетов SNMP только с одного конкретного IP-адреса сервера Dude.
Сохраняем настройку.
Этот ПК (сервер) предварительно добавлен в Dude, настройки его SNMP-профиля не изменялись.
Через некоторое время на этикетке сервера появится строка с параметрами производительности. Это свидетельствует о работе SNMP.
На вкладке SNMP этого устройства появились различные параметры.
Можно запустить Snmpwalk на устройстве.
Добавление желаемых OID для мониторинга аналогично описанному выше для RouterOS.
Например, нужно вывести на этикетку время непрерывной работы сервера.
Смотрим в диспетчере задач сервера эту информацию: 78дней.
Запускаем Snmpwalk.
Через поиск находим значение 78. Проверяем имя.
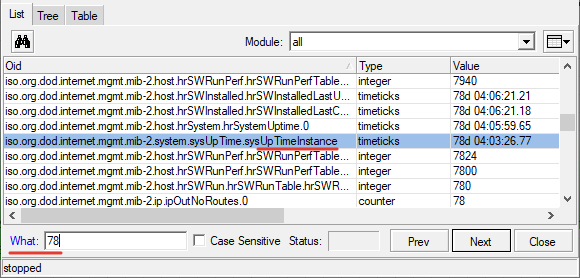
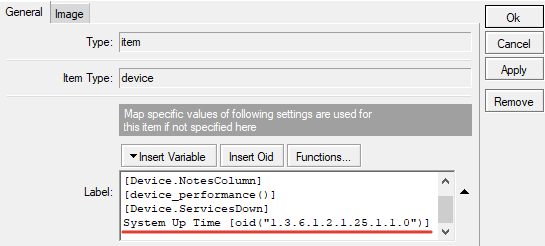
Копируем OID в этикетку. Дописываем пояснение.
System Up Time [oid(«1.3.6.1.2.1.25.1.1.0»)]
Результат.
По работе с агентом SNMPv3 информация будет добавлена позже.
SNMP в ПК с Linux.
Настройка выполнялась на ПК с UBUNTU20.
Запускаем терминал Ctrl+Alt+T
Входим с правами админа.
пароль
Обновляем ПО.
Установим SNMP демон.
Демон – компьютерная программа в UNIX-подобных системах, запускаемая самой системой и работающая в фоновом режиме без прямого взаимодействия с пользователем.
SNMP v1, v2.
Разрешим подключения SNMP к этому компьютеру с IP-адреса сервера The Dude.
Отредактируем файл конфигурации snmpd редактором nano.
|
nano /etc/snmp/snmpd.conf |
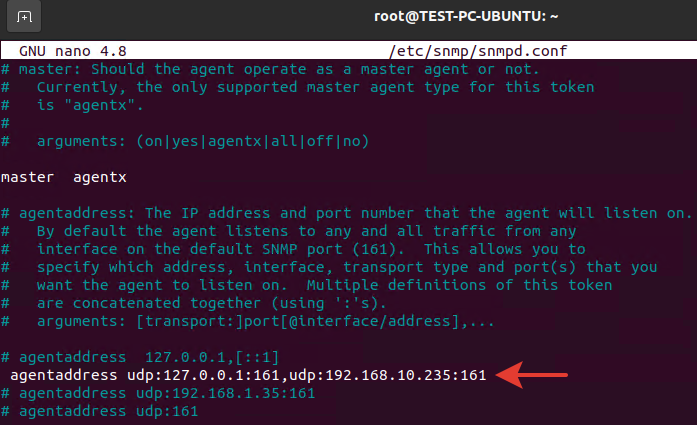
Закоментируем строку
|
# agentaddress 127.0.0.1,[::1] |
Создадим новую строку, разрешающую подключение с локальных интерфейсов и с внешнего интерфейса.
|
agentaddress udp:127.0.0.1:161,udp:192.168.10.235:161 |
(внешний интерфейс подразумевает интерфейс этого компьютера с его IP-адресом)
Далее нужно исправить комьюнити (community).
Синтаксис.
rocommunity (read-only) – разрешение только на чтение.
rwcommunity (read-write) – разрешение на запись.
public – название комьюнити.
IP-адрес с которого разрешено подключение.
Разрешим для комьюнити public доступ только на чтение с IP-адреса сервера Dude.
|
rocommunity public 192.168.1.1 |
Ctrl+O сохранить по тому же пути
Enter (Ввод)
Ctrl+X выйти
Перезапускаем snmpd
Проверяем статус snmpd
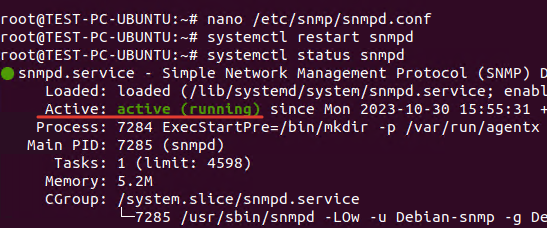
Устанавливаем автозапуск после перезагрузки ПК.
Проверяем прослушиваемые порты

Если нет команды netstat то ее нужно установить
Блокировку SNMP может производить firewall. Проверяем его статус.
(Status: inactive)
Если firewall работает то его нужно настроить для разрешения входящих подключений от Dude.
|
ufw allow from 192.168.1.1 to any port 161 comment «Allow SNMP» |
UFW – это оболочка с упрощенной настройкой для линуксового файервола iptables. Если используется iptables напрямую, то нужно выполнить следующие настройки.
|
iptables —A INPUT —s 192.168.1.1 —p udp —dport 161 —j ACCEPT —m comment —comment «Allow SNMP» |
Этой строкой мы разрешаем входящий трафик для порта UDP 161 с IP-адреса сервера The Dude.
Удаление правила по номеру в списке.
Выводим список с номерами.
|
iptables —L —line—numbers |
Удаляем нужный номер правила в нужной цепочке.
Переходим в The Dude. На тестовом ПК появилась его производительность.
В этикетку добавлен пробный OID, выводящий имя компьютера.
[oid(«1.3.6.1.2.1.1.5.0»)] PC name’s OID
Данные по SNMP передаются успешно.
SNMPv3
В этой версии отсутствует понятие комьюнити. Создаем пользователя и пароль, и так же пароль для шифрования передающихся данных. Синтаксис такой:
net-snmp-create-v3-user [-ro] [-A authpass] [-a MD5|SHA] [-X privpass][-x DES|AES] [username]
[-ro] — разрешение только на чтение;
[-A authpass] — пароль аутентификации (Authentication Password);
[-a MD5|SHA] — алгоритм аутентификации (выбрать MD5 или SHA);
[-X privpass] — пароль шифрования (Encryption Password);
[-x DES|AES] — алгоритм шифрования (выбрать DES или AES];
[username] — имя пользователя.
Действия выполнялись на другом сервере.
Поэтому заново заходим в терминал с правами root.
пароль
Обновляем ПО.
Установим SNMP демон.
Устанавливаем доп. библиотеку (нужна при создании пользователя).
Проверяем статус snmpd.
Останавливаем snmpd.
Создаем пользователя, пароли, задаем алгоритмы шифрования.
|
net—snmp—create—v3—user —ro —A Pass—123 —a SHA —X 123—Pass —x AES PC360—NETWORK |

Имя пользователя и пароли должны быть аналогичны настройке профиля SNMPv3 в The Dude.
*Для удаления или редактирования пользователя нужно остановить snmpd и с помощью редактора исправить или удалить данные usmUser и rouser в файлах по путям:
|
nano /var/lib/snmp/snmpd.conf nano /usr/share/snmp/snmpd.conf |
Запускаем snmpd
Отредактируем файл конфигурации snmpd с помощью редактора nano.
|
nano /etc/snmp/snmpd.conf |
Закоментируем строку.
|
# agentaddress 127.0.0.1,[::1] |
Создадим новую строку, разрешающую подключение с локальных и с внешнего интерфейсов.
|
agentaddress udp:127.0.0.1:161,udp:192.168.1.15:161 |

Отключим комьюнити public, закомментировав строки.

Ctrl+O сохранить по тому же пути.
Enter (Ввод).
Ctrl+X выйти.
Перезапускаем snmpd.
Проверяем статус snmpd.
Устанавливаем автозапуск после перезагрузки ПК.
Проверяем прослушиваемые порты.

Проверяем статус файрволов ufw и iptables. В данном случае они не мешают доступу.
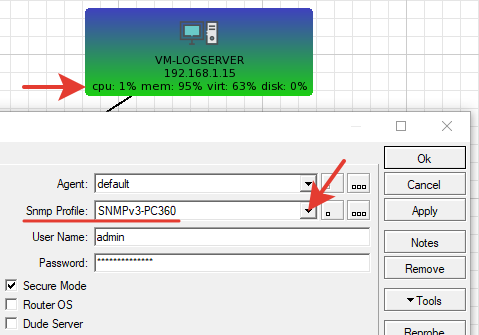
Переходим в The Dude. В настройках нужного компьютера выставляем созданный ранее профиль SNMPv3. Через пару минут на этикетке появилась информация о производительности.
Пример добавления OID аналогичен вышеописанным в RouterOS и Windows.
Запускаем Snmpwalk.
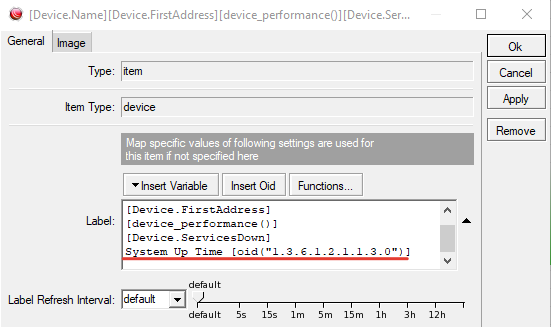
Выведем на этикетку, например, время работы системы. Находим OID по тэгу uptime.

Копируем его в этикетку.
System Up Time [oid(«1.3.6.1.2.1.1.3.0»)]
*c момента подключения SNMP
Результат.
Можно поискать другие полезные OID в Интернете.
SNMP в коммутаторах Zyxel GS1900-24 и 48.
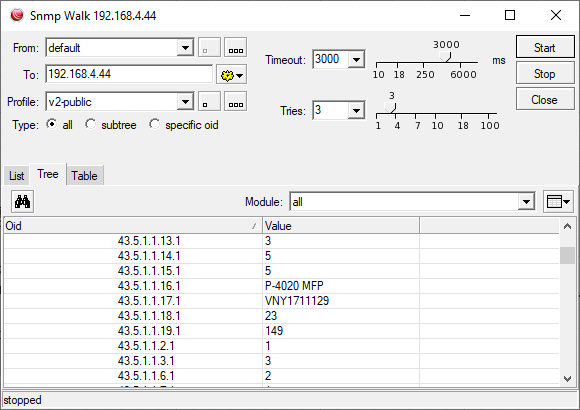
Изначально, по заводским настройкам SNMP v1 и v2c уже активирован с комьюнити public и работает после включения коммутатора. Убедиться в этом можно, если добавить коммутатор на схему The Dude и запустить Snmpwalk. Коммутатор выдаст большое количество разных объектов.
Выведем для теста пару OID на этикетку.
Up Time [oid(«1.3.6.1.2.1.1.3.0»)]
Model [oid(«1.3.6.1.2.1.47.1.1.1.1.13.67108992»)]
По сути дела это дыра в безопасности. Мало кто из администраторов специально подключается в новый купленный коммутатор и закрывает SNMP v1, и V2. Хотя в коммутаторе каждый раз появляется такое предупреждение при логине в него.
Настройка SNMPv3.
Создаем группу.

Добавляем пользователя.
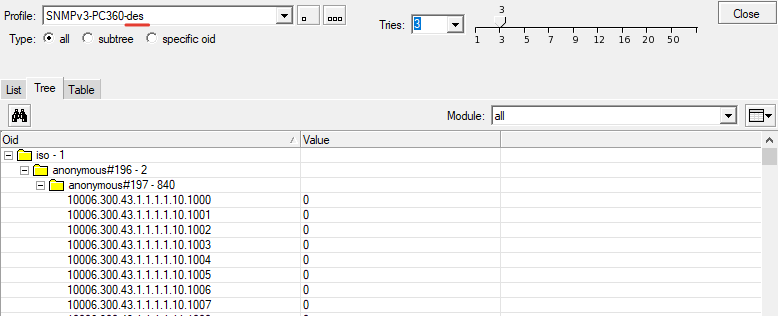
По результатам работы с GS1900, стало понятно, что в этих коммутаторах нельзя переключить шифрование des aes без командной строки. Настройка через командную строку в этих моделях не поддерживается. Работают команды только для просмотра. Поэтому создан профиль SNMPv3-des для проверки работы. В нем метод шифрования (Crypt Method) указан des.
Проверяем Snmpwalk – работает.
SNMP в коммутаторе Zyxel GS1920-48.
Подключаемся к коммутатору через web-браузер.
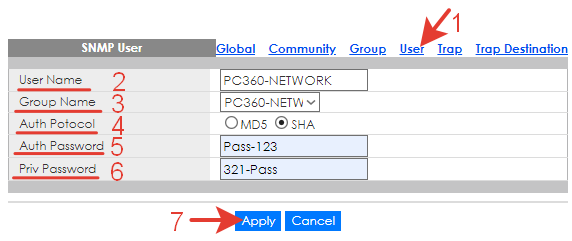
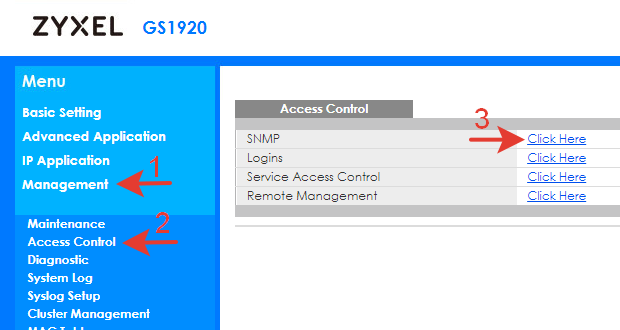
Переходим к настройке SNMP в главном меню коммутатора Management >> Access Control >> SNMP

Вводим учетные данные такие же, как в настройке для SNMPv3 в Dude.

Username: PC360-NETWORK – имя пользователя (имя сообщества).
Security Level: private – тип безопасности.
Authentication: SHA – способ аутентификации.
Password: Pass-123 – пароль аутентификации.
Privacy: AES – приватность (шифрование)
Password: пароль шифрования.
Group: readonly – группа только для чтения.
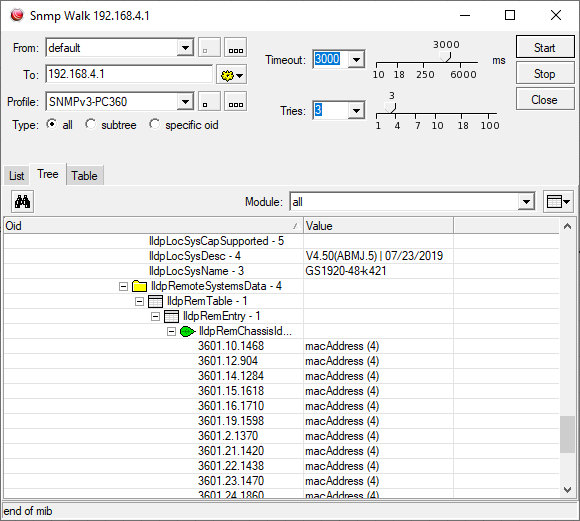
Проверяем Snmpwalk. Данные начинают поступать.
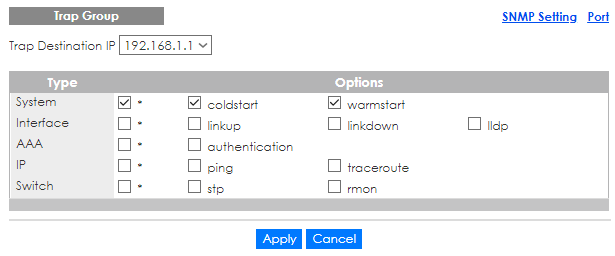
Есть еще дополнительная настройка на вкладке «Контроль доступа». Тут настраиваются «ловушки» (trap).
Trap – это определенное событие которое может произойти в устройстве. На него нет запроса, коммутатор сам его отправляет. Так же нет подтверждения от менеджера (сервера мониторинга) о доставке.
Настройки должны выглядеть примерно так.
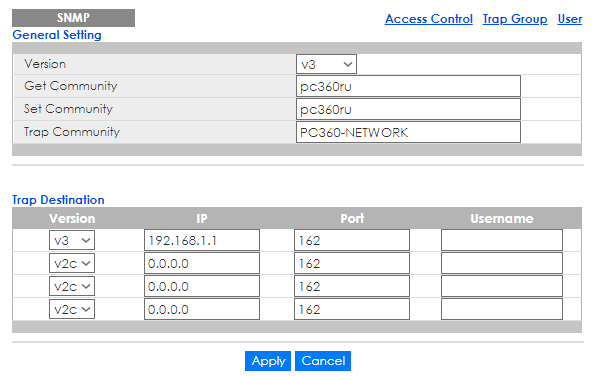
Trap Community используется, у остальных заменены названия чтоб отключить их.
Trap Destination: v3 192.168.1.1 (IP-адрес сервера Dude) – место назначения для отправляемых «ловушек».
После этого на вкладке Group отметить галочками события, о которых мы хотим получать сообщения.
SNMP в Kerio Control.
Настройка очень урезана.
Для версии 3 нельзя выбрать шифрование и пароль (через web-интерфейс). Получить данные через SNMPv3 не удалось.

Для версии 2c название комьюнити должно состоять только из букв и цифр.
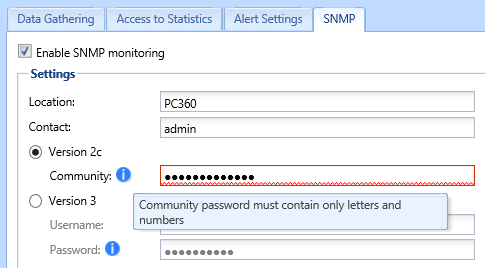
SNMPv2 работает, выполняется Snmpwalk.
SNMP в NAS QNAP D2 D4.
Через панель управления попадаем в настройку SNMP. Активируем службу SNMP. Выбираем версию SNMPv3. Настройки такие же как в сервере.
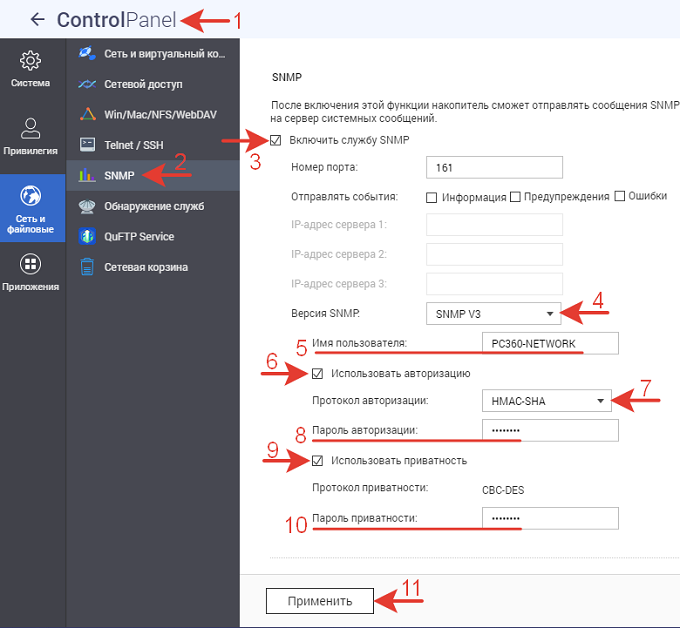
Применяем настройку. Переходим в сервер мониторинга.
В настройках объекта сетевого хранилища выбираем профиль SNMPv3 с шифрованием DES.
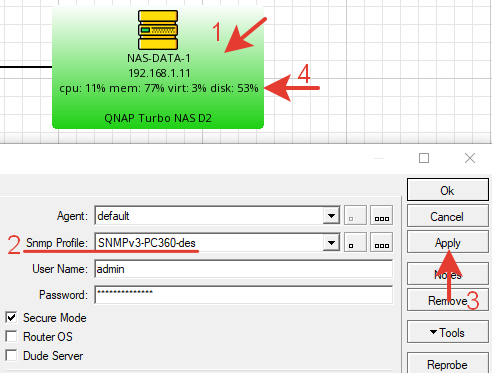
Через некоторое время на этикетки отобразились параметры производительности. Добавляем свои дополнительные параметры через OID по необходимости.
SNMP в QSAN XN5008R.
Control Panel >> Notification >> SNMP.
Активируем, выставляем настройки, такие же как в профиле сервера мониторинга.
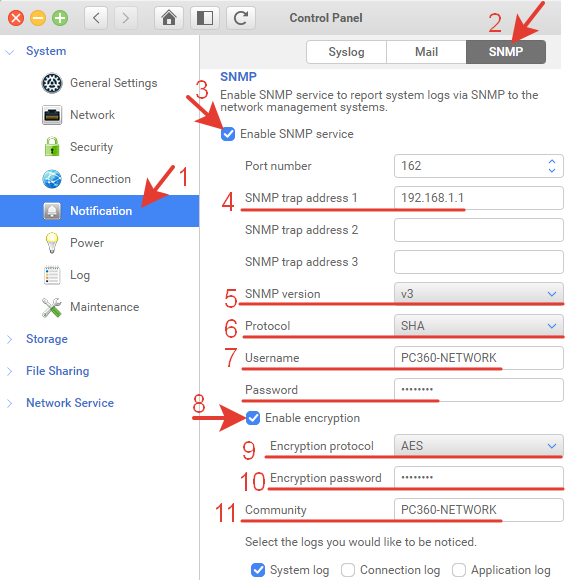
Подчеркнуты обязательные к заполнению настройки, без которых применение (Apply) не срабатывает.
Community: PC360-NETWORK или public – сообщество, используется для v1 и v2.
Ниже галочками отмечаются виды сообщений, которые хотим получать трапами.
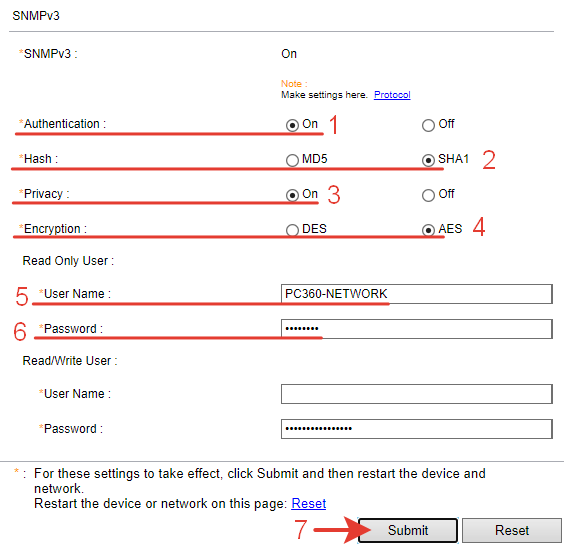
SNMP в сетевом принтере Kyocera P4020.
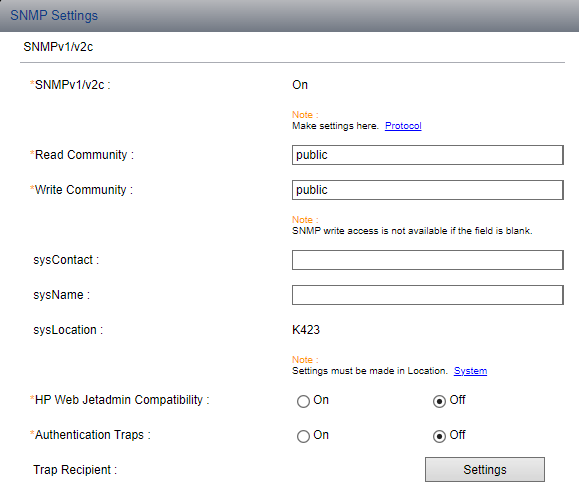
Настройка находится в боковом меню Management Settings >> SNMP.
Для версии v1, v2 и комьюнити «public» ничего настраивать не нужно.
Убедится в ее работе можно запустив Snmpwalk на добавленном на карту принтере.
Настройка v3.
Переходим в настройку протоколов.

Отключаем SNMPv1/v2c.
Включаем SNMPv3.
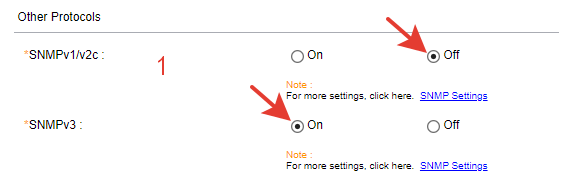
Возвращаемся к настройке SNMP.
SNMPv3 не заработал. Нет возможности ввести пароль AES.
SNMP в сетевом принтере PANTUM M6500W.
Настройки SNMP невозможно изменить через web-интерфейс.
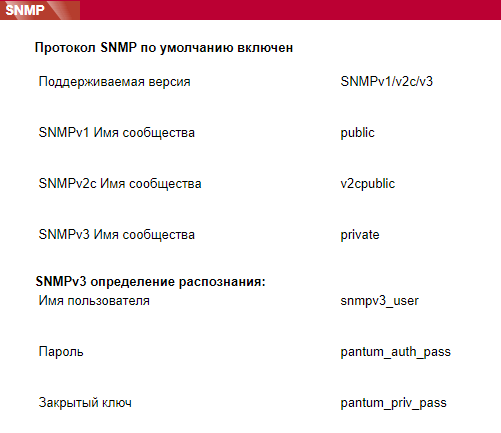
Под эти настройки нужно создать профиль в Dude. Указать все как тут.
После активации этого профиля в устройстве на карте, SNMPv3 заработал.
У разработчиков странная логика. Во первых комьюнити public и SNMPv1, v2 остались активными. Во вторых для всех принтеров этой модели общие одинаковые параметры имени пользователя и пароль в SNMPv3. Это дыра в безопасности. Хотя для принтер это может не очень критично.
SNMP в IP-камере видеонаблюдения DS-I452.
Не все камеры поддерживают работу с SNMP. В некоторых моделях в меню нет такой вкладки.
SNMPv1,v2 работает сразу после активации в настройках камеры.
Для SNMPv3 нужно ввести параметры имени пользователя паролей и шифрования, такие же как в профиле сервера мониторинга.
В связи с тем, что имя пользователя в настройке SNMP видеокамеры не может содержать определенных знаков, в настройке The Dude был создан дополнительный профиль для IP-видеокамер.
Подключаемся в камеру через браузер. Выполняем настройки.
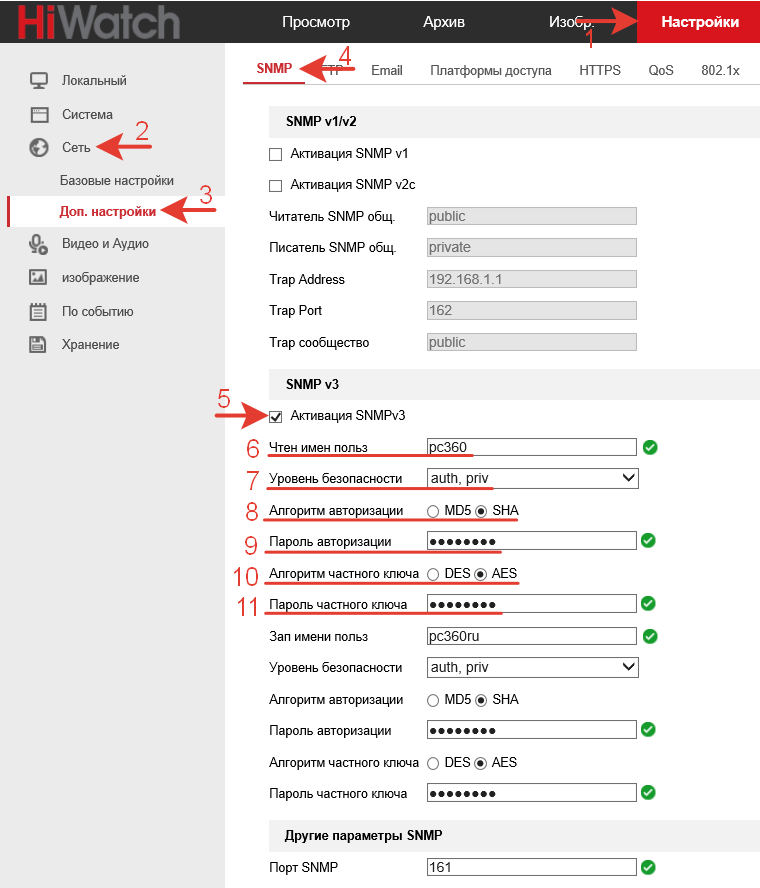
Так же необходимо заполнить настройки для пользователя с правами записи, иначе система не позволит сохранить введенные данные.
Проверка.

Уличная точка доступа wi-fi TP-Link Pharos CPE510.
Настройка выполняется на вкладке «Управление».

К сожалению SNMPv3 отсутствует. Активируем что есть.
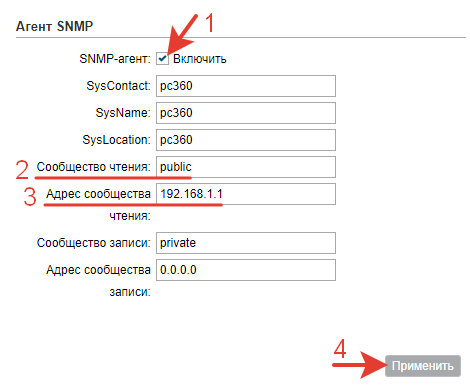
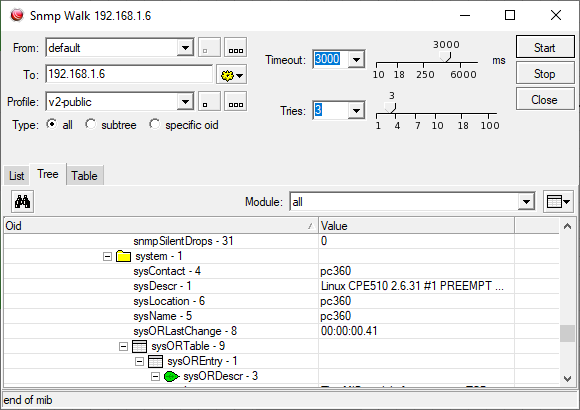
Проверка.
Освоить MikroTik Вы можете с помощью онлайн-куса
«Настройка оборудования MikroTik». Курс содержит все темы, которые изучаются на официальном курсе MTCNA. Автор курса – официальный тренер MikroTik. Подходит и тем, кто уже давно работает с микротиками, и тем, кто еще их не держал в руках. В курс входит 162 видеоурока, 45 лабораторных работ, вопросы для самопроверки и конспект.