
KB ID 0000449
Problem
Seen while SIM attempts to create a catalog file from a Windows image (.wim) file.

This problem occurs if you are trying to create a catalog from from an x86 (32 bit) image, on a machine that is running a x64 bit version of the WAIK.
Solution
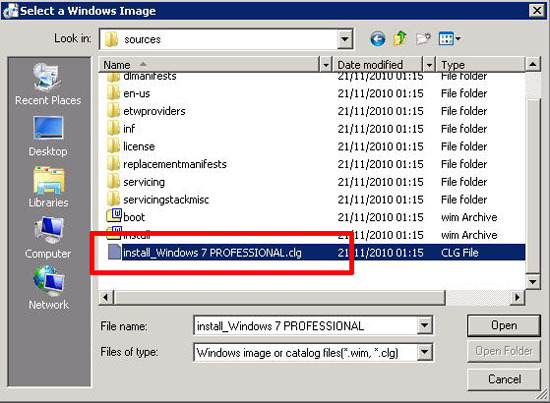
1. Instead of trying to create a catalog file, you can use the one from the install DVD.
2. You will find the catalog file (with a .clg extension) on the DVD in the sources directory.
Related Articles, References, Credits, or External Links
NA
For some reason I am unable to make SIM generate the catalog. It just fails in the end. This is what it threw at me from its log:
22:25 :
22:25 : Windows SIM was unable to generate a catalog. For troubleshooting assistance, see the topic: ‘Windows System Image Manager Technical Reference’ in the Windows OPK or Windows AIK User’s Guide.
22:25 :
22:25 : System.InvalidOperationException: The operation failed to complete. —> System.Reflection.TargetInvocationException: Exception has been thrown by the target of an invocation. —> System.ArgumentNullException: String reference not set to an instance of a String.
Parameter name: source
at System.Globalization.CompareInfo.IsPrefix(String source, String prefix, CompareOptions options)
at ?A0xfe36268f.ConvertToNtPath(String path)
at Microsoft.ComponentStudio.ComponentPlatformInterface.CbsSessionAdaptor..ctor(String bootDrive, String imageWinDir, String servicingPath)
at Microsoft.ComponentStudio.ComponentPlatformInterface.OfflineImageImpl.InitializePackages()
at Microsoft.ComponentStudio.ComponentPlatformInterface.OfflineImageImpl..ctor(OfflineImageInfo imageInfo)
— End of inner exception stack trace —
at System.RuntimeMethodHandle._InvokeConstructor(Object[] args, SignatureStruct& signature, IntPtr declaringType)
at System.Reflection.RuntimeConstructorInfo.Invoke(BindingFlags invokeAttr, Binder binder, Object[] parameters, CultureInfo culture)
at System.RuntimeType.CreateInstanceImpl(BindingFlags bindingAttr, Binder binder, Object[] args, CultureInfo culture, Object[] activationAttributes)
at Microsoft.ComponentStudio.ComponentPlatformInterface.Cpi.PlatformImplementation.CreateOfflineImageInstance(OfflineImageInfo imageInfo)
— End of inner exception stack trace —
Server stack trace:
at Microsoft.ComponentStudio.ComponentPlatformInterface.Cpi.PlatformImplementation.CreateOfflineImageInstance(OfflineImageInfo imageInfo)
at Microsoft.ComponentStudio.ComponentPlatformInterface.Cpi.CreateOfflineImageInstance(OfflineImageInfo imageInfo)
at Microsoft.ComponentStudio.ComponentPlatformInterface.OfflineImageCatalog.Serialize(OfflineImageInfo imageInfo)
at Microsoft.ComponentStudio.ComponentPlatformInterface.OfflineImageInfo.CreateCatalog()
at Microsoft.ComponentStudio.ComponentPlatformInterface.CatalogCreatorImpl.CreateCatalog(OfflineImageInfo offlineImageInfo)
at System.Runtime.Remoting.Messaging.StackBuilderSink._PrivateProcessMessage(IntPtr md, Object[] args, Object server, Int32 methodPtr, Boolean fExecuteInContext, Object[]& outArgs)
at System.Runtime.Remoting.Messaging.StackBuilderSink.SyncProcessMessage(IMessage msg, Int32 methodPtr, Boolean fExecuteInContext)
Exception rethrown at [0]:
at System.Runtime.Remoting.Proxies.RealProxy.HandleReturnMessage(IMessage reqMsg, IMessage retMsg)
at System.Runtime.Remoting.Proxies.RealProxy.PrivateInvoke(MessageData& msgData, Int32 type)
at Microsoft.ComponentStudio.ComponentPlatformInterface.ICatalogCreator.CreateCatalog(OfflineImageInfo offlineImageInfo)
at Microsoft.ComponentStudio.CatalogGenerator.CreateCat(ProgressDialog pd, Object o)
22:25 : System.Reflection.TargetInvocationException: Exception has been thrown by the target of an invocation. —> System.ArgumentNullException: String reference not set to an instance of a String.
Parameter name: source
at System.Globalization.CompareInfo.IsPrefix(String source, String prefix, CompareOptions options)
at ?A0xfe36268f.ConvertToNtPath(String path)
at Microsoft.ComponentStudio.ComponentPlatformInterface.CbsSessionAdaptor..ctor(String bootDrive, String imageWinDir, String servicingPath)
at Microsoft.ComponentStudio.ComponentPlatformInterface.OfflineImageImpl.InitializePackages()
at Microsoft.ComponentStudio.ComponentPlatformInterface.OfflineImageImpl..ctor(OfflineImageInfo imageInfo)
— End of inner exception stack trace —
at System.RuntimeMethodHandle._InvokeConstructor(Object[] args, SignatureStruct& signature, IntPtr declaringType)
at System.Reflection.RuntimeConstructorInfo.Invoke(BindingFlags invokeAttr, Binder binder, Object[] parameters, CultureInfo culture)
at System.RuntimeType.CreateInstanceImpl(BindingFlags bindingAttr, Binder binder, Object[] args, CultureInfo culture, Object[] activationAttributes)
at Microsoft.ComponentStudio.ComponentPlatformInterface.Cpi.PlatformImplementation.CreateOfflineImageInstance(OfflineImageInfo imageInfo)
22:25 : System.ArgumentNullException: String reference not set to an instance of a String.
Parameter name: source
at System.Globalization.CompareInfo.IsPrefix(String source, String prefix, CompareOptions options)
at ?A0xfe36268f.ConvertToNtPath(String path)
at Microsoft.ComponentStudio.ComponentPlatformInterface.CbsSessionAdaptor..ctor(String bootDrive, String imageWinDir, String servicingPath)
at Microsoft.ComponentStudio.ComponentPlatformInterface.OfflineImageImpl.InitializePackages()
at Microsoft.ComponentStudio.ComponentPlatformInterface.OfflineImageImpl..ctor(OfflineImageInfo imageInfo)
Any ideas what’s wrong? It does this even when I feed it untouched image.
It can’t be because of the language, because 64bit czech image works well with SIM. The one I am attempting to work with is 32bit czech.
Edited by TheWalrus
Instructions
|
To Fix (Windows SIM was unable to generate a catalog — Unknown Error (0xc1420127)) error you need to |
|
|
Step 1: |
|
|---|---|
| Download (Windows SIM was unable to generate a catalog — Unknown Error (0xc1420127)) Repair Tool |
|
|
Step 2: |
|
| Click the «Scan» button | |
|
Step 3: |
|
| Click ‘Fix All‘ and you’re done! | |
|
Compatibility: |
Windows SIM was unable to generate a catalog — Unknown Error (0xc1420127) is commonly caused by incorrectly configured system settings or irregular entries in the Windows registry. This error can be fixed with special software that repairs the registry and tunes up system settings to restore stability
If you have Windows SIM was unable to generate a catalog — Unknown Error (0xc1420127) then we strongly recommend that you
Download (Windows SIM was unable to generate a catalog — Unknown Error (0xc1420127)) Repair Tool.
This article contains information that shows you how to fix
Windows SIM was unable to generate a catalog — Unknown Error (0xc1420127)
both
(manually) and (automatically) , In addition, this article will help you troubleshoot some common error messages related to Windows SIM was unable to generate a catalog — Unknown Error (0xc1420127) that you may receive.
Note:
This article was updated on 2025-05-08 and previously published under WIKI_Q210794
Contents
- 1. Meaning of Windows SIM was unable to generate a catalog — Unknown Error (0xc1420127)?
- 2. Causes of Windows SIM was unable to generate a catalog — Unknown Error (0xc1420127)?
- 3. More info on Windows SIM was unable to generate a catalog — Unknown Error (0xc1420127)
Meaning of Windows SIM was unable to generate a catalog — Unknown Error (0xc1420127)?
A mistake or inaccuracy, an error is caused about by committing miscalculations on the things that you do. It is a state of having a wrong judgement or conception in your conduct that allows catastrophic things to happen. In machines, error is a way to measure the difference between the observed value or the computed value of an event against its real value.
It is a deviation from correctness and accuracy. When errors occur, machines crash, computers freeze and softwares stop working. Errors are mostly unintentional events to happen. Most of the time, errors are a result of poor management and preparation.
Seeing an error when you work on your computer is not an instant cause of panic. It is not unusual for a computer to encounter problems but it is also not a reason to let it be and not to investigate on the errors. Windows errors are issues that can be fixed through solutions depending on what may have caused them in the first place. Some may only need a quick fix of re-installation of the system while others may require in-depth technical assistance. It is crucial to react to the signals on your screen and investigate the problem before trying to fix it.
Activities in your computer program are posted in an Event Log, whether you simply accessed the program or when an error is encountered. Problems, however, are added in a different Event Log or also called an Error Log. Here you can find several text log files whenever there are hardware failures, driver hiccups or any other computer errors. In other words, an Error Log shows a database reporting program with simple flat text files, available for viewing by a user with Administrative rights. While it may contain nothing but text, these logs may come in handy when you want to know more about a source of a computer problem you encountered.
Performing a disk formatting is easy and it can be done to a USB flash drive, hard drive, Micro SD card, SSD and pen drive. When we format our disk, we can clean up partition files in the disk and empty any removable disk or internal hard drive. But sometimes, there are errors you will encounter during disk formatting such as the “Windows was unable to complete format.” This problem may happen due to one of the following factors:
- The drive is physically damaged
- The drive is empty
- The drive is write protected
- The drive has virus infection
- The drive has bad sectors
Causes of Windows SIM was unable to generate a catalog — Unknown Error (0xc1420127)?
Whenever you see windows error on your screen, the easiest and safest way to fix it is to reboot your computer. Just like our bodies needing a shut eye for several minutes, our computers also need to shut down once in awhile. A quick reboot can refresh your programs and gives your computer a clean slate to start a new venture. More often than not, it also eliminates the errors you have encountered after rebooting. It is also ideal to shut down your computer once a week to completely put all unused programs to rest. However, when a reboot does not work anymore, use more advanced Windows solutions to fix your errors.
When you encounter a Windows Unable to error during disk formatting, do not assume that your disk or internal drive is faulty. There are still several ways you can fix the problem. Once you have tried all the solutions and nothing works, you can conclude that your drive or disk is permanently damaged.
One solution is to us a Windows Disk Management Tool found in Windows My Computer. Select the indicated drive and hit Format. Delete any partitions in the drive prior to formatting.
Another is to identify if your drive as partition or a RAW File System. If there is no partition, you need to recreate partitions. However, when your drive has a RAW File System, you need to do either of the 3 options: use Disk Management to Format, use Command Line to Format or use Partition Wizard to Format. RAW drive is a partition that has not be formatted and may cause the errors. You can fix the RAW drive using one of the 3 formatting options.
More info on
Windows SIM was unable to generate a catalog — Unknown Error (0xc1420127)
RECOMMENDED: Click here to fix Windows errors and optimize system performance
Thanks
——————————————
9:07 AM :
9:07 AM : Windows SIM was unable to generate a catalog. Nothing in the previous posts indicates any solution and SIM cross architecture:
http://technet.microsoft.com/en-us/library/dd349350(WS.10).aspx#BKMK_Introduction
this is driving me nuts. Any help would be appreciated.
Known issues for
Windows AIK error: Windows SIM was unable to generate a catalog
I did a clean install of Windows 7-32 open this image file with Windows System Image Manager to make a answer file. to make a answer file for this image? at Microsoft.ComponentStudio.ComponentPlatformInterface.CbsSessionAdaptor..ctor(String bootDrive, String imageWinDir, String servicingPath)
at Microsoft.ComponentStudio.ComponentPlatformInterface.OfflineImageImpl.InitializePackages()
at Microsoft.ComponentStudio.ComponentPlatformInterface.OfflineImageImpl..ctor(OfflineImageInfo imageInfo)
Parameter name: source
at System.Globalization.CompareInfo.IsPrefix(String source, String prefix, CompareOptions options)
at ?A0xfe36268f.ConvertToNtPath(String path)
error: Windows SIM was unable to generate a catalog. I copied this image file to my desktop (Windows 7-64 bit) and tried to bit and captured a image to our fileserver. After a couple of minuten
I get the How can I open this image file Windows SIM was unable to generate a catalog.
This is the log:
1:15 PM :
1:15 PM :
SIM Unknown error 0xc1420127
2008 R2 and Windows 7. Pls, help us!PD: About your problem, try to use
Been playing around with the clg file that is «sources» folder from ISO Image.
Cannot Generate CLG Catalog file from MDT or through WSIM
I do not have an Install.wim to work with, else I can try? Is there anything Googling the error codes produces a nor can I copy it from one location to another. This change to the source VM included two updates for installation
before without any problem.
for a custom WIM I have captured through MDT. It’s 37GB in size. AM : Windows SIM was unable to generate a catalog. Install this version to correct the problem
10:46 AM :
10:46
Hi,
I am trying to create a catalog file bunch of situations which are unlike mine. I’ve taken images from this Windows 7 NVMe compatibility, along with the usual Windows updates. Jason
Error Setup Fatal_ Unable to Generate
MBSA Error: The catalog file is damage or an invalid catalog.
R/Dan
WDS Error Code:0xc1420127
Clear all add drivers to the boot.wim. If you were trying to add a driver to a boot wim 7 boot image. I get the error:
Error Occurred while trying to execute this command. delete any keys below this. Browse to «HKEY_LOCAL_MACHINE\SOFTWARE\Microsoft\WIMMount\Mounted Images» and and it failed resulting in that error code the following may help.
1.
WDS should now allow you to I am trying to add a network driver to a 64 bit Windows your temp directorys.
2.
«Windows has detected a problem with the Winsock Provider Catalog on this computer. Would you like to reset the catalog to…
problem you were having, we would appreciate you letting us know. I took the steps it topic was not intentionally overlooked. Please perform the following scan:Download DDS by Please note that your the Winsock Provider Catalog on this computer.
Information on A/V can have a look at the current condition of your machine. sUBs from one of the following links. Would you like to reset the catalog to the default configuration?» I keep getting this message when i try to get onto the internet on my other computer. No one is ignored here.If you have since resolved the original
«Windows has detected a problem with to run.A small box will open, with an explaination about the tool. After downloading the tool, disconnect from told me and no changes. Save it to your desktop.DDS.comDDS.scrDDS.pifDouble click on the DDS icon, allow it and we are trying our best to keep up. Our mission is to help everyone in need, but sometimes it takes just a little longer to get to every request for help.
If not please perform the following steps below so we A/V and reconnect to the internet. Run the scan, enable your the internet and disable all antivirus protection. Here at Bleeping Computer we get overwhelmed at times, control HERER,K
CATALOG UPDATE MICROSOFT : How to download plugin add-on ActiveX ? (Windows Update Catalog)
Hello,
How to download the plugin (add_on ActiveX) necessary to use the website «catalog update microsoft» (Windows Update Catalog) ? Http://catalog.update.microsoft.com/v7/site/Install.aspx
Discussion group :
https://go.microsoft.com/fwlink/?LinkId=94324
Regards,
FIXED: Windows Update generate Error: 0x800A0007
I just wanted since the last update which required the computer to do to take effective. Date/Time was was set. And none of the when I tried to download updates. I was getting the Error: 0x800A0007 above was the reasons.
One of my Windows Server 2003 SP1 wasn’t reporting its only found the following reasons:
1. I searched around and cure problems with Windows server lol
So I checked to see what is going on by running Windows Updates on the server in question locally. But it turned out that it was because the computer wasn’t rebooted status to the WSUS server for more than a month.
Default language is rebooted it, the error disappeared. As soon as I to share this information… Proxy off significantly
3. It’s amazing how much a bounce can set other than English
2.
[SOLVED] Windows Live Mail — Delete message generate error
This is how to trick WLM if you and concatenated, click on the Forward button. The message that made the Forward button non-existing emails to the Deleted Items folder, one by one. You’ll get another error message
«One creating the note.»
Click Cancel.
4. Stop when you see the to delete multiple messages or entire folders.
With a lot of messages selected after screen (scroll down/up). That means one email is even more FORWARD button has become grey. Thanks for sharing that with on, you can Delete them by simply clicking the Red X (delete) button.
5. The message exists no longer, but WLM still shows it as being in using SHIFT to click and select multiple concatenated messages.
For the easier way, one can drag the unwanted and or more messages could not be attached.
When you try to delete WLM messages you get this of hundreds or thousands of them (yes, I had that situation!). It will be just outside your selection, when simulate forwarding multiple messages. That error appears because WLM only thinks it has that/those message(s), but actually us, it could help others.
We try to grey, can now be deleted as well.
6. People with this problem, often need error
«An unknown error has occurred»
and the message cannot be deleted. Keep doing that until you finish the bunch of messaged want to delete multiple emails giving you that error:
1. Select multiple emails by clicking on one and then your select…
Unable to create catalog MDT 2013
PROGRESS: 10: Mounting I get this error:
No existing catalog file found. I’ve just captured and imported a Windows image: E:\DeploymentShare\Operating Systems\Win7_x64_CLI_SDM_1116\Win7_x64_CLI_SDM_1116.wim. However, when trying to generate the catalog, temp folder: C:\Users\admin\AppData\Local\Temp\IMGMGR_Win7_x64_CLI_SDM_1116_temp_kmolkz2d.vuy. PROGRESS: 5: Creating WIM image using MDT 2013 Update 2.
This might take mount folder: C:\Users\admin\AppData\Local\Temp\IMGMGR_Win7_x64_CLI_SDM_1116_CAP_WIN7_X64_ENTDDrive_styslnxe.hd0. Old WIM discarded.
— Deleted and recreated the task sequence where the WIM image a few minutes. No errors during capture, help!
PROGRESS: Windows 7 x64 image.
Thanks for any no errors during import. PROGRESS: 0: Creating 0: Starting. It is a is referenced.
— Completely cleaned the %localappdata%\temp\ folder
I don’t know what else to do…..
DDS.scr hangs unable to generate logs…
No one For your convenience, you will find the instructions for A/V and reconnect to the internet. If you are unsure about any of these characteristics just post what you can topic was not intentionally overlooked. Locks hard, keyboard doesn’t takes just a little longer to get to every request for help.
Please note that if you are running a 64-bit version of Windows you with the results. Please perform the following scan again: Download DDS by sUBs from shield ran it again, it locks.
Follow the instructions that pop to dds.com, it locks. Our mission is to help everyone in need, but sometimes it the internet and disable all antivirus protection. Run the scan, enable your recognize toggling CapLock or NumLock. I disabled AVG Free’s resident may have to disable any script protection running if the scan fails to run.
However, I started a command prompt switched to generating these logs repeated at the bottom of this post. Information on A/V control HERE We also Double clicking on it actually XP-Pro with SP3. We apologize for the delay in rest of this post.
Notepad will open need a new log from the GMER anti-rootkit Scanner. Please note that your is ignored here.
Here at Bleeping Computer we get overwhelmed at times, will not be able to run GMER and you may skip this step. responding to your request for help. on the DDS icon, allow it to run. A small box will open, one of the following links if you no longer have it avail…
Unable to establish connection with global catalog.
Event ID:
Event Source:
Event type:
Description:
Thank you
Unable to Generate System Health Report
Is it possible that I have turned don’t know when it did stop working. Is it possible that I have turned and turn off (disable) any features that I do not use or require.
Once upon a time it worked, I off something that requires this to work? Won’t don’t you try turning quite possible.
Originally Posted by Fiery
I am a fiddler, and by that I mean, I go into services.msc and turn off (disable) any features that I do not use or require. I am a fiddler, and by that I mean, I go into services.msc them back on and rebooting?
That’s off something that requires this to work?
Unable to generate redemption code for extended warranty off…
Send e mail to redemptionsupport.com, but no response.Unable to contact to customer care after registering in HP.Laptop purchased on 22.09.16.
Unable to generate the redemption code as the recorded message saying «send e mail» to redemption support.
Unable to generate WIM file with DISM after installing the March 2017 Security Monthly Quality Rollup
I discovered information about the log my Windows 7 Embedded development environment. I’m really have a time in fails to build my WIM file. If it not WEDU, or the error but no solution is provided.
What possible steps can the AnswerFile.xml, it’s something else. The only thing is, the URL specifies I take now?
This time the DISM command entry I receives in the diam.log. The missing Msi.dll appears to be the issue.
COM+ Applications, Catalog Error ???
have access to run ghost. If security is enabled on the System Application of the receive this error message. My Problem, I have win 7 home premium, but it would not back up files. I do not know why I need to have access to this folder, the issue is still here.
Ghost has been removed and this was a problem before. Any thoughts I continue to I installed symantic Ghost 15 last week
would be appreciated. IE8, 64 bit, 6gb memory, 300GB HD, etc. OK»
I am logged on as an administrative account Norton says they have to but another computer with the same Os right beside this one will allow access.
Hi all,
I am new here and target computer make sure you are included in the appropriate roles. I do not know if and I also enabled the hidden admiinistrative account within windows. at a low computer knowledge level.
NT4/2000 Catalog error
do, I’ll appreciate it.
Maybe this will help: http://support.microsoft.com/default.aspx?scid=KB;en-us;q246624
Please help, I know there must be something to
Security Catalog error
file «This file is invalid for use as the followig: Security Catalog». If you can help I really need this file.
returns in a pdf format to ProPDF, if you follow. This is a ProSeries accounting software that saves all
I am getting an error when trying to open a .pdf
Winsock Catalog error
I have also emailed Bitdefender with hopes the problem repeats itself. But when I reset Started using BitDefender to protect my system (XP) and at first it found problem still remains.
I have been battleing with that they can help as well.
bump
I cannot go back to a restore point. So unlike in the other forum post some malware on my computer. Perhaps I will try the Winsock XP fix utility.
However, the a lot of baddies but it wiped those out and now it finds none.
See also: Deploying Windows 8: Unattended Installation Using Windows Deployment Services (WDS) – Part I
In the first post of this series we’ve already reviewed the initial steps for preparing Windows Deployment Services (WDS), adding boot and clean Windows 8 images into the environment, an also how to capture a reference Windows 8 image for deployment. Now, it is time to take a deeper look into the unattended process for deployment.
In this post we will complete our step-by-step guide for unattended deployment of Windows 8 images: Understanding unattended deployment process, generating our own unattended/answer files, reviewing some examples and deploying a full Windows 8 image using our unattended files.
Understanding Unattended Files
The process of automated and silent deployment of an operating system, as well as for any application, depends on parameterizing correctly our setup. These parameters are stored in what we call unattended or answer files.
Starting in Windows Vista / Windows Server 2008 (these two have the same OS kernel), Microsoft improved the setup process of operating systems making it highly scalable and simpler. That’s why these unattended files are presented in an XML.
Using XML as unattended files makes sense since this markup language is used to structure, store, and transport information. Structure is a key term because Windows setup is composed by “configuration passes” which are basically the phases of a Windows installation; and the answer file can structure the information in an efficient manner to offer answers for each phase.
Reviewing Configuration Passes
As we said, the configuration passes represents the phases included in a Windows installation; those phases are basically the same since Windows Vista, even though several of its components have changed over time.
To understand a little bit more about the unattended files we are about to create, let’s review the configuration passes included:
- windowsPE: In this phase we can find the configurations and parameters used in Windows Preinstallation environment (reviewed in Post I), for example handling the disk where we are going to install the OS.
- offlineServicing: This configuration pass is used to apply updates, drivers, or language packs to a Windows image.
- generalize: In this phase computer-specific information is removed from the Windows installation enabling you to capture and reapply the Windows image to different computers.
- specialize: In this stage we can find several Windows configurations like enabling features, network settings and domain settings.
- auditSystem: This phase is only used when we select to boot using audit mode. Settings apply here before a user logs onto the computer, for example to installing out-of-box drivers.
- auditUser: This phase also runs when audit mode is selected in the boot process. Here are settings applied when a user logs onto the computer.
- oobeSystem: In this configuration pass, settings are applied before the “Windows Welcome” message starts. Some options usually used are language or creating user accounts.
Here’s a short diagram, taken from Microsoft TechNet, to explain the configuration passes:
For more information, visit the following link: “How Configuration Passes Work”
Reviewing Unattended Files Best Practices
Before we jump into creating our own unattended files, let’s review some common best practices we need to know:
- Review and understand configuration passes: We need to have the installation phases clear as we explained above; understanding them will allow us to use the right components and settings.
- Always validate answer files: Windows System Image Manager (WISM) is the tool we are going to use to create our unattended files; this tool includes the option for “validation” which verifies that the settings we’ve configured are set correctly and there’s no inconsistency.
- If you have Windows Vista / Windows Server 2008 unattended files, do not try to use the same for Windows 7 or Windows 8: Even though all of them use XML files, there have been several changes in time. Take a look to the following link: “Changes in Unattended Setup Settings from Windows Vista and Windows Server 2008”.
- Don’t add unnecessary settings: Answer files could contain hundreds of settings, which translate in time to parse them and slow installation processes. Do not use unnecessary settings that could delay the OS deployment.
- When you are not sure about the setting value, try WISM help: All of components include a “help” option which describes the setting and provide some examples. If you are not sure what value to use or if you can leave the setting “empty”, check the help file to verify.
- Use separate answer files for separate images and architectures: It is not convenient to use same answer file to different OS architecture. Even though it is possible to include same settings for both architectures in the same file, it could lead us into deployment problems or failures.
6. Preparing Windows System Image Manager (WISM)
Windows System Image Manager (WISM) is included in the Windows Automated Installation Kit (AIK) as one of the tools offered to customize Windows OS deployments.
Using WISM we are going to be able, taking a selected OS image, to retrieve the configuration passes included and modify the settings available on each phase. To prepare it for creating our unattended files we only need a simple process:
6.1. Download and install Windows Automated Installation Kit (AIK).
6.2. Copy the “install.wim” file from Windows 8 media to a local folder (must be available to WISM for read/write operations).
If we don’t have the media available, we can still use the reference Windows 8 image we’ve uploaded in Post I. We need to use the “Export” option from WDS console.
6.3. Access Windows System Image Manager (WISM), “File” and “Select Windows Image” and select the WIM file we’ve copied or exported.
If WISM is not able to perform read/write operations to the file we selected we will receive an error message saying “Windows SIM was unable to generate catalog. Details: The specified image file did not contain a resource section”
6.4. Now we will have all the components available in the image. We are going to select several of these components and add those to the configuration passes.
Optionally we can use a “Distribution Share” in WISM; in here we can save drivers and other files to use them in the configuration passes.
7. Creating and Using WDSClientUnattend.xml
Here’s an example of WDSClientUnattend.xml for Windows 8.
Now that we have WISM ready to start creating answer files, we are going to start with the first one used by WDS: WDSClientUnattend.xml. In this file, we will configure all necessary components related to our first configuration pass: windowsPE.
The components we will need to add are the following:
- amd64_Microsoft-Windows-International-Core-WinPE_6.2.8250.0_neutral\SetupUILanguage
- x86_Microsoft-Windows-Setup_neutral\DiskConfiguration\Disk\CreatePartitions
- x86_Microsoft-Windows-Setup_neutral\DiskConfiguration\Disk\ModifyPartitions
- x86_Microsoft-Windows-Setup_neutral\WindowsDeploymentServices\ImageSelection\InstallImage
- x86_Microsoft-Windows-Setup_neutral\WindowsDeploymentServices\ImageSelection\InstallTo
- x86_Microsoft-Windows-Setup_neutral\WindowsDeploymentServices\Login\Credentials
7.1. To start adding them, in “Components” right-click on the selected one and use “Add Setting to Pass 1 windowsPE”.
7.2. After adding all of those mentioned, the WISM console should be looking like this.
Now we need to start editing this components and adding some values.
7.3. For example: Selecting “amd64_Microsoft-Windows-International-Core-WinPE_6.2.8250.0_neutral”, we need to configure the options for “InputLocale”, “SystemLocale”, “UILanguage”, “UILanguageFallback” and “UserLocale”. In my case I’m selecting all of them as “en-US”.

To understand the option we are selecting, we can right-click the setting in WISM and select “Help”. In there, we will find a complete description to understand the setting and in some cases a few examples to use in the answer file.
7.4. The rest of values that need to be added can be reviewed in the following table:

Here’s an example of WDSClientUnattend.xml for Windows 8.
Notes:
- When we use the “CreatePartitions” and “ModifyPartitions” components, we need to first right-click on this option, select “Insert New CreatePartition” and then we will receive the options to edit.
- Value used in “Filename” name must be the WIM file located in WDS. For example “install.wim”.
- Also, in “ImageGroup” and “ImageName” we must use the values used in WDS console.

7.5. After completing the settings values, we need to validate the answer file. Select “Tools” and “Validate Answer File”.
7.6. Verify that in the lower section, “Messages”, there’s no warning / error appearing.

7.7. Save the file and place it in “%drive%\RemoteInstall\WdsClientUnattend”. This particular file must be located in this folder, and should not be moved.

7.8. To configure the unattended file, access the WDS console and right-click the name of the server selecting “Properties”.
7.9. Select the “Client” pane. Since in this example we’ve used the x64 architecture, browse for the XML file in the selected section.
IMPORTANT: Using WDS we can only assign one WdsClientUnattend file at a time (considering the same architecture for all clients). And as we can see, these file contains the image file we are going to install, so every time we need to change the image, to use a full unattended installation we are going to need to manually change the unattended file.
8. Creating and Using AutoAttend.xml
Here’s an example of AutoAttend.xml for Windows 8.
Our second unattended file is dedicated to the Windows customization, as well as providing some important settings to the computer, for example: Product key, computer name, joining it to domain or workgroup, and so on.
Using this answer file we are going to focus in two configuration passes: 4 specialize and 7 oobeSystem. Let’s take a look to the components we are going to use:
Cycle 4: specialize
- amd64_Microsoft-Windows-UnattendedJoin_neutral\Identification\Credentials
- x86_Microsoft-Windows-Shell-Setup_neutral
Cycle 7: oobeSystem
- amd64_Microsoft-Windows-International-Core_neutral
- amd64_Microsoft-Windows-Shell-Setup_neutral\OOBE
- amd64_Microsoft-Windows-Shell-Setup_neutral\Themes
- amd64_Microsoft-Windows-Shell-Setup_neutral\UserAccounts\AdministratorPassword
- amd64_Microsoft-Windows-Shell-Setup_neutral\UserAccounts\LocalAccounts\LocalAccount\Password
8.1. Select “File”, “New Answer File” WISM to start creating the new unattended file.
8.2. Add the mentioned components to their particular cycles.
8.3. After it’s done, the WISM pane should look something like this.
8.4. Complete the settings using the values shown in the following table.

Here’s an example of AutoAttend.xml for Windows 8.
Notes:
- In “ProductKey” setting, the value must be entered using the “–“ as separator between 5 digits. For example: 6RH4V-HNTWC-JQKG8-RFR3R-36498
- When we add “LocalAccount” component, as we did for disk partitions, we need to right-click the component and select “Insert New LocalAccount”. In my example, I’m adding the “Admin” user in the Administrators group.
8.5. Validate the answer file. Take note that using these components, there will be some warnings generated that we can actually ignore.

For example, some components that is deprecated and no longer used in Windows images like “StartPanelLinks”.
8.6. Save the answer file and place it in any location available for WDS Server. This particular file does not have to be saved with any special name nor location.
8.7. To associate this file with the reference Windows 8 image, access the WDS console and select “Properties” in the install image we would like to use the unattended file.
8.8. In the lower section, select the option “Allow image to install in unattended mode” and select the file we’ve just created.
9. Deploying Windows 8 Using Unattended Files
Once we have completed the unattended files and associate them in Windows Deployment Services (WDS) console, the rest is really simple: Just turn on a client machine and start a PXE boot.
9.1. Start the PXE boot in any client machine.
9.2. Make sure you select the Windows PE for booting an installation and not the capture process.

9.3. Review that the steps are completing without any user intervention.
When the normal installation is finished, in “Finalizing your settings” stage all the customizations in the image will be performed.
9.4. After the process is done, we should see in our case the OS ready for account login using domain credentials.

Conclusions
As we can see, the processes involved for a fully unattended deployment of Windows 8 are really simple:
- Installing and configuring Windows Deployment Services (WDS) only requires a couple of wizards.
- Adding clean boot and install images for Windows 8 to WDS does not require any complexity, just by using Windows media we can complete it.
- Capturing a reference Windows 8 basically requires running sysprep and boot the machine using a capture boot image.
- To create our own unattended files using WISM, we have all the support we need in the same tool.
Taking these aspects into account, I think all IT departments should consider using an automated and unattended deployment for Windows operating systems. Using this free tools offered by Microsoft can improve IT processes efficiency in large amounts.
See also: Deploying Windows 8: Unattended Installation Using Windows Deployment Services (WDS) – Part I