
Когда на сайте публикуются статьи о системных папках или файлах Windows 10, многие пользователи пишут в комментариях «а у меня их нет», а иногда возможен и другой вариант: на рабочем столе и в папках видны системные файлы desktop.ini, а начинающий пользователь не знает, как их скрыть.
Суть в том, что в Windows 10 и предыдущих версиях системы скрытые и системные файлы — это 2 отдельные «категории», причем один и тот же файл может относиться сразу к двум. Если вы включили показ скрытых файлов и папок, системные все так же не будут видны. В этой инструкции подробно о том, как включить показ системных файлов и папок в Windows 10, а также о том, как скрыть системные файлы.
Способы показать или скрыть системные файлы (папки)
Если вам необходимо включить показ системных файлов и папок в Windows 10, сделать это можно несколькими методами, самый простой — использовать следующие шаги:
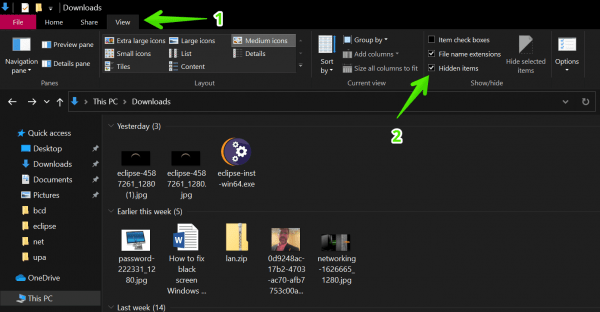
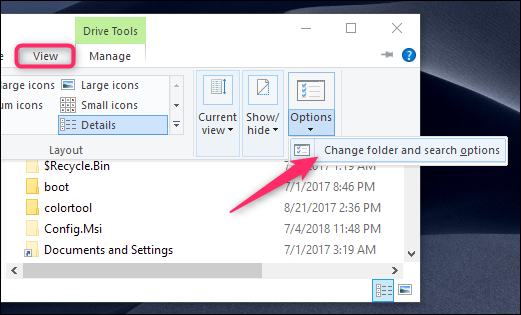
- Откройте проводник и на вкладке «Вид» нажмите по кнопке «Параметры».

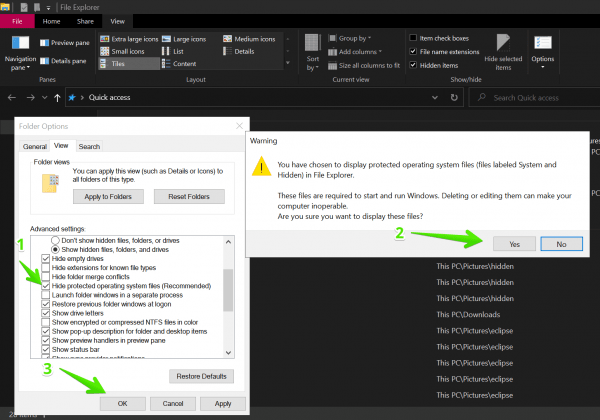
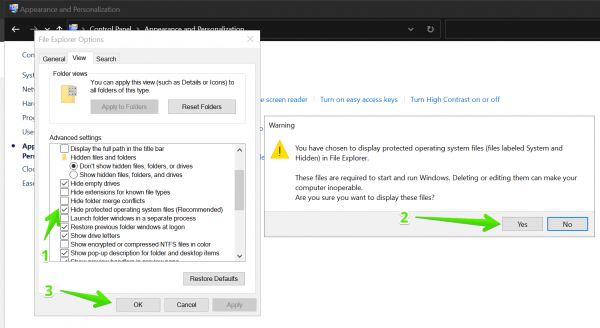
- В окне «Параметры папок» перейдите на вкладку «Вид» и снимите отметку «Скрывать защищённые системные файлы», ответьте утвердительно на предупреждение о последствиях показа системных файлов.
- Также установите отметку «Показывать скрытые файлы, папки и диски» — это нужно по той причине, что многие системные файлы также являются скрытыми и только шаг из пункта 2 не сделает их видимыми.

После этого примените настройки — все имеющиеся системные папки и файлы будут видны.
Второй метод попасть в рассмотренное окно параметров — зайти в «Панель управления» (для этого в Windows 10 можно использовать поиск в панели задач), переключить вид панели управления на «Значки» вместо «Категории» и открыть пункт «Параметры проводника».

В дальнейшем, если вам вновь потребуется скрыть системные файлы, там же в параметрах установите отметку «Скрывать защищенные системные файлы» и, при необходимости — «Не показывать скрытые файлы, папки и диски».
Windows 10 is designed to give the user a comfortable experience. In fact, several elements of the system have been carried forward from its previous versions. One of these elements is the file explorer. Similarly, this component allows you to view the files and folders present in the system.
However, since the beginning of Windows, the system has kept several files hidden. In general, these are system files. And if they are hidden it is for a fundamental security reason. Because manipulating or deleting them can damage the proper functioning of the Operative System.
In any case, it is also advisable to see the hidden system files to keep track of them. In any case, it is also advisable to see the hidden system files to keep track of them. Additionally, some programs require you to modify data present in some hidden folders. Well, in this post we will see some methods to show ‘hidden system files & folders’ in Windows 10.
Method 1: View hidden system files using file explorer.
The first method I will show you to view hidden files and folders is by using the file explorer.
- Step 1: Press the Win+E combination.
- Step 2: Once the file explorer is launched, please click on the View menu at the top of the screen.
- Then find the box corresponding to Hidden Items. Please check it to start viewing the hidden files and folders on your computer.

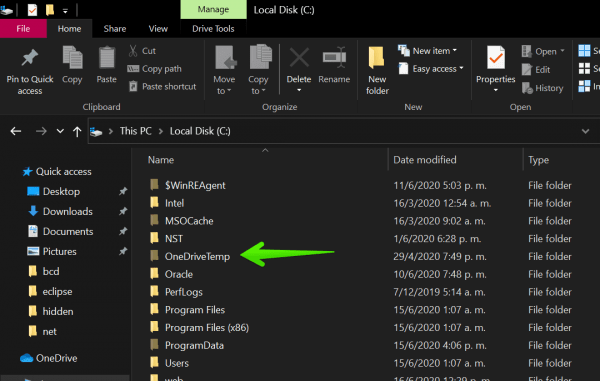
- From this point on you can check that the browser shows the hidden folders. In effect, these are shown with the darker folder icon.

Method 2: How to view hidden system files using folder option.
Using the previous method, we saw how to view hidden files and folders. However, for security reasons, some system files remain hidden. If you still want to see them, then follow the next steps:
- Press the Win+E combination to open the File Explorer
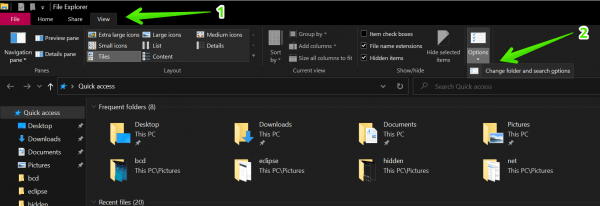
- Please click on the menu View. Now scroll to the right and display the Options section. Finally, click on the Change folder and search for options.

- A menu with Folder Options will immediately be displayed. Please click on the View tab. Now scroll down and deselect the check box “Hide protected operating system files” section (Recommended).
- Once you deselect the check box, a warning message about the sensitivity of these files will appear. Press Yes to set up the changes. Finally, click on OK to start viewing the hidden system files. You may revert to this option later after you have done your work.

- Back in the file explorer, you can look at previously hidden system files.

- That’s it. If you have any doubts about the steps above, then see the following Microsoft Guide to view the system files.
Method 3: How to view hidden system files using Control Panel
It is possible to manage the view of hidden system files from the Control Panel. Indeed, let’s see how to do it.
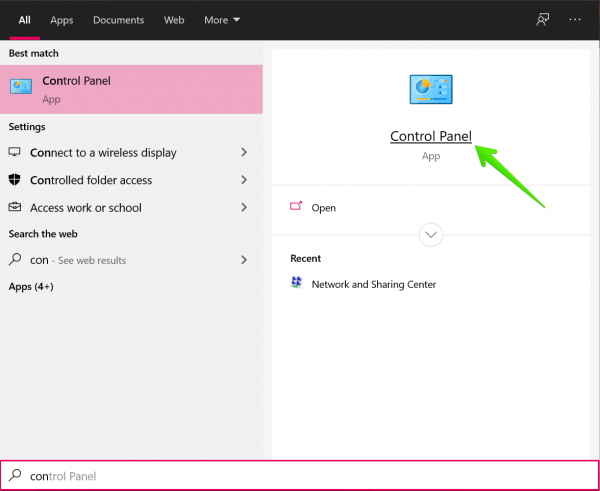
- Open the control panel by typing the Control Panel in the search bar.

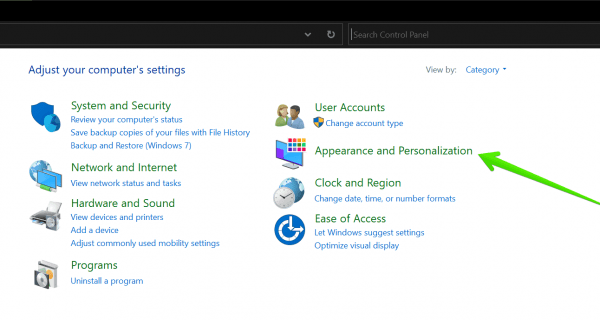
- Now click on Appearance and Personalization.

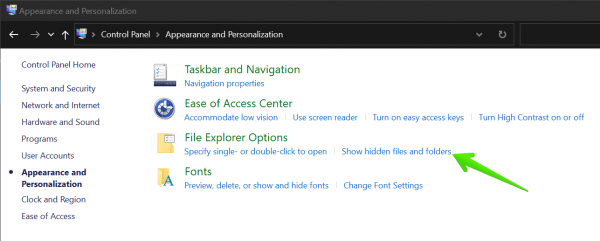
- Next, locate the File Explorer Options section. Once there, click on Show hidden files and folders.

- The File Explorer menu will be immediately displayed. Please follow the same steps taught in the previous method.

- That’s it.
Thus, we have seen several methods to view hidden system files and folders in Windows 10. I sincerely hope that I have solved your doubts. Let us know your impressions about this post, and if you liked it, please share it on your social networks.
Log in or Sign up
How to Show System Files
Discussion in ‘Malware (Spam, viruses, trojans)’ started by Major Attitude, Jul 18, 2004.
- Thread Status:
-
Not open for further replies.
-
Major Attitude
Co-Owner MajorGeeks.Com
Staff MemberSome malware programs can hide themselves from being visible. The below instructions (for each Windows Operating System) will allow you to configure your system to show all files and file extensions. Not doing this could allow file extensions commonly used by trojans and spyware to be hidden, for example a file ending in .exe or dll making manually finding it, if needed, difficult to impossible. PLEASE MAKE SURE YOU READ THE VERY IMPORTANT NOTE AT THE BOTTOM OF THIS MESSAGE after configuring your system to view hidden items.
Windows 7
- Right Click Start
- Select Open Windows Explorer
- Select Organize
- Select Folder and Search Options
- Select the View tab
- Under the Hidden files and folders heading select Show hidden files and folders.
- Uncheck the Hide extensions for known file types option.
- Uncheck the Hide protected operating system files (recommended) option.
- Click Apply
- Click OK
Windows Vista
- Right Click Start
- Select Explore
- Select Organize
- Select Folder and Search Options
- Select the View tab
- Under the Hidden files and folders heading select Show hidden files and folders.
- Uncheck the Hide extensions for known file types option.
- Uncheck the Hide protected operating system files (recommended) option.
- Click Apply
- Click OK
Windows XP
- Right Click Start.
- Select Explore
- Select the Tools menu and click Folder Options.
- Select the View Tab.
- Under the Hidden files and folders heading select Show hidden files and folders.
- Uncheck the Hide extensions for known file types option.
- Uncheck the Hide protected operating system files (recommended) option.
- Click Apply.
- Click OK.
Windows 2000
- Right Click Start.
- Select Explore
- Select the Tools menu and click Folder Options.
- Select the View Tab.
- Under the Hidden files and folders heading select Show hidden files and folders.
- Uncheck the Hide protected operating system files (recommended) option.
- Click Yes to confirm
- Click OK.
Windows ME
- Right Click Start.
- Select Explore
- Select the Tools menu and click Folder Options.
- Select the View Tab.
- Under the Hidden files and folders heading select Show hidden files and folders.
- Uncheck the Hide extensions for known file types option.
- Uncheck the Hide protected operating system files (recommended) option.
- Click Yes to confirm
- Click OK
If you do not see all the files you may need to click on an underlined link for the drive being accessed the link will say:
- View the Entire contents of this drive.
Windows 98
- Right Click Start.
- Select Explore
- Select the Tools menu and click Folder Options.
- Select the View Tab.
- In the Hidden files section select Show all files.
- Click OK.
IMPORTANT NOTE: Even after following these steps, some file extensions will still not be displayed. Thank Microsoft for another blunder and never fixing it, even though malware now uses it as a loop hole. The extensions that will still not be displayed are all for file types that are executable which makes this an even bigger problem. The extensions I’m referring to are .lnk, .pif and .shs . Malware is frequently using this loophole to infect your PC. Example problems:
- A file named somename.txt.shs will look like somename.txt but when you double click to open it with notepad. It will execute a program to infect you instead.
- somename.zip.pif will look like somename.zip but when you double click to openit with WinZip (or similar) it will again run some program to infect you.
- musicfile.mp3.lnk will look like musicfile.mp3 and when you double click on it to see what musice file it is you will again not play the MP3 but will instead run a program to infect your PC
Those are just a few examples. There are many more. This is a very dangerous problem that should have been resolved a long time ago.
Last edited by a moderator: Dec 28, 2009
Major Attitude,
Jul 18, 2004
#1
- Thread Status:
-
Not open for further replies.
- Your name or email address:
- Do you already have an account?
-
- No, create an account now.
- Yes, my password is:
-
Forgot your password?
-
Stay logged in
MajorGeeks.Com Menu
Downloads All In One Tweaks
\ Android
\ Anti-Malware
\ Anti-Virus
\ Appearance
\ Backup
\ Browsers
\ CD\DVD\Blu-Ray
\ Covert Ops
\ Drive Utilities
\ Drivers
\ Graphics
\ Internet Tools
\ Multimedia
\ Networking
\ Office Tools
\ PC Games
\ System Tools
\ Mac/Apple/Ipad Downloads
Other News:
Top Downloads
\ News (Tech)
\ Off Base (Other Websites News)
\ Way Off Base (Offbeat Stories and Pics)
Social:
Facebook
\ YouTube
\ Twitter
\ Tumblr
\ Pintrest
\ RSS Feeds
Search
-
- Search titles only
- Posted by Member:
-
Separate names with a comma.
- Newer Than:
-
- Search this thread only
- Search this forum only
- Display results as threads
-
Useful Searches
- Recent Posts
More…
Quick Links
-
Where Are System Files Stored?
-
How To Show Hidden System Files in Windows
-
What Happens If System Files Become Corrupted?
Technically speaking, a Windows system file is any file with the hidden system attribute turned on. In practice, system files are those files that Windows depends upon to operate properly. These range from hardware drivers to configuration and DLL files and even the various hive files that make up the Windows Registry.
These files are often changed automatically during system updates or application installations, but generally speaking, it’s best to leave system files alone. Deleting, moving, renaming, or changing these files could cause a complete system failure. Because of this fact, often times they’re hidden and are made read-only. That said, there are a lot of hacks and tweaks out there—including a bunch we’ve featured on this site—that involve modifying system files.
If you’re careful, and you know what you’re doing—or you’re following instructions from a source you trust—you can get a lot of value from these types of hacks.
Where Are System Files Stored?
System files are usually located in specific folders that are identified as a system folder. To further prevent any accidental deletion, these files are hidden from view in Windows by default. They also don’t appear in searches.
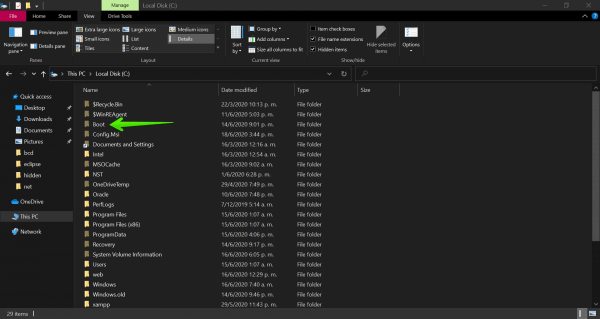
The truth is, system files can be stored in lots of locations on your PC. The root folder of your system drive (C:\), for example, holds system files like your page file (pagefile.sys) and hibernation file (hiberfil.sys).
The majority of Windows system files are stored in C:\Windows, especially in subfolders like /System32 and /SysWOW64. But, you’ll also find system files scattered throughout user folders (like the appdata folder) and app folders (like ProgramData or the Program Files folders).
While system files are hidden by default in Windows, it’s easy enough to have Windows display them.
Just bear in mind that deleting, moving, editing, or renaming these files can cause all kinds of problems. Our advice is to leave system files hidden for the most part. If you’re intentionally working with system files while applying some hack or tweak, display them, and then hide them again when you’re done.
To show system files in Windows, start by opening up a File Explorer window. In File Explorer, head to View > Options > Change Folder and Search Options.
In the Folder Options window, switch to the «View» tab, and then remove the tick on the «Hide protected operating system files (Recommended)» option. Click «OK» when you’re done.
You’ll now be able to see hidden system files. Note that the icons for system files appear dimmer than the icons for non-system files, to help signify their importance.
What Happens If System Files Become Corrupted?
It really depends on which system files are corrupted, so symptoms could include anything from apps not launching (or crashing), blue-screen errors, or even Windows failing to start.
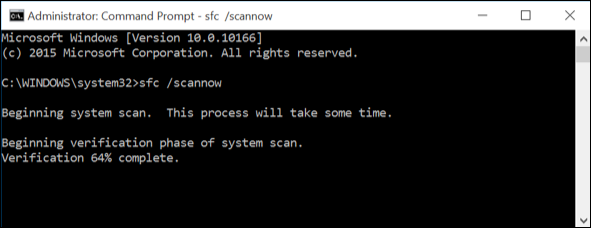
If you suspect corrupted or missing system files, there are a couple of built-in system tools that can help. The System File Checker (SFC) scans Windows system files, and can replace any it finds to be missing or corrupted. The Deployment Image Servicing and Management (DISM) command can be used to help fix underlying problems that prevent SFC from doing its job. Using them together, you should be able to successfully repair missing or corrupted system files.
SFC scans your computer for any Windows system files for corruption or any other changes. If it finds a file that was modified, it will automatically replace it with the correct version.
If all else fails, and neither of these options work, you can always refresh or reset your computer back to its default state. This option should only be used as a last resort. All your personal files will be kept, but any after-market downloaded applications will be removed.
Windows 10 поддерживает несколько файловых систем из коробки. Некоторые из них являются наследием и существуют в основном для обратной совместимости, другие современные и имеют широкое применение. В этой статье описаны различные способы, которые вы можете использовать, чтобы посмотреть, с помощью какой файловой системы отформатированы ваши диски.
Файловая система — это особый способ хранения и организации вашей информации на разных носителях, включая жесткие диски, твердотельные диски, USB-накопители и другие устройства. Она позволяет хранить, изменять, читать файлы и папки для приложений и операционной системы, установленных на вашем компьютере.
При форматировании внутреннего диска или флеш-накопителя вы готовите его для использования в качестве носителя для хранения данных в вашей операционной системе. Во время этого процесса создается файловая система. Во время форматирования вся информация, хранящаяся на диске или разделе, будет удалена.
Windows 10 поддерживает файловые системы FAT, FAT32, exFAT, NTFS и ReFS без использования дополнительного программного обеспечения.
У них разные функции и свойства. Например, FAT и FAT32 являются устаревшими файловыми системами. FAT поддерживает максимальный объем 4 ГБ, FAT32 поддерживает 32 ГБ. Файловые системы FAT также имеют ограничения на максимальный размер файла. NTFS — единственная файловая система, которая поддерживает сжатие и шифрование файлов и имеет расширенные функции.
Существует несколько способов, которые вы можете применить для поиска файловой системы, используемой на ваших дисках.
Чтобы узнать файловую систему на дисках в Windows 10, выполните следующие действия.
- Откройте «Проводник» и перейдите в папку «Этот компьютер».
- Кликните правой кнопкой мыши диск и выберите в контекстном меню «Свойства».
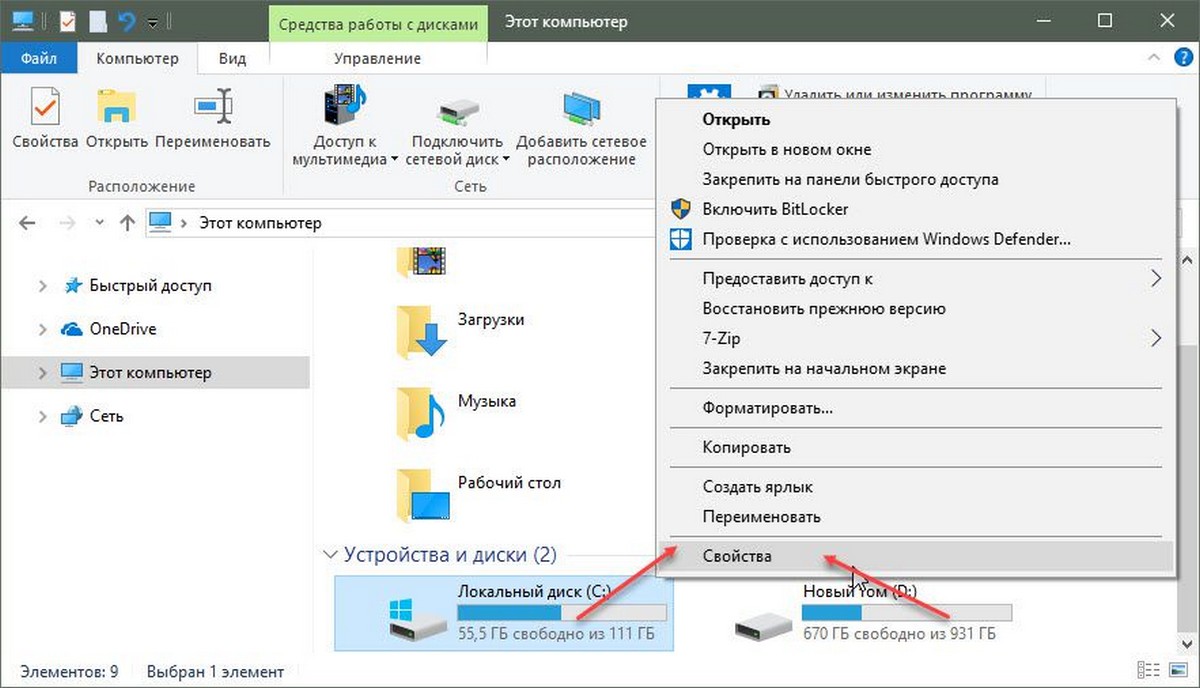
- В окне «Свойства» на вкладке «Общие», вы увидите файловую систему вашего диска.

Этот способ, является самым простым и быстрым.
Кроме того, вы можете использовать инструмент Diskpart, Управление дисками или PowerShell.
Посмотреть файловую систему диска с помощью Diskpart
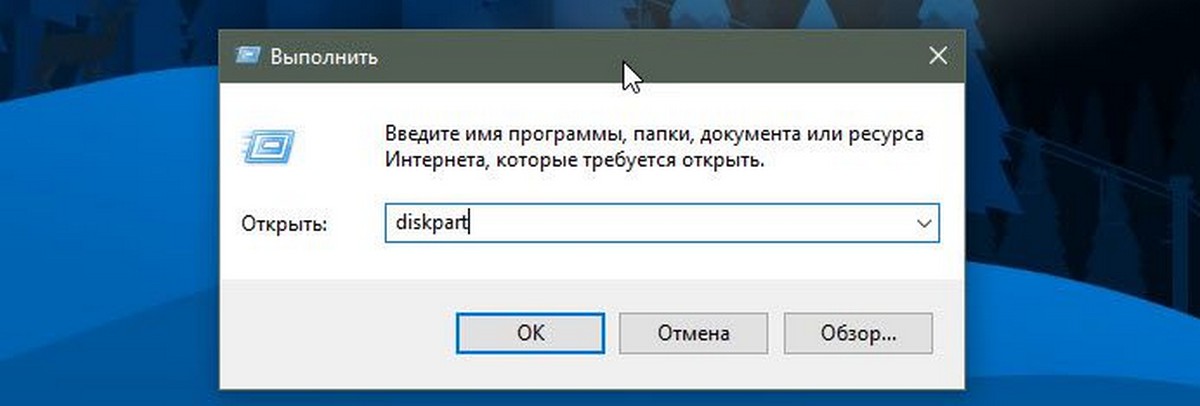
- Нажмите сочетание клавиш Win + R.
- В поле «Выполнить» введите «diskpart» и нажмите Enter.
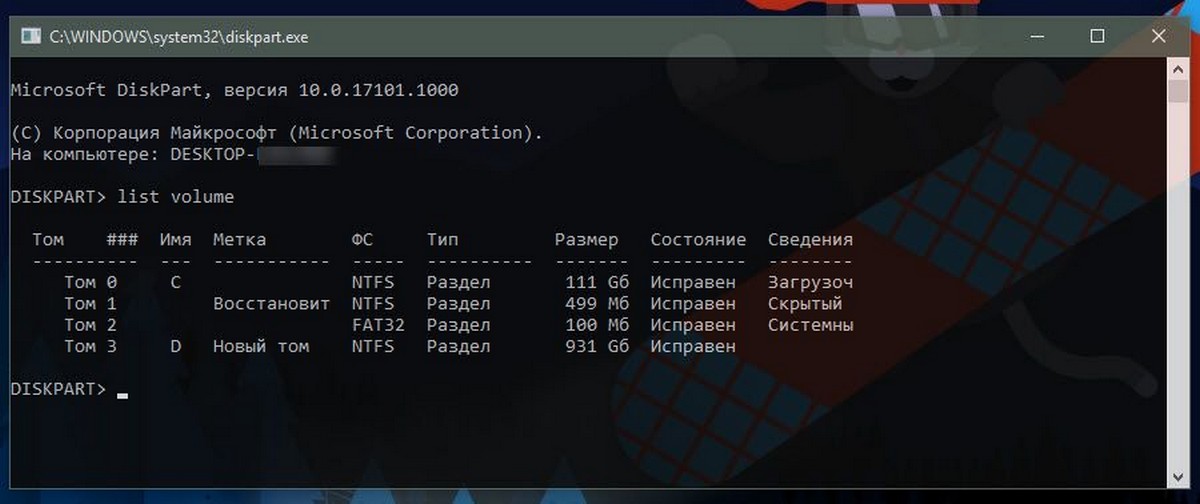
- В Diskpart введите команду list volume.
После выполнения команды вы увидите файловую систему для каждого диска, подключенного к вашему компьютеру.
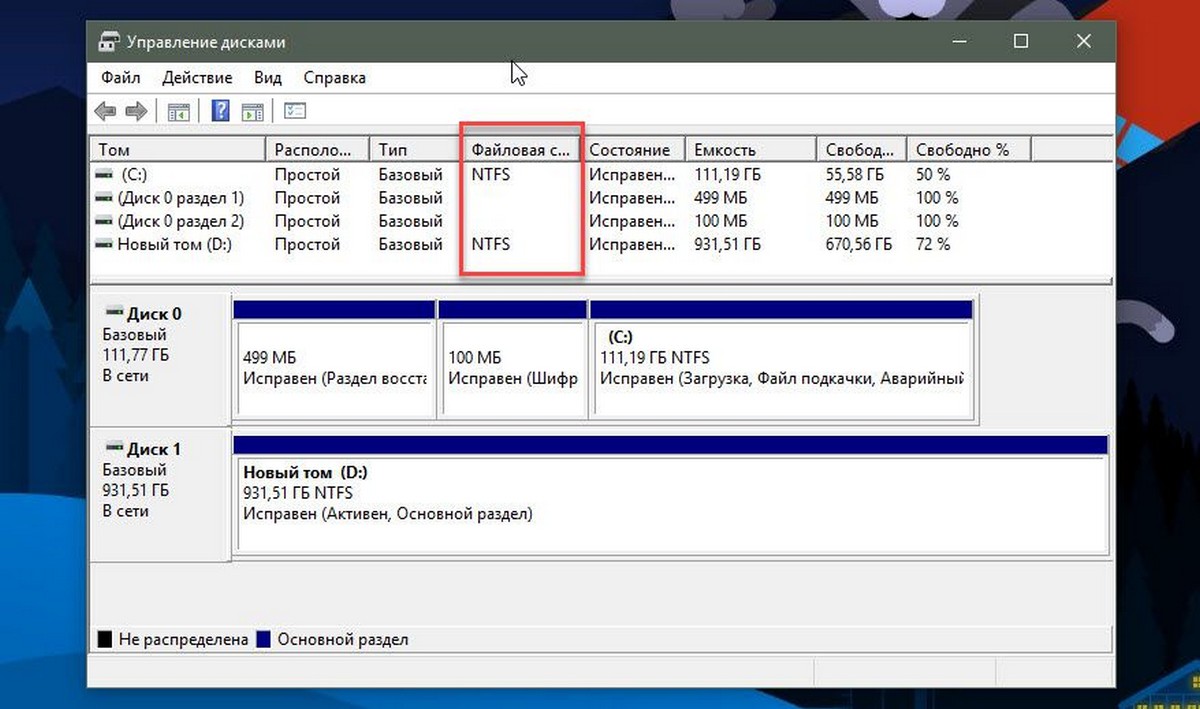
Показать файловую систему диска с помощью «Управление дисками».
- Нажмите Win + X или кликните правой кнопкой мыши на кнопку «Пуск».
- В меню WinX выберите «Управление дисками».
- См. Значения в столбце Файловая система.
Наконец, существует еще один способ определения файловой системы для каждого диска, подключенного к вашему компьютеру, с использованием языка сценариев PowerShell.
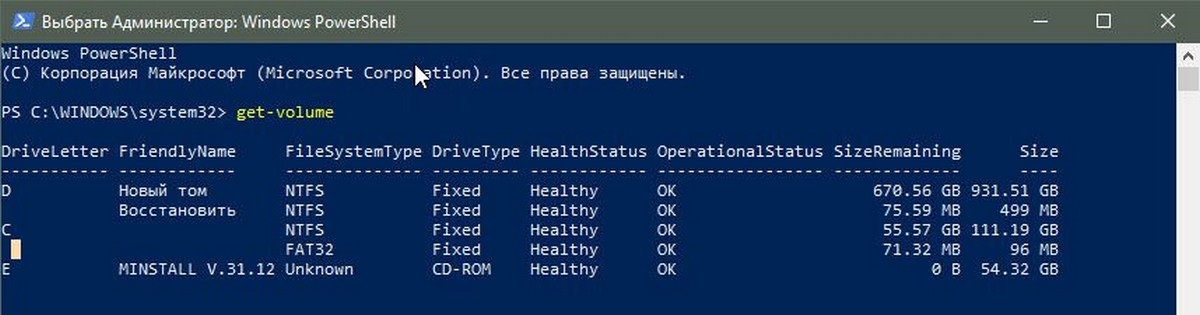
Определить файловую систему с помощью PowerShell.
- Откройте PowerShell от имени администратора.
- Введите: get-volume и нажмите клавишу Enter.
- На выходе см. Значения в столбце FileSystemType.
Теперь вы знаете, что, очень легко определить файловую систему для ваших дисков. Вы можете использовать любой способ, который вам нравится больше.
Вот и все.